Configuring a VXLANv6 Fabric

This chapter describes how to configure a VXLAN fabric with IPv6 underlay.

Overview

From Cisco DCNM Release 11.3(1), you can create an Easy fabric with IPv6 only underlay. The IPv6 underlay is supported only for the Easy_Fabric_11_1 template. In the IPv6 underlay fabric, intra-fabric links, routing loopback, vPC peer link SVI, and NVE loopback interface for VTEP are configured with IPv6 addresses. EVPN BGP neighbor peering is also established using IPv6 addressing.

The following guidelines are applicable for IPv6 underlay:

  • IPv6 underlay is supported for the Cisco Nexus 9000 Series switches with Cisco NX-OS Release 9.3(1) or higher.

  • VXLANv6 is only supported Cisco Nexus 9332C, Cisco Nexus C9364C, and Cisco Nexus modules that end with EX, FX, FX2, FX3, or FXP.


    Note


    VXLANv6 is defined as a VXLAN fabric with IPv6 underlay.


  • In VXLANv6, the platforms supported on spine are all Nexus 9000 Series and Nexus 3000 Series platforms.

  • The overlay routing protocol supported for the IPv6 fabric is BGP EVPN.

  • vPC with physical multichassis EtherChannel trunk (MCT) feature is supported for the IPv6 underlay network in DCNM. The vPC peer keep-alive can be loopback or management with IPv4 or IPv6 address.

  • Brownfield migration is supported for the VXLANv6 fabrics. Note that L3 vPC keep-alive using IPv6 address is not supported for brownfield migration. This vPC configuration is deleted after the migration. However, L3 vPC keep-alive using IPv4 address is supported.

  • DHCPv6 is supported for the IPv6 underlay network.

  • The following features are not supported for VXLAN IPv6 underlay:

    • Multicast underlay

    • Tenant Routed Multicast (TRM)

    • ISIS, OSPF, and BGP authentication

    • VXLAN Multi-Site

    • Dual stack underlay

    • vPC Fabric Peering

    • DCI SR-MPLS or MPLS-LDP handoff

    • BFD

    • Super Spine switch roles

    • NGOAM

Creating a VXLAN Fabric with IPv6 Underlay

This procedure shows how to create a VXLAN BGP EVPN fabric with IPv6 underlay. Only the fields for creating a VXLAN fabric with IPv6 underlay are documented. For information about the remaining fields, see Creating a New VXLAN BGP EVPN Fabric.

Procedure


Step 1

Navigate to Control > Fabric Builder.

Step 2

In the Fabric Builder window, click Create Fabric.

The Add Fabric window appears.

  • Fabric Name - Enter the name of the fabric.

  • Fabric Template - From the drop-down list, choose the Easy_Fabric_11_1 fabric template.

Step 3

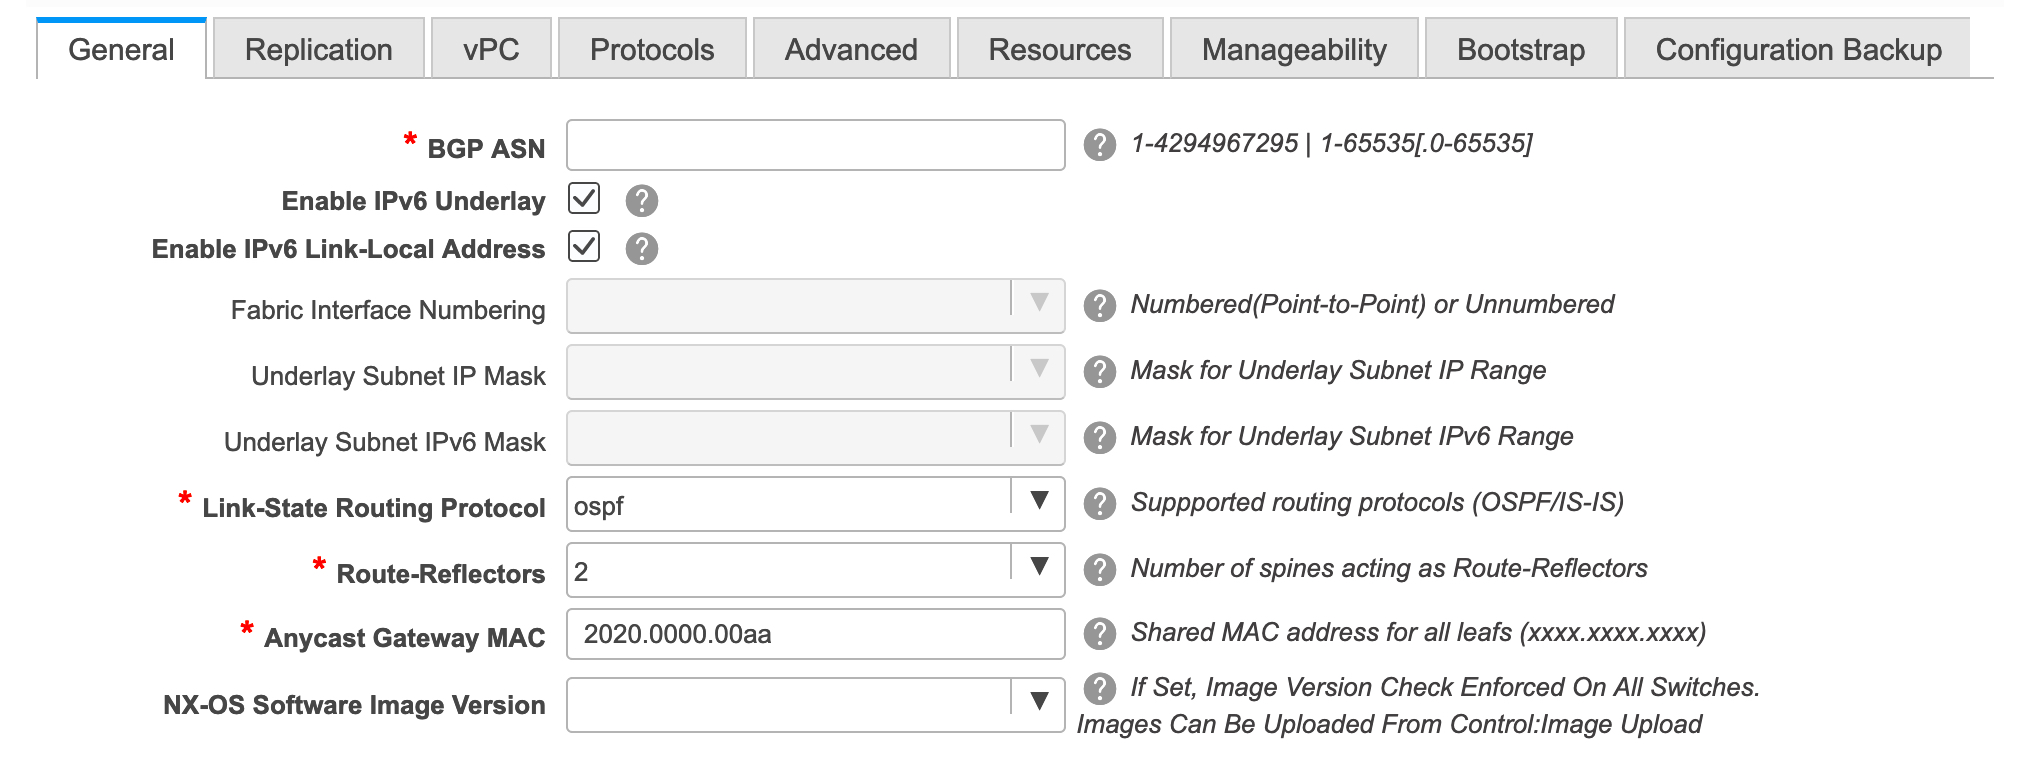
Enter the relevant values under the General tab.

BGP ASN: Enter the BGP AS number for the fabric. You can enter either the 2 byte BGP ASN or 4 byte BGP ASN.

Enable IPv6 Underlay:Select this check box to enable the IPv6 underlay feature.

Enable Link-Local Address:Select this check box to use the link local addresses in the fabric between leaf-spine and spine-border interfaces. If you select this check box, the Underlay Subnet IPv6 Mask field is not editable. By default, the Enable Link-Local Address field is enabled.

IPv6 underlay supports only the p2p networks. Therefore, the Fabric Interface Numbering drop-down list field is disabled.

Underlay Subnet IPv6 Mask: Specifies the subnet mask for the fabric interface IPv6 addresses.

Link-State Routing Protocol: The IGP used in the fabric, that is, OSPFv3 or IS-IS for VXLANv6.

Step 4

Click the Replication tab.

IPv6 underlay supports only the ingress replication mode.

All the fields under this tab are disabled.

Step 5

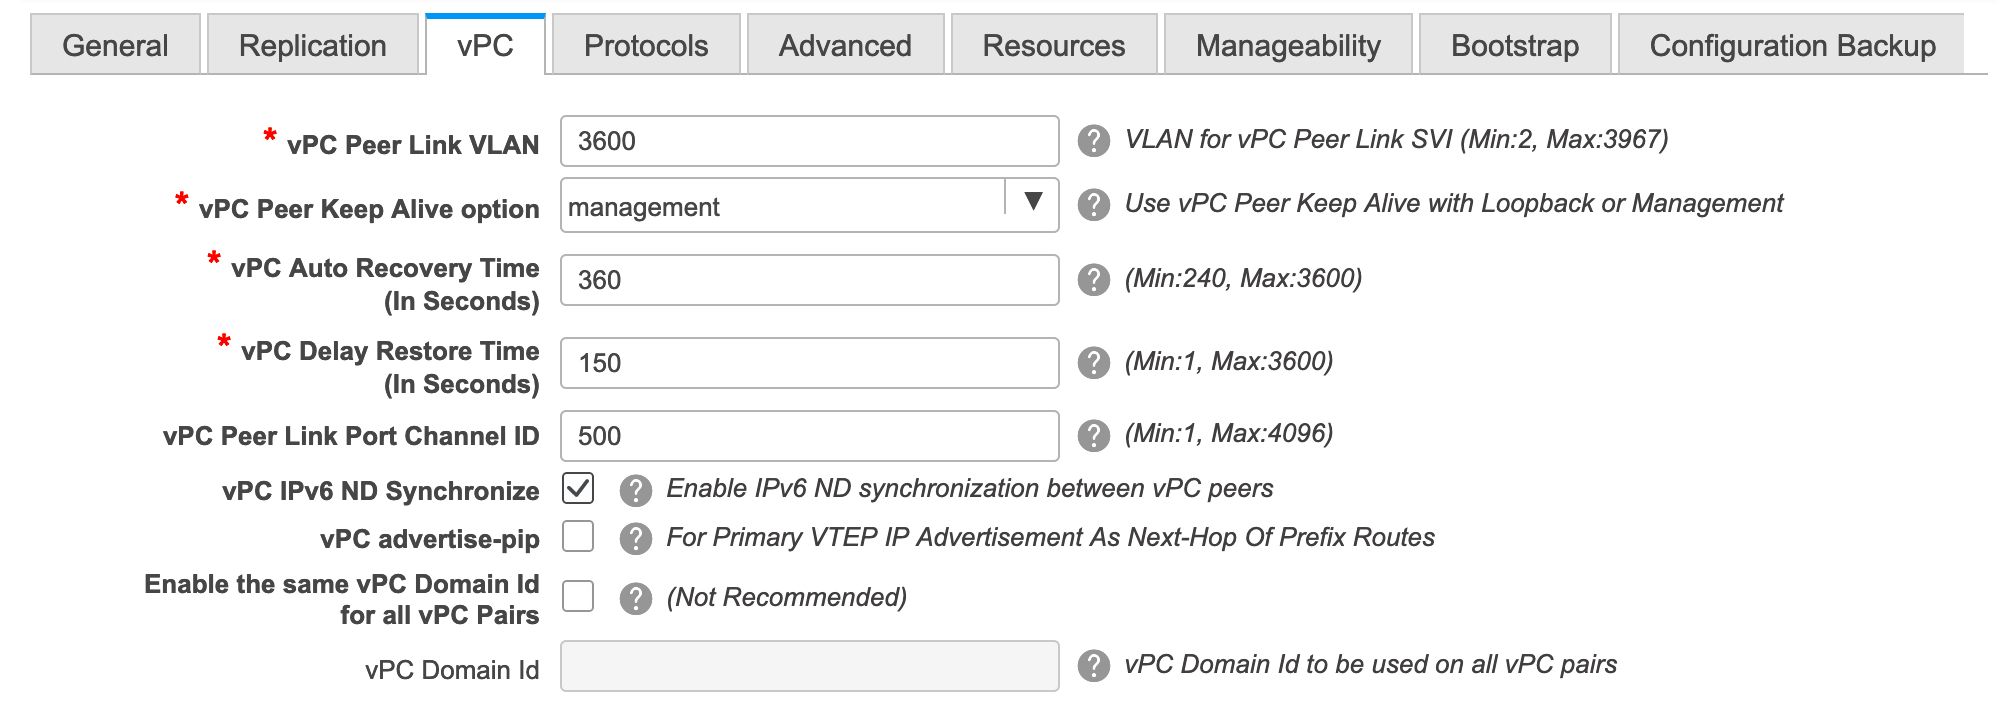
Click the vPC tab.

vPC Peer Keep Alive option – Choose the management or loopback option. If you want to use IP addresses assigned to the management port and the management VRF, choose management. If you use IP addresses assigned to loopback interfaces (and a non-management VRF), choose loopback. Both the options are supported for IPv6 underlay.

Step 6

Click the Protocols tab.

Underlay Anycast Loopback Id: Specifies the underlay anycast loopback ID for IPv6 underlay. Since an IPv6 address cannot be configured as secondary, an additional loopback interface is allocated on each vPC device. Its IPv6 address will be used as the VIP.

Step 7

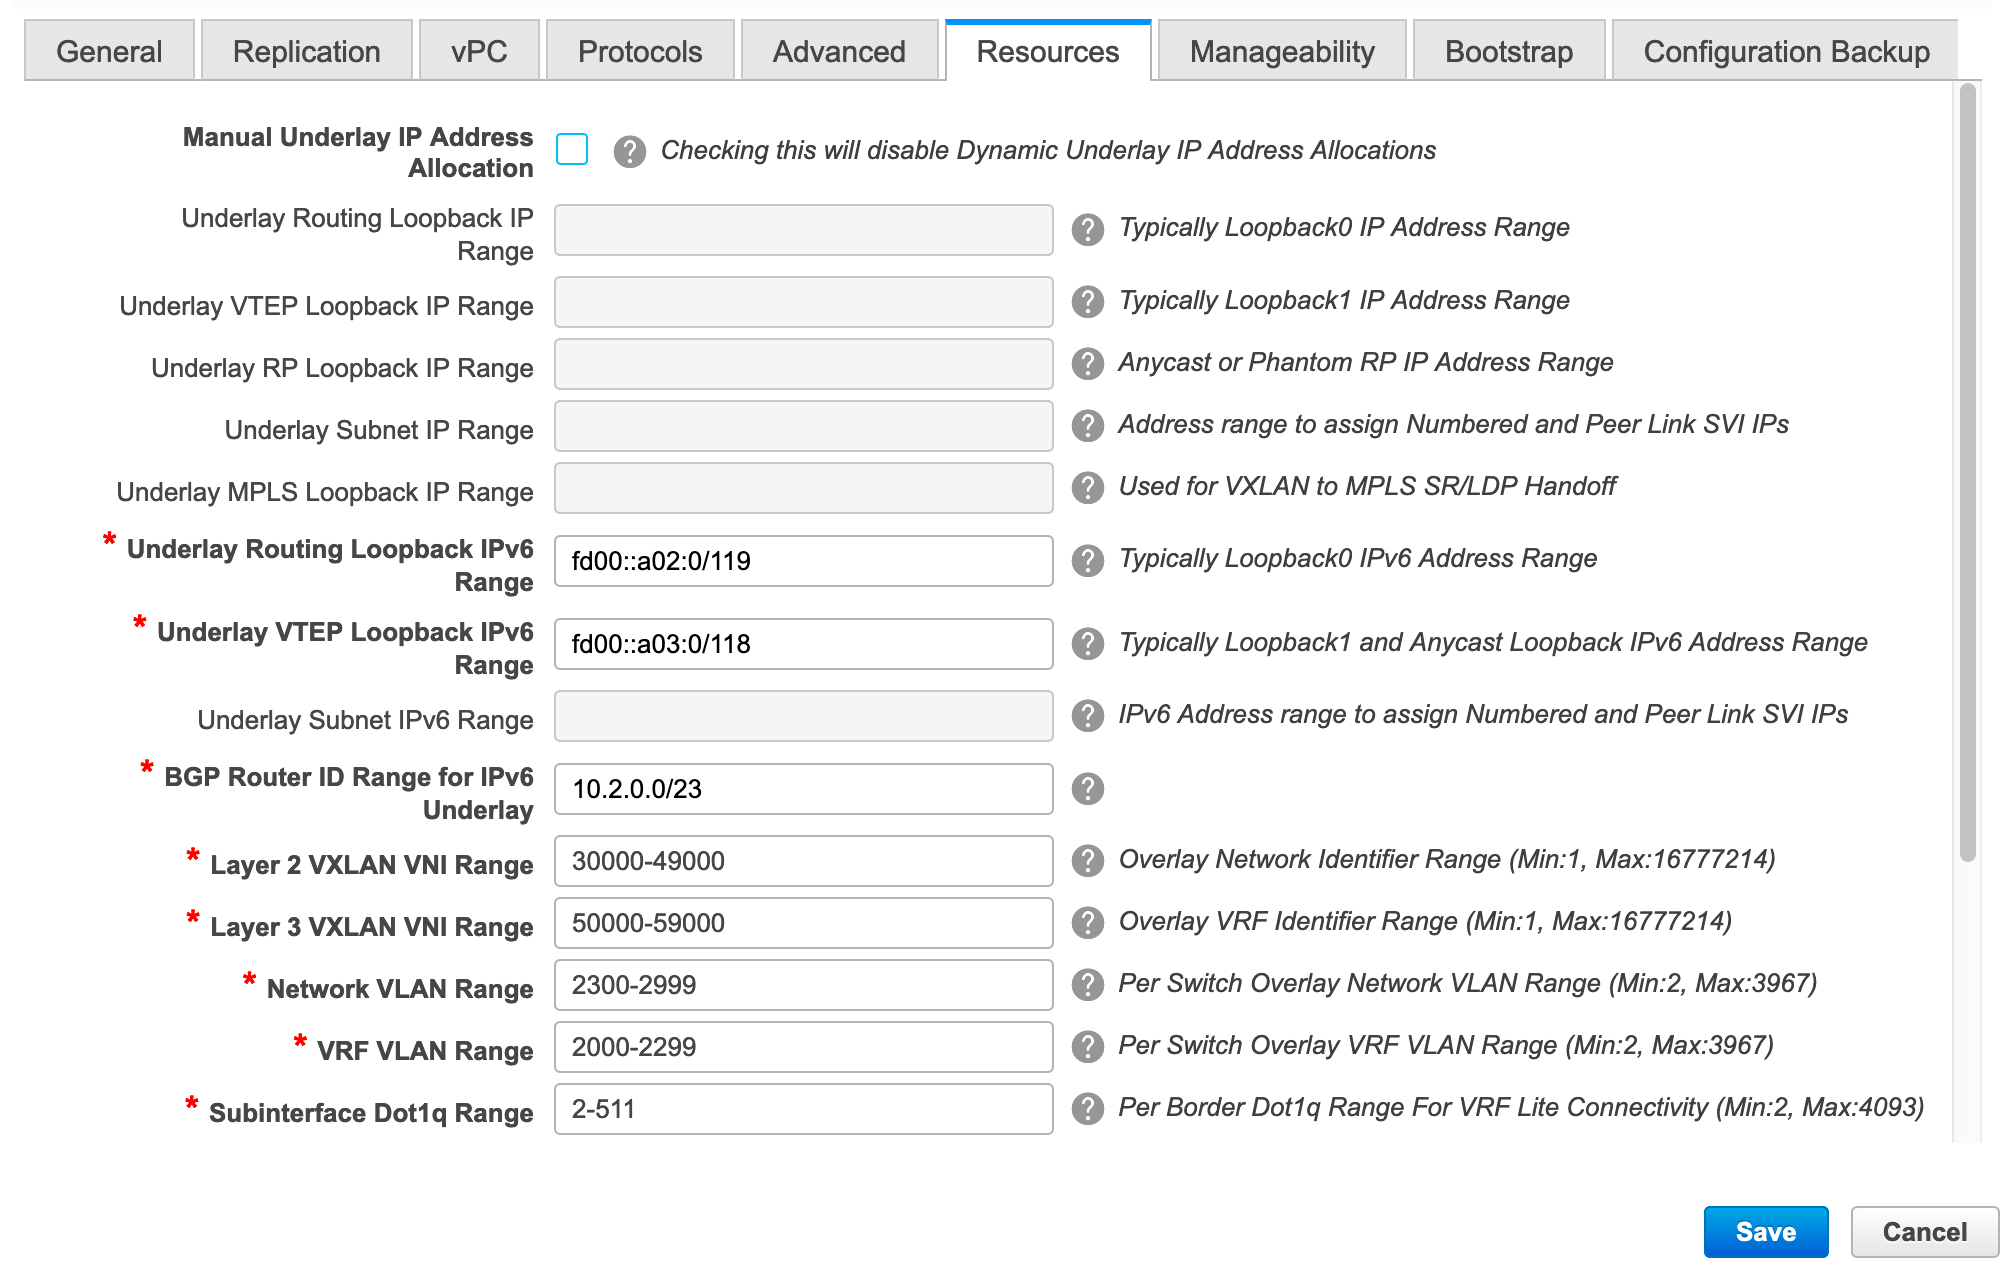
Click the Resources tab.

Manual Underlay IP Address Allocation: Select this check box to manually allocate underlay IP addresses. The dynamic underlay IP addresses fields are disabled.

Underlay Routing Loopback IPv6 Range: Specifies loopback IPv6 addresses for the protocol peering.

Underlay VTEP Loopback IPv6 Range: Specifies loopback IPv6 addresses for VTEPs. The IPv6 address for anycast will be assigned from this range.

Underlay Subnet IPv6 Range: Specifies the IPv6 address range that is used for assigning IP addresses for numbered and peer link SVIs. To edit this field, you need to unselect the Enable Link-Local Address check box under the General tab.

Underlay BGP Router ID Range: Specifies the address range to assign the BGP Router IDs.

Step 8

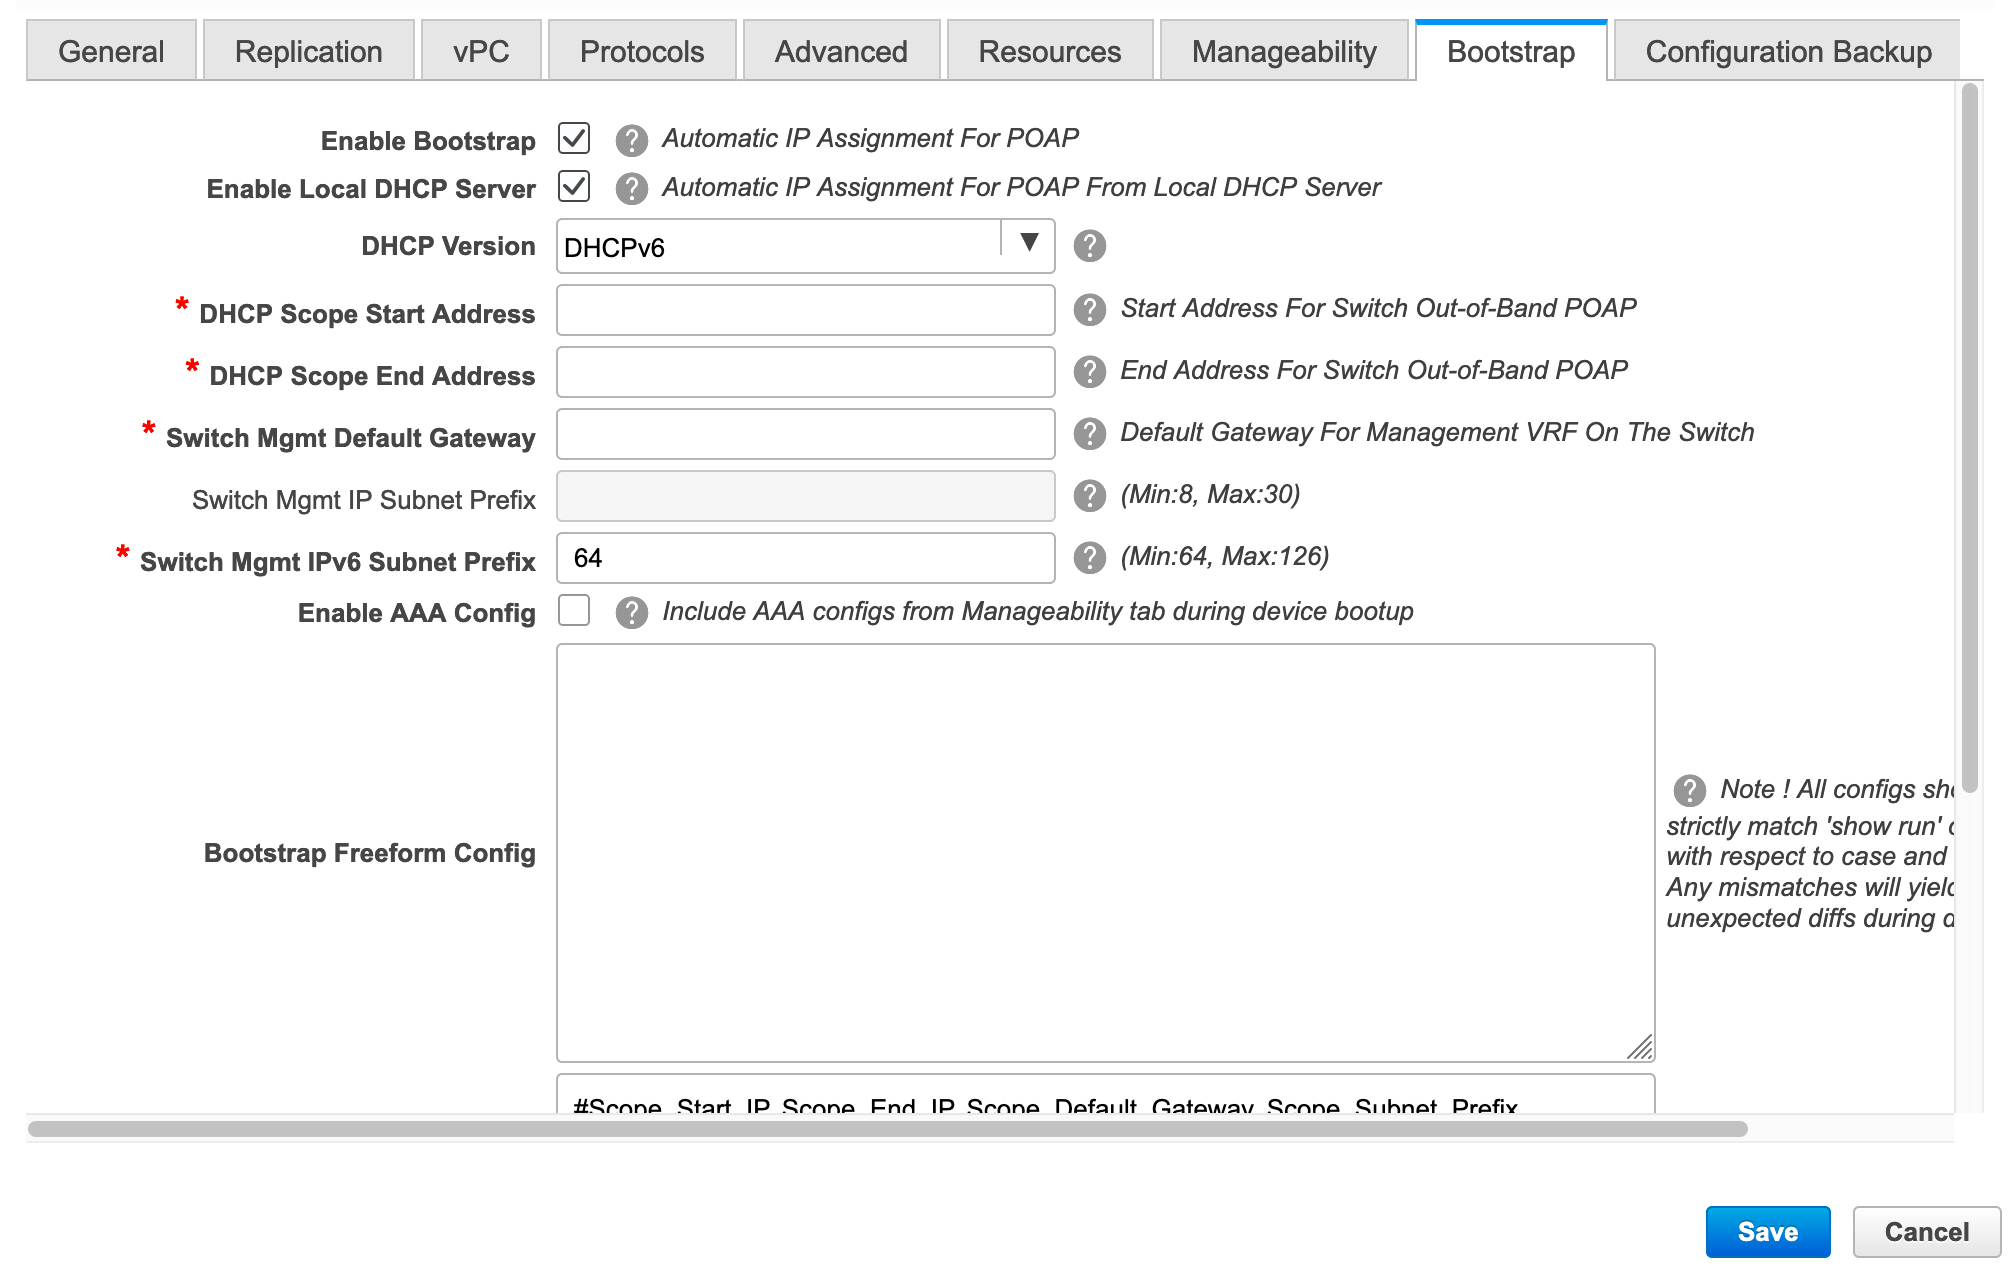
Click the Bootstrap tab.

DHCP Version – Select DHCPv4 or DHCPv6 from this drop-down list. When you select DHCPv4, the Switch Mgmt IPv6 Subnet Prefix field is disabled. If you select DHCPv6, the Switch Mgmt IP Subnet Prefix is disabled.

Switch Mgmt IPv6 Subnet Prefix - Specifies the IPv6 prefix for the Mgmt0 interface on the switch. The prefix can be between 64 and 126. This field is editable if you enable IPv6 for DHCP.

For information about the remaining tabs and fields, see Creating a New VXLAN BGP EVPN Fabric.


What to do next

Adding Switches to a Fabric