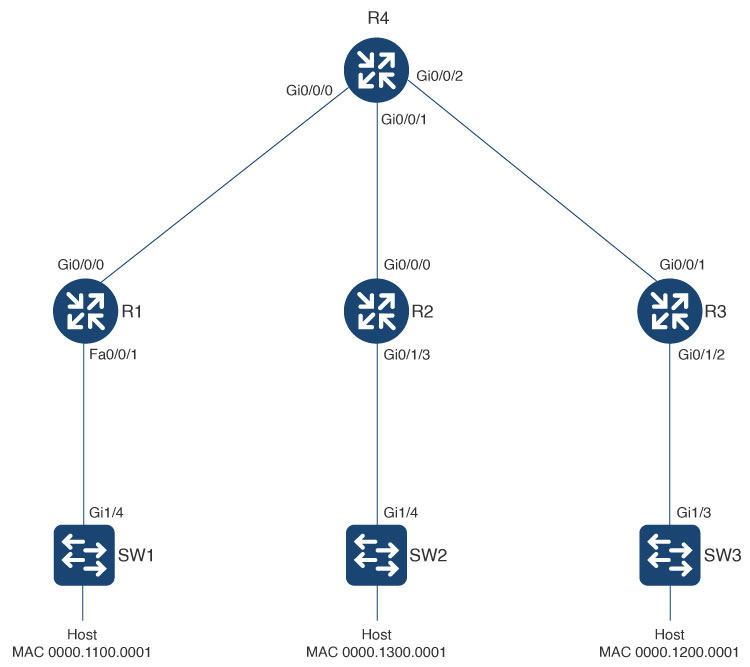
Verify the configuration on the router R1
Use the show l2vpn evpn evi 3 detail command to verify the configuration of the EVI and bridge-domain, and to ensure the ethernet-tag value is configured.
Router1#show l2vpn evpn evi 3 detail
EVPN instance:       3 (VLAN Aware)
  Profile:           evpn_va
  RD:                10.10.10.2:32770 (auto)
  Import-RTs:        1:3
  Export-RTs:        1:3
  Per-EVI Label:     none
  State:             Established
  Replication Type:  Ingress (profile)
  Encapsulation:     vxlan (profile)
  IP Local Learn:    Enabled (global)
  Adv. Def. Gateway: Disabled (global)
  Re-originate RT5:  Disabled (profile)
  AR Flood Suppress: Enabled (global)
  Bridge Domain:     12
    Ethernet-Tag:    50012
    State:           Established
    Flood Suppress:  Attached
    Core If:
    Access If:
    NVE If:          nve1
    RMAC:            0000.0000.0000
    Core BD:         0
    L2 VNI:          50012
    L3 VNI:          0
    VTEP IP:         192.0.2.1
    Pseudoports:
      Vlan12 service instance 12
        Routes: 0 MAC, 0 MAC/IP
    Peers:
      192.0.2.2
        Routes: 0 MAC, 0 MAC/IP, 1 IMET, 0 EAD
      192.0.2.3
        Routes: 1 MAC, 0 MAC/IP, 1 IMET, 0 EAD
  Bridge Domain:     22
    Ethernet-Tag:    50022
    State:           Established
    Flood Suppress:  Attached
    Core If:
    Access If:
    NVE If:          nve1
    RMAC:            0000.0000.0000
    Core BD:         0
    L2 VNI:          50022
    L3 VNI:          0
    VTEP IP:         192.0.2.1
    Pseudoports:
      Vlan22 service instance 22
        Routes: 0 MAC, 0 MAC/IP
    Peers:
      192.0.2.2
        Routes: 0 MAC, 0 MAC/IP, 1 IMET, 0 EAD
      192.0.2.3
        Routes: 0 MAC, 0 MAC/IP, 1 IMET, 0 EAD
Use the show l2route evpn imet command to verify the IMET routes.
Router1#show l2route evpn imet
EVI       ETAG   Prod                          Router IP Addr  Type    Label                               Tunnel ID Multicast Proxy
----- ---------- ------ --------------------------------------- ----- -------- --------------------------------------- ---------------
    3      50012    BGP                              10.10.20.2     6    50012                               192.0.2.2              No
    3      50012    BGP                              10.10.30.2     6    50012                               192.0.2.3              No
    3      50012  L2VPN                              10.10.10.2     6    50012                               192.0.2.1              No
    3      50022    BGP                              10.10.20.2     6    50022                               192.0.2.2              No
    3      50022    BGP                              10.10.30.2     6    50022                               192.0.2.3              No
    3      50022  L2VPN                              10.10.10.2     6    50022                               192.0.2.1              No
Use the show ip bgp l2vpn evpn all command to verify the configuration.
Router1#show ip bgp l2vpn evpn all
BGP table version is 31, local router ID is 192.0.2.1
Status codes: s suppressed, d damped, h history, * valid, > best, i - internal,
              r RIB-failure, S Stale, m multipath, b backup-path, f RT-Filter,
              x best-external, a additional-path, c RIB-compressed,
              t secondary path, L long-lived-stale,
Origin codes: i - IGP, e - EGP, ? - incomplete
RPKI validation codes: V valid, I invalid, N Not found

     Network          Next Hop            Metric LocPrf Weight Path
Route Distinguisher: 192.0.2.1:32770
 *>   [2][192.0.2.1:32770][50012][48][000011000001][0][*]/20
                      0.0.0.0                            32768 ?
 *>i  [2][192.0.2.1:32770][50012][48][000012000001][0][*]/20
                      192.0.2.3            0    100      0 ?
 *>i  [2][192.0.2.1:32770][50012][48][000013000001][0][*]/20
                      192.0.2.2            0    100      0 ?
 *>i  [2][192.0.2.1:32770][50012][48][04BD9708512B][0][*]/20
                      192.0.2.3            0    100      0 ?
 *>   [2][192.0.2.1:32770][50022][48][000011000002][0][*]/20
                      0.0.0.0                            32768 ?
 *>i  [2][192.0.2.1:32770][50022][48][000012000002][0][*]/20
                      192.0.2.3            0    100      0 ?
 *>i  [2][192.0.2.1:32770][50022][48][000013000002][0][*]/20
                      192.0.2.2            0    100      0 ?
Route Distinguisher: 192.0.2.2:32770
 *>i  [2][192.0.2.2:32770][50012][48][000013000001][0][*]/20
                      192.0.2.2            0    100      0 ?
 *>i  [2][192.0.2.2:32770][50022][48][000013000002][0][*]/20
                      192.0.2.2            0    100      0 ?
Route Distinguisher: 192.0.2.3:32770
 *>i  [2][192.0.2.3:32770][50012][48][000012000001][0][*]/20
                      192.0.2.3            0    100      0 ?
 *>i  [2][192.0.2.3:32770][50012][48][04BD9708512B][0][*]/20
                      192.0.2.3            0    100      0 ?
 *>i  [2][192.0.2.3:32770][50022][48][000012000002][0][*]/20
                      192.0.2.3            0    100      0 ?
Route Distinguisher: 192.0.2.1:32770
 *>   [3][192.0.2.1:32770][50012][32][192.0.2.1]/17
                      0.0.0.0                            32768 ?
 *>i  [3][192.0.2.1:32770][50012][32][192.0.2.2]/17
                      192.0.2.2            0    100      0 ?
 *>i  [3][192.0.2.1:32770][50012][32][192.0.2.3]/17
                      192.0.2.3            0    100      0 ?
 *>   [3][192.0.2.1:32770][50022][32][192.0.2.1]/17
                      0.0.0.0                            32768 ?
 *>i  [3][192.0.2.1:32770][50022][32][192.0.2.2]/17
                      192.0.2.2            0    100      0 ?
 *>i  [3][192.0.2.1:32770][50022][32][192.0.2.3]/17
                      192.0.2.3            0    100      0 ?
Route Distinguisher: 192.0.2.2:32770
 *>i  [3][192.0.2.2:32770][50012][32][192.0.2.2]/17
                      192.0.2.2            0    100      0 ?
 *>i  [3][192.0.2.2:32770][50022][32][192.0.2.2]/17
                      192.0.2.2            0    100      0 ?
Route Distinguisher: 192.0.2.3:32770
 *>i  [3][192.0.2.3:32770][50012][32][192.0.2.3]/17
                      192.0.2.3            0    100      0 ?
 *>i  [3][192.0.2.3:32770][50022][32][192.0.2.3]/17
                      192.0.2.3            0    100      0 ?
Use the show nve peers command to verify the configuration.
Router1#show nve peers
'M' - MAC entry download flag  'A' - Adjacency download flag
'4' - IPv4 flag  '6' - IPv6 flag

Interface  VNI      Type Peer-IP          RMAC/Num_RTs   eVNI     state flags UP time
nve1       50012    L2CP 192.0.2.2    1              50012      UP   N/A  00:38:47
nve1       50012    L2CP 192.0.2.3    1              50012      UP   N/A  00:38:47
nve1       50022    L2CP 192.0.2.2    1              50022      UP   N/A  00:38:47
nve1       50022    L2CP 192.0.2.3    1              50022      UP   N/A  00:38:47
Use the show l2vpn evpn mac command to verify the configuration.
Router1#show l2vpn evpn mac
MAC Address    EVI   BD    ESI                      Ether Tag  Next Hop(s)
-------------- ----- ----- ------------------------ ---------- ---------------
0000.1100.0001 3     12    0000.0000.0000.0000.0000 50012      Vl12:12
0000.1200.0001 3     12    0000.0000.0000.0000.0000 50012      192.0.2.3
0000.1300.0001 3     12    0000.0000.0000.0000.0000 50012      192.0.2.2
04bd.9708.512b 3     12    0000.0000.0000.0000.0000 50012      192.0.2.3
0000.1100.0002 3     22    0000.0000.0000.0000.0000 50022      Vl22:22
0000.1200.0002 3     22    0000.0000.0000.0000.0000 50022      192.0.2.3
0000.1300.0002 3     22    0000.0000.0000.0000.0000 50022      192.0.2.2
Verify the configuration on the router R2
Use the show l2vpn evpn evi 3 detail command to verify the configuration of the EVI and bridge-domain, and to ensure the ethernet-tag value is configured.
Router2#show l2vpn evpn evi 3 detail

EVPN instance:       3 (VLAN Aware)
  Profile:           evpn_va
  RD:                10.10.20.2:32770 (auto)
  Import-RTs:        1:3
  Export-RTs:        1:3
  Per-EVI Label:     none
  State:             Established
  Replication Type:  Ingress (profile)
  Encapsulation:     vxlan (profile)
  IP Local Learn:    Enabled (global)
  Adv. Def. Gateway: Disabled (global)
  Re-originate RT5:  Disabled (profile)
  AR Flood Suppress: Enabled (global)
  Bridge Domain:     12
    Ethernet-Tag:    50012
    State:           Established
    Flood Suppress:  Attached
    Core If:
    Access If:
    NVE If:          nve1
    RMAC:            0000.0000.0000
    Core BD:         0
    L2 VNI:          50012
    L3 VNI:          0
    VTEP IP:         192.0.2.2
    Pseudoports:
      Vlan12 service instance 12
        Routes: 0 MAC, 0 MAC/IP
    Peers:
      192.0.2.1
        Routes: 0 MAC, 0 MAC/IP, 1 IMET, 0 EAD
      192.0.2.3
        Routes: 1 MAC, 0 MAC/IP, 1 IMET, 0 EAD
  Bridge Domain:     22
    Ethernet-Tag:    50022
    State:           Established
    Flood Suppress:  Attached
    Core If:
    Access If:
    NVE If:          nve1
    RMAC:            0000.0000.0000
    Core BD:         0
    L2 VNI:          50022
    L3 VNI:          0
    VTEP IP:         192.0.2.2
    Pseudoports:
      Vlan22 service instance 22
        Routes: 0 MAC, 0 MAC/IP
    Peers:
      192.0.2.1
        Routes: 0 MAC, 0 MAC/IP, 1 IMET, 0 EAD
      192.0.2.3
        Routes: 0 MAC, 0 MAC/IP, 1 IMET, 0 EAD
Use the show l2route evpn imet command to verify the IMET routes.
Router2#show l2route evpn imet
 EVI       ETAG   Prod                          Router IP Addr  Type    Label                               Tunnel ID Multicast Proxy
----- ---------- ------ --------------------------------------- ----- -------- --------------------------------------- ---------------
    3      50012    BGP                              10.10.10.2     6    50012                               192.0.2.1              No
    3      50012    BGP                              10.10.30.2     6    50012                               192.0.2.3              No
    3      50012  L2VPN                              10.10.20.2     6    50012                               192.0.2.2              No
    3      50022    BGP                              10.10.10.2     6    50022                               192.0.2.1              No
    3      50022    BGP                              10.10.30.2     6    50022                               192.0.2.3              No
    3      50022  L2VPN                              10.10.20.2     6    50022                               192.0.2.2              No
Use the show ip bgp l2vpn evpn all command to verify the configuration.
Router2#sh ip bgp l2vpn evpn all
BGP table version is 27, local router ID is 192.0.2.2
Status codes: s suppressed, d damped, h history, * valid, > best, i - internal,
              r RIB-failure, S Stale, m multipath, b backup-path, f RT-Filter,
              x best-external, a additional-path, c RIB-compressed,
              t secondary path, L long-lived-stale,
Origin codes: i - IGP, e - EGP, ? - incomplete
RPKI validation codes: V valid, I invalid, N Not found

     Network          Next Hop            Metric LocPrf Weight Path
Route Distinguisher: 192.0.2.1:32770
 *>i  [2][192.0.2.1:32770][50012][48][000011000001][0][*]/20
                      192.0.2.1            0    100      0 ?
 *>i  [2][192.0.2.1:32770][50022][48][000011000002][0][*]/20
                      192.0.2.1            0    100      0 ?
Route Distinguisher: 192.0.2.2:32770
 *>i  [2][192.0.2.2:32770][50012][48][000011000001][0][*]/20
                      192.0.2.1            0    100      0 ?
 *>i  [2][192.0.2.2:32770][50012][48][000012000001][0][*]/20
                      192.0.2.3            0    100      0 ?
 *>   [2][192.0.2.2:32770][50012][48][000013000001][0][*]/20
                      0.0.0.0                            32768 ?
 *>i  [2][192.0.2.2:32770][50012][48][04BD9708512B][0][*]/20
                      192.0.2.3            0    100      0 ?
 *>i  [2][192.0.2.2:32770][50022][48][000011000002][0][*]/20
                      192.0.2.1            0    100      0 ?
 *>i  [2][192.0.2.2:32770][50022][48][000012000002][0][*]/20
                      192.0.2.3            0    100      0 ?
 *>   [2][192.0.2.2:32770][50022][48][000013000002][0][*]/20
                      0.0.0.0                            32768 ?
Route Distinguisher: 192.0.2.3:32770
 *>i  [2][192.0.2.3:32770][50012][48][000012000001][0][*]/20
                      192.0.2.3            0    100      0 ?
 *>i  [2][192.0.2.3:32770][50012][48][04BD9708512B][0][*]/20
                      192.0.2.3            0    100      0 ?
 *>i  [2][192.0.2.3:32770][50022][48][000012000002][0][*]/20
                      192.0.2.3            0    100      0 ?
Route Distinguisher: 192.0.2.1:32770
 *>i  [3][192.0.2.1:32770][50012][32][192.0.2.1]/17
                      192.0.2.1            0    100      0 ?
 *>i  [3][192.0.2.1:32770][50022][32][192.0.2.1]/17
                      192.0.2.1            0    100      0 ?
Route Distinguisher: 192.0.2.2:32770
 *>i  [3][192.0.2.2:32770][50012][32][192.0.2.1]/17
                      192.0.2.1            0    100      0 ?
 *>   [3][192.0.2.2:32770][50012][32][192.0.2.2]/17
                      0.0.0.0                            32768 ?
 *>i  [3][192.0.2.2:32770][50012][32][192.0.2.3]/17
                      192.0.2.3            0    100      0 ?
 *>i  [3][192.0.2.2:32770][50022][32][192.0.2.1]/17
                      192.0.2.1            0    100      0 ?
 *>   [3][192.0.2.2:32770][50022][32][192.0.2.2]/17
                      0.0.0.0                            32768 ?
 *>i  [3][192.0.2.2:32770][50022][32][192.0.2.3]/17
                      192.0.2.3            0    100      0 ?
Route Distinguisher: 192.0.2.3:32770
 *>i  [3][192.0.2.3:32770][50012][32][192.0.2.3]/17
                      192.0.2.3            0    100      0 ?
 *>i  [3][192.0.2.3:32770][50022][32][192.0.2.3]/17
                      192.0.2.3            0    100      0 ?
Use the show nve peers command to verify the configuration.
Router2#show nve peers
'M' - MAC entry download flag  'A' - Adjacency download flag
'4' - IPv4 flag  '6' - IPv6 flag

Interface  VNI      Type Peer-IP          RMAC/Num_RTs   eVNI     state flags UP time
nve1       50012    L2CP 192.0.2.1    2              50012      UP   N/A  00:05:28
nve1       50012    L2CP 192.0.2.3    3              50012      UP   N/A  00:05:28
nve1       50022    L2CP 192.0.2.1    2              50022      UP   N/A  00:05:28
nve1       50022    L2CP 192.0.2.3    2              50022      UP   N/A  00:05:28
Use the show l2vpn evpn mac command to verify the configuration
Router2#show l2vpn evpn mac
MAC Address    EVI   BD    ESI                      Ether Tag  Next Hop(s)
-------------- ----- ----- ------------------------ ---------- ---------------
0000.1100.0001 3     12    0000.0000.0000.0000.0000 50012      192.0.2.1
0000.1200.0001 3     12    0000.0000.0000.0000.0000 50012      192.0.2.3
0000.1300.0001 3     12    0000.0000.0000.0000.0000 50012      Vl12:12
04bd.9708.512b 3     12    0000.0000.0000.0000.0000 50012      192.0.2.3
0000.1100.0002 3     22    0000.0000.0000.0000.0000 50022      192.0.2.1
0000.1200.0002 3     22    0000.0000.0000.0000.0000 50022      192.0.2.3
0000.1300.0002 3     22    0000.0000.0000.0000.0000 50022      Vl22:22
Verify the configuration on the router R3
Use the show l2vpn evpn evi 3 detail command to verify the configuration of the EVI and bridge-domain, and to ensure the ethernet-tag value is configured.
Router3#show l2vpn evpn evi 3 detail
EVPN instance:       3 (VLAN Aware)
  Profile:           evpn_va
  RD:                10.10.30.2:32770 (auto)
  Import-RTs:        1:3
  Export-RTs:        1:3
  Per-EVI Label:     none
  State:             Established
  Replication Type:  Ingress (profile)
  Encapsulation:     vxlan (profile)
  IP Local Learn:    Enabled (global)
  Adv. Def. Gateway: Disabled (global)
  Re-originate RT5:  Disabled (profile)
  AR Flood Suppress: Enabled (global)
  Bridge Domain:     12
    Ethernet-Tag:    50012
    State:           Established
    Flood Suppress:  Attached
    Core If:
    Access If:
    NVE If:          nve1
    RMAC:            0000.0000.0000
    Core BD:         0
    L2 VNI:          50012
    L3 VNI:          0
    VTEP IP:         192.0.2.3
    Pseudoports:
      Vlan12 service instance 12
        Routes: 1 MAC, 0 MAC/IP
    Peers:
      192.0.2.1
        Routes: 0 MAC, 0 MAC/IP, 1 IMET, 0 EAD
      192.0.2.2
        Routes: 0 MAC, 0 MAC/IP, 1 IMET, 0 EAD
  Bridge Domain:     22
    Ethernet-Tag:    50022
    State:           Established
    Flood Suppress:  Attached
    Core If:
    Access If:
    NVE If:          nve1
    RMAC:            0000.0000.0000
    Core BD:         0
    L2 VNI:          50022
    L3 VNI:          0
    VTEP IP:         192.0.2.3
    Pseudoports:
      Vlan22 service instance 22
        Routes: 0 MAC, 0 MAC/IP
    Peers:
      192.0.2.1
        Routes: 0 MAC, 0 MAC/IP, 1 IMET, 0 EAD
      192.0.2.2
        Routes: 0 MAC, 0 MAC/IP, 1 IMET, 0 EAD
Use the show l2route evpn imet command to verify the IMET routes.
Router3#show l2route evpn imet
  EVI       ETAG   Prod                          Router IP Addr  Type    Label                               Tunnel ID Multicast Proxy
----- ---------- ------ --------------------------------------- ----- -------- --------------------------------------- ---------------
    3      50012    BGP                              10.10.10.2     6    50012                               192.0.2.1              No
    3      50012    BGP                              10.10.20.2     6    50012                               192.0.2.2              No
    3      50012  L2VPN                              10.10.30.2     6    50012                               192.0.2.3              No
    3      50022    BGP                              10.10.10.2     6    50022                               192.0.2.1              No
    3      50022    BGP                              10.10.20.2     6    50022                               192.0.2.2              No
    3      50022  L2VPN                              10.10.30.2     6    50022                               192.0.2.3              No
Use the show ip bgp l2vpn evpn all command to verify the configuration.
Router3# sh ip bgp l2vpn evpn all
BGP table version is 30, local router ID is 192.0.2.3
Status codes: s suppressed, d damped, h history, * valid, > best, i - internal,
              r RIB-failure, S Stale, m multipath, b backup-path, f RT-Filter,
              x best-external, a additional-path, c RIB-compressed,
              t secondary path, L long-lived-stale,
Origin codes: i - IGP, e - EGP, ? - incomplete
RPKI validation codes: V valid, I invalid, N Not found

     Network          Next Hop            Metric LocPrf Weight Path
Route Distinguisher: 192.0.2.1:32770
 *>i  [2][192.0.2.1:32770][50012][48][000011000001][0][*]/20
                      192.0.2.1            0    100      0 ?
 *>i  [2][192.0.2.1:32770][50022][48][000011000002][0][*]/20
                      192.0.2.1            0    100      0 ?
Route Distinguisher: 192.0.2.2:32770
 *>i  [2][192.0.2.2:32770][50012][48][000013000001][0][*]/20
                      192.0.2.2            0    100      0 ?
 *>i  [2][192.0.2.2:32770][50022][48][000013000002][0][*]/20
                      192.0.2.2            0    100      0 ?
Route Distinguisher: 192.0.2.3:32770
 *>i  [2][192.0.2.3:32770][50012][48][000011000001][0][*]/20
                      192.0.2.1            0    100      0 ?
 *>   [2][192.0.2.3:32770][50012][48][000012000001][0][*]/20
                      0.0.0.0                            32768 ?
 *>i  [2][192.0.2.3:32770][50012][48][000013000001][0][*]/20
                      192.0.2.2            0    100      0 ?
 *>   [2][192.0.2.3:32770][50012][48][04BD9708512B][0][*]/20
                      0.0.0.0                            32768 ?
 *>i  [2][192.0.2.3:32770][50022][48][000011000002][0][*]/20
                      192.0.2.1            0    100      0 ?
 *>   [2][192.0.2.3:32770][50022][48][000012000002][0][*]/20
                      0.0.0.0                            32768 ?
 *>i  [2][192.0.2.3:32770][50022][48][000013000002][0][*]/20
                      192.0.2.2            0    100      0 ?
Route Distinguisher: 192.0.2.1:32770
 *>i  [3][192.0.2.1:32770][50012][32][192.0.2.1]/17
                      192.0.2.1            0    100      0 ?
 *>i  [3][192.0.2.1:32770][50022][32][192.0.2.1]/17
                      192.0.2.1            0    100      0 ?
Route Distinguisher: 192.0.2.2:32770
 *>i  [3][192.0.2.2:32770][50012][32][192.0.2.2]/17
                      192.0.2.2            0    100      0 ?
 *>i  [3][192.0.2.2:32770][50022][32][192.0.2.2]/17
                      192.0.2.2            0    100      0 ?
Route Distinguisher: 192.0.2.3:32770
 *>i  [3][192.0.2.3:32770][50012][32][192.0.2.1]/17
                      192.0.2.1            0    100      0 ?
 *>i  [3][192.0.2.3:32770][50012][32][192.0.2.2]/17
                      192.0.2.2            0    100      0 ?
 *>   [3][192.0.2.3:32770][50012][32][192.0.2.3]/17
                      0.0.0.0                            32768 ?
 *>i  [3][192.0.2.3:32770][50022][32][192.0.2.1]/17
                      192.0.2.1            0    100      0 ?
 *>i  [3][192.0.2.3:32770][50022][32][192.0.2.2]/17
                      192.0.2.2            0    100      0 ?
 *>   [3][192.0.2.3:32770][50022][32][192.0.2.3]/17
                      0.0.0.0                            32768 ?
Use the show nve peers command to verify the configuration.
Router3#show nve peers
'M' - MAC entry download flag  'A' - Adjacency download flag
'4' - IPv4 flag  '6' - IPv6 flag

Interface  VNI      Type Peer-IP          RMAC/Num_RTs   eVNI     state flags UP time
nve1       50012    L2CP 192.0.2.1    2              50012      UP   N/A  00:07:48
nve1       50012    L2CP 192.0.2.2    2              50012      UP   N/A  00:05:23
nve1       50022    L2CP 192.0.2.1    2              50022      UP   N/A  00:07:48
nve1       50022    L2CP 192.0.2.2    2              50022      UP   N/A  00:05:23
Use the show l2vpn evpn mac command to verify the configuration
Router3# show l2vpn evpn mac
MAC Address    EVI   BD    ESI                      Ether Tag  Next Hop(s)
-------------- ----- ----- ------------------------ ---------- ---------------
0000.1100.0001 3     12    0000.0000.0000.0000.0000 50012      192.0.2.1
0000.1200.0001 3     12    0000.0000.0000.0000.0000 50012      Vl12:12
0000.1300.0001 3     12    0000.0000.0000.0000.0000 50012      192.0.2.2
0000.1100.0002 3     22    0000.0000.0000.0000.0000 50022      192.0.2.1
0000.1200.0002 3     22    0000.0000.0000.0000.0000 50022      Vl22:22
0000.1300.0002 3     22    0000.0000.0000.0000.0000 50022      192.0.2.2

 Feedback