Fluidity Coloring is introduced from UIW Release 17.12.1. It enables wayside or outside devices (Fluidity infrastructure devices)
to be given specific color codes to enhance or drive the handoff process, and with the standard configuration handoff decision
is made based on received signal strength indication (RSSI).
Typical use case: When a train is travelling on one side of the track in one direction (metro line with single tunnel for both track directions)
and does not need to connect to the access point located on the opposite side of the tunnel, so mark the access point on each
side with a different color to prevent occasional handovers to infrastructure devices on the opposite track.
Fluidity coloring logic
The following image explains the Fluidity coloring logic and painter is a key role for wayside or outside device (Fluidity
infrastructure device):
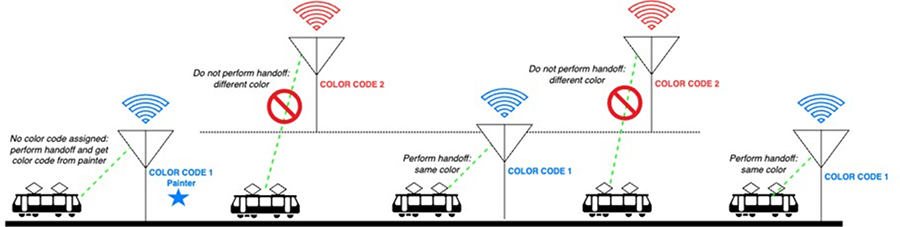 The process of Fluidity coloring as follows:
-
Based on the color code, painter notifies the Fluidity vehicle device which Fluidity infrastructure devices are suitable for
the handoff.
-
The Fluidity vehicle device ignores the color settings and continues to use the standard handoff mechanism (based on RSSI
level) until it detects a painter.
-
Once the Fluidity vehicle device completes the handoff on a Fluidity infrastructure device with the painter configuration,
it starts considering only Fluidity infrastructure devices with the same color code or other painters Fluidity infrastructure
devices.
-
Multiple Fluidity infrastructure devices acting as painters are allowed.
The following table explains the Fluidity color role and its corresponding options:
Table 1. Fluidity Coloring Role
|
Fluidity Coloring Role
|
Options
|
|
Wayside painter (Fluidity infrastructure device)
|
Only one color code can be assigned to a Fluidity infrastructure device configured as a painter
|
|
Wayside standard (Fluidity infrastructure device)
|
A non-painter Fluidity infrastructure device can be configured with multiple color codes
|
|
Fluidity vehicle
|
Only one color can be assigned to Fluidity vehicle device
|
Configure fluidity coloring using CLI
To configure a Fluidity color mode, use the following CLI commands:Device# configure fluidity color mode
Disabled: disable coloring
Enabled: enable coloring
Device# configure fluidity color value
WORD quoted list of colors from 1 to 7 or "p X" for painter (for example: "1 2 6","4", "p 1"). "clear" to reset
Example (painter):Device# configure fluidity color mode enabled
Device# configure fluidity color value "p 1"
Device# write
Device# reload
Example (non-painter):Device# configure fluidity color mode enabled
Device# configure fluidity color value "3 4 5"
Device# write
Devie# reload
Example (clear):Device# configure fluidity color value clear
Verify fluidity coloring using CLI
To verify a Fluidity color mode, use the following show commands:Device# #show fluidity config
Example (painter):Device# show fluidity config
...
Color: enabled, current: p 1
...
Example (non-painter):Device# show fluidity config
...
Color: enabled, current: 3 4 5
...
Example (clear):Device# show fluidity config
...
Color: enabled, current: 0
...
Configure fluidity coloring RSSI threshold
The Fluidity vehicle device temporarily ignore the Fluidity coloring settings if there is a coverage hole and the current
RSSI is less than the configured RSSI threshold. In this case, the Fluidity vehicle device retain it's Fluidity coloring settings
and ignores them until it receives a handoff from a Fluidity infrastructure device that has the current color code. The Fluidity
vehicle device resets its Fluidity coloring settings to the default value (no color) after four consecutive handoffs on a
Fluidity infrastructure device with color codes differs from the present value.
Configure fluidity coloring RSSI threshold using CLI
Device# configure fluidity color rssi-threshold
         <0-96> COLOR_RSSI_THRESHOLD
Example:
Device# configure fluidity color rssi-threshold 55
Verify fluidity coloring RSSI threshold using CLI
Device# show fluidity config
Example:
Device# show fluidity config
                 ...
                 Color: enabled, current: 0
                 Color min RSSI threshold: 55


 Feedback