Introduction to Access Control Rules
Within an access control policy, access control rules provide a granular method of handling network traffic across multiple managed devices.
 Note |
Security Intelligence filtering, SSL inspection, user identification, and some decoding and preprocessing occur before access control rules evaluate network traffic. |
The system matches traffic to access control rules in the order you specify. In most cases, the system handles network traffic according to the first access control rule where all the rule’s conditions match the traffic.
Each rule also has an action, which determines whether you monitor, trust, block, or allow matching traffic. When you allow traffic, you can specify that the system first inspect it with intrusion or file policies to block any exploits, malware, or prohibited files before they reach your assets or exit your network.
The following scenario summarizes the ways that traffic can be evaluated by access control rules in an inline, intrusion prevention deployment.
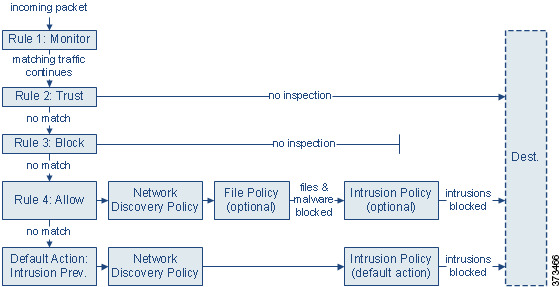
In this scenario, traffic is evaluated as follows:
-
Rule 1: Monitor evaluates traffic first. Monitor rules track and log network traffic. The system continues to match traffic against additional rules to determine whether to permit or deny it. (However, see an important exception and caveat at Access Control Rule Monitor Action.)
-
Rule 2: Trust evaluates traffic next. Matching traffic is allowed to pass to its destination without further inspection, though it is still subject to identity requirements and rate limiting. Traffic that does not match continues to the next rule.
-
Rule 3: Block evaluates traffic third. Matching traffic is blocked without further inspection. Traffic that does not match continues to the final rule.
-
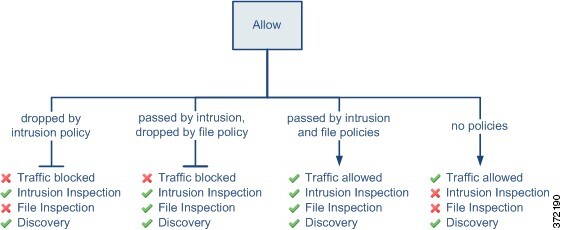
Rule 4: Allow is the final rule. For this rule, matching traffic is allowed; however, prohibited files, malware, intrusions, and exploits within that traffic are detected and blocked. Remaining non-prohibited, non-malicious traffic is allowed to its destination, though it is still subject to identity requirements and rate limiting. You can configure Allow rules that perform only file inspection, or only intrusion inspection, or neither.
-
Default Action handles all traffic that does not match any of the rules. In this scenario, the default action performs intrusion prevention before allowing non-malicious traffic to pass. In a different deployment, you might have a default action that trusts or blocks all traffic, without further inspection. (You cannot perform file or malware inspection on traffic handled by the default action.)
Traffic you allow, whether with an access control rule or the default action, is automatically eligible for inspection for host, application, and user data by the network discovery policy. You do not explicitly enable discovery, although you can enhance or disable it. However, allowing traffic does not automatically guarantee discovery data collection. The system performs discovery only for connections involving IP addresses that are explicitly monitored by your network discovery policy; additionally, application discovery is limited for encrypted sessions.
Note that access control rules handle encrypted traffic when your SSL inspection configuration allows it to pass, or if you do not configure SSL inspection. However, some access control rule conditions require unencrypted traffic, so encrypted traffic may match fewer rules. Also, by default, the system disables intrusion and file inspection of encrypted payloads. This helps reduce false positives and improve performance when an encrypted connection matches an access control rule that has intrusion and file inspection configured.
Access Control Rule Management
The Rules tab of the access control policy editor allows you to add, edit, categorize, search, filter move, enable, disable, delete, and otherwise manage access control rules in the current policy. Use the search bar to filter the list of access control policy rules. To switch between the list of rules that match the filter criteria, and all rules in the current access control policy, click Toggle.
For each access control rule, the policy editor displays its name, a summary of its conditions, the rule action, and icons that communicate the rule’s inspection options or status. These icons represent:
-
Time Range Option (
 )
) -
Intrusion policy (
 )
) -
File policy (
 )
) -
Safe search (
 )
) -
YouTube EDU (
 )
) -
Logging (
 )
) -
Original Client option
-
Comment (
 )
) -
Warning (
 )
) -
Errors (
 )
) -
important Information (
 )
)
Disabled rules are dimmed and marked (disabled) beneath the rule name.
To create or edit a rule, use the access control rule editor. You can:
-
Configure basic properties such as the rule’s name, state, position, and action in the upper portion of the editor.
-
Add conditions using the tabs on the left side of the lower portion of the editor.
-
Use the tabs on the right side of the lower portion to configure inspection and logging options, and also to add comments to the rule. For your convenience, the editor lists the rule’s inspection and logging options regardless of which tab you are viewing.
 Note |
Properly creating and ordering access control rules is a complex task, but one that is essential to building an effective deployment. If you do not plan your policy carefully, rules can preempt other rules, require additional licenses, or contain invalid configurations. To help ensure that the system handles traffic as you expect, the access control policy interface has a robust warning and error feedback system for rules. |
Access Control Rule Components
In addition to its unique name, each access control rule has the following basic components:
State
By default, rules are enabled. If you disable a rule, the system does not use it and stops generating warnings and errors for that rule.
Position
Rules in an access control policy are numbered, starting at 1. If you are using policy inheritance, rule 1 is the first rule in the outermost policy. The system matches traffic to rules in top-down order by ascending rule number. With the exception of Monitor rules, the first rule that traffic matches is the rule that handles that traffic.
Rules can also belong to a section and a category, which are organizational only and do not affect rule position. Rule position goes across sections and categories.
Section and Category
To help you organize access control rules, every access control policy has two system-provided rule sections, Mandatory and Default. To further organize access control rules, you can create custom rule categories inside the Mandatory and Default sections.
If you are using policy inheritance, the current policy's rules are nested between its parent policy's Mandatory and Default sections.
Conditions
Conditions specify the specific traffic the rule handles. Conditions can be simple or complex; their use often depends on license.
Traffic must meet all of the conditions specified in all of the tabs in a rule. For example, if the Applications tab specifies HTTP but not HTTPS, the URL category and reputation conditions in the URLs tab will not apply to HTTPS traffic.
Applicable Time
You can specify days and times during which a rule is applicable.
Action
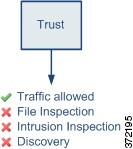
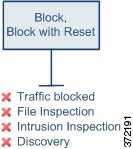
A rule’s action determines how the system handles matching traffic. You can monitor, trust, block, or allow (with or without further inspection) matching traffic. The system does not perform deep inspection on trusted, blocked, or encrypted traffic.
Inspection
Deep inspection options govern how the system inspects and blocks malicious traffic you would otherwise allow. When you allow traffic with a rule, you can specify that the system first inspect it with intrusion or file policies to block any exploits, malware, or prohibited files before they reach your assets or exit your network.
Logging
A rule’s logging settings govern the records the system keeps of the traffic it handles. You can keep a record of traffic that matches a rule. In general, you can log sessions at the beginning or end of a connection, or both. You can log connections to the database, as well as to the system log (syslog) or to an SNMP trap server.
Comments
Each time you save changes to an access control rule, you can add comments.
Access Control Rule Order
Rules in an access control policy are numbered, starting at 1. The system matches traffic to access control rules in top-down order by ascending rule number.
In most cases, the system handles network traffic according to the first access control rule where all the rule’s conditions match the traffic. Except for Monitor rules, the system does not continue to evaluate traffic against additional, lower-priority rules after that traffic matches a rule.
To help you organize access control rules, every access control policy has two system-provided rule sections, Mandatory and Default. To further organize, you can create custom rule categories inside the Mandatory or Default sections. After you create a category, you cannot move it, although you can delete it, rename it, and move rules into, out of, within, and around it. The system assigns rule numbers across sections and categories.
If you use policy inheritance, the current policy's rules are nested between its parent policy's Mandatory and Default rule sections. Rule 1 is the first rule in the outermost policy, not the current policy, and the system assigns rule numbers across policies, sections, and categories.
Any predefined user role that allows you to modify access control policies also allows you to move and modify access control rules within and among rules categories. You can, however, create custom roles that restrict users from moving and modifying rules. Any user who is allowed to modify access control policies can add rules to custom categories and modify rules in them without restriction.
 Tip |
Proper access control rule order reduces the resources required to process network traffic, and prevents rule preemption. Although the rules you create are unique to every organization and deployment, there are a few general guidelines to follow when ordering rules that can optimize performance while still addressing your needs. |

 )
)
 Feedback