Advanced Configuration

Some device features are configured using ASA configuration commands. Although the FDM can configure many command-based features, it does not support all of them. If you need to use some of these ASA features that are not otherwise supported in the FDM, you can use Smart CLI or FlexConfig to manually configure the features.

The following topics explain this type of advanced configuration in more detail.

About Smart CLI and FlexConfig

FTD uses ASA configuration commands to implement some features, but not all features. There is no unique set of the FTD configuration commands.

You can configure features using the CLI using the following methods:

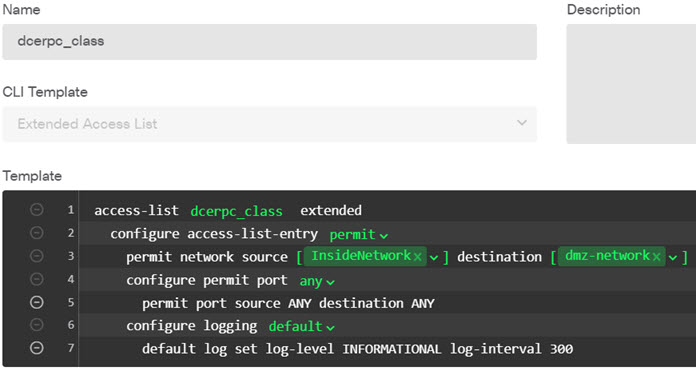
  • Smart CLI—(Preferred method.) A Smart CLI template is a pre-defined template for a particular feature. All of the commands needed for the feature are provided, and you simply need to select values for variables. The system validates your selection, so that you are more likely to configure a feature correctly. If a Smart CLI template exists for the feature you want, you must use this method.

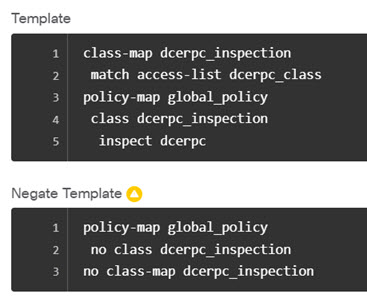
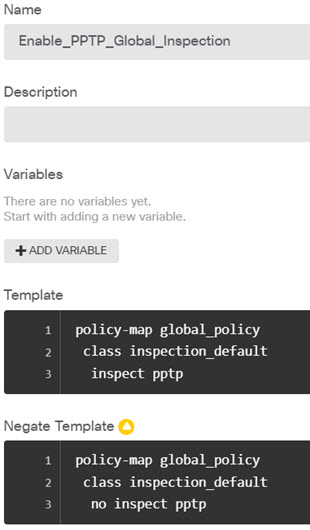
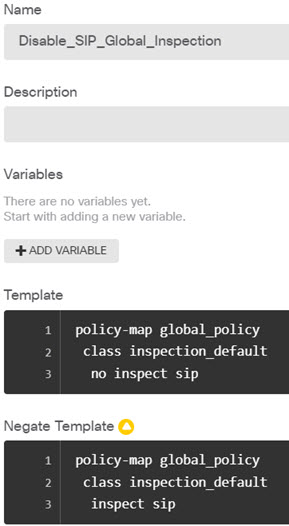
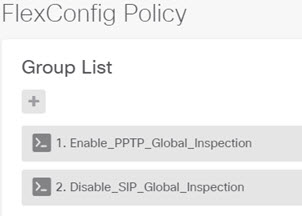
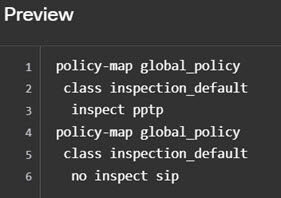
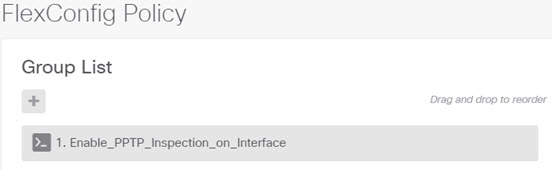
  • FlexConfig—The FlexConfig policy is a collection of FlexConfig objects. The FlexConfig objects are more free-form than Smart CLI templates, and the system does no CLI, variable, or data validation. You must know ASA configuration commands and follow the ASA configuration guides to create a valid sequence of commands.

The point of Smart CLI and FlexConfig is to allow you to configure features that are not directly supported through FDM policies and settings.


Caution

Cisco strongly recommends using Smart CLI and FlexConfig only if you are an advanced user with a strong ASA background and at your own risk. You may configure any commands that are not prohibited. Enabling features through Smart CLI and FlexConfig may cause unintended results with other configured features.

You may contact the Cisco Technical Assistance Center for support concerning Smart CLI and FlexConfig objects that you have configured. The Cisco Technical Assistance Center does not design or write custom configurations on any customer's behalf. Cisco expresses no guarantees for correct operation or interoperability with other FTD features. Smart CLI and FlexConfig features may become deprecated at any time. For fully guaranteed feature support, you must wait for the FDM support. When in doubt, do not use Smart CLI or FlexConfig.


The following topics explain these features in more detail.

Recommended Usage for Smart CLI and FlexConfig

There are two main recommended uses for FlexConfig:

  • You are migrating from ASA to FTD, and there are compatible features you are using (and need to continue using) that the FDM does not directly support. In this case, use the show running-config command on the ASA to see the configuration for the feature and create your FlexConfig objects to implement it. Verify by comparing show running-config output on the two devices.

  • You are using the FTD but there is a setting or feature that you need to configure, e.g. the Cisco Technical Assistance Center tells you that a particular setting should resolve a specific problem you are encountering. For complicated features, use a lab device to test the FlexConfig and verify that you are getting the expected behavior.

Before trying to recreate an ASA configuration, first determine if you can configure an equivalent feature in standard policies. For example, the access control policy includes intrusion detection and prevention, HTTP and other types of protocol inspection, URL filtering, application filtering, and access control, which the ASA implements using separate features. Because many features are not configured using CLI commands, you will not see every policy represented within the output of show running-config .


Note

At all times, keep in mind that there is not a one-to-one overlap between ASA and FTD. Do not attempt to completely recreate an ASA configuration on the FTD device. You must carefully test any feature that you configure using FlexConfig.


CLI Commands in Smart CLI and FlexConfig Objects

The FTD uses ASA configuration commands to configure some features. Although not all ASA features are compatible with FTD, there are some features that can work on the FTD but that you cannot configure in the FDM policies. You can use Smart CLI and FlexConfig objects to specify the CLI required to configure these features.

If you decide to use Smart CLI or FlexConfig to manually configure a feature, you are responsible for knowing and implementing the commands according to the proper syntax. FlexConfig does not validate CLI command syntax. For more information about proper syntax and configuring CLI commands, use the ASA documentation as a reference:

The following topics explain more about configuration commands.

How Software Upgrades Affect the FlexConfig Policy

Each new version of the FTD software adds support for configuring features in the FDM. Sometimes, these new features can overlap with features you have previously configured using FlexConfig.

After upgrade, you need to examine the FlexConfig policy and objects. If any contain commands that have become prohibited due to added support within FDM or Smart CLI, icons in the objects list and messages indicate the problem. Please take the time to redo your configuration. Use the list of prohibited commands for help in determining where the commands should now be configured.

The system will not prevent you from deploying changes while the FlexConfig objects that are attached to the FlexConfig policy contain newly-prohibited commands. However, you will be prevented from creating new Smart CLI objects until you resolve all issues noted in the FlexConfig policy.

You can simply remove the problematic objects from the FlexConfig policy, as the restriction applies only to those objects you are actively deploying to the device configuration. Thus, you can remove the objects, then use them as a reference as you create the corresponding Smart CLI or integrated the FDM configuration. Once you are satisfied with the new configuration, you can simply delete the objects. If the removed objects contain some non-prohibited elements, you can edit them to remove the unsupported commands, and then reattach the objects to the FlexConfig policy.

Determine the ASA Software Version and Current CLI Configuration

Because the system uses ASA software commands to configure some features, you need to determine the current ASA version used in software running on the FTD device. This version number indicates which ASA CLI configuration guides to use for instructions on configuring a feature. You also should examine the current CLI-based configuration and compare it to the ASA configuration you want to implement.

Keep in mind that any ASA configuration will be very different from the FTD configuration. Many FTD policies are configured outside of the CLI, so you cannot see the configuration by looking at the commands. Do not try to create a one-to-one correspondence between an ASA and FTD configuration.

To view this information, either open the CLI Console in the FDM or make an SSH connection to the device's management interface and issue the following commands:

  • show version system and look for the Cisco Adaptive Security Appliance Software Version number.

  • show running-config to view the current CLI configuration.

  • show running-config all to include all the default commands in the current CLI configuration.

Prohibited CLI Commands

The purpose of Smart CLI and FlexConfig is to configure features that are available on ASA devices that you cannot configure on the FTD devices using the FDM.

Thus, you are prevented from configuring ASA features that have equivalents in the FDM. The following table lists some of these prohibited command areas. This list contains many parent commands that enter configuration modes. The prohibition of the parent includes the prohibition of the children commands. It also includes the no version of the commands and their associated clear commands.

The FlexConfig object editor prevents you from including these commands in the object. This list does not apply to Smart CLI templates, as they include only those commands you can validly configure.

Prohibited CLI Command

Comments

aaa

Use Objects > Identity Sources.

aaa-server

Use Objects > Identity Sources.

access-group

Use Policies > Access Control to configure access rules.

access-list

Partially blocked.

  • You can create ethertype access lists.

  • You cannot create extended and standard access lists. Create these ACLs using the Smart CLI Extended Access List or Standard Access List objects. You can then use them on FlexConfig-supported commands that refer to the ACL by object name, such as match access-list with an extended ACL for service policy traffic classes.

  • You cannot create advanced access lists, which the system uses with the access-group command. Instead, use Policies > Access Control to configure access rules.

  • You cannot create webtype access lists.

anyconnect-custom-data

Use Device > Remote Access VPN to configure AnyConnect Client.

asdm

This feature does not apply to a FTD system.

as-path

Create Smart CLI AS Path objects and use them in a Smart CLI BGP object to configure an autonomous system path filter.

attribute

auth-prompt

This feature does not apply to a FTD system.

boot

call-home

captive-portal

Use Policies > Identity to configure the captive portal used for active authentication.

clear

client-update

clock

Use Device > System Settings > NTP to configure system time.

cluster

command-alias

community-list

Create Smart CLI Expanded Community List or Standard Community List objects and use them in a Smart CLI BGP object to configure a community list filter.

compression

configure

crypto

On the Objects page, use Certificates, IKE Policies, and IPSec Proposals.

dhcp-client

dhcpd

Use Device > System Settings > DHCP Server.

dns

Configure DNS groups using Objects > DNS Groups, and assign the groups using Device > System Settings > DNS Server.

dns-group

Configure DNS groups using Objects > DNS Groups, and assign the groups using Device > System Settings > DNS Server.

domain-name

Configure DNS groups using Objects > DNS Groups, and assign the groups using Device > System Settings > DNS Server.

dynamic-access-policy-config

dynamic-access-policy-record

enable

event

failover

fips

firewall

FDM supports routed firewall mode only.

hostname

Use Device > System Settings > Hostname.

hpm

This feature does not apply to a FTD system.

http

Use the Data Interfaces tab on Device > System Settings > Management Access.

inline-set

interface for BVI, Management, Ethernet, GigabitEthernet, and subinterfaces.

Partially blocked.

Configure physical interfaces, subinterfaces, and Bridge Virtual Interfaces on the Device > Interfaces page. You can then configure additional options using FlexConfig.

However, the following interface mode commands are prohibited for these types of interface.

  • cts
  • ip address
  • ip address dhcp
  • ipv6 address
  • ipv6 enable
  • ipv6 nd dad
  • ipv6 nd suppress-ra
  • mode
  • nameif
  • security-level
  • shutdown
  • zone-member

interface for vni , redundant , tunnel

Configure interfaces on the Device > Interfaces page. FDM does not support these types of interface.

ip audit

This feature does not apply to a FTD system. Instead, apply intrusion policies using access control rules.

ip-client

To configure the system to use data interfaces as the management gateway, use Device > System Settings > Management Interface.

ip local pool

Use Device > Remote Access VPN to configure address pools.

ipsec

ipv6

Create Smart CLI IPv6 Prefix List objects and use them in a Smart CLI BGP object to configure prefix list filtering for IPv6.

ipv6-vpn-addr-assign

Use Device > Remote Access VPN to configure address pools.

isakmp

Use Device > Site-to-Site VPN.

jumbo-frame

The system automatically enables jumbo frame support if you increase the MTU of any interface over the default 1500.

ldap

license-server

Use Device > Smart License.

logging

Use Objects > Syslog Servers and Device > System Settings > Logging Settings.

However, you can configure the logging history command in FlexConfig.

management-access

migrate

Use Device > Remote Access VPN and Device > Site-to-Site VPN to enable IKEv2 support.

mode

FDM supports single context mode only.

mount

mtu

Configure MTU per interface on Device > Interfaces.

nat

Use Policies > NAT.

ngips

ntp

Use Device > System Settings > NTP

object-group network

object network
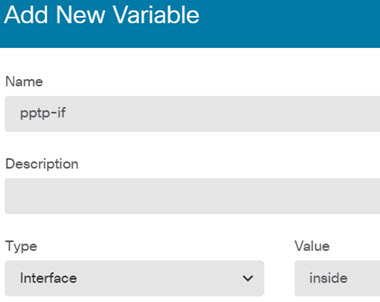
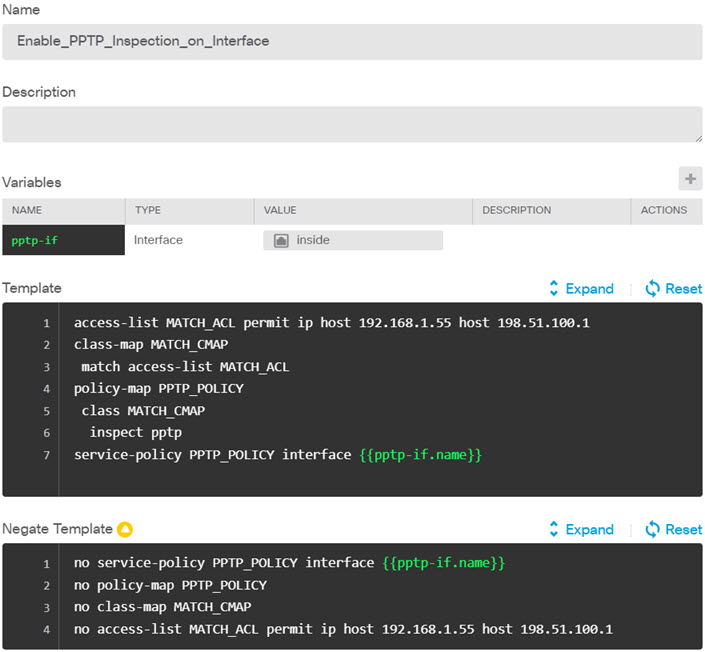
Use Objects > Network.

You cannot create network objects or groups in FlexConfig, but you can use network objects and groups defined in the object manager inside the template as variables.

object service |natorigsvc

object service |natmappedsvc

The object service command is allowed in general, but you cannot edit the internal objects named |natorigsvc or |natmappedsvc. In these names, the vertical bar is intentional and it is the first character of the restricted object names.

passwd

password

password-policy

policy-list

Create Smart CLI Policy List objects and use them in a Smart CLI BGP object to configure a policy list.

policy-map sub-commands

You cannot configure the following commands in a policy map.

  • priority
  • police
  • match tunnel-group

prefix-list

Create Smart CLI IPv4 Prefix List objects and use them in a Smart CLI OSPF or BGP object to configure prefix list filtering for IPv4.

priority-queue

privilege

reload

You cannot schedule reloads. The system does not use the reload command to restart the system, it uses the reboot command.

rest-api

This feature does not apply to a FTD system. The REST API is always installed and enabled.

route

Use Device > Routing to configure static routes.

route-map

Create Smart CLI Route Map objects and use them in a Smart CLI OSPF or BGP object to configure route maps.

router bgp

Use the Smart CLI templates for BGP.

router ospf

Use the Smart CLI templates for OSPF.

scansafe

This feature does not apply to a FTD system. Instead, configure URL filtering in access control rules.

setup

This feature does not apply to a FTD system.

sla

ssh

Use the Data Interfaces tab on Device > System Settings > Management Access.

ssl

telnet

FTD does not support Telnet connections. Use SSH instead of Telnet to access the device CLI.

time-range

tunnel-group

Use Device > Remote Access VPN and Device > Site-to-Site VPN.

tunnel-group-map

Use Device > Remote Access VPN and Device > Site-to-Site VPN.

user-identity

Use Policies > Identity.

username

To create CLI users, open an SSH or console session to the device and use the configure user commands.

vpdn

vpn

vpn-addr-assign

vpnclient

vpn-sessiondb

vpnsetup

webvpn

zone

zonelabs-integrity

This feature does not apply to a FTD system.

Smart CLI Templates

The following table explains the Smart CLI templates based on the feature.

Feature

Templates

Description

Objects: AS Path

ASPath

Create ASPath objects for use with routing protocol objects.

Objects: Access List

Extended Access List

Standard Access List

Create extended or standard ACLs for use with routing objects. You can also refer to these objects by name from FlexConfig objects that configure permitted commands that use ACLs.

Objects: Community List

Expanded Community List

Standard Community List

Create expanded or standard community lists for use with routing objects.

Objects: Prefix List

IPV4 Prefix List

IPV6 Prefix List

Create IPv4 or IPv6 prefix lists for use with routing objects.

Objects: Policy List

Policy List

Create policy lists for use with routing objects.

Objects: Route Map

Route Map

Create route maps for use with routing objects.

Routing: BGP

BGP

Use the BGP template to configure the routing process.

Routing: BGP General Settings

BGP

Use the BGP General Settings template to configure global settings that apply to all BGP processes.

Routing: OSPFv2

OSPF

OSPF Interface Settings

Use the OSPF template to configure the routing process, and the Interface template to configure per-interface OSPF behavior.

Tips:

  • If you intend to redistribute routes from other routing processes, you should first configure those processes. For example, before configuring OSPF to redistribute EIGRP routes, first create and deploy the FlexConfig object that configures EIGRP.

  • You can configure up to 2 OSPF processes.

Guidelines and Limitations for Smart CLI and FlexConfig

Please keep the following in mind when configuring features through Smart CLI or FlexConfig.

  • The commands defined in FlexConfig objects are deployed after all commands for features defined through FDM, including Smart CLI. Thus, you can depend on objects, interfaces, and so forth being configured before these commands are issued to the device. If you need to use a FlexConfig-deployed item in a Smart CLI template, create and deploy the FlexConfig before creating and deploying the Smart CLI template. For example, if you want to use the OSPF Smart CLI template to redistribute EIGRP routes, first use FlexConfig to configure EIGRP, then create the OSPF Smart CLI template.

  • If you want to remove a feature or part of a feature that you configured through FlexConfig, but a Smart CLI template refers to that feature, you must first remove the commands in the Smart CLI template that use the feature. Then, deploy the configuration so that the Smart-CLI configured feature no longer refers to it. You can then remove the feature from FlexConfig and redeploy the configuration to finally eliminate it altogether.

Configuring Smart CLI Objects

Smart CLI objects define features that cannot be configured elsewhere in the FDM. Smart CLI objects provide a level of guidance in configuring a feature. For a given feature (template), all possible commands are pre-loaded, and the variables you enter are validated. Thus, although you still use CLI commands to configure a feature, Smart CLI objects are not as free-form as FlexConfig objects.

Although Smart CLI templates do provide a level of guidance, you must still read the ASA configuration guides and command references to understand the command usage so that you pick values that work correctly for your network. Ideally, you already have an ASA configuration to work from, and you merely need to build the same sequence of commands in the Smart CLI object.

Smart CLI objects are grouped according to feature area.


Note

All Smart CLI objects that you define are deployed. Unlike FlexConfig, you cannot create several Smart CLI objects and then select which of them to deploy. Create Smart CLI objects only for those features you want to configure.


Procedure


Step 1

Click View Configuration in Device > Advanced Configuration.

Step 2

Click the appropriate feature area under Smart CLI in the Advanced Configuration table of contents.

Step 3

Do one of the following:

  • To create an object, click the + button.

  • To edit an object, click the edit icon (edit icon) for the object.

To delete an object, click the trash can icon (delete icon) for the object.

Step 4

Enter a Name for the object and optionally, a description.

Step 5

Select the CLI Template for the feature you are configuring.

The system loads the command template into the Template window. Initially, only the required commands are shown. These represent the minimum configuration required for the template.

Note 

Some features require more than one template. For example, to configure OSPFv2, you need to create two Smart CLI objects, using the OSPF and the Interface templates. Note that you cannot use the OSPF template to configure OSPFv3.

Step 6

Fill in the variables and add commands as needed in the template.

Ideally, you are working with an existing configuration from an ASA or FTD device (one that is managed by the FMC). With a configuration in hand, you simply need to make the template conform to it, changing variables such as IP addresses and interface names as appropriate for the location of this specific device in your network.

Following are some tips for filling in the template:

  • To select a value for a variable, click the variable and either type in the appropriate value, or select it from a list (in the case of enumerated values). Mousing over variables that require typing shows the valid values for the option, such as a range of numbers. In some cases, the recommended value is mentioned.

    For example, in the OSPF template, the required command router ospf process-id shows “Process ID (1-65535)” on mouse-over, and when you click process-id , the field is highlighted. Simply type in the number you want.

  • When you select an option for a variable, if there are additional possible commands to configure the option, these are automatically exposed and disabled or enabled as appropriate. Watch for these additional commands.

  • Use the Show/Hide Disabled link above the template to control your view. Disabled commands will not be configured, but you must display them to configure them. To see the full template, click the Show Disabled link above the template. To see only those commands that will be configured, click the Hide Disabled link above the table.

  • To clear all of your edits since you last saved the object, click the Reset link above the template.

  • To enable an optional command, click the + button to the left of the line number.

  • To disable an optional command, click the - button to the left of the line number. If you edited the line, your edits are not deleted.

  • To duplicate a command, click the Options ... button and select Duplicate. You are allowed to duplicate commands only if it is valid to enter the command more than once.

  • To delete a duplicated command, click the Options ... button and select Delete. You cannot delete the commands that are a part of the base template.

Step 7

Click OK.


Configuring the FlexConfig Policy

The FlexConfig Policy is simply a list of the FlexConfig objects that you want to deploy to the device configuration. Only those objects included in the policy are deployed, all others are simply defined and unused.

The commands defined in FlexConfig objects are deployed after all commands for features defined through FDM, including Smart CLI. Thus, you can depend on objects, interfaces, and so forth being configured before these commands are issued to the device. If you need to use a FlexConfig-deployed item in a Smart CLI template, create and deploy the FlexConfig before creating and deploying the Smart CLI template. For example, if you want to use the OSPF Smart CLI template to redistribute EIGRP routes, first use FlexConfig to configure EIGRP, then create the OSPF Smart CLI template.


Note

If there is a Smart CLI template for a feature, you cannot configure it using FlexConfig. You must use the Smart CLI object.


Before you begin

Create the FlexConfig objects. See the following topics:

Procedure


Step 1

Click View Configuration in Device > Advanced Configuration.

Step 2

Click FlexConfig > FlexConfig Policy in the Advanced Configuration table of contents.

Step 3

Manage the list of objects in the Group List.

  • To add an object, click the + button. If the object does not yet exist, click Create New FlexConfig Object to define it.

  • To delete an object, click the X button at the right of the object entry.

Note 

We recommend that each object be completely self-contained and not depend on the configuration defined in any other FlexConfig object. This ensures that you can add or remove objects without affecting other objects.

Step 4

Evaluate the proposed commands in the Preview pane.

You can click the Expand button (and subsequently, Collapse) to widen the screen so you can see long commands more clearly.

The preview evaluates variables and produces the exact commands that will be issued. Ensure that these commands are correct and valid. You are responsible for ensuring the commands will not result in errors or poor configurations that make the device unusable.

Caution 

The system does not validate the commands. It is possible for you to deploy invalid and even potentially destructive commands. Examine the preview very carefully before deploying changes.

Step 5

Click Save.


What to do next

After editing the FlexConfig policy, carefully examine the results of the next deployment. If there are errors, correct the CLI in the object. See Troubleshooting the FlexConfig Policy.

Configuring FlexConfig Objects

A FlexConfig object contains the ASA commands required to configure a particular feature that you cannot otherwise configure using the FDM. You are responsible for ensuring that you enter the right sequence of commands, without typos. The system does not validate the content of FlexConfig objects.

We recommend that you create separate objects for each general feature you intend to configure. For example, if you want to define banners and also configure the RIP routing protocol, use 2 separate objects. Isolating features in separate objects makes it easier for you to pick and choose which to objects to deploy, and also makes troubleshooting more straight-forward.


Note

Do not include the enable and configure terminal commands. The system enters the right mode for configuration commands automatically.


Procedure


Step 1

Click View Configuration in Device > Advanced Configuration.

Step 2

Click FlexConfig > FlexConfig Objects in the Advanced Configuration table of contents.

Step 3

Do one of the following:

  • To create an object, click the + button.

  • To edit an object, click the edit icon (edit icon) for the object.

To delete an unreferenced object, click the trash can icon (delete icon) for the object.

Step 4

Enter a Name for the object and optionally, a description.

Step 5

In the Variables section, create any variables that you want to use in the object body.

The only variables that you must create are those that point to objects defined within the FDM, specifically, the Network, Port, and Secret Key variable types, or the Interface variable, which points to a named interface. For other variable types, you can simply type in the values into the object body.

For detailed information on creating and using variables, see Creating Variables in a FlexConfig Object.

Step 6

In the Template section, type in the ASA commands required to configure the feature.

You must enter commands in the right order for configuring the feature. Use the ASA CLI configuration guides to learn how to enter the commands. Ideally, you should have a pre-tested configuration file from an ASA or another FTD device that you can use as a reference.

You can also use Mustache notation to refer to and process variables. For detailed information, see Referring to FlexConfig Variables and Retrieving Values.

Following are some tips for creating the object body:

  • To add lines, put the cursor at the end of a line and press Enter.

  • To use a variable, type the variable name between double-braces: {{variable_name}} . For variables that refer to objects, you must include the attribute whose value you are retrieving: {{variable_name.attribute}} . The available attributes differ based on object type. For complete information, see Variable References: {{variable}} or {{{variable}}}.

  • To use a Smart CLI object, type the name of the object. If you need to refer to a routing process configured in Smart CLI, enter the process identifier. See Referring to Smart CLI Objects in a FlexConfig Object.

  • Click the Expand/Collapse link above the template body to make the body larger or smaller.

  • Click the Reset link to erase any changes you made since you last saved the object.

Step 7

In the Negate Template section, enter the commands needed to remove or reverse the commands configured in the object body.

The Negate section is very important and serves two purposes:

  • It simplifies deployment. Before re-deploying the commands in the body, the system uses these commands to first erase or undo the configuration. This ensures a clean deployment.

  • If you decide to remove the feature by removing the object from the FlexConfig Policy, the system uses these commands to remove the commands from the device.

If you do not supply the commands needed to negate or reverse the CLI in the object body, the deployment might need to clear the entire device configuration and redeploy all policies, not just the commands within the object. This will make deployment take longer and also disrupt traffic. Ensure that you have all, and only, those commands needed to undo the configuration defined in the object body. Although negate commands are typically the no or clear form of the commands in the template, if you are actually turning off a feature that was already enabled, the “negate” command is actually the positive form of the command, the one that enables the feature.

Use the ASA configuration guides and command reference to determine the appropriate commands. Sometimes, you can undo a configuration with a single command. For example, in an object that configures RIP, a simple no router rip command removes the entire router rip configuration, including subcommands.

Likewise, if you entered several banner login commands to create a multi-line banner, a single no banner login command negates the entire login banner.

If your template creates several nested objects, the negate template needs to remove the objects in reverse order, to first remove references to the objects before deleting the objects. For example, if you first create an ACL, then refer to it in a traffic class, then refer to the traffic class in a policy map, and finally enable the policy map using a service policy, the negate template must undo the configuration by first removing the service policy, then the policy map, then the traffic class, and finally the ACL.

Step 8

Click OK.


What to do next

Simply creating a FlexConfig object is not enough to get it deployed. You must add the object to the FlexConfig Policy. Only those objects in the FlexConfig policy get deployed. This makes it possible for you to refine your FlexConfig objects, and have some ready for special uses, without having all of them automatically deployed. See Configuring the FlexConfig Policy.

Creating Variables in a FlexConfig Object

The variables you use inside a FlexConfig object are defined within the object itself. There is no separate list of variables. Thus, you cannot define a variable and then use it within separate FlexConfig objects.

Variables provide these main benefits:

  • They make it possible to point to objects defined using the FDM. This includes network, port, and secret key objects.

  • They isolate values that might change from the object body. Thus, if you need to change a value, you simply edit the variable and you do not need to edit the object body. This can be especially helpful if you need to refer to the object in several command lines.

This procedure explains the process of adding variables to a FlexConfig object.

Procedure


Step 1

Edit or create a FlexConfig object from the Device > Advanced Configuration page.

See Configuring FlexConfig Objects.

Step 2

Do one of the following in the Variables section:

  • To add a variable, click the + button (or click Add Variable if there are none yet defined).

  • To edit a variable, click the edit icon (edit icon) for the variable.

To delete a variable, click the trash can (delete icon) icon for the variable. Make sure you remove any references to it from the template body.

Step 3

Enter a Name for the variable and optionally, a description.

Step 4

Select a data Type for the variable, then enter or select the value.

You can create the following types of variable. Choose a type that fits the data requirements of the commands in which you will use the variable.

  • String—A text string. For example, hostnames, usernames, and so forth.

  • Numeric—An integer number. Do not include commas, decimals, signs (such as negative), or hexadecimal notation. For non-integer numbers, use a string variable.

  • Boolean—A logical true/false. Select either True or False.

  • Network—A network object or group defined on the Objects page. Select the network object or group.

  • Port—A TCP or UDP port object defined on the Objects page. Select the port object. You cannot select groups or objects for other protocols.

  • Interface—A named interface defined on the Device > Interfaces page. Select the interface. You cannot select interfaces that have no names.

  • IP—A single IPv4 or IPv6 IP address without netmask or prefix length.

  • Secret—A secret key object defined for FlexConfig. Select the object. For information on creating secret key objects, see Configuring Secret Key Objects.

Step 5

Click Add or Save in the Variable dialog box.

You can now use the variable within the body of the FlexConfig object. The way you refer to the variable differs based on variable type. For details on how to use these variables, see the following topics:

Step 6

Click OK in the FlexConfig Object dialog box.


Referring to FlexConfig Variables and Retrieving Values

FlexConfig uses Mustache as the template language, but support is limited to the features explained in the following sections. Use these features to refer to variables, retrieve their values, and process them.

Variable References: {{variable}} or {{{variable}}}

To refer to a variable, which you define within a FlexConfig object, you use the following notation:

{{variable_name}}

Or:

{{{variable_name}}}

This is sufficient for simple variables that are single values, which includes variables of the following types: Numeric, String, Boolean, and IP. Use triple braces if the variable contains special characters such as &. Alternatively, you can always use triple braces for all variables.

However, for variables that point to elements that are modeled as objects in the configuration database, you must use dot notation and include the name of the object attribute you want to retrieve. You can find these attribute names by examining the models in the API Explorer for the related object type. You must use the following notation to use variables of the following types: Secret, Network, Port, and Interface.

{{variable_name.attribute}}

For example, to retrieve the address from a network variable named net-object1 (which points to a network object, not a network group), you would use:

{{net-object1.value}}

If you are trying to retrieve an attribute value from an object within an object, you need to use a series of dotted attributes to drill down to the desired value. For example, the IP addresses for an interface are modeled as sub-objects, named ipv4 and ipv6, to the interface object. Thus, to retrieve the IPv4 address and subnet mask for an interface variable named int-inside (which points to the inside interface), you would use:

{{int-inside.ipv4.ipAddress.ipAddress}} {{int-inside.ipv4.ipAddress.netmask}}


Note

To open API Explorer, click the more options button (More options button.) and choose API Explorer.


The following table lists the variable types, how to refer to them, and for objects, the name of the API model and the most likely references that you might use.

Variable Type

Reference Models

Description

Boolean

(simple variable)

Variable:

{{variable_name}}

Section:


{{#variable_name}}
commands
{{/variable_name}}

Inverse Section:


{{^variable_name}}
commands
{{/variable_name}}

A logical true/false. The main purpose for Boolean variables is for sections or inverse sections. You can edit the value of a Boolean variable to turn a section of commands on or off, for example, if you need to enable a feature periodically or under special circumstances only.

Some objects also have Boolean attributes in their models, which you can use to provide optional processing of a section.

Interface

(object variable: API model is Interface)

Variable:

{{variable_name.attribute}}

Section:


{{#variable_name.attribute}}
commands
{{/variable_name.attribute}}

Inverse Section:


{{^variable_name.attribute}}
commands
{{/variable_name.attribute}}

A named interface defined on the Device > Interfaces page. You cannot point to unnamed interfaces.

There is a wide variety of attributes available in the interface model. Also, the interface model includes sub-objects, for example, for IP addresses.

Following are some of the main attributes that you might find useful:

  • variable_name.name returns the logical name of the interface.

  • variable_name.hardwareName returns the interface port name, such as GigabitEthernet1/8.

  • variable_name.managementOnly is a Boolean value. TRUE means that the interface is defined as management only. FALSE means the interface is for through-the-device traffic. You could use this option as a section key.

  • variable_name.ipv4.ipAddress.ipAddress returns the IPv4 address for the interface.

  • variable_name.ipv4.ipAddress.netmask returns the subnet mask for the IPv4 address for the interface.

IP

(simple variable)

Variable:

{{variable_name}}

A single IPv4 or IPv6 IP address without netmask or prefix length.

Network

(object variable: API model is NetworkObject)

Variable (Network Objects):

{{variable_name.attribute}}

Section (Group Objects):


{{#variable_name.networkObjects}}
commands referring to one of   
  {{value}}
  {{name}}
{{/variable_name.networkObjects}}

A network object or group defined on the Objects page. You can use sections to process network groups.

Following are the main attributes that you might find useful:

  • {{variable_name.name}} returns the name of the network object or group.

  • {{variable_name.value}} returns the IP address contents of a network object (but not a network group). Ensure that you use a network object that has the right type of contents for a given command, for example, a host address rather than a subnet address.

  • {{variable_name.groups}} returns the list of network objects contained within a network group. Use this only with variables that point to network groups, and use it on a section tag to iteratively process the contents of the group. Use either {{value}} or {{name}} to retrieve the contents of each network object in turn.

Numeric

(simple variable)

Variable:

{{variable_name}}

An integer number. Do not include commas, decimals, signs (such as negative), or hexadecimal notation. For non-integer numbers, use a string variable.

Port

(object variable: API model is PortObject, tcpports or udpports)

Variable:

{{variable_name.attribute}}

A TCP or UDP port object defined on the Objects page. This must be a port object, not a port group.

Following are the main attributes that you might find useful:

  • {{variable_name.port}} returns the port number. The protocol is not included.

  • {{variable_name.name}} returns the name of the port object.

Secret

(object variable: API model is Secret)

Variable:

{{variable_name.password}}

Or:

{{{variable_name.password}}}

A secret key object defined for FlexConfig.

The only reference you should make is to the password attribute, which returns the encrypted string.

If the password includes special characters such as &, use triple braces.

String

(simple variable)

Variable:

{{variable_name}}

A text string. For example, hostnames, usernames, and so forth.

Sections {{#key}} {{/key}} and Inverse Sections {{^key}} {{/key}}

A section or an inverse section is a block of commands between the section start and end tags, which use a key as the processing criteria. How the section is processed depends on whether it is a regular or an inverse section:

  • A regular section (or simply, a section) is processed if the key is TRUE or has non-empty contents. If the key is FALSE or the object has no content, the commands in the section are not configured. The section is bypassed.

    The following is the syntax for a regular section.

    
    {{#key}}
    one or more commands
    {{/key}}
    
    
  • An inverse section is the opposite of a section. It is processed if the key is FALSE or the object has no contents. If the key is TRUE or the object has contents, the inverse section is bypassed.

    The following is the syntax for an inverse section. The only difference is that a caret replaces the hash tag.

    
    {{^key}}
    one or more commands
    {{/key}}


The following topics explain the main uses for sections and inverse sections.

How to Process Multiple-Value Variables

The primary example of processing a multiple-value variable is a network variable that points to a network group. Because the group contains multiple objects (under the objects attribute), you can iteratively go through the values in the network group to configure the same command multiple times with different values.

Although an object group defines the contained network objects within the objects attribute, those objects do not include the contents of the contained objects. Instead, you use the networkObjects attribute to get at the contents of the contained objects.

For example, if you have a network group named net-group with the hosts 192.168.10.0, 192.168.20.0, and 192.168.30.0, you can use the following technique to configure a network command for each address for RIP routing. Note that you use the network object's value attribute alone, because the use of net-group.networkObjects in the section start implies that the value attribute will be taken from the member objects. (You do not create a separate variable for the “value” attribute within the FlexConfig object.)


router rip
{{#net-group.networkObjects}}
 network {{value}}
{{/net-group.networkObjects}}

The system translates the section structure as:


router rip
   network 192.168.10.0
   network 192.168.20.0
   network 192.168.30.0

How to Perform Optional Processing Based on a Boolean Value or an Empty Object

If the content of the variable in the section start tag is TRUE, or an object is not empty, the section is processed. If a Boolean value is FALSE or empty (such as an empty object), the section is bypassed.

The main use here is for Boolean values. For example, you could create a Boolean variable, and put commands within a section covered by the variable. Then, if you need to enable or disable a section of the commands in the FlexConfig object, you merely need to change the value of the Boolean variable, you do not need to delete those lines from the code. This makes it easy to turn features on or off.

For example, you might want to be able to turn off SNMP traps if you use FlexConfig to enable SNMP. You could create a Boolean variable named enable-traps, and initially set it to TRUE. Then, if you need to turn off traps, you simply edit the variable, change it to FALSE, save the object and then redeploy the configuration. The command sequence could look like the following:


snmp-server enable
snmp-server host inside 192.168.1.5
snmp-server community clearTextString 
{{#enable-traps}}
snmp-server enable traps all
{{/enable-traps}}

You can also do this type of processing based on Boolean values within an object. For example, you could check whether an interface is management-only before configuring some characteristic on it. In the following example, int-inside is an interface variable that points to the interface named inside. The FlexConfig configures the EIGRP-related interface options on the interface only if the interface is not set to management only. You would use an inverse section so that the commands are configured only if the Boolean value is FALSE.


router eigrp 2
 network 192.168.1.0 255.255.255.0
{{^int-inside.managementOnly}}
interface {{int-inside.hardwareName}}
 hello interval eigrp 2 60
 delay 200
{{/int-inside.managementOnly}}

Referring to Smart CLI Objects in a FlexConfig Object

When you create a FlexConfig object, you can use variables to point to objects that you can configure within the FDM. For example, you can create variables that point to interface elements or network objects.

However, you cannot point to Smart CLI objects in the same way.

Instead, if you create a Smart CLI object that you need to use in a FlexConfig policy, you simply type in the name of the Smart CLI object at the appropriate location.

For example, you might want to use an extended access list as the traffic class when you configure protocol inspection. Because there is a Smart CLI object for extended access lists, you need to use the Smart CLI object to create the ACL: you cannot use the access-list command in the FlexConfig object.

As an example, if you wanted to enable DCERPC inspection between networks 192.168.1.0/24 and 192.168.2.0/24 globally, you would do the following.

Procedure


Step 1

Create separate network objects for the two networks. For example, InsideNetwork and dmz-network.

Step 2

Use these objects in a Smart CLI extended access list object.


Smart CLI extended access list object.

Step 3

Create a FlexConfig object that points to the Smart CLI object by name.

For example, if the object is named “dcerpc_class,” your FlexConfig object might look like the following. Note that in the negate template, you do not negate the access list created through the Smart CLI object, as that object is not actually created through FlexConfig.


FlexConfig object that points to a Smart CLI object.

Step 4

Add the object to the FlexConfig policy.


Configuring Secret Key Objects

The point of a secret key object is to obscure passwords or sensitive strings. If you do not want to risk someone seeing a string used in a FlexConfig object or Smart CLI template, create a secret key object for the string.

Procedure


Step 1

Select Objects, then select Secret Keys from the table of contents.

Step 2

Do one of the following:

  • To create an object, click the + button.

  • To edit an object, click the edit icon (edit icon) for the object.

To delete an unreferenced object, click the trash can icon (delete icon) for the object.

Step 3

Enter a Name for the object and optionally, a description.

Step 4

Enter the password or other secret string in both the Password and Confirm Password fields.

The system obscures the text as you type.

Step 5

Click OK.


What to do next

  • If this is a new object, to use it in FlexConfig, edit a FlexConfig object, create a variable of the secret key type, and select the object. Then, refer to the variable within the object body. For more information, see Creating Variables in a FlexConfig Object.

  • If you are editing an existing object that is used in a FlexConfig object that is part of the FlexConfig policy, you need to deploy the configuration to update the device with the new string.

  • In Smart CLI templates, if a command requires a secret key, you will see a list of these objects when editing the relevant property. Select the right key for the purpose.

Troubleshooting the FlexConfig Policy

After editing the FlexConfig policy, carefully examine the results of the next deployment. If you get a “Last Deployment Failed” message in the Pending Changes dialog box, click the See Details link. The link takes you to the audit log, where you can find the failed deployment job. Open the job to find the specific error messages.

If the deployment fails because of a FlexConfig problem, the details will mention the FlexConfig object with the bad command, and show the command that failed. Use this information to correct the object and try deployment again. The object name is a link, click it to open the edit dialog for the object.

For example, you might want to configure the maximum TCP segment size (TCP MSS). You can control this setting with the sysopt connection tcpmss command. When configured by FDM, the FTD default for this option is 0, compared to the ASA default of 1380.

The ASA default is designed for optimal processing when running an IPv4 VPN on interfaces that use the default MTU of 1500. The system needs 120 bytes for the VPN headers. For IPv6, the system needs 140 bytes. The FTD default of 0 simply allows the endpoints to negotiate the MSS, which is the ideal setting for normal traffic, especially if you use different MTUs across the interfaces on the device, including MTUs over 1500. Because TCP MSS is a global setting and not per-interface, you would change it only if a significant percentage of your traffic is over VPN and you are getting excessive fragmentation. In that case, you might set TCP MSS to MTU minus 120 (for IPv4) or 140 (for IPv6), and use the same MTU for all interfaces.

For purposes of illustration, suppose you want to set TCP MSS to 3 bytes. The command takes 48 bytes as the minimum value, so you will get a deployment error similar to the following:


Sample error message for FlexConfig deployment failure.

The error is composed of these elements:

  1. The deployment error message, which includes the name of the FlexConfig object that caused the error. The object name is linked to the edit dialog box so you can quickly open the object and correct the error. This is the first sentence of the message.

  2. The text starting with “ERROR:” is the message returned from the device. This is exactly how an ASA would respond if you typed in the errant command, without the formatting of an SSH client. In this example, the error message is “ERROR: [3] is smaller than the minimum allowed MSS of 48 by RFC 791.” The text that starts with "Config Error" mentions the specific line that generated the error message.

  3. The text in black is the actual line from the FlexConfig object that caused the error. You must fix this line. In this example, if you are trying to accommodate IPv4 VPN traffic on MTU 1500 interfaces (the common situation), you would change 3 to 1380.

    In fixing this example, you can keep the CLI Console open and use show running-config all sysopt to see all of the sysopt command settings. Most of the sysopt commands have default settings appropriate for most uses, so they do not appear in the running configuration. The all keyword includes these default settings in the output.

Examples for FlexConfig

The following topics provide some examples for using FlexConfig to configure features.

How to Enable and Disable Global Default Inspections

Some protocols embed IP addressing information in the user data packet or open secondary channels on dynamically assigned ports. These protocols require the system to do a deep packet inspection so that NAT can be applied and secondary channels can be allowed. Several common inspection engines are enabled on the system by default, but you might need to enable others, or disable default inspections, depending on your network.

To see the list of currently enabled inspections, use the show running-config policy-map command, either in CLI Console or an SSH session. Following is what you would see on a system where no changes have been made to the inspection configuration. In this output, the list of inspect commands at the end of the output shows which protocol inspections are enabled. The preceding commands enable these inspections on the inspection_default traffic class (which is the normal protocols and, if applicable, port numbers, for the inspected protocol). This class is part of the global_policy policy map, which applies these inspections on all interfaces using a service-policy command that is not shown in the output. For example, ICMP inspection is done on all ICMP traffic that passes through the device.


> show running-config policy-map 
!
policy-map type inspect dns preset_dns_map
 parameters
  message-length maximum client auto
  message-length maximum 512
  no tcp-inspection
policy-map global_policy
 class inspection_default
  inspect dns preset_dns_map 
  inspect ftp 
  inspect h323 h225 
  inspect h323 ras 
  inspect rsh 
  inspect rtsp 
  inspect sqlnet 
  inspect skinny  
  inspect sunrpc 
  inspect xdmcp 
  inspect sip  
  inspect netbios 
  inspect tftp 
  inspect ip-options 
  inspect icmp 
  inspect icmp error 
!


Note

For a detailed discussion of each inspection, see the Cisco ASA Series Firewall Configuration Guide available from https://www.cisco.com/c/en/us/support/security/asa-firepower-services/products-installation-and-configuration-guides-list.html.


The following procedure shows you how to enable, or disable, inspections in this globally-applied default inspection class. For purposes of illustration, the example:

  • Enables PPTP (Point-to-Point Tunneling Protocol). This protocol is used for tunneling a point-to-point connection between to endpoints.

  • Disables SIP (Session Initiation Protocol). You would typically disable SIP only if the inspection is causing problems in the network. However, if you disable SIP, you must ensure that your access control policies allow the SIP traffic (UDP/TCP 5060) and any dynamically allocated ports, and that you do not need NAT support for SIP connections. Adjust the access control and NAT policies accordingly through the standard pages, not through FlexConfig.

Before you begin

Good planning will help you use FlexConfig efficiently. In this example, we are changing two different and unrelated inspections, although we are making the changes in the same traffic class. But it is highly likely that if you need to alter these policies, you will do so independently.

Therefore, we recommend creating separate FlexConfig objects for each inspection in this example. That way, you can easily change your setting for one inspection without changing the other, and without needing to edit the FlexConfig object.

Procedure


Step 1

Click View Configuration in Device > Advanced Configuration.

Step 2

Click FlexConfig > FlexConfig Objects in the Advanced Configuration table of contents.

Step 3

Create the object to enable PPTP inspection.

  1. Click the + button to create a new object.

  2. Enter a name for the object. For example, Enable_PPTP_Global_Inspection.

  3. In the Template editor, enter the following lines, including indentations.

    
    policy-map global_policy
     class inspection_default
      inspect pptp
    
    
  4. In the Negate Template editor, enter the lines required to undo this configuration.

    Just as you need to include the parent commands to enter the correct sub-mode for a command to enable it, you also need to include those commands in the negate template.

    The negate template will be applied if you remove this object from the FlexConfig policy (after having deployed it successfully), and also during an unsuccessful deployment (to reset the configuration to its previous condition).

    Thus, for this example, the negate template would be the following:

    
    policy-map global_policy
     class inspection_default
      no inspect pptp


    The object should look like the following:


    FlexConfig object for enabling PPTP inspection globally.

    Note 

    Because the inspection_default class has other inspection commands enabled, you do not want to negate the entire class. Similarly, the global_policy policy map includes these other inspections, and you do not want to negate the policy map either.

  5. Click OK to save the object.

Step 4

Create the object to disable SIP inspection.

  1. Click the + button to create a new object.

  2. Enter a name for the object. For example, Disable_SIP_Global_Inspection.

  3. In the Template editor, enter the following lines, including indentations.

    
    policy-map global_policy
     class inspection_default
      no inspect sip
    
    
  4. In the Negate Template editor, enter the lines required to undo this configuration.

    The “negate” command for a disabling “no” command is the command that enables the feature. Thus, the “negate” template is not just the commands to disable a feature, it is the commands to reverse whatever you do in the “positive” template. The point of the negate template is to undo your changes.

    Thus, for this example, the negate template would be the following:

    
    policy-map global_policy
     class inspection_default
      inspect sip


    The object should look like the following:


    FlexConfig object for disabling SIP inspection globally.

  5. Click OK to save the object.

Step 5

Add the objects to the FlexConfig policy.

Creating an object isn’t enough. Objects are deployed only if you add them to the FlexConfig policy (and save your changes). This allows you to experiment with objects (and leave them partially complete) without risking deployment failures on unfinished work. You can then easily turn features on or off simply by adding and removing objects: there is no need to recreate the object each time.

  1. Click FlexConfig Policy in the table of contents.

  2. Click + in the Group List.

  3. Select the Enable_PPTP_Global_Inspection and Disable_SIP_Global_Inspection objects and click OK.

    The group list should look like the following:


    FlexConfig policy object list for global inspection.

    The preview should update with the commands in the template. Verify you are seeing the expected commands.


    FlexConfig preview for global inspection changes.

  4. Click Save.

    You can now deploy the policy.

Step 6

Commit your changes.

  1. Click the Deploy Changes icon in the upper right of the web page.

    Deploy changes button, highlighted when there are changes to deploy.

  2. Click the Deploy Now button.

    You can wait until deployment completes, or click OK and check the task list or deployment history later.

Step 7

In CLI Console or an SSH session, use the show running-config policy-map command and verify that the running configuration has the correct changes.

In the following output, note that inspect pptp is added to the bottom of the inspection_default class, and that inspect sip is no longer in the class. This confirms that the changes defined in the FlexConfig object were successfully deployed.


> show running-config policy-map 
!
policy-map type inspect dns preset_dns_map
 parameters
  message-length maximum client auto
  message-length maximum 512
  no tcp-inspection
policy-map global_policy
 class inspection_default
  inspect dns preset_dns_map 
  inspect ftp 
  inspect h323 h225 
  inspect h323 ras 
  inspect rsh 
  inspect rtsp 
  inspect sqlnet 
  inspect skinny  
  inspect sunrpc 
  inspect xdmcp 
  inspect netbios 
  inspect tftp 
  inspect ip-options 
  inspect icmp 
  inspect icmp error 
  inspect pptp 
!


How to Undo Your FlexConfig Changes

If you enter a correct negate template in a FlexConfig object, removing the changes made using that object is trivial. You simply delete the object from the FlexConfig policy, and upon the next deployment, the system uses your negate template to undo your changes.

You do not need to create a new object to undo your changes.

The following example shows how to re-enable global SIP inspection. The example reverts the change explained in How to Enable and Disable Global Default Inspections, which disabled SIP inspection.

Before you begin

Verify that the FlexConfig object has the correct negate template. If it does not, edit the object to correct the negate template.

Procedure


Step 1

Click View Configuration in Device > Advanced Configuration.

Step 2

Click FlexConfig > FlexConfig Policy in the Advanced Configuration table of contents.

Step 3

Click the X on the right side of the Disable_SIP_Global_Inspection object’s entry in the FlexConfig policy to delete it from the policy.


Removing an object from the FlexConfig policy.

The commands from the object are removed from the preview. The negate commands are not added to the preview, these will be executed behind the scenes.

Step 4

Click Save.

Step 5

Commit your changes.

  1. Click the Deploy Changes icon in the upper right of the web page.

    Deploy changes button, highlighted when there are changes to deploy.

  2. Click the Deploy Now button.

    You can wait until deployment completes, or click OK and check the task list or deployment history later.

Step 6

In CLI Console or an SSH session, use the show running-config policy-map command and verify that the running configuration has the correct changes.

In the following output, note that inspect sip is added to the bottom of the inspection_default class. This confirms that the changes defined in the FlexConfig object were successfully deployed. (Order is not important in this class, so it does not matter that inspect sip is at the end and not in its original location.)


> show running-config policy-map 
!
policy-map type inspect dns preset_dns_map
 parameters
  message-length maximum client auto
  message-length maximum 512
  no tcp-inspection
policy-map global_policy
 class inspection_default
  inspect dns preset_dns_map 
  inspect ftp 
  inspect h323 h225 
  inspect h323 ras 
  inspect rsh 
  inspect rtsp 
  inspect sqlnet 
  inspect skinny  
  inspect sunrpc 
  inspect xdmcp 
  inspect netbios 
  inspect tftp 
  inspect ip-options 
  inspect icmp 
  inspect icmp error 
  inspect pptp 
  inspect sip  
!


How to Enable Inspections for Unique Traffic Classes

In this example, we will enable PPTP inspection for traffic between two endpoints on a specific interface. This targets the inspection to just those endpoints that have a point-to-point tunnel configured between them.

The CLI required to enable PPTP inspection between 2 endpoints involves the following:

  1. An ACL with the source and destination set to the IP addresses of the endpoint hosts.

  2. A traffic class that refers to this ACL.

  3. A policy map that includes the traffic class, and that enables PPTP inspection on the traffic class.

  4. A service policy that applies the policy map to the desired interface. This is the step that actually activates the policy and enables the inspection.


Note

For a detailed discussion of service policies related to inspections, see the Cisco ASA Series Firewall Configuration Guide available from https://www.cisco.com/c/en/us/support/security/asa-firepower-services/products-installation-and-configuration-guides-list.html.


Procedure


Step 1

Click View Configuration in Device > Advanced Configuration.

Step 2

Click FlexConfig > FlexConfig Objects in the Advanced Configuration table of contents.

Step 3

Click the + button to create a new object.

Step 4

Enter a name for the object. For example, Enable_PPTP_Inspection_on_Interface.

Step 5

Add a variable for the inside interface.

  1. Click + above the Variables list.

  2. Enter a name for the variable, for example, pptp-if.

  3. For Type, select Interface.

  4. For Value, select the inside interface.

    The dialog box should look like the following:


    Adding an Interface variable to a FlexConfig object.

  5. Click Add.

Step 6

In the Template editor, enter the following lines, including indentations.


access-list MATCH_ACL permit ip host 192.168.1.55 host 198.51.100.1 
class-map MATCH_CMAP
 match access-list MATCH_ACL
policy-map PPTP_POLICY
 class MATCH_CMAP
  inspect pptp
service-policy PPTP_POLICY interface {{pptp-if.name}}

Note that to use the variable, you type the variable name between double braces. You also need to use dot notation to pick out the attribute you want to retrieve, because the object that defines an interface has many attributes. Because the interface name is held in the “name” attribute, entering {{pptp-if.name}} retrieves the value of the name attribute for the interface assigned to the variable. If you need to change the interface for PPTP inspection, you simply need to select a different interface in the variable definition.

Step 7

In the Negate Template editor, enter the lines required to undo this configuration.

For this example, we will assume that the class map, policy map, and service policy exist for the sole purpose of applying PPTP inspection. Thus, in the negate template, we want to remove all of these.

If, however, you are actually adding PPTP inspection to an existing service policy on an interface, you would not negate the policy map or service policy. You would either negate the class from the policy map, or simply turn off inspection within the class within the policy map. You need to have a clear understanding of what you are implementing in other FlexConfig objects to ensure that your negate template does not have unintended consequences.

When deleting nested items, you need to do it in the reverse order in which you created them. Thus, you start by deleting the service policy, and end by deleting the access list. Otherwise, you would be trying to delete objects that are in use, and the system will return errors and not let you do that.


no service-policy PPTP_POLICY interface {{pptp-if.name}}
no policy-map PPTP_POLICY
no class-map MATCH_CMAP
no access-list MATCH_ACL permit ip host 192.168.1.55 host 198.51.100.1 

The object should look like the following:


FlexConfig object to enable PPTP inspection on an interface.

Step 8

Click OK to save the object.

Step 9

Add the objects to the FlexConfig policy.

  1. Click FlexConfig Policy in the table of contents.

  2. Click + in the Group List.

  3. Select the Enable_PPTP_Inspection_on_Interface object and click OK.

    The group list should look like the following:


    FlexConfig policy with the interface inspection object.

    The preview should update with the commands in the template. Verify you are seeing the expected commands, as shown in the following graphic. Notice that the interface variable resolves to the name “inside” in the preview. Pay special attention to variables: if they do not resolve correctly in the preview, they will not deploy correctly. Edit the FlexConfig object until you get the correct variable translation in the preview.


    FlexConfig policy preview for interface inspection.

  4. Click Save.

    You can now deploy the policy.

Step 10

Commit your changes.

  1. Click the Deploy Changes icon in the upper right of the web page.

    Deploy changes button, highlighted when there are changes to deploy.

  2. Click the Deploy Now button.

    You can wait until deployment completes, or click OK and check the task list or deployment history later.

Step 11

In CLI Console or an SSH session, use variations of the show running-config command and verify that the running configuration has the correct changes.

You can enter show running-config and examine the entire CLI configuration, or you can use the following commands to verify each part of this configuration:

  • show running-config access-list MATCH_ACL to verify the ACL.

  • show running-config class to verify the class map. This command will show all of the class maps.

  • show running-config policy-map PPTP_POLICY to verify the class and policy map configuration.

  • show running-config service-policy to verify that the policy map was applied to the interface. This will show all service policies.

The following output shows this sequence of commands, and you can see that configuration is correctly applied.


> show running-config access-list MATCH_ACL 
access-list MATCH_ACL extended permit ip host 192.168.1.55 host 198.51.100.1 

> show running-config class 
!
class-map MATCH_CMAP
 match access-list MATCH_ACL
class-map inspection_default
 match default-inspection-traffic
!

> show running-config policy-map PPTP_POLICY 
!
policy-map PPTP_POLICY
 class MATCH_CMAP
  inspect pptp 
!
> show running-config service-policy 
service-policy global_policy global
service-policy PPTP_POLICY interface inside


How to Configure Precision Time Protocol (ISA 3000)

The Precision Time Protocol (PTP) is a time-synchronization protocol developed to synchronize the clocks of various devices in a packet-based network. These device clocks are generally of varying precision and stability. The protocol is designed specifically for industrial, networked measurement and control systems, and is optimal for use in distributed systems because it requires minimal bandwidth and little processing overhead.

A PTP system is a distributed, networked system consisting of a combination of PTP and non-PTP devices. PTP devices include ordinary clocks, boundary clocks and transparent clocks. Non-PTP devices include network switches, routers and other infrastructure devices.

You can configure the FTD device to be a transparent clock. The FTD device does not synchronize its clock with the PTP clocks. The FTD device will use the PTP default profile, as defined on the PTP clocks.

When you configure the PTP devices, you define a domain number for the devices that are meant to function together. Thus, you can configure multiple PTP domains, and then configure each non-PTP device to use the PTP clocks for one specific domain.

Before you begin

Determine the domain number configured on the PTP clocks that the device should use. This example assumes the PTP domain number is 10. Also, determine the interfaces through which the system can reach the PTP clocks in the domain.

Following are guidelines for configuring PTP:

  • This feature is only available on the Cisco ISA 3000 appliance.

  • Cisco PTP supports multicast PTP messages only.

  • PTP is available only for IPv4 networks, not for IPv6 networks.

  • PTP configuration is supported on physical Ethernet data interfaces, whether routed or bridge group members. It is not supported on the management interface, subinterfaces, EtherChannels, Bridge Virtual Interfaces (BVI), or any other virtual interfaces.

  • PTP flows on VLAN subinterfaces are supported, assuming the appropriate PTP configuration is present on the parent interface.

  • You must ensure that PTP packets are allowed to flow through the device. PTP traffic is identified by UDP destination ports 319 and 320, and destination IP address 224.0.1.129, so any access control rule that allows this traffic should work.

  • In Routed firewall mode, you must enable Multicast routing for PTP multicast groups. In addition, if an interface on which you enable PTP is not in a bridge group, you must configure the interface to join the IGMP multicast group 224.0.1.129. If the physical interface is a bridge group member, you do not configure it to join the IGMP multicast group.

Procedure


Step 1

Verify the current PTP configuration.

In a CLI session, either SSH or on the Console port, or using the FDM CLI Console, you can use the show ptp command to verify the current PTP settings. If PTP is not configured, you should see the following output. The remainder of this procedure assumes that PTP is not configured.


> show ptp clock
 No clock information is available in PTP forwarding mode.
> show ptp port
 No clock information is available in PTP forwarding mode.
Step 2

Verify the configuration of the PTP clock-facing interfaces.

The default configuration places all interfaces in the same bridge group, but you can remove interfaces from the bridge group. It is important that you determine whether the interfaces are routed, or bridge group members, because you must configure them differently with respect to multicast IGMP groups.

The following procedure explains how to determine which interfaces are part of the bridge group. Check whether the interfaces you are configuring for PTP are bridge group members.

  1. In the FDM, click View All Interfaces in Device > Interfaces.

  2. Find the interfaces in the list, and check the Mode column. BridgeGroupMember means it is part of a bridge group, otherwise it should be Routed.

Step 3

In the FDM, click View Configuration in Device > Advanced Configuration.

Step 4

Click FlexConfig > FlexConfig Objects in the Advanced Configuration table of contents.

Step 5

Create the object needed to enable PTP and to configure it on the appropriate interfaces.

  1. Click the + button to create a new object.

  2. Enter a name for the object. For example, Enable_PTP.

  3. In the Template editor, enter the required commands, including indentations.

    The following example configures PTP on GigabitEthernet1/2 for PTP domain 10. You need to adjust these settings to the ones relevant for your network. Enable PTP on the interface through which the system can connect to the PTP clock in your network. If there are other interfaces through which a backup clock is available, add the lines to enable PTP and, for routed interfaces, join the IGMP group for that interface, to this set of commands.

    In this example, GigabitEthernet1/2 is a bridge group member, so do not include the igmp command. Note that the igmp command is not supported on bridge group members, so if you include the command, you will get a deployment error, where the system says it cannot recognize the command.

    
    multicast-routing
    ptp mode e2etransparent
    ptp domain 10
    interface GigabitEthernet1/2
     ptp enable
    

    If GigabitEthernet1/2 is a routed interface, you must include the igmp command to join the 224.0.1.129 IGMP group (that is the correct IP address for all networks). The complete object would look like the following:

    
    multicast-routing
    ptp mode e2etransparent
    ptp domain 10
    interface GigabitEthernet1/2
     ptp enable
     igmp join-group 224.0.1.129
    
  4. In the Negate Template editor, enter the lines required to undo this configuration.

    Just as you need to include the parent commands to enter the correct sub-mode for a command to enable it, you also need to include those commands in the negate template.

    The negate template will be applied if you remove this object from the FlexConfig policy (after having deployed it successfully), and also during an unsuccessful deployment (to reset the configuration to its previous condition).

    Thus, for this example, the negate template would be the following:

    
    no multicast-routing
    no ptp mode e2etransparent
    no ptp domain 10
    interface GigabitEthernet1/2
     no ptp enable
    

    The negate template for a routed interface would look like the following:

    
    no multicast-routing
    no ptp mode e2etransparent
    no ptp domain 10
    interface GigabitEthernet1/2
     no ptp enable
     no igmp join-group 224.0.1.129
    

    The object should look like the following:


    FlexConfig object to enable PTP on ISA 3000 devices.

  5. Click OK to save the object.

Step 6

Add the objects to the FlexConfig policy.

  1. Click FlexConfig Policy in the table of contents.

  2. Click + in the Group List.

  3. Select the Enable_PTP object and click OK.

    The group list should look like the following:


    FlexConfig object list with the PTP object selected.

    The preview should update with the commands in the template. Verify you are seeing the expected commands.


    FlexConfig preview for PTP configuration.

  4. Click Save.

    You can now deploy the policy.

Step 7

Commit your changes.

  1. Click the Deploy Changes icon in the upper right of the web page.

    Deploy changes button, highlighted when there are changes to deploy.

  2. Click the Deploy Now button.

    You can wait until deployment completes, or click OK and check the task list or deployment history later.

Step 8

Verify the PTP configuration.

From the FDM CLI Console, or an SSH or Console session, verify the PTP settings:


> show ptp clock
 PTP CLOCK INFO
  PTP Device Type: End to End Transparent Clock
  Operation mode: One Step
  Clock Identity: 34:62:88:FF:FE:1:73:81
  Clock Domain: 10
  Number of PTP ports: 4
> show ptp port
 PTP PORT DATASET: GigabitEthernet1/1
  Port identity: Clock Identity: 34:62:88:FF:FE:1:73:81
  Port identity: Port Number: 1
  PTP version: 2
  Port state: Disabled

 PTP PORT DATASET: GigabitEthernet1/2
  Port identity: Clock Identity: 34:62:88:FF:FE:1:73:81
  Port identity: Port Number: 2
  PTP version: 2
  Port state: Enabled

 PTP PORT DATASET: GigabitEthernet1/3
  Port identity: Clock Identity: 34:62:88:FF:FE:1:73:81
  Port identity: Port Number: 3
  PTP version: 2
  Port state: Disabled

 PTP PORT DATASET: GigabitEthernet1/4
  Port identity: Clock Identity: 34:62:88:FF:FE:1:73:81
  Port identity: Port Number: 4
  PTP version: 2
  Port state: Disabled