Before You Begin
Before you start a terminal session with the router, you must connect a PC or PC terminal to the router console port.
The documentation set for this product strives to use bias-free language. For the purposes of this documentation set, bias-free is defined as language that does not imply discrimination based on age, disability, gender, racial identity, ethnic identity, sexual orientation, socioeconomic status, and intersectionality. Exceptions may be present in the documentation due to language that is hardcoded in the user interfaces of the product software, language used based on RFP documentation, or language that is used by a referenced third-party product. Learn more about how Cisco is using Inclusive Language.
This chapter describes how to start a terminal session with the IR8140H using the console port. The console port is found in the CPU module.
Start a terminal session with the router when you are at the router installation location and want to administer the router with a direct connection using the CLI software.
These topics are discussed:
Before you start a terminal session with the router, you must connect a PC or PC terminal to the router console port.
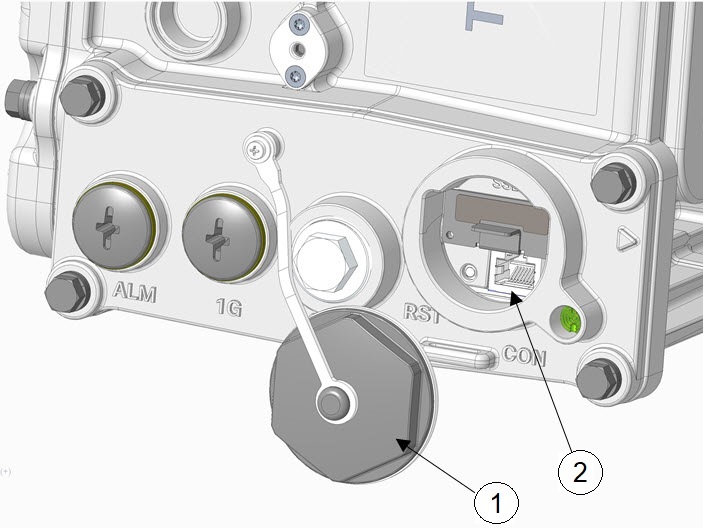
The console port is found in the CPU module, as shown in the following figure.

|
1 |
M42 plug |
2 |
Console port |
To access the console port, open the M42 plug.
The console port is an asynchronous serial port that allows you to connect to the device for initial configuration through a standard RS-232 port with an RJ-45 connector. Any device connected to this port must be capable of asynchronous transmission.
 Caution |
The console port does not support cable glands. When a cable is connected to this port, the router's interior is exposed to environmental elements, which can damage the port and the router's interior. This port should be exposed only during terminal sessions, when a cable is connected to the port. This port should never be left unattended when in use. |
The console port is an asynchronous serial port that allows you to connect to the device for initial configuration through a standard RS-232 port with an RJ-45 connector. Any device connected to this port must be capable of asynchronous transmission.
Configure the following parameters for the console port:
|
Parameter |
Console Port Setting |
Description |
|---|---|---|
|
Baud |
9600 |
Specifies the transmission speed for the connection. |
|
Data bits |
8 |
Specifies the number of bits in an 8-bit byte that is used for data. |
|
Parity |
None |
Specifies the odd or even parity for error detection. |
|
Stop bits |
1 |
Specifies the number of stop bits for an asynchronous line. |
The router console port is located in the router's exterior and can be accessed by removing the seal over the console port (see CPU Module with Console Port).
On many Cisco routers, you can enter Ctrl-C to interrupt the router startup process and then delete or change the admin password, or view or delete the router configuration.
To prevent unauthorized access to the router configurations and passwords, the Ctrl-C command is disabled on the router while it is booting up and loading the system software.
To connect to the router console port using Microsoft Windows:
|
Step 1 |
Start a terminal emulator application, such as Windows HyperTerminal (included with some versions of the Windows operating system) or PuTTY. |
|
Step 2 |
Configure the terminal emulation software with the parameters described in About the Console Port. |
|
Step 3 |
Connect to the router. |
To connect a Mac OS X system USB port to the console using the built-in OS X Terminal utility:
|
Step 1 |
Use the Finder application, and go to Applications > Utilities > Terminal . |
|
Step 2 |
Connect the OS X USB port to the router. |
|
Step 3 |
Enter the following commands to find the OS X USB port number: |
|
Step 4 |
Connect to the USB port with the following command, followed by the router USB port speed: To disconnect the OS X USB console from the Terminal window, press Ctrl+A followed by Ctrl+\ . |
To connect a Linux system USB port to the console using the built-in Linux Terminal utility:
|
Step 1 |
Open the Linux Terminal window. |
|
Step 2 |
Connect the Linux USB port to the router. |
|
Step 3 |
Enter the following commands to find the Linux USB port number: |
|
Step 4 |
Connect to the USB port with the following command followed by the router USB port speed: To disconnect the Linux USB console from the Terminal window, press Ctrl+A followed by : , and then enter quit . |