QoS Preservation Across IPN

QoS and Global DSCP Policy

Cisco ACI Quality of Service (QoS) feature allows you to classify the network traffic in your fabric and then to prioritize and police the traffic flow to help avoid congestion in your network. When traffic is classified within the fabric, it is assigned a QoS Priority Level, which is then used throughout the fabric to provide the most desirable flow of packets through the network.

This release of Nexus Dashboard Orchestrator supports configuration of QoS level based on source EPG or a specific Contract. Additional options are available in each fabric directly. You can find detailed information on ACI QoS in Cisco APIC and QoS.

When traffic is sent and received within the Cisco ACI fabric, the QoS Level is determined based on the CoS value of the VXLAN packet's outer header. In certain use cases, such as multi-pod or remote leaf topologies, the traffic must transit an intersite network, where devices that are not under Cisco APIC's management may modify the CoS values in the packets. In these cases you can preserve the ACI QoS Level between parts of the same fabric or different fabrics by creating a mapping between the Cisco ACI QoS level and the DSCP value within the packet.

DSCP Policy Guidelines and Limitations

When configuring the global DSCP translation policy, the following guidelines apply.


Note


If you plan to use the global DSCP translation policy along with SD-WAN integration, skip this chapter and see the SD-WAN Integration chapter instead for all information including the full list of guidelines and limitations.


  • Global DSCP policy is supported for on-premises sites only.

  • When defining the global DSCP policy, you must pick a unique value for each QoS Level.

  • When assigning QoS level, you can choose to assign it to a specific Contract or an entire EPG.

    If multiple QoS levels could apply for any given traffic, only one is applied using the following precedence:

    • Contract QoS level: If QoS is enabled in the Contract, the QoS level specified in the contract is used.

    • Source EPG QoS level: If QoS level is not specified for the Contract, the QoS level set for the source EPG is used.

    • Default QoS level: If no QoS level is specified, the traffic is assigned Level 3 QoS class by default.

Configuring Global DSCP Policy

When traffic is sent and received within a Cisco ACI fabric, it is prioritized based on the ACI QoS Level, which is determined based on the CoS value of the VXLAN packet's outer header. When traffic exits the ACI fabric towards an intersite network, for example in multi-pod and remote leaf topologies, the QoS level is translated into a DSCP value which is included in the outer header of the VXLAN-encapsulated packet.

This section describes how to define the DSCP translation policy for traffic entering or exiting ACI fabric. This is required when traffic must transit through non-ACI networks, where devices that are not under Cisco APIC's management may modify the CoS values in the transiting packets.

Before you begin

  • You should be familiar with Quality of Service (QoS) functionality within ACI fabrics.

    QoS is described in more detail in Cisco APIC and QoS.

Procedure


Step 1

Log in to your Nexus Dashboard and open the Nexus Dashboard Orchestrator service.

Step 2

Create a new Tenant Policy.

  1. From the left navigation pane, choose Application Management > Tenant Policies.

  2. On the Tenant Policy Templates page, click Add Tenant Policy Template.

  3. In the Tenant Policies page's right properties sidebar, provide the Name for the template.

  4. From the Select a Tenant dropdown, choose the tenant with which you want to associate this template.

    All the policies you create int his template as described in the following steps will be associated with the selected tenant and deployed to it when you push the template to a specific site.

By default, the new template is empty, so you need to add one or more tenant policies as described in the following steps. Note that you don't have to create every policy available in the template – you can define one or more policies of each type to deploy along with this template. If you don't want to create a specific policy, simply skip the step that describes it.

Step 3

Create a QoS DSCP policy.

  1. From the +Create Object dropdown, select QoS DSCP.

  2. In the right properties sidebar, provide the Name for the policy.

  3. (Optional) Click Add Description and provide a description for the policy.

  4. Provide policy details.

    • Admin State – Enables or disables the policy.

    • Advanced Settings – Click the arrow next to this section to expand.

      Choose the DSCP value for each ACI QoS level. Each dropdown contains the default list of available DSCP values. You must choose a unique DSCP value for each level.

  5. Repeat this step to create any additional QoS DSCP policies.

    Typically, we recommend applying this policy consistently across all sites that are part of your Multi-Site domain.

Step 4

Assign the policy to one or more sites.

  1. In the Fabric Policies template view, select Actions > Sites Association.

  2. In the Associate Sites to <tempalte> dialog, select one or more sites for this policy template and click Ok.

  3. In the Fabric Policies template view, click Deploy.

    After you save and deploy, the DSCP policy settings will be pushed to each site. You can verify the configuration by logging in to the site's APIC and navigating to Tenants > infra > Policies > Protocol > DSCP class-CoS translation policy for L3 traffic.


What to do next

After you have defined the global DSCP policy, you can assign the ACI QoS Levels to EPGs or Contracts as described in Set QoS Level for EPGs and Contracts.

Set QoS Level for EPGs and Contracts

This section describes how to choose an ACI QoS level for traffic in your fabrics. You can choose to specify QoS for individual Contracts or entire EPGs.

Before you begin

Procedure


Step 1

Log in to your Cisco Nexus Dashboard Orchestrator GUI.

Step 2

Choose the Schema you want to edit.

  1. Navigate to Application Management > Schemas > .

  2. Click the name of the schema you want to edit or Add Schema to create a new one.

The Edit Policy window will open.

Step 3

Pick a QoS Level for an EPG

  1. In the main pane, scroll down to the EPG area and select an EPG or click Add EPG to create a new one.

  2. In the right sidebar, scroll down to the QoS Level dropdown and choose the QoS Level you want to assign to the EPG.

Step 4

Pick a QoS Level for an EPG

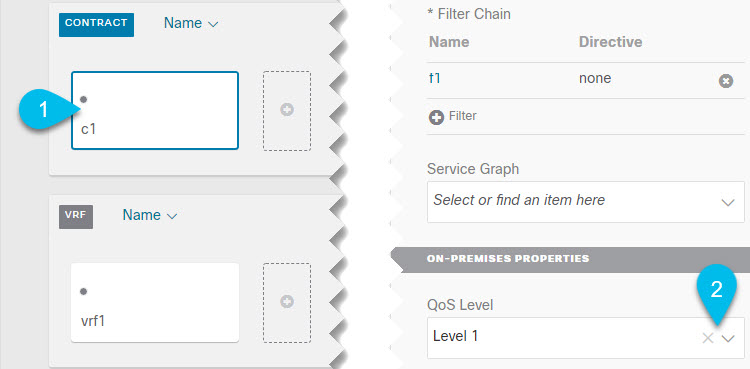
  1. In the main pane, scroll down to the Contract area and select a Contract or click the + icon to create a new one.

  2. In the right sidebar, scroll down to the QoS Level dropdown and choose the QoS Level you want to assign to the Contract.