Operations
Firmware Management (Cluster Upgrades)
This section describes how to manage different firmware versions and perform cluster upgrades.
The upgrade process involves uploading a new image and then deploying it. As such, the same workflow can be used for cluster firmware downgrades as well.

Note ![]() This release of Nexus Dashboard does not support downgrades. If you want to downgrade to an earlier release, you will need to deploy a new cluster and reinstall the applications.
This release of Nexus Dashboard does not support downgrades. If you want to downgrade to an earlier release, you will need to deploy a new cluster and reinstall the applications.
Prerequisites and Guidelines
Before you upgrade your existing Nexus Dashboard cluster:
-
Ensure that you have read the target release’s Release Notes for any changes in behavior, guidelines, and issues that may affect your upgrade.
-
The upgrade process is the same for all Nexus Dashboard form factors.
Regardless of whether you deployed your cluster using physical servers, VMware ESX OVA, or in Azure or AWS cloud, you will use the target release’s ISO image to upgrade.
-
Ensure that your current Nexus Dashboard cluster is healthy.
You can check the system status on the System Overview page of the Nexus Dashboard GUI or by logging in to one of the nodes as
rescue-userand executing theacs healthcommand. -
Ensure you backup the existing configuration, as described in Creating Configuration Backups.
-
You must not make any configuration changes to the cluster, such as adding worker or standby nodes, while the upgrade is in progress.
-
This release of Nexus Dashboard does not support downgrades.
If you want to downgrade to an earlier release, you will need to deploy a new cluster and reinstall the applications.
Adding Images
Before you can upgrade your Nexus Dashboard cluster, you need to make the upgrade image available by adding it using the GUI.
-
Download the Nexus Dashboard image.
-
Browse to the Software Download page.
https://software.cisco.com/download/home/286327743/type/286328258
-
Choose the Nexus Dashboard version you want to download.
-
Download the Cisco Nexus Dashboard image (
nd-dk9.<version>.iso).
Note
 You must download the
 .isoimage for all upgrades, even if you used the VMware ESX.ova, Linux KVM.qcow2, or a cloud provider’s marketplace for initial cluster deployment.
-
(Optional) Host the image on a web server in your environment.
When you upload the image to your Nexus Dashboard cluster, you will have an option to provide a direct URL to the image.
-
-
Navigate to your Nexus Dashboard’s Admin Console.
-
Add an image.

-
From the main navigation menu, select Operations > Firmware Management.
-
In the main pane, select the Images tab.
The page will list any previously added images.
-
In top right of the main pane, click the Actions menu and select Add Image.
-
-
In the Add Firmware Image window that opens, choose whether your image is stored on a remote server or local system.
-
If specifying a remote image, provide the full URL to the image.
-
If uploading a local image, click Choose File and select the image file from your local system.
Note
If uploading from a local machine, slow upload speeds may cause the session to timeout which can interrupt the transfer. We recommend at least 40Mbps upload speed and increasing the session timeout to 1800 seconds (from the default 1200). You can change session timeout in the Administrative > Security page in your Nexus Dashboard GUI.
-
-
Click Upload to upload the image.
The Images tab will show the image upload progress, wait for it to finish before proceeding to the next section.
Upgrading the Cluster
You must have the upgrade image already added to the Nexus Dashboard cluster as described in Adding Images.
To upgrade your cluster:
-
Navigate to your Nexus Dashboard’s Admin Console.
-
Initiate an update.
-
From the main navigation menu, select Operations > Firmware Management.
-
In the main pane, select the Updates tab.
-
Click Set up Update or Modify Details.
If this is the first time you are upgrading your cluster, simply click the Setup Update button in the middle of the page.
If you have previously upgraded the cluster, the last upgrade’s details will be displayed in this page instead of the Setup Update button. In this case, click the Modify Details button at the top right of the screen.
-
-
In the Setup/Version Selection screen, select the target version and click Next to proceed.
If you uploaded multiple images to your Nexus Dashboard, they will be listed here.
-
In the Setup/Confirmation screen, review the details of the update and click Begin Install to proceed.
The screen will proceed to the Install tab and you will be able to see the progress of each node.
The process can take up to 20 minutes and you can navigate away from this screen in the meantime.
-
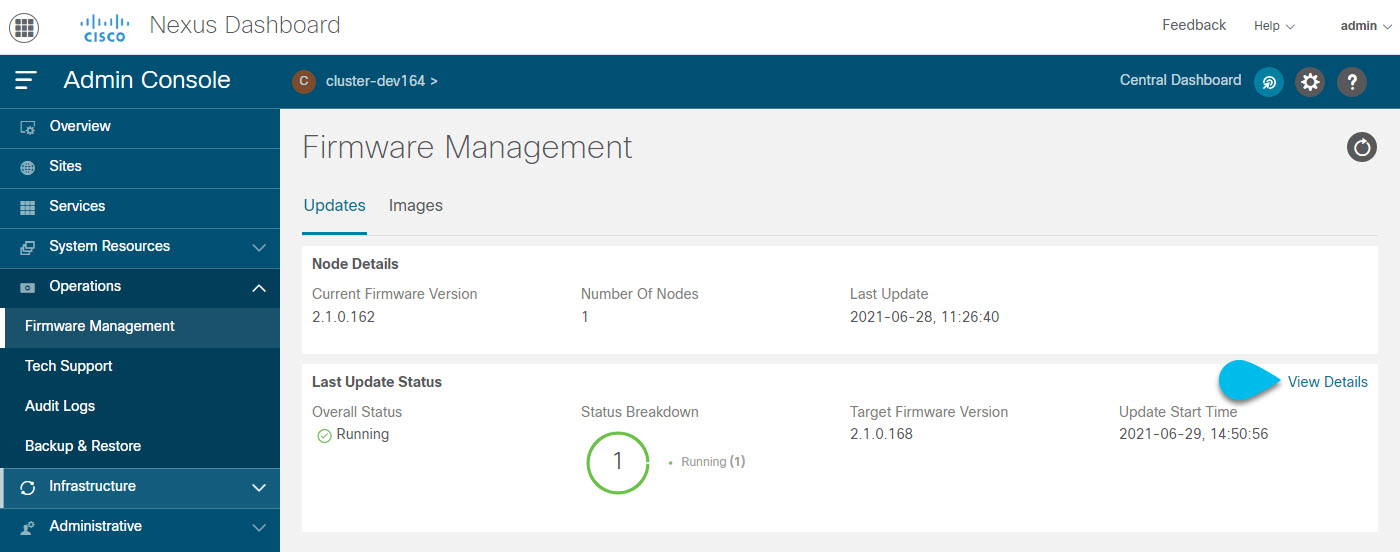
Wait for the image installation to complete.
You can check the installation status by navigating back to Operations > Firmware Management screen and clicking View Details link in the Last Status tile.
-
Click Activate.
If you navigated away from the installation screen, navigate back to Operations > Firmware Management screen and click View Details link in the Last Status tile.
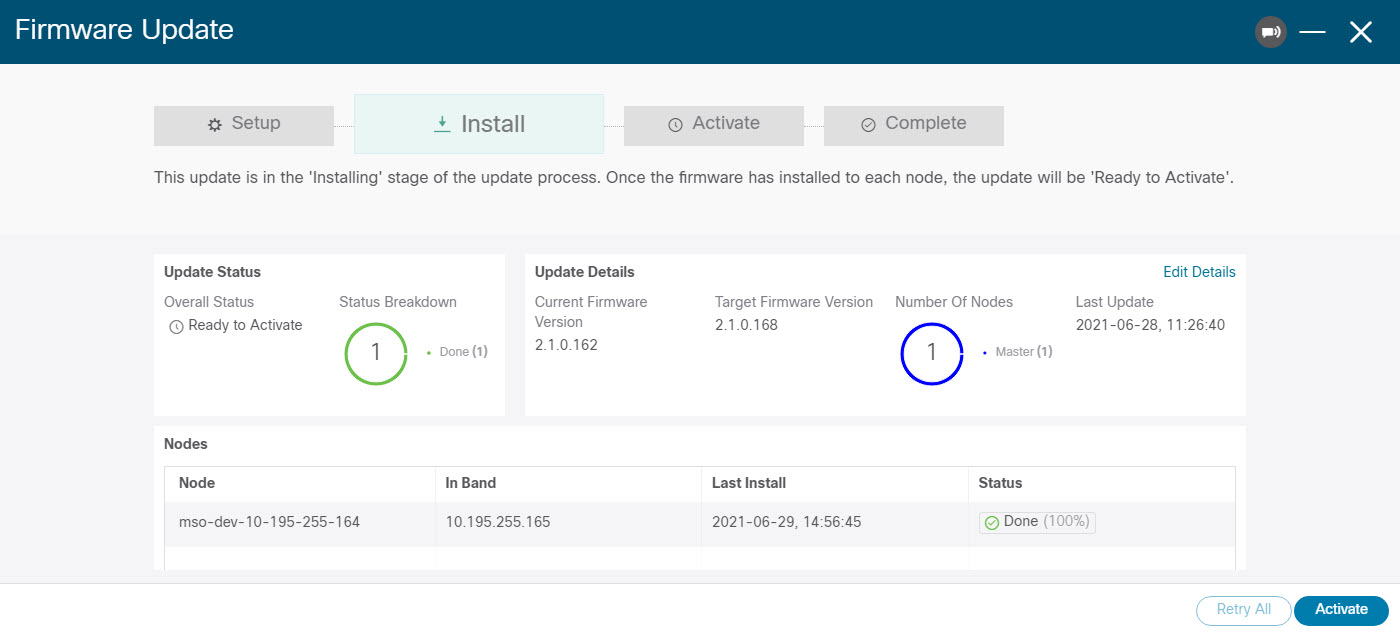
It may take up to 20 additional minute for all the cluster services to start and the GUI may become unavailable during this process. The page will automatically reload when the process is completed. You can track the activation process in the Activate screen as shown below.
Deleting Images
Nexus Dashboard will retain any firmware images that you upload to it. If at any time you want to remove any of the images (for example, from older upgrades), you can use the following steps:
-
Navigate to your Nexus Dashboard’s Admin Console.
-
From the main navigation menu, select Operations > Firmware Management.
-
In the main pane, select the Images tab.
-
Click the Actions (
…) menu next to the image you want to delete and select Delete Image. -
In top right of the main pane, click the Actions menu and select Delete Image.
-
In the Confirm Delete prompt, click OK to confirm.
Tech Support
Tech support enables you to collect logs and activities in the system for further troubleshooting by Cisco TAC. Cisco Nexus Dashboard provides best-effort tech support collection and gives ability to download tech support for individual nodes, the whole cluster, or applications. Tech support files are hosted on the Cisco Nexus Dashboard and can be downloaded at any time.
To collect Tech Support information:
-
Navigate to your Nexus Dashboard’s Admin Console.
-
Collect Tech Support.

-
From the main navigation menu, select Operations > Tech Support.
-
In top right of the main pane, click the Actions menu and select Collect Tech Support.
-
-
In the Collect Tech Support window that opens, provide a description.
-
From the Scope dropdown, select the category for which you want to collect tech support information.
-
Systemcollects Infra tech support information. -
App Storecollects App Store tech support information. -
Service-specific selections collects tech support information for that specific service.
-
-
Click Collect.
After you begin Tech Support collection, you can see the progress in the same screen.
If for any reason the tech support collection process fails, you can also obtain the same information by logging into each node as the
rescue-userand running one of theacs techsupport collectcommands. For more information about specifictechsupport collectcommand options, see Useful Commands. -
Download the Tech Support archive.
After the collection is finished, you can download the archive by clicking Download next it:
If you want to delete an existing Tech Support package, simply select it in the Tech Support screen and choose Delete Tech Support from the Actions menu.
Audit Logs
Nexus Dashboard audit logging is automatically enabled when you first deploy the cluster and captures the operational changes made by the users in the environment.
You can view the audit logs directly in the GUI by selecting Operations > Audit Logs from the main navigation menu.
Note that the logs are not sorted by default; you can sort the list by clicking on any of the column headings.
You can choose to filter the list using the Filter by attributes field and providing a specific attribute and value pair.

Additionally, to view detailed information about a specific entry, simply click the entry in the list to open the Details tab.
Back up and Restore
This section describes how to back up or restore Nexus Dashboard cluster configuration.
Creating Configuration Backups
-
Navigate to your Nexus Dashboard’s Admin Console.
-
Start a back up.
-
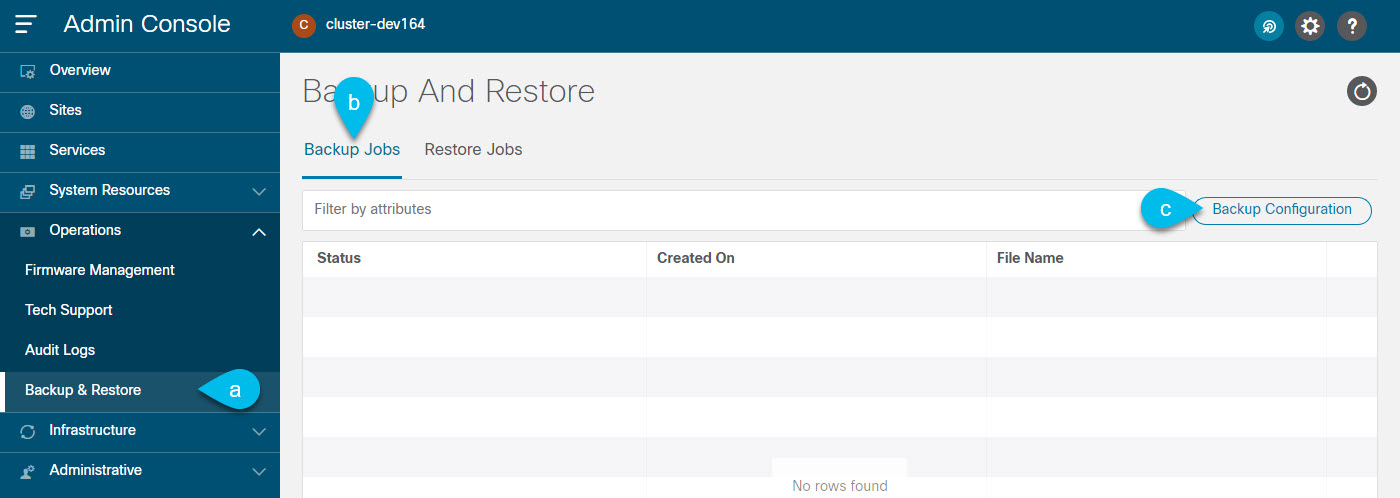
From the main navigation menu, select Operations > Backup & Restore.
-
In the main pane, select the Backup Jobs tab.
-
In top right of the main pane, click Backup Configuration.
-
-
In the Backup Configuration window that opens, provide the Encryption Key and the File Name.
The encryption key is used to encrypt the archive and must be at least 8 characters long.
-
Click Download to start the backup.
Note
Cisco Nexus Dashboard does not store configuration backups or encryption keys, so you must download and maintain them outside the Nexus Dashboard cluster.
Restoring Configuration
-
Navigate to your Nexus Dashboard’s Admin Console.
-
Begin restoring a configuration.
-
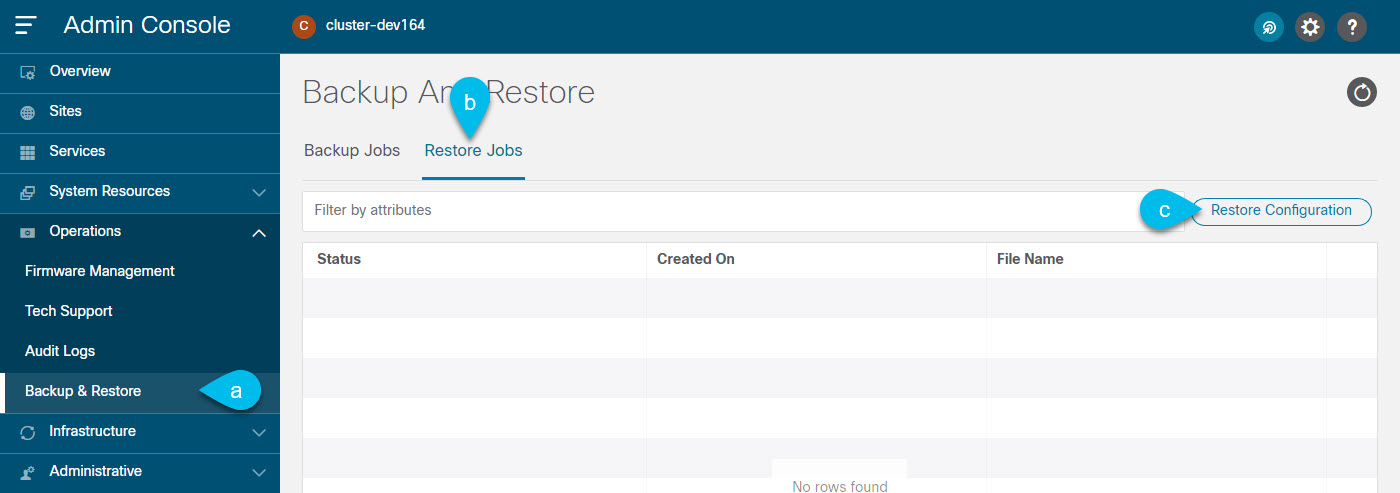
From the main navigation menu, select Operations > Backup & Restore.
-
In the main pane, select the Restore Jobs tab.
-
In top right of the main pane, click the Restore Configuration.
You do not need to select one of the listed backups. You will be asked to upload the configuration backup file in the next screen.
-
-
Provide the details.
-
Provide the Encryption Key.
This must be the same encryption key that you used when creating the backup.
-
Click Choose File and select the backup file.
Cisco Nexus Dashboard does not store configuration backups, so you must upload the backup file before restoring it
The file must be in
.tgzortar.gzformat.
-
-
Click Import to start the restore procedure.
Event Analytics
The Event Analytics page enables you to easily access your Nexus Dashboard’s events and audit logs. The Audit Logs tab displays all events that occur during the cluster operation. In addition to viewing the events and logs directly in the Nexus Dashboard GUI, you can also configure the cluster to stream the events to an external syslog server, as described in Cluster Configuration.
The Events tab includes high severity events that may require your attention to resolve:
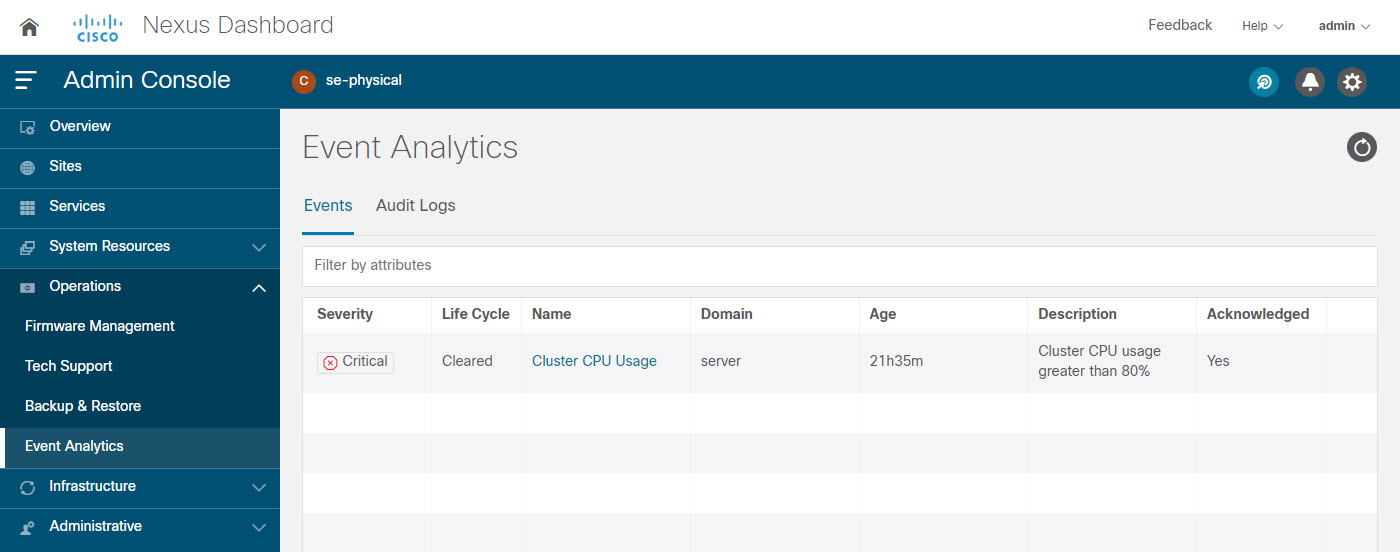
You can view a summary of all critical events in the list or double-click any specific event for additional information about it. After you have viewed and analyzed an event, you can choose to acknowledge and clear it by clicking the Actions (…) menu next to the event in the list.
 Feedback