ASA Platform Mode Deployment with ASDM and Chassis Manager


Note


Version 9.20 is the final release for the Firepower 2100.


Is This Chapter for You?

The Firepower 2100 runs an underlying operating system called the FXOS. You can run the Firepower 2100 for ASA in the following modes:

  • Platform mode—When in Platform mode, you must configure basic operating parameters and hardware interface settings in FXOS. These settings include enabling interfaces, establishing EtherChannels, NTP, image management, and more. You can use the chassis manager web interface or FXOS CLI. You can then configure your security policy in the ASA operating system using ASDM or the ASA CLI. For the full FXOS configuration guide, see the FXOS ASA configuration guide. For FXOS troubleshooting commands, see the FXOS troubleshooting guide.


    Note


    For many interface show commands, you either cannot use the ASA commands or the commands lack the full statistics. You must view more detailed interface information using FXOS commands. See the FXOS troubleshooting guide for more information.


  • Appliance mode (the default)—Appliance mode lets you configure all settings in the ASA. Only advanced troubleshooting commands are available from the FXOS CLI.

This chapter describes how to deploy the Firepower 2100 in your network in ASA Platform mode. By default, the Firepower 2100 runs in Appliance mode, so this chapter tells you how to set the mode to Platform mode. This chapter does not cover the following deployments, for which you should refer to the ASA configuration guide:

  • Failover

  • CLI configuration

This chapter also walks you through configuring a basic security policy; if you have more advanced requirements, refer to the configuration guide.

The Firepower 2100 hardware can run either ASA software or threat defense software. Switching between ASA and threat defense requires you to reimage the device. See Reimage the Cisco ASA or Firepower Threat Defense Device.

Privacy Collection Statement—The Firepower 2100 does not require or actively collect personally-identifiable information. However, you can use personally-identifiable information in the configuration, for example for usernames. In this case, an administrator might be able to see this information when working with the configuration or when using SNMP.

About the ASA

The ASA provides advanced stateful firewall and VPN concentrator functionality in one device.

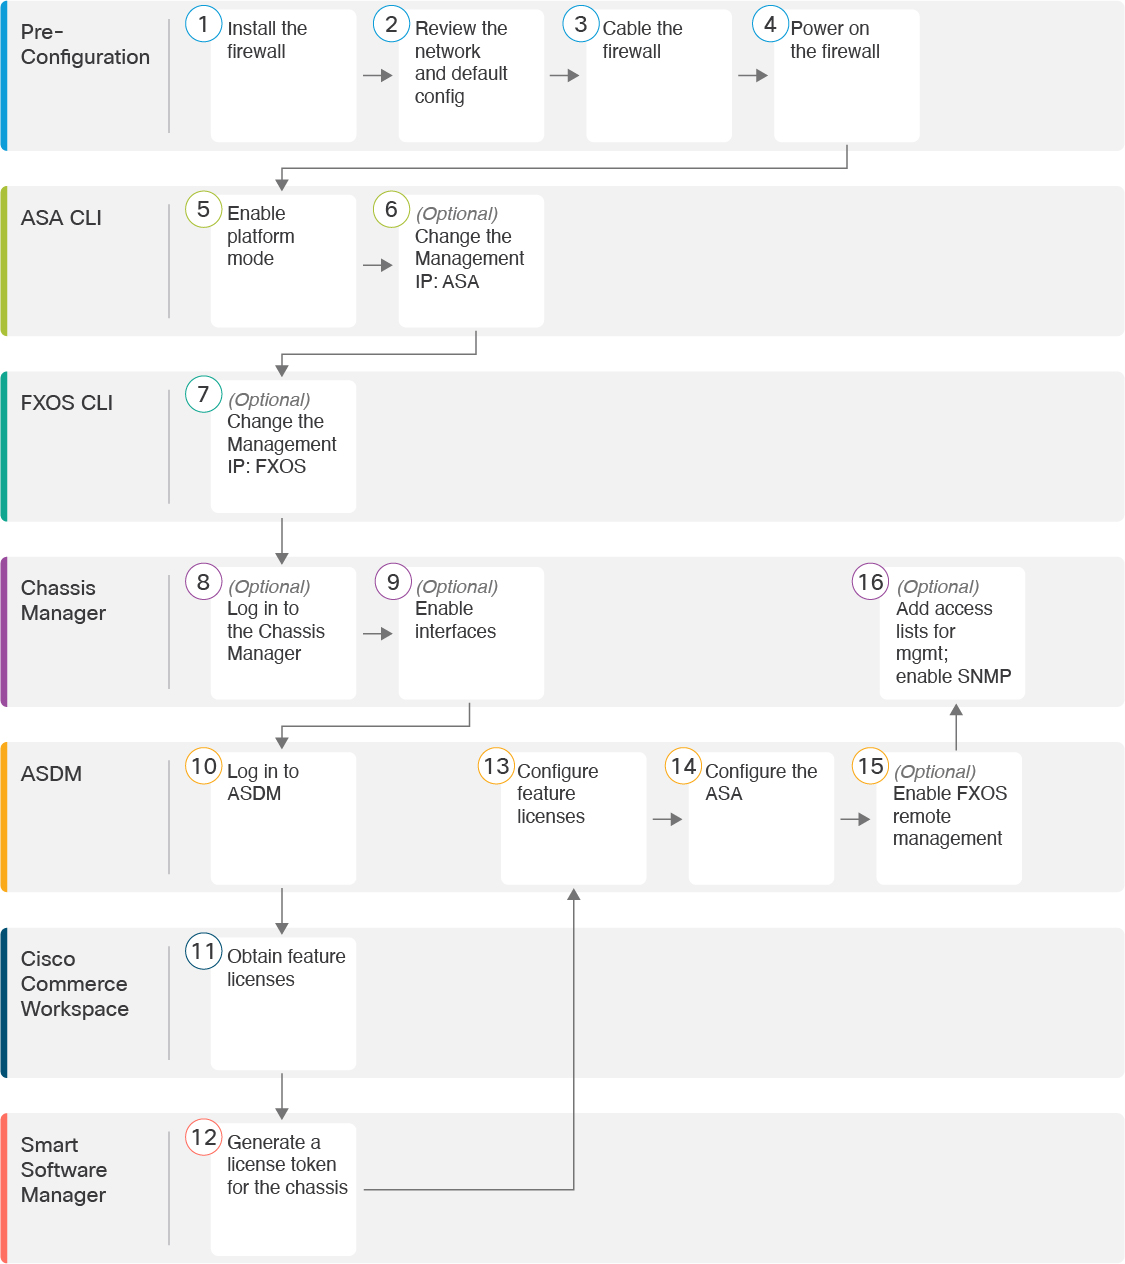
The Firepower 2100 is a single-application appliance for the ASA. You can run the ASA in either Platform mode or Appliance mode (the default). The Firepower 2100 runs an underlying operating system called the FXOS. When in Platform mode, you must configure basic operating parameters and hardware interface settings in FXOS. These settings include enabling interfaces, establishing EtherChannels, NTP, image management, and more. You can use the chassis manager web interface or FXOS CLI. You can then configure your security policy in the ASA operating system using one of the following managers:

  • ASDM—A single device manager included on the device. This guide describes how to manage the ASA using ASDM.

  • CLI

  • Cisco Security Manager—A multi-device manager on a separate server.

Appliance mode lets you configure all settings in the ASA. Only advanced troubleshooting commands are available from the FXOS CLI.

ASA and FXOS Management

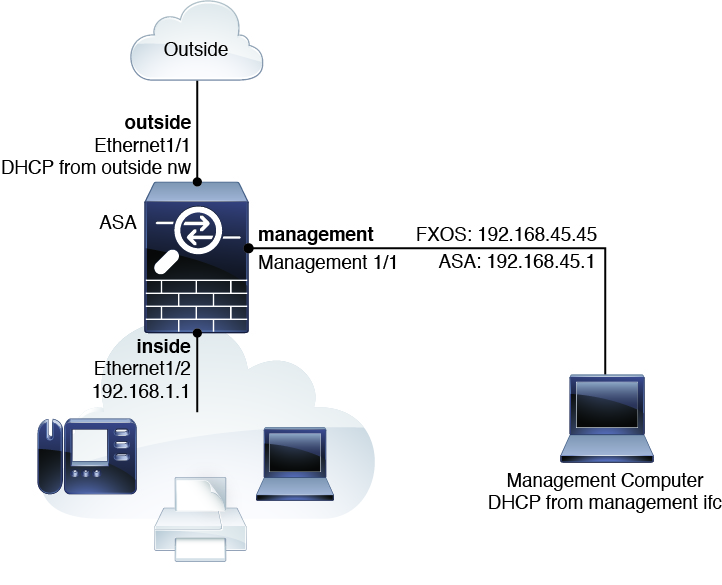
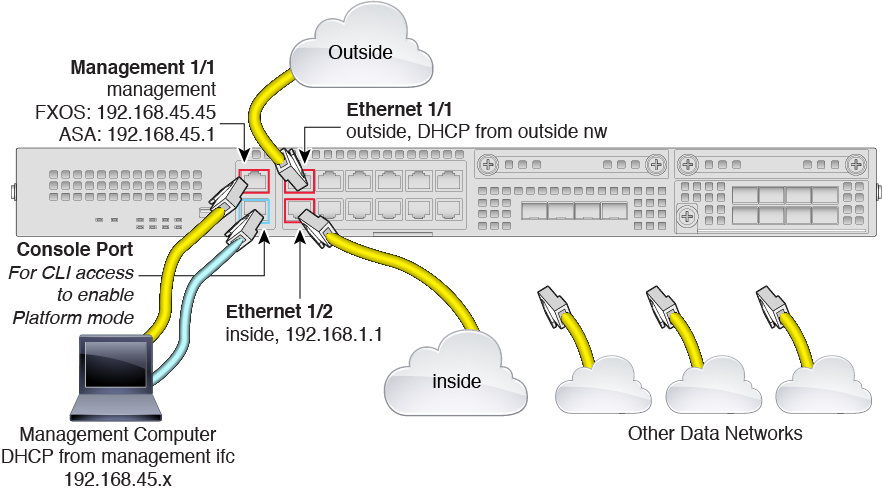
The ASA and FXOS operating systems share the Management 1/1 interface. This interface has separate IP addresses for connecting to ASA and to FXOS.


Note


This interface is called Management 1/1 in the ASA; in FXOS, you might see it displayed as MGMT, management0, or other similar names. This guide refers to this interface as Management 1/1 for consistency and simplicity.


Some functions must be monitored on FXOS and others on the ASA, so you need to make use of both operating systems for ongoing maintenance. For initial configuration on FXOS, you can connect to the default 192.168.45.45 IP address using SSH or your browser (https://192.168.45.45).

For initial configuration of the ASA, you can connect using ASDM to https://192.168.45.1/admin. In ASDM, you can later configure SSH access from any interface.

Both operating systems are available from the console port. Initial connection accesses the FXOS CLI. You can access the ASA CLI using the connect asa command.

You can also allow FXOS management from ASA data interfaces; configure SSH, HTTPS, and SNMP access. This feature is useful for remote management.

Unsupported Features

Unsupported ASA Features

The following ASA features are not supported on the Firepower 2100:

  • Integrated Routing and Bridging

  • Redundant interfaces

  • Clustering

  • Clientless SSL VPN with KCD

  • ASA REST API

  • ASA FirePOWER module

  • Botnet Traffic Filter

  • The following inspections:

    • SCTP inspection maps (SCTP stateful inspection using ACLs is supported)

    • Diameter

    • GTP/GPRS

Unsupported FXOS Features

The following FXOS features are not supported on the Firepower 2100:

  • Backup and restore FXOS configuration

    You can instead show all or parts of the configuration by using the show configuration command.


    Note


    Show commands do not show the secrets (password fields), so if you want to paste a configuration into a new device, you will have to modify the show output to include the actual passwords.


  • External AAA Authentication for FXOS

    Note that when you connect to the ASA console from FXOS (connect asa ), then ASA AAA configuration for console access applies (aaa authentication serial console ).

End-to-End Procedure

See the following tasks to deploy and configure the ASA.

Pre-Configuration

Install the firewall. See the hardware installation guide.

Pre-Configuration

Review the Network Deployment and Default Configuration.

Pre-Configuration

Cable the Device.

Pre-Configuration

Power on the Firewall.

ASA CLI

Enable Platform Mode.

ASA CLI

(Optional) Change the FXOS and ASA Management IP Addresses or Gateway: Change the Management IP: ASA.

FXOS CLI

(Optional) Change the FXOS and ASA Management IP Addresses or Gateway: Change the Management IP: FXOS.

Chassis Manager

(Optional) Log Into the Chassis Manager.

Chassis Manager

(Optional) Enable Additional Interfaces in the Chassis Manager.

ASDM

Log Into ASDM.

Cisco Commerce Workspace

Configure Licensing: Obtain feature licenses.

Smart Software Manager

Configure Licensing: Generate a license token for the chassis.

ASDM

Configure Licensing: Configure feature licenses.

ASDM

Configure the ASA.

ASDM

(Optional) Configure Management Access for FXOS on Data Interfaces: Enable FXOS remote management; allow FXOS to initiate management connections from an ASA interface.

Chassis Manager

(Optional) Configure Management Access for FXOS on Data Interfaces: Configure access lists to allow your management addresses; enable SNMP (HTTPS and SSH are enabled by default).

Review the Network Deployment and Default Configuration

The following figure shows the default network deployment for the Firepower 2100 using the default configuration in ASA Platform mode.

If you connect the outside interface directly to a cable modem or DSL modem, we recommend that you put the modem into bridge mode so the ASA performs all routing and NAT for your inside networks. If you need to configure PPPoE for the outside interface to connect to your ISP, you can do so as part of the ASDM Startup Wizard.


Note


If you cannot use the default FXOS and ASA Management IP addresses, see (Optional) Change the FXOS and ASA Management IP Addresses or Gateway.

If you need to change the inside IP address, you can do so using the ASDM Startup Wizard. For example, you may need to change the inside IP address in the following circumstances:

  • If the outside interface tries to obtain an IP address on the 192.168.1.0 network, which is a common default network, the DHCP lease will fail, and the outside interface will not obtain an IP address. This problem occurs because the ASA cannot have two interfaces on the same network. In this case you must change the inside IP address to be on a new network.

  • If you add the ASA to an existing inside network, you will need to change the inside IP address to be on the existing network.


Figure 1. Firepower 2100 in Your Network

Firepower 2100 Platform Mode Default Configuration

You can set the Firepower 2100 to run in Platform mode; Appliance mode is the default.


Note


For pre-9.13(1) versions, Platform mode was the default and only option. If you upgrade from Platform mode, this mode is maintained.


ASA Configuration

The default factory configuration for the ASA on the Firepower 2100 configures the following:

  • inside→outside traffic flow—Ethernet 1/1 (outside), Ethernet 1/2 (inside)

  • outside IP address from DHCP, inside IP address—192.168.1.1

  • DHCP server on inside interface

  • Default route from outside DHCP

  • management—Management 1/1 (management), IP address 192.168.45.1

  • ASDM access—Management hosts allowed.

  • NAT—Interface PAT for all traffic from inside to outside.

  • FXOS management traffic initiation—The FXOS chassis can initiate management traffic on the ASA outside interface.

  • DNS servers—OpenDNS servers are pre-configured.

The configuration consists of the following commands:


interface Management1/1
  management-only
  nameif management
  security-level 100
  ip address 192.168.45.1 255.255.255.0
  no shutdown
!
interface Ethernet1/1
  nameif outside
  security-level 0
  ip address dhcp setroute
  no shutdown
!
interface Ethernet1/2
  nameif inside
  security-level 100
  ip address 192.168.1.1 255.255.255.0
  no shutdown
!
object network obj_any
  subnet 0.0.0.0 0.0.0.0
  nat (any,outside) dynamic interface
!
http server enable
http 192.168.45.0 255.255.255.0 management
!
dhcpd auto_config outside
dhcpd address 192.168.1.20-192.168.1.254 inside
dhcpd enable inside
!
ip-client outside
!
dns domain-lookup outside
dns server-group DefaultDNS
   name-server 208.67.222.222 outside
   name-server 208.67.220.220 outside

FXOS Configuration

The default factory configuration for FXOS on the Firepower 2100 configures the following:

  • Management 1/1—IP address 192.168.45.45

  • Default gateway—ASA data interfaces

  • Chassis Manager and SSH access—From the management network only.

  • Default Usernameadmin, with the default password Admin123

  • DHCP server—Client IP address range 192.168.45.10-192.168.45.12

  • NTP server—Cisco NTP servers: 0.sourcefire.pool.ntp.org, 1.sourcefire.pool.ntp.org, 2.sourcefire.pool.ntp.org

  • DNS Servers—OpenDNS: 208.67.222.222, 208.67.220.220

  • Ethernet 1/1 and Ethernet 1/2—Enabled

Cable the Device

Manage the Firepower 2100 on the Management 1/1 interface. You can use the same management computer for FXOS and ASA. The default configuration also configures Ethernet1/1 as outside.

Procedure


Step 1

Install the chassis. See the hardware installation guide.

Step 2

Connect your management computer directly to Management 1/1 (labeled MGMT), or connect Management 1/1 to your management network.

Make sure your management computer is on the management network, because only clients on that network can access the ASA or FXOS. Management 1/1 has a default FXOS IP address (192.168.45.45) and ASA default IP address (192.168.45.1). FXOS also runs a DHCP server to provide IP addresses to clients (including the management computer), so make sure these settings do not conflict with any existing management network settings (see Firepower 2100 Platform Mode Default Configuration).

If you need to change the FXOS and ASA Management IP address from the defaults, see (Optional) Change the FXOS and ASA Management IP Addresses or Gateway.

You can later configure FXOS and ASA management access from data interfaces. For FXOS access, see (Optional) Configure Management Access for FXOS on Data Interfaces. For ASA access, see the ASA general operations configuration guide.

Step 3

Connect your management computer to the console port.

You need to access the ASA CLI to change from Appliance mode to Platform mode. The Firepower 2100 ships with a DB-9 to RJ-45 serial cable, so you will need a third party serial-to-USB cable to make the connection. Be sure to install any necessary USB serial drivers for your operating system.

Step 4

Connect the outside network to the Ethernet1/1 interface (labeled WAN).

For Smart Software Licensing, the ASA needs internet access so that it can access the License Authority.

Step 5

Connect the inside network to Ethernet1/2.

Step 6

Connect other networks to the remaining interfaces.


Power on the Firewall

The power switch is located to the left of power supply module 1 on the rear of the chassis. It is a toggle switch that controls power to the system. If the power switch is in standby position, only the 3.3-V standby power is enabled from the power supply module and the 12-V main power is OFF. When the switch is in the ON position, the 12-V main power is turned on and the system boots.

Procedure


Step 1

Attach the power cord to the device and connect it to an electrical outlet.

Step 2

Press the power switch on the back of the device.

Step 3

Check the PWR LED on the front of the device; if it is solid green, the device is powered on.

Step 4

Check the SYS LED on the front of the device; after it is solid green, the system has passed power-on diagnostics.

Note


Before you move the power switch to the OFF position, use the shutdown commands so that the system can perform a graceful shutdown. This may take several minutes to complete. After the graceful shutdown is complete, the console displays It is safe to power off now. The front panel blue locator beacon LED lights up indicating the system is ready to be powered off. You can now move the switch to the OFF position. The front panel PWR LED flashes momentarily and turns off. Do not remove the power until the PWR LED is completely off.

See the FXOS Configuration Guide for more information on using the shutdown commands.


Enable Platform Mode

The Firepower 2100 runs in Appliance mode by default. This procedure tells you how to change the mode to Platform mode, and optionally how to change it back to Appliance mode.


Caution


When you change the mode, you need to reload the system, and the configuration is cleared. The default configuration is applied upon reload.


Procedure


Step 1

Connect your management computer to the console port. The Firepower 2100 ships with a DB-9 to RJ-45 serial cable, so you will need a third party serial-to-USB cable to make the connection. Be sure to install any necessary USB serial drivers for your operating system. Use the following serial settings:

  • 9600 baud

  • 8 data bits

  • No parity

  • 1 stop bit

You connect to the ASA CLI. There are no user credentials required for console access by default.

Note


After you change to Platform mode, the console connection will access the FXOS CLI, not the ASA CLI. But you can access the ASA CLI from the console in Platform mode; see Connect to the Console Port to Access FXOS and ASA CLI.

Step 2

Access privileged EXEC mode.

enable

You are prompted to change the password the first time you enter the enable command.

Example:


ciscoasa> enable
Password:
The enable password is not set. Please set it now.
Enter Password: ******
Repeat Password: ******
ciscoasa#

All non-configuration commands are available in privileged EXEC mode. You can also enter configuration mode from privileged EXEC mode.

To exit privileged mode, enter the disable , exit , or quit command.

Step 3

Access global configuration mode.

configure terminal

Example:


ciscoasa# configure terminal
ciscoasa(config)#

Step 4

Set the mode to Platform mode.

no fxos mode appliance

write memory

reload

After you set the mode, you need to save the configuration and reload the device. Prior to reloading, you can set the mode back to the original value without any disruption.

Caution


When you reload, the configuration is cleared. The default configuration is applied upon reload.

Example:


ciscoasa(config)# no fxos mode appliance
Mode set to platform mode
WARNING: This command will take effect after the running-config is saved and the system has been rebooted. Command accepted.
ciscoasa(config)# write memory
Building configuration...
Cryptochecksum: c0532471 648dc7c2 4f2b4175 1f162684

23736 bytes copied in 1.520 secs (23736 bytes/sec)
[OK]
ciscoasa(config)# reload
Proceed with reload? [confirm]  

Step 5

After restart, view the current mode to confirm the change.

show fxos mode

Example:


ciscoasa(config)# show fxos mode
Mode is currently set to platform

Step 6

(Optional) Set the mode back to Appliance mode.

fxos mode appliance

write memory

reload

After you set the mode, you need to save the configuration and reload the device. Prior to reloading, you can set the mode back to the original value without any disruption.

Caution


When you reload, the configuration is cleared. The default configuration is applied upon reload.

Example:


ciscoasa(config)# fxos mode appliance
Mode set to appliance mode
WARNING: This command will take effect after the running-config is saved and the system has been rebooted. Command accepted.
ciscoasa(config)# write memory
Building configuration...
Cryptochecksum: c0532471 648dc7c2 4f2b4175 1f162684

23736 bytes copied in 1.520 secs (23736 bytes/sec)
[OK]
ciscoasa(config)# reload
Proceed with reload? [confirm]  


(Optional) Change the FXOS and ASA Management IP Addresses or Gateway

You can change the FXOS management IP address on the Firepower 2100 chassis from the FXOS CLI. The default address is 192.168.45.45. You can also change the default gateway for FXOS management traffic. The default gateway is set to 0.0.0.0, which sends FXOS traffic over the backplane to be routed through the ASA data interfaces. If you want to route traffic to a router on the Management 1/1 network instead, then you can change the gateway IP address. You must also change the access list for management connections to match your new network. If you change the gateway from the default 0.0.0.0 (the ASA data interfaces), then you will not be able to access FXOS on a data interface nor will FXOS be able to initiate traffic on a data interface (see (Optional) Configure Management Access for FXOS on Data Interfaces).

Typically, the FXOS Management 1/1 IP address will be on the same network as the ASA Management 1/1 IP address, so this procedure also shows how to change the ASA IP address on the ASA.

Before you begin

  • After you change the FXOS management IP address, you need to reestablish any chassis manager and SSH connections using the new address.

  • Because the DHCP server is enabled by default on Management 1/1, you must disable DHCP before you change the management IP address.

Procedure


Step 1

Connect to the console port (see Connect to the Console Port to Access FXOS and ASA CLI). We recommend that you connect to the console port to avoid losing your connection.

Step 2

Disable the DHCP server.

scope system

scope services

disable dhcp-server

commit-buffer

You can reenable DHCP using new client IP addresses after you change the management IP address. You can also enable and disable the DHCP server in the chassis manager at Platform Settings > DHCP.

Example:


firepower-2110# scope system
firepower-2110 /system # scope services
firepower-2110 /system/services # disable dhcp-server
firepower-2110 /system/services* # commit-buffer

Step 3

Configure an IPv4 management IP address, and optionally the gateway.

  1. Set the scope for fabric-interconnect a.

    scope fabric-interconnect a

    Example:

    
    firepower-2110# scope fabric-interconnect a
    firepower-2110 /fabric-interconnect # 
    
    
  2. View the current management IP address.

    show

    Example:

    
    firepower-2110 /fabric-interconnect # show
    
    Fabric Interconnect:
        ID   OOB IP Addr     OOB Gateway     OOB Netmask     OOB IPv6 Address OOB IPv6 Gateway Prefix Operability
        ---- --------------- --------------- --------------- ---------------- ---------------- ------ -----------
        A    192.168.45.45    0.0.0.0        0.0.0.0          ::               ::               64     Operable
    
    
  3. Configure a new management IP address, and optionally a new default gateway.

    set out-of-band static ip ip_address netmask network_mask gw gateway_ip_address

    To keep the currently-set gateway, omit the gw keyword. Similarly, to keep the existing management IP address while changing the gateway, omit the ip and netmask keywords.

    To set the gateway to the ASA data interfaces, set the gw to 0.0.0.0. This is the default setting.

    Example:

    
    firepower-2110 /fabric-interconnect # set out-of-band static ip 192.168.4.1 netmask 255.255.255.0 
    Warning: When committed, this change may disconnect the current CLI session
    firepower-2110 /fabric-interconnect* # 


Step 4

Configure an IPv6 management IP address and gateway.

  1. Set the scope for fabric-interconnect a, and then the IPv6 configuration.

    scope fabric-interconnect a

    scope ipv6-config

    Example:

    
    firepower-2110# scope fabric-interconnect a
    firepower-2110 /fabric-interconnect # scope ipv6-config
    firepower-2110 /fabric-interconnect/ipv6-config #
    
    
  2. View the current management IPv6 address.

    show ipv6-if

    Example:

    
    firepower-2110 /fabric-interconnect/ipv6-config # show ipv6-if
    
    Management IPv6 Interface:
        IPv6 Address                        Prefix     IPv6 Gateway
        ----------------------------------- ---------- ------------
        ::                                  ::         ::
    
    
  3. Configure a new management IPv6 address and gateway:

    Firepower-chassis /fabric-interconnect/ipv6-config # set out-of-band static ipv6 ipv6_address ipv6-prefix prefix_length ipv6-gw gateway_address

    To keep the currently-set gateway, omit the ipv6-gw keyword. Similarly, to keep the existing management IP address while changing the gateway, omit the ipv6 and ipv6-prefix keywords.

    To set the gateway to the ASA data interfaces, set the gw to ::. This is the default setting.

    Example:

    
    firepower-2110 /fabric-interconnect/ipv6-config # set out-of-band static ipv6 2001:DB8::34 ipv6-prefix 64 ipv6-gw 2001:DB8::1
    firepower-2110 /fabric-interconnect/ipv6-config* # 


Step 5

Delete and add new access lists for HTTPS, SSH, and SNMP to allow management connections from the new network.

  1. Set the scope for system/services.

    scope system

    scope services

    Example:

    
    firepower-2110# scope system
    firepower-2110 /system # scope services
    
    
  2. View the current access lists.

    show ip-block

    Example:

    
    firepower-2110 /system/services # show ip-block
    
    Permitted IP Block:
        IP Address      Prefix Length Protocol
        --------------- ------------- --------
        192.168.45.0               24 https
        192.168.45.0               24 ssh
    firepower-2140 /system/services #             
    
    
  3. Add new access lists.

    For IPv4:

    enter ip-block ip_address prefix [http | snmp | ssh]

    For IPv6:

    enter ipv6-block ipv6_address prefix [https | snmp | ssh]

    For IPv4, enter 0.0.0.0 and a prefix of 0 to allow all networks. For IPv6, enter :: and a prefix of 0 to allow all networks. You can also add access lists in the chassis manager at Platform Settings > Access List.

    Example:

    
    firepower-2110 /system/services # enter ip-block 192.168.4.0 24 https
    firepower-2110 /system/services/ip-block* # exit
    firepower-2110 /system/services* # enter ip-block 192.168.4.0 24 ssh
    firepower-2110 /system/services/ip-block* # exit
    firepower-2110 /system/services* # enter ip-block 192.168.4.0 24 snmp
    firepower-2110 /system/services/ip-block* # exit
    firepower-2110 /system/services* # enter ipv6-block 2001:DB8:: 64 https
    firepower-2110 /system/services/ip-block* # exit
    firepower-2110 /system/services* # enter ipv6-block 2001:DB8:: 64 ssh
    firepower-2110 /system/services/ip-block* # exit
    firepower-2110 /system/services* # enter ipv6-block 2001:DB8:: 64 snmp
    firepower-2110 /system/services/ip-block* # exit
    firepower-2110 /system/services* # 
    
    
  1. Delete the old access lists.

    For IPv4:

    delete ip-block ip_address prefix [http | snmp | ssh]

    For IPv6:

    delete ipv6-block ipv6_address prefix [https | snmp | ssh]

    Example:

    
    firepower-2110 /system/services # delete ip-block 192.168.45.0 24 https
    firepower-2110 /system/services* # delete ip-block 192.168.45.0 24 ssh
    firepower-2110 /system/services* # 


Step 6

(Optional) Reenable the IPv4 DHCP server.

scope system

scope services

enable dhcp-server start_ip_address end_ip_address

You can also enable and disable the DHCP server in the chassis manager at Platform Settings > DHCP.

Example:


firepower-2110# scope system
firepower-2110 /system # scope services
firepower-2110 /system/services # enable dhcp-server 192.168.4.10 192.168.4.20

Step 7

Save the configuration.

commit-buffer

Example:


firepower-2110 /system/services* # commit-buffer

Step 8

Change the ASA address to be on the correct network. The default ASA Management 1/1 interface IP address is 192.168.45.1.

  1. From the console, connect to the ASA CLI and access global configuration mode.

    connect asa

    enable

    configure terminal

    In ASA version 9.12(1) and later, you are prompted to set an enable password. In previous versions, the default enable password is blank.

    Example:

    
    firepower-2110# connect asa
    Attaching to Diagnostic CLI ... Press 'Ctrl+a then d' to detach.
    Type help or '?' for a list of available commands.
    ciscoasa> enable
    Password: 
    The enable password is not set. Please set it now.
    Enter Password: ******
    Repeat Password: ******
    ciscoasa# configure terminal
    ciscoasa(config)# 
    
    
  2. Change the Management 1/1 IP address.

    interface management1/1

    ip address ip_address mask

    Example:

    
    ciscoasa(config)# interface management1/1
    ciscoasa(config-ifc)# ip address 10.86.118.4 255.255.255.0
    
    
  3. Change the network that can access ASDM.

    no http 192.168.45.0 255.255.255.0 management

    http ip_address mask management

    Example:

    
    ciscoasa(config)# no http 192.168.45.0 255.255.255.0 management
    ciscoasa(config)# http 10.86.118.0 255.255.255.0 management
    
    
  4. Save the configuration.

    write memory

  5. To return to the FXOS console, enter Ctrl+a, d.


Example

The following example configures an IPv4 management interface and gateway:


firepower-2110# scope fabric-interconnect a
firepower-2110 /fabric-interconnect # show

Fabric Interconnect:
    ID   OOB IP Addr     OOB Gateway     OOB Netmask     OOB IPv6 Address OOB IPv6 Gateway Prefix Operability
    ---- --------------- --------------- --------------- ---------------- ---------------- ------ -----------
    A    192.168.2.112    192.168.2.1     255.255.255.0   2001:DB8::2     2001:DB8::1       64     Operable
firepower-2110 /fabric-interconnect # set out-of-band static ip 192.168.2.111 netmask 255.255.255.0 gw 192.168.2.1
Warning: When committed, this change may disconnect the current CLI session
firepower-2110 /fabric-interconnect* # commit-buffer
firepower-2110 /fabric-interconnect #

The following example configures an IPv6 management interface and gateway:


firepower-2110# scope fabric-interconnect a
firepower-2110 /fabric-interconnect # scope ipv6-config
firepower-2110 /fabric-interconnect/ipv6-config # show ipv6-if

Management IPv6 Interface:
    IPv6 Address                        Prefix     IPv6 Gateway
    ----------------------------------- ---------- ------------
    2001:DB8::2                          64         2001:DB8::1
firepower-2110 /fabric-interconnect/ipv6-config # set out-of-band static ipv6 2001:DB8::2 ipv6-prefix 64 ipv6-gw 2001:DB8::1
firepower-2110 /fabric-interconnect/ipv6-config* # commit-buffer
firepower-2110 /fabric-interconnect/ipv6-config #

(Optional) Log Into the Chassis Manager

Use the chassis manager to configure chassis settings, including enabling interfaces and creating EtherChannels.

Before you begin

Procedure


Step 1

On your management computer connected to the Management 1/1 interface, launch the chassis manager by going to the following URL.

https://192.168.45.45

Step 2

Enter the default username: admin. You are prompted to set a password.


(Optional) Enable Additional Interfaces in the Chassis Manager

By default, the Management 1/1, Ethernet 1/1, and Ethernet 1/2 interfaces are physically enabled for the chassis and logically enabled in the ASA configuration. To use any additional interfaces, you must enable it for the chassis using this procedure, and then later enable it in the ASA configuration. You can also add EtherChannels (known as port-channels).


Note


If you change the interfaces in FXOS after you enable failover (by adding or removing a network module, or by changing the EtherChannel configuration, for example), make the interface changes in FXOS on the standby unit, and then make the same changes on the active unit.

If you remove an interface in FXOS (for example, if you remove a network module, remove an EtherChannel, or reassign an interface to an EtherChannel), then the ASA configuration retains the original commands so that you can make any necessary adjustments; removing an interface from the configuration can have wide effects. You can manually remove the old interface configuration in the ASA OS.


Note


For many interface show commands, you either cannot use the ASA commands or the commands lack the full statistics. You must view more detailed interface information using FXOS commands:

  • /eth-uplink/fabric# show interface

  • /eth-uplink/fabric# show port-channel

  • /eth-uplink/fabric/interface# show stats

  • (local-mgmt)# show portmanager counters

  • (local-mgmt)# show lacp

  • (local-mgmt)# show portchannel

See the FXOS troubleshooting guide for more information.


Before you begin

Procedure


Step 1

In the chassis manager, click Interfaces.

The All Interfaces page shows a visual representation of the currently-installed interfaces at the top of the page and provides a listing of the installed interfaces in the table below.

Step 2

To enable or disable an interface, click Enable slider (slider disabled) or Disable slider (slider enabled).

Note


The Management 1/1 interface shows as MGMT in this table.

Step 3

(Optional) Add an EtherChannel.

Note


EtherChannel member ports are visible on the ASA, but you can only configure EtherChannels and port membership in FXOS.

  1. Click Add Port Channel above the interfaces table.

  2. In the Port Channel ID field, enter an ID for the port channel. Valid values are between 1 and 47.

  3. Check the Enable check box to enable the port channel.

    Ignore the Type drop-down list; the only available type is Data.

  4. From the Admin Speed drop-down list, choose the speed for all member interfaces.

    If you choose interfaces that are not capable of the speed (and other settings that you choose), the fastest possible speed is automatically applied.

  5. Click the Auto Negotiation Yes or No radio button for all member interfaces.

  6. Admin Duplex drop-down list, choose the duplex for all member interfaces.

  7. In the Available Interface list, select the interface you want to add, and click Add Interface.

    You can add up to 16 interfaces of the same type and speed. The first interface added to the channel group determines the correct type and speed.

    Tip


    You can add multiple interfaces at one time. To select multiple individual interfaces, click on the desired interfaces while holding down the Ctrl key. To select a range of interfaces, select the first interface in the range, and then, while holding down the Shift key, click to select the last interface in the range.

  8. Click OK.


Log Into ASDM

Launch ASDM so you can configure the ASA.

Strong Encryption (3DES/AES) is available for management connections before you connect to the License Authority or Satellite server so you can launch ASDM. Note that ASDM access is only available on management-only interfaces with the default encryption. Through the box traffic is not allowed until you connect and obtain the Strong Encryption license.

Before you begin

See the ASDM release notes on Cisco.com for the requirements to run ASDM.

Procedure


Step 1

Using a supported browser, enter the following URL.

https://management_ip/admin

  • management_ip —Identifies the IP address or host name of the ASA management interface (192.168.45.1).

The Cisco ASDM web page appears. You may see browser security warnings because the ASA does not have a certificate installed; you can safely ignore these warnings and visit the web page.

Step 2

Click one of these available options: Install ASDM Launcher or Run ASDM.

Step 3

Follow the onscreen instructions to launch ASDM according to the option you chose.

The Cisco ASDM-IDM Launcher appears.

Step 4

Leave the username empty, enter the enable password that you set when you deployed the ASA, and click OK.

The main ASDM window appears.


Configure Licensing

The ASA uses Smart Licensing. You can use regular Smart Licensing, which requires internet access; or for offline management, you can configure Permanent License Reservation or a Smart Software Manager On-Prem (formerly known as a Satellite server). For more information about these offline licensing methods, see Cisco ASA Series Feature Licenses; this guide applies to regular Smart Licensing.

For a more detailed overview on Cisco Licensing, go to cisco.com/go/licensingguide

When you register the chassis, the Smart Software Manager issues an ID certificate for communication between the firewall and the Smart Software Manager. It also assigns the firewall to the appropriate virtual account. Until you register with the Smart Software Manager, you will not be able to make configuration changes to features requiring special licenses, but operation is otherwise unaffected. Licensed features include:

  • Essentials

  • Security Contexts

  • Strong Encryption (3DES/AES)—If your Smart Account is not authorized for strong encryption, but Cisco has determined that you are allowed to use strong encryption, you can manually add a stong encryption license to your account.

  • Cisco Secure ClientSecure Client Advantage, Secure Client Premier, or Secure Client VPN Only.

Strong Encryption (3DES/AES) is available for management connections before you connect to the License Authority or Satellite server so you can launch ASDM. Note that ASDM access is only available on management-only interfaces with the default encryption. Through the box traffic is not allowed until you connect and obtain the Strong Encryption license.

When you request the registration token for the ASA from the Smart Software Manager, check the Allow export-controlled functionality on the products registered with this token check box so that the full Strong Encryption license is applied (your account must be qualified for its use). The Strong Encryption license is automatically enabled for qualified customers when you apply the registration token on the chassis, so no additional action is required. If your Smart Account is not authorized for strong encryption, but Cisco has determined that you are allowed to use strong encryption, you can manually add a strong encryption license to your account.


Note


Unlike the Firepower 4100/9300 chassis, you perform all licensing configuration on the ASA, and not in the FXOS configuration.


Before you begin

  • Have a master account on the Smart Software Manager.

    If you do not yet have an account, click the link to set up a new account. The Smart Software Manager lets you create a master account for your organization.

  • Your Smart Software Manager account must qualify for the Strong Encryption (3DES/AES) license to use some features (enabled using the export-compliance flag).

Procedure


Step 1

Make sure your Smart Licensing account contains the available licenses you need, including at a minimum the Essentials license.

When you bought your device from Cisco or a reseller, your licenses should have been linked to your Smart Software License account. However, if you need to add licenses yourself, use the Search All field on the Cisco Commerce Workspace.

Figure 2. License Search
License Search

Choose Products & Services from the results.

Figure 3. Results
Results

Search for the following license PIDs:

Note


If a PID is not found, you can add the PID manually to your order.

  • Essentials license—L-FPR2100-ASA=. The Essentials license is free, but you still need to add it to your Smart Software Licensing account.

  • 5 context license—L-FPR2K-ASASC-5=. Context licenses are additive; buy multiple licenses to meet your needs.

  • 10 context license—L-FPR2K-ASASC-10=. Context licenses are additive; buy multiple licenses to meet your needs.

  • Strong Encryption (3DES/AES) license—L-FPR2K-ENC-K9=. Only required if your account is not authorized for strong encryption.

Step 2

In the Cisco Smart Software Manager, request and copy a registration token for the virtual account to which you want to add this device.

  1. Click Inventory.

  2. On the General tab, click New Token.

  3. On the Create Registration Token dialog box enter the following settings, and then click Create Token:

    • Description

    • Expire After—Cisco recommends 30 days.

    • Max. Number of Uses

    • Allow export-controlled functionaility on the products registered with this token—Enables the export-compliance flag.

    The token is added to your inventory.

  4. Click the arrow icon to the right of the token to open the Token dialog box so you can copy the token ID to your clipboard. Keep this token ready for later in the procedure when you need to register the ASA.

    Figure 4. View Token
    Figure 5. Copy Token

Step 3

In ASDM, choose Configuration > Device Management > Licensing > Smart Licensing.

Step 4

Click Register.

Step 5

Enter the registration token in the ID Token field.

You can optionally check the Force registration check box to register the ASA that is already registered, but that might be out of sync with the Smart Software Manager. For example, use Force registration if the ASA was accidentally removed from the Smart Software Manager.

Step 6

Click Register.

The ASA registers with the Smart Software Manager using the pre-configured outside interface, and requests authorization for the configured license entitlements. The Smart Software Manager also applies the Strong Encryption (3DES/AES) license if your account allows. ASDM refreshes the page when the license status is updated. You can also choose Monitoring > Properties > Smart License to check the license status, particularly if the registration fails.

Step 7

Set the following parameters:

  1. Check Enable Smart license configuration.

  2. From the Feature Tier drop-down list, choose Essentials.

    Only the Essentials tier is available.

  3. (Optional) For the Context license, enter the number of contexts.

    You can use 2 contexts without a license. The maximum number of contexts depends on your model:

    • Firepower 2110—25 contexts

    • Firepower 2120—25 contexts

    • Firepower 2130—30 contexts

    • Firepower 2140—40 contexts

    For example, to use the maximum of 25 contexts on the Firepower 2110, enter 23 for the number of contexts; this value is added to the default of 2.

Step 8

Click Apply.

Step 9

Click the Save icon in the toolbar.

Step 10

Quit ASDM and relaunch it.

When you change licenses, you need to relaunch ASDM to show updated screens.


Configure the ASA

Using ASDM, you can use wizards to configure basic and advanced features. You can also manually configure features not included in wizards.

Procedure


Step 1

Choose Wizards > Startup Wizard, and click the Modify existing configuration radio button.

Step 2

The Startup Wizard walks you through configuring:

  • The enable password

  • Interfaces, including setting the inside and outside interface IP addresses and enabling interfaces.

  • Static routes

  • The DHCP server

  • And more...

Step 3

(Optional) From the Wizards menu, run other wizards.

Step 4

To continue configuring your ASA, see the documents available for your software version at Navigating the Cisco ASA Series Documentation.


(Optional) Configure Management Access for FXOS on Data Interfaces

If you want to manage FXOS on the Firepower 2100 from a data interface, then you can configure SSH, HTTPS, and SNMP access. This feature is useful if you want to manage the device remotely, but you want to keep Management 1/1, which is the native way to access FXOS, on an isolated network. If you enable this feature, you can continue to use Management 1/1 for local access only. However, you cannot allow remote access to or from Management 1/1 for FXOS at the same time as using this feature. This feature requires forwarding traffic to the ASA data interfaces over the backplane (the default), and you can only specify one FXOS management gateway.

The ASA uses non-standard ports for FXOS access; the standard port is reserved for use by the ASA on the same interface. When the ASA forwards traffic to FXOS, it translates the non-standard destination port to the FXOS port for each protocol (do not change the HTTPS port in FXOS). The packet destination IP address (which is the ASA interface IP address) is also translated to an internal address for use by FXOS. The source address remains unchanged. For returning traffic, the ASA uses its data routing table to determine the correct egress interface. When you access the ASA data IP address for the management application, you must log in using an FXOS username; ASA usernames only apply for ASA management access.

You can also enable FXOS management traffic initiation on ASA data interfaces, which is required for SNMP traps, or NTP and DNS server access, for example. By default, FXOS management traffic initiation is enabled for the ASA outside interface for DNS and NTP server communication (required for Smart Software Licensing communication).

Before you begin

  • Single context mode only.

  • Excludes ASA management-only interfaces.

  • You cannot use a VPN tunnel to an ASA data interface and access FXOS directly. As a workaround for SSH, you can VPN to the ASA, access the ASA CLI, and then use the connect fxos command to access the FXOS CLI. Note that SSH, HTTPS, and SNMPv3 are/can be encrypted, so direct connection to the data interface is safe.

  • Ensure that the FXOS gateway is set to forward traffic to the ASA data interfaces (the default). If you changed the gateway, then see (Optional) Change the FXOS and ASA Management IP Addresses or Gateway.

Procedure


Step 1

In ASDM, choose Configuration > Device Management > Management Access > FXOS Remote Management.

Step 2

Enable FXOS remote management.

  1. Choose HTTPS, SNMP, or SSH from the navigation pane.

  2. Click Add, and set the Interface where you want to allow management, set the IP Address allowed to connect, and then click OK.

    You can create multiple entries for each protocol type. Set the Port if you do not want to use the following defaults:

    • HTTPS default port—3443

    • SNMP default port—3061

    • SSH default port—3022

Step 3

Allow FXOS to initiate management connections from an ASA interface.

  1. Choose FXOS Traffic Initiation from the navigation pane.

  2. Click Add, and enable the ASA interfaces where you need to send FXOS management traffic. By default, the outside interface is enabled.

Step 4

Click Apply.

Step 5

Connect to the chassis manager (by default https://192.168.45.45, with the username: admin and the password you set at initial login).

Step 6

Click the Platform Settings tab, and enable SSH, HTTPS, or SNMP.

SSH and HTTPS are enabled by default.

Step 7

Configure an Access List on the Platform Settings tab to allow your management addresses. SSH and HTTPS only allow the Management 1/1 192.168.45.0 network by default. You need to allow any addresses that you specified in the FXOS Remote Management configuration on the ASA.


Access the ASA and FXOS CLI

This section describes how to connect to the FXOS and ASA console and how to connect to FXOS using SSH.

Connect to the Console Port to Access FXOS and ASA CLI

The Firepower 2100 console port connects you to the FXOS CLI. From the FXOS CLI, you can then connect to the ASA console, and back again.

You can only have one console connection at a time. When you connect to the ASA console from the FXOS console, this connection is a persistent console connection, not like a Telnet or SSH connection.

Procedure


Step 1

Connect your management computer to the console port. The Firepower 2100 ships with a DB-9 to RJ-45 serial cable, so you will need a third party serial-to-USB cable to make the connection. Be sure to install any necessary USB serial drivers for your operating system. Use the following serial settings:

  • 9600 baud

  • 8 data bits

  • No parity

  • 1 stop bit

You connect to the FXOS CLI. Enter the user credentials; by default, you can log in with the admin user and the default password, Admin123. You are prompted to change the admin password when you first log in.

Step 2

Connect to the ASA:

connect asa

Example:


firepower-2110# connect asa
Attaching to Diagnostic CLI ... Press 'Ctrl+a then d' to detach.
Type help or '?' for a list of available commands.
ciscoasa>

Step 3

To return to the FXOS console, enter Ctrl+a, d.


Connect to FXOS with SSH

You can connect to FXOS on Management 1/1 with the default IP address, 192.168.45.45. If you configure remote management ((Optional) Configure Management Access for FXOS on Data Interfaces), you can also connect to the data interface IP address on the non-standard port, by default, 3022.

To connect using SSH to the ASA, you must first configure SSH access according to the ASA general operations configuration guide.

You can connect to the ASA CLI from FXOS, and vice versa.

FXOS allows up to 8 SSH connections.

Before you begin

To change the management IP address, see (Optional) Change the FXOS and ASA Management IP Addresses or Gateway.

Procedure


Step 1

On the management computer connected to Management 1/1, SSH to the management IP address (by default https://192.168.45.45, with the username: admin and password: Admin123).

You can log in with any username if you added users in FXOS. If you configure remote management, SSH to the ASA data interface IP address on port 3022 (the default port).

Step 2

Connect to the ASA CLI.

connect asa

To return to the FXOS CLI, enter Ctrl+a, d.

Example:


firepower-2110# connect asa
Attaching to Diagnostic CLI ... Press 'Ctrl+a then d' to detach.
Type help or '?' for a list of available commands.
ciscoasa>

Step 3

If you SSH to the ASA (after you configure SSH access in the ASA), connect to the FXOS CLI.

connect fxos

You are prompted to authenticate for FXOS; use the default username: admin and password: Admin123. To return to the ASA CLI, enter exit or type Ctrl-Shift-6, x.

Example:


ciscoasa# connect fxos
Connecting to fxos.
Connected to fxos. Escape character sequence is 'CTRL-^X'.

FXOS 2.2(2.32) kp2110

firepower-2110 login: admin
Password: Admin123
Last login: Sat Jan 23 16:20:16 UTC 2017 on pts/1
Successful login attempts for user 'admin' : 4
Cisco Firepower Extensible Operating System (FX-OS) Software

[…]

firepower-2110# 
firepower-2110# exit
Remote card closed command session. Press any key to continue.
Connection with fxos terminated.
Type help or '?' for a list of available commands.
ciscoasa#


History for the Firepower 2100 in Platform Mode

Feature Name

Version

Feature Information

The default mode changed to Appliance mode

9.13(1)

With the introduction of Appliance mode, the default mode was changed to Appliance mode. In earlier releases, the only mode available was Platform mode. If you are upgrading to 9.13(1), the mode will remain in Platform mode.

New/Modified commands: fxos mode appliance , show fxos mode

Prompt to set admin password

9.13(1)

You are not prompted to set the admin password when you first log into the chassis manager. Formerly, the default password was Admin123.