ASA Appliance Mode Deployment with ASDM


Note


Version 9.20 is the final release for the Firepower 2100.


Is This Chapter for You?

The Firepower 2100 runs an underlying operating system called the FXOS. You can run the Firepower 2100 for ASA in the following modes:

  • Appliance mode (the default)—Appliance mode lets you configure all settings in the ASA. Only advanced troubleshooting commands are available from the FXOS CLI. See the FXOS troubleshooting guide for more information. The chassis manager is not supported.

  • Platform mode—When in Platform mode, you must configure basic operating parameters and hardware interface settings in FXOS. These settings include enabling interfaces, establishing EtherChannels, NTP, image management, and more. You can use the chassis manager web interface or FXOS CLI. You can then configure your security policy in the ASA operating system using ASDM or the ASA CLI.

This chapter describes how to deploy the Firepower 2100 in your network in ASA Appliance mode. By default, the Firepower 2100 runs in Appliance mode; to use Platform mode, see ASA Platform Mode Deployment with ASDM and Chassis Manager. This chapter does not cover the following deployments, for which you should refer to the ASA configuration guide:

  • Failover

  • CLI configuration

This chapter also walks you through configuring a basic security policy; if you have more advanced requirements, refer to the configuration guide.

The Firepower 2100 hardware can run either ASA software or threat defense software. Switching between ASA and threat defense requires you to reimage the device. See Reimage the Cisco ASA or Firepower Threat Defense Device.

Privacy Collection Statement—The Firepower 2100 does not require or actively collect personally-identifiable information. However, you can use personally-identifiable information in the configuration, for example for usernames. In this case, an administrator might be able to see this information when working with the configuration or when using SNMP.

About the ASA

The ASA provides advanced stateful firewall and VPN concentrator functionality in one device.

Unsupported Features

The following ASA features are not supported on the Firepower 2100:

  • Integrated Routing and Bridging

  • Redundant interfaces

  • Clustering

  • Clientless SSL VPN with KCD

  • ASA REST API

  • ASA FirePOWER module

  • Botnet Traffic Filter

  • The following inspections:

    • SCTP inspection maps (SCTP stateful inspection using ACLs is supported)

    • Diameter

    • GTP/GPRS

Migrating an ASA 5500-X Configuration

You can copy and paste an ASA 5500-X configuration into the Firepower 2100 in Appliance Mode. However, you will need to modify your configuration. Also note some behavioral differences between the platforms.

  1. To copy the configuration, enter the more system:running-config command on the ASA 5500-X.

  2. Edit the configuration as necessary (see below).

  3. Connect to the console port of the Firepower 2100 in Appliance Mode, and enter global configuration mode:

    
    ciscoasa> enable
    Password:
    The enable password is not set. Please set it now.
    Enter Password: ******
    Repeat Password: ******
    ciscoasa# configure terminal
    ciscoasa(config)#
    
    
  4. Clear the current configuration using the clear configure all command.

  5. Paste the modified configuration at the ASA CLI.

This guide assumes a factory default configuration, so if you paste in an existing configuration, some of the procedures in this guide will not apply to your ASA.

ASA 5500-X Configuration

Firepower 2100 in Appliance Mode Configuration
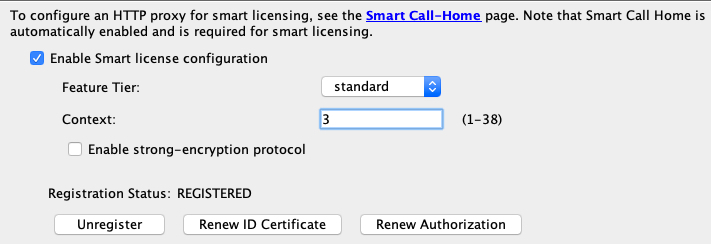
PAK License

Smart License

PAK licensing is not applied when you copy and paste your configuration. There are no licenses installed by default. Smart Licensing requires that you connect to the Smart Licensing server to obtain your licenses. Smart Licensing also affects ASDM or SSH access (see below).

Initial ASDM access

Remove any VPN or other strong encryption feature configuration—even if you only configured weak encryption—if you cannot connect to ASDM or register with the Smart Licensing server.

You can reenable these features after you obtain the Strong Encryption (3DES) license.

The reason for this issue is that the ASA includes 3DES capability by default for management access only. If you enable a strong encryption feature, then ASDM and HTTPS traffic (like that to and from the Smart Licensing server) are blocked. The exception to this rule is if you are connected to a management-only interface, such as Management 1/1. SSH is not affected.

Interface IDs

Make sure you change the interface IDs to match the new hardware IDs. For example, the ASA 5525-X includes Management 0/0, and GigabitEthernet 0/0 through 0/5. The Firepower 1120 includes Management 1/1 and Ethernet 1/1 through 1/8.

boot system commands

The ASA 5500-X allows up to four boot system commands to specify the booting image to use.

The Firepower 2100 in Appliance Mode only allows a single boot system command, so you should remove all but one command before you paste. You actually do not need to have any boot system commands present in your configuration, as it is not read at startup to determine the booting image. The last-loaded boot image will always run upon reload.

The boot system command performs an action when you enter it: the system validates and unpacks the image and copies it to the boot location (an internal location on disk0 managed by FXOS). The new image will load when you reload the ASA.

End-to-End Tasks

See the following tasks to deploy and configure the ASA.

Pre-Configuration

Install the firewall. See the hardware installation guide.

Pre-Configuration

Review the Network Deployment and Default Configuration.

Pre-Configuration

Cable the Device.

Pre-Configuration

Power on the Firewall.

ASA CLI

(Optional) Change the IP Address.

ASDM

Log Into ASDM.

Cisco Commerce Workspace

Configure Licensing: Obtain feature licenses.

Smart Software Manager

Configure Licensing: Generate a license token for the chassis.

ASDM

Configure Licensing: Configure feature licenses.

ASDM

Configure the ASA.

Review the Network Deployment and Default Configuration

The following figure shows the default network deployment for the ASA using the default configuration in Appliance mode.

If you connect the outside interface directly to a cable modem or DSL modem, we recommend that you put the modem into bridge mode so the ASA performs all routing and NAT for your inside networks. If you need to configure PPPoE for the outside interface to connect to your ISP, you can do so as part of the ASDM Startup Wizard.


Note


If you cannot use the default Management IP address for ASDM access, you can set the Management IP address at the ASA CLI. See (Optional) Change the IP Address.

If you need to change the inside IP address, you can do so using the ASDM Startup Wizard. For example, you may need to change the inside IP address in the following circumstances:

  • If the outside interface tries to obtain an IP address on the 192.168.1.0 network, which is a common default network, the DHCP lease will fail, and the outside interface will not obtain an IP address. This problem occurs because the ASA cannot have two interfaces on the same network. In this case you must change the inside IP address to be on a new network.

  • If you add the ASA to an existing inside network, you will need to change the inside IP address to be on the existing network.


Firepower 2100 Appliance Mode Default Configuration

The Firepower 2100 runs in Appliance mode by default.


Note


For pre-9.13(1) versions, Platform mode was the default and only option. If you upgrade from Platform mode, Platform mode is maintained.


The default factory configuration for the Firepower 2100 in Appliance mode configures the following:

  • inside→outside traffic flow—Ethernet 1/1 (outside), Ethernet 1/2 (inside)

  • outside IP address from DHCP, inside IP address—192.168.1.1

  • management IP address from DHCP—Management 1/1 (management)

  • DHCP server on inside interface

  • Default routes from outside DHCP, management DHCP

  • ASDM access—Management and inside hosts allowed. Inside hosts are limited to the 192.168.1.0/24 network.

  • NAT—Interface PAT for all traffic from inside to outside.

  • DNS servers—OpenDNS servers are pre-configured.

The configuration consists of the following commands:


interface Management1/1
  management-only
  nameif management
  security-level 100
  ip address dhcp setroute
  no shutdown
!
interface Ethernet1/1
  nameif outside
  security-level 0
  ip address dhcp setroute
  no shutdown
!
interface Ethernet1/2
  nameif inside
  security-level 100
  ip address 192.168.1.1 255.255.255.0
  no shutdown
!
object network obj_any
  subnet 0.0.0.0 0.0.0.0
  nat (any,outside) dynamic interface
!
http server enable
http 0.0.0.0 0.0.0.0 management
http 192.168.1.0 255.255.255.0 management
!
dhcpd auto_config outside
dhcpd address 192.168.1.20-192.168.1.254 inside
dhcpd enable inside
!
dns domain-lookup outside
dns server-group DefaultDNS
   name-server 208.67.222.222 outside
   name-server 208.67.220.220 outside
!

Cable the Device

Manage the Firepower 2100 on either Management 1/1 or Ethernet 1/2. The default configuration also configures Ethernet1/1 as outside.

Procedure


Step 1

Install the chassis. See the hardware installation guide.

Step 2

Connect your management computer to either of the following interfaces:

  • Ethernet 1/2—Ethernet 1/2 has a default IP address (192.168.1.1) and also runs a DHCP server to provide IP addresses to clients (including the management computer), so make sure these settings do not conflict with any existing inside network settings (see Firepower 2100 Appliance Mode Default Configuration). Only clients on 192.168.1.0/24 can access the ASA.

    If you need to change the Ethernet 1/2 IP address from the default, you must also cable your management computer to the console port. See (Optional) Change the IP Address.

  • Management 1/1 (labeled MGMT)—Management 1/1 obtains an IP address from a DHCP server on your management network; if you use this interface, you must determine the IP address assigned to the ASA so that you can connect to the IP address from your management computer.

You can later configure ASA management access from other interfaces; see the ASA general operations configuration guide.

Step 3

Connect the outside network to the Ethernet1/1 interface (labeled WAN).

For Smart Software Licensing, the ASA needs internet access.

Step 4

Connect other networks to the remaining interfaces.


Power on the Firewall

The power switch is located to the left of power supply module 1 on the rear of the chassis. It is a toggle switch that controls power to the system. If the power switch is in standby position, only the 3.3-V standby power is enabled from the power supply module and the 12-V main power is OFF. When the switch is in the ON position, the 12-V main power is turned on and the system boots.

Procedure


Step 1

Attach the power cord to the device and connect it to an electrical outlet.

Step 2

Press the power switch on the back of the device.

Step 3

Check the PWR LED on the front of the device; if it is solid green, the device is powered on.

Step 4

Check the SYS LED on the front of the device; after it is solid green, the system has passed power-on diagnostics.

Note


Before you move the power switch to the OFF position, use the shutdown commands so that the system can perform a graceful shutdown. This may take several minutes to complete. After the graceful shutdown is complete, the console displays It is safe to power off now. The front panel blue locator beacon LED lights up indicating the system is ready to be powered off. You can now move the switch to the OFF position. The front panel PWR LED flashes momentarily and turns off. Do not remove the power until the PWR LED is completely off.

See the FXOS Configuration Guide for more information on using the shutdown commands.


(Optional) Change the IP Address

If you cannot use the default IP address for ASDM access, you can set the IP address of the inside interface at the ASA CLI.


Note


This procedure restores the default configuration and also sets your chosen IP address, so if you made any changes to the ASA configuration that you want to preserve, do not use this procedure.


Procedure


Step 1

Connect to the ASA console port, and enter global configuration mode. See Access the ASA and FXOS CLI for more information.

Step 2

Restore the default configuration with your chosen IP address.

configure factory-default [ip_address [mask]]

Note


This command does not clear the currently-set mode, Appliance or Platform, for the Firepower 2100.

Example:


ciscoasa(config)# configure factory-default 10.1.1.151 255.255.255.0
Based on the management IP address and mask, the DHCP address
pool size is reduced to 103 from the platform limit 256

WARNING: The boot system configuration will be cleared.
The first image found in disk0:/ will be used to boot the
system on the next reload.
Verify there is a valid image on disk0:/ or the system will
not boot.

Begin to apply factory-default configuration:
Clear all configuration
Executing command: interface ethernet1/2
Executing command: nameif inside
INFO: Security level for "inside" set to 100 by default.
Executing command: ip address 10.1.1.151 255.255.255.0
Executing command: security-level 100
Executing command: no shutdown
Executing command: exit
Executing command: http server enable
Executing command: http 10.1.1.0 255.255.255.0 management
Executing command: dhcpd address 10.1.1.152-10.1.1.254 management
Executing command: dhcpd enable management
Executing command: logging asdm informational
Factory-default configuration is completed
ciscoasa(config)# 

Step 3

Save the default configuration to flash memory.

write memory


Log Into ASDM

Launch ASDM so you can configure the ASA.

The ASA includes 3DES capability by default for management access only, so you can connect to the Smart Software Manager and also use ASDM immediately. You can also use SSH and SCP if you later configure SSH access on the ASA. Other features that require strong encryption (such as VPN) must have Strong Encryption enabled, which requires you to first register to the Smart Software Manager.


Note


If you attempt to configure any features that can use strong encryption before you register—even if you only configure weak encryption—then your HTTPS connection will be dropped on that interface, and you cannot reconnect. The exception to this rule is if you are connected to a management-only interface, such as Management 1/1. SSH is not affected. If you lose your HTTPS connection, you can connect to the console port to reconfigure the ASA, connect to a management-only interface, or connect to an interface not configured for a strong encryption feature.


Before you begin

Procedure


Step 1

Enter the following URL in your browser.

  • https://192.168.1.1 —Inside (Ethernet 1/2) interface IP address.

  • https://management_ip —Management interface IP address assigned from DHCP.

Note


Be sure to specify https://, and not http:// or just the IP address (which defaults to HTTP); the ASA does not automatically forward an HTTP request to HTTPS.

The Cisco ASDM web page appears. You may see browser security warnings because the ASA does not have a certificate installed; you can safely ignore these warnings and visit the web page.

Step 2

Click Install ASDM Launcher.

Step 3

Follow the onscreen instructions to launch ASDM.

The Cisco ASDM-IDM Launcher appears.

Step 4

Leave the username and password fields empty, and click OK.

The main ASDM window appears.


Configure Licensing

The ASA uses Smart Licensing. You can use regular Smart Licensing, which requires internet access; or for offline management, you can configure Permanent License Reservation or a Smart Software Manager On-Prem (formerly known as a Satellite server). For more information about these offline licensing methods, see Cisco ASA Series Feature Licenses; this guide applies to regular Smart Licensing.

For a more detailed overview on Cisco Licensing, go to cisco.com/go/licensingguide

When you register the chassis, the Smart Software Manager issues an ID certificate for communication between the firewall and the Smart Software Manager. It also assigns the firewall to the appropriate virtual account. Until you register with the Smart Software Manager, you will not be able to make configuration changes to features requiring special licenses, but operation is otherwise unaffected. Licensed features include:

  • Essentials

  • Security Contexts

  • Strong Encryption (3DES/AES)—If your Smart Account is not authorized for strong encryption, but Cisco has determined that you are allowed to use strong encryption, you can manually add a stong encryption license to your account.

  • Cisco Secure ClientSecure Client Advantage, Secure Client Premier, or Secure Client VPN Only.

The ASA includes 3DES capability by default for management access only, so you can connect to the Smart Software Manager and also use ASDM immediately. You can also use SSH and SCP if you later configure SSH access on the ASA. Other features that require strong encryption (such as VPN) must have Strong Encryption enabled, which requires you to first register to the Smart Software Manager.


Note


If you attempt to configure any features that can use strong encryption before you register—even if you only configure weak encryption—then your HTTPS connection will be dropped on that interface, and you cannot reconnect. The exception to this rule is if you are connected to a management-only interface, such as Management 1/1. SSH is not affected. If you lose your HTTPS connection, you can connect to the console port to reconfigure the ASA, connect to a management-only interface, or connect to an interface not configured for a strong encryption feature.


When you request the registration token for the ASA from the Smart Software Manager, check the Allow export-controlled functionality on the products registered with this token check box so that the full Strong Encryption license is applied (your account must be qualified for its use). The Strong Encryption license is automatically enabled for qualified customers when you apply the registration token on the chassis, so no additional action is required. If your Smart Account is not authorized for strong encryption, but Cisco has determined that you are allowed to use strong encryption, you can manually add a strong encryption license to your account.

Before you begin

  • Have a master account on the Smart Software Manager.

    If you do not yet have an account, click the link to set up a new account. The Smart Software Manager lets you create a master account for your organization.

  • Your Smart Software Manager account must qualify for the Strong Encryption (3DES/AES) license to use some features (enabled using the export-compliance flag).

Procedure


Step 1

Make sure your Smart Licensing account contains the available licenses you need, including at a minimum the Essentials license.

When you bought your device from Cisco or a reseller, your licenses should have been linked to your Smart Software License account. However, if you need to add licenses yourself, use the Search All field on the Cisco Commerce Workspace.

Figure 1. License Search
License Search

Choose Products & Services from the results.

Figure 2. Results
Results

Search for the following license PIDs:

Note


If a PID is not found, you can add the PID manually to your order.

  • Essentials license—L-FPR2100-ASA=. The Essentials license is free, but you still need to add it to your Smart Software Licensing account.

  • 5 context license—L-FPR2K-ASASC-5=. Context licenses are additive; buy multiple licenses to meet your needs.

  • 10 context license—L-FPR2K-ASASC-10=. Context licenses are additive; buy multiple licenses to meet your needs.

  • Strong Encryption (3DES/AES) license—L-FPR2K-ENC-K9=. Only required if your account is not authorized for strong encryption.

Step 2

In the Cisco Smart Software Manager, request and copy a registration token for the virtual account to which you want to add this device.

  1. Click Inventory.

  2. On the General tab, click New Token.

  3. On the Create Registration Token dialog box enter the following settings, and then click Create Token:

    • Description

    • Expire After—Cisco recommends 30 days.

    • Max. Number of Uses

    • Allow export-controlled functionaility on the products registered with this token—Enables the export-compliance flag.

    The token is added to your inventory.

  4. Click the arrow icon to the right of the token to open the Token dialog box so you can copy the token ID to your clipboard. Keep this token ready for later in the procedure when you need to register the ASA.

    Figure 3. View Token
    Figure 4. Copy Token

Step 3

In ASDM, choose Configuration > Device Management > Licensing > Smart Licensing.

Step 4

Click Register.

Step 5

Enter the registration token in the ID Token field.

You can optionally check the Force registration check box to register the ASA that is already registered, but that might be out of sync with the Smart Software Manager. For example, use Force registration if the ASA was accidentally removed from the Smart Software Manager.

Step 6

Click Register.

The ASA registers with the Smart Software Manager using the pre-configured outside interface, and requests authorization for the configured license entitlements. The Smart Software Manager also applies the Strong Encryption (3DES/AES) license if your account allows. ASDM refreshes the page when the license status is updated. You can also choose Monitoring > Properties > Smart License to check the license status, particularly if the registration fails.

Step 7

Set the following parameters:

  1. Check Enable Smart license configuration.

  2. From the Feature Tier drop-down list, choose Essentials.

    Only the Essentials tier is available.

  3. (Optional) For the Context license, enter the number of contexts.

    You can use 2 contexts without a license. The maximum number of contexts depends on your model:

    • Firepower 2110—25 contexts

    • Firepower 2120—25 contexts

    • Firepower 2130—30 contexts

    • Firepower 2140—40 contexts

    For example, to use the maximum of 25 contexts on the Firepower 2110, enter 23 for the number of contexts; this value is added to the default of 2.

Step 8

Click Apply.

Step 9

Click the Save icon in the toolbar.

Step 10

Quit ASDM and relaunch it.

When you change licenses, you need to relaunch ASDM to show updated screens.


Configure the ASA

Using ASDM, you can use wizards to configure basic and advanced features. You can also manually configure features not included in wizards.

Procedure


Step 1

Choose Wizards > Startup Wizard, and click the Modify existing configuration radio button.

Step 2

The Startup Wizard walks you through configuring:

  • The enable password

  • Interfaces, including setting the inside and outside interface IP addresses and enabling interfaces.

  • Static routes

  • The DHCP server

  • And more...

Step 3

(Optional) From the Wizards menu, run other wizards.

Step 4

To continue configuring your ASA, see the documents available for your software version at Navigating the Cisco ASA Series Documentation.


Access the ASA and FXOS CLI

You can use the ASA CLI to troubleshoot or configure the ASA instead of using ASDM. You can access the CLI by connecting to the console port. You can later configure SSH access to the ASA on any interface; SSH access is disabled by default. See the ASA general operations configuration guide for more information.

You can also access the FXOS CLI from the ASA CLI for troubleshooting purposes.

Procedure


Step 1

Connect your management computer to the console port. Be sure to install any necessary serial drivers for your operating system. Use the following serial settings:

  • 9600 baud

  • 8 data bits

  • No parity

  • 1 stop bit

You connect to the ASA CLI. There are no user credentials required for console access by default.

Step 2

Access privileged EXEC mode.

enable

You are prompted to change the password the first time you enter the enable command.

Example:


ciscoasa> enable
Password:
The enable password is not set. Please set it now.
Enter Password: ******
Repeat Password: ******
ciscoasa#

The enable password that you set on the ASA is also the FXOS admin user password if the ASA fails to boot up, and you enter FXOS failsafe mode.

All non-configuration commands are available in privileged EXEC mode. You can also enter configuration mode from privileged EXEC mode.

To exit privileged EXEC mode, enter the disable , exit , or quit command.

Step 3

Access global configuration mode.

configure terminal

Example:


ciscoasa# configure terminal
ciscoasa(config)#

You can begin to configure the ASA from global configuration mode. To exit global configuration mode, enter the exit , quit , or end command.

Step 4

(Optional) Connect to the FXOS CLI.

connect fxos [admin]

  • admin —Provides admin-level access. Without this option, users have read-only access. Note that no configuration commands are available even in admin mode.

You are not prompted for user credentials. The current ASA username is passed through to FXOS, and no additional login is required. To return to the ASA CLI, enter exit or type Ctrl-Shift-6, x.

Within FXOS, you can view user activity using the scope security/show audit-logs command.

Example:


ciscoasa# connect fxos admin
Connecting to fxos.
Connected to fxos. Escape character sequence is 'CTRL-^X'.
firepower# 
firepower# exit
Connection with FXOS terminated.
Type help or '?' for a list of available commands.
ciscoasa#