Cisco WAE 6.4 System Administration Guide
Bias-Free Language
The documentation set for this product strives to use bias-free language. For the purposes of this documentation set, bias-free is defined as language that does not imply discrimination based on age, disability, gender, racial identity, ethnic identity, sexual orientation, socioeconomic status, and intersectionality. Exceptions may be present in the documentation due to language that is hardcoded in the user interfaces of the product software, language used based on RFP documentation, or language that is used by a referenced third-party product. Learn more about how Cisco is using Inclusive Language.
- Updated:
- March 22, 2016
Chapter: Services and Statistics
Services and Statistics
The Statistics pages enable you to configure, monitor and troubleshoot all services and servers.

Note The WAE Statistics page does not appear in some web browsers if you do not have the correct SSL certificates. To work around this, install the correct SSL certificates (see the “” section) or do the following:
1. Click the WAE Statistics link. The URL format is https:// <server_IP> :8443. For example,
2. Copy the URL of this page to another browser window.
3. In the new browser, change the URL port from 8443 to 8843. For example,
4. Follow the browser messages to accept the connection and add it as an exception.
The following terms are used on these UI pages and in this documentation.
- Service—An instance of a program that is being executed. Depending on the process, it may have multiple threads of concurrent execution.
Note that the terms service , process , and function are used interchangeably. For example, the Processes page lists services. The Platform Diagnostics page, Functions tab shows services per component.
- Component—A server or host that is running services. It can be either a device or a virtual machine. A component can reside as a stand-alone system or it can be one of the servers in a distributed (high-availability) environment.
Note that the terms component , server , and host are used interchangeably.
Note If you do not see the Statistics UI, make sure the System services are running. If they are not, turn on the System services through the CLI. For information, see Events.
Services
Service Types
Monitor Services
The
wae-svcs-mon
service automatically monitors all
wae-svcs*
,
wae-ni
, and
wae-web-server
upon installation completing. It also monitors the Automation services once they are started. If the system is rebooted or if you “ungracefully” stop a process, such as with a
kill
command,
wae-svcs-mon
automatically restarts the service. Therefore, the only way to shut down a service is as follows:
Note The wae-mld service is not monitored.
Service Location
The scripts for starting and stopping Automation and WAE services are located in
/etc/init.d
and
/usr/local/bin
. Whether these scripts are executed on startup is handled by symbolic links created in
/etc/rc#.d
directories, where # is a number 0 through 6.
You can use
chkconfig
to disable, enable, and view startup settings. Note that you must have root permission to execute
chkconfig
commands.
For more information on
service
and
chkconfig
utilities, use their
man
pages.
Ports
The ports that servers are listening to are listed in the System Requirements document posted on cisco.com. Following is an example of how to verify that the WAE Core service started and is listening to the correct port, which by default is 7777.
Viewing Service Status Details
Access: WAE Statistics > Processes.
The Process Status page shows the status of all services except
wae-mld
. The column headings list the hostname and IP address for each server (host). For each service that is running on a host, an icon appears on the service row under the appropriate host column. The icon color indicates the status of the service under the related host.
- Green—The service is operational and running.
- Red—The service is not reachable.
- Gray—The service is either initializing or is not being monitored. To enable monitoring, see
If a service is not available, a dash appears in the cell for that host.
Click the circular icon to view service status details, such as the service uptime, data collection timestamp, and the memory and CPU usage on that server.
There are two types of services monitored: WAE services and System services.
-
WAE services—These services operate WAE. Monitoring these services enables you to determine if the products are properly communicating. For instance, if
wae-nidisplays red, then you know the WAE Network Interface (NI) server might have stopped running. You could also determine network issues, such as if a port were blocked by a firewall or if a WAE server could not communicate with the network. - System services—These services enable you to gather and view the statistics. Checking these services is a good way to stay informed of whether you are properly gathering the data needed to monitor and troubleshoot WAE.
The status is updated every 15 seconds. You can also refresh the status by clicking the upper right Refresh icon.
Managing and Configuring Services
If you have an admin role, you can perform the following tasks using the WAE UI:
- Start, stop, and restart a service.
- Enable or disable monitoring of a service.
- Enable or disable a service from automatically starting at system boot.
Note System services and wae-web-server cannot be disabled at boot. You can only start, end, and restart wae-web-server using the CLI. For more information, see Starting and Stopping Services Using the CLI.
Step 1 From the WAE UI, select WAE Statistics > Processes . The Process Status lists all running services.
Step 2 Click the circular icon that belongs to the WAE service that you want to configure.
Step 3 Click the appropriate button to perform the desired action. If there are no buttons available, then that service cannot be configured.
Events
Access: WAE Statistics > Events.
Viewing Event Log Details
The Log Events Detail section shows detailed log information for each service except
wae-mld
and thus, can be used for troubleshooting the system or simply better understanding it. You could use this information for investigating a wide range of issues. For example, you could find logs that identify why a collection failed or find warnings applicable to PCEP LSP deployments.
The most recent 100 logs appear, and log data is kept up to 30 days.
- Time—Time the message was logged.
- ServiceType—Service on which the message is logged.
- ClientId—IP address of the host (component) running the service.
- LogLevel—Type of Log4j log message from Failure to Trace. Each row is color-coded to show its log level. For example, Debug is light green and Info is light blue.
- Logger—Method within the service that generated the message.
- Thread—Process thread that generated the message.
- Bundle—Karaf software component (not the same as a WAE component).
- Message—Log message.
You can search for any word in the Log Events Detail section. This search feature uses the query string syntax produced by Elasticsearch. For information on these capabilities, see the Query String Syntax information in the Elasticsearch documentation.
https://www.elastic.co/guide/en/elasticsearch/reference/current/query-dsl-query-string-query.html#query-string-syntax
Filter Log Events by Severity
To filter what type of log events are displayed, do the following:
Step 1 From the WAE UI, select WAE Statistics > Events.
Step 2 From the Select Log Level drop-down list, select the minimum log level severity.
The Log Events Detail immediately displays events with the minimum severity level you selected. For example, if you select WARN, all severity levels set to WARN or higher will be displayed. The log level severities are listed in the following order (from highest to lowest): FATAL, ERROR, WARN, INFO, and DEBUG.
Viewing Event Log Graphs
Platform Diagnostics
Access: WAE Statistics > Diagnostics.
The Platform Diagnostics page is particularly useful for analyzing trends over time and for being alerted to sudden changes in those trends, which could indicate either problems with one of the servers or a problem in the network. Diagnostics data is kept up to 7 days.
Note You can switch between the system status or utilization graphs by clicking the toggle icon underneath the Refresh icon. For more information on system status, see Chapter8, “Local Server Status”
The default view is Summary of Components in distributed deployments or Components in single-system deployments.
- Summary of Components and Components—Summary of Components shows trends of diagnostics for all components. The Components tab show trends for the component in a single-system deployment, or for a selected component in a distributed deployment.
These trends enable you to clearly see changes and potentially correlate these changes with events. If a component is sluggish or not performing as expected based on the past, you would see this as a trend change. For example, if a CPU is running generally at 25% usage and suddenly jumps to 90%, that spike would appear in the graph, and you could then check the Event Logs for errors or warnings that indicate why the CPU percentage drastically increased. If the memory usage trend changed from 5 GB to 25 GB, this change would appear in the graph, and you could check the network to see if a problem had occurred to cause such an increase.
Component diagnostics include CPU percentage usage, memory usage, network usage, and free disk space. For distributed deployments, this is also selectable as “Summary of all Components” from the top, right selection menu. The following options are also available in the top left.
- Functions—Shows diagnostics per service running on the selected component. Diagnostics include heap size, thread count, and CPU percentage used. This option is useful when you need more information than available in the Components view.
- WAE-NI—Shows interface and LSP diagnostics from WAE NI.
Note that whether the page displays services and whether the page displays information for a distributed deployment differs depending on the option selected.
Note The wae-mld service is not available from the Platform Diagnostics page.
Figure 7-1 Platform Diagnostics Selections

Using the Events and Diagnostic UIs
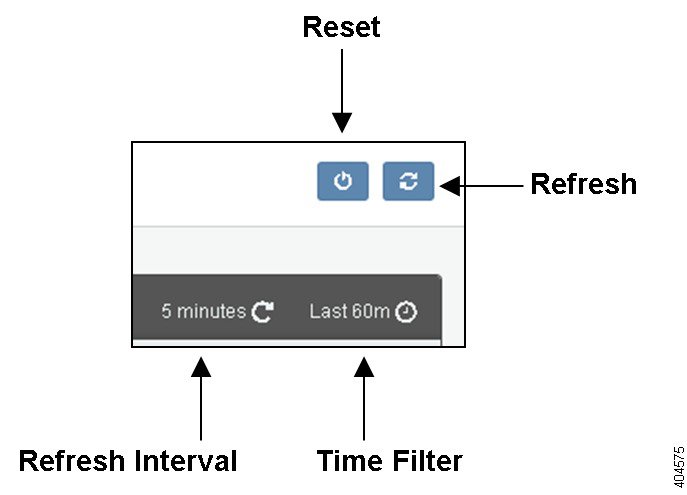
Time Filters and Refresh Intervals
The time filter and refresh interval in the top right are toggles for showing and hiding the selections to change them (Figure 7-2). The two act in conjunction with each other. The time filter is the amount of time for which the events or diagnostics are displayed. The refresh interval is how often the data is refreshed. For example, on the Platform Diagnostics page, if the time filter is the last 30 minutes and the refresh interval is 5 minutes, this means that every 5 minutes the diagnostics are updated to show the last 30 minutes from that point in time.
The default time filter is 60 minutes, and by default, the information on the pages is not automatically refreshed.
Figure 7-2 Event and Diagnostic Time Features
Change Time Filter
To change the time filter, click it. A set of choices appear. Once you set the time filter, click Go .
- Quick—Enables you to select from a set of preset time filters, ranging from the last 15 minutes up to the last 5 years.
- Relative—Enables you to specify a time that is relative to the current time. For instance, you could set it to show the data for 2 hours ago. The time extends down to the milliseconds. To round this number, select “round to the <increment> ” button, where increment changes, depending on your selection.
- Absolute—Enables you to a specific date range. Selecting a future time is not applicable.
Change Refresh Interval
To change the time interval, click the time filter or the refresh interval, select Refresh Interval, and then make your selection. You can also turn off the viewing of this interval.
Note If you leave the page, the refresh setting reverts to the default of not refreshing (off).
UI Tips
- Click the arrow to expand or close the legend that defines what each color represents.
- To highlight information represented by any color, move the cursor over it in the legend or in the graph.
- To reset the time filter, refresh interval, and graph positions to their defaults, click the Reset button.
- To move a graph, drag it to the desired location.
- To get more detail about a datapoint in the graph, hover over it.
- To expand or shrink a graph, click and drag the bottom, right corner.
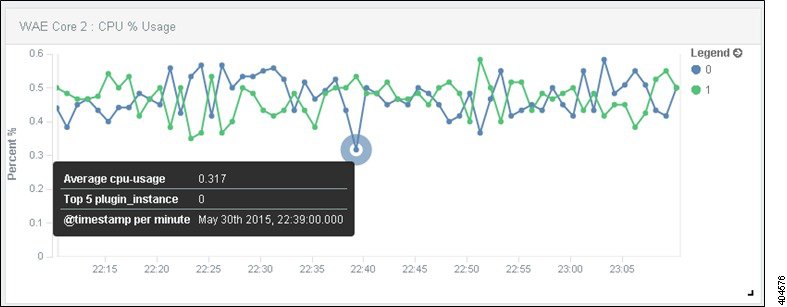
Figure 7-3 shows an example of the CPU% Usage for the WAE Core 2 component. The expanded legend defines the trend lines for CPU cores 0 (blue) and 1 (green). Hovering over the lowest CPU utilization shows more details for it. Notice the icon in the bottom right for expanding and contracting the graph.
Figure 7-3 Example Expanded View with Legend and Tooltip
Viewing Database Information
Access: WAE Statistics > Database Info.
From this page, you can view and monitor database information such as space usage (MB), and read/write cache rate percentage and disk input/output performance.
Change Date/Time Range
The graphs, by default, display information for the past day. To change the date or time range, do the following:
Step 1 From the WAE UI, select WAE Statistics > Database Info.
Step 2 Click the Date/Time Range link.
Step 3 Click the applicable radial button to enter the past number of days or to give a date and time range.
Step 4 Click the Redraw Graphs button to view the updated graphs.
Generate and Download Database Information
To generate and download a report of the information shown in the graphs, do the following:
Step 1 From the WAE UI, select WAE Statistics > Database Info.
Step 2 Click the Generate Diagnostics Report button. It may take some time for the report to generate.
Step 3 Click the Download Report button. This button is only enabled when the report is ready.
 Feedback