Cisco WAE 6.4 System Administration Guide
Bias-Free Language
The documentation set for this product strives to use bias-free language. For the purposes of this documentation set, bias-free is defined as language that does not imply discrimination based on age, disability, gender, racial identity, ethnic identity, sexual orientation, socioeconomic status, and intersectionality. Exceptions may be present in the documentation due to language that is hardcoded in the user interfaces of the product software, language used based on RFP documentation, or language that is used by a referenced third-party product. Learn more about how Cisco is using Inclusive Language.
- Updated:
- April 17, 2018
Chapter: Core Security Concepts
Core Security Concepts
If you are an administrator and are looking to optimize the security of your Cisco WAE product, you should have a good understanding of the following security concepts.
HTTPS
Hypertext Transfer Protocol Secure (HTTPS) uses Secure Sockets Layer (SSL) or its subsequent standardization, Transport Layer Security (TLS), to encrypt the data transmitted over a channel. Several vulnerabilities have been found in SSL, so Cisco WAE now supports TLS only.

Note TLS is loosely referred to as SSL often, so we will also follow this convention.
SSL employs a mix of privacy, authentication, and data integrity to secure the transmission of data between a client and a server. To enable these security mechanisms, SSL relies upon certificates, private-public key exchange pairs, and Diffie-Hellman key agreement parameters.
SSL Certificates
SSL certificates and private-public key pairs are a form of digital identification for user authentication and the verification of a communication partner’s identity. Certificate Authorities (CAs), such as VeriSign and Thawte, issue certificates to identify an entity (either a server or a client). A client or server certificate includes the name of the issuing authority and digital signature, the serial number, the name of the client or server that the certificate was issued for, the public key, and the certificate's expiration date. A CA uses one or more signing certificates to create SSL certificates. Each signing certificate has a matching private key that is used to create the CA signature. The CA makes signed certificates (with the public key embedded) readily available, enabling anyone to use them to verify that an SSL certificate was actually signed by a specific CA.
In general, setting up certificates involves the following steps:
1. Generating an identity certificate for a server.
2. Installing the identity certificate on the server.
3. Installing the corresponding root certificate on your client or browser.
4. The specific tasks you need to complete will vary, depending on your environment.
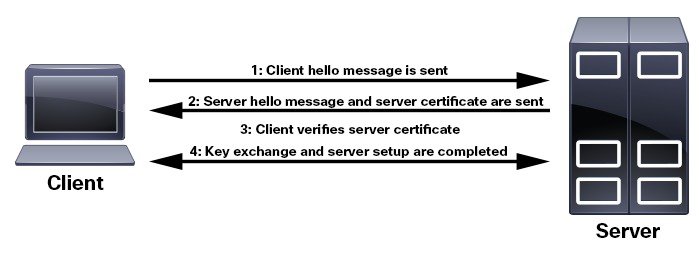
1-Way SSL Authentication
This authentication method is used when a client needs assurance that it is connecting to the right server (and not an intermediary server), making it suitable for public resources like online banking websites. Authentication begins when a client requests access to a resource on a server. The server on which the resource resides then sends its server certificate (also known as an SSL certificate) to the client in order to verify its identity. The client then verifies the server certificate against another trusted object: a server root certificate, which must be installed on the client or browser. After the server has been verified, an encrypted (and therefore secure) communication channel is established. At this point, the Cisco WAE server prompts for the entry of a valid username and password in an HTML form. Entering user credentials after an SSL connection is established protects them from being intercepted by an unauthorized party. Finally, after the username and password have been accepted, access is granted to the resource residing on the server.
Note A client might need to store multiple server certificates to enable interaction with multiple servers.
To determine whether you need to install a root certificate on your client, look for a lock icon in your browser’s URL field. If you see this icon, this generally indicates that the necessary root certificate has already been installed. This is usually the case for server certificates signed by one of the bigger Certifying Authorities (CAs), because root certificates from these CAs are included with popular browsers.
If your client does not recognize the CA that signed a server certificate, it will indicate that the connection is not secure. This is not necessarily a bad thing. It just indicates that the identity of the server you want to connect has not been verified. At this point, you can do one of two things: First, you can install the necessary root certificate on your client or browser. A lock icon in your browser’s URL field will indicate the certificate was installed successfully. And second, you can install a self-signed certificate on your client. Unlike a root certificate, which is signed by a trusted CA, a self-signed certificate is signed by the person or entity that created it. While you can use a self-signed certificate to create an encrypted channel, understand that it carries an inherent amount of risk because the identity of the server you are connected with has not been verified.
Note Cisco WAE includes a default certificate that will cause the browser to indicate that the certificate is not trusted. This is the expected behavior. The warning can be removed by applying an appropriate CA issued certificate.
Installing an SSL Certificate
As an administrator with root privileges, you can use the
install_web_certificate
script to install certificates for WAE UI and WAE application use. The script is located in the WAE Planning server under the
/usr/local/bin
directory.
Obtain the proper SSL certificate from certificate authority (CA) and have your private key file.
Step 1 Confirm that the WAE web service is running:
Step 2 Enter the following command:
wae_install_web_certificate -k <private_key_file> -c <signed_certificate_file> -a <ca_authority_file>
wae_install_web_certificate -k /path/to/172.28.101.204.web.key -c /path/to/172.28.101.204.web.crt -a /path/to/172.28.101.204.ca.crt
Note • You must include -key and - cert options when running this tool. To view help information, enter wae_install_web_certificate command with no options.
- Backup certificate files are created in $WAE_ROOT/etc/cert. To view tasks being performed and what files are affected run the command with the -verbose option.
Step 3 When prompted to restart services, enter
y
.
 Feedback