Upgrading Automatically Via Service Catalog

Overview

There are two approaches when it comes to upgrading your Nexus Dashboard Orchestrator:

  • Upgrading in-place by upgrading each component (such as the Nexus Dashboard platform and the Orchestrator service) in sequence.

    This approach is described in this chapter and is recommended in the following cases:

    • If you are using a physical Nexus Dashboard cluster.

    • If you are running a recent release of Nexus Dashboard (2.2.2 or later) and Nexus Dashboard Orchestrator (3.7.1 or later).

      While you can use this approach to upgrade any Orchestrator release 3.3(1) or later, it may require upgrading the underlying Nexus Dashboard platform before you can upgrade the Orchestrator service. In those cases, an upgrade via configuration restore described below may be faster and simpler.

  • Deploy a brand new Nexus Dashboard cluster, installing a new NDO service instance in it and transferring existing Orchestrator configuration via the configuration restore workflow

    This approach is described in Upgrading Manually Using Configuration Restore and is recommended in the following cases:

    • If you are running any release of Nexus Dashboard Orchestrator or Multi-Site Orchestrator prior to release 3.3(1).

      In this case you must upgrade using configuration restore because in-place upgrade is not supported.

    • If you are using a virtual Nexus Dashboard cluster and running an older release of Nexus Dashboard Orchestrator.

      Upgrading from an old Nexus Dashboard Orchestrator release requires upgrading the underlying Nexus Dashboard platform as well, in which case deploying a new cluster and restoring configuration may shorten the required maintenance window.

      This also allows you to simply disconnect the existing cluster and keep the existing VMs until the upgrade is complete in case you want to revert to the previous version or the upgrade does not succeed.

Changes in Release 4.0(1) and Later

Beginning with Release 4.0(1), Nexus Dashboard Orchestrator will validate and enforce a number of best practices when it comes to template design and deployment:

  • All policy objects must be deployed in order according to their dependencies.

    For example, when creating a bridge domain (BD), you must associate it with a VRF. In this case, the BD has a VRF dependency so the VRF must be deployed to the fabric before or together with the BD. If these two objects are defined in the same template, then the Orchestrator will ensure that during deployment, the VRF is created first and associate it with the bridge domain.

    However, if you define these two objects in separate templates and attempt to deploy the template with the BD first, the Orchestrator will return a validation error as the associated VRF is not yet deployed. In this case you must deploy the VRF template first, followed by the BD template.

  • All policy objects must be undeployed in order according to their dependencies, or in other words in the opposite order in which they were deployed.

    As a corollary to the point above, when you undeploy templates, you must not undeploy objects on which other objects depend. For example, you cannot undeploy a VRF before undeploying the BD with which the VRF is associated.

  • No cyclical dependencies are allowed across multiple templates.

    Consider a case of a VRF (vrf1) associated with a bridge domain (bd1), which is in turn associated with an EPG (epg1). If you create vrf1 in template1 and deploy that template, then create bd1 in template2 and deploy that template, there will be no validation errors since the objects are deployed in correct order. However, if you then attempt to create epg1 in template1, it would create a circular dependency between the two template, so the Orchestrator will not allow you to save template1 addition of the EPG.

Due to these additional rules and requirements, an upgrade to release 4.0(1) or later from an earlier release requires an analysis of all existing templates and conversion of any template that does not satisfy the new requirements. This is done automatically during the upgrade process described in the following sections and you will receive a detailed report of all the changes that had to be applied to your existing templates to make them compliant with the new best practices.


Note


You must ensure that you complete all the requirements described in the following "Prerequisites and Guidelines" section before you back up your existing configuration for the upgrade. Failure to do so may result in template conversion to fail for one or more templates and require you to manually resolve the issues or restart the migration process.


Upgrade Workflow

The following list provides a high level overview of the upgrade process and the order of tasks you will need to perform.

  1. Review the upgrade guidelines and complete all prerequisites.

  2. If upgrading from a release prior to release 4.0(1), validate existing configuration using a Cisco-provided validation script.

  3. If necessary, disable the existing Nexus Dashboard Orchestrator service and upgrade the Nexus Dashboard cluster.

    This is mandatory when upgrading to release 4.2(1) as you need to also upgrade the Nexus Dashboard platform software, which requires all services to be disabled during the upgrade.

    However, if your Nexus Dashboard cluster is virtual, you can choose to deploy a brand new cluster and install Nexus Dashboard release 3.0(1) or later along with the Orchestrator service release 4.2(1) in it. After the new cluster is up and running, you can disconnect the old cluster's VMs and complete the migration process on the new cluster, which allows you to preserve your existing cluster and easily bring it back in service in case of any issue with the migration procedure. This effectively turns the upgrade into a manual upgrade using the backup restore approach, and in this case we recommend following the instructions described in Upgrading Manually Using Configuration Restore instead

  4. Re-enable your existing Orchestrator service, then upload and activate Nexus Dashboard Orchestrator release 4.2(1).


    Note


    Enabling the older version of NDO in the newer Nexus Dashboard is required for the upgrade purposes only and is not supported for production functionality. You must upgrade to NDO release 4.2(1) or later as described in this document.


  5. Finalize the upgrade and resolve any configuration drifts.
Prerequisites and Guidelines

Before you upgrade your Cisco Nexus Dashboard Orchestrator cluster:

  • Ensure that you are running Nexus Dashboard Orchestrator release 3.3(1) or later.


    Note


    If you are running a release prior to 3.3(1), you must skip this chapter and follow the instructions described in Upgrading Manually Using Configuration Restore instead.


  • Note that downgrading from this release is not supported.

    If you ever want to downgrade, you can deploy a brand-new cluster using the earlier version and then restore configuration from the earlier release. Note that you cannot restore a backup created on a newer version in an older version, in other words restoring a backup from release 4.2(1) in release 3.7(1) is not supported.

  • Ensure that your current Nexus Dashboard cluster is healthy.

    You can check the Nexus Dashboard cluster health in one of two ways:

    • By logging into your Nexus Dashboard GUI and verifying system status in the System Overview page.

    • By logging into any one of the nodes directly as rescue-user and running the following command:

      # acs health
      All components are healthy
  • Ensure that your current Cisco Nexus Dashboard Orchestrator is healthy.

    Depending on your existing Orchestrator version, you can check the service status in one of two ways:

    • For recent NDO releases, check the Nexus Dashboard's Overview page that shows the platform and services' health.

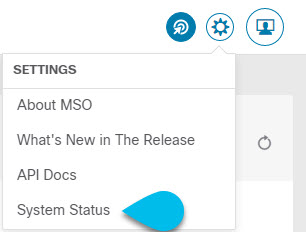
    • For older Orchestrator releases, you can check the status of you Nexus Dashboard Orchestrator service by navigating to Settings > System Status:

      Then ensure that the status of all nodes and services is healthy:

  • Ensure that there are no configuration drifts before you back up your existing configuration.

    This applies to all template types available in your existing release, such as application, tenant policies, fabric policies, and fabric resource policies templates.

    If your existing Nexus Dashboard Orchestrator is release 3.7(1) or later, you can use the drift reconciliation workflow for application templates, as described in the "Configuration Drifts" section of the Nexus Dashboard Orchestrator Configuration Guide.

  • Back up and download your existing Orchestrator configurations.

    Configuration backups are described in the "Backup and Restore" chapter of the Nexus Dashboard Orchestrator Configuration Guide for your release.

  • Back up and download your existing fabrics' configurations.

    We recommend running configuration drift reconciliation after you upgrade your Nexus Dashboard Orchestrator, which may require you to redeploy configurations to your fabrics. As such, we recommend creating configuration backups of all fabrics managed by your Nexus Dashboard Orchestrator.

    For more information on creating Cisco APIC configuration backups, see the "Management" chapter of the Cisco APIC Basic Configuration Guide for your release.

    For more information on creating Cisco Cloud Network Controller configuration backups, see the "Configuring Cisco Cloud Network Controller Components" chapter of the Cisco Cloud Network Controller User Guide for your release.

    For more information on creating Cisco Nexus Dashboard Fabric Controller configuration backups, see the "Backup and Restore" chapter of the Cisco NDFC Fabric Controller Configuration Guide for your release.

  • Note that if you have template versioning enabled (supported since release 3.4(1)), only the latest versions of the templates are preserved during the upgrade.

    All other existing versions of templates, including older versions that are tagged Golden, will not be transferred.

  • Ensure that all templates are in a supported state before creating the configuration backup of the existing cluster:

    • Templates that are undeployed or were never deployed after they were created require no additional attention and will be migrated during the upgrade.

    • All deployed templates must have no pending configuration changes.

      If you have one or more templates that have been modified since they were last deployed, you must either deploy the latest version of the template or undo the changes to the template since it was deployed by reverting to the last-deployed version and re-deploying it.

  • When upgrading the Orchestrator service, you can do so in one of two ways:

    • Using the Nexus Dashboard's App Store, as described in Upgrading Orchestrator Service Using Cisco App Store.

      In this case, the Cisco DC App Center must be reachable from the Nexus Dashboard via the Management Network directly or using a proxy configuration. Nexus Dashboard proxy configuration is described in the Nexus Dashboard User Guide.


      Note


      The App Store allows you to upgrade to the latest available version of the service only. If you want to upgrade to a different release, you must use the manual upgrade process as described below.


    • By manually uploading the new app image, as described in Upgrading Orchestrator Service Manually.

      You can use this approach if you are unable to establish the connection to the DC App Center or if you want to upgrade to a version of the service that is not the latest available release.

  • SR-MPLS and SDA integration configurations are not transferred during the upgrade.

    If you have either of these integrations in your deployment, it will not affect the migration, but you will receive a notification and will need to reconfigure them after you complete the upgrade.

  • If you plan to add and manage new Cloud Network Controller sites after you upgrade your Nexus Dashboard Orchestrator to this release, ensure that they are running Cloud Network Controller release 5.2(1) or later.

    On-boarding and managing Cloud Network Controller sites running earlier releases is not supported.

Validate Existing Configuration


Note


If you are upgrading from release 4.0(1) or later, you can skip this section and proceed to Upgrade Your Nexus Dashboard Cluster.


As mentioned in the Overview, release 4.0(1) introduced a number of template validations and enforces a set of best practices when it comes to template design and deployment. The upgrade process automatically verifies the existing templates and updates them as necessary. However, some template issues cannot be addressed automatically by the upgrade and you must resolve them before upgrading from a release prior to release 4.0(1).

This section describes how to validate your existing configuration before proceeding with the upgrade.

Before you begin

You must have the following completed:

Procedure


Step 1

Download and verify the configuration validation script.

You will use this script to validate your existing configuration before creating a backup and upgrading the Orchestrator service to this release.

  1. Ensure that you have Python installed on your local machine.

    The script requires Python 3 to run. You can check if Python is installed on your machine using the following command:

    $ python3 --version
    Python 3.9.6
  2. Download and extract the validation script tarball.

    Navigate to https://software.cisco.com/download/home/285968390/type/286317465, select the target NDO version to which you want to upgrade, download the upgrade validation script (Final_ndo<version>-UpgradeValidationScript.tgz), then extract it, for example:
    $ tar -xzf Final_ndo<version>-UpgradeValidationScript.tgz
    $ ls
    ACI_4070389ff0d61fc7fbb8cdfdec0f38f30482c22e.PEM
    Final_ndo4.1.2h-UpgradeValidationScript.tgz
    UpgradeValidationScript.tgz
    UpgradeValidationScript.tgz.signature
    cisco_x509_verify_release.py3
  3. Verify the validation script tarball signature.

    You can use the following command to verify the Cisco signature on the configuration validation script.

    $ ./cisco_x509_verify_release.py3 -e ACI_4070389ff0d61fc7fbb8cdfdec0f38f30482c22e.PEM \
      -i UpgradeValidationScript.tgz -s UpgradeValidationScript.tgz.signature -v dgst -sha512
    Retrieving CA certificate from https://www.cisco.com/security/pki/certs/crcam2.cer ...
    Successfully retrieved and verified crcam2.cer.
    Retrieving SubCA certificate from https://www.cisco.com/security/pki/certs/innerspace.cer ...
    Successfully retrieved and verified innerspace.cer.
    Successfully verified root, subca and end-entity certificate chain.
    Successfully fetched a public key from ACI_4070389ff0d61fc7fbb8cdfdec0f38f30482c22e.PEM.
    Successfully verified the signature of UpgradeValidationScript.tgz using ACI_4070389ff0d61fc7fbb8cdfdec0f38f30482c22e.PEM

    Note


    If signature verification fails, you will receive the following error:

    $ ./cisco_x509_verify_release.py3 -e ACI_4070389ff0d61fc7fbb8cdfdec0f38f30482c22e.PEM\
    -i UpgradeValidationScript.tgz -s UpgradeValidationScript.tgz.signature.fail -v dgst -sha512
    Retrieving CA certificate from https://www.cisco.com/security/pki/certs/crcam2.cer ...
    Successfully retrieved and verified crcam2.cer.
    Retrieving SubCA certificate from https://www.cisco.com/security/pki/certs/innerspace.cer ...
    Successfully retrieved and verified innerspace.cer.
    Successfully verified root, subca and end-entity certificate chain.
    Successfully fetched a public key from ACI_4070389ff0d61fc7fbb8cdfdec0f38f30482c22e.PEM.
    Error log: Failed to verify dgst signature of UpgradeValidationScript.tgz.
    Error log: Verification Failure

    In this case, we recommend you re-download the <ndo-version>-UpgradeValidationScript.tgz tarball from the Cisco Software Download portal.

  4. Once the validation script signature is verified, extract the script itself.

    % tar -xzf UpgradeValidationScript.tgz
    $ ls
    ACI_4070389ff0d61fc7fbb8cdfdec0f38f30482c22e.PEM
    Final_ndo4.1.2h-UpgradeValidationScript.tgz
    README.md
    UpgradeValidationScript.tgz
    UpgradeValidationScript.tgz.signature
    cisco_x509_verify_release.py3
    ndo
    ndoCmd.py
    ndoCopy.py
    requirements.txt

Step 2

Validate your existing configuration before you create the backup.

You can verify that your configuration backup will be compatible with upgrade to this release by running the validation script you have downloaded in the previous step. If for any reason you are unable to run the script, we recommend contacting Cisco support to have them validate your configuration backup before proceeding with the upgrade.

  1. Log in to your Nexus Dashboard and open the Nexus Dashboard Orchestrator service.

  2. Download the tech support logs from your existing Orchestrator.

    While for the migration you will create and download the configuration backup using the standard procedure, the validation is done on the tech support information. Note that it is normal for the tech support archive to be significantly larger than your typical configuration backup.

    You can generate the tech support logs by navigating to Admin > Tech Support page in the Orchestrator UI. Then click the Download icon in the System Logs tile. This downloads the msc_report_<date>.zip archive to your machine.

  3. Extract the tech support archive you downloaded.

    The tech support archive comes in a standard .zip format, so you can use any tool of your choice to extract the contents, for example:

    $ unzip msc_report_<date>.zip

    After you extract the archive, copy the msc-db-json-<date>_temp.tar.gz file inside into the directory where you extracted the validation script.

  4. Run the validation script.

    The script requires a number of dependencies, which are all defined in the requirements.txt file that comes with the script, so we recommend creating a Python virtual environment before installing the dependencies and running the script:

    $ python -m venv ndo-upgrade
    $ source ndo-upgrade/bin/activate
    $ pip install -r requirements.txt

    After the virtual environment is set up and the required modules are installed, run the script using the tech support file you downloaded and extracted in a previous step, for example:

    • -f allows you to provide the file on which to run the validation.

    • -N specifies that no configuration will be deployed to any live system.

    • -C generates the JSON-formatted output at the end of the script.

    (ndo-upgrade)ndoCmd $ ./ndoCopy.py -f msc_report_20220617_181529/msc-db-json-20220617181553_temp.tar.gz -N -C
    11:49:56 Loading collection site2...4
    11:49:56 Loading collection tenant...12
    [...]
    11:49:56 Checking template versions
    11:49:56 Checking policy deployment dependencies
    11:49:56 Fixing template policy flow loops
    11:49:56 Fixing template dependency loops
    11:49:56 Fixing policies for upgrade
    11:49:56 Determine template ordering
    11:49:56 Analysis completed
    {
      "summaryStats": {
        "appTemplatePoliciesConverted": 139,
        "appTemplateSiteAssocMods": 7,
        "appTemplatePolicyEvictions": 2,
        "appTemplateSchemasConverted": 11,
        "appTemplatesConverted": 38,
        "appTemplatesCreated": 1,
        "tenantMods": 1
      },
    [...]
    }

    After the output is generated:

    • If there are no errors or warnings blocks at the end of the generated JSON, then your configuration is compliant with the migration requirements and you can proceed to the "Back up existing deployment configuration" step.

    • If there is only a number of warnings but no errors, it means the migration will complete successfully, but there's a number of things that you may want to resolve before or after the upgrade. We recommend reviewing any warnings before continuing with the next step.

        "warnings": [
          "dropped DHCP Relay policy dhcp-tn-epgOnRL-policy: invalid provider ip address: 141.1.141.2/24",
          "dropped Route Map policy sameContract: fromPrefixLen and toPrefixLen must be larger than prefix",
          "dropped Mulicast Route Map policy mCastRt.map: invalid RP ip: 12.13.14.15/23",
          "dropped DHCP Option policy dhcpBdMso-option: duplicate option id: 1; duplicate option id: 1",
          "removed dhcpLabels.0 from bd[tn-epgOnRL::Template 1::bdDhcpClient] for 
      unresolved policy ref key[dhcpRelayPolicies::tn-epgOnRL::dhcp-tn-epgOnRL-policy]",
          "removed dhcpLabels.0 from bd[dhcp-msite-mso::bd::bd-client-l3out] for 
      unresolved policy ref key[dhcpRelayPolicies::dhcp-msite-mso::dhcp-msite-mso-relay-policy-epg-cleint-l3out]"
        ], 
    • If there is 1 or more errors listed in the JSON, the migration would fail if you continue with the current configuration.

      Note


      You must resolve any existing errors before creating the backup and proceeding with the upgrade. We recommend re-running the validation script after you resolve any existing errors to ensure that the backup will be ready for the migration.

      For example, the following sample shows 2 possible errors that can come up during validation:

      "errors": [
        "template appTemplate[<template>] version 6 is in state EDIT_CONFIG",
        "deployed policy bd[<bd>] requires vrf[<vrf>] which is not deployed",
      ] 
      • As mentioned in the Prerequisites and Guidelines section, any deployed templates must not have undeployed changes. You must either deploy the latest version of that template or revert to the deployed version (so it is the latest version) and re-deploy the template.

      • Objects must be deployed in order of their dependencies. In other words, you must not have a deployed bridge domain if the required VRF is not deployed.

  5. Resolve any shown errors and repeat this step to re-validate the configuration.


Upgrade Your Nexus Dashboard Cluster

This section described how to upgrade the Nexus Dashboard cluster to release 3.0.1 which is required for this release of Nexus Dashboard Orchestrator.

Before you begin

You must have the following completed:

  • Backed up and downloaded the existing Nexus Dashboard Orchestrator configuration.

Before upgrading the Nexus Dashboard cluster:

  • Check your existing Nexus Dashboard release.

    At a minimum, you must upgrade to Nexus Dashboard release 3.0.1.


    Note


    Nexus Dashboard supports direct upgrades between specific sets of releases only:

    • If you are on release 2.2.1 or later, you can upgrade directly to release 3.0.1.

    • If you are on a release prior to release 2.2.1, you must first upgrade to release 2.2.1 and then to release 3.0.1.


  • Ensure that you have read the Release Notes for every upgrade hop's target release for any changes in behavior, guidelines, and issues that may affect your upgrade.

    The upgrade process is the same for all Nexus Dashboard form factors. Regardless of whether you deployed your cluster using physical servers, VMware ESX, Linux KVM, Azure, or AWS, you will use the target release's ISO image to upgrade.

  • Ensure that your current Nexus Dashboard cluster is healthy.

    You can check the system status on the System Overview page of the Nexus Dashboard GUI or by logging in to one of the nodes as rescue-user and ensuring that the acs health command returns All components are healthy.

  • We recommend that you create a backup of the existing Nexus Dashboard cluster configuration prior to the upgrade.

  • Ensure that no configuration changes are made to the cluster, such as adding worker or standby nodes, while the upgrade is in progress.

  • If you are upgrading Nexus Dashboard from release 2.1(1) or earlier, you may need to clear your browser cache after the upgrade is completed for the UI to show properly.

Procedure


Step 1

Download the Nexus Dashboard image.

If you have to upgrade across multiple hops as mentioned in the Before you begin section above, download the images for every target hop.

  1. Browse to the Software Download page.

    https://software.cisco.com/download/home/286327743/type/286328258

  2. Choose the Nexus Dashboard version you want to download.

  3. Download the Cisco Nexus Dashboard image (nd-dk9.<version>.iso).

    Note


    You must download the .iso image for all upgrades, even if you used the VMware ESX .ova image or a cloud provider's marketplace for initial cluster deployment.

  4. (Optional) Host the image on a web server in your environment.

    When you upload the image to your Nexus Dashboard cluster, you will have an option to provide a direct URL to the image.

Step 2

Log in to your current Nexus Dashboard GUI as an Administrator user.

Step 3

Disable all installed services in the cluster.

When you upgrade Nexus Dashboard, all currently installed services must be disabled.

Step 4

Upload the new Nexus Dashboard image to the cluster.

Note


Note that the UI may differ slightly across different Nexus Dashboard releases, but the navigation remains the same.

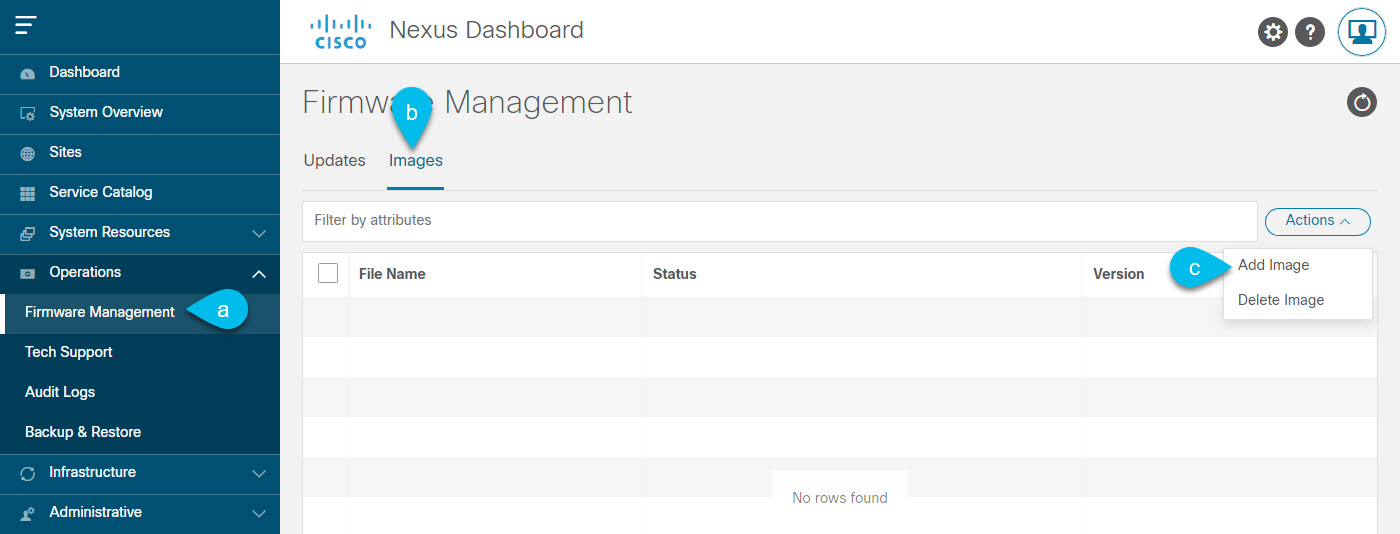
  1. Navigate to Operations > Firmware Management.

  2. Select the Images tab.

  3. From the Actions menu, select Add Image.

Step 5

Select the new image.

Note


If you have to upgrade over multiple hops, you must upload only one image at a time for the immediate release to which you are upgrading. Then after the upgrade to that hop is complete, you can repeat the process with the image for the next hop.

  1. In the Add Firmware Image window, select Local.

    Alternatively, if you hosted the image on a web server, choose Remote instead.

  2. Click Select file and select the ISO image you downloaded in the first step.

    If you chose to upload a remote image, provide the file path for the image on the remote server.

  3. Click Upload to add the image.

    The image will be uploaded to the Nexus Dashboard cluster, unpacked, processed, and made available for the upgrade. The whole process may take several minutes and you will be able to see the status of the process in the Images tab.

Step 6

Wait for the image status to change to Downloaded.

You can check the status of the image download progress in the Images.

Step 7

Set up the update.

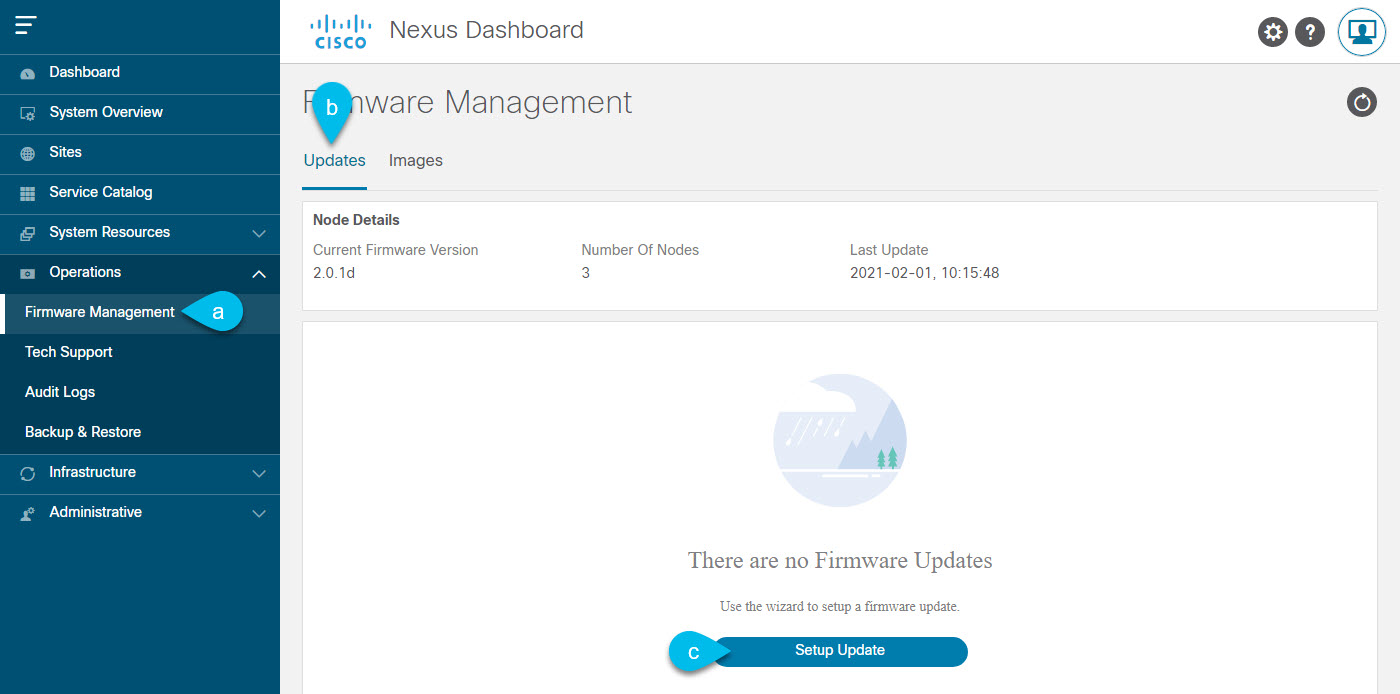
  1. Navigate to Operations > Firmware Management.

  2. Select the Updates tab.

  3. Click Setup Update.

    The Firmware Update screen opens.

Step 8

Choose the upgrade image.

  1. In the Firmware Update > Version selection screen, select the firmware version you uploaded and click Next.

  2. In the Firmware Update > Confirmation screen, verify the details and click Begin Install.

    The installation progress window is displayed. You can navigate away from this screen while the update is in progress. To check on the update status at a later time, navigate to the Firmware Management screen and click View Details in the Last Update Status tile.

    This will set up the required Kubernetes images and services but will not switch the cluster to the new version. The cluster will continue to run the existing version until you activate the new image in the next step. The entire process may take up to 20 minutes.

Step 9

Activate the new image.

  1. Navigate back to the Operations > Firmware Management screen

  2. In the Last Update Status tile, click View Details.

  3. Click Activate.

  4. In the Activation Confirmation window, click Continue.

    It may take up to 20 additional minutes for all the cluster services to start and the GUI to become available. The page will automatically reload when the process is completed.

Step 10

If you upgraded a virtual cluster deployed in VMware ESX, convert the nodes to the new profile.

Note


If your cluster is not deployed in VMware ESX or is already on release 2.1.1 or later, skip this step.

Starting with Release 2.1.1, Nexus Dashboard supports two different node profiles for virtual nodes deployed in VMware ESX. After the upgrade, you must convert all the nodes of the existing cluster to one of the new profiles:

  • Data node—node profile designed for data-intensive applications, such as Nexus Dashboard Insights

  • App node—node profile designed for non-data-intensive applications, such as Nexus Dashboard Orchestrator

The profile you choose depends on your use case scenario:

  • If you plan to run only the Nexus Dashboard Orchestrator service, convert all nodes to the App node profile.

  • If you plan to run Nexus Dashboard Insights or co-host applications, you must convert the nodes to the Data profile.

You convert the nodes to the new profile by deploying brand new nodes using that profile and replacing existing nodes with them one at a time.

  1. Bring down one of the nodes.

    You must replace one node at a time.

  2. Deploy a new node in VMware ESX using the App or Data profile OVA.

    When deploying the new node, you must use the same exact network configuration parameters as the node you are replacing.

  3. Log in to the existing Nexus Dashboard GUI.

    You can use the management IP address of one of the remaining healthy master nodes.

  4. From the left navigation pane, select System Resources > Nodes.

    The node you are replacing will be listed as Inactive.

  5. Click the (...) menu next to the inactive master node you want to replace and select Replace.

    The Replace window will open.

  6. Provide the Management IP Address and Password for the node, then click Verify.

    The cluster will connect to the new node's management IP address to verify connectivity.

  7. Click Replace.

    It may take up to 20 minutes for the node to be configured and join the cluster.

  8. Wait for the cluster to become healthy, then repeat this step for the other two nodes.

Step 11

After the upgrade is successful, delete the upgrade image you had uploaded.

You must remove the older upgrade images before uploading a new image for the next upgrade.

Step 12

If you are upgrading across multiple hops, repeat these steps for each upgrade one at a time.


Upgrading Orchestrator Service Using Cisco App Store

This section describes how to upgrade Cisco Nexus Dashboard Orchestrator.

Before you begin

  • Ensure that you have completed the prerequisites described in Prerequisites and Guidelines.

  • Ensure that Cisco DC App Center is reachable from the Nexus Dashboard via the Management Network directly or using a proxy configuration.

    Nexus Dashboard proxy configuration is described in the Nexus Dashboard User Guide

Procedure


Step 1

Log in to your Nexus Dashboard.

Step 2

From the left navigation menu, select Services.

Step 3

Re-enable the existing version of Nexus Dashboard Orchestrator.

If you had to disable the NDO service in order to upgrade the Nexus Dashboard platform as described in the previous section, you must re-enable it before upgrading to this release.

Note


Enabling the older version of NDO in the newer Nexus Dashboard is required for the upgrade purposes only and is not supported for production functionality. You must upgrade to NDO release 4.2(1) or later as described in the next steps before using the service after it's re-enabled.

Step 4

Upgrade the application using the App Store.

  1. In the Services screen, select the App Store tab.

  2. In the Nexus Dashboard Orchestrator tile, click Upgrade.

  3. In the License Agreement window that opens, click Agree and Download.

Step 5

Wait for the new image to initialize.

It may take up to 20 minutes for the new application image to become available.

Step 6

Activate the new image.

  1. In the Services page, select the Installed Services tab.

  2. In the top right corner of the Nexus Dashboard Orchestrator tile, click the menu (...) and choose Available Versions.

  3. In the available versions window, click Activate next to the new image.

    Note


    Do not Disable the currently running image before activating the new image. The image activation process will recognize the currently running image and perform the upgrade workflows necessary for the currently running version.

    It may take up to 20 additional minutes for all the application services to start and the GUI to become available. The page will automatically reload when the process is completed.

Step 7

Delete the old service image.

Because service downgrades are not supported, we recommend that you delete the older images from your Nexus Dashboard after you upgraded.

  1. In the Services page, select the Installed Services tab.

  2. In the top right corner of the Nexus Dashboard Orchestrator tile, click the menu (...) and choose Available Versions.

  3. In the available versions window, click the delete icon next to the image you want to delete.


What to do next

After you have upgraded the NDO service, you must finalize the upgrade from the NDO UI as described in Finalize Database Upgrade.

Upgrading Orchestrator Service Manually

This section describes how to upgrade Cisco Nexus Dashboard Orchestrator.

Before you begin

Procedure


Step 1

Download the target NDO release image.

  1. Browse to the Nexus Dashboard Orchestrator page on DC App Center:

    https://dcappcenter.cisco.com/nexus-dashboard-orchestrator.html
  2. From the Version dropdown, choose the version you want to install and click Download.

  3. Click Agree and download to accept the license agreement and download the image.

Step 2

Log in to your Nexus Dashboard.

Step 3

Re-enable the existing version of Nexus Dashboard Orchestrator.

If you had to disable the NDO service in order to upgrade the Nexus Dashboard platform as described in the previous section, you must re-enable it before upgrading to this release.

Note


Enabling the older version of NDO in the newer Nexus Dashboard is required for the upgrade purposes only and is not supported for production functionality. You must upgrade to NDO release 4.2(1) or later as described in the next steps before using the service after it's re-enabled.

Step 4

Upload the new NDO image to your Nexus Dashboard.

  1. From the left navigation menu, select Services.

  2. In the Nexus Dashboard's Services screen, select the Installed Services tab.

  3. From the Actions menu in the top right of main pane, select Upload App.

  4. In the Upload App window, choose the location of the image

    If you downloaded the application image to your system, choose Local.

    If you are hosting the image on a server, choose Remote.

  5. Choose the file.

    If you chose Local in the previous substep, click Select File and select the app image you downloaded.

    If you chose Remote, provide the full URL to the image file, for example http://<ip-address>:<port>/<full-path>/cisco-mso-<version>.nap.

  6. Click Upload to add the app to the cluster.

    A new tile will appear with the upload progress bar. Once the image upload is completed, the Nexus Dashboard will recognize the new image as an existing application and add it as a new version.

Step 5

Wait for the new image to initialize.

It may take up to 20 minutes for the new application image to become available.

Step 6

Activate the new image.

  1. In the OperateServices page, select the Installed Services tab.

  2. In the top right corner of the Nexus Dashboard Orchestrator tile, click the menu (...) and choose Available Versions.

  3. In the available versions window, click Activate next to the new image.

    Note


    Do not Disable the currently running image before activating the new image. The image activation process will recognize the currently running image and perform the upgrade workflows necessary for the currently running version.

    It may take up to 20 additional minutes for all the application services to start and the GUI to become available. The page will automatically reload when the process is completed.

Step 7

Delete the old service image.

Because service downgrades are not supported, we recommend that you delete the older images from your Nexus Dashboard after you upgraded.

  1. In the Services page, select the Installed Services tab.

  2. In the top right corner of the Nexus Dashboard Orchestrator tile, click the menu (...) and choose Available Versions.

  3. In the available versions window, click the delete icon next to the image you want to delete.


What to do next

After you have upgraded the NDO service, you must finalize the upgrade from the NDO UI as described in Finalize Database Upgrade.

Finalize Database Upgrade

This section describes how to deploy and configure the new Nexus Dashboard cluster and the NDO service, which you will use to restore your previous configuration.

Before you begin

You must have the following completed:

Procedure


Step 1

Open the Orchestrator service UI.

Simply click Open on the service tile in the Nexus Dashboard's Services page.

When you open NDO 4.1(2) or later for the first time, it automatically starts Post Upgrade Validation process.

Step 2

Finalize database upgrade.

  1. Ensure that there are no failures listed in the report, then click Restore and Continue to proceed.

    Before the configuration database is updated for this release, the upgrade process performs a number of validations. The validation provides a summary of template and policy changes that are performed during this final upgrade stage in the next step and includes the following:

    • Implicit template stretching – if one or more objects are implicitly stretched, the upgrade process will create new explicitly-stretched templates and move the objects into those templates.

      For example, if you have a template (t1) that contains vrf1 and is associated to site1 and another template (t2) that contains a BD that references vrf1 but is associated to two sites (site1 and site2), then vrf1 will be implicitly stretched between the two sites.

      This is no longer allowed starting with release 4.0(1) and the VRF must be explicitly stretched to both sites. In such cases during the upgrade, the VRF will be either moved to a different template which will be explicitly stretched between both sites or the original template will be associated with both sites, depending on whether the other policies in that template require stretching as well.

      Any templates that are created in this case will be named UpgradeTemplate%d, where %d is an incrementing number starting with 1 to ensure that all newly added templates are unique.

    • Global policy migration – all global tenant policies (such as DHCP relay or route maps) and fabric policies (such as QoS) will be moved into the new tenant and fabric policy templates that have been added in release 4.0(1).

    This is the stage of the upgrade where the existing schemas and templates are recreated in your NDO configuration database according to the current best practices. These schemas and templates are then posted to the local NDO database as if it were a greenfield schema/template creation. Then the newly saved templates are deployed in the correct order that conforms to the current deployment requirements and best practices. The template deployment in this step uses a “local deploy” option to calculate the deployment plan and update the database, but does not send any configuration payload to the sites' controllers.

    The upgrade process also checks for any configuration drifts between the local NDO database (configuration that is correct from NDO's point of view) and what is actually deployed in the fabrics. If this release of NDO supports additional objects or properties compared to the release from which you are upgrading, the upgrade will automatically reconcile those drifts by importing the existing configuration from the site's controller.

  2. Review the report from the previous substep and click Ok to finish.

    The final stage of the database upgrade presents a full report of the performed actions for you to review. If you close the report but want to review it again, simply click the View Restore Report in the Backups page.

Step 3

Verify that backup was restored successfully and all objects and configurations are present.

  1. In the Sites page, verify that all sites are listed as Managed.

  2. In the Tenants and Schemas pages, confirm that all tenants and schemas from your previous Nexus Dashboard Orchestrator cluster are present.

  3. Navigate to Infrastructure > Site Connectivity and confirm that intersite connectivity is intact.

    In the main pane, click Show Connectivity Status next to each site and verify that the existing tunnels are up and connectivity was not interrupted.

  4. In the main pane, click Configure to open Fabric Connectivity Infra screen and verify External Subnet Pool addresses.

    You can view the external subnet pools by selecting General Settings > IPsec Tunnel Subnet Pools tab of the Fabric Connectivity Infra screen and verify that the External Subnet Pools previously configured in Cloud Network Controller have been imported from the cloud sites.

    These subnets are used to address the IPsec tunnel interfaces and loopbacks of the Cloud Routers used for on-premises connectivity and had to be configured directly in the Cloud Network Controller in earlier Nexus Dashboard Orchestrator releases.

Step 4

Check for and resolve any configuration inconsistencies in your templates. The inconsistencies will be displayed as a warning message in a bulleted list.

  1. Navigate to your schemas and check for any templates marked with a warning. Click on the ellipsis (…​) at the restored file location to view the error message.

  2. Open a template that contains a warning and resolve any configuration inconsistencies.

  3. Save and deploy the template.

  4. Repeat these steps for all templates that have a warning.


Resolve Configuration Drifts

In some cases you may run into a situation where the configuration actually deployed in the site's controller is different from the configuration defined in the Nexus Dashboard Orchestrator. These configuration discrepancies are referred to as Configuration Drifts and are indicated by an Out of Sync warning next to the site name in the template view page

After upgrading your Nexus Dashboard Orchestrator and restoring the previous configuration backup, we recommend that you check for and resolve any configuration drifts that were not automatically resolved by the upgrade process as described in this section.


Note


Deploying any templates before resolving configuration drifts would push the configuration defined in the Orchestrator and overwrite the values defined in the fabrics' controllers.


Procedure


Step 1

In your Nexus Dashboard Orchestrator, navigate to Operate > Tenant Templates.

Step 2

Choose the Applications tab.

Step 3

Select the first schema and check its templates for configuration drifts.

You will repeat the following steps for every schema and template in your deployment

You can check for configuration drifts in one of the following two ways:

  • Check the template deployment status icon for each site to which the template is assigned.

  • Select the template and click Deploy to sites to bring up the configuration comparison screen to check which objects contain configuration drifts.

Step 4

If the template contains a configuration drift, resolve the conflicts.

For more information about configuration drifts, check the "Configuration Drifts" chapter in the Cisco Nexus Dashboard Orchestrator Configuration Guide for ACI Fabrics.

  1. Close the template deployment dialog to return to the Schema view.

    Deploying any templates at this point would push the values in the Orchestrator database and overwrite any existing settings in the fabrics.

  2. From the template's Actions menu, select Drift Reconciliation.

    The Drift Reconciliation wizard opens.

  3. In the Drift Reconciliation screen, compare the template-level configurations for each site and choose the one you want.

    Template-level properties are common across all sites associated to the template. You can compare the template level properties defined on Nexus Dashboard Orchestrator with the configuration rendered in each site and decide what should become the new configuration in the Nexus Dashboard Orchestrator template. Selecting the site configuration will modify those properties in the existing Nexus Dashboard Orchestrator template, whereas selecting the Nexus Dashboard Orchestrator configuration will keep the existing Nexus Dashboard Orchestrator template settings as is

  4. Click Go to Site Specific Properties to switch to site-level configuration.

    You can choose a site to compare that specific site's configuration. Unlike template-level configurations, you can choose either the Nexus Dashboard Orchestrator-defined or actual existing configurations for each site individually to be retained as the template's site-local properties for that site.

    Even though in most scenarios you will make the same choice for both template-level and site-level configuration, the drift reconciliation wizard allows you to choose the configuration defined in the site's controller at the "Template Properties" level and the configuration defined in Nexus Dashboard Orchestrator at the "Site Local Properties" level or vice versa.

  5. Click Preview Changes to verify your choices.

    The preview will display full template configuration adjusted based on the choices picked in the Drift Reconciliation wizard

  6. Save the schema.

  7. Click Deploy to sites to deploy the configuration and finish reconciling the drift for that template

Step 5

Repeat the above steps for every schema and template in your Nexus Dashboard Orchestrator.

Step 6

Check audit logs to verify that all templates have been re-deployed.

You can view the audit logs in the Operations tab.

Audit Logs page and confirm that all templates show as Redeployed to ensure that full re-deployment successfully completed.