Cisco Intersight
Cisco Intersight is a Software-as-a-Service (SaaS) infrastructure management platform that is augmented by other intelligent systems. It provides global management of the Cisco Unified Computing System (Cisco UCS) and Cisco HyperFlex hyperconverged infrastructure, Cisco APIC, and other platforms including Nexus Dashboard.
Data center apps, such as Cisco Nexus Dashboard Insights, connect to the Cisco Intersight portal through a Device Connector that is embedded in the management controller of each system, in this case your Nexus Dashboard platform. Device Connector provides a secure way for the connected devices to send information and receive control instructions from the Cisco Intersight portal, using a secure internet connection.
When an Intersight-enabled device or application starts, the Device Connector starts at boot by default and attempts to connect to the cloud service. If the Auto Update option is enabled, the Device Connector is automatically updated to the latest version through a refresh by the Intersight service when you connect to Cisco Intersight. For more information on the Auto Update option, see Configuring Device Connector Settings.
For additional information on Cisco Intersight, see https://www.intersight.com/help/getting_started.

Note ![]() If you upgraded from Application Services Engine and your Intersight device connector is claimed with a proxy configured, you will need to re-configure the proxy in the Cluster Configuration screen. For more information, see Cluster Configuration.
If you upgraded from Application Services Engine and your Intersight device connector is claimed with a proxy configured, you will need to re-configure the proxy in the Cluster Configuration screen. For more information, see Cluster Configuration.
Configuring Device Connector Settings
Devices are connected to the Cisco Intersight portal through a Device Connector, which provides a secure way for the connected devices to send information and receive control instructions from the Cisco Intersight portal.
All device connectors must properly resolve svc.intersight.com and allow outbound initiated HTTPS connections on port 443. If a proxy is required for an HTTPS connection, you must configure the proxy settings in your Nexus Dashboard.
This section describes how to configure the basic Device Connector settings.
-
Navigate to your Nexus Dashboard’s Admin Console.
-
From the main navigation menu, select Infrastructure > Intersight.
-
In the top right of the main pane, click Settings.
-
Click the General tab to configure basic options.
-
Use the Device Connector knob to enable or disable the Device Connector.
This enables you to claim the device and leverage the capabilities of Intersight. If it is disabled, no communication is allowed to Cisco Intersight.
-
In the Access Mode area, choose whether to allow Intersight the capability to make changes to this device.
-
Allow Control(default) — enables you to perform full read or write operations from the cloud based on the features available in Cisco Intersight. -
Read-only— ensures that no changes are made to this device from Cisco Intersight.For example, actions such as upgrading firmware or a profile deployment will not be allowed in read-only mode. However, the actions depend on the features available for a particular system.
-
-
Use the Auto Update knob to enable automatic Device Connector updates.
We recommend that you enable automatic updates so that the system automatically updates the Device Connector software. When enabled, the Device Connector will automatically upgrade its image whenever there is any upgrade push from Intersight.
If you disable the automatic updates, you will be asked to manually update the software when new releases become available. Note that if the Device Connector is out-of-date, it may be unable to connect to Cisco Intersight.
-
-
Click Save to save the changes.
-
Click the Certificate Manager tab if you want to import additional certificates.
By default, the device connector trusts only the built-in certificate. If the device connector establishes a TLS connection and a server sends a certificate that does not match the built-in certificate, the device connector terminates TLS connections because it cannot determine if the server is a trusted device.
You can choose to upload additional certificates by clicking the Import button in this screen. The imported certificates must be in the
.pem(base64 encoded) format. After a certificate is successfully imported, it is listed in the list of Trusted Certificates and if the certificate is correct, it is shown in the In-Use column.You can click the View icon at the end of the certificate’s row to view its details such as name, issue and expiration dates.
Target Claim
This section describes how to claim the Nexus Dashboard platform as a device for Cisco Intersight.
You must have configured the Intersight Device Connector as described in Configuring Device Connector Settings.
To claim the device:
-
Navigate to your Nexus Dashboard’s Admin Console.
-
From the main navigation menu, select Infrastructure > Intersight.
-
Check whether the Device Connector is already configured.
-
If you see a green dotted line connecting Internet to Intersight in the Device Connector page and the text Claimed, then your Intersight Device Connector is already configured and connected to the Intersight cloud service, and the device is claimed. In this case, you can skip the rest of this section.
-
If you see a red dotted line connecting to Internet in the Device Connector page, you must configure a proxy for your Nexus Dashboard cluster to be able to access the Internet, as described in Cluster Configuration before continuing with the rest of this section.
-
If you see a yellow dotted line and a caution icon connecting Internet to Intersight in the Device Connector page and the text Not Claimed, then your Intersight Device Connector is not yet configured and connected to the Intersight service, and the device is not yet claimed. Follow these procedures to configure the Intersight Device Connector and connect to the Intersight cloud service, and claim the device. In this case, proceed with the rest of the steps to configure the device.
-
-
If necessary, update the device connector software.
If there is a new Device Connector software version available and you do not have the Auto Update option enabled, you will see a message at the top of the screen informing you that Device Connector has important updates available. Enabling the auto-update feature is described in Configuring Device Connector Settings.
To manually update the Device Connector, click the Update Now link.
-
Note down the
Device IDandClaim Codelisted on the Nexus Dashboard’s Intersight page.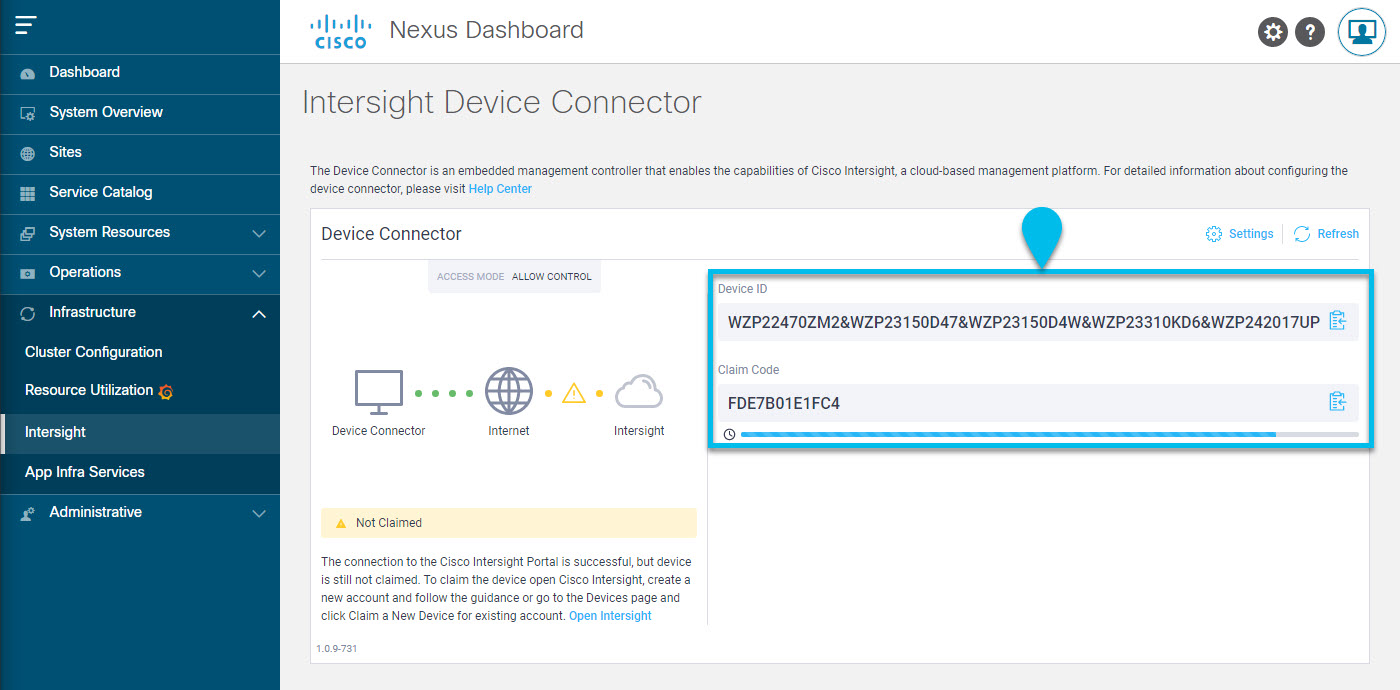
-
Log into the Cisco Intersight cloud site at https://www.intersight.com.
-
Follow the instructions described in the Target Claim section of the Intersight documentation to claim the device.
After the device is claimed in Intersight, you should see green dotted lines connecting Internet to Intersight in your Nexus Dashboard’s Device Connector page along with the text Claimed.
Note
 You may need to click Refresh in top right of the page to update the latest status.
Unclaiming the Device
To unclaim the Nexus Dashboard as a device from Intersight:
-
Navigate to your Nexus Dashboard’s Admin Console.
-
From the main navigation menu, select Infrastructure > Intersight.
-
In the main pane, click Unclaim.
 Feedback