Deploying in Microsoft Azure

Prerequisites and Guidelines

Cloud deployments are supported starting with Nexus Dashboard, Release 2.0.2b. Earlier releases support only the physical form factor described in Deploying as Physical Appliance.

Before you proceed with deploying the Nexus Dashboard cluster in Microsoft Azure, you must:

  • Review and complete the general prerequisites described in the Deployment Overview.

  • Ensure that the Azure form factor supports your scale and application requirements.

    Scale and application co-hosting vary based on the cluster form factor. You can use the Nexus Dashboard Capacity Planning tool to verify that the cloud form factor satisfies your deployment requirements.

  • Have appropriate access privileges for your Azure account and subscription.

  • Create an SSH key pair.

    A key pair consists of a private key and a public key, which are used as security credentials to verify your identity when connecting to Nexus Dashboard VMs. You will be asked to provide the public key when creating the Nexus Dashboard nodes.

    You can use an external utility, such as putty, to generate a key pair for your cluster.
Deploying the Cisco Nexus Dashboard in Azure

This section describes how to deploy Cisco Nexus Dashboard cluster in Microsoft Azure.

Before you begin

Procedure


Step 1

Subscribe to Cisco Nexus Dashboard product in Azure Marketplace.

  1. Log into your Azure account and browse to https://azuremarketplace.microsoft.com

  2. In the search field, type Cisco Nexus Dashboard and select the option that is presented.

    You will be re-directed to the Nexus Dashboard Azure Marketplace page.

  3. Click Get it now.

  4. In the Select a plan dropdown, select the version and click Create.

Step 2

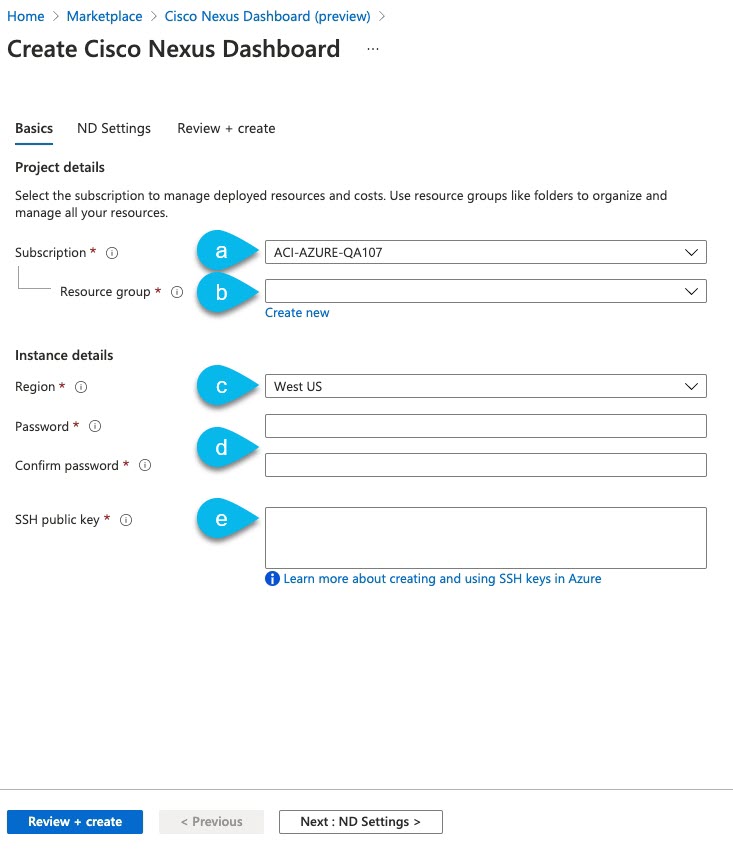
In the Basics tab, provide the subscription details, region, and password.

  1. From the Subscription dropdown, select the subscription you want to use for this.

  2. From the Resource group dropdown, select an existing resource group for the cluster or click Create new to create one.

  3. From the Region dropdown, select the regions where the template will be deployed.

    This must be the same region where you created your resource group and VNET.

  4. Provide and confirm the node password.

    This is the same password that will be used for the rescue-user on each node.

  5. In the SSH public key field, paste the public key from the key pair you generate as part of the Prerequisites and Guidelines section.

Step 3

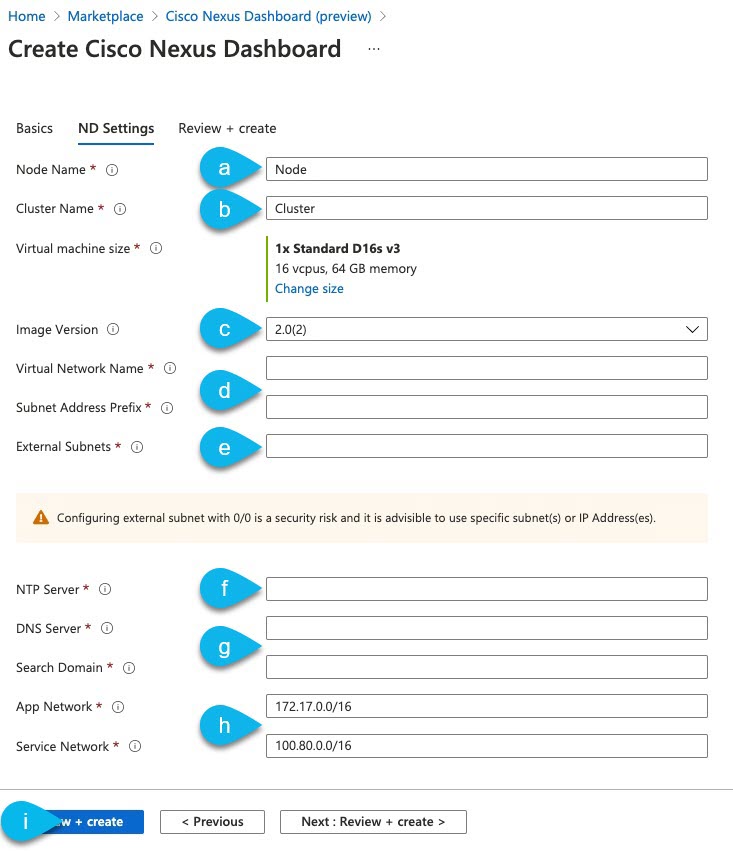
Provide ND Settings cluster details.

  1. Provide the Node Name.

    The template will deploy a 3-node cluster with each node using the Node Name prefix and appending 1, 2, and 3 to create unique host names for each node.

  2. Provide the Cluster Name.

    The cluster name must be the same across all nodes you deploy.

  3. In the Image Version dropdown, ensure the latest release is selected.

  4. In the Virtual Network Name and Subnet Address Prefix fields, provide the name of the VNET and choose a subnet within that VNET.

    If the VNET with the name you enter does not exist, it will be created for you.

  5. In the External Subnets field, provide the external network allowed to access the cluster.

    For example, 0.0.0.0/0 to be able to access the cluster from anywhere.

  6. Provide the NTP Servers information.

  7. Provide the DNS Servers and Search Domains information.

  8. Provide the Application Network and Service Network.

    These are internal networks used by the Nexus Dashboard and its processes.

    For example, 172.17.0.1/16 and 100.80.0.0/16.

  9. Click Review + create.

    The product page appears, which shows a summary of your configuration and enables you to launch the cloud formation template.

Step 4

Wait for the VMs deployment to complete, then start the VMs.

Step 5

(Optional) Enable password-based SSH login.

By default only key-based SSH login is enabled for each node. If you'd like to be able to SSH into the nodes using a password, you will need to explicitly enable password-based logins. You can do that by connecting to the VM console of each node from Azure, logging in as rescue-user using the password you provided during cluster deployment, and then executing the following command:
# acs login-prompt enable

Step 6

Verify that the cluster is healthy.

It may take up to 30 minutes for the cluster to form and all the services to start.

  1. Login in to one of the nodes.

    $ ssh rescue-user@<node-ip-address>
  2. Verify that the cluster is up and running.

    You can check the current status of cluster deployment by logging in to any of the nodes and running the acs health command.

    While the cluster is converging, you may see the following outputs:

    $ acs health
    k8s install is in-progress
    $ acs health
    k8s services not in desired state - [...]
    $ acs health
    k8s: Etcd cluster is not ready
    When the cluster is up and running, the following output will be displayed:
    $ acs health
    All components are healthy
  3. Log in to the Nexus Dashboard GUI.

    After the cluster becomes available, you can access it by browsing to any one of your nodes' management IP addresses. The default password for the admin user is the same as the rescue-user password you chose for the first node of the Nexus Dashboard cluster.

    When you first log in, you will be prompted to change the password.