Configure Devices

Device limits

The number of devices you can assign to a data gateway under Crosswork Cloud Traffic Analysis or Crosswork Cloud Trust Insights depends on your subscription plan. To view the current number of devices used and available under your plan, navigate to Purchasing icon > Licensing and click Traffic Analysis or Trust Insights.

Important note on device limits

If a single device is assigned to both a Crosswork Cloud Traffic Analysis data gateway and a Crosswork Cloud Trust Insights data gateway, it counts as a separate device towards each application plan’s device limit.

Example:

You have subscription plans for Crosswork Cloud Traffic Analysis and Crosswork Cloud Trust Insights with the following device limits:

Device limits

  • Crosswork Cloud Trust Insights plan: 10 devices

  • Crosswork Cloud Traffic Analysisplan: 5 devices

Under your tenancy, you have these devices assigned to data gateways in this manner:

Devices assigned to data gateways

  • Crosswork Cloud Trust Insights: 5 devices

  • Crosswork Cloud Traffic Analysis: 3 devices

  • Both Crosswork Cloud Traffic Analysis and Crosswork Cloud Traffic Analysis: 1 device

Calculate the number of available devices you have left under each plan.

Crosswork Cloud Trust Insights:

  • Devices Used: 6 (5 devices + 1 device assigned to both)

  • Devices Available: 4 (10 device limit - 6 used)

Crosswork Cloud Traffic Analysis:

  • Devices Used: 4 (3 devices + 1 device assigned to both)

  • Devices Available: 1 (5 device limit - 4 used)

Add devices to Crosswork Traffic Analysis

Follow these steps to add devices to Crosswork Traffic Analysis:

Before you begin

Confirm that there is an active data gateway in Crosswork Cloud. For more information, see Get Started with Crosswork Cloud Traffic Analysis.

Procedure


Step 1

Configure BGP, SNMP, and network flow monitoring protocols on the devices.

Step 2

Add device credentials for BGP, SSH (optional), and SNMP to be used when adding devices.

Step 3

Add or import devices.

Step 4

Designate an External Interface


What to do next

Add devices to Crosswork Cloud Trust Insights

Follow these steps to add devices to Crosswork Trust Insights:

Before you begin

Confirm that there is an active data gateway in Crosswork Cloud. For more information, see Get Started with Crosswork Cloud Trust Insights.

Procedure


Step 1

Confirm that the Cisco IOS XR version on your devices are supported.

Step 2

Verify Router Configuration

Step 3

Configure Limited Privilege User

Step 4

Add device credential profiles to be used when adding devices.

Step 5

Add or import devices.

Step 6

Initiate a dossier collection to get the latest device information.


Prerequisites for adding devices for Crosswork Cloud Traffic Analysis

Before you add devices to Crosswork Cloud Traffic Analysis, ensure that your devices have SSH and the following protocols configured:

Table 1. Protocol Configurations

Protocol

Example

SNMP

SNMP configuration examples

BGP

BGP configuration example for Cisco IOS devices

Network Flow Monitoring

If your devices are configured to restrict certain commands, you must ensure the following CLI commands are allowed:

  • show platform security integrity dossier
  • show version

The following sections contain configuration examples.

SNMP configuration examples

The following code shows examples of SNMP configurations.

  • SNMPv2 configuration example:

    snmp-server community flow123 RO

    In the previous example, flow123 should match the configuration from the SNMP communities.

  • SNMPv3 configuration examples:

    • For SNMPv3 without authentication and without privacy:

      snmp-server group [groupname] v3 noauth
      snmp-server user [username] [groupname] v3
    • For SNMPv3 with authentication and without privacy:

      snmp-server group [groupname] v3 auth
      snmp-server user [username] [groupname] auth [md5|sha] <auth-password>
    • For SNMPv3 with authentication and privacy:

      snmp-server group [groupname] v3 priv
      snmp-server user [username] [groupname] auth [md5|sha] <auth-password> priv [aes 128] <priv-password>

    Crosswork Cloud Traffic Analysis supports SNMPv3 128-bit only for the privacy protocol.

  • (Optional) You can use the snmp-server view command to restrict SNMPv3 access. The following command examples show SNMP object identifiers (OIDs) read by Crosswork Cloud Traffic Analysis:

    snmp-server view [view_name] 1.3.6.1.2.1.1 included
    snmp-server view [view_name] 1.3.6.1.2.1.2 included
    snmp-server view [view_name] 1.3.6.1.2.1.31 included
    
    snmp-server group [groupname] v3 [noauth|auth|priv] read [view_name]
    

BGP configuration example for Cisco IOS devices

The following code is an example of a BGP configuration for Cisco IOS devices:


Note


All BGP prefixes must be shared with Cisco Crosswork Data Gateway.


Cisco IOS XE

router bgp <asn> << This must match the ASN in the CDG DEVICE configuration page in the Crosswork Cloud UI
>>
bgp router-id <router-id>
bgp log-neighbor-changes
no bgp default ipv4-unicast
neighbor <CDG-ipv4-address> remote-as <CDG-asn>  << This must match the ASN of the CDG in the Crosswork Cloud UI. It should be a Private ASN number. >>
neighbor <CDG-ipv4-address> description Cisco CrossWork Cloud CDG IPv4
neighbor <CDG-ipv4-address> ebgp-multihop 255
neighbor <CDG-ipv4-address> update-source <src-interface>
!
neighbor <CDG-ipv6-address> remote-as <CDG-asn>   << This must match the ASN of the CDG in the Crosswork Cloud UI. It should be a Private ASN number. >>
neighbor <CDG-ipv6-address> description Cisco CrossWork Cloud CDG IPv6
neighbor <CDG-ipv6-address> ebgp-multihop 255
neighbor <CDG-ipv6-address> update-source <src-interface>
!
address-family ipv4
  neighbor <CDG-ipv4-address> activate
  neighbor <CDG-ipv4-address> send-community both
  neighbor <CDG-ipv4-address> filter-list 2 in
  neighbor <CDG-ipv4-address> filter-list 1 out
exit-address-family
!
address-family ipv6
  neighbor <CDG-ipv6-address> activate
  neighbor <CDG-ipv6-address> send-community both
  neighbor <CDG-ipv6-address> filter-list 2 in
  neighbor <CDG-ipv6-address> filter-list 1 out
exit-address-family
!
ip as-path access-list 1 permit .*   <<All BGP prefixes from the device must be shared with Cisco CrossWork Cloud CDG>>
ip as-path access-list 2 deny .*
!
 

Cisco IOS XR

router bgp <asn> << This must match the ASN in the CDG DEVICE configuration page in the Crosswork Cloud UI
>>
 bgp router-id <router-id>
 address-family ipv4 unicast
 !
 address-family ipv6 unicast
 !
 neighbor <CDG-ipv4-address>   
  remote-as <CDG-asn>    << This must match the ASN of the CDG in the Crosswork Cloud UI. It should be a Private ASN number. >>

  ebgp-multihop 255
  description Cisco CrossWork Cloud CDG IPv4
  update-source <src-interface>
  address-family ipv4 unicast
   route-policy DROP in
   route-policy PASS out
 !
 neighbor <route-server-ipv6>
  remote-as <CDG-asn>   << This must match the ASN of the CDG in the Crosswork Cloud UI. It should be a Private ASN number. >>

  ebgp-multihop 255
  description Cisco CrossWork Route Server IPv6
  update-source <src-interface>
  address-family ipv6 unicast
   route-policy DROP in
   route-policy PASS out
!
route-policy PASS
 pass
end-policy
!
route-policy DROP
 drop
end-policy
!
 

where

  • <asn> is the BGP AS number in your network

  • <router-id> is the BPG router ID in your network

  • <CDG-asn> is the BGP ASN number of CDG. It should be a Private ASN number

  • <src-interface> is the BGP source interface in your network

  • <CDG-ipv4-address> is the IPv4 address of CDG

  • <CDG-ipv6-address> is the IPv6 address of CDG

Netflow configuration example for Cisco IOS XR devices

The following code shows Netflow configuration examples for Cisco IOS XR devices:

IPv4 Example:

flow exporter-map ccni
 packet-length 1468
 version v9
  options sampler-table timeout 15
  template data timeout 15
  template options timeout 15
 !
 transport udp 2055
 source GigabitEthernet0/0/0/0
 destination 172.24.96.171  << this is the IP address of the CDG >>
!
flow monitor-map ccni
 record ipv4
 exporter ccni
 cache entries 1000000
 cache timeout active 12
 cache timeout update 15
!
sampler-map ccni-sampler
 random 1 out-of 1000
!         
interface GigabitEthernet0/0/0/0
 ipv4 address 172.24.96.141 255.255.255.128
 flow ipv4 monitor ccni sampler ccni-sampler ingress

Example for exporting NetFlow IPv6 records through an IPv4 connection:


Note


In this example, 192.0.2.169 is the IPv4 address of the Crosswork Data Gateway.


flow exporter-map ccni
 packet-length 1468
 version v9
  options sampler-table timeout 15
  template data timeout 15
  template options timeout 15
 !
 transport udp 2055
 source GigabitEthernet0/0/0/0
 destination 192.0.2.169  << this is the IP address of the CDG >>
!
flow monitor-map ccni-ipv6
 record ipv6
 exporter ccni
 cache entries 1000000
 cache timeout active 12
 cache timeout update 15
!
sampler-map ccni-sampler
random 1 out-of 1000
!         
interface GigabitEthernet0/0/0/0
 ipv6 address 2001:100:100::1/64
flow ipv6 monitor ccni-ipv6 sampler ccni-sampler ingress


Applying IPv4 and IPv6 Example:


flow exporter-map ccni
packet-length 1468
version v9
  options sampler-table timeout 15
  template data timeout 15
  template options timeout 15
!
transport udp 2055
source GigabitEthernet 0/0/0/0
destination 172.24.96.171 << this is the IP address of the CDG >>
!
flow monitor-map ccni
  record ipv4
  exporter ccni
  cache entries 1000000
  cache timeout active 12
  cache timeout update 15
!
flow monitor-map ccni-ipv6
  record ipv6
  exporter ccni
  cache entries 1000000
  cache timeout active 12
  cache timeout update 15
 
sampler-map ccni-sampler
  random 1 out-of 1000 
!
interface GigabitEthernet0/0/0/0
 
  ipv4 address 172.24.96.141 255.255.255.128
  ipv6 address 2001:100:100::1/64
  flow ipv4 monitor ccni sampler ccni-sampler ingress
  flow ipv6 monitor ccni-ipv6 sampler ccni-sampler ingress

IPFIX configuration example for Cisco IOS XR devices

The following code shows an IPFIX configuration example for Cisco IOS XR devices:

flow exporter-map ccni
 packet-length 1468
 version ipfix
  options sampler-table timeout 15
  template data timeout 15
  template options timeout 15
 !
 transport udp 2055
 source GigabitEthernet0/0/0/0
 destination 172.24.96.184
!
flow monitor-map ccni
 record ipv4
 exporter ccni
 cache entries 1000000
 cache timeout active 3
 cache timeout update 3
!
sampler-map ccni-sampler
 random 1 out-of 1000
!
interface TenGigE0/0/0/16
 description internal interface
 ipv4 address 182.1.0.1 255.255.255.0
 flow ipv4 monitor ccni sampler ccni-sampler ingress
!
interface TenGigE0/0/0/27
 description external interface
 ipv4 address 184.1.0.1 255.255.255.0
 flow ipv4 monitor ccni sampler ccni-sampler ingress

SNMP object identifiers used by Crosswork Cloud Traffic Analysis

If you want to create a specific SNMP view for Crosswork Cloud Traffic Analysis, the following list contains the SNMP object identifiers (OIDs) that Crosswork Cloud Traffic Analysis uses.

  • sysDescr—1.3.6.1.2.1.1.1.0

  • sysObjectID—1.3.6.1.2.1.1.2.0

  • sysUpTime—1.3.6.1.2.1.1.3.0

  • sysName—1.3.6.1.2.1.1.5.0

  • sysLocation—1.3.6.1.2.1.1.6.0

  • ifDescr—1.3.6.1.2.1.2.2.1.2

  • ifType—1.3.6.1.2.1.2.2.1.3

  • ifSpeed—1.3.6.1.2.1.2.2.1.5

  • ifOperStatus—1.3.6.1.2.1.2.2.1.8

  • ifName—1.3.6.1.2.1.31.1.1.1.1

  • ifHCSpeed—1.3.6.1.2.1.31.1.1.1.15

  • ifHCInOctets—1.3.6.1.2.1.31.1.1.1.6

  • ifHCOutOctets—1.3.6.1.2.1.31.1.1.1.10

Configure interfaces

Designate an external interface for Crosswork Cloud Traffic Analysis

After you add devices, you need to verify their SNMP status and then configure one or more interfaces to be external interfaces. Crosswork Cloud Traffic Analysis cannot display traffic data until you designate an external interface.

Procedure


Step 1

In the main window, click Configure > Devices.

Step 2

Click on a device name in the Device column.

Step 3

Hover your cursor over SNMP, which appears between Crosswork Data Gateway and Devices, and ensure that the status is Connected.

By default, all interfaces are designated as internal interfaces. You need to select the external interface on your device and designate it as external.

Step 4

Click the Traffic Analysis tab, then click Interfaces.

Step 5

Select one or more external interfaces, then click Set External.

Crosswork Cloud Traffic Analysis recognizes the interface as an external interface.


Assign a Committed Information Rate (CIR) to an interface

The Committed Information Rate (CIR) allows you to specify the bandwidth allowed on an interface if it is less than the physical capacity of that interface. It is useful to specify this, so that all calculations for interface capacity utilization refer to the permitted capacity rather than the physical capacity. For example, a 10 Gbps interface may only support a CIR of 1 Gbps. To accurately get an understanding of interface utilization in your network, you may want to base capacity calculations on the CIR of an interface. To assign a CIR to an interface:

Procedure


Step 1

In the main window, click Crosswork Cloud Traffic Analysis icon > Interfaces.

Step 2

From the Interfaces column, click on an interface name.

Step 3

Click Edit.

Step 4

In the Interface Capacity Override area, you can see what the interface capacity is currently set at. Toggle the switch to ENABLED.

Step 5

Enter the CIR for this interface. It must be lower than the physical interface capacity, but not less than 10 Mbps.

Step 6

Click Save.


After a CIR is assigned, all capacity calculations are based on the CIR. This means that interface utilization thresholds set in policies, as well as all interface capacity values displayed in Crosswork Traffic Analysis, use the CIRs assigned to the applicable interfaces.

Identify CIR interfaces

All interface capacity values that have an assigned CIR displays a CIR icon (CIR icon). For example:

Figure 1. Traffic Drilldown Example

Traffic Drilldown Capacity Example

Prerequisites for Adding Devices to Crosswork Cloud Trust Insights

Before you add your Cisco IOS XR routers to Crosswork Cloud Trust Insights, you must ensure the following router settings:

Verify router configuration for Crosswork Cloud Trust Insights

Before you use Crosswork Cloud Trust Insights, you need to verify that your Cisco IOS XR routers are configured correctly to allow their trust information to be accessed. Follow these steps to ensure your routers are configured correctly for Crosswork Cloud Trust Insights.


Note


The following example is the minimal Cisco IOS XR configuration required to enable Crosswork Cloud Trust Insights. For more configuration examples, refer to the configuration guide that corresponds to the platform on which you want to enable Crosswork Cloud Trust Insights. See Related Hardware Documentation for direct links to the configuration guides.


Procedure


Step 1

Log into your router and enter the following command:

ios# show running-config

Step 2

Verify that the output contains the following configuration elements:

  • Hostname

  • DNS domain name

  • SSH server enabled

  • Netconf-yang enabled for SSH

  • Valid IP interface configured and reachable for inbound SSH access

  • Appropriate static default route configured

The following example output shows what you should see:


hostname xr9kv-001
domain name test.cisco.com
!
netconf-yang agent
 ssh
!
interface MgmtEth0/RP0/CPU0/0
 ipv4 address 192.168.1.123 255.255.255.0
!
router static
 address-family ipv4 unicast
  0.0.0.0/0 192.168.1.1
  !
!
ssh server v2
ssh server netconf vrf default

Step 3

Ensure the router can be reached by SSH.

Step 4

To generate keypairs for both the system-root-key and the system-enroll-key, enter the following operational mode commands:

RP/0/RP0/CPU0:xr9kv-001#crypto key generate rsa system-root-key
Tue Apr 21 22:45:55.400 UTC
The name for the keys will be: system-root-key
Choose the size of the key modulus in the range of 512 to 4096 for your General Purpose Keypair. Choosing a key modulus greater than 512 may take a few minutes.

How many bits in the modulus [2048]:
Generating RSA keys ...
Done w/ crypto generate keypair
[OK]

RP/0/RP0/CPU0:xr9kv-001#crypto key generate rsa system-enroll-key
Tue Apr 21 22:46:24.943 UTC
The name for the keys will be: system-enroll-key
Choose the size of the key modulus in the range of 512 to 4096 for your General Purpose Keypair. Choosing a key modulus greater than 512 may take a few minutes.

How many bits in the modulus [2048]:
Generating RSA keys ...
Done w/ crypto generate keypair
[OK]
RP/0/RP0/CPU0:xr9kv-001#

The keys generated are stored securely within the Cisco IOS XR operating system and are not displayed in the configuration.

Step 5

To generate and enroll the certificate required to add the router to Crosswork Cloud Trust Insights, add the following configuration:

crypto ca trustpoint system-trustpoint
 keypair rsa system-enroll-key
 ca-keypair rsa system-root-key
 ip-address 1.1.1.1
 subject-name CN=cisco.com
 lifetime certificate 720
 enrollment url self
 message-digest sha256
 lifetime ca-certificate 720
!

Note


The CA certificate lifetime is set to 2 years (720 days), and the enrollment certificate lifetime is also set to 2 years in the above example.

Step 6

To authenticate and enroll the certificate required for signing operations and enrollment into Crosswork Cloud Trust Insights, enter the following commands:

RP/0/RP0/CPU0:xr9kv-001#crypto ca authenticate system-trustpoint
Tue Apr 21 22:47:46.935 UTC
% The subject name in the certificate will include: xr9kv-001.test.cisco.com
  Serial Number  : 25:34
  Subject:
	serialNumber=144c478a,unstructuredName=xr9kv-001.test.cisco.com
Issued By      :
	serialNumber=144c478a,unstructuredName=xr9kv-001.test.cisco.com
  Validity Start : 22:47:47 UTC Tue Apr 21 2020
  Validity End   : 22:47:47 UTC Wed Apr 21 2021
  SHA1 Fingerprint:
	 6C20DBEC569808F21A06E779A219C39B1F20E182
RP/0/RP0/CPU0:xr9kv-001#


RP/0/RP0/CPU0:xr9kv-001#crypto ca enroll system-trustpoint
Tue Apr 21 22:48:31.141 UTC

% The subject name in the certificate will include: CN=test.cisco.com
% The subject name in the certificate will include: xr9kv-001.test.cisco.com
% Include the router serial number in the subject name? [yes/no]: yes
% The serial number in the certificate will be: 144c478a
% The IP address in the certificate is 192.168.23.211
  Serial Number  : 25:35
  Subject:
	serialNumber=144c478a,unstructuredAddress=192.168.1.123,unstructuredName=xr9kv-001.test.cisco.com,CN=test.cisco.com
  Issued By      :
	serialNumber=144c478a,unstructuredName=xr9kv-001.test.cisco.com
  Validity Start : 22:48:31 UTC Tue Apr 21 2020
  Validity End   : 22:48:31 UTC Sat Nov 07 2020
  SHA1 Fingerprint:
	 8F44F8EE427F9D48B6E47CDF60B90537EF9F65B4
RP/0/RP0/CPU0:xr9kv-001#

Step 7

Verify that the signing operations are successfully using the enrollment certificates and keys using the CLI signing utility command as shown in the following example:

Note


If the “signature” field is populated, the enrollment certificate is ready for Crosswork Cloud Trust Insights.

RP/0/RP0/CPU0:xr9kv-001#show version | utility sign include-certificate
Tue Apr 21 22:49:24.632 UTC
{
"cli-output": "Cisco IOS XR Software, Version 7.0.2\nCopyright (c) 2013-2020 by Cisco Systems, 
Inc.\n\nBuild Information:\n Built By : ahoang\n Built On : Fri Mar 13 22:27:54 PDT 2020\n 
Built Host : iox-ucs-029\n Workspace : /auto/srcarchive15/prod/7.0.2/xrv9k/ws\n Version : 7.0.2\n 
Location : /opt/cisco/XR/packages/\n Label : 7.0.2\n\ncisco IOS-XRv 9000 () processor\n
System uptime is 8 hours 58 minutes\n\n",
"signature-envelop": {
"signature-version": "01",
"digest-algorithm": "RSA-SHA256",
"pub-key-id": "2508",
"signature": "F910CRigUmsBBQmnRUoiBYmg+TAWseO1Ey5eRBDwCkT+jHAiQdBhKXGl2MVza5JplrLayDdNbU+L4IvNAlFGegXR1G9IVcd/
RHbsIhhD8GvUTLOrYoIXyWw9b3L0PAbOjRTcbSe5Yr+4qf9XJJ1m88xjtJUgEE08jGz5lYgaBGGHMgS8KwAOmyBiwTaZcKaqYUIiLGqWfJ/
PtxsGv0fhJ+8/9FxjdJcWPLIwXAhQe2QkT15afAjV6LmShQu4TM+Dylad4n4A6YlWFz4sAfEWobl0dVGXPKzDI9UUJDYbdOU8j/
y6Bv9Eko8xYZJaDlUyNCjBWmLi28us9car/wbkfw==",
"signing-certificate": [ "MIIDNDCCAhygAwIBAwICCcswDQYJKoZIhvcNAQELBQAwOzEmMCQGCSqGSIb3DQEJAhYXeHJ2OWtfZXN4MThfNy5
jaXNjby5jb20xETAPBgNVBAUTCGVlZmY1MzRiMB4XDTIxMDIyMDA1NTYzNVoXDTIyMDIyMDA1NTYzNVowOzEmMCQGCSqGSIb3DQEJAhYXeHJ2OWtfZ
XN4MThfNy5jaXNjby5jb20xETAPBgNVBAUTCGVlZmY1MzRiMIIBIjANBgkqhkiG9w0BAQEFAAOCAQ8AMIIBCgKCAQEA0n
LmZqLe9bJNdvpvOFmr8vQzDwZ9pcjtuRx7SOfafs+RasNTnaOot3IL76hayCCfvkCOK/Re/8tUpjDpLS/rtOx9J/adRIK
GjlpYoxK1PK4XxMubg5cOZFzVprQmwur8Rvhx6c2xB79KANqKYSEF4cgoLHMQ0YHkfcBAs9abnStYecUWOGHwnC3OalM1
x3pRe
4ZCY30mS5ZJa/C+21EL+MDCKPj+aUkOCw8ADJUX3qT+TWMf7aLrZj/hfmzDEgrahbv2A1F9QG+ooP53pjRXmN2k6Va67J
tGsZ7spYF8F5KcUF7AhZWvKxGOegS7sUMBu4EhF0eHLoB7Mz3sVGNHNQIDAQABo0IwQDAPBgNVHRMBAf8EBTADAQH/MA4
GA1UdDwEB/wQEAwIBxjAdBgNVHQ4EFgQUFWl+ShMwn/DK+ExWKWVm9JzwJNgwDQYJKoZIhvcNAQELBQADggEBAJvxdPpw
qF0+WHFxvfTzgr09ql7roJ92vao8M47v9xX2pMQFMQceU9tL3O/XZ6sDAg+FF7jyTAOVHgzbfG2OlVoAuDeElgsK5xrYE
RhWBk86IiWTasbrUSeHPNsXJgHK/RuudpB+w8pdOEYORKsVLfFH/u1Sfet33grRkiEvFxU8zj515mnjhVE/4GgeH9hF6T
pR3/1Xv6Afka74wJbikppNo/d2TH4KX6AJ6hKnkd1PGaTyZ
GF1UFOvtFXV5cAwaL0wfUft7qF2YNFr9i4lUuR4oi///c72eLLuL+c00c6hADUH3lJVRTcuaLbsrviz7yEGOD/7/MfYRf
oZ2wNIP2U=", "MIIDhjCCAm6gAwIBAwICCcwwDQYJKoZIhvcNAQELBQAwOzEmMCQGCSqGSIb3DQEJAhYXeHJ2OWtfZXN
4MThfNy5jaXNjby5jb20xETAPBgNVBAUTCGVlZmY1MzRiMB4XDTIxMDIyMDA1NTYzNloXDTIxMDkwODA1NTYzNlowazET
MBEGA1UEAwwKY2lzY28uY29tIDEmMCQGCSqGSIb3DQEJAhYXeHJ2OWtfZXN4MThfNy5jaXNjby5jb20xGTAXBgkqhkiG9
w0BCQgTCjEuNzQuMzIuMzcxETAPBgNVBAUTCGVlZmY1MzRiMIIBIjANBgkqhkiG9w0BAQEFAAOCAQ8AMIIBCgKCAQEAtc
WkoBPwa5yPerZcRtbbUFVDtg7430PjvLzjHjWzmtY/CPea1
bZ3NPWTAUmS0Q+0D5VwqL+5SVkE9ZVwFoRoyMm2+wwbfBAxt0G2MYTdOttLulEP/H7ApVA/Y+pUGXYGsekRxu8Ipyi
Vesi57DQxgHlo2lk4EBsZsDv7oW9Osrtx7rib/kCyA5hTsEpw3oZ20Qp+91QY+vY7NUIQKx78RYkPiQNeOjQqibR0M1Rj
Glgo4ZTDI4IxsdgXm/xxiX3scTqu1q/XVY3v5uEjT2zao0nZAU6z3PQKDSyHDXg3yIDskFMj74HI6hUJsA1U+Qj+mw9DcK
aypjQ8y7ZchLeeQQIDAQABo2QwYjAPBgNVHRMBAf8EBTADAQH/MA4GA1UdDwEB/wQEAwID+DAgBgNVHSUBAf8EFjAUBgg
rBgEFBQcDAQYIKwYBBQUHAwIwHQYDVR0OBBYEFHJJ3dCXoGGWD2yZ8JQ3f/A/8XqxMA0GCSqGSIb3DQEBCwUAA4IBAQBm
z5YfGTbNAXPHJCxA9w8HUHyr1MlKB6wMKT0AUoWBJ6HvXJXoA
H5cs7uF3Zw4QjY28HaaxkMPr6338VbGi3DnyIOf1Hc6/XRfNBi3eMYcSNyRRgtvQSmTzM7A3CrSOiFlMmdPCdYIeoFiMd
M3uIZzfMe1EnONetev1bs+Te29utYXzb6QWjW0oJZ6/6g4cauo6jkhC/SNsRh3b/+8YMzxAHgzRFg+rm/O6cYa3jNCopjR
JqeFfmNuISgU9LIszmkt3/4n4uiAj4aAqwAc7YG0dzwWdwiXUwj3Q7TrMS8R8AaLUN47nYzm0QfUwNbUDkST2XjIGV90J
vH3E2CnAX+j" ]
}
}

This verifies your router is configured correctly in order to have trust information retrieved.

Step 8

If you encounter problems with the signing operation, use the following commands to clear the existing certificates and keys:

# crypto key zeroize rsa <name of key>
# clear crypto ca certificates system-trustpoint
# crypto ca cancel-enroll system-trustpoint 

Step 9

To renew a certificate before it expires, use the following commands:

# clear crypto ca certificate system-trustpoint
# crypto key zeroize rsa system-enroll-key
# crypto key generate rsa system-enroll-key
# crypto ca authenticate system-trustpoint
# crypto ca enroll system-trustpoint

Note


Regenerate the enrollment key prior to renewing the certificate. The lifetime for the signing CA certificate and the enrollment certificate is set using the crypto ca trustpoint configuration.


Configure limited privilege access for Crosswork Cloud Trust Insights

To prevent unauthorized operational or configuration changes to your Cisco IOS XR routers, the credentials used to access the devices should have limited privileges. Ensure your devices have the following configuration, which includes the recommended task group and user configuration, to allow the minimal authorization required to execute the trust dossier and signing commands.

The following commands are supported in release Cisco IOS XR Release 7.3.1 and later:
!
taskgroup alltasks-dossier
task read sysmgr
task read system
task read dossier
task read pkg-mgmt
task read basic-services
task read config-services
task execute dossier
task execute basic-services
!
The following commands are supported in releases prior to Cisco IOS XR Release 7.3.1:
!
taskgroup alltasks-dossier
 task read sysmgr
 task read system
 task read pkg-mgmt
 task read basic-services
 task read config-services
 task execute crypto
 task execute dossier
 task execute basic-services
!
usergroup dossier-group
 taskgroup alltasks-dossier
!
username dossier
 group dossier-group
 secret 10 <not shown here>
!

This configuration creates:

  • The alltasks-dossier task group, which defines all required tasks to enable dossier collection and signing operations. You can rename the task group if needed.

  • The dossier-group user group, which is where the task permissions are assigned. You can rename the user group name if needed.

  • The dossier user with the appropriate taskgroup permissions. You can rename the user if needed. Make sure you specify the appropriate credentials (secret).

After applying this configuration, you can create a new credential group in Crosswork Cloud Trust Insights with this information. See Create Credentials for more information.

Add devices

Complete the following steps to add your devices.

Before you begin

  • There must be at least one active data gateway in Crosswork Cloud.

  • When using a CSV file to import devices:

    • if any optional fields are listed in the CSV file (credentials, device groups, or data gateways), confirm that they are configured prior to adding the devices:

      • Credentials (Configure > Credentials)

      • Device Groups (Configure > Device Groups)

      • Data Gateways (Configure > Data Gateways)

    • up to 1,000 devices can be imported in one operation, and

    • you can download a sample CSV file to edit and use (Configure > Devices > CSV Import tab).

Procedure


Step 1

In the main window, click Configure > Devices. You can also add a device and link it to a Crosswork Data Gateway by navigating to Configure > Data Gateways > data_gateway_name.

Step 2

Click Add Device.

Step 3

To import devices using a CSV file, click CSV Import.

Step 4

To import a single device, complete the following fields:

Table 2. Add Device Field Descriptions

Field

Description

Device Name

Display name of the device.

Note

 
For data privacy reasons, this field isn't automatically populated from the device.

Description

(Optional) Add a description of the device.

Hostname

The DNS FQDN or IP address that is used by Crosswork Data Gateway.

SSH Port

(Optional) TCP port for SSH access. The default is TCP/22. SSH access is not required for Crosswork Cloud Traffic Analysis.

Credential: SSH

If you previously created a credential group, you can select it from the Credential: SSH drop-down list. To create a new credential group, from the Credential: SSH drop-down list, select Add New Credential. For more information about credential groups, see Create Credentials.

Device Group

For Crosswork Cloud Traffic Analysis only. If you previously created a device group, you can select it from the Device Group drop-down list. To create a new device group, from the Device Group drop-down list, select Add new device group. For more information about device groups, see Configure Device Groups.

City

(Optional) City for device geo-location.

Location

(Optional) Logical site identifier.

Country

(Optional) Country for device geo-location.

Device Timezone

(Optional) Timezone local to device.

Tags

(Optional) Specify a tag to help with grouping and identifying devices. For example, you might want to enter text that identifies router types in your system, such as edge.

The remaining fields depend on the Crosswork Cloud applications for which you have a valid license. You have the option to link a device to both a Crosswork Data Gateway instance for Crosswork Cloud Trust Insights and a Crosswork Data Gateway instance for Crosswork Cloud Traffic Analysis.

Table 3. Crosswork Cloud Trust Insights Add Device Field Descriptions

Field

Description

Data Gateway: Trust Insights Toggle the switch to On and select a Crosswork Data Gateway instance for the device. To add a Crosswork Data Gateway, see Add Crosswork Data Gateway Information.

Collect Configuration Hash

Enables collection of configuration hash information. This must be set to Yes if you want to include the Device Running Configuration alarm which monitors possible unwanted device configuration changes. When enabled, Crosswork Trust Insights checks to see if the stored hash does not match the hash reported by the system.

Configuration Hash Collection Frequency

From the drop-down list, select the interval you want Crosswork Trust Insights to collect the device hash configuration.

Table 4. Crosswork Cloud Traffic Analysis Add Device Field Descriptions

Field

Description

Data Gateway: Traffic Analysis Toggle the switch to On and select a NetFlow Data Gateway instance for the device.

NetFlow Source Address

Enter the NetFlow source address.

ASN

Enter the ASN. The value must be in the private ASN range (64512 - 65535).

SNMP Address

If you do not enter an SNMP address, the NetFlow address is used.

Credential: SNMP

If you previously created a credential group, you can select it from the Credential: SNMP drop-down list. To create a new credential group for the device you're adding, from the Credential: SNMP drop-down list, select Add New Credential. For more information about credential groups, see Create Credentials.

BGP Router ID IP Address

Credential: BGP

If you previously created a credential group, you can select it from the Credential: BGP drop-down list. To create a new credential group for the device you're adding, from the Credential: BGP drop-down list, select Add New Credential. For more information about credential groups, see Create Credentials.

Note


All BGP prefixes must be shared with Cisco Crosswork Data Gateway.

Step 5

Click Save.

After the save operation completes, the device appears when you click Monitor > Devices or Configure > Devices in the main window.


Dossier information for Crosswork Cloud Trust Insights

After you add a device to Crosswork Cloud Trust Insights, a dossier containing trust information is retrieved from the routers via Crosswork Data Gateway. The trust dossier (.json format) is collected via SSH and is signed with a Crosswork Cloud Trust Insights enrollment key. The trust dossier that Crosswork Data Gateway forwards to Crosswork Cloud Trust Insights contains the following information:

  • Cisco IOS version and platform output

  • Anti-replay nonce

  • System hardware inventory

  • File system inventory


    Note


    The File system inventory is supported in Cisco IOS XR Release 7.9.1 and later releases.


  • Secure unique device identifier (SUCI) certificate for hardware identify

  • Software package inventory

  • Reboot history

  • Rollback history

Manage dossier

Collect Data for Trust Insights Device Dossier

The following procedure describes how to initiate an ad hoc dossier collection to get the latest device information. By default, device dossier collection occurs every 12 hours. To change the dossier collection frequency or disable collection for one or more devices, see Change Device Dossier Collection Frequency.

Procedure


Step 1

In the main window, click Trust Insights > Configure > Devices.

Step 2

Click on the name of the device for which you want to force a dossier collection.

Step 3

Click the Trust Insights tab.

Step 4

Click Collect Dossier.

An informational message appears indicating it may take a few minutes to complete the dossier collection, and text appears under the Collect Dossier button about the request.

After the dossier collection is complete, the device data on the UI is updated.


Change Device Dossier Collection Frequency

You can change the dossier collection frequency for one or more devices.


Note


This procedure applies to Crosswork Cloud Trust Insights devices only.


Procedure


Step 1

In the main window, click Trust Insights > Configure > Devices.

Step 2

Check the checkbox next to one or more devices for which you want to change the frequency of the dossier collection.

Step 3

Click Collection.

Note


Crosswork Cloud displays Trust Insights devices only. If you select a device that doesn't belong to Trust Insights, it will not be displayed.

Step 4

Confirm that the Disabled/Enabled toggle switch is set to Enabled. Selecting Disabled stops any future dossier collections.

Step 5

From the Frequency drop-down list, select the frequency in which you want the collection performed. Notice that the device New Frequency and New Status columns are updated appropriately.

Step 6

Click Save.


Troubleshoot device connectivity for Crosswork Cloud Trust Insights

Follow these steps to troubleshoot connectivity between Crosswork Data Gateway and your Crosswork Cloud Trust Insights devices.

Procedure


Step 1

In the main window, click Devices and then click the device for which you want to view connectivity to Crosswork Data Gateway.

Step 2

Click the Status tab.

Step 3

If the connection between the Crosswork Data Gateway and the device are red, indicating there is an error, ensure that if you have a firewall, it is configured to allow cdg.crosswork.cisco.com and crosswork.cisco.com.

Test and correct the connectivity between Crosswork Data Gateway and the device.

Step 4

Ensure the SSH arrow between the Crosswork Data Gateway and the device is green, indicating that the connection is working.

If the SSH arrow is red, Crosswork Data Gateway is not able to connect to the device. Correct the following errors:

  • Ensure the SSH configuration on the router is correct. See Verify router configuration for Crosswork Cloud Trust Insights for more information.

  • Ensure that the credentials you entered in Crosswork Cloud Trust Insights match the credentials configured on the router. Hover your cursor over the SSH link and click the blue hyperlink to go to the credentials for that device.

Step 5

Ensure the Trust Data arrow between the Crosswork Data Gateway and the device is green, indicating that the connection is working.


Disable devices

When you disable a device, the collection of information temporarily stops. The previously collected device data is retained.

Alternatively, you can remove a device to remove it and its data completely. You cannot recover any of its data after removing a device. See Delete devices.

Procedure


Step 1

In the main window, click Monitor > Devices or Configure > Devices.

Step 2

Select the check box next to one or more devices you want to deactivate, then click Disable.

A message appears to indicate that the device is deactivated.

You can reactivate a device that you previously deactivated. After reactivating a device, it can take up to 30 mins for the statistics to appears on the device details page.

Step 3

To restart data collection for the device, select the device, then click Enable.

A message appears to indicate that the device is activated, and data collection for the device resumes.


Delete devices

When you delete a device, the system deletes all previously collected device data. You have up to seven days to recover device data.

Alternatively, you can disable a device to temporarily stop the data collection and retain previously collected device data.

Procedure


Step 1

In the main window, click Monitor > Devices or Configure > Devices.

Step 2

Click the checkbox next to the name of one or more devices you want to delete.

Step 3

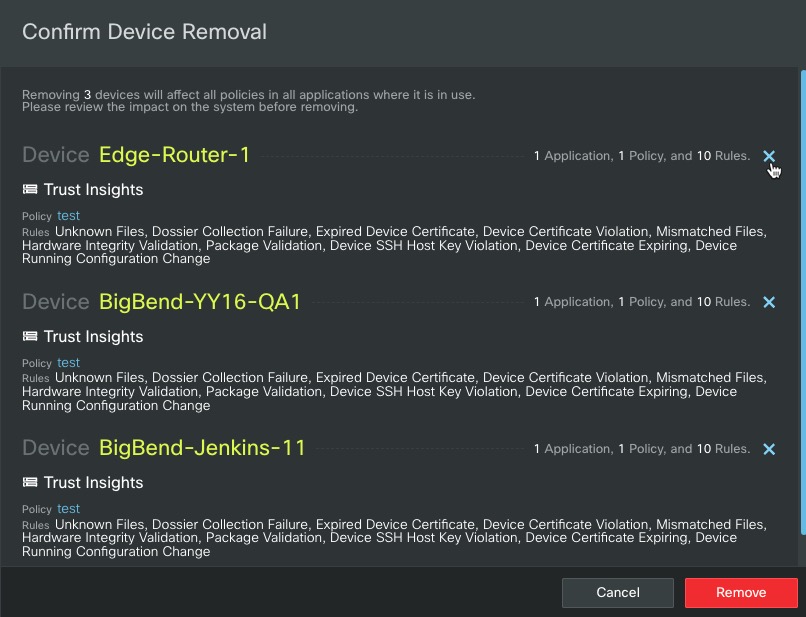
Click Remove. A confirmation window appears listing all applications, policies, and rules that will be impacted.

Step 4

If you selected more than one device and decide to exclude any devices from removal, click the x next to the device entry.

Example:

Figure 2. Delete Device Confirmation

Delete Device Confirmation

Step 5

To confirm device deletion, click Remove.

The device, and its previously collected data, is deleted.

Step 6

To restore a recently removed device, see Restore removed devices.


Restore removed devices

You can restore a previously removed device. When you remove a device, Crosswork Cloud remembers the device for approximately 7 days to allow you to readd it quickly if needed.

Procedure


Step 1

In the main window, click Configure > Removed Devices.

If it has been longer than 7 days since you removed the device, it might not appear on the list of Removed Devices. You will have to re-add the device as described in Add devices.

Step 2

Click Restore next to the device you want to re-add.

The device is restored.