User Control with ISE/ISE-PIC

The following topics discuss how to perform user awareness and user control with ISE/ISE-PIC:

The ISE/ISE-PIC Identity Source

You can integrate your Cisco Identity Services Engine (ISE) or ISE Passive Identity Connector (ISE-PIC) deployment with the system to use ISE/ISE-PIC for passive authentication.

ISE/ISE-PIC is an authoritative identity source, and provides user awareness data for users who authenticate using Active Directory (AD), LDAP, RADIUS, or RSA. Additionally, you can perform user control on Active Directory users. ISE/ISE-PIC does not report failed login attempts or the activity of ISE Guest Services users.

In addition to user awareness and control, if you use ISE ISE to define and use security group tags (SGT) for classifying traffic in a Cisco TrustSec network, you can write access control rules that use SGT as both source and destination matching criteria. This enables you to block or allow access based on security group membership rather than IP addresses or network objects. For more information, see Configure Dynamic Attributes Conditions. Also see ISE/ISE-PIC Guidelines and Limitations.


Note


The system does not parse IEEE 802.1x machine authentication but it does parse 802.1x user authentication. If you are using 802.1x with ISE, you must include user authentication. 802.1x machine authentication will not provide a user identity to the management center that can be used in policy.

For more information on Cisco ISE/ISE-PIC, see the Cisco Identity Services Engine Passive Identity Connector Administrator Guide or the Cisco Identity Services Engine Administrator Guide.


Note


We strongly recommend you use the latest version of ISE/ISE-PIC to get the latest feature set and the most number of issue fixes.


Source and Destination Security Group Tag (SGT) Matching

If you use ISE to define and use security group tags (SGT) for classifying traffic in a Cisco TrustSec network, you can write access control rules that use SGT as both source and destination matching criteria. This enables you to block or allow access based on security group membership rather than IP addresses or network objects. For more information, see Configure Dynamic Attributes Conditions.

Matching on SGT tags provides the following benefits:

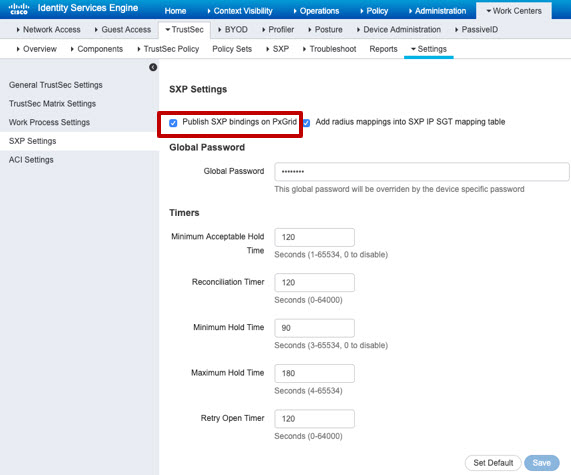
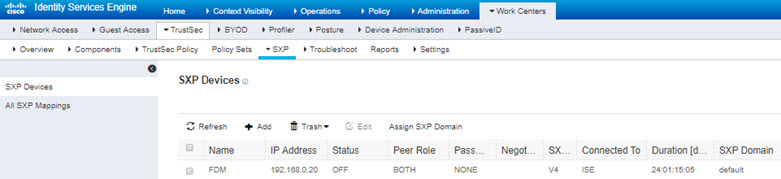
  • The management center can subscribe to Security Group Tag eXchange Protocol (SXP) mappings from ISE.

    ISE uses SXP to propagate the IP-to-SGT mapping database to managed devices. When you configure management center to use an ISE server, you enable the option to listen to the SXP topic from ISE. This causes the management center to learn about the security group tags and mappings directly from ISE. The management center then publishes SGTs and mappings to managed devices.

    The SXP Topic receives security group tags based on static and dynamic mappings learned through the SXP protocol between ISE and other SXP compliant devices (like switches).

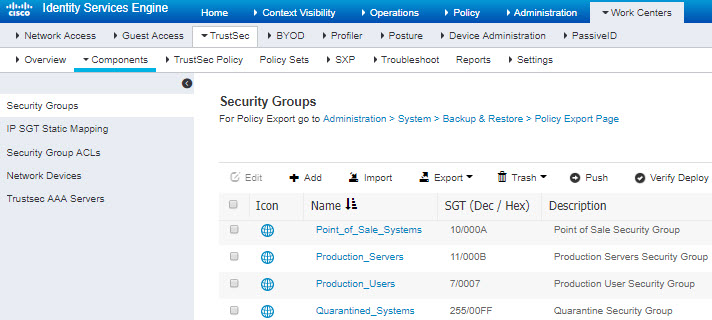
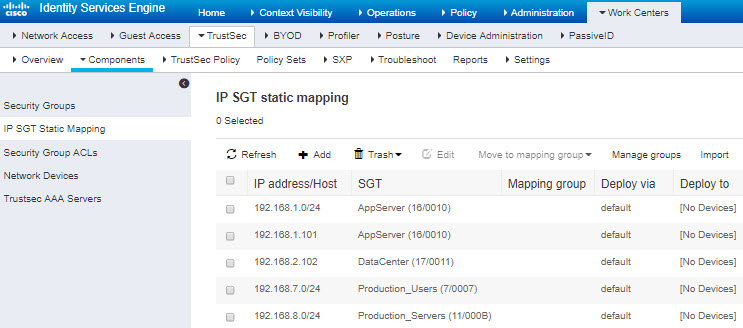
    You can create security group tags in ISE and assign host or network IP addresses to each tag. You can also assign SGTs to user accounts, and the SGT is assigned to the user's traffic. If the switches and routers in the network are configured to do so, these tags then get assigned to packets as they enter the network controlled by ISE, the Cisco TrustSec cloud.

    SXP is not supported by ISE-PIC.

  • The management center and managed devices can learn about SGT mappings without deploying additional policy. (In other words, you can view connection events for SGT mappings without deploying an access control policy.)

  • Supports Cisco TrustSec, which enables you to segment your network to protect critical business assets.

  • When a managed device evaluates SGT as a traffic matching criteria for an access control rule, it uses the following priority:

    1. The source SGT tag defined in the packet, if any.

      For the SGT tag to be in the packet, the switches and routers in the network must be configured to add them. See the ISE documentation for information on how to implement this method.

      For the SGT tag to be in the packet, the switches and routers in the network must be configured to add them. See the ISE documentation for information on how to implement this method.

    2. The SGT assigned to the user session, as downloaded from the ISE session directory. The SGT can be matched to source or destination.

    3. The SGT-to-IP address mapping downloaded using SXP. If the IP address is in the range for an SGT, then the traffic matches the access control rule that uses the SGT. The SGT can be matched to source or destination.

Examples:

  • In ISE, create an SGT tag named Guest Users and associate it with the 192.0.2.0/24 network.

    For example, you could use Guest Users as a source SGT condition in your access control rule and restrict access to certain URLs, web site categories, or networks from anyone who accesses your network.

  • In ISE, create an SGT tag named Restricted Networks and associate it with the 198.51.100.0/8 network.

    For example, you could use Restricted Networks as a destination SGT rule condition and block access from Guest Users and other networks that have users who are not authorized to access the network.

License Requirements for ISE/ISE-PIC

Threat Defense License

Any

Classic License

Control

Requirements and Prerequisites for ISE/ISE-PIC

Supported Domains

Any

User Roles

  • Admin

  • Access Admin

  • Network Admin

ISE/ISE-PIC Guidelines and Limitations

Use the guidelines discussed in this section when configuring ISE/ISE-PIC.

ISE/ISE-PIC Version and Configuration Compatibility

Your ISE/ISE-PIC version and configuration affects its integration and interaction with the Secure Firewall Management Center, as follows:

  • We strongly recommend you use the latest version of ISE/ISE-PIC to get the latest feature set.

  • Synchronize the time on the ISE/ISE-PIC server and the Secure Firewall Management Center. Otherwise, the system might perform user timeouts at unexpected intervals.

  • To implement user control using ISE or ISE-PIC data, configure and enable a realm for the ISE server assuming the pxGrid persona as described in Create an LDAP Realm or an Active Directory Realm and Realm Directory.

  • Each Secure Firewall Management Center host name that connects to an ISE server must be unique; otherwise, the connection to one of the Secure Firewall Management Centers will be dropped.

  • If you configure ISE/ISE-PIC to monitor a large number of user groups, the system might drop user mappings based on groups due to managed device memory limitations. As a result, rules with realm or user conditions might not perform as expected.

    For any device running version 6.7 or later, you can optionally use the configure identity-subnet-filter command to limit the subnets that the managed device monitors. For more information, see the Cisco Secure Firewall Threat Defense Command Reference.

    Alternatively, you can configure a network object and apply that object as an Identity Mapping Filter in the identity policy. See Create an Identity Policy.

For the specific versions of ISE/ISE-PIC that are compatible with this version of the system, see the Cisco Firepower Compatibility Guide.

IPv6 support
  • Compatible versions of ISE/ISE-PIC version 2.x include support for IPv6-enabled endpoints.

  • Version 3.0 (patch 2) and later of ISE/ISE-PIC enables IPv6 communication between ISE/ISE-PIC and the management center.

Approve clients in ISE

Before a connection between the ISE server and the management center succeeds, you must manually approve the clients in ISE. (Typically, there are two clients: one for the connection test and another for ISE agent.)

You can also enable Automatically approve new accounts in ISE as discussed in the chapter on Managing users and external identity sources in the Cisco Identity Services Engine Administrator Guide.

Unreachable sessions are removed
If a user session in ISE/ISE-PIC is reported as unreachable, the Secure Firewall Management Center prunes that session so another user with the same IP cannot match the unreachable user's identity rules.
You can control this behavior in ISE/ISE-PIC by going to Providers > Endpoint Probes and clicking one of the following:
  • Enabled to cause ISE/ISE-PIC to monitor endpoint connections and therefore to cause the Secure Firewall Management Center prune a session from an unreachable user.

  • Disabled to cause ISE/ISE-PIC to ignore endpoint connections.

Security Group Tags (SGT)

A Security Group Tag (SGT) specifies the privileges of a traffic source within a trusted network. Cisco ISE and Cisco TrustSec use a feature called Security Group Access (SGA) to apply SGT attributes to packets as they enter the network. These SGTs correspond to a user's assigned security group within ISE or TrustSec. If you configure ISE as an identity source, the Firepower System can use these SGTs to filter traffic.

Security Group Tags can be used both as source and destination matching criteria in access control rules.


Note


To implement user control using only the ISE SGT attribute tag, you do not need to configure a realm for the ISE server. ISE SGT attribute conditions can be configured in policies with or without an associated identity policy.


Note


In some rules, custom SGT conditions can match traffic tagged with SGT attributes that were not assigned by ISE. This is not considered user control, and works only if you are not using ISE/ISE-PIC as an identity source; see Custom SGT Conditions.
To match destination SGT tags in addition to source SGT tags, the following apply:

Required ISE version: 2.6 patch 6 or later, 2.7 patch 2 or later

Router support: Any Cisco router that supports SGT inline tagging over Ethernet. For more information, consult a reference such as the Cisco Group Based Policy Platform and Capability Matrix Release

Limitations:

  • Quality of Service (QoS) policy uses source SGT matching only; it does not use destination SGT matching

  • RA-VPN does not receive SGT mappings directly through RADIUS

ISE and High Availability
When the primary ISE/ISE-PIC server fails, the following occurs:

As a result of the integration with pxGrid v2, the management center round-robins between both configured ISE hosts until one accepts the connection.

If the connection is lost, the management center resumes round-robin attempts to the connected hosts.

Endpoint Location (or Location IP)

An Endpoint Location attribute is the IP address of the network device that used ISE to authenticate the user, as identified by ISE.

You must configure and deploy an identity policy to control traffic based on Endpoint Location (Location IP).

ISE Attributes

Configuring an ISE connection populates the Secure Firewall Management Center database with ISE attribute data. You can use the following ISE attributes for user awareness and user control. This is not supported with ISE-PIC.

Endpoint Profile (or Device Type)

An Endpoint Profile attribute is the user's endpoint device type, as identified by ISE.

You must configure and deploy an identity policy to control traffic based on Endpoint Profile (Device Type).

How to Configure ISE/ISE-PIC for User Control

You can use ISE/ISE-PIC in any of the following configurations:

  • With a realm, identity policy, and associated access control policy.

    Use a realm to control user access to network resources in policy. You can still use ISE/ISE-PIC Security Group Tags (SGT) metadata in your policies.

  • With an access control policy only. No realm or identity policy are necessary.

    Use this method to control network access using SGT metadata alone.

How to Configure ISE Without a Realm

This topic provides a high-level overview of tasks you must complete to configure ISE to be able to allow or block access to the network using SGT tags.

Procedure

  Command or Action Purpose

Step 1

SGT matching: Enable SXP on ISE.

This enables the management center to receive updates from ISE when SGT metadata changes.

Step 2

Export system certificates from ISE/ISE-PIC.

The certificates are required to connect securely between the ISE/ISE-PIC pxGrid, monitoring (MNT) servers and the management center. See Export Certificates from the ISE/ISE-PIC Server for Use in the Management Center

Step 3

Import the certificates in the management center.

The certificates must be imported as follows:

  • pxGrid client certificate: internal certificate with key (Objects > Object Management > PKI > Internal Certs)

  • pxGrid server certificate: trusted CA (Objects > Object Management > PKI > Trusted CAs)

  • MNT certificate: trusted CA

Step 4

Create the ISE/ISE-PIC identity source.

The ISE/ISE-PIC identity source enables you to control user activity using Security Group Tags (SGT) provided by ISE/ISE-PIC. See Configure ISE/ISE-PIC for User Control.

Step 5

Create an access control rule.

The access control rule specifies an action to take (for example, allow or block) if traffic matches the rule criteria. You can use source and destination SGT metadata as matching criteria in the access control rule. See Introduction to Access Control Rules.

Step 6

Deploy the access control policy to managed devices.

Before your policy can take effect, it must be deployed to managed devices. See Deploy Configuration Changes.

What to do next

Export Certificates from the ISE/ISE-PIC Server for Use in the Management Center

How to Configure ISE/ISE-PIC for User Control Using a Realm

Before you begin

This topic provides a high-level overview of tasks you must complete to configure ISE/ISE-PIC for user control and to be able to allow or block user or group access to the network. Users and groups can be stored in any server listed in Supported Servers for Realms.

Procedure

  Command or Action Purpose

Step 1

Destination SGT only: Enable SXP on ISE.

This enables the management center to receive updates from ISE when SGT metadata changes.

Step 2

Export system certificates from ISE/ISE-PIC.

The certificates are required to connect securely between the ISE/ISE-PIC pxGrid, monitoring (MNT) servers and the management center. See the following:

Step 3

Import the certificates in the management center.

The certificates must be imported as follows:

  • pxGrid client certificate: internal certificate with key (Objects > Object Management > PKI > Internal Certs)

  • pxGrid server certificate: trusted CA (Objects > Object Management > PKI > Trusted CAs)

  • MNT certificate: trusted CA

Step 4

Create a realm.

You must create a realm only to control access to the network by the users and groups you choose.

See Create an LDAP Realm or an Active Directory Realm and Realm Directory.

Step 5

Download users and groups, and enable the realm.

Downloading users and groups enables you to use them in access control rules. See Synchronize Users and Groups.

Step 6

Create the ISE/ISE-PIC identity source.

The ISE/ISE-PIC identity source enables you to control user activity using Security Group Tags (SGT) provided by ISE/ISE-PIC. See Configure ISE/ISE-PIC for User Control.

Step 7

Create an identity policy.

An identity policy is a container for one or more identity rules. See Create an Identity Policy.

Step 8

Create an identity rule.

An identity rule specifies how a realm is used to control access to the network by users and groups. See Create an Identity Rule.

Step 9

Associate the identity policy with an access control policy.

This enables the access control policy to use users and groups in the realm.

Step 10

Create an access control rule.

The access control rule specifies an action to take (for example, allow or block) if traffic matches the rule criteria. You can use source and destination SGT metadata as matching criteria in the access control rule. See Introduction to Access Control Rules.

Step 11

Deploy the access control policy to managed devices.

Before your policy can take effect, it must be deployed to managed devices. See Deploy Configuration Changes.

What to do next

Export Certificates from the ISE/ISE-PIC Server for Use in the Management Center

Configure ISE/ISE-PIC

The following topics discuss how to configure the ISE/ISE-PIC server for use with identity policies in the management center.

The topics discuss how to:

  • Export certificates from the ISE/ISE-PIC server to authenticate with the management center.

  • Publish SXP topics so the management center can be updated with Security Group Tags (SGT) on the ISE server.

Configure Security Groups and SXP Publishing in ISE

There is a lot of configuration that you must do in Cisco Identity Services Engine (ISE) to create the TrustSec policy and security group tags (SGT). Please look at the ISE documentation for more complete information on implementing TrustSec.

The following procedure picks out the highlights of the core settings you must configure in ISE for the threat defense device to be able to download and apply static SGT-to-IP address mappings, which can then be used for source and destination SGT matching in access control rules. See the ISE documentation for detailed information.

The screen shots in this procedure are based on ISE 2.4. The exact paths to these features might change in subsequent releases, but the concepts and requirements will be the same. Although ISE 2.4 or later is recommended, and preferably 2.6 or later, the configuration should work starting with ISE 2.2 patch 1.

Before you begin

You must have the ISE Plus license to publish SGT-to-IP address static mappings and to get user session-to-SGT mappings so that the threat defense device can receive them.

Procedure


Step 1

Choose Work Centers > TrustSec > Settings > SXP Settings, and select the Publish SXP Bindings on PxGrid option.

This option makes ISE send the SGT mappings out using SXP. You must select this option for the threat defense device to “hear” anything from listing to the SXP topic. This option must be selected for the threat defense device to get static SGT-to-IP address mapping information. It is not necessary if you simply want to use SGT tags defined in the packets, or SGTs that are assigned to a user session.


Turn on Publish SXP Bindings on PxGrid option in ISE.

Step 2

Choose Work Centers > TrustSec > SXP > SXP Devices, and add a device.

This does not have to be a real device, you can even use the management IP address of the threat defense device. The table simply needs at least one device to induce ISE to publish the static SGT-to-IP address mappings. This step is not necessary if you simply want to use SGT tags defined in the packets, or SGTs that are assigned to a user session.


Add an SXP device in ISE.

Step 3

Choose Work Centers > TrustSec > Components > Security Groups and verify there are security group tags defined. Create new ones as necessary.


Configure security group tags (SGT) in ISE.

Step 4

Choose Work Centers > TrustSec > Components > IP SGT Static Mapping and map host and network IP addresses to the security group tags.

This step is not necessary if you simply want to use SGT tags defined in the packets, or SGTs that are assigned to a user session.


Configure IP to SGT static mappings in ISE.


Export Certificates from the ISE/ISE-PIC Server for Use in the Management Center

The following sections discuss how to:

  • Export system certificates from the ISE/ISE-PIC server.

    These certificates are required to securely connect to the ISE/ISE-PIC server. You might need to export one, or as many as three, certificates, depending on how your ISE system is set up:

    • One certificate for the pxGrid server

    • One certificate for the monitoring (MNT) server

    • One certificate, including the private key, for the pxGrid client (that is, the management center)

      Unlike the first two certificates, this is a self-signed certificate.

  • Import these certificates into the management center:

    • pxGrid client certificate: internal certificate with key (Objects > Object Management > PKI > Internal Certs)

    • pxGrid server certificate: trusted CA (Objects > Object Management > PKI > Trusted CAs)

    • MNT certificate: trusted CA

Export a System Certificate

You can export a system certificate or a certificate and its associated private key. If you export a certificate and its private key for backup purposes, you can reimport them later if needed.

Before you begin

To perform the following task, you must be a Super Admin or System Admin.

Procedure

Step 1

In the Cisco ISE GUI, click the Menu icon () and choose Administration > System > Certificates > System Certificates.

Step 2

Check the check box next to the certificate that you want to export and click Export.

Step 3

Choose whether to export only the certificate, or the certificate and its associated private key.

Tip


We do not recommend exporting the private key that is associated with a certificate because its value may be exposed. If you must export a private key (for example, when you export a wildcard system certificate to be imported into the other Cisco ISE nodes for inter-node communication), specify an encryption password for the private key. You must specify this password while importing this certificate into another Cisco ISE node to decrypt the private key.

Step 4

Enter the password if you have chosen to export the private key. The password should be at least eight characters long.

Step 5

Click Export to save the certificate to the file system that is running your client browser.

If you export only the certificate, the certificate is stored in the PEM format. If you export both the certificate and private key, the certificate is exported as a .zip file that contains the certificate in the PEM format and the encrypted private key file.


Generate a Self-Signed Certificate

Add a new local certificate by generating a self-signed certificate. Cisco recommends that you only employ self-signed certificates for your internal testing and evaluation needs. If you plan to deploy Cisco ISE in a production environment, use CA-signed certificates whenever possible to ensure more uniform acceptance around a production network.


Note


If you use a self-signed certificate and you want to change the hostname of your Cisco ISE node, log in to the administration portal of the Cisco ISE node, delete the self-signed certificate that has the old hostname, and generate a new self-signed certificate. Otherwise, Cisco ISE continues to use the self-signed certificate with the old hostname.


Before you begin

To perform the following task, you must be a Super Admin or System Admin.

Procedure

Step 1

In the Cisco ISE GUI, click the Menu icon () and choose Administration > System > Certificates > System Certificates.

To generate a self-signed certificate from a secondary node, choose Administration > System > Server Certificate.

Step 2

In the ISE-PIC GUI, click the Menu icon () and choose Certificates > System Certificates.

Step 3

Click Generate Self Signed Certificate and enter the details in the window displayed.

Step 4

Check the check boxes in the Usage area based on the service for which you want to use this certificate.

Step 5

Click Submit to generate the certificate.

To restart the secondary nodes, from the CLI, enter the following commands in the following order:

  1. application stop ise

  2. application start ise


Import ISE/ISE-PIC Certificates

This procedure is optional. You can also import ISE server certificates when you create the ISE/ISE-PIC identity source as discussed in Configure ISE/ISE-PIC for User Control.

Before you begin

Export certificates from the ISE/ISE-PIC server as discussed in Export a System Certificate. The certificates and key must be present on the machine from which you log in to the management center.

You must import the certificates as follows:

  • pxGrid client certificate: internal certificate with key (Objects > Object Management > PKI > Internal Certs)

  • pxGrid server certificate: trusted CA (Objects > Object Management > PKI > Trusted CAs)

  • MNT certificate: trusted CA

Procedure

Step 1

Log in to the management center if you have not already done so.

Step 2

Click Objects > Object Management.

Step 3

Expand PKI.

Step 4

Click Internal Certs.

Step 5

Click Add Internal Cert.

Step 6

Follow the prompts on your screen to import the certificate and private key.

Step 7

Click Trusted CAs.

Step 8

Click Add Trusted CA.

Step 9

Follow the prompts on your screen to import the pxGrid server certificate.

Step 10

Repeat the preceding steps, if necessary, to import the MNT server's trusted CA.


What to do next

Configure ISE/ISE-PIC for User Control

Configure ISE/ISE-PIC for User Control

The following procedure discusses how to configure the ISE/ISE-PIC identity source. You must be in the global domain to perform this task.

Before you begin

  • To get user sessions from a Microsoft Active Directory Server or supported LDAP server, configure and enable a realm for the ISE server, assuming the pxGrid persona, as discussed in Create an LDAP Realm or an Active Directory Realm and Realm Directory.

  • To get all mappings that are defined in ISE, including SGT-to-IP address mappings published through SXP, use the procedure that follows. As an alternative, you have the following options:

    • To use the SGT information in the packets only, and not use mappings downloaded from ISE, skip the steps discussed in Create and Edit Access Control Rules. Note that in this case, you can use SGT tags as a source condition only; these tags will never match destination criteria.

    • To use SGT in packets and user-to-IP-address/SGT mappings only, do not subscribe to the SXP topic in the ISE identity source, and do not configure ISE to publish SXP mappings. You can use this information for both source and destination matching conditions.

  • Export certificates from the ISE/ISE-PIC server and optionally import them into the management center as discussed in Export Certificates from the ISE/ISE-PIC Server for Use in the Management Center.

  • To publish SXP topics so the management center can be updated with Security Group Tags (SGT) on the ISE server, see Configure ISE/ISE-PIC.

Procedure


Step 1

Log in to the management center.

Step 2

Click Integration > Other Integrations > Identity Sources.

Step 3

Click Identity Services Engine for the Service Type to enable the ISE connection.

Note


To disable the connection, click None.

Step 4

Enter a Primary Host Name/IP Address and, optionally, a Secondary Host Name/IP Address.

Step 5

Click the appropriate certificate authorities from the pxGrid Server CA and MNT Server CA lists, and the appropriate certificate from the pxGrid Client Certificate list. You can also click Add (add icon) to add a certificate.

Note


The pxGrid Client Certificate must include the clientAuth extended key usage value, or it must not include any extended key usage values.

Step 6

(Optional.) Enter an ISE Network Filter using CIDR block notation.

Step 7

In the Subscribe To section, check the following:

  • Session Directory Topic to receive ISE user session information from the ISE server.

  • SXP Topic to receive updates to SGT-to-IP mappings when available from the ISE server. This option is required to use destination SGT tagging in access control rules.

Step 8

To test the connection, click Test.

If the test fails, click Additional Logs for more information about the connection failure.


What to do next

ISE/ISE-PIC Configuration Fields

The following fields are used to configure a connection to /ISE-PIC.

Primary and Secondary Host Name/IP Address

The hostname or IP address for the primary and, optionally, the secondary pxGrid ISE servers.

The ports used by the host names you specify must be reachable by both ISE and the management center.

pxGrid Server CA

The trusted certificate authority for the pxGrid framework. If your deployment includes a primary and a secondary pxGrid node, the certificates for both nodes must be signed by the same certificate authority.

MNT Server CA

The trusted certificate authority for the ISE certificate when performing bulk downloads. If your deployment includes a primary and a secondary MNT node, the certificates for both nodes must be signed by the same certificate authority.

pxGrid Client Certificate

The internal certificate and key that the Secure Firewall Management Center must provide to /ISE-PIC to connect to /ISE-PIC or to perform bulk downloads.


Note


The pxGrid Client Certificate must include the clientAuth extended key usage value, or it must not include any extended key usage values.


ISE Network Filter

An optional filter you can set to restrict the data that ISE reports to the Secure Firewall Management Center. If you provide a network filter, ISE reports data from the networks within that filter. You can specify a filter in the following ways:

  • Leave the field blank to specify any.

  • Enter a single IPv4 address block using CIDR notation.

  • Enter a list of IPv4 address blocks using CIDR notation, separated by commas.


Note


This version of the system does not support filtering using IPv6 addresses, regardless of your ISE version.


Subscribe to:
Session Directory Topic: Check this box to subscribe to user session information from the ISE server. Includes SGT and endpoint metadata.
SXP Topic: Check this box to subscribe to SXP mappings from the ISE server.

Troubleshoot the ISE/ISE-PIC or Cisco TrustSec Issues

Troubleshoot Cisco TrustSec issues

A device interface can be configured to propagate Security Group Tags (SGTs) either from ISE/ISE-PIC or from a Cisco device on the network (referred to as Cisco TrustSec.) On the device management page (Devices > Device Management), the Propagate Security Group Tag check box for an interface is checked after a device reboot. If you do not want the interface to propagate TrustSec data, uncheck the box.

Troubleshoot ISE/ISE-PIC issues

For other related troubleshooting information, see Troubleshoot Realms and User Downloads and Troubleshoot User Control.

If you experience issues with the ISE or ISE-PIC connection, check the following:

  • The pxGrid Identity Mapping feature in ISE must be enabled before you can successfully integrate ISE with the system.

  • When the primary server fails, you must manually promote the secondary to primary; there is no automatic failover.

  • Before a connection between the ISE server and the management center succeeds, you must manually approve the clients in ISE. (Typically, there are two clients: one for the connection test and another for ISE agent.)

    You can also enable Automatically approve new accounts in ISE as discussed in the chapter on Managing users and external identity sources in the Cisco Identity Services Engine Administrator Guide.

  • The pxGrid Client Certificate must include the clientAuth extended key usage value, or it must not include any extended key usage values.

  • The time on your ISE server must be synchronized with the time on the Secure Firewall Management Center. If the appliances are not synchronized, the system may perform user timeouts at unexpected intervals.

  • If your deployment includes a primary and a secondary pxGrid node,

    • The certificates for both nodes must be signed by the same certificate authority.

    • The ports used by the host name must be reachable by both the ISE server and by the management center.

  • If your deployment includes a primary and a secondary MNT node, the certificates for both nodes must be signed by the same certificate authority.

To exclude subnets from receiving user-to-IP and Security Group Tag (SGT)-to-IP mappings from ISE, use the configure identity-subnet-filter { add | remove} command. You should typically do this for lower-memory managed devices to prevent Snort identity health monitor memory errors.

If you experience issues with user data reported by ISE or ISE-PIC, note the following:

  • After the system detects activity from an ISE user whose data is not yet in the database, the system retrieves information about them from the server. Activity seen by the ISE user is not handled by access control rules, and is not displayed in the web interface until the system successfully retrieves information about them in a user download.

  • You cannot perform user control on ISE users who were authenticated by an LDAP, RADIUS, or RSA domain controller.

  • The management center does not receive user data for ISE Guest Services users.

  • If ISE monitors the same users as TS Agent, the management center prioritizes the TS Agent data. If the TS Agent and ISE report identical activity from the same IP address, only the TS Agent data is logged to the management center.

  • Your ISE version and configuration impact how you can use ISE in the system. For more information, see The ISE/ISE-PIC Identity Source.

  • If you have management center high availability configured and the primary fails, see the section on ISE and high availability in ISE/ISE-PIC Guidelines and Limitations.

  • ISE-PIC does not provide ISE attribute data.

  • ISE-PIC cannot perform ISE ANC remediations.

  • Active FTP sessions are displayed as the Unknown user in events. This is normal because, in active FTP, the server (not the client) initiates the connection and the FTP server should not have an associated user name. For more information about active FTP, see RFC 959.

If you experience issues with supported functionality, see The ISE/ISE-PIC Identity Source for more information about version compatibility.

ISE/ISE-PIC user timeout

If you're setting up ISE/ISE-PIC without a realm, be aware there is a user session timeout that affects how users are seen by the management center. For more information, see Realm Fields.

History for ISE/ISE-PIC

Feature

Minimum Management Center

Minimum Threat Defense

Details

pxGrid 2.0 is the default for supported ISE/ISE-PIC versions

6.7.0

6.7.0

Note the following:

  • Supported ISE/ISE-PIC versions: 2.6 patch 6 or later, 2.7 patch 2 or later

  • Adaptive Network Control (ANC) policies replace Endpoint Protection Service (EPS) remediations. If you have EPS policies configured in the management center, you must migrate them to use ANC.

Optionally exclude subnets from receiving user-to-IP and Security Group Tag (SGT)-to-IP mappings from ISE. You should typically do this for lower-memory managed devices to prevent Snort identity health monitor memory errors.

6.7.0

6.7.0

New command: configure identity-subnet-filter { add | remove}

Destination Security Group Tag matching (SGT)

6.5.0

6.5.0

Feature introduced. Enables you to use ISE SGT tags for both source and destination matching criteria in access control rules.

SGT tags are tag-to-host/network mappings obtained by ISE.

New/modified screens:

  • New options to configure Destination SGT matching:

    System > Integration > Identity Sources > ISE/ISE-PIC

    • Session Directory Topic: Subscribe to ISE user session information.

    • SXP Topic: Subscribe to SGT tag updates on the ISE server.

  • New and renamed columns in Analysis > Connections > Events

    • Renamed: Security Groups Tags renamed to Source SGT

    • New: Destination SGT

Integration with ISE-PIC

6.2.1

6.2.1

You can now use data from ISE-PIC.

SGT tags for user control.

6.2.1

6.2.0

You no longer need to create a realm or identity policy to perform user control based on ISE Security Group Tag (SGT) data.

Integration with ISE.

6.0

6.0

Feature introduced. By subscribing to Cisco’s Platform Exchange Grid (PxGrid), the Firepower Management Center can download additional user data, device type data, device location data, and Security Group Tags (SGTs) —a method used by ISE to provide network access control).