Add an LDAP server to support external users for threat
defense management.
In a multidomain deployment, external authentication objects are only available in the domain in which they are created.
Sharing External Authentication Objects
External LDAP objects can be used by the management center and threat
defense devices. You can share the same object between the management center and devices or create separate objects.

Note
|
For LDAP, the timeout range is different for the threat
defense and the management center, so if you share an object, be sure not to exceed the threat
defense's smaller timeout range (1-30 seconds). If you set the timeout to a higher value, the deployment to the threat
defense will fail.
|
Threat Defense Supported Fields
Only a subset of fields in the LDAP object are used for threat
defense SSH access. If you fill in additional fields, they are ignored. If you also use this object for the management center, those fields will be used. This procedure only covers the supported fields for the threat
defense. For other fields, see Add an LDAP External Authentication Object for the Management Center.
Usernames
Usernames must be Linux-valid usernames and be lower-case only, using alphanumeric
characters plus period (.) or hyphen (-). Other special characters such as at sign
(@) and slash (/) are not supported. You cannot add the admin user for
external authentication. You can only add external users (as part of the External
Authentication object) in the management center; you cannot add them at the CLI. Note that internal users can only be added at
the CLI, not in the management center.
If you previously configured the same username for an internal user using the
configure user add command, the threat
defense first checks the password against the internal user, and if that fails, it checks
the LDAP server. Note that you cannot later add an internal user with the same name
as an external user; only pre-existing internal users are supported.
Privilege Level
LDAP users always have Config privileges.
Examples
Basic Example
The
following figures illustrate a basic configuration of an LDAP login authentication
object for a Microsoft Active Directory Server. The LDAP server in this example has
an IP address of 10.11.3.4. The connection uses port 389 for access.

This example shows a
connection using a base distinguished name of OU=security,DC=it,DC=example,DC=com for the security organization in
the information technology domain of the Example company.

A CLI Access Attribute of
sAMAccountName causes each sAMAccountName attribute to be checked for all
objects in the directory for matches when a user logs into the threat
defense.
Note that because no base filter is applied to this
server, the threat
defense checks attributes for all objects in the directory indicated by the base
distinguished name. Connections to the server time out after the default time period
(or the timeout period set on the LDAP server).
Advanced Example
This example illustrates an advanced configuration of an LDAP
login authentication object for a Microsoft Active Directory Server. The LDAP server
in this example has an IP address of 10.11.3.4. The connection uses port 636 for
access.
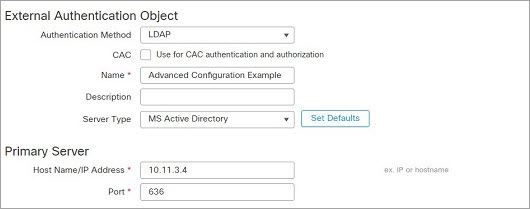
This example shows a
connection using a base distinguished name of OU=security,DC=it,DC=example,DC=com for the security organization in
the information technology domain of the Example company. However, note that this
server has a base filter of (cn=*smith). The
filter restricts the users retrieved from the server to those with a common name
ending in smith.
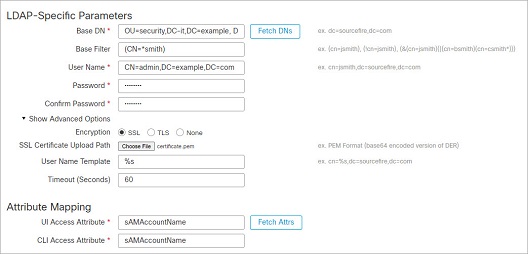
The connection to the server is
encrypted using SSL and a certificate named certificate.pem is used for the connection. In addition, connections
to the server time out after 60 seconds because of the Timeout (Seconds) setting.
Because this server is a Microsoft Active Directory server, it
uses the sAMAccountName attribute to store
user names rather than the uid
attribute.
The CLI Access
Attribute of sAMAccountName
causes each sAMAccountName attribute to be
checked for all objects in the directory for matches when a user logs into the threat
defense.
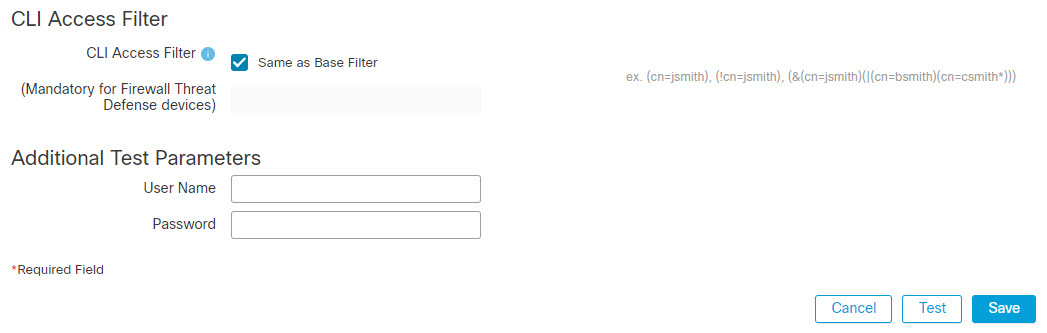
In the following example, the CLI access
filter is set to be the same as the base filter.

 )
) )
) )
)


 Feedback