High Availability

The following topics describe how to configure Active/Standby failover to accomplish high availability of the threat defense.

About Secure Firewall Threat Defense High Availability

Configuring high availability, also called failover, requires two identical threat defense devices connected to each other through a dedicated failover link and, optionally, a state link. threat defense supports Active/Standby failover, where one unit is the active unit and passes traffic. The standby unit does not actively pass traffic, but synchronizes configuration and other state information from the active unit. When a failover occurs, the active unit fails over to the standby unit, which then becomes active.

The health of the active unit (hardware, interfaces, software, and environmental status) is monitored to determine if specific failover conditions are met. If those conditions are met, failover occurs.


Note


High availability is not supported on threat defense virtual running in the public cloud. See the Cisco Secure Firewall Threat Defense Virtual Getting Started Guide for more information about configuring the threat defense virtual device for high availability.


High Availability System Requirements

This section describes the hardware, software, and license requirements for threat defense devices in a High Availability configuration.

Hardware Requirements

The two units in a High Availability configuration must:

  • Be the same model. In addition, for container instances, they must use the same resource profile attributes.

    For the Firepower 9300, High Availability is only supported between same-type modules; but the two chassis can include mixed modules. For example, each chassis has an SM-56, SM-48, and SM-40. You can create High Availability pairs between the SM-56 modules, between the SM-48 modules, and between the SM-40 modules.

    If you change the resource profile after you add the High Availability pair to the management center, update the inventory for each unit on the Devices > Device Management > Device > System > Inventory dialog box.

    If you assign a different profile to instances in an established high-availability pair, which requires the profile to be the same on both units, you must:

    1. Break high availability.

    2. Assign the new profile to both units.

    3. Re-establish high availability.

  • Have the same number and types of interfaces.

    For the Firepower 4100/9300 chassis, all interfaces must be preconfigured in FXOS identically before you enable High Availability. If you change the interfaces after you enable High Availability, make the interface changes in FXOS on the Standby unit, and then make the same changes on the Active unit.

If you are using units with different flash memory sizes in your High Availability configuration, make sure the unit with the smaller flash memory has enough space to accommodate the software image files and the configuration files. If it does not, configuration synchronization from the unit with the larger flash memory to the unit with the smaller flash memory will fail.

Software Requirements

The two units in a High Availability configuration must:

  • Be in the same firewall mode (routed or transparent).

  • Have the same software version.

  • Be in the same domain or group on the management center.

  • Have the same NTP configuration. See Configure NTP Time Synchronization for Threat Defense.

  • Be fully deployed on the management center with no uncommitted changes.

  • Not have DHCP or PPPoE configured in any of their interfaces.

  • (Firepower 4100/9300) Have the same flow offload mode, either both enabled or both disabled.

License Requirements for Threat Defense Devices in a High Availability Pair

Both threat defense units in a high availability configuration must have the same licenses.

High availability configurations require two license entitlements: one for each device in the pair.

Before high availability is established, it does not matter which licenses are assigned to the secondary/standby device. During high availability configuration, the management center releases any unnecessary licenses assigned to the standby unit and replaces them with identical licenses assigned to the primary/active unit. For example, if the active unit has a Base license and a Threat license, and the standby unit has only a Base license, the management center communicates with the Smart Software Manager to obtain an available Threat license from your account for the standby unit. If your license account does not include enough purchased entitlements, your account becomes Out-of-Compliance until you purchase the correct number of licenses.

Failover and Stateful Failover Links

The failover link and the optional stateful failover link are dedicated connections between the two units. Cisco recommends to use the same interface between two devices in a failover link or a stateful failover link. For example, in a failover link, if you have used eth0 in device 1, use the same interface (eth0) in device 2 as well.

Failover Link

The two units in a failover pair constantly communicate over a failover link to determine the operating status of each unit.

Failover Link Data

The following information is communicated over the failover link:

  • The unit state (active or standby)

  • Hello messages (keep-alives)

  • Network link status

  • MAC address exchange

  • Configuration replication and synchronization

Interface for the Failover Link

You can use an unused data interface (physical, or EtherChannel) as the failover link; however, you cannot specify an interface that is currently configured with a name. You also cannot use a subinterface with the exception of a subinterface defined on the chassis for multi-instance mode. The failover link interface is not configured as a normal networking interface; it exists for failover communication only. This interface can only be used for the failover link (and also for the state link).

The threat defense does not support sharing interfaces between user data and the failover link. You also cannot use separate subinterfaces on the same parent for the failover link and for data (multi-instance chassis subinterfaces only). If you use a chassis subinterface for the failover link, then all subinterfaces on that parent, and the parent itself, are restricted for use as failover links.


Note


When using an EtherChannel as the failover or state link, you must confirm that the same EtherChannel with the same member interfaces exists on both devices before establishing high availability.

See the following guidelines for the failover link:

  • Firepower 4100/9300—We recommend that you use a 10 GB data interface for the combined failover and state link.

  • All other models—1 GB interface is large enough for a combined failover and state link.

The alternation frequency is equal to the unit hold time.


Note


If you have a large configuration and a low unit hold time, alternating between the member interfaces can prevent the secondary unit from joining/re-joining. In this case, disable one of the member interfaces until after the secondary unit joins.


For an EtherChannel used as the failover link, to prevent out-of-order packets, only one interface in the EtherChannel is used. If that interface fails, then the next interface in the EtherChannel is used. You cannot alter the EtherChannel configuration while it is in use as a failover link.

Connecting the Failover Link

Connect the failover link in one of the following two ways:

  • Using a switch, with no other device on the same network segment (broadcast domain or VLAN) as the failover interfaces of the threat defense device.

  • Using an Ethernet cable to connect the units directly, without the need for an external switch.

If you do not use a switch between the units, if the interface fails, the link is brought down on both peers. This condition may hamper troubleshooting efforts because you cannot easily determine which unit has the failed interface and caused the link to come down.

Stateful Failover Link

To use Stateful Failover, you must configure a Stateful Failover link (also known as the state link) to pass connection state information.

Shared with the Failover Link

Sharing a failover link is the best way to conserve interfaces. However, you must consider a dedicated interface for the state link and failover link, if you have a large configuration and a high traffic network.

Dedicated Interface for the Stateful Failover Link

You can use a dedicated data interface (physical or EtherChannel) for the state link. See Interface for the Failover Link for requirements for a dedicated state link, and Connecting the Failover Link for information about connecting the state link as well.

For optimum performance when using long distance failover, the latency for the state link should be less than 10 milliseconds and no more than 250 milliseconds. If latency is more than 10 milliseconds, some performance degradation occurs due to retransmission of failover messages.

Avoiding Interrupted Failover and Data Links

We recommend that failover links and data interfaces travel through different paths to decrease the chance that all interfaces fail at the same time. If the failover link is down, the threat defense device can use the data interfaces to determine if a failover is required. Subsequently, the failover operation is suspended until the health of the failover link is restored.

See the following connection scenarios to design a resilient failover network.

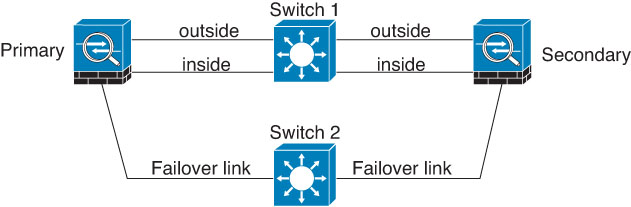
Scenario 1—Not Recommended

If a single switch or a set of switches are used to connect both failover and data interfaces between two threat defense devices, then when a switch or inter-switch-link is down, both threat defense devices become active. Therefore, the two connection methods shown in the following figures are not recommended.

Figure 1. Connecting with a Single Switch���Not Recommended

Connecting through a single switch. Not recommended.

Figure 2. Connecting with a Double-Switch—Not Recommended

Connecting with a double switch. Not recommended.

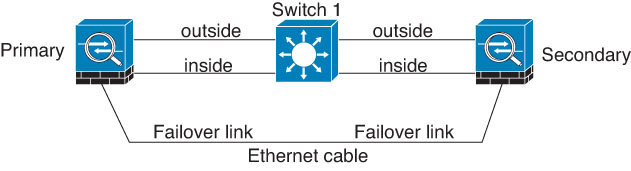
Scenario 2—Recommended

We recommend that failover links not use the same switch as the data interfaces. Instead, use a different switch or use a direct cable to connect the failover link, as shown in the following figures.

Figure 3. Connecting with a Different Switch

Connecting with a different switch.

Figure 4. Connecting with a Cable

Connecting with a cable.

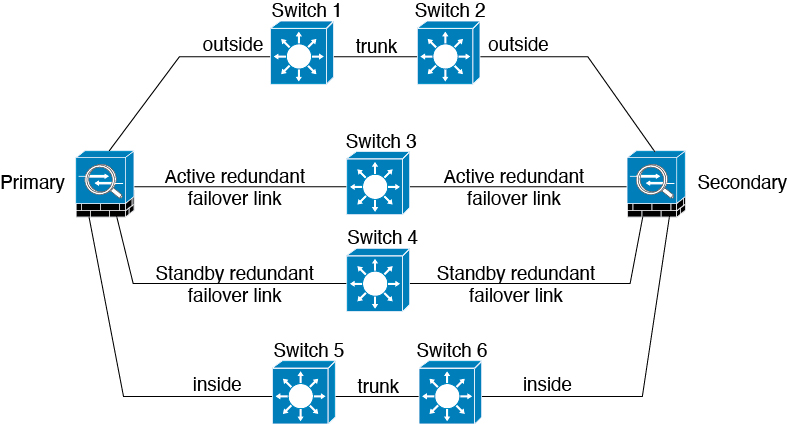
Scenario 3—Recommended

If the threat defense data interfaces are connected to more than one set of switches, then a failover link can be connected to one of the switches, preferably the switch on the secure (inside) side of network, as shown in the following figure.

Figure 5. Connecting with a Secure Switch

Connecting with a secure switch.

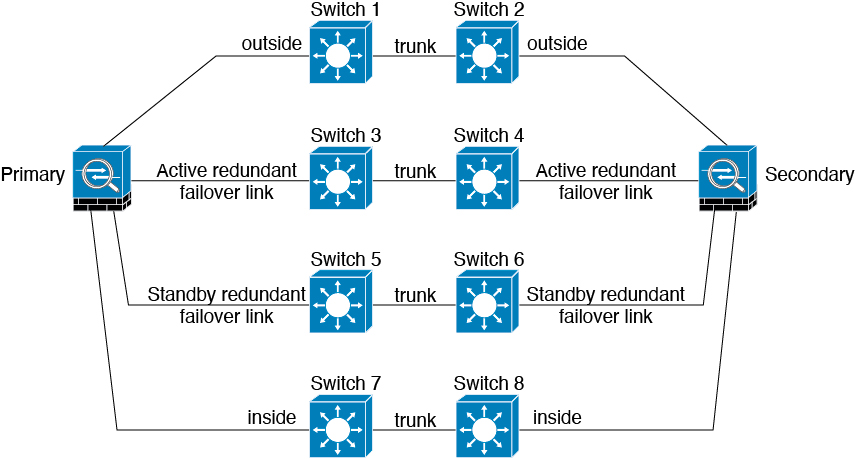
Scenario 4—Recommended

The most reliable failover configurations use a redundant interface on the failover link, as shown in the following figures.

Figure 6. Connecting with Redundant Interfaces

Connecting with Redundant Interfaces.

Figure 7. Connecting with Inter-switch Links

Connecting with inter-switch links.

MAC Addresses and IP Addresses in High Availability

When you configure your interfaces, you can specify an active IP address and a standby IP address on the same network. Generally, when a failover occurs, the new active unit takes over the active IP addresses and MAC addresses. Because network devices see no change in the MAC to IP address pairing, no ARP entries change or time out anywhere on the network.


Note


Although recommended, the standby address is not required. Without a standby IP address, the active unit cannot perform network tests to check the standby interface health; it can only track the link state. You also cannot connect to the standby unit on that interface for management purposes.


The IP address and MAC address for the state link do not change at failover.

Active/Standby IP Addresses and MAC Addresses

For Active/Standby High Availability, see the following for IP address and MAC address usage during a failover event:

  1. The active unit always uses the primary unit's IP addresses and MAC addresses.

  2. When the active unit fails over, the standby unit assumes the IP addresses and MAC addresses of the failed unit and begins passing traffic.

  3. When the failed unit comes back online, it is now in a standby state and takes over the standby IP addresses and MAC addresses.

However, if the secondary unit boots without detecting the primary unit, then the secondary unit becomes the active unit and uses its own MAC addresses, because it does not know the primary unit MAC addresses. When the primary unit becomes available, the secondary (active) unit changes the MAC addresses to those of the primary unit, which can cause an interruption in your network traffic. Similarly, if you swap out the primary unit with new hardware, a new MAC address is used.

If you reload the standby unit with the failover configuration disabled, the standby unit boots up as the active unit and uses the primary unit's IP addresses and MAC addresses. This leads to duplicate IP addresses and causes network traffic disruptions. Use the command configure high-availability resume to enable failover and restore the traffic flow.

Virtual MAC addresses guard against this disruption, because the active MAC addresses are known to the secondary unit at startup, and remain the same in the case of new primary unit hardware. We recommend that you configure the virtual MAC address on both the primary and secondary units to ensure that the secondary unit uses the correct MAC addresses when it is the active unit, even if it comes online before the primary unit. If you do not configure virtual MAC addresses, you might need to clear the ARP tables on connected routers to restore traffic flow. The threat defense device does not send gratuitous ARPs for static NAT addresses when the MAC address changes, so connected routers do not learn of the MAC address change for these addresses.

Virtual MAC Addresses

The threat defense device has multiple methods to configure virtual MAC addresses. We recommend using only one method. If you set the MAC address using multiple methods, the MAC address used depends on many variables, and might not be predictable.

For multi-instance capability, the FXOS chassis autogenerates only primary MAC addresses for all interfaces. You can overwrite the generated MAC address with a virtual MAC address with both the primary and secondary MAC addresses, but predefining the secondary MAC address is not essential; setting the secondary MAC address does ensure that to-the-box management traffic is not interrupted in the case of new secondary unit hardware.

Stateful Failover

During Stateful Failover, the active unit continually passes per-connection state information to the standby unit. After a failover occurs, the same connection information is available at the new active unit. Supported end-user applications are not required to reconnect to keep the same communication session.

Supported Features

For Stateful Failover, the following state information is passed to the standby threat defense device:

  • NAT translation table.

  • TCP and UDP connections and states, including HTTP connection states. Other types of IP protocols, and ICMP, are not parsed by the active unit, because they get established on the new active unit when a new packet arrives.

  • Snort connection states, inspection results, and pin hole information, including strict TCP enforcement.

  • The ARP table

  • The Layer 2 bridge table (for bridge groups)

  • The ISAKMP and IPsec SA table

  • GTP PDP connection database

  • SIP signaling sessions and pin holes.

  • Static and dynamic routing tables—Stateful Failover participates in dynamic routing protocols, like OSPF and EIGRP, so routes that are learned through dynamic routing protocols on the active unit are maintained in a Routing Information Base (RIB) table on the standby unit. Upon a failover event, packets travel normally with minimal disruption to traffic because the active secondary unit initially has rules that mirror the primary unit. Immediately after failover, the re-convergence timer starts on the newly active unit. Then the epoch number for the RIB table increments. During re-convergence, OSPF and EIGRP routes become updated with a new epoch number. Once the timer is expired, stale route entries (determined by the epoch number) are removed from the table. The RIB then contains the newest routing protocol forwarding information on the newly active unit.


    Note


    Routes are synchronized only for link-up or link-down events on an active unit. If the link goes up or down on the standby unit, dynamic routes sent from the active unit may be lost. This is normal, expected behavior.


  • DHCP Server—DHCP address leases are not replicated. However, a DHCP server configured on an interface will send a ping to make sure an address is not being used before granting the address to a DHCP client, so there is no impact to the service. State information is not relevant for DHCP relay or DDNS.

  • Access control policy decisions—Decisions related to traffic matching (including URL, URL category, geolocation, and so forth), intrusion detection, malware, and file type are preserved during failover. However, for connections being evaluated at the moment of failover, there are the following caveats:

    • AVC—App-ID verdicts are replicated, but not detection states. Proper synchronization occurs as long as the App-ID verdicts are complete and synchronized before failover occurs.

    • Intrusion detection state—Upon failover, once mid-flow pickup occurs, new inspections are completed, but old states are lost.

    • File malware blocking—The file disposition must become available before failover.

    • File type detection and blocking—The file type must be identified before failover. If failover occurs while the original active device is identifying the file, the file type is not synchronized. Even if your file policy blocks that file type, the new active device downloads the file.

  • User identity decisions from the identity policy, including the user-to-IP address mappings gathered passively through ISE Session Directory, and active authentication through captive portal. Users who are actively authenticating at the moment of failover might be prompted to authenticate again.

  • Network AMP—Cloud lookups are independent from each device, so failover does not affect this feature in general. Specifically:

    • Signature Lookup—If failover occurs in the middle of a file transmission, no file event is generated and no detection occurs.

    • File Storage—If failover occurs when the file is being stored, it is stored on the original active device. If the original active device went down while the file was being stored, the file does not get stored.

    • File Pre-classification (Local Analysis)—If failover occurs in the middle of pre-classification, detection fails.

    • File Dynamic Analysis (Connectivity to the cloud)—If failover occurs, the system might submit the file to the cloud.

    • Archive File Support—If failover occurs in the middle of an analysis, the system loses visibility into the file/archive.

    • Custom Blocking—If failover occurs, no events are generated.

  • Security Intelligence decisions. However, DNS-based decisions that are in process at the moment of failover are not completed.

  • RA VPN—Remote access VPN end users do not have to reauthenticate or reconnect the VPN session after a failover. However, applications operating over the VPN connection could lose packets during the failover process and not recover from the packet loss.

  • From all the connections, only established ones will be replicated on the Standby ASA.

Unsupported Features

For Stateful Failover, the following state information is not passed to the standby threat defense device:

  • Sessions in plaintext tunnels other than GREv0 and IPv4-in-IP. Sessions inside tunnels are not replicated and the new active node will not be able to reuse existing inspection verdicts to match the correct policy rules.

  • Decrypted TLS/SSL connections—The decryption states are not synchronized, and if the active unit fails, then decrypted connections will be reset. New connections will need to be established to the new active unit. Connections that are not decrypted (in other words, those that match a TLS/SSL Do Not Decrypt rule action) are not affected and are replicated correctly.

  • TCP state bypass connections

  • Multicast routing.

Bridge Group Requirements for High Availability

There are special considerations for high availability when using bridge groups.

When the active unit fails over to the standby unit, the switch port running Spanning Tree Protocol (STP) can go into a blocking state for 30 to 50 seconds when it senses the topology change. To avoid traffic loss on the bridge group member interfaces while the port is in a blocking state, you can configure one of the following workarounds:

  • Switch port is in Access mode—Enable the STP PortFast feature on the switch:

    
    interface interface_id
      spanning-tree portfast


    The PortFast feature immediately transitions the port into STP forwarding mode upon linkup. The port still participates in STP. So if the port is to be a part of the loop, the port eventually transitions into STP blocking mode.

  • If the switch port is in Trunk mode, or you cannot enable STP PortFast, then you can use one of the following less desirable workarounds that impacts failover functionality or STP stability:

    • Disable interface monitoring on the bridge group and member interfaces.

    • Increase the interface hold time in the failover criteria to a high value that will allow STP to converge before the unit fails over.

    • Decrease the STP timers on the switch to allow STP to converge faster than the interface hold time.

Failover Health Monitoring

The threat defense device monitors each unit for overall health and for interface health. This section includes information about how the threat defense device performs tests to determine the state of each unit.

Unit Health Monitoring

The threat defense device determines the health of the other unit by monitoring the failover link with hello messages. When a unit does not receive three consecutive hello messages on the failover link, the unit sends LANTEST messages on each data interface, including the failover link, to validate whether or not the peer is responsive. The action that the threat defense device takes depends on the response from the other unit. See the following possible actions:

  • If the threat defense device receives a response on the failover link, then it does not fail over.

  • If the threat defense device does not receive a response on the failover link, but it does receive a response on a data interface, then the unit does not failover. The failover link is marked as failed. You should restore the failover link as soon as possible because the unit cannot fail over to the standby while the failover link is down.

  • If the threat defense device does not receive a response on any interface, then the standby unit switches to active mode and classifies the other unit as failed.

Heartbeat Module Redundancy

Each unit in the HA periodically sends a broadcast keepalive heartbeat packet over the cluster control link. If the control plane is too busy handling traffic, sometimes the heartbeat packets do not reach the peers, or the peers do not process the heartbeat packets due to CPU overloading. When peers cannot communicate the keepalive status within the configurable timeout period, a false failover or split-brain scenario occurs.

The heartbeat module in the data plane helps to avoid the occurrence of false failover or split-brain due to traffic congestion in the control plane.

  • The additional heartbeat module works similarly to the control plane module but sends and receives heartbeat messages using the data plane transport infrastructure.

  • When the peer receives heartbeat packets in the data plane, a counter gets incremented.

  • If the heartbeat transfer in the control plane fails, the node checks the heartbeat counter in the data plane. If the counter is incrementing, then the peer is alive, and the cluster does not perform a failover in this situation.


Note


  • The additional heartbeat module is enabled by default whenever HA is enabled. You do not have to set a poll interval for the additional heartbeat module in the data plane. This module uses the same heartbeat interval that you set for the control plane.

  • This feature is not available in Version 7.3.


Interface Monitoring

When a unit does not receive hello messages on a monitored interface for 15 seconds, it runs interface tests. If one of the interface tests fails for an interface, but this same interface on the other unit continues to successfully pass traffic, then the interface is considered to be failed, and the device stops running tests.

If the threshold you define for the number of failed interfaces is met (see Devices > Device Management > High Availability > Failover Trigger Criteria), and the active unit has more failed interfaces than the standby unit, then a failover occurs. If an interface fails on both units, then both interfaces go into the “Unknown” state and do not count towards the failover limit defined by failover interface policy.

An interface becomes operational again if it receives any traffic. A failed device returns to standby mode if the interface failure threshold is no longer met.

If an interface has IPv4 and IPv6 addresses configured on it, the device uses the IPv4 addresses to perform the health monitoring. If an interface has only IPv6 addresses configured on it, then the device uses IPv6 neighbor discovery instead of ARP to perform the health monitoring tests. For the broadcast ping test, the device uses the IPv6 all nodes address (FE02::1).

Interface Tests

The threat defense device uses the following interface tests. The duration of each test is approximately 1.5 seconds.

  1. Link Up/Down test—A test of the interface status. If the Link Up/Down test indicates that the interface is down, then the device considers it failed, and testing stops. If the status is Up, then the device performs the Network Activity test.

  2. Network Activity test—A received network activity test. At the start of the test, each unit clears its received packet count for its interfaces. As soon as a unit receives any eligible packets during the test, then the interface is considered operational. If both units receive traffic, then testing stops. If one unit receives traffic and the other unit does not, then the interface on the unit that does not receive traffic is considered failed, and testing stops. If neither unit receives traffic, then the device starts the ARP test.

  3. ARP test—A test for successful ARP replies. Each unit sends a single ARP request for the IP address in the most recent entry in its ARP table. If the unit receives an ARP reply or other network traffic during the test, then the interface is considered operational. If the unit does not receive an ARP reply, then the device sends a single ARP request for the IP address in the next entry in the ARP table. If the unit receives an ARP reply or other network traffic during the test, then the interface is considered operational. If both units receive traffic, then testing stops. If one unit receives traffic, and the other unit does not, then the interface on the unit that does not receive traffic is considered failed, and testing stops. If neither unit receives traffic, then the device starts the Broadcast Ping test.

  4. Broadcast Ping test—A test for successful ping replies. Each unit sends a broadcast ping, and then counts all received packets. If the unit receives any packets during the test, then the interface is considered operational. If both units receive traffic, then testing stops. If one unit receives traffic, and the other unit does not, then the interface on the unit that does not receive traffic is considered failed, and testing stops. If neither unit receives traffic, then testing starts over again with the ARP test. If both units continue to receive no traffic from the ARP and Broadcast Ping tests, then these tests will continue running in perpetuity.

Interface Status

Monitored interfaces can have the following status:

  • Unknown—Initial status. This status can also mean the status cannot be determined.

  • Normal—The interface is receiving traffic.

  • Normal (Waiting)—The interface is up, but has not yet received a hello packet from the corresponding interface on the peer unit.

  • Normal (Not-Monitored)—The interface is up, but is not monitored by the failover process.

  • Testing—Hello messages are not heard on the interface for five poll times.

  • Link Down—The interface or VLAN is administratively down.

  • Link Down (Waiting)—The interface or VLAN is administratively down and has not yet received a hello packet from the corresponding interface on the peer unit.

  • Link Down (Not-Monitored)—The interface or VLAN is administratively down, but is not monitored by the failover process.

  • No Link—The physical link for the interface is down.

  • No Link (Waiting)—The physical link for the interface is down and has not yet received a hello packet from the corresponding interface on the peer unit.

  • No Link (Not-Monitored)—The physical link for the interface is down, but is not monitored by the failover process.

  • Failed—No traffic is received on the interface, yet traffic is heard on the peer interface.

Failover Triggers and Detection Timing

The following events trigger failover in a Firepower high availability pair:

  • More than 50% of the Snort instances on the active unit are down.

  • Disk space on the active unit is more than 90% full.

  • The no failover active command is run on the active unit or the failover active command is run on the standby unit.

  • The active unit has more failed interfaces than the standby unit.

  • Interface failure on the active device exceeds the threshold configured.

    By default, failure of a single interface causes failover. You can change the default value by configuring a threshold for the number of interfaces or a percentage of monitored interfaces that must fail for the failover to occur. If the threshold breaches on the active device, failover occurs. If the threshold breaches on the standby device, the unit moves to Fail state.

    To change the default failover criteria, enter the following command in global configuration mode:

    Table 1.

    Command

    Purpose

    failover interface-policy num [%]

    hostname (config)# failover interface-policy 20%

    Changes the default failover criteria.

    When specifying a specific number of interfaces, the num argument can be from 1 to 250.

    When specifying a percentage of interfaces, the num argument can be from 1 to 100.

The following table shows the failover triggering events and associated failure detection timing. If failover occurs, you can view the reason for the failover in the Message Center, along with various operations pertaining to the high availability pair. You can configure these thresholds to a value within the specified minimum-maximum range.

Table 2. Threat Defense Failover Times

Failover Triggering Event

Minimum

Default

Maximum

Active unit loses power, hardware goes down, or the software reloads or crashes. When any of these occur, the monitored interfaces or failover link do not receives any hello message.

800 milliseconds

15 seconds

45 seconds

Active unit interface physical link down.

500 milliseconds

5 seconds

15 seconds

Active unit interface up, but connection problem causes interface testing.

5 seconds

25 seconds

75 seconds

About Active/Standby Failover

Active/Standby failover lets you use a standby threat defense device to take over the functionality of a failed unit. When the active unit fails, the standby unit becomes the active unit.

Primary/Secondary Roles and Active/Standby Status

When setting up Active/Standby failover, you configure one unit to be primary and the other to be secondary. During configuration, the primary unit's policies are synchronized to the secondary unit. At this point, the two units act as a single device for device and policy configuration. However, for events, dashboards, reports and health monitoring, they continue to display as separate devices.

The main differences between the two units in a failover pair are related to which unit is active and which unit is standby, namely which IP addresses to use and which unit actively passes traffic.

However, a few differences exist between the units based on which unit is primary (as specified in the configuration) and which unit is secondary:

  • The primary unit always becomes the active unit if both units start up at the same time (and are of equal operational health).

  • The primary unit MAC addresses are always coupled with the active IP addresses. The exception to this rule occurs when the secondary unit becomes active and cannot obtain the primary unit MAC addresses over the failover link. In this case, the secondary unit MAC addresses are used.

Active Unit Determination at Startup

The active unit is determined by the following:

  • If a unit boots and detects a peer already running as active, it becomes the standby unit.

  • If a unit boots and does not detect a peer, it becomes the active unit.

  • If both units boot simultaneously, then the primary unit becomes the active unit, and the secondary unit becomes the standby unit.

Failover Events

In Active/Standby failover, failover occurs on a unit basis.

The following table shows the failover action for each failure event. For each failure event, the table shows the failover policy (failover or no failover), the action taken by the active unit, the action taken by the standby unit, and any special notes about the failover condition and actions.

Table 3. Failover Events

Failure Event

Policy

Active Unit Action

Standby Unit Action

Notes

Active unit failed (power or hardware)

Failover

n/a

Become active

Mark active as failed

No hello messages are received on any monitored interface or the failover link.

Formerly active unit recovers

No failover

Become standby

No action

None.

Standby unit failed (power or hardware)

No failover

Mark standby as failed

n/a

When the standby unit is marked as failed, then the active unit does not attempt to fail over, even if the interface failure threshold is surpassed.

Failover link failed during operation

No failover

Mark failover link as failed

Mark failover link as failed

You should restore the failover link as soon as possible because the unit cannot fail over to the standby unit while the failover link is down.

Failover link failed at startup

No failover

Become active

Mark failover link as failed

Become active

Mark failover link as failed

If the failover link is down at startup, both units become active.

State link failed

No failover

No action

No action

State information becomes out of date, and sessions are terminated if a failover occurs.

Interface failure on active unit above threshold

Failover

Mark active as failed

Become active

None.

Interface failure on standby unit above threshold

No failover

No action

Mark standby as failed

When the standby unit is marked as failed, then the active unit does not attempt to fail over even if the interface failure threshold is surpassed.

Config-Sync Optimization

When there is node reboot or node rejoin following suspend or resume failover, the joining unit clears its running configuration. The active unit sends its entire configuration to the joining unit for a full config-sync. If the active unit has large configuration, the joining unit takes several minutes to synchronize the configuration.

The Config-Sync Optimization feature enables comparing the configuration of the joining unit and the active unit by exchanging config-hash values. If the hash computed on both active and joining units match, the joining unit skips full configuration synchronization and rejoin the HA. This feature enables faster HA peering and reduces maintenance window and upgrade time.

Guidelines and Limitations of Config-Sync Optimization

  • The Config-Sync Optimization feature is enabled by default on threat defense version 7.2 and later.

  • threat defense multiple context mode supports the Config-Sync Optimization feature by sharing the context order during full configuration synchronization, allowing comparison of context order during subsequent node-rejoin.

  • If you configure passphrase and failover IPsec key, then Config-Sync Optimization is not effective as the hash value computed in the active and standby unit differs.

  • If you configure the device with dynamic ACL or SNMPv3, the Config-Sync Optimization feature is not effective.

  • Active unit syncs full configuration with flapping LAN links as default behavior. During failover flaps between active and standby units, the Config-Sync Optimization feature is not triggered and performs a full configuration synchronization.

Monitoring Config-Sync Optimization

When Config-Sync Optimization feature is enabled, syslog messages are generated displaying whether the hash values computed on the active and joining unit match, does not match, or if the operation timeout expires. The syslog message also displays the time elapsed, from the time of sending the hash request to the time of getting and comparing the hash response.

Requirements and Prerequisites for High Availability

Model Support

Secure Firewall Threat Defense

Supported Domains

Any

User Roles

Admin

Network Admin

Guidelines for High Availability

Model Support

  • Firepower 1010:

    • You should not use the switch port functionality when using High Availability. Because the switch ports operate in hardware, they continue to pass traffic on both the active and the standby units. High Availability is designed to prevent traffic from passing through the standby unit, but this feature does not extend to switch ports. In a normal High Availability network setup, active switch ports on both units will lead to network loops. We suggest that you use external switches for any switching capability. Note that VLAN interfaces can be monitored by failover, while switch ports cannot. Theoretically, you can put a single switch port on a VLAN and successfully use High Availability, but a simpler setup is to use physical firewall interfaces instead.

    • You can only use a firewall interface as the failover link.


      Note


      On Firepower 1010 devices on which version 6.5 or above is freshly installed and managed by the management center version 6.5 or later, the default interfaces will be of switch port type. Since the switch port functionality is not supported for failover, turn off switch port on those interfaces, do a deployment, and then create failover. For Firepower 1010 systems that are upgraded from versions prior to 6.5, the default interfaces will be the same as those in the previous version.


  • Firepower 9300—Intra-chassis High Availability is not supported.

  • The threat defense virtual on public cloud networks such as Microsoft Azure and Amazon Web Services are not supported with High Availability because Layer 2 connectivity is required.

Additional Guidelines

  • When the active unit fails over to the standby unit, the connected switch port running Spanning Tree Protocol (STP) can go into a blocking state for 30 to 50 seconds when it senses the topology change. To avoid traffic loss while the port is in a blocking state, you can enable the STP PortFast feature on the switch:

    interface interface_id spanning-tree portfast

    This workaround applies to switches connected to both routed mode and bridge group interfaces. The PortFast feature immediately transitions the port into STP forwarding mode upon linkup. The port still participates in STP. So if the port is to be a part of the loop, the port eventually transitions into STP blocking mode.

  • Configuring port security on the switches connected to the threat defense device failover pair can cause communication problems when a failover event occurs. This problem occurs when a secure MAC address configured or learned on one secure port moves to another secure port, a violation is flagged by the switch port security feature.

  • For Active/Standby High Availability and a VPN IPsec tunnel, you cannot monitor both the active and standby units using SNMP over the VPN tunnel. The standby unit does not have an active VPN tunnel, and will drop traffic destined for the NMS. You can instead use SNMPv3 with encryption so the IPsec tunnel is not required.

  • Both the peer devices go into unknown state and high-availability configuration fails if you run clish in any of the peer devices while creating a High Availability pair.

  • Immediately after failover, the source address of syslog messages will be the failover interface address for a few seconds.

  • For better convergence (during a failover), you must shut down the interfaces on a HA pair that are not associated with any configuration or instance.

  • If you configure failover encryption in evaluation mode, the systems use DES for the encryption. If you then register the devices using an export-compliant account, the devices will use AES after a reboot. Thus, if a system reboots for any reason, including after installing an upgrade, the peers will be unable to communicate and both units will become the active unit. We recommend that you do not configure encryption until after you register the devices. If you do configure this in evaluation mode, we recommend you remove the encryption before registering the devices.

  • When using SNMPv3 with failover, if you replace a failover unit, then SNMPv3 users are not replicated to the new unit. You must remove the users, re-add them, and then redeploy your configuration to force the users to replicate to the new unit.

  • The device does not share SNMP client engine data with its peer.

  • If you have a very large number of access control and NAT rules, the size of the configuration can prevent efficient configuration replication, resulting in the standby unit taking an excessively long time to reach standby ready state. This can also impact your ability to connect to the standby unit during replication through the console or SSH session. To enhance configuration replication performance, enable transactional commit for both access rules and NAT, using the asp rule-engine transactional-commit access-group and asp rule-engine transactional-commit nat commands.

  • A unit in a High Availability pair transitioning to the standby role synchronizes its clock with the active unit.

    Example:

    firepower#show clock
    01:00:52 UTC Mar 1 2022
    
    ...
    01:01:18 UTC Mar 1 2022 <======= Incorrect (previous) clock
    Cold Standby               Sync Config                Detected an Active mate
    
    19:38:21 UTC Apr 9 2022 <======= Updated clock
    Sync Config                Sync File System           Detected an Active mate
    ...
    firepower/sec/stby#show clock
    19:38:40 UTC Apr 9 2022
  • The units in High Availability do not dynamically synchronize the clock. Here are some examples of events when synchronization takes place:

    • A new High Availability pair is created.

    • High Availability is broken and re-created.

    • Communication over the failover link was disrupted and reestablished.

    • Failover status was manually changed at the CLI using the no failover/failover or configure high-availability suspend/resume (threat defense) commands.

  • Enabling High Availability forces all routes to be deleted and are re-added after the High Availability progression changes to the Active state. You could experience connection loss during this phase.

  • If you replace the primary unit, then when you re-create high-availability, you should set the replacement unit as the secondary unit so that the configurations are replicated from the former secondary unit to the replacement unit. If you set the replacement unit as primary, you will accidentally overwrite the configuration that is present on the operational unit.

  • Deploying Firepower 1100 and 2100 devices in high availability with hundreds of interfaces configured on them can result in increased delay in the failover time (seconds).

  • In the High Availability configuration, short-lived connections, usually using port 53, are closed quickly and never transferred or synchronized from Active to Standby, so there might be a difference in the number of connections on both High Availability devices. This is expected behavior for short-lived connections. You can try to compare the connections that are long-lived ( for example, more than 30-60 seconds).

  • In the High Availability configuration, embryonic connections—connection requests that have not yet completed the three-way handshake process—are closed quickly and not synchronized between the active and standby devices. This design ensures HA system efficiency and security. For this reason, there might be a difference in the number of connections on both High Availability devices, which is to be expected.

  • If the failover LAN link is not connected back-to-back and instead connected through one or more switches, a failure within the intermediate path can cause the active unit to lose connectivity with the standby unit, resulting in inconsistent active/standby states. Although this does not impact High Availability functionality, it is recommended to check and recover the failover-link path between the active and standby units.

    When the failover LAN link is down, it is not recommended to deploy any configuration, as it may not be replicated to the peer unit.

  • See the Cisco Secure Firewall Threat Defense Virtual Getting Started Guide and review your threat defense virtual device configurations for high availability.

Add a High Availability Pair

When establishing an Active/Standby high-availability pair, you designate one of the devices as primary and the other as secondary. The management center deploys a merged configuration to the paired devices. If there is a conflict, the primary device setting is used.

In a multidomain deployment, devices in a high-availability pair must belong to the same domain.


Note


The failover link and the stateful failover link are in a private IP space and are only used for communication between peers in a high-availability pair. After high availability is established, selected interface links and encryption settings cannot be modified without breaking the high-availability pair and reconfiguring it.


Caution


Creating or breaking a high-availability pair immediately restarts the Snort process on the primary and secondary devices, temporarily interrupting traffic inspection on both devices. Whether traffic drops during this interruption or passes without further inspection depends on how the target device handles traffic. See Snort Restart Traffic Behavior for more information. The system warns you that continuing to create a high-availability pair restarts the Snort process on the primary and secondary devices and allows you to cancel.


Before you begin

Confirm that both devices:

  • Are the same model.

  • Have the same number and type of interfaces.

  • Are in the same domain and group.

  • Have normal health status and are running the same software.

  • Are either in routed or transparent mode.

  • Have the same NTP configuration. See Time Synchronization.

  • Are fully deployed with no uncommitted changes.

  • Do not have DHCP or PPPoE configured on any interfaces.


Note


The high availability formation is possible between the two threat defense devices when the certificate available on the primary device is not present on the secondary device. When high availability is formed, the certificate will be synched on the secondary device.


Procedure


Step 1

Add both devices to the management center according to Add a Device to the Management Center.

Step 2

Choose Devices > Device Management.

Step 3

From the Add drop-down menu, choose High Availability.

Step 4

Enter a display Name for the high-availability pair.

Step 5

Under Device Type, choose Firepower Threat Defense.

Step 6

Choose the Primary Peer device for the high-availability pair.

Step 7

Choose the Secondary Peer device for the high-availability pair.

Step 8

Click Continue.

Step 9

Under LAN Failover Link, choose an Interface with enough bandwidth to reserve for failover communications.

Note


Only interfaces that do not have a logical name and do not belong to a security zone, will be listed in the Interface drop-down in the Add High Availability Pair dialog.

Step 10

Type any identifying Logical Name.

Step 11

Type a Primary IP address for the failover link on the active unit.

This address should be on an unused subnet. This subnet can be 31-bits (255.255.255.254 or /31) with only two IP addresses.

Note


169.254.1.0/24 and fd00:0:0:*::/64 are internally used subnets and cannot be used for the failover or state links.

Step 12

Optionally, choose Use IPv6 Address.

Step 13

Type a Secondary IP address for the failover link on the standby unit. This IP address must be in the same subnet as the primary IP address.

Step 14

If IPv4 addresses are used, type a Subnet Mask that applies to both the primary and secondary IP addresses.

Step 15

Optionally, under Stateful Failover Link, choose the same Interface, or choose a different interface and enter the high availability configuration information.

This subnet can be 31-bits (255.255.255.254 or /31) with only two IP addresses.

Note


169.254.1.0/24 and fd00:0:0:*::/64 are internally used subnets and cannot be used for the failover or state links.

Step 16

Optionally, choose Enabled and choose the Key Generation method for IPsec Encryption between the failover links.

Step 17

Click OK. This process takes a few minutes as the process synchronizes system data.


What to do next

Back up the devices. You can use the backup to quickly replace the devices when they fail and to restore the high availability service without being delinked from the management center. For more information, see Cisco Secure Firewall Management Center Administration Guide.

Configure Optional High Availability Parameters

You can view the initial High Availability Configuration on the management center. You cannot edit these settings without breaking the high availability pair and then re-establishing it.

You can edit the Failover Trigger Criteria to improve failover results. Interface Monitoring allows you to determine which interfaces are better suited for failover.

Configure Standby IP Addresses and Interface Monitoring

For each interface, set a standby IP address. Although recommended, the standby address is not required. Without a standby IP address, the active unit cannot perform network tests to check the standby interface health; it can only track the link state.

By default, monitoring is enabled on all physical interfaces, for the Firepower 1010 all VLAN interfaces, with logical names configured. You might want to exclude interfaces attached to less critical networks from affecting your failover policy. Firepower 1010 switch ports are not eligible for interface monitoring.

Procedure


Step 1

Choose Devices > Device Management.

Step 2

Next to the device high-availability pair you want to edit, click the Edit (edit icon).

Step 3

Click the High Availability tab.

Step 4

In the Monitored Interfaces area, click the Edit (edit icon) next to the interface you want to edit.

Step 5

Check the Monitor this interface for failures check box.

Step 6

On the IPv4 tab, enter the Standby IP Address.

This address must be a free address on the same network as the active IP address.

Step 7

If you configured the IPv6 address manually, on the IPv6 tab, click the Edit (edit icon) next to the active IP address, enter the Standby IP Address, and click OK.

This address must be a free address on the same network as the active IP address. For autogenerated and Enforce EUI 64 addresses, the standby address is automatically generated.

Step 8

Click OK.


Edit High Availability Failover Criteria

You can customize failover criteria based on your network deployment.

Procedure


Step 1

Choose Devices > Device Management.

Step 2

Next to the device high-availability pair you want to edit, click the Edit (edit icon).

Step 3

Choose High Availability.

Step 4

Next to Failover Trigger Criteria, click the Edit (edit icon).

Step 5

Under Interface Failure Threshold, choose the number or percentage of interfaces that must fail before the device fails over.

Step 6

Under Hello packet Intervals, choose how often hello packets are sent over the failover link.

Note


If you use remote access VPN on the Firepower 2100, use the default hello packet intervals. Otherwise, you might see high CPU usage that can cause a failover to occur.

Step 7

Click OK.


Configure Virtual MAC Addresses

You can configure active and standby MAC addresses for failover using the following methods in the Secure Firewall Management Center:

  • From the Advanced tab on the Edit Interface page during interface configuration; see Configure the MAC Address.

  • From the Add Interface MAC Address dialog-box which is accessed from the High Availability page; see this procedure.


    Note


    To configure the MAC address in both primary and secondary units (so that the MAC address is transferred to all sub-interfaces to both the high-availability units), the recommended approach is to use the Interfaces tab to replicate the MAC addresses on sub-interfaces over both active and standby high-availability units.


If you configure active and standby MAC addresses in both locations, the addresses defined during interface configuration take precedence for failover.

You can minimize loss of traffic during failover by designating active and standby MAC addresses to the physical interface. This feature offers redundancy against IP address mapping for failover.

Procedure


Step 1

Choose Devices > Device Management.

Step 2

Next to the device high-availability pair you want to edit, click Edit (edit icon).

Step 3

Click High Availability.

Step 4

Click the Add (add icon) icon next to Interface MAC Addresses.

Step 5

Choose a Physical Interface.

Step 6

Enter the Active Interface Mac Address.

Step 7

Enter the Standby Interface Mac Address.

Step 8

Click OK.

Note


For detailed information, see Task 2, steps from 10 to 14 in Configure FTD High Availability on Firepower Appliances.

.

Manage High Availability

This section describes how to manage High Availability units after you enable High Availability, including how to change the High Availability setup and how to force failover from one unit to another.

Switch the Active Peer in the Threat Defense High Availability Pair

After you establish the threat defense high availability pair, you can manually switch the active and standby units, effectively forcing failover for reasons such as persistent fault or health events on the current active unit. Both units should be fully deployed before you complete this procedure.

Before you begin

Refresh Node Status for a Single Threat Defense High Availability Pair. This ensures that the status on the threat defense high availability device pair is in sync with the status on the management center.

Procedure


Step 1

Choose Devices > Device Management.

Step 2

Next to the high availability pair where you want to change the active peer, click the Switch Active Peer.

Step 3

You can:

  • Click Yes to immediately make the standby device the active device in the high availability pair.
  • Click No to cancel and return to the Device Management page.

Refresh Node Status for a Single Threat Defense High Availability Pair

Whenever active or standby devices in the threat defense high availability pair are rebooted, the management center may not display accurate high availability status for either device. This is because when the device reboots, the high availability status is immediately updated on the device and its corresponding event is sent to the management center. However, the status may not be updated on the management center because the communication between the device and the management center is yet to be established.

Communication failures or weak communication channels between the management center and devices may result in out of sync data. When you switch the active and standby devices in a high availability pair, the change may not be reflected in the management center even after a significant time duration.

In these scenarios, you can refresh the high availability node status to obtain accurate information about the active and standby device in a high availability pair.

Procedure


Step 1

Choose Devices > Device Management.

Step 2

Next to the high availability pair where you want to refresh the node status, click the Refresh HA Node Status.

Step 3

Click Yes to refresh the node status.


Suspend and Resume High Availability

You can suspend a unit in a high-availability pair, which is useful when:

  • Both units are in an active-active situation, and fixing the communication on the failover link does not correct the problem.

  • You want to troubleshoot an active or standby unit and do not want the units to fail over during that time.

When you suspend high availability, the currently active device remains active, handling all user connections. However, failover criteria are no longer monitored, and the system will never fail over to the now pseudo-standby device.

The key difference between suspending high availability and breaking high availability is that on a suspended high-availability device, the high-availability configuration is retained. When you break high availability, the configuration is erased. Thus, you have the option to resume high availability on a suspended system, which enables the existing configuration and makes the two devices function as a failover pair again.

To suspend high availability, use the configure high-availability suspend command.


> configure high-availability suspend
Please ensure that no deployment operation is in progress before suspending 
high-availability.
Please enter 'YES' to continue if there is no deployment operation in 
progress and 'NO' if you wish to abort: YES
Successfully suspended high-availability.


If you suspend high availability from the active unit, the configuration is suspended on both the active and standby units. The standby unit interface configuration is also erased. If you suspend it from the standby unit, it is suspended on the standby unit only, but the active unit will not attempt to fail over to a suspended unit.

To resume failover, use the configure high-availability resume command.


> configure high-availability resume
Successfully resumed high-availablity.

You can resume a unit only if it is in Suspended state. The unit will negotiate active/standby status with the peer unit.


Note


Suspending high availability is a temporary state. If you reload a unit, it resumes the high-availability configuration automatically and negotiates the active/standby state with the peer.


Replace a Unit in Threat Defense High Availability Pair

To replace a failed unit in the threat defense high availability pair using a backup file, see Restoring Management Centers and Managed Devices in the Cisco Secure Firewall Management Center Administration Guide.

If you do not have a backup of the failed device, you must break high availability. Then, register the replacement device to the Secure Firewall Management Center and reestablish high availability. The process varies depending on whether the device is primary or secondary:

Replace a Primary Threat Defense HA Unit with no Backup

Follow the steps below to replace a failed primary unit in the threat defense high availability pair. Failing to follow these steps can overwrite the existing high availability configuration.


Caution


Creating or breaking the threat defense high availability pair immediately restarts the Snort process on the primary and secondary devices, temporarily interrupting traffic inspection on both devices. Whether traffic drops during this interruption or passes without further inspection depends on how the target device handles traffic. See Snort Restart Traffic Behavior for more information. The system warns you that continuing to create a high availability pair restarts the Snort process on the primary and secondary devices and allows you to cancel.


Caution


Never move a disk from sensor or management center to another device without reimaging the disk. This is an unsupported configuration and can cause breakage in functionality.


Procedure

Step 1

Choose Force Break to separate the high availability pair; see Break a High Availability Pair.

Note


The break operation removes all the configuration related to HA from threat defense and management center, and you need to recreate it manually later. To successfully configure the same HA pair, ensure that you save the IPs, MAC addresses, and monitoring configuration of all the interfaces/subinterfaces prior to executing the HA break operation.

Step 2

Unregister the failed primary threat defense device from the management center; see Delete (Unregister) a Device from the Management Center.

Step 3

Register the replacement threat defense to the management center; see Add a Device to the Management Center.

Step 4

Configure high availability, using the existing secondary/active unit as the primary device and the replacement device as the secondary/standby device during registration; see Add a High Availability Pair.


Replace a Secondary Threat Defense HA Unit with no Backup

Follow the steps below to replace a failed secondary unit in the threat defense high availability pair.


Caution


Creating or breaking the threat defense high availability pair immediately restarts the Snort process on the primary and secondary devices, temporarily interrupting traffic inspection on both devices. Whether traffic drops during this interruption or passes without further inspection depends on how the target device handles traffic. See Snort Restart Traffic Behavior for more information. The system warns you that continuing to create a high availability pair restarts the Snort process on the primary and secondary devices and allows you to cancel.


Procedure

Step 1

Choose Force Break to separate the high availability pair; see Break a High Availability Pair.

Note


The break operation removes all the configuration related to HA from threat defense and management center, and you need to recreate it manually later. To successfully configure the same HA pair, ensure that you save the IPs, MAC addresses, and monitoring configuration of all the interfaces/subinterfaces prior to executing the HA break operation.

Step 2

Unregister the secondary threat defense device from the management center; see Delete (Unregister) a Device from the Management Center.

Step 3

Register the replacement threat defense to the management center; see Add a Device to the Management Center.

Step 4

Configure high availability, using the existing primary/active unit as the primary device and the replacement device as the secondary/standby device during registration; see Add a High Availability Pair.


Break a High Availability Pair

When you break a high-availability pair, the high-availability configuration is removed from both units.

The active unit remains up and passing traffic. The standby unit interface configuration is erased.

Policies that were not deployed to the active unit prior to the break operation continue to remain un-deployed after the break operation is complete. Deploy the policies on the standalone device after the break operation is complete.


Note


If you cannot reach the high-availability pair using the management center, connect to the CLI on each device and enter configure high-availability disable to manually break high availability. See also Delete (Unregister) a High Availability Pair and Register to a New Management Center.


Caution


Breaking the threat defense high-availability pair immediately restarts the Snort process on the primary and secondary units, temporarily interrupting traffic inspection on both devices. Whether traffic drops during this interruption or passes without further inspection depends on how the target device handles traffic. See Snort Restart Traffic Behavior for more information.


Before you begin

Procedure


Step 1

Choose Devices > Device Management.

Step 2

Next to the high-availability pair you want to break, click Break HA.

Step 3

If the standby peer does not respond, check Force Break.

Step 4

Click Yes.

The Break operation removes the high-availability configuration from the active and standby units.

A FlexConfig policy deployed on the active unit may show a deployment failure after the break high-availability operation. You must alter and re-deploy the FlexConfig policy on the active unit.


What to do next

If you are using a FlexConfig policy on the active unit, alter and re-deploy the FlexConfig policy to eliminate deployment errors.

Delete (Unregister) a High Availability Pair and Register to a New Management Center

If the management center can no longer reach the High Availability pair, you can unregister the pair and manually break High Availability at the CLI so you can later re-register them as standalone devices and optionally re-form High Availability. If you can still reach both units, we recommend that you instead use the Break option and then unregister the standalone devices. See Break a High Availability Pair.

Unregistering a High Availability pair:

  • Severs all communication between the management center and the pair.

  • Removes the pair from the Device Management page.

  • Returns the pair to local time management if the pair's platform settings policy is configured to receive time from the management center using NTP.

  • Leaves the configuration intact, so the pair continues to process traffic.

    Policies, such as NAT and VPN, ACLs, and the interface configurations remain intact.

Before you begin

  • This procedure requires CLI access.

Procedure


Step 1

Choose Devices > Device Management.

Step 2

Next to the High Availability pair you want to unregister, click More (more icon) and choose Delete.

Step 3

Click Yes. The device High Availability pair is unregistered.

Step 4

You can register the pair to a new (or the same) management center.

  1. On each unit, access the threat defense CLI, and enter the following command to break High Availability.

    configure high-availability disable

    You must break High Availability before you can re-add the units to a management center. When you break High Availability, the active device remains up and passing traffic.

  2. On each unit, identify the new management center using the configure manager add command. See Modify Threat Defense Management Interfaces at the CLI.

  3. Choose Devices > Device Management, and then click Add Device and add both units as standalone devices.

    When you register the devices to the management center, the configuration is removed, so the active unit will stop processing traffic at this point.

  4. Re-form High Availability according to Add a High Availability Pair.


Monitoring High Availability

This section lets you monitor the High Availability status.

View Failover History

You can view the failover history of both high availability devices in a single view. The history displays in chronological order and includes the reason for any failover.

Procedure


Step 1

Choose Devices > Device Management.

Step 2

Next to the device high-availability pair you want to edit, click Edit (edit icon).

Step 3

Choose Summary.

Step 4

Under General, click View (View button).


View Stateful Failover Statistics

You can view the stateful failover link statistics of both the primary and secondary devices in the high availability pair.

Procedure


Step 1

Choose Devices > Device Management.

Step 2

Next to the device high-availability pair you want to edit, click Edit (edit icon).

Step 3

Choose High Availability.

Step 4

Under Stateful Failover Link, click View (View button).

Step 5

Choose a device to view statistics.


History for High Availability

Feature

Minimum Management Center

Minimum Threat Defense

Details

Policy rollback support for high availability

7.2

Any

The configure policy rollback command is supported for high availability.

Config-Sync Optimization feature for faster HA peering

7.2

Any

The Config-Sync Optimization feature enables comparing the configuration of the joining unit and the active unit by exchanging config-hash values. If the hash computed on both active and joining units match, the joining unit skips full config-sync and rejoin the HA. This feature enables faster HA peering and reduces maintenance window and upgrade time.

Improvements to the upgrade workflow for clustered and high-availability devices

7.1

Any

We made the following improvements to the upgrade workflow for clustered and high-availability devices:

  • The upgrade wizard now correctly displays clustered and high-availability units as groups, rather than as individual devices. The system can identify, report, and preemptively require fixes for group-related issues you might have. For example, you cannot upgrade a cluster on the Firepower 4100/9300 if you have made unsynced changes on Firepower Chassis Manager.

  • We improved the speed and efficiency of copying upgrade packages to clusters and high-availability pairs. Previously, the FMC copied the package to each group member sequentially. Now, group members can get the package from each other as part of their normal sync process.

  • You can now specify the upgrade order of data units in a cluster. The control unit always upgrades last.

Clearing routes in a high-availability group or cluster.

7.1

Any

In previous releases, the clear route command cleared the routing table on the unit only. Now, when operating in a high-availability group or cluster, the command is available on the active or control unit only, and clears the routing table on all units in the group or cluster.

FTD High Availability Hardening

6.2.3

Any

Version 6.2.3 introduces the following features for FTD devices in high availability:

  • Whenever active or standby FTD devices in a high-availability pair restart, the FMC may not display accurate high-availability status for either managed device. However, the status may not upgrade on the FMC because the communication between the device and the FMC is not established yet. The Refresh Node Status option on the Devices > Device Management page allows you to refresh the high-availability unit status to obtain accurate information about the active and standby device in a high-availability pair.

  • The Devices > Device Management page of the FMC UI has a new Switch Active Peer icon.

  • Version 6.2.3 includes a new REST API object, Device High Availability Pair Services, that contains four functions:

    • DELETE ftddevicehapairs

    • PUT ftddevicehapairs

    • POST ftddevicehapairs

    • GET ftddevicehapairs