Threat Defense Deployment with the Device Manager

Is This Chapter for You?

This chapter explains how to complete the initial set up and configuration of your threat defense device using the device manager web-based device setup wizard.

Device Manager lets you configure the basic features of the software that are most commonly used for small networks. It is especially designed for networks that include a single device or just a few, where you do not want to use a high-powered multiple-device manager to control a large network containing many device manager devices.

If you are managing large numbers of devices, or if you want to use the more complex features and configurations that threat defense allows, use the management center instead.

The ISA 3000 hardware can run either threat defense software or ASA software. Switching between threat defense and ASA requires you to reimage the device. See Reimage the Cisco ASA or Firepower Threat Defense Device.

Privacy Collection Statement—The Firepower 1100 Series does not require or actively collect personally-identifiable information. However, you can use personally-identifiable information in the configuration, for example for usernames. In this case, an administrator might be able to see this information when working with the configuration or when using SNMP.

End-to-End Procedure

See the following tasks to deploy threat defense with device manager on your chassis.
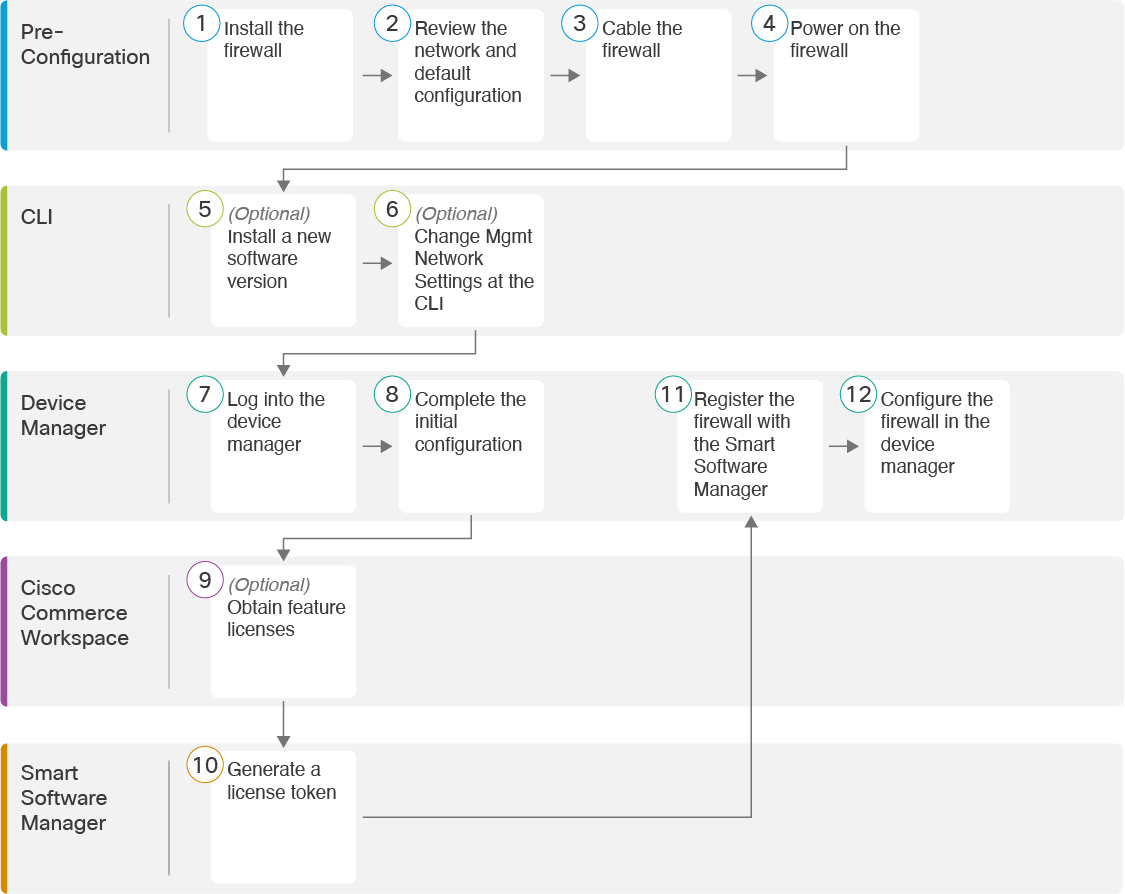
Pre-Configuration

Review the Network Deployment and Default Configuration.

Pre-Configuration

Pre-Configuration

Power on the Device.

Threat Defense CLI

(Optional) Change Management Network Settings at the CLI.

Device Manager

Log Into the Device Manager.

Device Manager

Cisco Commerce Workspace

Configure Licensing: Obtain license features.

Smart Software Manager

Configure Licensing: Generate a license token.

Device Manager

Configure Licensing: Register the device with the Smart Licensing Server.

Device Manager

Review the Network Deployment and Default Configuration

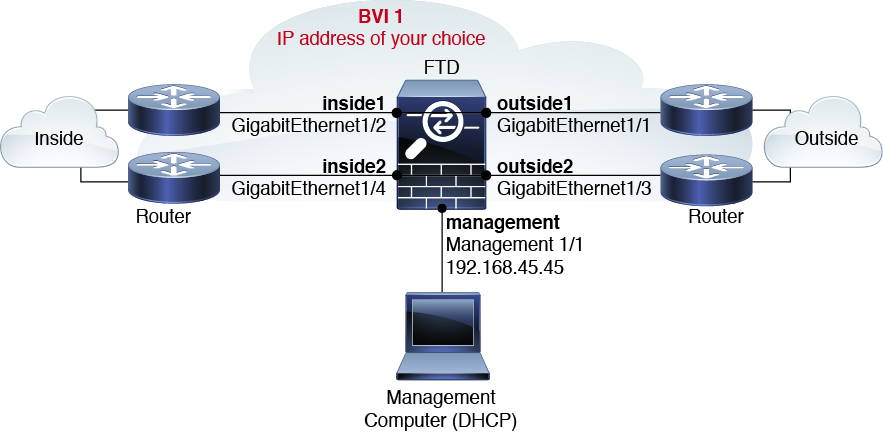
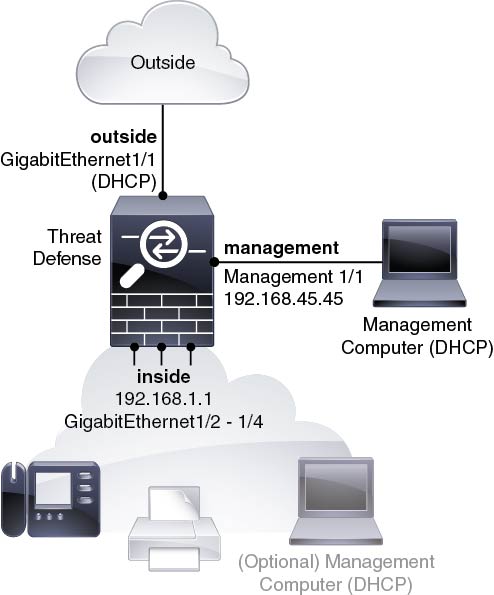
The following figures show the suggested network deployment for the ISA 3000 for version 6.5 and later, and for version 6.4 and earlier. The default configuration changed in version 6.5.


Note

If cannot use the default Management IP address (for example, you are adding your device to an existing network), then you can connect to the console port and perform initial setup at the CLI, including setting the Management IP address, gateway, and other basic networking settings. See (Optional) Change Management Network Settings at the CLI.


Figure 1. 6.5 and Later: Suggested Network Deployment
ISA 3000 Network
Figure 2. 6.4 and Earlier: Suggested Network Deployment

Default Configuration (6.5 and Later)

The configuration for the ISA 3000, which is a special default configuration applied before shipping, includes the following:

  • BVI 1—All member interfaces are in the same network (IP address not pre-configured; you must set to match your network): GigabitEthernet 1/1 (outside1), GigabitEthernet 1/2 (inside1), GigabitEthernet 1/3 (outside2), GigabitEthernet 1/4 (inside2)

  • inside←→outside traffic flow. All interfaces can communicate with each other.

  • management—Management 1/1 (management), IP address 192.168.45.45


    Note

    The Management 1/1 interface is shared between the Management logical interface and the Diagnostic logical interface; see the FDM configuration guide for more information.


  • DNS server for management—OpenDNS: 208.67.222.222, 208.67.220.220

  • NTP—Cisco NTP servers: 0.sourcefire.pool.ntp.org, 1.sourcefire.pool.ntp.org, 2.sourcefire.pool.ntp.org

  • Default routes

    • Management interface—Through the Management interface to 192.168.45.1.

    • Data interfaces—None.

  • FDM access—Management hosts allowed

  • Hardware bypass—Enabled for the following interface pairs: GigabitEthernet 1/1 & 1/2; GigabitEthernet 1/3 & 1/4


    Note

    When the ISA 3000 loses power and goes into hardware bypass mode, only the above interface pairs can communicate; inside1 and inside2, and outside1 and outside2 can no longer communicate. Any existing connections between these interfaces will be lost. When the power comes back on, there is a brief connection interruption as the threat defense takes over the flows.


Default Configuration (6.4 and Earlier)

The configuration for the ISA 3000 after initial setup includes the following:

  • inside—GigabitEthernet 1/2 through 1/4 belong to bridge group interface (BVI) 1, IP address 192.168.1.1

  • outside—GigabitEthernet 1/1, IP address from DHCP or an address you specify during setup

  • inside→outside traffic flow

  • management—Management 1/1 (management), IP address 192.168.45.45


    Note

    The Management 1/1 interface is shared between the Management logical interface and the Diagnostic logical interface; see the FDM configuration guide for more information.


  • DNS server for management—OpenDNS: 208.67.222.222, 208.67.220.220, or servers you specify during setup

  • NTP—Cisco NTP servers: 0.sourcefire.pool.ntp.org, 1.sourcefire.pool.ntp.org, 2.sourcefire.pool.ntp.org, or servers you specify during setup

  • Default routes

    • Data interfaces—Obtained from outside DHCP, or a gateway IP address you specify during setup

    • Management interface—Over the backplane and through the data interfaces. The threat defense requires internet access for licensing and updates.

  • DHCP server on inside interface, management interface

  • FDM access—Management and inside hosts allowed

  • NAT—Interface PAT for all traffic from inside to outside

Cable the Device (6.5 and Later)

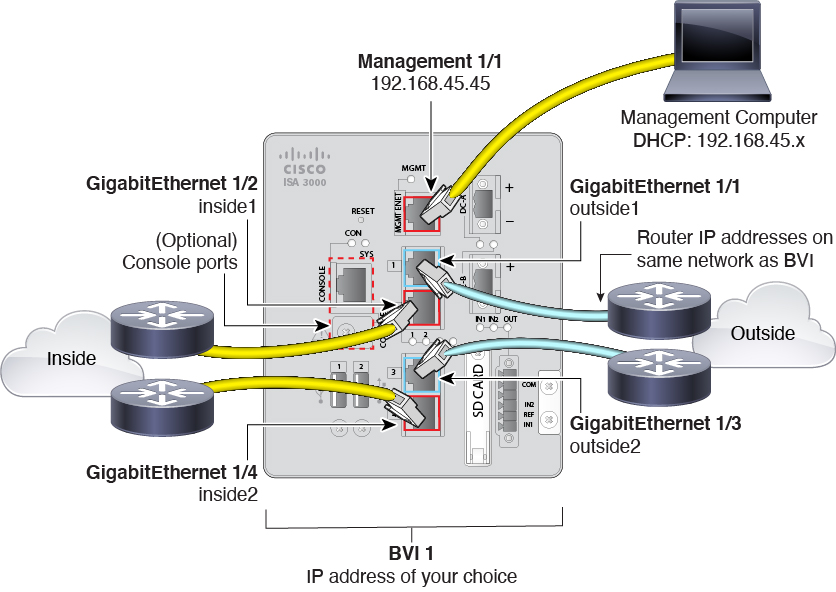
ISA 3000 cabling

Manage the ISA 3000 on the Management 1/1 interface.

Procedure


Step 1

Connect GigabitEthernet 1/1 to an outside router, and GigabitEthernet 1/2 to an inside router.

These interfaces form a hardware bypass pair.

Step 2

Connect GigabitEthernet 1/3 to a redundant outside router, and GigabitEthernet 1/4 to a redundant inside router.

These interfaces form a hardware bypass pair. These interfaces provide a redundant network path if the other pair fails. All 4 of these data interfaces are on the same network of your choice. You will need to configure the BVI 1 IP address to be on the same network as the inside and outside routers.

Step 3

Connect Management 1/1 to your management PC (or network).

If you need to change the Management 1/1 IP address from the default, you must also cable your management PC to the console port (cabling not shown). See (Optional) Change Management Network Settings at the CLI.


Cable the Device (6.4 and Earlier)

Manage the ISA 3000 on either Management 1/1 or GigabitEthernet 1/2 through 1/4. The default configuration also configures GigabitEthernet1/1 as outside.

Procedure


Step 1

Connect your management computer to one of the following interfaces:

  • GigabitEthernet 1/2 through 1/4—Connect your management computer directly to one of the inside ports (Ethernet 1/2 through 1/4). inside has a default IP address (192.168.1.1) and also runs a DHCP server to provide IP addresses to clients (including the management computer), so make sure these settings do not conflict with any existing inside network settings (see Default Configuration (6.4 and Earlier)).

  • Management 1/1—Connect your management computer directly to Management 1/1. Or connect Management 1/1 to your management network. Management 1/1 has a default IP address (192.168.45.45) and also runs a DHCP server to provide IP addresses to clients (including the management computer), so make sure these settings do not conflict with any existing management network settings (see Default Configuration (6.4 and Earlier)).

    If you need to change the Management 1/1 IP address from the default, you must also cable your management PC to the console port (cabling not shown). See (Optional) Change Management Network Settings at the CLI.

Step 2

Connect the outside network to the GigabitEthernet 1/1 interface.

By default, the IP address is obtained using DHCP, but you can set a static address during initial configuration.

Step 3

Connect inside devices to the remaining ports, GigabitEthernet 1/2 through 1/8.


Power on the Device

System power is controlled by DC power; there is no power button.

Before you begin

It's important that you provide reliable power for your device (for example, using an uninterruptable power supply (UPS)). Loss of power without first shutting down can cause serious file system damage. There are many processes running in the background all the time, and losing power does not allow the graceful shutdown of your system.

Procedure


Step 1

Attach the power plug to the ISA 3000 after wiring it to the DC power source.

Refer to “Connecting to DC Power” in the hardware installation guide for instructions on proper wiring of the power plug.

Step 2

Check the System LED on the front panel of the ISA 3000 device; if it is steady green, the device is powered on. If it is flashing green, the device is in Boot up phase and POST.

Refer to “Verifying Connections” in the hardware installation guide to verify that all devices are properly connected to the ISA 3000.


(Optional) Change Management Network Settings at the CLI

If you cannot use the default management IP address, then you can connect to the console port and perform initial setup at the CLI, including setting the Management IP address, gateway, and other basic networking settings. You can only configure the Management interface settings; you cannot configure inside or outside interfaces, which you can later configure in the GUI.


Note

You cannot repeat the CLI setup script unless you clear the configuration; for example, by reimaging. However, all of these settings can be changed later at the CLI using configure network commands. See Cisco Secure Firewall Threat Defense Command Reference.


Procedure


Step 1

Connect to the threat defense console port. See Access the Threat Defense CLI for more information.

Log in with the admin user and the default password, Admin123.

Note 

If the password was already changed, and you do not know it, you must reimage the device to reset the password to the default. See the Cisco ASA and Firepower Threat Defense Device Reimage Guide for instructions.

Step 2

The first time you log into the threat defense, you are prompted to accept the End User License Agreement (EULA) and to change the admin password. You are then presented with the CLI setup script.

Defaults or previously-entered values appear in brackets. To accept previously entered values, press Enter.

See the following guidelines:

  • Enter the IPv4 default gateway for the management interface—If you set a manual IP address, enter either data-interfaces or the IP address of the gateway router. The data-interfaces setting sends outbound management traffic over the backplane to exit a data interface. This setting is useful if you do not have a separate Management network that can access the internet. Traffic originating on the Management interface includes license registration and database updates that require internet access. If you use data-interfaces, you can still use the device manager (or SSH) on the Management interface if you are directly-connected to the Management network, but for remote management for specific networks or hosts, you should add a static route using the configure network static-routes command. Note that the device manager management on data interfaces is not affected by this setting. If you use DHCP, the system uses the gateway provided by DHCP and uses the data-interfaces as a fallback method if DHCP doesn't provide a gateway.

  • If your networking information has changed, you will need to reconnect—If you are connected with SSH to the default IP address but you change the IP address at initial setup, you will be disconnected. Reconnect with the new IP address and password. Console connections are not affected.

  • Manage the device locally?—Enter yes to use the device manager. A no answer means you intend to use the on-premises or cloud-delivered management center to manage the device.

Example:


You must accept the EULA to continue.
Press <ENTER> to display the EULA:
End User License Agreement
[...]

Please enter 'YES' or press <ENTER> to AGREE to the EULA: 

System initialization in progress.  Please stand by.
You must change the password for 'admin' to continue.
Enter new password: ********
Confirm new password: ********
You must configure the network to continue.
You must configure at least one of IPv4 or IPv6.
Do you want to configure IPv4? (y/n) [y]:
Do you want to configure IPv6? (y/n) [n]:
Configure IPv4 via DHCP or manually? (dhcp/manual) [manual]:
Enter an IPv4 address for the management interface [192.168.45.45]: 10.10.10.15
Enter an IPv4 netmask for the management interface [255.255.255.0]: 255.255.255.192
Enter the IPv4 default gateway for the management interface [data-interfaces]: 10.10.10.1
Enter a fully qualified hostname for this system [firepower]: ftd-1.cisco.com
Enter a comma-separated list of DNS servers or 'none' [208.67.222.222,208.67.220.220]:
Enter a comma-separated list of search domains or 'none' []:
If your networking information has changed, you will need to reconnect.
For HTTP Proxy configuration, run 'configure network http-proxy'

Manage the device locally? (yes/no) [yes]: yes

>
Step 3

Log into the device manager on the new Management IP address.


Log Into the Device Manager

Log into the device manager to configure your threat defense.

Before you begin

  • Use a current version of Firefox, Chrome, Safari, Edge, or Internet Explorer.

Procedure


Step 1

Enter the following URL in your browser.

  • Management—https://192.168.45.45 . If you changed the Management IP address at the CLI setup, then enter that address.

  • (6.4 and earlier only) Inside—https://192.168.1.1 . You can connect to the inside address on any inside BVI interfaces (Ethernet1/2 through 1/4). For 6.5 and later, the default configuration does not pre-configure management on data interfaces.

Step 2

Log in with the username admin, and thedefault password Admin123.


What to do next

Complete the Initial Configuration (6.5 and Later)

This section describes how to configure the following important settings:

  • BVI 1 IP address—You must set the BVI 1 IP address for traffic to flow between the bridge group member interfaces.

  • Default route for traffic originating on the device—All interfaces are part of a bridge group, which use MAC address lookups for traffic forwarding. However, for traffic originating on the device, you need a default route. If you change the management gateway to the data interfaces, then this route is used for management interface traffic as well.

Procedure


Step 1

If you did not use the CLI setup script ((Optional) Change Management Network Settings at the CLI), and this connection is your first connection, then you are prompted to:

  • Read and accept the End User License Agreement.

  • Change the admin password.

  • Accept the 90-day evaluation license

Step 2

Set the BVI 1 IP address.

You must set the BVI 1 IP address for traffic to flow between the bridge group member interfaces.

  1. On the Device page, click the link in the Interfaces summary, then click Bridge Groups.

  2. Click the edit icon (edit icon) for the BVI1 bridge group.

  3. Click the IPv4 Address tab and configure the IPv4 address.

    Select one of the following options from the Type field:

    • Static—Choose this option if you want to assign an address that should not change. Type in the bridge group's IP address and the subnet mask. All attached endpoints will be on this network. Ensure that the address is not already used on the network.

      If you configured High Availability, and you are monitoring this interface for HA, also configure a standby IP address on the same subnet. The standby address is used by this interface on the standby device. If you do not set the standby IP address, the active unit cannot monitor the standby interface using network tests; it can only track the link state.
    • DHCP—Choose this option if the address should be obtained from the DHCP server on the network. This is not the typical option for bridge groups, but you can configure it if needed. You cannot use this option if you configure high availability. Change the following options if necessary:

      • Obtain Default Route Using DHCP—Whether to get the default route from the DHCP server. You would normally select this option, which is the default.

  4. Click the IPv6 Address tab and configure the IPv6 address.

    • State—To enable IPv6 processing and to automatically configure the link-local address when you do not configure the global address, click the slider so it is enabled (Enabled slider.). The link local address is generated based on the interface MAC addresses (Modified EUI-64 format).

      Note 

      Disabling IPv6 does not disable IPv6 processing on an interface that is configured with an explicit IPv6 address or that is enabled for autoconfiguration.

    • Static Address/Prefix—If you do not use stateless autoconfiguration, enter the full static global IPv6 address and network prefix. For example, 2001:0DB8::BA98:0:3210/48.

    • Suppress RA—Whether to suppress router advertisements. The threat defense can participate in router advertisements so that neighboring devices can dynamically learn a default router address. By default, router advertisement messages (ICMPv6 Type 134) are periodically sent out each IPv6 configured interface.

      Router advertisements are also sent in response to router solicitation messages (ICMPv6 Type 133). Router solicitation messages are sent by hosts at system startup so that the host can immediately autoconfigure without needing to wait for the next scheduled router advertisement message.

      You might want to suppress these messages on any interface for which you do not want the threat defense device to supply the IPv6 prefix (for example, the outside interface).

    • Standby IP Address—If you configure High Availability, and you are monitoring this interface for HA, also configure a standby IPv6 address on the same subnet. The standby address is used by this interface on the standby device. If you do not set the standby IP address, the active unit cannot monitor the standby interface using network tests; it can only track the link state.

  5. Click OK.

Step 3

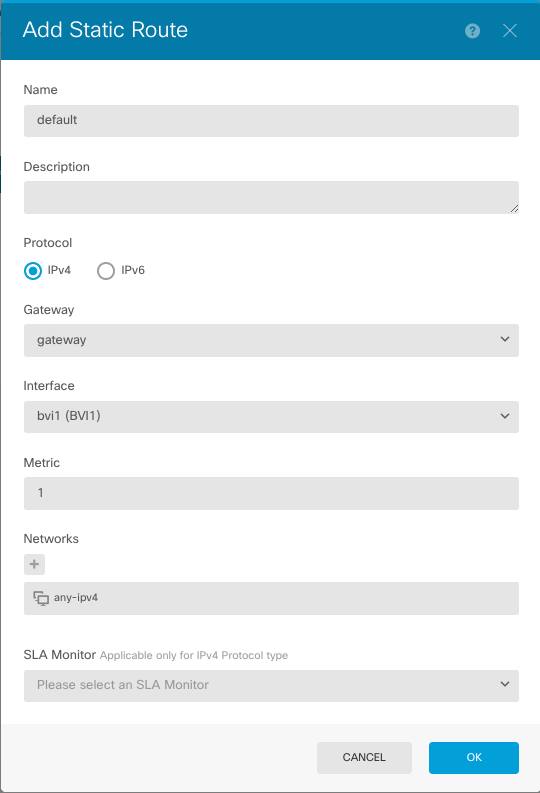
Set the default route for traffic originating on the device.

All interfaces are part of a bridge group, which use MAC address lookups for traffic forwarding. However, for traffic originating on the device, you need a default route. If you keep the management gateway as the data interfaces (the default), then this route is used for management interface traffic as well.

  1. Click Device, then click the link in the Routing summary.

    The Static Routing page appears.

  2. Click Plus icon. or Create Static Route.

  3. Configure the default route properties.

    1. Enter a Name, for example, default.

    2. Click either the IPv4 or IPv6 radio button.

      You need to create separate default routes for IPv4 and IPv6.

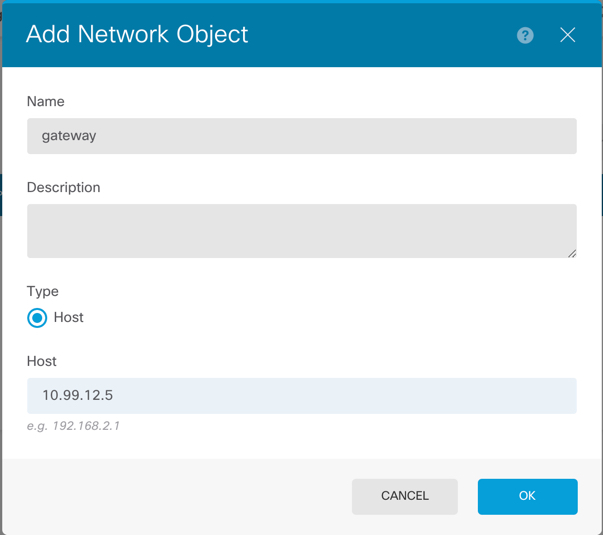
    3. Click Gateway, and then click Create New Network to add the gateway IP address as a host object. Click OK to add the object.

    4. For the Interface, choose BVI1.

    5. Click the Networks Plus icon. icon, and choose any-ipv4 for an IPv4 default route or any-ipv6 for an IPv6 default route.

  4. Click OK.

  5. Click OK.

Step 4

If you did not set a new Management IP address and gateway using (Optional) Change Management Network Settings at the CLI, then you can change the IP address and gateway on the Device > System Settings > Management Interface page. You will have to reconnect to the new address with your browser.

Step 5

Click the Deploy Changes icon in the upper right of the web page.

The icon is highlighted with a dot when there are undeployed changes.

Deploy changes button, highlighted when there are changes to deploy.

The Pending Changes window shows a comparison of the deployed version of the configuration with the pending changes. These changes are color-coded to indicate removed, added, or edited elements. See the legend in the window for an explanation of the colors.

Step 6

If you are satisfied with the changes, you can click Deploy Now to start the job immediately.

The window will show that the deployment is in progress. You can close the window, or wait for deployment to complete. If you close the window while deployment is in progress, the job does not stop. You can see results in the task list or audit log. If you leave the window open, click the Deployment History link to view the results.


What to do next

Complete the Initial Configuration (6.4 and Earlier)

Use the setup wizard when you first log into the device manager to complete the initial configuration. After you complete the setup wizard, you should have a functioning device with a few basic policies in place:

  • An outside (GigabitEthernet1/1) and an inside interface. GigabitEthernet1/2 through 1/4 are inside bridge group members.

  • Security zones for the inside and outside interfaces.

  • An access rule trusting all inside to outside traffic.

  • An interface NAT rule that translates all inside to outside traffic to unique ports on the IP address of the outside interface.

  • A DHCP server running on the inside interface.


Note

If you performed the (Optional) Change Management Network Settings at the CLI procedure, then some of these tasks, specifically changing the admin password and configuring the outside and management interfaces, should have already been completed.


Procedure


Step 1

You are prompted to read and accept the End User License Agreement and change the admin password.

You must complete these steps to continue.

Step 2

Configure the following options for the outside and management interfaces and click Next.

Note 
Your settings are deployed to the device when you click Next. The interface will be named “outside” and it will be added to the “outside_zone” security zone. Ensure that your settings are correct.
  1. Outside Interface—This is the data port that you connected to your gateway router. You cannot select an alternative outside interface during initial device setup. The first data interface is the default outside interface.

    Configure IPv4—The IPv4 address for the outside interface. You can use DHCP or manually enter a static IP address, subnet mask, and gateway. You can also select Off to not configure an IPv4 address. You cannot configure PPPoE using the setup wizard. PPPoE may be required if the interface is connected to a DSL modem, cable modem, or other connection to your ISP, and your ISP uses PPPoE to provide your IP address. You can configure PPPoE after you complete the wizard.

    Configure IPv6—The IPv6 address for the outside interface. You can use DHCP or manually enter a static IP address, prefix, and gateway. You can also select Off to not configure an IPv6 address.

  2. Management Interface

    DNS Servers—The DNS server for the system's management address. Enter one or more addresses of DNS servers for name resolution. The default is the OpenDNS public DNS servers. If you edit the fields and want to return to the default, click Use OpenDNS to reload the appropriate IP addresses into the fields.

    Firewall Hostname—The hostname for the system's management address.

Step 3

Configure the system time settings and click Next.

  1. Time Zone—Select the time zone for the system.

  2. NTP Time Server—Select whether to use the default NTP servers or to manually enter the addresses of your NTP servers. You can add multiple servers to provide backups.

Step 4

(Optional) Configure the smart licenses for the system.

Your purchase of the threat defense device automatically includes a Base license. All additional licenses are optional.

You must have a smart license account to obtain and apply the licenses that the system requires. Initially, you can use the 90-day evaluation license and set up smart licensing later.

To register the device now, click the link to log into your Smart Software Manager account, and see Configure Licensing.

To use the evaluation license, select Start 90 day evaluation period without registration.

Step 5

Click Finish.


What to do next

Configure Licensing

The threat defense uses Cisco Smart Software Licensing, which lets you purchase and manage a pool of licenses centrally.

When you register the chassis, the License Authority issues an ID certificate for communication between the chassis and the License Authority. It also assigns the chassis to the appropriate virtual account.

The Base license is included automatically. Smart Licensing does not prevent you from using product features that you have not yet purchased, but you should purchase the following optional feature licenses to be in compliance:

  • Secure Firewall Threat Defense IPS—Security Intelligence and Cisco Secure IPS

  • Secure Firewall Threat Defense Malware DefenseMalware Defense

  • Secure Firewall Threat Defense URL Filtering—URL Filtering

  • RA VPN—AnyConnect Plus, AnyConnect Apex, or AnyConnect VPN Only.

In addition to the above licenses, you also need to buy a matching subscription to access updates for 1, 3, or 5 years.

For complete information on licensing your system, see the FDM configuration guide.

Before you begin

  • Have a master account on the Cisco Smart Software Manager.

    If you do not yet have an account, click the link to set up a new account. The Smart Software Manager lets you create a master account for your organization.

  • Your Cisco Smart Software Licensing account must qualify for the Strong Encryption (3DES/AES) license to use some features (enabled using the export-compliance flag).

Procedure


Step 1

Make sure your Smart Licensing account contains the available licenses you need.

When you bought your device from Cisco or a reseller, your licenses should have been linked to your Smart Software License account.

Step 2

In the Cisco Smart Software Manager, request and copy a registration token for the virtual account to which you want to add this device.

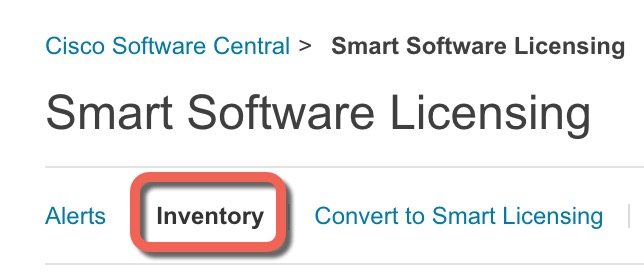
  1. Click Inventory.

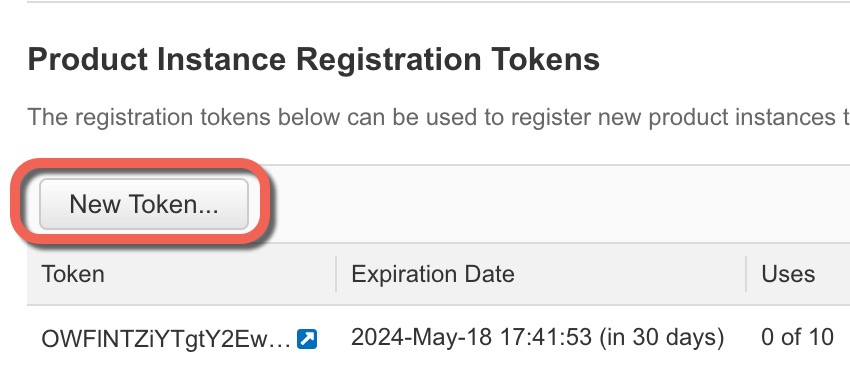
  2. On the General tab, click New Token.

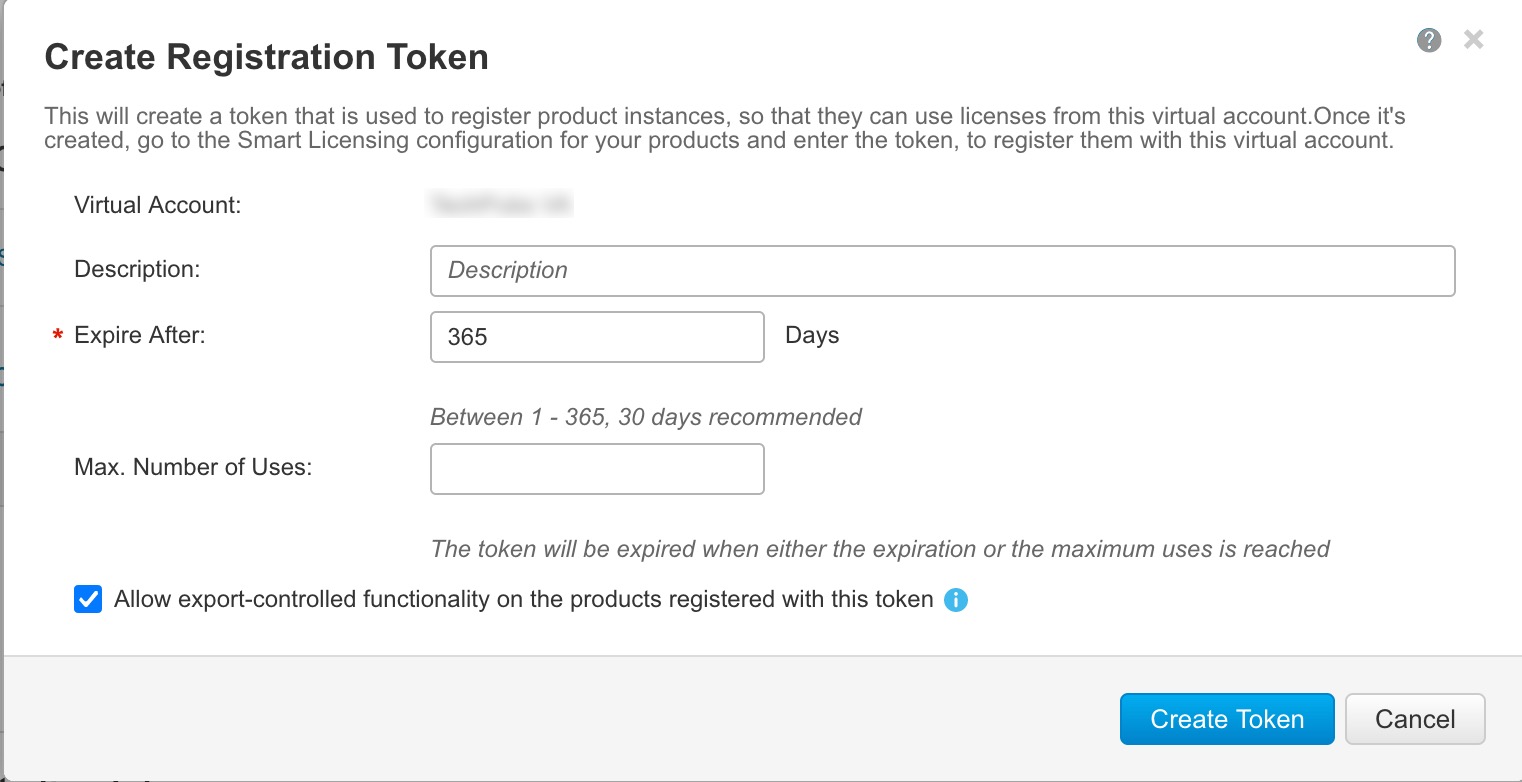
  3. On the Create Registration Token dialog box enter the following settings, and then click Create Token:

    • Description

    • Expire After—Cisco recommends 30 days.

    • Allow export-controlled functionaility on the products registered with this token—Enables the export-compliance flag if you are in a country that allows for strong encryption.

    The token is added to your inventory.

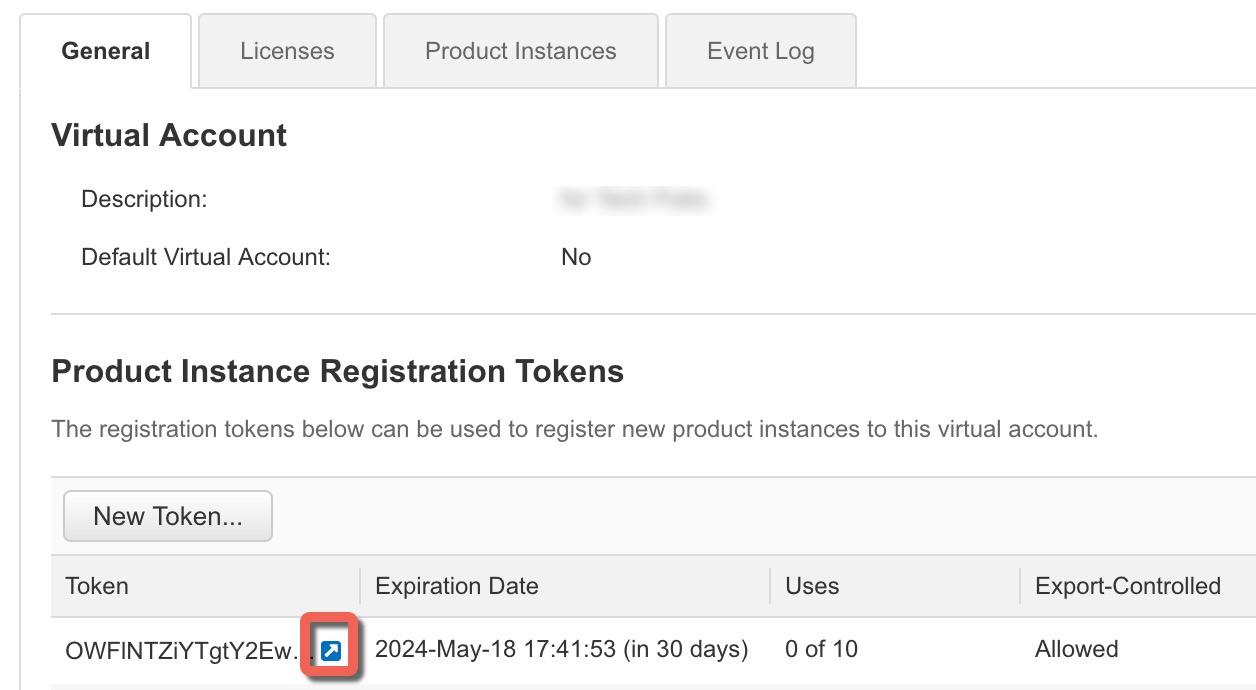
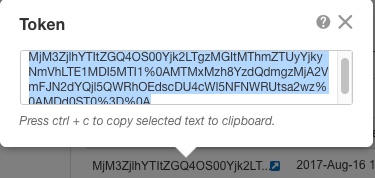
  4. Click the arrow icon to the right of the token to open the Token dialog box so you can copy the token ID to your clipboard. Keep this token ready for later in the procedure when you need to register the threat defense.

    Figure 3. View Token
    Figure 4. Copy Token
Step 3

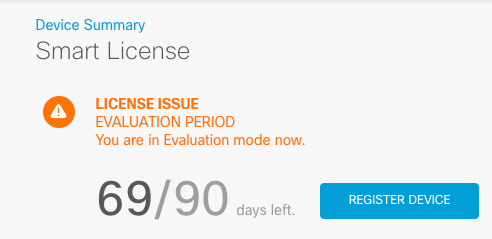
In device manager, click Device, and then in the Smart License summary, click View Configuration.

You see the Smart License page.

Step 4

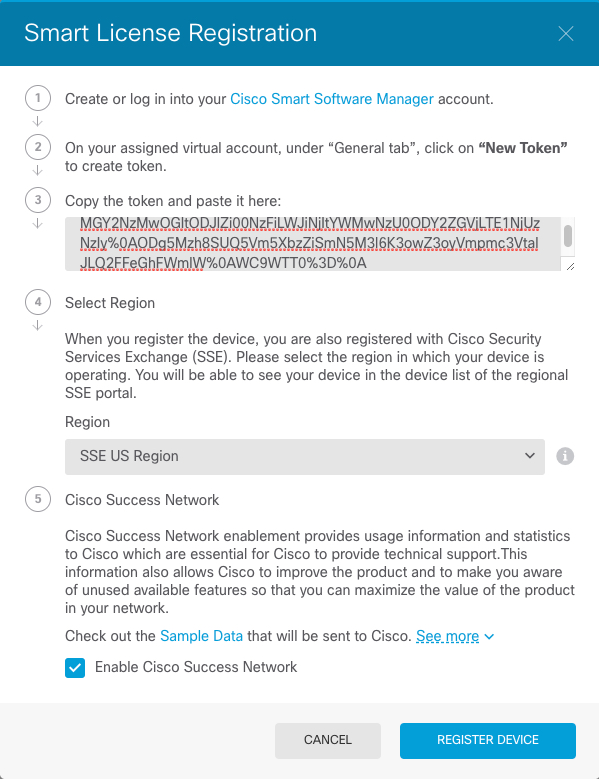
Click Register Device.

Then follow the instructions on the Smart License Registration dialog box to paste in your token.:

Step 5

Click Register Device.

You return to the Smart License page. While the device registers, you see the following message:

After the device successfully registers and you refresh the page, you see the following:

Step 6

Click the Enable/Disable control for each optional license as desired.

  • Enable—Registers the license with your Cisco Smart Software Manager account and enables the controlled features. You can now configure and deploy policies controlled by the license.

  • Disable—Unregisters the license with your Cisco Smart Software Manager account and disables the controlled features. You cannot configure the features in new policies, nor can you deploy policies that use the feature.

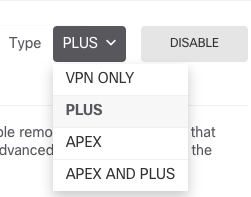
  • If you enabled the RA VPN license, select the type of license you want to use: Plus, Apex, VPN Only, or Plus and Apex.

After you enable features, if you do not have the licenses in your account, you will see the following non-compliance message after you refresh the page:

Step 7

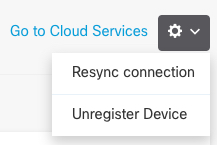
Choose Resync Connection from the gear drop-down list to synchronize license information with Cisco Smart Software Manager.


Configure the Device in the Device Manager (6.5 and Later)

The following steps provide an overview of additional features you might want to configure. Please click the help button (?) on a page to get detailed information about each step.

Procedure


Step 1

If you want to convert a bridge group interface, choose Device, and then click the link in the Interfaces summary.

Click the edit icon () for each interface to set the mode and define the IP address and other settings.
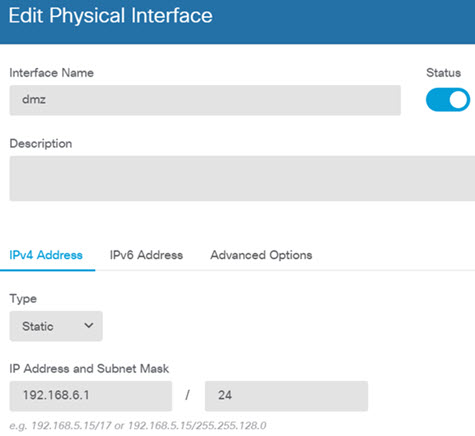
The following example configures an interface to be used as a “demilitarized zone” (DMZ), where you place publicly-accessible assets such as your web server. Click Save when you are finished.

Figure 5. Edit Interface
Step 2

Choose Policies and configure the security policies for the network.

By default, all traffic is allowed between all interfaces. If you add other security zones, you need rules to allow traffic to and from those zones. In addition, you can configure other policies to provide additional services, and fine-tune access rules to get the results that your organization requires. You can configure the following policies:

  • SSL Decryption—If you want to inspect encrypted connections (such as HTTPS) for intrusions, malware, and so forth, you must decrypt the connections. Use the SSL decryption policy to determine which connections need to be decrypted. The system re-encrypts the connection after inspecting it.

  • Identity—If you want to correlate network activity to individual users, or control network access based on user or user group membership, use the identity policy to determine the user associated with a given source IP address.

  • Security Intelligence—Use the Security Intelligence policy to quickly drop connections from or to blacklisted IP addresses or URLs. By blacklisting known bad sites, you do not need to account for them in your access control policy. Cisco provides regularly updated feeds of known bad addresses and URLs so that the Security Intelligence blacklist updates dynamically. Using feeds, you do not need to edit the policy to add or remove items in the blacklist.

  • NAT (Network Address Translation)—Use the NAT policy to convert internal IP addresses to externally routable addresses.

  • Access Control—Use the access control policy to determine which connections are allowed on the network. You can filter by security zone, IP address, protocol, port, application, URL, user or user group. You also apply intrusion and file (malware) policies using access control rules. Use this policy to implement URL filtering.

  • Intrusion—Use the intrusion policies to inspect for known threats. Although you apply intrusion policies using access control rules, you can edit the intrusion policies to selectively enable or disable specific intrusion rules.

The following example shows how to allow traffic between the inside-zone and dmz-zone in the access control policy. In this example, no options are set on any of the other tabs except for Logging, where At End of Connection is selected.

Figure 6. Access Control Policy
Step 3

Choose Device, then click View Configuration in the Updates group and configure the update schedules for the system databases.

If you are using intrusion policies, set up regular updates for the Rules and VDB databases. If you use Security Intelligence feeds, set an update schedule for them. If you use geolocation in any security policies as matching criteria, set an update schedule for that database.

Step 4

Click the Deploy button in the menu, then click the Deploy Now button (), to deploy your changes to the device.

Changes are not active on the device until you deploy them.


Configure the Firewall in the Device Manager (6.4 and Earlier)

The following steps provide an overview of additional features you might want to configure. Please click the help button (?) on a page to get detailed information about each step.

Procedure


Step 1

If you want to convert a bridge group interface, choose Device, and then click the link in the Interfaces summary.

Click the edit icon () for each interface to set the mode and define the IP address and other settings.

The following example configures an interface to be used as a “demilitarized zone” (DMZ), where you place publicly-accessible assets such as your web server. Click Save when you are finished.

Figure 7. Edit Interface
Step 2

If you configured new interfaces, choose Objects, then select Security Zones from the table of contents.

Edit or create new zones as appropriate. Each interface must belong to a zone, because you configure policies based on security zones, not interfaces. You cannot put the interfaces in zones when configuring them, so you must always edit the zone objects after creating new interfaces or changing the purpose of existing interfaces.

The following example shows how to create a new dmz-zone for the dmz interface.

Figure 8. Security Zone Object
Step 3

If you want internal clients to use DHCP to obtain an IP address from the device, choose Device > System Settings > DHCP Server, then select the DHCP Servers tab.

There is already a DHCP server configured for the inside interface, but you can edit the address pool or even delete it. If you configured other inside interfaces, it is very typical to set up a DHCP server on those interfaces. Click + to configure the server and address pool for each inside interface.

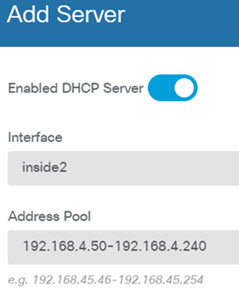
You can also fine-tune the WINS and DNS list supplied to clients on the Configuration tab. The following example shows how to set up a DHCP server on the inside2 interface with the address pool 192.168.4.50-192.168.4.240.

Figure 9. DHCP Server
Step 4

Choose Device, then click View Configuration (or Create First Static Route) in the Routing group and configure a default route.

The default route normally points to the upstream or ISP router that resides off the outside interface. A default IPv4 route is for any-ipv4 (0.0.0.0/0), whereas a default IPv6 route is for any-ipv6 (::0/0). Create routes for each IP version you use. If you use DHCP to obtain an address for the outside interface, you might already have the default routes that you need.

Note 

The routes you define on this page are for the data interfaces only. They do not impact the management interface. Set the management gateway on Device > System Settings > Management Interface.

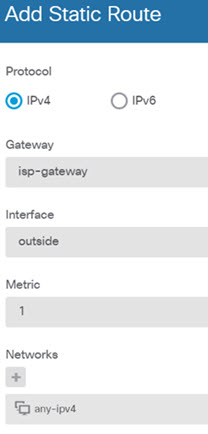
The following example shows a default route for IPv4. In this example, isp-gateway is a network object that identifies the IP address of the ISP gateway (you must obtain the address from your ISP). You can create this object by clicking Create New Network at the bottom of the Gateway drop-down list.

Figure 10. Default Route
Step 5

Choose Policies and configure the security policies for the network.

The device setup wizard enables traffic flow between the inside-zone and outside-zone, and interface NAT for all interfaces when going to the outside interface. Even if you configure new interfaces, if you add them to the inside-zone object, the access control rule automatically applies to them.

However, if you have multiple inside interfaces, you need an access control rule to allow traffic flow from inside-zone to inside-zone. If you add other security zones, you need rules to allow traffic to and from those zones. These would be your minimum changes.

In addition, you can configure other policies to provide additional services, and fine-tune NAT and access rules to get the results that your organization requires. You can configure the following policies:

  • SSL Decryption—If you want to inspect encrypted connections (such as HTTPS) for intrusions, malware, and so forth, you must decrypt the connections. Use the SSL decryption policy to determine which connections need to be decrypted. The system re-encrypts the connection after inspecting it.

  • Identity—If you want to correlate network activity to individual users, or control network access based on user or user group membership, use the identity policy to determine the user associated with a given source IP address.

  • Security Intelligence—Use the Security Intelligence policy to quickly drop connections from or to blacklisted IP addresses or URLs. By blacklisting known bad sites, you do not need to account for them in your access control policy. Cisco provides regularly updated feeds of known bad addresses and URLs so that the Security Intelligence blacklist updates dynamically. Using feeds, you do not need to edit the policy to add or remove items in the blacklist.

  • NAT (Network Address Translation)—Use the NAT policy to convert internal IP addresses to externally routeable addresses.

  • Access Control—Use the access control policy to determine which connections are allowed on the network. You can filter by security zone, IP address, protocol, port, application, URL, user or user group. You also apply intrusion and file (malware) policies using access control rules. Use this policy to implement URL filtering.

  • Intrusion—Use the intrusion policies to inspect for known threats. Although you apply intrusion policies using access control rules, you can edit the intrusion policies to selectively enable or disable specific intrusion rules.

The following example shows how to allow traffic between the inside-zone and dmz-zone in the access control policy. In this example, no options are set on any of the other tabs except for Logging, where At End of Connection is selected.

Figure 11. Access Control Policy
Step 6

Choose Device, then click View Configuration in the Updates group and configure the update schedules for the system databases.

If you are using intrusion policies, set up regular updates for the Rules and VDB databases. If you use Security Intelligence feeds, set an update schedule for them. If you use geolocation in any security policies as matching criteria, set an update schedule for that database.

Step 7

Click the Deploy button in the menu, then click the Deploy Now button (), to deploy your changes to the device.

Changes are not active on the device until you deploy them.


Access the Threat Defense CLI

Use the command-line interface (CLI) to set up the system and do basic system troubleshooting. You cannot configure policies through a CLI session. You can access the CLI by connecting to the console port.

You can SSH to the management interface of the threat defense device. You can also connect to the address on a data interface if you open the interface for SSH connections. SSH access to data interfaces is disabled by default.

Procedure


Step 1

To log into the CLI, connect your management computer to the console port., either the RJ-45 port or the mini-USB port.Be sure to install any necessary USB serial drivers for your operating system. Use the following serial settings:

  • 9600 baud

  • 8 data bits

  • No parity

  • 1 stop bit

Step 2

Log in to the threat defense CLI using the admin username and the password you set at initial setup (the default is Admin123).

After logging in, for information on the commands available in the CLI, enter help or ? . For usage information, see the Cisco Firepower Threat Defense Command Reference.


Power Off the Firewall

It's important that you shut down your system properly. Simply unplugging the power can cause serious file system damage. Remember that there are many processes running in the background all the time, and unplugging or shutting off the power does not allow the graceful shutdown of your firewall system.

The ISA 3000 chassis does not have an external power switch.You can power off the firewall using device manager, or you can use the CLI.

Power Off the Firewall Using the Device Manager

You can shut down your system properly using the device manager.


Note

Shutting down is supported in 7.0.2+/7.2+.


Procedure


Step 1

Use the device manager to shut down the firewall.

  1. Click Device, then click the System Settings > Reboot/Shutdown link.

  2. Click Shut Down.

Step 2

Monitor the shutdown process. If you cannot monitor the device, wait approximately 3 minutes to ensure the system has shut down.

  • Console—If you have a console connection to the firewall, monitor the system prompts as the firewall shuts down. You will see the following prompt:

    
    System is stopped.
    It is safe to power off now.
    
    To restart the device, you must Power cycle to the device.
    
Step 3

You can now unplug the power to physically remove power from the chassis if necessary.


Power Off the Firewall at the CLI

It's important that you shut down your system properly. Simply unplugging the power can cause serious file system damage. Remember that there are many processes running in the background all the time, and unplugging or shutting off the power does not allow the graceful shutdown of your system. The ISA 3000 chassis does not have an external power switch.


Note

Shutting down is supported in 7.0.2+/7.2+.


Procedure


Step 1

Connect to the console port to access the threat defense CLI, and then shut down the threat defense.

shutdown

Example:


> shutdown
This command will shutdown the system.  Continue?
Please enter 'YES' or 'NO': yes
INIT: Stopping Cisco Threat Defense......ok
Shutting down sfifd...                                                [  OK  ]
Clearing static routes
Unconfiguring default route                                           [  OK  ]
Unconfiguring address on br1                                          [  OK  ]
Unconfiguring IPv6                                                    [  OK  ]
Downing interface                                                     [  OK  ]
Stopping xinetd:
Stopping nscd...                                                      [  OK  ]
Stopping system log daemon...                                         [  OK  ]
Stopping Threat Defense ...
Stopping system message bus: dbus.                                    [  OK  ]
Un-mounting disk partitions ...
device-mapper: remove ioctl on root failed: Device or resource busy
[...]
mdadm: Cannot get exclusive access to /dev/md0:Perhaps a running process, mounted filesystem or active volume group?
Stopping OpenBSD Secure Shell server: sshd
stopped /usr/sbin/sshd (pid 3520)
done.
Stopping Advanced Configuration and Power Interface daemon: stopped /usr/sbin/acpid (pid 3525)
acpid.
Stopping system message bus: dbus.
Stopping internet superserver: xinetd.
no /etc/sysconfig/kdump.conf
Deconfiguring network interfaces... ifdown: interface br1 not configured
done.
SSP-Security-Module is shutting down ...
Sending ALL processes the TERM signal ...
acpid: exiting
Sending ALL processes the KILL signal ...
Deactivating swap...
Unmounting local filesystems...
 
Firepower Threat Defense stopped.
It is safe to power off now.
 
To restart the device, you must Power cycle to the device.  
 
Step 2

After the threat defense shuts down, and the console shows that "It is safe to power off now", you can then unplug the power to physically remove power from the chassis if necessary.