Authenticating Your REST API Client Using OAuth

The threat defense REST API uses Oauth 2.0 for authenticating calls from API clients. OAuth is an access token-based method, and the threat defense uses JSON web tokens for the schema. The relevant standards are:

  • RFC6749, The OAuth 2.0 Authorization Framework, https://tools.ietf.org/html/rfc6749.

  • RFC7519, JSON Web Token (JWT), https://tools.ietf.org/html/rfc7519.

The following topics explain the methods for obtaining and using the required tokens.

Overview of the API Client Authentication Process

Following is the end-to-end view of how to authenticate your API client with the threat defense device.
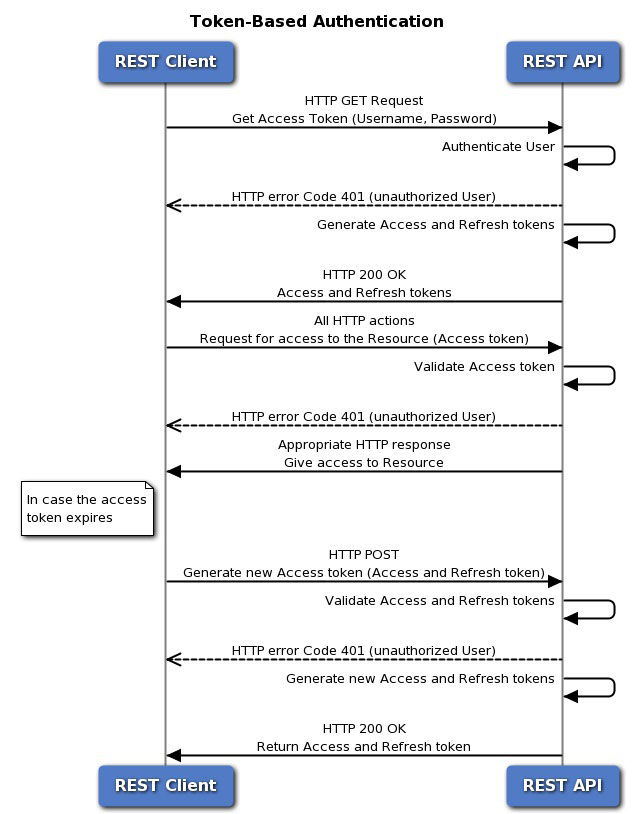

Oauth process for the threat defense REST API.

Before you begin

Each token represents an HTTPS login session, which counts for API sessions and device manager sessions. There can be a maximum of 5 active HTTPS sessions. If you exceed this limit, the oldest session, either the device manager login or API token, is expired to allow the new session. Thus, it is important that you get only those tokens you need, and you reuse each token until it is expired, then renew them. Getting a new token for each API call will result in severe session churn and could lock users out of the device manager. These limits do not apply to SSH sessions.

Procedure


Step 1

Authenticate the API client user using whatever method you require.

Your client is obligated to authenticate users and ensure they have the authority to access and modify the threat defense device. If you want to provide differential abilities based on authorization rights, you need to build that into your client.

For example, if you want to allow read-only access, you must set up the required authentication server, user accounts, and so forth. Then, when a user with read-only rights logs into your client, you must ensure that you issue GET calls only. In API v1, this type of variable access cannot be controlled by the threat defense device itself. Starting with API v2, if you are using external users and you do not groom calls based on user authorization, you will get errors if there is a mismatch between user authorization and the calls you attempt.

For v1, when communicating with the device, you must use the admin user account on the threat defense device. The admin account has full read/write authorization for all user-configurable objects.

Step 2

Request a password-granted access token based on username/password using the admin account.

See Requesting a Password-Granted Access Token.

Step 3

Optionally, request a custom access token for your client.

With a custom token, you can explicitly request a validity period, and assign a subject name for the token. See Requesting a Custom Access Token.

Step 4

Use the access token on API calls in the Authorization: Bearer header.

See Using an Access Token on API Calls.

Step 5

Before the access token expires, refresh the token.

See Refreshing an Access Token.

Step 6

When you are finished, revoke the token if it has not yet expired.

See Revoking an Access Token.


Requesting a Password-Granted Access Token

Every REST API call must include an authentication token to verify that the caller is authorized to perform the requested action. Initially, you need to obtain an access token by supplying the admin username/password. This is called a password-granted access token, that is, grant_type = password.

Procedure


Step 1

Create the JSON object for the password-granted access token grant.


{
  "grant_type": "password",
  "username": "string",
  "password": "string"
}

Specify the admin username and the correct password, for example:


{
  "grant_type": "password",
  "username": "admin",
  "password": "Admin123"
}

Step 2

Use POST /fdm/token to obtain the access token.

For example, the curl command would look like the following:


curl -X POST --header 'Content-Type: application/json' --header 
'Accept: application/json' -d '{ 
   "grant_type": "password", 
   "username": "admin", 
   "password": "Admin123" 
 }' 'https://ftd.example.com/api/fdm/latest/fdm/token'

Step 3

Retrieve the access and refresh tokens from the response.

A good response (status code 200) looks like the following:


{
  "access_token": "eyJhbGciOiJIUzI1NiJ9.eyJpYXQiOjE1MDI4MzI2NjcsInN
1YiI6ImFkbWluIiwianRpIjoiMGM3ZDBmNDgtODIwMS0xMWU3LWE4MWMtMDcwZmYzOW
U3ZjQ0IiwibmJmIjoxNTAyODMyNjY3LCJleHAiOjE1MDI4MzQ0NjcsInJlZnJlc2hU
b2tlbkV4cGlyZXNBdCI6MTUwMjgzNTA2NzQxOSwidG9rZW5UeXBlIjoiSldUX0FjY2
VzcyIsIm9yaWdpbiI6InBhc3N3b3JkIn0.b2hI6fVA_GbmhCOPM-ZUx6IC8SgCk1Ak
HXI-llV0r7s",
  "expires_in": 1800,
  "token_type": "Bearer",
  "refresh_token": "eyJhbGciOiJIUzI1NiJ9.eyJpYXQiOjE1MDI4MzI2NjcsI
nN1YiI6ImFkbWluIiwia nRpIjoiMGM3ZDBmNDgtODIwMS0xMWU3LWE4MWMtMDcwZmY
zOWU3ZjQ0IiwibmJmIjoxNTAyODMyNjY3LCJleHAiOjE1MDI4MzUwNjcsImFjY2Vzc1
Rva2VuRXhwaXJlc0F0IjoxNTAyODM0NDY3NDE5LCJyZWZyZXNoQ291bnQiOi0xLCJ0b2
tlblR5cGUiOiJKV1RfUmVmcmVzaCIsIm9yaWdpbiI6InBhc3N3b3JkIn0.iLNqz1c1Xl
vcq0j9pQYW4gwYsvUCcSyaiDRXGutAz_o",
  "refresh_expires_in": 2400
}

Where:

  • access_token is the bearer token you need to include on API calls. See Using an Access Token on API Calls.

  • expires_in is the number of seconds for which the access token is valid, from the time the token is issued.

  • refresh_token is the token you would use on a refresh request. See Refreshing an Access Token.

  • refresh_expires _in is the number of seconds for which the refresh token is valid. This is always longer than the access token validity period.


Requesting a Custom Access Token

You can use the password-granted access token. However, you can also request a custom access token. With a custom token, you can supply a subject name to help differentiate token usage (for your own purposes). You can also request specific validity periods if the default values returned for password tokens do not fit your requirements.

Before you begin

You must first get a password-granted access token before getting a custom token. See Requesting a Password-Granted Access Token.

In addition:

  • You can request a custom token only if you are a local user. External users cannot request custom tokens.

  • You can use a custom token on the unit for which you obtain it only. You cannot use the token on the peer device in a high availability group.

Procedure


Step 1

Create the JSON object for the custom access token grant.


{
  "grant_type": "custom_token",
  "access_token": "string",
  "desired_expires_in": 0,
  "desired_refresh_expires_in": 0,
  "desired_subject": "string",
  "desired_refresh_count": 0
}

Where:

  • access_token is a valid password-granted access token.

  • desired_expires_in is an integer representing the number of seconds for which the custom access token will be valid. In comparison, the password-granted tokens are valid for 1800 seconds.

  • desired_refresh_expires_in is an integer representing the number of seconds for which the custom refresh token will be valid. If you obtain a refresh token, ensure that this value is larger than the desired_expires_in value. In comparison, the password-granted refresh tokens are valid for 2400 seconds. This parameter is not required if you specify 0 for desired_refresh_count .

  • desired_subject is a name you give to the custom token.

  • desired_refresh_count is the number of times you want to be able to refresh the token. Specify 0 if you do not want to get a refresh token. When you do not have a refresh token, you must obtain a new access token when the existing one expires.

For example, the following requests a custom token for api-client that expires in 2400 seconds, with a refresh token that expires in 3000 seconds. The token can be refreshed 3 times.


{{
  "grant_type": "custom_token",
  "access_token": "eyJhbGciOiJIUzI1NiJ9.eyJpYXQiOjE1MDI4MzI2NjcsInN
1YiI6ImFkbWluIiwianRpIjoiMGM3ZDBmNDgtODIwMS0xMWU3LWE4MWMtMDcwZmYzOW
U3ZjQ0IiwibmJmIjoxNTAyODMyNjY3LCJleHAiOjE1MDI4MzQ0NjcsInJlZnJlc2hU
b2tlbkV4cGlyZXNBdCI6MTUwMjgzNTA2NzQxOSwidG9rZW5UeXBlIjoiSldUX0FjY2
VzcyIsIm9yaWdpbiI6InBhc3N3b3JkIn0.b2hI6fVA_GbmhCOPM-ZUx6IC8SgCk1Ak
HXI-llV0r7s",
  "desired_expires_in": 2400,
  "desired_refresh_expires_in": 3000,
  "desired_subject": "api-client",
  "desired_refresh_count": 3
}

Step 2

Use POST /fdm/token to obtain the access token.

For example, the curl command would look like the following:


curl -X POST --header 'Content-Type: application/json' --header 
'Accept: application/json' -d '{ 
   "grant_type": "custom_token", 
   "access_token": "eyJhbGciOiJIUzI1NiJ9.eyJpYXQiOjE1MDI4MzU5N
jgsInN1YiI6ImFkbWluIiwianRpIjoiYmMyNjM4N2EtODIwOC0xMWU3LWE4MWM
tYzNlYTZkZjJjZThjIiwibmJmIjoxNTAyODM1OTY4LCJleHAiOjE1MDI4Mzc3N
jgsInJlZnJlc2hUb2tlbkV4cGlyZXNBdCI6MTUwMjgzODM2ODYwNiwidG9rZW5
UeXBlIjoiSldUX0FjY2VzcyIsIm9yaWdpbiI6InBhc3N3b3JkIn0.acOE_Y4SE
ds-NE4Qw99fQlUzdoSkhsjInaCh0a9WK38",
   "desired_expires_in": 2400, 
   "desired_refresh_expires_in": 3000, 
   "desired_subject": "api-client", 
   "desired_refresh_count": 3  
 }' 'https://ftd.example.com/api/fdm/latest/fdm/token'

Step 3

Retrieve the access and refresh tokens from the response.

A good response (status code 200) looks like the following:


{
  "access_token": "eyJhbGciOiJIUzI1NiJ9.eyJpYXQiOjE1MDI4MzU5O
TEsInN1YiI6ImFwaS1jbGllbnQiLCJqdGkiOiJjOWIxYzdjYi04MjA4LTExZT
ctYTgxYy02YmY0NzY3ZmRmZGUiLCJuYmYiOjE1MDI4MzU5OTEsImV4cCI6MTU
wMjgzODM5MSwicmVmcmVzaFRva2VuRXhwaXJlc0F0IjoxNTAyODM4OTkxMzMx
LCJ0b2tlblR5cGUiOiJKV1RfQWNjZXNzIiwib3JpZ2luIjoiY3VzdG9tIn0.9
IVzLjGffVQffHAWdrNkrYfvuO6TgpJ7Zi_z3RYubN8",
  "expires_in": 2400,
  "token_type": "Bearer",
  "refresh_token": "eyJhbGciOiJIUzI1NiJ9.eyJpYXQiOjE1MDI4MzU5
OTEsInN1YiI6ImFwaS1jbGllbnQiLCJqdGkiOiJjOWIxYzdjYi04MjA4LTExZ
TctYTgxYy02YmY0NzY3ZmRmZGUiLCJuYmYiOjE1MDI4MzU5OTEsImV4cCI6MT
UwMjgzODk5MSwiYWNjZXNzVG9rZW5FeHBpcmVzQXQiOjE1MDI4MzgzOTEzMzE
sInJlZnJlc2hDb3VudCI6MywidG9rZW5UeXBlIjoiSldUX1JlZnJlc2giLCJv
cmlnaW4iOiJjdXN0b20ifQ.qseqjg3Uo183YvfN_77iJZELEqwpWw5AbKAqAn
CIcSA",
  "refresh_expires_in": 3000
}

Where:

  • access_token is the bearer token you need to include on API calls. See Using an Access Token on API Calls.

  • expires_in is the number of seconds for which the access token is valid, from the time the token is issued.

  • refresh_token is the token you would use on a refresh request. See Refreshing an Access Token.

  • refresh_expires _in is the number of seconds for which the refresh token is valid. This is always longer than the access token validity period.


Using an Access Token on API Calls

After you obtain either a password-granted or custom access token, you must include it on each API call in the Authorization: Bearer header to the HTTPS request.

For example, a curl command to perform GET /object/networks might look like the following:


curl -k -X GET -H 'Accept: application/json' 
-H 'Authorization: Bearer eyJhbGciOiJIUzI1NiJ9.yJp
YXQiOjE1MDI4MzU5OTEsInN1YiI6ImFwaS1jbGllbnQiLCJqdG
kiOiJjOWIxYzdjYi04MjA4LTExZTctYTgxYy02YmY0NzY3ZmRm
ZGUiLCJuYmYiOjE1MDI4MzU5OTEsImV4cCI6MTUwMjgzODM5MS
wicmVmcmVzaFRva2VuRXhwaXJlc0F0IjoxNTAyODM4OTkxMzMx
LCJ0b2tlblR5cGUiOiJKV1RfQWNjZXNzIiwib3JpZ2luIjoiY3
VzdG9tIn0.9IVzLjGffVQffHAWdrNkrYfvuO6TgpJ7Zi_z3RYu
bN8' 
'https://ftd.example.com/api/fdm/latest/object/networks'


Note


When you use the API Explorer to try out methods and resources, the curl command shown does not include the Authorization: Bearer header. However, you must add this header when making calls from your API client.


Refreshing an Access Token

After an access token expires, you need to refresh it using the refresh token that was supplied in the original grant. A refreshed access token is actually different than the original access token. “Refreshing” actually supplies a new pair of access token and refresh token, it does not simply extend the life of the old access token.

Procedure


Step 1

Create the JSON object for the refresh token grant.


{
  "grant_type": "refresh_token",
  "refresh_token": "string"
}

The refresh_token can be from a password-granted or custom access token grant.

For example:


{
  "grant_type": "refresh_token",
  "refresh_token": "eyJhbGciOiJIUzI1NiJ9.eyJpYXQ
iOjE1MDI4MzU5OTEsInN1YiI6ImFwaS1jbGllbnQiLCJqdGk
iOiJjOWIxYzdjYi04MjA4LTExZTctYTgxYy02YmY0NzY3ZmR
mZGUiLCJuYmYiOjE1MDI4MzU5OTEsImV4cCI6MTUwMjgzODk
5MSwiYWNjZXNzVG9rZW5FeHBpcmVzQXQiOjE1MDI4MzgzOTE
zMzEsInJlZnJlc2hDb3VudCI6MywidG9rZW5UeXBlIjoiSld
UX1JlZnJlc2giLCJvcmlnaW4iOiJjdXN0b20ifQ.qseqjg3U
o183YvfN_77iJZELEqwpWw5AbKAqAnCIcSA"
}

Step 2

Use POST /fdm/token to obtain the refreshed access token.

For example, the curl command would look like the following:


curl -X POST --header 'Content-Type: application/json' --header 
'Accept: application/json' -d '{ 
   "grant_type": "refresh_token", 
   "refresh_token": "eyJhbGciOiJIUzI1NiJ9.eyJpYXQiOjE1M
DI4MzU5OTEsInN1YiI6ImFwaS1jbGllbnQiLCJqdGkiOiJjOWIxYzdj
Yi04MjA4LTExZTctYTgxYy02YmY0NzY3ZmRmZGUiLCJuYmYiOjE1MDI
4MzU5OTEsImV4cCI6MTUwMjgzODk5MSwiYWNjZXNzVG9rZW5FeHBpcm
VzQXQiOjE1MDI4MzgzOTEzMzEsInJlZnJlc2hDb3VudCI6MywidG9rZ
W5UeXBlIjoiSldUX1JlZnJlc2giLCJvcmlnaW4iOiJjdXN0b20ifQ.q
seqjg3Uo183YvfN_77iJZELEqwpWw5AbKAqAnCIcSA" 
 }' 'https://ftd.example.com/api/fdm/latest/fdm/token'

Step 3

Retrieve the access and refresh tokens from the response.

A good response (status code 200) looks like the following. In this example, the refresh token was for a custom token. The expiration periods are based on the values from the original custom access token request.


{
  "access_token": "eyJhbGciOiJIUzI1NiJ9.eyJpYXQ
iOjE1MDI4Mzc1MTAsInN1YiI6ImFwaS1jbGllbnQiLCJqdG
kiOiJjOWIxYzdjYi04MjA4LTExZTctYTgxYy02YmY0NzY3Z
mRmZGUiLCJuYmYiOjE1MDI4Mzc1MTAsImV4cCI6MTUwMjgz
OTkxMSwicmVmcmVzaFRva2VuRXhwaXJlc0F0IjoxNTAyODQ
wNTEwNzQxLCJ0b2tlblR5cGUiOiJKV1RfQWNjZXNzIiwib3
JpZ2luIjoiY3VzdG9tIn0.fAAreX0DdnuqnM0Bs0NXYnI-9
jkpyW1pWDMwgwO_h7A",
  "expires_in": 2400,
  "token_type": "Bearer",
  "refresh_token": "eyJhbGciOiJIUzI1NiJ9.eyJpYX
QiOjE1MDI4Mzc1MTAsInN1YiI6ImFwaS1jbGllbnQiLCJqd
GkiOiJjOWIxYzdjYi04MjA4LTExZTctYTgxYy02YmY0NzY3
ZmRmZGUiLCJuYmYiOjE1MDI4Mzc1MTAsImV4cCI6MTUwMjg
0MDUxMCwiYWNjZXNzVG9rZW5FeHBpcmVzQXQiOjE1MDI4Mz
k5MTEwNzIsInJlZnJlc2hDb3VudCI6MiwidG9rZW5UeXBlI
joiSldUX1JlZnJlc2giLCJvcmlnaW4iOiJjdXN0b20ifQ.p
Adc2N0oun7Yyw872qK12pFlix4arAwyMETD1ErKu5c",
  "refresh_expires_in": 3000
}

Where:

  • access_token is the bearer token you need to include on API calls. See Using an Access Token on API Calls.

  • expires_in is the number of seconds for which the access token is valid, from the time the token is issued.

  • refresh_token is the token you would use on a refresh request.

  • refresh_expires _in is the number of seconds for which the refresh token is valid. This is always longer than the access token validity period.


Revoking an Access Token

Because access tokens are valid for a particular length of time, you should clean up by revoking a token when the user logs out of your API client. This ensures that no back door is left open into the threat defense device.

Procedure


Step 1

Create the JSON object for the revoke token grant.


{
  "grant_type": "revoke_token",
  "access_token": "string",
  "token_to_revoke": "string",
  "custom_token_id_to_revoke": "string",
  "custom_token_subject_to_revoke": "string"
}

Where:

  • access_token must be a password-granted access token. You cannot revoke a token using a custom access token.

  • You must specify one, and only one, of the following:

    • token_to_revoke is a password-granted or custom token that you want to revoke. This can be the same token as access_token , so you can use a password-granted token to revoke itself.

    • (Do not use.) custom_token_id_to_revoke identifies custom access token by its internal unique ID. However, there is no direct way for you to obtain this value. Use the other options instead.

    • custom_token_subject_to_revoke is the desired_subject value for the custom access token that you want to revoke.

For example:


{
  "grant_type": "revoke_token",
  "access_token": "eyJhbGciOiJIUzI1NiJ9.eyJpYXQ
iOjE1MDI5MDQzMjQsInN1YiI6ImFkbWluIiwianRpIjoiZT
MzNGIxOWYtODJhNy0xMWU3LWE4MWMtNGQ3NzY2ZTExMzVkI
iwibmJmIjoxNTAyOTA0MzI0LCJleHAiOjE1MDI5MDYxMjQs
InJlZnJlc2hUb2tlbkV4cGlyZXNBdCI6MTUwMjkwNjcyNDE
xMiwidG9rZW5UeXBlIjoiSldUX0FjY2VzcyIsIm9yaWdpbi
I6InBhc3N3b3JkIn0.OVZBT9yVZc4zxZfZiiLH4SZcFclaH
yCPbZJC_Gyd5FE",
  "custom_token_subject_to_revoke": "api-client"
}

Step 2

Use POST /fdm/token to revoke the access token.

For example, the curl command would look like the following:


curl -X POST --header 'Content-Type: application/json' 
--header 'Accept: application/json' -d '{ 
   "grant_type": "revoke_token", 
   "access_token": "eyJhbGciOiJIUzI1NiJ9.eyJpYXQ
iOjE1MDI5MDQzMjQsInN1YiI6ImFkbWluIiwianRpIjoiZTM
zNGIxOWYtODJhNy0xMWU3LWE4MWMtNGQ3NzY2ZTExMzVkIiw
ibmJmIjoxNTAyOTA0MzI0LCJleHAiOjE1MDI5MDYxMjQsInJ
lZnJlc2hUb2tlbkV4cGlyZXNBdCI6MTUwMjkwNjcyNDExMiw
idG9rZW5UeXBlIjoiSldUX0FjY2VzcyIsIm9yaWdpbiI6InB
hc3N3b3JkIn0.OVZBT9yVZc4zxZfZiiLH4SZcFclaHyCPbZJ
C_Gyd5FE", 
   "custom_token_subject_to_revoke": "api-client" 
 }' 'https://ftd.example.com/api/fdm/latest/fdm/token'

Step 3

Evaluate the response to verify that the token was revoked.

A good response (status code 200) looks like the following.


{
  "message": "OK",
  "status_code": 200
}