The API Explorer

Use the API Explorer to learn about the REST API. You can also test the various methods and resources to verify you are configuring them correctly. You can copy and paste the JSON models into your code as a starting point.


Tip


The purpose of the API Explorer is to help you learn the API. Testing calls through the API Explorer requires the creation of access locks that might interfere with regular operation. We recommend that you use the API Explorer on a non-production device.


Opening the API Explorer

The API Explorer explains all of the resources and JSON objects available for your programmatic use. The Explorer provides detailed information about the attribute-value pairs in each object, and you can experiment with the various HTTP methods to ensure you understand the coding required to use each resource.

Procedure


Step 1

Using a browser, open the home page of the system, for example, https://ftd.example.com.

Step 2

Log into the device manager.

Step 3

(6.4 and earlier.) Edit the URL to point to /#/api-explorer, for example, https://ftd.example.com/#/api-explorer.

Step 4

(6.5 and later.) Click the more options button (More options button.) and choose API Explorer.

The system opens the API Explorer in a separate tab or window, depending on your browser settings.


Finding Your Way Around API Explorer

When you enter the API Explorer, you are presented with a list of resource groups. These groups include the resources available in the API. The following illustration shows a small sample of the list.


Resource list in API Explorer.

These group names are links: click the link to open the group to see the methods you can use with the resources in the group. Each group also includes the following commands on the right:

  • Show/Hide opens and closes the group. This is the same as clicking the group name. Initially, the expansion simply shows the methods (same as List Operations), but the system remembers the last expanded state (before you closed it) and re-opens to the same degree of expansion.

  • List Operations shows the HTTP methods available for each resource in the group. The information includes the relative path for the universal resource locator (URL) template for each resource. Path variables are indicated by the standard convention: {variable} . You need to replace {variable} , including the braces, with an appropriate value. You must add the base URL to this relative path; see The Base URL for the API.

    Click an operation URL template to see complete documentation for that method.

  • Expand Operations opens all of the HTTP methods and resources available for in a group.

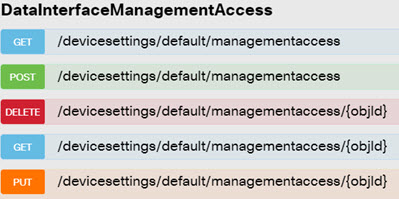
Some groups have many children resources. For example, the DataInterface ManagementAccess group includes GET, POST, and DELETE operations for /devicesettings/default/managementaccess, and GET and PUT operations for /devicesettings/default/managementaccess/{objId}.


Resource listing for a category in API Explorer.

Viewing Documentation About a Resource

The attributes in each resource are documented in the API Explorer.

Procedure


Step 1

Drill down to the specific resource and method that interests you.

Step 2

In the Response Class section, click the Model tab.

The model lists the attributes with descriptions and data types. For GET, there are also paging options that might be returned. If there are more objects than were returned in the response, you get the URLs for the next and previous batch of objects.

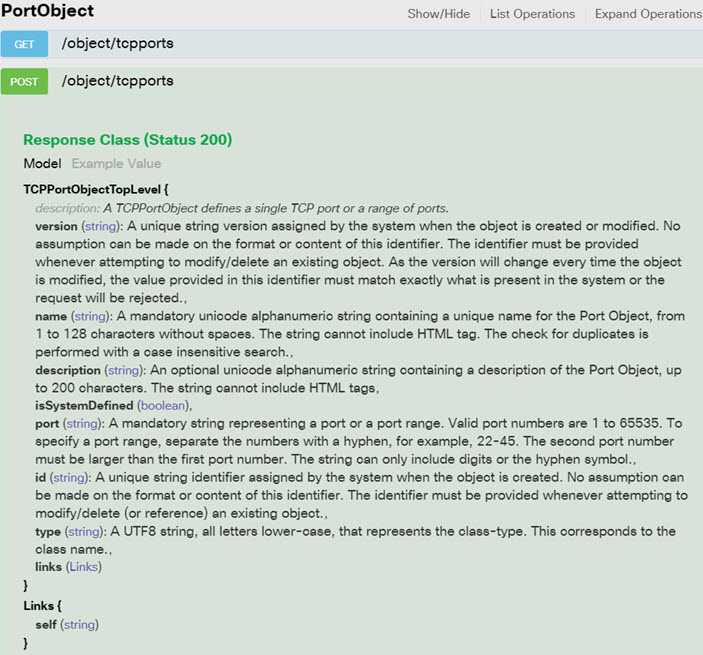
For example, the following graphic shows the POST /object/tcpports method and resource, with the Model tab selected. By default, the Example Value tab is selected, so you must always click Model to see the documentation.


POST object/tcpports documentation in API Explorer.


Finding the Object ID (objId) and Parent ID

Some resources require an object ID or related parent object ID in the URL, such as the following:

  • PUT /object/networks/{objId}

  • GET /policy/intrusionpolicies/{parentId}/intrusionrules

In most cases, you can get the object or parent ID by using a GET method one level higher in the resource hierarchy. The object/parent ID is the UUID on the id parameter for a given object.

For example, GET /object/networks returns a list of all network objects currently defined. You might need to do multiple calls to page through the list to get to the object you want, or include the limit query parameter to increase the number of objects returned for a call. Each object has the following format; the object ID is highlighted.


{
      "version": "9bbb9e5d-8115-11e7-8cb4-772d7eb1894d",
      "name": "any-ipv4",
      "description": null,
      "subType": "NETWORK",
      "value": "0.0.0.0/0",
      "isSystemDefined": true,
      "id": "9bbbc56e-8115-11e7-8cb4-01865c95f930",
      "type": "networkobject",
      "links": {
        "self": "https://ftd.example.com/api/fdm/latest/object/networks/
9bbbc56e-8115-11e7-8cb4-01865c95f930"
      }


Note


In some cases, the {objId} occurs at the top-level of a hierarchy. In these cases, sometimes you can enter any value for object ID and get the same results. In other cases, examine the object model documentation for information on valid object types; the ID is one of the valid types. These are always GET calls. For example, GET /operational/systeminfo/{objId} and GET /operational/featureinfo/{objId}.


Viewing the Error Catalog And Evaluating Error Messages

As a REST API, the system returns standard HTTP error codes, such as 404 if you perform a GET for an object that does not exist.

In addition, the system includes a number of error messages that explain errors more specifically. If your API call results in an error, the response body might include these more specific messages.

For example, if you try to POST /object/networks the following network object, you will get an error. In this case, you are trying to specify a network, but you forgot to include a netmask (that is, the value should be either 10.10.10.0/24 or 10.10.10.0/255.255.255.0):


{
  "name": "test-network",
  "subType": "NETWORK",
  "value": "10.10.10.0",
  "type": "networkobject"
}

The result would be an HTTP response code of 422, and a response body that includes a specific error message:


{
  "error": {
    "severity": "ERROR",
    "key": "Validation",
    "messages": [
      {
        "description": "The type Network requires a netmask. To specify a single host, either use the type Host, or use {0}/255.255.255.255.",
        "code": "networkWithoutNetmask",
        "location": "value"
      }
    ]
  }
}

The following procedure explains how to view the list of possible error messages that can be returned in a response body.

Procedure


Step 1

In the device manager, click the more options button (More options button.) and choose API Explorer.

Step 2

Click Error Catalog in the table of contents.

The messages have the following components.

  • Category—The general type of message. This value appears in the key attribute of the error response body. Categories include Validation, General, and Deployment.

  • Code—A unique string that identifies the error message. This value appears in the code attribute of the error response body. You can use the browser’s Find On Page feature to locate messages in the catalog using this value.

  • Message—The specific message that explains the error. This value appears in the description attribute of the error response body. Variables within the message are indicated as {0}, {1}, and so forth.