Messages
The Messages page shows your messages and search results and allows you to look for possible compromises. You can display up to 100 messages per page.
Messages Page Icons
The following table shows icons used on the Messages page and their meanings.
Search and Filter
Use the calendar control to show data for a defined time period (most recent Day, Week, or Month), or a Custom time frame within the last 90 days.

Use the search field to search for strings or indicators of interest, such as hashes or URLs.

Filter Panel
Use the filter panel to refine your search. For example, you may want to see all mail sent from a specific sender, mail with a specific verdict, mail with attachments or links, mail that has been reclassified, mail that has been moved to Junk, and so on.
1.![]() Click the arrow to expand the filter panel.
Click the arrow to expand the filter panel.

2.![]() Make your selections, then click Apply. Note that you must have at least one item selected under Verdict.
Make your selections, then click Apply. Note that you must have at least one item selected under Verdict.
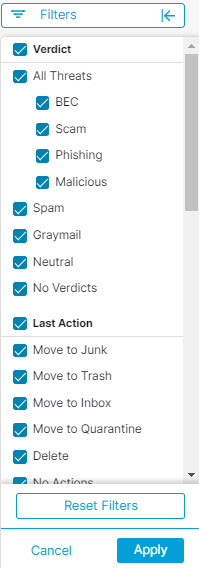
Use the Reset Filters button to reset the filters to their defaults.
Messages Graph and Quick Filter
The messages graph and quick filter across the top of the Messages page provides a graphical view of your message traffic. Use this graph to quickly filter your messages. The graph includes:
■![]() A Threat and category breakout to view totals and easily filter for threats
A Threat and category breakout to view totals and easily filter for threats
■![]() A Quarantine total you can use to filter for quarantined items
A Quarantine total you can use to filter for quarantined items
■![]() Message Direction totals you can use to quickly filter by direction
Message Direction totals you can use to quickly filter by direction

Verdicts
Secure Email Threat Defense applies the following threat verdicts to messages:
■![]() BEC : Business Email Compromises (BEC) are sophisticated scams that use social engineering and intrusion techniques to cause financial damage to the organization.
BEC : Business Email Compromises (BEC) are sophisticated scams that use social engineering and intrusion techniques to cause financial damage to the organization.
■![]() Scam : Scams are focused on causing financial harm to individuals using techniques such as lottery or extortion fraud.
Scam : Scams are focused on causing financial harm to individuals using techniques such as lottery or extortion fraud.
■![]() Phishing : These messages have been convicted of fraudulently copying or mimicking legitimate services in an attempt to acquire sensitive information such as user names, passwords, credit card numbers, and more.
Phishing : These messages have been convicted of fraudulently copying or mimicking legitimate services in an attempt to acquire sensitive information such as user names, passwords, credit card numbers, and more.
■![]() Malicious : These messages have been convicted of containing, serving, or supporting the delivery or propagation of malicious software.
Malicious : These messages have been convicted of containing, serving, or supporting the delivery or propagation of malicious software.
Retrospective Verdicts
A retrospective verdict is one that was applied to a message sometime after the message was first scanned by Secure Email Threat Defense.
A retrospective verdict in Secure Email Threat Defense is slightly different that in other Cisco security products. Although Secure Email Threat Defense is not an inline mail processor, it does have a fixed time range for completing its initial analysis of a message. Newer content engines that have longer analysis times, such as Talos’ Deep URL Analysis, are treated as a retrospective verdict. As the verdict is delayed, so is the remediation. Thus, Secure Email Threat Defense tags these convictions distinctly.
Retrospective verdicts are indicated on the Messages page next to the Verdict with a blue icon. Hover your cursor over the icon to see the time the retrospective verdict was applied and the difference between when the message was received and when the verdict was applied.

Retrospective Verdict Email Notifications
To turn email notifications for retrospective verdicts on or off:
1.![]() Select Administration > Business.
Select Administration > Business.
2.![]() Under Preferences, select or deselect Send Notifications for Retrospective Verdicts.
Under Preferences, select or deselect Send Notifications for Retrospective Verdicts.
Retrospective verdicts email notifications are sent to the specified notification email address if the check box is selected. These notifications are turned on by default.
Message Report
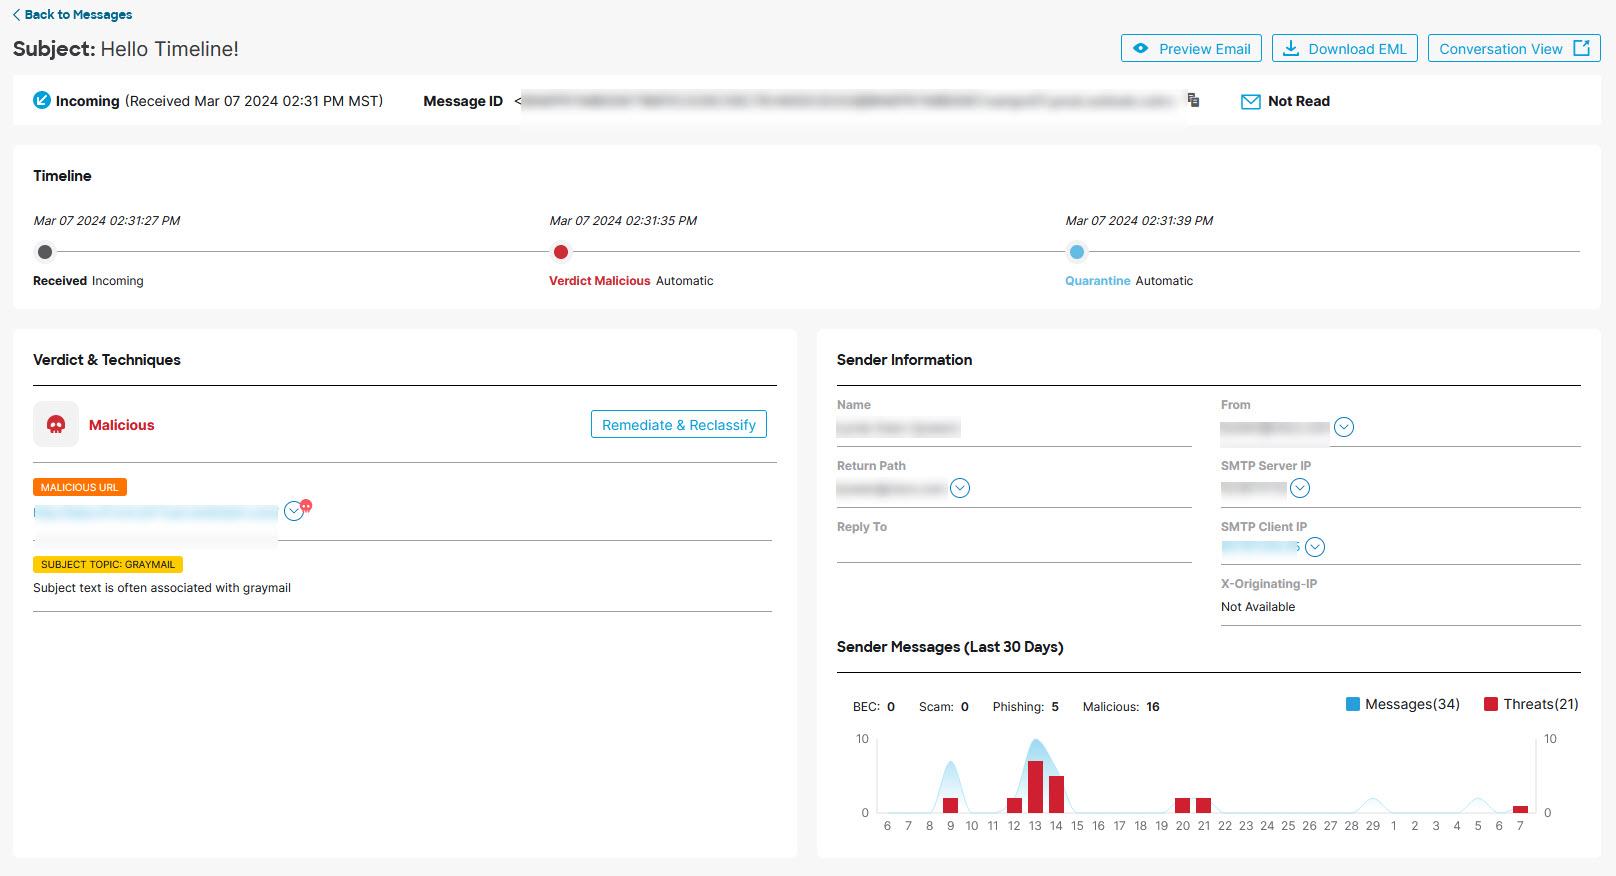
The message report allows you to investigate details about a message. Select the > icon or click anywhere on a message row to access the report for that message.

The message report shows details about a message including:
■![]() Message direction, Microsoft Message ID, and if the message was read at the time of remediation
Message direction, Microsoft Message ID, and if the message was read at the time of remediation
■![]() Recipient information including Recipients, Envelope Recipients, and Mailboxes
Recipient information including Recipients, Envelope Recipients, and Mailboxes
The message report also gives access to Conversation View and EML Downloads.
Timeline
The Timeline for a message is shown on the messages report.

■![]() Received : when a message was received and details about the message direction
Received : when a message was received and details about the message direction
■![]() Rule : information about any message rule that was applied
Rule : information about any message rule that was applied
■![]() Verdict : information about any verdict that was rendered or applied and who performed the action
Verdict : information about any verdict that was rendered or applied and who performed the action
■![]() Action : information about any action that was taken on the message and who performed the action. This includes:
Action : information about any action that was taken on the message and who performed the action. This includes:
–![]() Where and how a message was moved
Where and how a message was moved
–![]() Information about any remediation errors on the message and which mailboxes had the errors
Information about any remediation errors on the message and which mailboxes had the errors
Verdict and Techniques
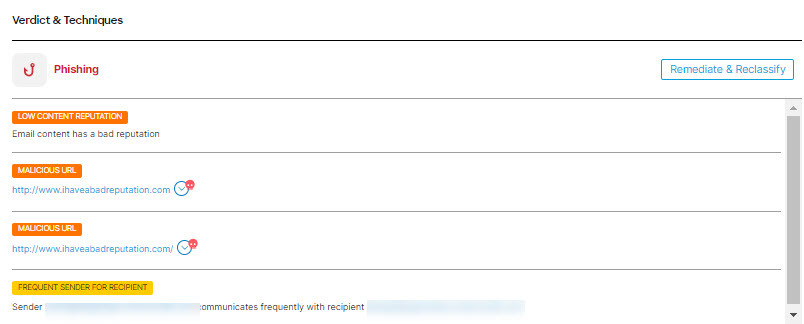
The Verdict and Techniques panel shows a visual representation of the verdict applied to a message and techniques detected that may have contributed to the verdict. Techniques are color coded to indicate their severity. Malicious file names/SHA256 and URLs are shown dynamically when available. Static descriptions are shown when dynamic text is not possible.
You can remediate and/or reclassify a message directly from this panel. Click the Remediate & Reclassify button, then follow the directions provided in Move and Reclassify Messages.
Sender Information
The Sender Information panel shows information known about the sender of the message including name, email address, return path, reply to, SMTP server and client IPs and X-Originating IP.

Sender Messages
The Sender Messages graph shows the total messages sent and total threat messages sent by the sender of the message over the last 30 days. This can help you quickly see if there is any pattern of threat messages from the user.

Recipient Information
The Recipients and Envelope Recipients panels show information about who the message was sent to.

Mailbox List
The Mailbox List shows a list of end-user mailboxes that received incoming and internal messages. The list also shows if the message was read prior to the last remediation action and any remediation errors on the message. Remediation errors can occur if a user deleted or moved a messages before the system tried to remediate it.

Links and Attachments
The Links and Attachment panels show information about links and attachments found in the message.

Email Preview
The Email Preview allows super-admin and admin users to request and see a message as it appears to the end-user without needing to download the EML file. The message is shown as an image. Click the Open Email Preview button to see the preview.
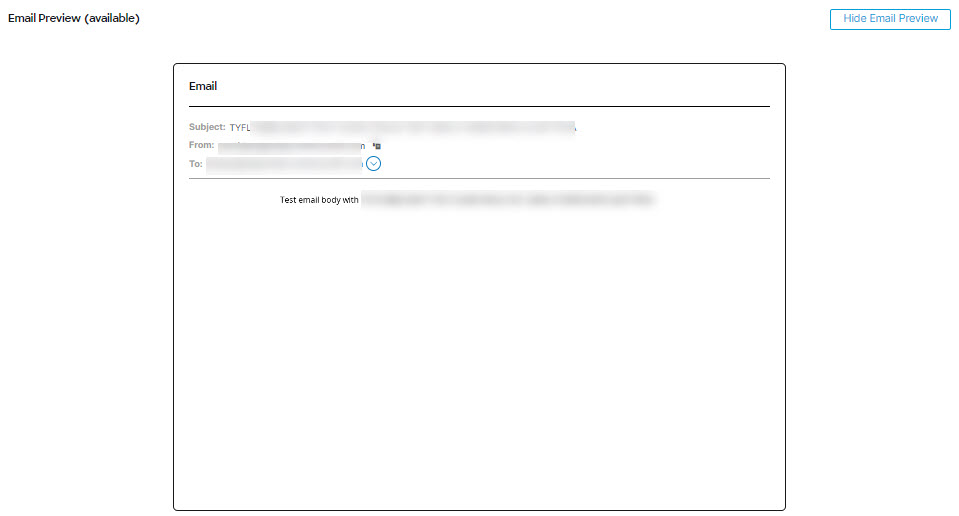
An audit log record is created when a user previews a message. The audit log is available for download from Administration > Business > Preferences.
Conversation View
Conversation view provides a holistic view of a conversation. Use the conversation view to track the messages in a conversation and gain a complete understanding of the mail flow. This can be useful in determining where a threat originated and how it spread within your organization.
When you are in the message report, click the Conversation View button on the top right of the page to see messages that are connected to a specific email.

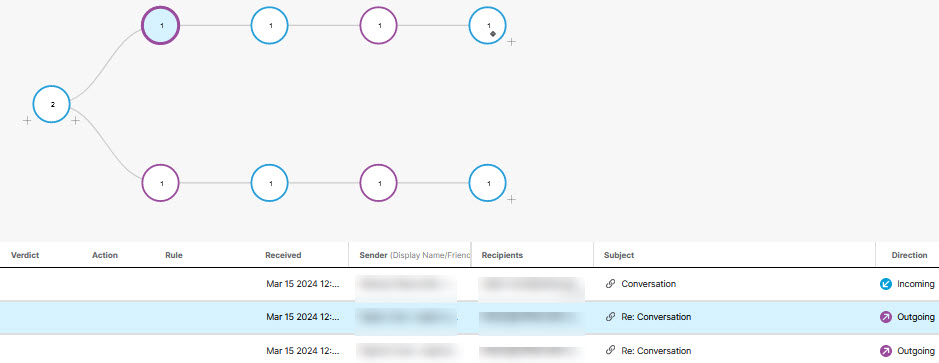
Click the + icons to expand nodes of the conversation so you can see messages that came earlier or later in the conversation. Nodes that are expanded are added to the message grid shown below the nodes. Nodes and messages are color-coded to indicate direction: Incoming, Outgoing, or Internal.
The number within the node circle indicates how many addresses the message was sent to. An icon within a node indicates if a threat was detected or a verdict was applied. When you select a node, the corresponding message in the grid is highlighted.
XDR Pivot Menu
If your Secure Email Threat Defense business is integrated with Cisco XDR you can access the XDR pivot menu from within the message report. For information about integrating with XDR, see XDR.
Move and Reclassify Messages
Use the Messages page to move or reclassify messages if you think they have been incorrectly classified. You can move or reclassify up to 100 messages at a time by changing the number of messages displayed per page. You can also move and reclassify a message directly from the Verdict & Techniques panel of the Message Report page.
You can also move and reclassify messages using the Remediation and Reclassification API. See the API guide for details https://developer.cisco.com/docs/message-search-api/.
Note: Reclassifying only affects the verdict on the selected message(s). It does not indicate any change in action on future messages from the selected sender or based on the message content. The message will be queued for review by Cisco Talos. Talos may use the feedback to influence future classifications. For false positive messages, consider adding Verdict Override Rules.
About Hybrid Exchange Accounts
Secure Email Threat Defense can act only on mailboxes located in Exchange Online (O365). If you are in the process of migrating your mailboxes from on-premises Exchange to Exchange Online (O365), remediation (move or deletion) will only work for mailboxes located in Exchange Online (O365). You will not be notified that the remediation for on-premises Exchange mailboxes has failed.
Read Remediation Mode
If you are in Read mode, you can reclassify (apply a different verdict to) messages.
1.![]() Select the message(s) you want to reclassify.
Select the message(s) you want to reclassify.
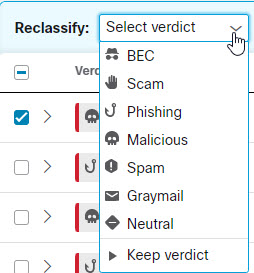
2.![]() Select a verdict from the drop-down menu. You can reclassify the messages as BEC, Scam, Phishing, Malicious, Spam, Graymail, or Neutral or you can select Keep verdict.
Select a verdict from the drop-down menu. You can reclassify the messages as BEC, Scam, Phishing, Malicious, Spam, Graymail, or Neutral or you can select Keep verdict.
Read/Write Remediation Mode
If you are in Read/Write remediation mode, you can move suspicious messages out of user Inboxes and into their Junk or Trash, or to a Quarantine folder they cannot access. Similarly, if you determine a message that was moved to Junk, Trash, or Quarantine is not suspicious, you can move it back to user Inboxes. You can also Delete messages entirely. This process also allows you to reclassify (apply a different verdict to) messages.
1.![]() Select the message(s) you want to move or reclassify.
Select the message(s) you want to move or reclassify.
2.![]() Select a verdict from the Reclassify drop-down menu. You can reclassify the messages as BEC, Scam, Phishing, Malicious, Spam, Graymail, or Neutral, or you can select Keep verdict.
Select a verdict from the Reclassify drop-down menu. You can reclassify the messages as BEC, Scam, Phishing, Malicious, Spam, Graymail, or Neutral, or you can select Keep verdict.
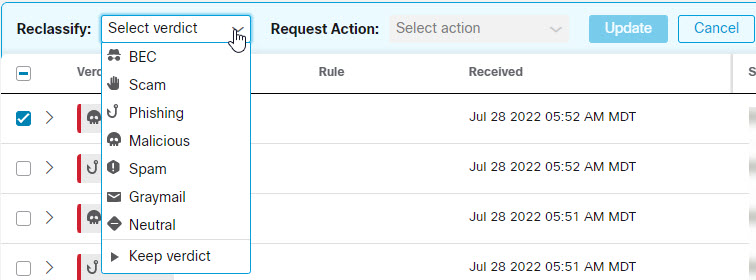
3.![]() Select an action from the Request Action drop-down menu. You can Move to Junk, Move to Trash, Move to Inbox, Move to Quarantine, Delete, or you can select Do Not Move.
Select an action from the Request Action drop-down menu. You can Move to Junk, Move to Trash, Move to Inbox, Move to Quarantine, Delete, or you can select Do Not Move.

4.![]() Click Update to apply the new classification and take action on the messages.
Click Update to apply the new classification and take action on the messages.
If a message has been moved, it is indicated in the Last Action column.
Note: For outgoing and internal message, the Move to Inbox action moves the message to the Sent folder of the initial sender of the message, instead of to their Inbox.
Delete Messages
Super-admin and admin users can permanently delete messages from mail boxes using the Delete action in the Reclassify/Remediate workflow. Deleted messages are moved to the recoverableitemspurges folder. This folder is not accessible to users and Secure Email Threat Defense cannot restore deleted messages to Inboxes.
1.![]() Select the message(s) you want to delete.
Select the message(s) you want to delete.
2.![]() Select a verdict from the Reclassify drop-down menu. You can reclassify the messages as BEC, Scam, Phishing, Malicious, Spam, Graymail, or Neutral, or you can select Keep verdict.
Select a verdict from the Reclassify drop-down menu. You can reclassify the messages as BEC, Scam, Phishing, Malicious, Spam, Graymail, or Neutral, or you can select Keep verdict.

3.![]() Select Delete from the Request Action drop-down menu.
Select Delete from the Request Action drop-down menu.

4.![]() Click Update to delete the message(s).
Click Update to delete the message(s).
5.![]() A Confirm Deletion dialog indicates that messages cannot be recovered and verifies that you want to continue. Click Delete to continue.
A Confirm Deletion dialog indicates that messages cannot be recovered and verifies that you want to continue. Click Delete to continue.
Quarantine Messages
Quarantine folders are created automatically for each mailbox and are hidden from Outlook users. The secret folder name is visible to Super-admin and admin users on the Administration > Business page. In Outlook, messages in the quarantine folder are automatically purged according to your Deleted Items purge settings. Secure Email Threat Defense cannot restore messages back to user Inboxes after they are purged from the quarantine folder.
To manually move messages to quarantine:
1.![]() Select the message(s) you want to move to quarantine.
Select the message(s) you want to move to quarantine.
2.![]() Select a verdict from the Reclassify drop-down menu. You can reclassify the messages as BEC, Scam, Phishing, Malicious, Spam, Graymail, or Neutral, or you can Keep verdict.
Select a verdict from the Reclassify drop-down menu. You can reclassify the messages as BEC, Scam, Phishing, Malicious, Spam, Graymail, or Neutral, or you can Keep verdict.

3.![]() Select Move to Quarantine from the Request Action drop-down menu.
Select Move to Quarantine from the Request Action drop-down menu.

Download Search Results
You can download a CSV file of the data for messages in your search results. Downloads are limited to 10,000 messages. Complete the following steps to download your data:
1.![]() Click the Download button and select Create Download (.csv).
Click the Download button and select Create Download (.csv).

2.![]() A banner indicating that your request is in progress appears. Click the text to be taken to the Downloads: Messages page.
A banner indicating that your request is in progress appears. Click the text to be taken to the Downloads: Messages page.

3.![]() When your download is ready, download your file by clicking the Download icon under the Actions column.
When your download is ready, download your file by clicking the Download icon under the Actions column.
Download History
Your download history is kept for 90 days. Click the Download button and select View Download History to go to the Downloads: Messages page.

This page shows you the date range, who requested the download, the date it was initiated, and the status. Download your file by selecting the Download icon under the Actions column.


 Feedback