Configure NAT

Configure NAT

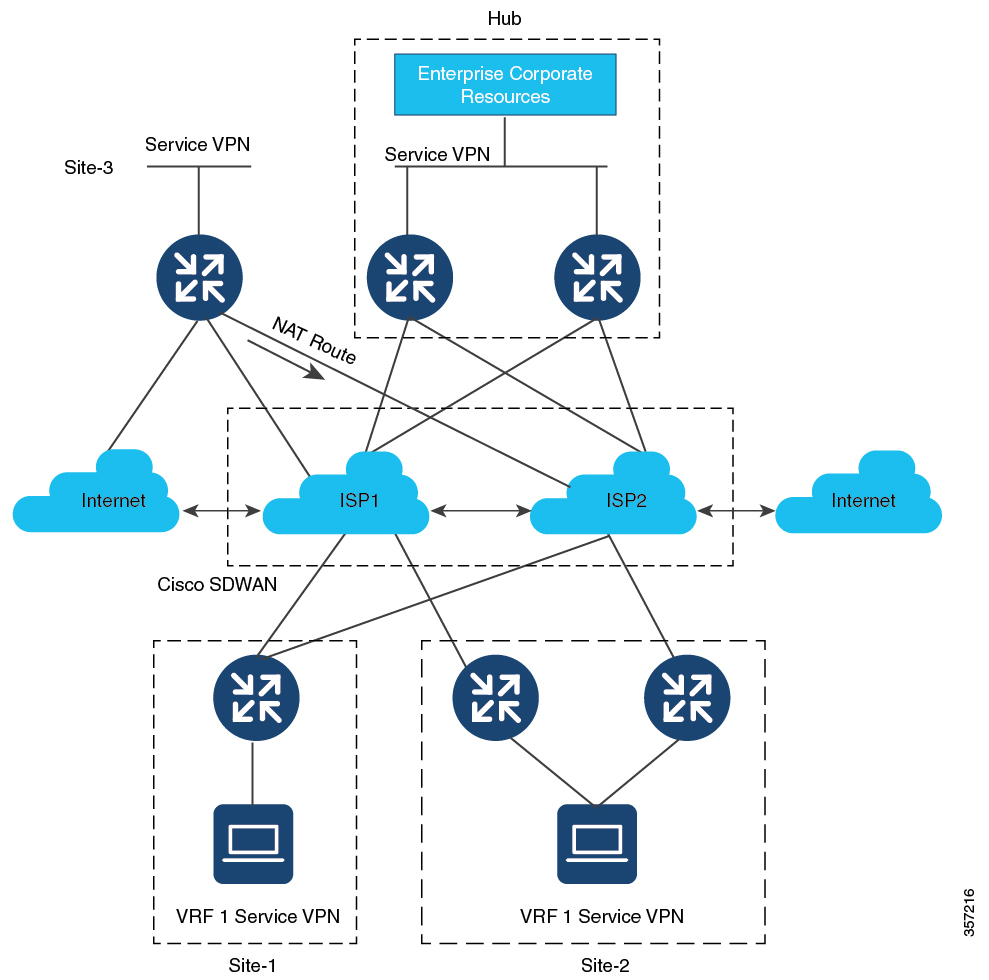
Cisco IOS XE Catalyst SD-WAN includes the following types of Network Address Translation (NAT) configuration:

  • NAT Direct Internet Access (DIA): Allows remote sites to route traffic directly to the internet rather than routing the traffic to a central site or data center.

  • NAT service-side: Allows you to configure inside and outside NAT on data traffic traveling to and from the service hosts of the network overlay. Service-side NAT translates data traffic, of inside and outside host addresses, that match a configured centralized data policy.

NAT is designed for IP address conservation. NAT enables private IP networks that use nonregistered IP addresses to connect to the internet. NAT operates on a device, usually connecting two networks. Before packets are forwarded onto another network, NAT translates the private (not globally unique) addresses in the internal network into legal addresses.

NAT allows a single device to act as an agent between the internet (or public network) and a local network (or private network), which means that only a single unique IP address is required to represent an entire group of computers to anything outside their network.


Note


When NAT performs maintenance operations, it needs to lock the NAT database. When the NAT database is locked, NAT does not process any packets for translations. Typically, NAT maintenance operations are less than a second to a few seconds. Usually, NAT sending out untranslated packets is not an issue because these packets are dropped by an ISP.

Configure the following command to ensure that NAT drops packets when performing NAT database updates:

ip nat service modify-in-progress drop

NAT Direct Internet Access

Table 1. Feature History

Feature Name

Release Information

Description

Support for NAT Pool, Static NAT, and NAT as a Loopback Interface

Cisco IOS XE Catalyst SD-WAN Release 17.2.1r

Cisco vManage 20.1.1

This feature supports NAT configuration for loopback interface addresses, NAT pool support for Direct Internet Access (DIA), and static NAT.

Advertise NAT Routes Through OMP

Cisco IOS XE Catalyst SD-WAN Release 17.5.1a

This feature allows you to advertise NAT routes through the Cisco Catalyst SD-WAN Overlay Management Protocol (OMP) to the branch routers. You can configure this feature only through a Cisco SD-WAN Manager device CLI template.

Support for NAT DIA IPv4 over an IPv6 Tunnel

Cisco IOS XE Catalyst SD-WAN Release 17.8.1a

Cisco vManage Release 20.8.1

This feature provides support for an IPv4 client to access IPv4 servers when using an IPv6 network.

IPv4 traffic is routed to the internet over an IPv6 tunnel.

You can configure NAT DIA IPv4 over an IPv6 tunnel using the CLI or a CLI add-on template.

Support for PPP Dialer Interfaces with NAT DIA

Cisco IOS XE Catalyst SD-WAN Release 17.9.1a

Cisco vManage Release 20.9.1

This feature adds support for the following Point-to-Point Protocol (PPP) dialer interfaces: PPP over Ethernet (PPPoE), PPP over Asynchronous Transfer Mode (PPPoA), and PPP over Ethernet Asynchronous Transfer Mode (PPPoEoA).

You can use the PPP dialer interfaces to access IPv4 services and sites.

Support for Static NAT Mapping with HSRP

Cisco IOS XE Catalyst SD-WAN Release 17.9.1a

Cisco vManage Release 20.9.1

With this feature, if both the Hot Standby Router Protocol (HSRP) routers are configured with the same static NAT mapping, only the active device responds to the Address Resolution Protocol (ARP) request for a static NAT mapping entry. Traffic that fails over from the HSRP active device to the standby device does not have to wait for the ARP request to time out before failing over.

ALG Support for NAT DIA and Zone-Based Firewalls

Cisco IOS XE Catalyst SD-WAN Release 17.9.1a

Cisco vManage Release 20.9.1

This feature provides support for an application-level gateway (ALG) that translates the IP address inside the payload of an application packet. Specific protocols such as Domain Name System (DNS), FTP, and Session Initiation Protocol (SIP) require a NAT ALG for translation of the IP addresses and port numbers in the packet payload.

Support for Port Forwarding with NAT DIA

Cisco IOS XE Catalyst SD-WAN Release 17.9.1a

Cisco vManage Release 20.9.1

With this feature, you can define one or more port-forwarding rules to send packets received on a particular port from an external network to reach devices on an internal network.

Before Cisco IOS XE Catalyst SD-WAN Release 17.9.1a and Cisco vManage Release 20.9.1, port forwarding was available for service-side NAT only.

Support for NAT High-Speed Logging

Cisco IOS XE Catalyst SD-WAN Release 17.9.1a

Cisco vManage Release 20.9.1

Also

Cisco IOS XE Release 17.6.4 and later 17.6.x releases

Cisco vManage Release 20.6.4 and later 20.6.x releases

This feature provides the ability to enable or disable high-speed logging (HSL) of all translations by NAT.

You can configure NAT HSL using a device CLI template or CLI add-on feature template.

Support for Source Port Preservation for well-known Cisco Catalyst SD-WAN Ports

Cisco IOS XE Catalyst SD-WAN Release 17.10.1a

Cisco vManage Release 20.10.1

This feature allows preservation of well-known Cisco Catalyst SD-WAN ports during NAT.

Destination NAT Support

Cisco IOS XE Catalyst SD-WAN Release 17.11.1a

Cisco vManage Release 20.11.1

This feature changes the destination address of packets passing through WAN edge devices. Destination NAT is used to redirect traffic destined to a private address to the translated destination public IP address.

Port Forwarding with NAT DIA Using a Loopback Interface

Cisco IOS XE Catalyst SD-WAN Release 17.11.1a

Cisco vManage Release 20.11.1

This feature supports port forwarding with NAT DIA by using a loopback interface.

You can configure a loopback interface by using either device CLI templates or CLI add-on feature templates.

ALG Support Enhancement for NAT DIA and Zone-Based Firewalls

Cisco IOS XE Catalyst SD-WAN Release 17.11.1a

Cisco vManage Release 20.11.1

The ALG support for NAT DIA is extended for the following protocols:

  • Trivial File Transfer Protocol (TFTP)

  • Point-to-Point Tunneling Protocol (PPTP)

  • Sun Remote Procedure Call (SUNRPC)

  • Skinny Client Control Protocol (SCCP)

  • H.323

Support for Configuring Multiple NAT Types

Cisco IOS XE Catalyst SD-WAN Release 17.14.1a

Cisco Catalyst SD-WAN Manager Release 20.14.1

This feature supports configuration of multiple NAT types—interface, loopback interface, or NAT pool for Direct Internet Access (DIA).

Use the centralized data policy to assign rules for combining various NAT types for DIA traffic egressing the edge router. You can also bypass NAT altogether.

Information About NAT DIA

NAT DIA allows branch sites to route traffic directly to the internet rather than having to go through a central site to be inspected. This allows cloud-based applications to go directly to the internet and to cloud-service providers without having to use unnecessary bandwidth.

NAT DIA Flow-Stickiness

Minimum supported releases: Cisco IOS XE Release 17.6.1a, Cisco vManage Release 20.6.1

When NAT DIA is configured with centralized data policy with application match, the application flows subject to NAT DIA policy may get reset due to path change. For example, when you have a data policy matching an application list and the action is NAT DIA, the first few packets may not be identified by deep packet inspection (DPI). So, the packets not matching NAT DIA application policy follow routing to the Cisco Catalyst SD-WAN overlay path. When the flow is identified, the later packets of the flow will take the NAT DIA path as defined by the data policy. This path change results in a flow reset as different paths means different client source or port combination towards the server and the server resets the unknown TCP flows.

The Flow-Stickiness feature is enabled to record the flow level state of the NAT path. If the first packet of the flow is non-NAT, it keeps the rest of the packets of this flow to non-NAT paths. If the first packet flow is via the NAT DIA path, it keeps the rest of the packets of this flow to the NAT DIA path. It is enabled by default with NAT DIA data policy.

To disable flow stickiness, use the command flow-stickiness-disable under the localized policy using CLI add-on template.

Multiple NAT DIA Methods on an Interface

Minimum supported releases: Cisco IOS XE Catalyst SD-WAN Release 17.14.1a and Cisco Catalyst SD-WAN Manager Release 20.14.1

A NAT configuration can include an interface overload, an interface DIA pool, or an interface loopback. Having the ability to allow multiple NAT pools for an interface while also having a default interface for any traffic that doesn't match a pool provides a robust option for configuring NAT DIA.You can configure Cisco IOS XE Catalyst SD-WAN devices so that the NAT DIA traffic from an internal subnet is assigned to one public IP address, while all other NAT DIA traffic falls back to a default interface.

For example, your organization might have a requirement to apply NAT to IPs of a certain subset of phones to a different public address than the majority of internet traffic. You might also want to use public cloud services for voice and require all traffic for a voice subnet to use specific IP addresses. These scenarios require you to have multiple NAT pools for specific DIA traffic while also having a default NAT interface for regular traffic.

You can configure multiple NAT DIA methods using CLI commands, feature templates, or configuration groups. After configuring the interface with multiple NAT types, configure the centralized traffic policy to create rules based on the match–action condition. Based on the configured policy match condition and the exit DIA interface that you specify, the policy chooses the appropriate NAT method for source address translation.

If multiple NAT DIA methods are present, traffic can exit on any DIA interface and the corresponding NAT type is chosen. To ensure traffic egresses through a particular NAT DIA interface, configure the centralized traffic policy to include Local TLOC option and assign a preferred TLOC color to the NAT DIA interface. Based on the match condition, the policy selects the DIA interface associated with preferred color for egress.


Note


  • This feature supports only IPv4 addresses.

  • For a given match condition (sequence in data policy), multiple source DIA interfaces or source DIA pools can’t correspond to the same match interface. However, they can be provided in different sequences. For example, if the default NAT type is interface overload then the second method (match-interface) for the same interface cannot be interface overload. However, the second method can be a NAT pool or a loopback interface.


Benefits of NAT DIA

  • Enables good application performance

  • Contributes to reduced bandwidth consumption and latency

  • Contributes to lower bandwidth cost

  • Enables improved branch office user experience by providing DIA at remote sites

Restrictions for NAT DIA

  • NAT64:

    • NAT DIA pool is not supported for NAT64.

  • Multiple NAT DIA:

    • Support for multiple NAT DIA pools per interface requires Cisco IOS XE Catalyst SD-WAN Release 17.14.1a or later.

  • Multiple NAT mappings:

    • A NAT mapping can include an interface overload, an interface DIA pool, or an interface loopback. Multiple NAT mappings for the same interface require Cisco IOS XE Catalyst SD-WAN Release 17.14.1a or later.

  • Shared IP address:

    • An IP address used in a NAT pool cannot be shared with an interface address or static address mappings.

  • Requirement of at least one NAT on WAN interface:

    • Cisco SD-WAN Manager does not configure a NAT DIA route in a Cisco VPN template, which is the service-side VPN, if at least one form of NAT is not enabled on the WAN interface.

  • Non-tunnel traffic

    • NAT DIA or non-tunnel traffic is not supported for L3 TLOC extension.

  • Port allocation limit

    • When configuring NAT DIA for a single IP address, approximately 55,000 ports can be translated for TCP and UDP protocols each, providing up to 110,000 port translations in total.

    • When configuring NAT DIA for multiple IP addresses (NAT pool), approximately 64,000 ports can be translated for TCP and UDP protocols for each IP address in the pool. IP addresses from the NAT pool are chosen randomly and are not based on a round-robin method.

Configure NAT DIA

Workflow for Enabling NAT DIA

  1. Enable NAT by editing an existing Cisco VPN Interface Ethernet template. From Cisco IOS XE Catalyst SD-WAN Release 17.14.1a, you can configure multiple NAT types for an interface.

    1. Configure interface overload (default).


      Note


      From Cisco IOS XE Catalyst SD-WAN Release 17.14.1a, the first NAT type that you configure becomes the default or the primary NAT method for the Cisco VPN Interface Ethernet. It can be either an interface overload, NAT pool, or a loopback interface.

      Any additional NAT types that you configure for that interface become secondary NAT methods.


    2. Configure a NAT pool.

    3. Configure a loopback interface.

      For more information on configuring a loopback interface, see Configure a NAT Pool and a Loopback Interface.

    4. (Optional) Configure static NAT.

      For more information on configuring static NAT, see Configure Service-Side Static NAT.

  2. Configure a NAT DIA route using a Cisco VPN template, which is a service-side VPN template used to direct user traffic from a service VPN directly into the internet transport.

Configure a NAT Pool and a Loopback Interface

A NAT pool is a range of IPv4 addresses that are allocated for NAT translation as needed.

You can specify a software-only interface called a loopback interface to emulate a physical interface. A loopback interface is a virtual interface on a device that remains up (active) until you disable it. From Cisco IOS XE Catalyst SD-WAN Release 17.14.1a, you can configure multiple NAT types for an interface.

Configure NAT DIA Using Configuration Groups
  1. From the Cisco SD-WAN Manager menu, choose Configuration > Configuration Groups.

  2. Click adjacent to the configuration group name and choose Edit.

  3. Click Transport & Management Profile.

  4. Edit the VPN0 feature by clicking under Actions.

  5. Click Add Sub-Feature and choose Ethernet Interface.

  6. Click NAT.

  7. Click IPv4 Settings.

  8. In the NAT drop-down list, change the scope from Default to Global, and click On to enable NAT.

  9. Configure the NAT Type by choosing from one of the following options:

    • interface

    • pool

    • loopback

    From Cisco IOS XE Catalyst SD-WAN Release 17.14.1a, click Add Multiple NAT to configure more NAT pools.

    The default is the Interface option.

  10. In the NAT Type field, click the Pool option and enter the following NAT pool parameters:

    Table 2. NAT Pool Parameters

    Parameter Name

    Description

    Range Start

    Enter a starting IP address for the NAT pool.

    1. Change the scope from Default to Global to enable the field.

    2. Enter the starting IP address for the NAT pool.

    Range End

    Enter a closing IP address for the NAT pool.

    1. Change the scope from Default to Global to enable the field.

    2. Enter the last IP address for the NAT pool.

    Prefix Length

    Enter the NAT pool prefix length.

    UDP Timeout

    Enter the time when NAT translations over UDP sessions time out.

    Range: 1 to 8947 minutes

    Default: 1 minute

    TCP Timeout

    Enter the time when NAT translations over TCP sessions time out.

    Range: 1 to 8947 minutes

    Default: 60 minutes (1 hour)

  11. Configure a loopback interface. From Cisco IOS XE Catalyst SD-WAN Release 17.14.1a, click Add Multiple NAT to configure multiple loopback interfaces.

    In the NAT Type field, click the Loopback option and enter the name of the loopback interface.


    Note


    For a given match condition (sequence in data-policy), multiple source DIA interfaces or source DIA pools can’t correspond to the same match interface. However, they can be provided in different sequences. For example, if the default NAT type is interface overload then the second method (match-interface) for the same interface cannot be interface overload. However, the second method can be a NAT pool or a loopback interface.


  12. Click Save.

Configure Match and Action Parameters Using a Policy Group

After you have configured the multiple NAT types using configuration groups, configure the Application & Priority SLA policy to apply match-action conditions. When the NAT DIA traffic matches the conditions in the match portion of a centralized data policy, the packet is accepted. Then, you can associate action parameters with accepted packets. For more information, see Application and Priority SLA.

  1. From the Cisco SD-WAN Manager menu, choose Configuration > Policy Groups > Application & Priority SLA.

  2. Click adjacent to the policy group name and choose Edit.

  3. Click the Advanced Layout button on the top-right corner of the page to swtich to the advanced view.

  4. Click Add Traffic Policy, provide the details for the new traffic policy, and choose Accept.

  5. Click Add.

  6. Click Add Rules and enter a name and sequence for the traffic. For more information, see Configure Traffic Rules.

  7. Click Add Match to associate a match condition with the rule. For more information, see Match Parameters - Data Policy.

  8. Click Add Action and choose NAT VPN to associate a NAT DIA action with the match condition specified in the previous step.

    • DIA Pool: Enter a comma-separated list of NAT DIA pools. You can enter up to 4095 NAT pools.

    • DIA Interface: Enter a comma-separated list of NAT DIA interfaces.

    • ByPass: Traffic exits the DIA interface associated with public internet without applying NAT to the source IP address.

Configure NAT DIA Using a Feature Template
  1. From the Cisco SD-WAN Manager menu, choose Configuration > Templates.

  2. Click Feature Templates.


    Note


    In Cisco vManage Release 20.7.x and earlier releases, Feature Templates is titled Feature.


  3. To edit a Cisco VPN Interface Ethernet template, click adjacent to the template name and choose Edit.

  4. Click NAT.

  5. Click IPv4.

  6. In the NAT drop-down list, change the scope from Default to Global, and click On to enable NAT.

  7. Configure interface overload.

    In the NAT Type field, ensure that Interface is enabled for interface overload mode.

    The default is the Interface option.

  8. Configure a NAT pool. From Cisco IOS XE Catalyst SD-WAN Release 17.14.1a, click Add Multiple NAT to configure more NAT pools.

    In the NAT Type field, click the Pool option and enter the following NAT pool parameters:

    Table 3. NAT Pool Parameters

    Parameter Name

    Description

    NAT Pool Range Start

    Enter a starting IP address for the NAT pool.

    1. Change the scope from Default to Global to enable the field.

    2. Enter the starting IP address for the NAT pool.

    NAT Pool Range End

    Enter a closing IP address for the NAT pool.

    1. Change the scope from Default to Global to enable the field.

    2. Enter the last IP address for the NAT pool.

    NAT Pool Prefix Length

    Enter the NAT pool prefix length.

    Overload

    Click On to enable per-port translation. The default is On.

    Note


    If Overload is set to Off, only dynamic NAT is configured on the end device. Per-port NAT is not configured.

    UDP Timeout

    Enter the time when NAT translations over UDP sessions time out.

    Range: 1 to 8947 minutes

    Default: 1 minute

    TCP Timeout

    Enter the time when NAT translations over TCP sessions time out.

    Range: 1 to 8947 minutes

    Default: 60 minutes (1 hour)

  9. Configure a loopback interface. From Cisco IOS XE Catalyst SD-WAN Release 17.14.1a, click Add Multiple NAT to configure multiple loopback interfaces.

    In the NAT Type field, click the Loopback option and enter the following values:

    Table 4. NAT Loopback Parameters

    Parameter

    Description

    NAT Inside Source Loopback Interface Specify the IP address of the loopback interface.
    UDP Timeout Enter the time when NAT translations over UDP sessions time out.

    Default: 1 minute. Range: 1-65536 minutes

    TCP Timeout Enter the time when NAT translations over TCP sessions time out.

    Default: 60 minutes (1 hour). Range: 1-65536 minutes


    Note


    When a device from one template with a NAT configuration on one virtual interface is moved to another template without NAT configuration on another virtual interface, you must first disable the NAT configurations and then remove the virtual interface before enabling NAT configurations again. You disable NAT in the template to which the device was attached initially.


  10. Click Update.

Configure Match and Action Parameters Using the Centralized Data Policy

After you have configured the multiple NAT types using a feature template, configure the traffic rules in the centralized data policy to apply match-action conditions. When the NAT DIA traffic matches the conditions in the match portion of a centralized data policy, the packet is accepted. Then, you can associate action parameters with accepted packets. For more information, about configuring the traffic policy, see Configure Traffic Rules. After you have created a traffic policy, specify the match and action conditions:

  1. Configure the traffic data policy. For more information, see Configure Traffic Rules.

  2. After creating a custom sequence type in the traffic data policy, click Sequence Rule and configure the the details for the new traffic policy and choose Accept.

  3. Configure the match condition. For more information, see Match Parameters - Data Policy.

  4. Click Actions > Accept.

  5. Click NAT VPN and choose from the following NAT DIA actions to associate with the match condition that you specify in the previous step:

    • ByPass: Traffic exits the DIA interface associated with public internet without applying NAT to the source IP address.

    • Pool: Enter a comma-separated list of NAT DIA pools. You can enter up to 4095 NAT pools.

    • Interface: Enter a comma-separated list of NAT DIA interfaces. You can enter up to four interfaces.

Configure Multiple NAT Types Using CLI

Minimum supported releases: Cisco IOS XE Catalyst SD-WAN Release 17.14.1a and Cisco Catalyst SD-WAN Manager Release 20.14.1

  1. Configure a NAT DIA interface.

    interface interface-name
     ip address ip-address prefix/length
     no ip redirects
     load-interval interval-number
     negotiation auto
     ip nat outside
     !
  2. Configure multiple NAT DIA methods where the default NAT method is a NAT pool and the alternative or secondary NAT method is an interface overload.

    ip nat inside source list list-name pool pool-name overload egress-interface interface-name
  3. Configure the alternative or secondary NAT method by using the match-interface keyword. Here, the alternative or secondary NAT method is the interface overload.

    ip nat inside source list list-name interface interface-name overload match-interface interface-name

    For more information about the match-interface keyword, see the ip nat inside source command in the Cisco Catalyst SD-WAN Qualified Command Reference guide.

The following is a sample configuration for configuring multiple NAT DIA where the default NAT method is using a NAT pool and the alternative or secondary NAT method is using interface overload with match-interface:

interface GigabitEthernet1
 ip address 10.1.1.1 255.255.255.0
 no ip redirects
 load-interval 30
 negotiation auto
 ip nat outside
 !
 ip nat inside source list dia-list pool natpool1 overload egress-interface GigabitEthernet1
 ip nat inside source list dia-list interface GigabitEthernet1 overload match-interface GigabitEthernet1

The following is an example for configuring loopback interfaces as alternative or secondary NAT methods while the default method is a NAT pool or interface overload:

interface GigabitEthernet1
 ip address 10.1.1.1
 no ip redirects
 load-interval 30
 negotiation auto
 ip nat outside
 !
 ip nat inside source list dia-list interface Loopback10 overload match-interface GigabitEthernet1
 ip nat inside source list dia-list interface Loopback11 overload match-interface GigabitEthernet1

The following is an example for configuring NAT pools as alternative or secondary methods while the default method is an interface overload or a NAT pool:

interface GigabitEthernet1
 ip address 10.1.1.1
 no ip redirects
 load-interval 30
 negotiation auto
 ip nat outside
 !
 ip nat pool natpool10 10.10.10.10 10.10.10.10 prefix-length 24 
 ip nat inside source list dia-list pool natpool1 overload match-interface GigabitEthernet1
 ip nat inside source list dia-list pool natpool2 overload match-interface GigabitEthernet1
Configure the Traffic Data Policy

After you have configured the multiple NAT types using a feature template, configure the traffic rules in the centralized data policy to apply match-action conditions. When the NAT DIA traffic matches the conditions in the match portion of a centralized data policy, the packet is accepted.

The following is a sample configuration for configuring the traffic data policy:

data-policy data-policy-name
  vpn-list list-name
   sequence sequence-number
    match source-data-prefix-list data-prefix list-name
    !
    action accept
     count vpn-list-name
     nat use-vpn 0
     nat source-dia-pool pool-id
     nat source-dia-interface interface-name
    !
   !
   default-action drop
  !

The following is an example for configuring the traffic data policy:

data-policy MULTIPLE-NAT-DIA-TRAFFIC
  vpn-list VPN1
   sequence 1
    match source-data-prefix-list NAT-DIA-PREFIX-LIST
    !
    action accept
     count VPN1-TRAFFIC
     nat use-vpn 0
     nat source-dia-pool 1
         !
   !
   default-action drop
  !

For more information about configuring the traffic data policy, see Configure Centralized Policies Using the CLI.

The following is an example configuration corresponding to the above traffic data policy, where the default NAT method is interface overload and the alternative or secondary NAT method is NAT pool:

interface GigabitEthernet1
 ip address 10.1.1.1 255.255.255.0
 no ip redirects
 load-interval 30
 negotiation auto
 ip nat outside
 !
 ip nat inside source list dia-list pool natpool1 overload match-interface GigabitEthernet1
 ip nat inside source list dia-list interface GigabitEthernet1 overload

Configure a NAT DIA Route

Every service VPN routes packets into the transport VPN for DIA traffic. Configure a NAT DIA route for the service-side VPN.


Note


You configure an IPv4 DIA route in a Cisco VPN template, which is a service-side VPN.


Configure a NAT DIA Route Using a Cisco VPN Template
  1. From the Cisco SD-WAN Manager menu, choose Configuration > Templates.

  2. Click Feature Templates.


    Note


    In Cisco vManage Release 20.7.x and earlier releases, Feature Templates is titled Feature.


  3. To edit a Cisco VPN template, click . . . adjacent to the template name and choose Edit.

  4. Click IPv4 Route.

  5. Click New IPv4 Route.

  6. In the Prefix field, enter an IPv4 prefix for NAT.

  7. In the Gateway field, click VPN.

  8. In the Enable VPN drop-down list, change the scope from Default to Global, and click On to enable VPN.

  9. Click Update.

Configure a NAT DIA Route Using the CLI

The following is a sample configuration for configuring a NAT DIA route.

Device(config)# interface GigabitEthernet3
ip address 192.0.2.1 255.255.255.0
ip nat outside
no shut

interface GigabitEthernet2
vrf forwarding 1
ip address 10.0.0.1 255.255.255.0
no shut

ip nat route vrf 1 0.0.0.0 0.0.0.0 global
ip route 0.0.0.0 0.0.0.0 192.0.2.2

Verify NAT DIA Route Configuration

The following is a sample output from the show ip route command:

Device# show ip route
Codes: L - local, C - connected, S - static, R - RIP, M - mobile, B - BGP
       D - EIGRP, EX - EIGRP external, O - OSPF, IA - OSPF inter area 
       N1 - OSPF NSSA external type 1, N2 - OSPF NSSA external type 2
       E1 - OSPF external type 1, E2 - OSPF external type 2, m - OMP
       n - NAT, Ni - NAT inside, No - NAT outside, Nd - NAT DIA
       i - IS-IS, su - IS-IS summary, L1 - IS-IS level-1, L2 - IS-IS level-2
       ia - IS-IS inter area, * - candidate default, U - per-user static route
       H - NHRP, G - NHRP registered, g - NHRP registration summary
       o - ODR, P - periodic downloaded static route, l - LISP
       a - application route
       + - replicated route, % - next hop override, p - overrides from PfR
       & - replicated local route overrides by connected

The following is a sample output from the show ip route vrf 1 command:

Device# show ip route vrf 1

Routing Table: 1
Codes: L - local, C - connected, S - static, R - RIP, M - mobile, B - BGP
       D - EIGRP, EX - EIGRP external, O - OSPF, IA - OSPF inter area 
       N1 - OSPF NSSA external type 1, N2 - OSPF NSSA external type 2
       E1 - OSPF external type 1, E2 - OSPF external type 2, m - OMP
       n - NAT, Ni - NAT inside, No - NAT outside, Nd - NAT DIA
       i - IS-IS, su - IS-IS summary, L1 - IS-IS level-1, L2 - IS-IS level-2
       ia - IS-IS inter area, * - candidate default, U - per-user static route
       H - NHRP, G - NHRP registered, g - NHRP registration summary
       o - ODR, P - periodic downloaded static route, l - LISP
       a - application route
       + - replicated route, % - next hop override, p - overrides from PfR
       & - replicated local route overrides by connected

NAT DIA IPv4 over an IPv6 Tunnel

The following sections provide information about configuring NAT DIA IPv4 over an IPv6 tunnel.

Information About NAT DIA IPv4 over an IPv6 Tunnel

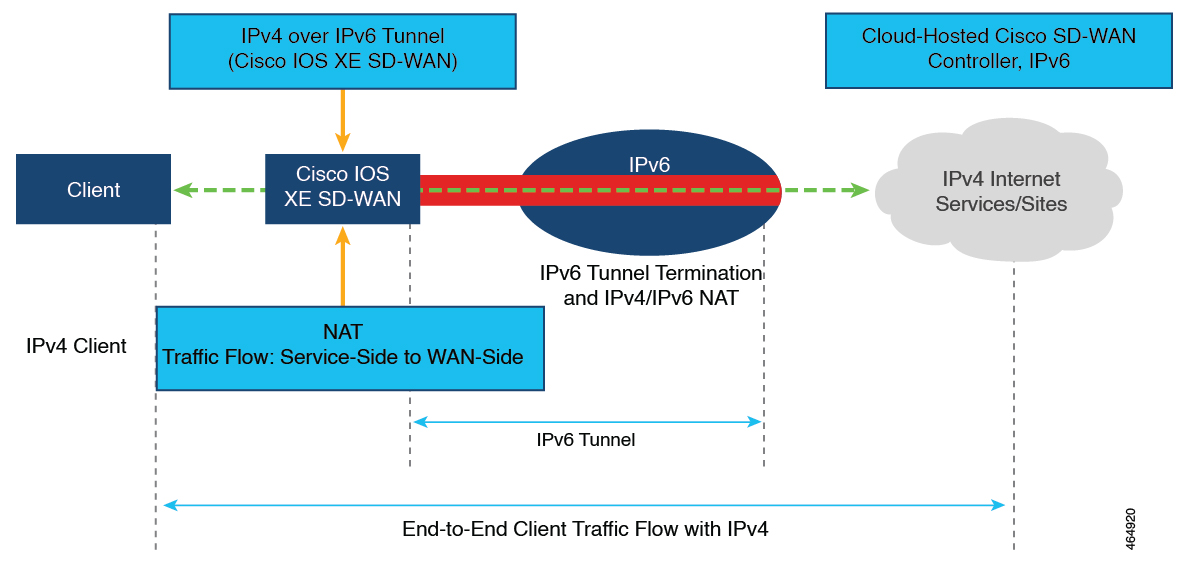
The NAT DIA IPv4 over an IPv6 tunnel enables IPv6-only devices to access IPv4 websites and services.

The traffic flow is from the service side (LAN) to the transport side (WAN) in the overlay network.

Service-side source IPv4 addresses are translated to public IPv4 addresses on the tunnel interface.

Configure NAT DIA IPv4 over an IPv6 tunnel using a device CLI or a CLI add-on template.

Benefits of NAT DIA IPv4 over an IPv6 Tunnel
  • Provides IPv4 access from an IPv6-only device.

  • Supports routing of IPv4 traffic over an IPv6 tunnel.

  • Supports translation of service-side source IPv4 addresses to public IPv4 addresses on the tunnel interface.

Restrictions for NAT DIA IPv4 over an IPv6 Tunnel

  • NAT DIA tracker is not supported.

  • Unified Threat Defense (UTD) is not supported.

  • Keepalive traffic on a tunnel interface is not supported.

Use Case for NAT DIA IPv4 over an IPv6 Tunnel

A customer has an IPv6-only device, but requires access to IPv4 websites and services. To support this scenario, use an IPv6 tunnel for directing the IPv4 traffic to the internet.

Figure 2. NAT DIA IPv4 over IPv6 Tunnel Support
NAT DIA IPv4 over IPv6 Tunnel Support

Minimum supported release: Cisco IOS XE Catalyst SD-WAN Release 17.11.1a and Cisco vManage Release 20.11.1

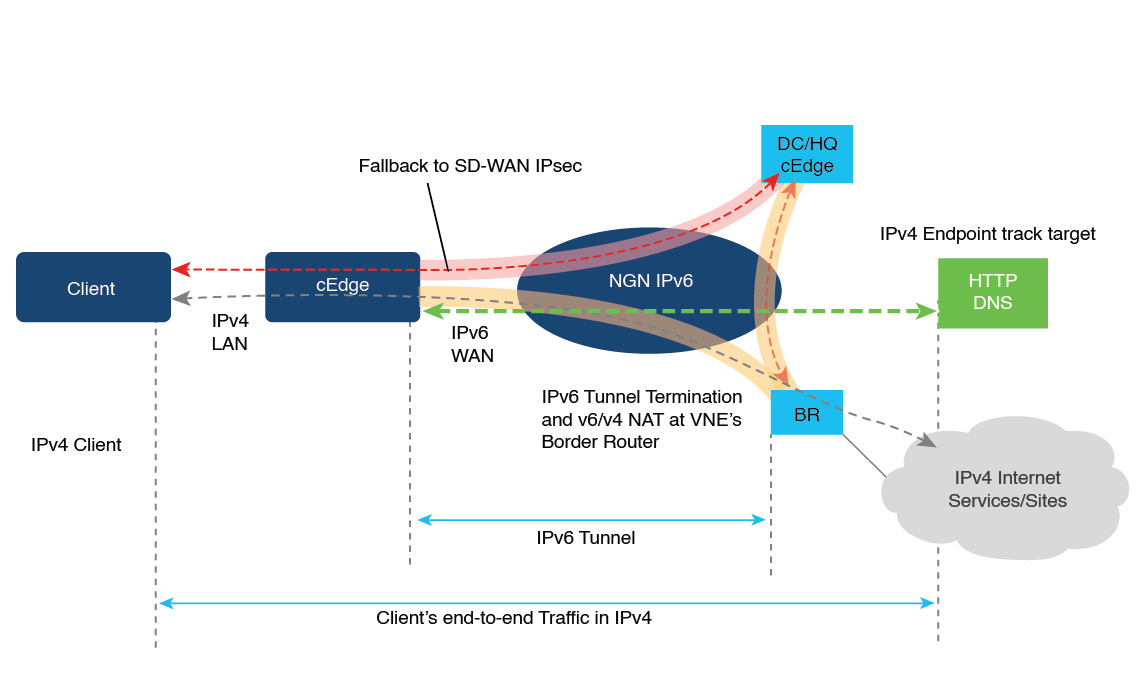
The border router acts as a gateway between IPv6 and IPv4 traffic to send IPv4 bound traffic through static IPv6 tunnel. When the border router and the IPv6 tunnel is unreachable, the WAN edge device cannot determine if the IPv6 tunnel is inactive and therefore cannot re-route the traffic.

Associating IPv4 DIA tracker to an IPv6 tunnel and the border router, helps the WAN edge device to determine if the IPv6 tunnel is active based on the tracker status. When IPv4 tracker is inactive, the associated IPv6 tunnel is also inactive and the traffic is re-routed to an alternative path based on the routing table. When the IPv4 tracker is active, the associated IPv6 tunnel is also active and the traffic is resumed back to the IPv6 tunnel.

Workflow for Configuring NAT DIA IPv4 over an IPv6 Tunnel

Cisco SD-WAN Manager Configuration
  1. Enable NAT by editing an existing Cisco VPN Interface Ethernet template.

    1. Configure interface overload (default).

    2. Configure a NAT pool.

      For more information on configuring a NAT pool, see Configure a NAT Pool and a Loopback Interface.

  2. Configure a NAT DIA route using a Cisco VPN template.

    For more information on configuring a NAT DIA route, see Configure a NAT DIA Route.

CLI Configuration
  1. Configure an IPv4 over an IPv6 tunnel.

  2. Configure the ip nat outside command on the tunnel interface.

  3. Configure a NAT DIA route for routing IPv4 traffic over an IPv6 tunnel.

Configure NAT DIA IPv4 over an IPv6 Tunnel Using the CLI

  1. Configure a global default route for the IPv6 tunnel:

    Device(config)# interface Tunnel1000
    Device(config-if)# ip address 10.1.15.15 255.255.255.0
    Device(config-if)# ip mtu 1460
    Device(config-if)# ip tcp adjust-mss 1420
    Device(config-if)# load-interval 30
    Device(config-if)# tunnel source GigabitEthernet3
    Device(config-if)# tunnel mode ipv6
    Device(config-if)# tunnel destination 2001:DB8:A1:10::10
    Device(config-if)# tunnel route-via GigabitEthernet3 mandatory
    Device(config-if)# tunnel path-mtu-discovery
    !
    Device(config)# ip route 0.0.0.0 0.0.0.0 Tunnel1000 
  2. Configure an IPv4 over an IPv6 tunnel using the ip nat outside command:

    Device(config)# interface Tunnel1000 
    Device(config)# ip nat outside
  3. Configure an IPv4 over an IPv6 tunnel with a NAT pool and interface overload mode:

    Device(config)# interface Tunnel1000 
    Device(config)# ip nat inside source list nat-dia-vpn-hop-access-list interface Tunnel1000 overload

    or

    Device(config)# ip nat pool natpool10 203.0.113.1 203.0.113.25 prefix-length 24
    Device(config)# ip nat inside source list nat-dia-vpn-hop-access-list pool natpool10 overload egress-interface Tunnel1000
  4. Configure a NAT DIA route within a service-side VPN:

    Device(config)# ip nat route vrf 10 0.0.0.0 0.0.0.0 global

    Note


    If you are configuring a NAT DIA route using a centralized data policy, use the nat use-vpn 0 command.


Configure NAT DIA IPv4 over an IPv6 Tunnel Using CLI (Cisco IOS XE Catalyst SD-WAN Release 17.11.1a and later releases)

Minimum supported release: Cisco IOS XE Catalyst SD-WAN Release 17.11.1a and Cisco vManage Release 20.11.1

For more information on using CLI templates, see CLI Templates and CLI Add-On Feature Templates.


Note


By default, CLI templates execute commands in global config mode.


You can configure NAT DIA IPv4 over an IPv6 tunnel using IPv4 NAT DIA tracker. For more information on NAT DIA tracker, see NAT DIA Tracker.

  1. Configure the endpoint tracker for tracking the status of an endpoint:

    endpoint-tracker tracker-name

  2. Configure the IP address of an endpoint:

    endpoint-ip ip-address

  3. Configure the tracker type for the tracker:

    tracker-type interface-name

  4. Configure NAT DIA IPv4 over an IPv6 tunnel.

    For more information, see Configure NAT DIA IPv4 over an IPv6 Tunnel Using the CLI

Here is the complete configuration example to configure NAT DIA IPv4 over an IPv6 tunnel using IPv4 DIA tracker:


       endpoint-tracker test1
        endpoint-ip 10.0.12.13
        tracker-type interface

          interface Tunnel5
          ip address 192.168.9.2 255.255.255.0
          ip nat outside
          endpoint-tracker test1
          tunnel source GigabitEthernet8
          tunnel mode ipv6
           tunnel destination 2A00:B00::1D1E:CA68
           tunnel path-mtu-discovery

           interface GigabitEthernet8
           no ip address
           negotiation auto
           ipv6 address 2A00:B00::1D1E:CA58/64
           no mop enabled
           no mop sysid

        ip nat inside source list nat-dia-vpn-hop-access-list interface Tunnel5 overload
        ip nat route vrf 1 0.0.0.0 0.0.0.0 global
        ip route 0.0.0.0 0.0.0.0 Tunnel5

Configure NAT DIA IPv4 over an IPv6 Tunnel Using a CLI Add-On Template

Before You Begin

Create a new CLI add-on template or edit an existing CLI add-on template.

For more information on CLI add-on feature templates, see CLI Add-On Feature Templates.

Configure NAT DIA IPv4 over an IPv6 Tunnel Using a CLI Add-On Template
  1. From the Cisco SD-WAN Manager menu, choose Configuration > Templates.

  2. Click Feature Templates.

  3. Click Add Template.

  4. Choose a device from the device list.

  5. In the OTHER TEMPLATES area, click CLI Add-On Template.

  6. In the CLI Add-On Template area, enter the configuration.

  7. Configure IPv4 over an IPv6 tunnel as shown in the following example configuration:

    interface Tunnel1000
     no shutdown
     ip address 203.0.113.1 255.255.255.0
     ip nat outside
     load-interval 30
     tunnel source GigabitEthernet1
     tunnel destination 2001:DB8:A1:10::10
     tunnel mode ipv6
     tunnel path-mtu-discovery
     tunnel route-via GigabitEthernet1 mandatory
    !
    ip nat inside source list nat-dia-vpn-hop-access-list interface Tunnel1000 overload
    ip route 0.0.0.0 0.0.0.0 Tunnel1000 203.0.113.2
    ip nat route vrf 10 0.0.0.0 0.0.0.0 global
  8. Click Save.

    The CLI add-on template that you created is displayed in the CLI Configuration table.

  9. Attach the CLI add-on template to your device.

Verify NAT DIA IPv4 over an IPv6 Tunnel Configuration

Verify NAT DIA Route Entries

The following is a sample output from the show ip nat route-dia command:

Device# show ip nat route-dia 
route add [1] addr [0.0.0.0] vrfid [2] prefix len [0] 
route add [1] addr [0.0.0.0] vrfid [4] prefix len [0] 

In the sample output, two NAT route advertisements are enabled.

Verify NAT DIA Routing Table Entries

The following is a sample output from the show ip route vrf 1 nat-route command:

Device# show ip route vrf 1 nat-route 
Routing Table: 1
Codes: L - local, C - connected, S - static, R - RIP, M - mobile, B - BGP
       D - EIGRP, EX - EIGRP external, O - OSPF, IA - OSPF inter area 
       N1 - OSPF NSSA external type 1, N2 - OSPF NSSA external type 2  
       E1 - OSPF external type 1, E2 - OSPF external type 2, m - OMP 
       n - NAT, Ni - NAT inside, No - NAT outside, Nd - NAT DIA
       i - IS-IS, su - IS-IS summary, L1 - IS-IS level-1, L2 - IS-IS level-2
       ia - IS-IS inter area, * - candidate default, U - per-user static route
       H - NHRP, G - NHRP registered, g - NHRP registration summary
       o - ODR, P - periodic downloaded static route, l - LISP
       a - application route
       + - replicated route, % - next hop override, p - overrides from PfR
       & - replicated local route overrides by connected

Gateway of last resort is 0.0.0.0 to network 0.0.0.0

n*Nd  0.0.0.0/0 [6/0], 00:40:17, Null0

In this sample output, n*Nd 0.0.0.0/0 is the configured NAT DIA route.

Display IP Translations

The following is a sample output from the show ip nat translations command:

Device# show ip nat translations
show ip nat translations 
Pro  Inside global        Inside local          Outside local         Outside global
tcp  203.0.113.1:5201     10.20.24.150:5201     10.20.25.150:5201     10.20.25.150:5201
icmp 203.0.113.1:25440    10.20.24.150:25440    10.20.25.150:25440    10.20.25.150:25440
Total number of translations: 2

In the sample output, there are two translations.

Verify IP NAT Global Statistics

The following is a sample output from the show ip nat statistics command:

Device# show ip nat statistics
Total active translations: 2 (0 static, 2 dynamic; 2 extended)
Outside interfaces:
  Tunnel1000
Inside interfaces: 
Hits: 1012528  Misses: 56
Expired translations: 3
Dynamic mappings:
-- Inside Source
[Id: 3] access-list nat-dia-vpn-hop-access-list interface Tunnel1000 refcount 2
nat-limit statistics:
 max entry: max allowed 0, used 0, missed 0
In-to-out drops: 0  Out-to-in drops: 0
Pool stats drop: 0  Mapping stats drop: 0
Port block alloc fail: 0
IP alias add fail: 0
Limit entry add fail: 0

In the sample output, there are two translations for tunnel 11000.

The output of the show ip nat statistics command displays information about all the IP address pools and NAT mappings that you have configured.

Clear NAT Global Statistics

Use the clear ip nat statistics command to clear NAT global statistics:

Device# clear ip nat global statistics
Display NAT Statistics

The following is a sample output from the show platform hardware qfp active feature nat datapath stats command:

Device# show platform hardware qfp active feature nat datapath stats
Total active translations: 2 (0 static, 2 dynamic; 2 extended)
Outside interfaces:
  Tunnel1000
Inside interfaces: 
Hits: 1012528  Misses: 56
Expired translations: 3
Dynamic mappings:
-- Inside Source
[Id: 3] access-list nat-dia-vpn-hop-access-list interface Tunnel1000 refcount 2
nat-limit statistics:
 max entry: max allowed 0, used 0, missed 0
In-to-out drops: 0  Out-to-in drops: 0
Pool stats drop: 0  Mapping stats drop: 0
Port block alloc fail: 0
IP alias add fail: 0
Limit entry add fail: 0
Check NAT Global Counters: Datapath Map

The following is a sample output from the show platform hardware qfp active feature nat datapath map command:

Device# show platform hardware qfp active feature nat datapath map
I/f Map Table

if_handle 65529 next 0x0 hash_index 220
laddr 0.0.0.0 lport 0 map 0xdec942c0 refcnt 0
gaddr 203.60.10.1 gport 0 proto 0 vrfid 0x0
src_type 1 flags 0x80100 cpmapid 3
I/f Map Table End
edm maps 0
mapping id 1 pool_id 0 if_handle 0xfff9 match_type 0 source_type 1 domain 0 proto 0 Local IP 0.0.0.0, 
Local Port 0 Global IP 203.60.10.1 Global Port 0 Flags 0x80100 refcount 0 cp_mapping_id 3 
next 0x0 hashidx 50 vrfid 0 vrf_tableid 0x0 rg 0 pap_enabled 0 egress_ifh 0x14 
Check NAT Global Counters: Session Dump

The following is a sample output from the show platform hardware qfp active feature nat datapath sess-dump command:

Device# show platform hardware qfp active feature nat sess-dump
id 0xdd70c1d0 io 10.20.24.150 oo 10.20.25.150 io 5201 oo 5201 it 203.0.113.1 ot 10.20.25.150 it 5201 ot 5201 pro 6 vrf 4 tableid 4 bck 65195 in_if 0 out_if 20 ext_flags 0x1 in_pkts 183466 in_bytes 264182128 out_pkts 91731 out_bytes 2987880flowdb in2out fh 0x0 flowdb out2in fh 0x0 
id 0xdd70c090 io 10.20.24.150 oo 10.20.25.150 io 25965 oo 25965 it 203.0.113.1 ot 10.20.25.150 it 25965 ot 25965 pro 1 vrf 4 tableid 4 bck 81393 in_if 0 out_if 20 ext_flags 0x1 in_pkts 27 in_bytes 38610 out_pkts 27 out_bytes 38610flowdb in2out fh 0x0 flowdb out2in fh 0x0 

Configuration Examples for NAT DIA IPv4 over an IPv6 Tunnel

Device# show sdwan running-config | section Tunnel1000|GigabitEthernet1
interface GigabitEthernet1
 ip address 10.1.15.15 255.255.255.0
 no ip redirects
 load-interval 30
 negotiation auto
 ipv6 address 2001:DB8:A1:F::F/64
 ipv6 enable
 ipv6 nd ra suppress all
 service-policy output shape_GigabitEthernet1 
!
interface Tunnel1000
 no shutdown
 ip address 203.0.113.1 255.255.255.0
 ip nat outside
 load-interval 30
 tunnel source GigabitEthernet1
 tunnel destination 2001:DB8:a1:10::10
 tunnel mode ipv6
 tunnel path-mtu-discovery
 tunnel route-via GigabitEthernet1 mandatory
!
ip nat inside source list nat-dia-vpn-hop-access-list interface Tunnel1000 overload
ip route 0.0.0.0 0.0.0.0 Tunnel1000 203.0.113.2
ip nat route vrf 10 0.0.0.0 0.0.0.0 global

Dialer Interfaces with NAT DIA

The following sections provide information about configuring dialer interfaces with NAT DIA.

Information About Using a Dialer Interface with NAT DIA

Minimum supported releases: Cisco IOS XE Catalyst SD-WAN Release 17.9.1a, Cisco vManage Release 20.9.1

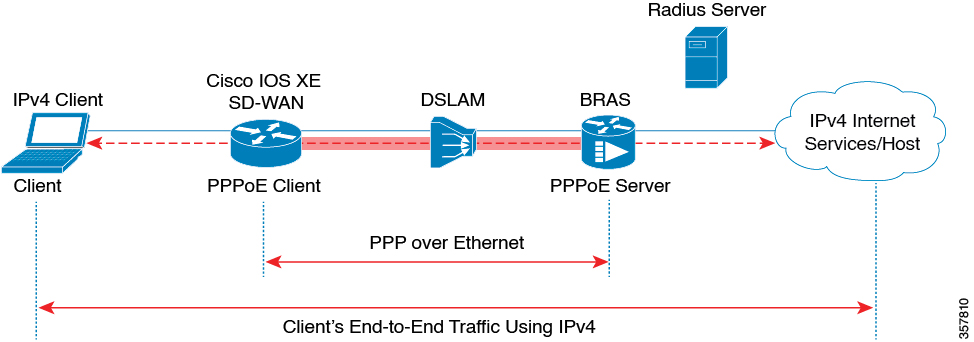
This feature provides support for Point-to-Point Protocol (PPP) dialer interfaces for the NAT DIA use case. Use dialer interfaces to access IPv4 internet services and sites.

A dialer interface specifies how to handle traffic from clients, including default routing information, the encapsulation protocol, and the dialer pool to use.

The following dialer interfaces are supported:

  • Point-to-Point Protocol over Ethernet (PPPoE)

  • Point-to-Point Protocol over Asynchronous Transfer Mode (PPPoA)

  • Point-to-Point Protocol over Ethernet over Asynchronous Transfer Mode (PPPoEoA)

For more information on configuring PPPoE, see the Configuring PPPoE section in the Cisco Catalyst SD-WAN Systems and Interfaces Guide, Cisco IOS XE Catalyst SD-WAN Release 17.x.

Adjust the TCP Maximum Segment Size for NAT DIA

Note


Beginning with Cisco IOS XE Catalyst SD-WAN Release 17.9.1a and Cisco vManage Release 20.9.1, you can adjust the TCP maximum segment size (MSS) value for preventing dropped TCP sessions.

For more information on configuring TCP MSS, see the Configure TCP MSS and Clear Dont Fragment section in the Cisco Catalyst SD-WAN Systems and Interfaces Guide, Cisco IOS XE Catalyst SD-WAN Release 17.x.


Benefits of Using a Dialer Interface with NAT DIA
  • Supports interface overload mode with NAT DIA

  • Supports route-based as well as data-policy-based configuration with NAT DIA

  • Provides support for NAT pools and loopback

  • Provides support for static NAT configuration

  • Provides support for static NAT port forwarding

  • Allows physical interfaces to take on different characteristics based on incoming or outgoing call requirements

  • Provides static or negotiated IP address support over a dialer interface with NAT DIA

Workflow for a NAT DIA Dialer Interface

Minimum supported releases: Cisco IOS XE Catalyst SD-WAN Release 17.9.1a, Cisco vManage Release 20.9.1

The following diagram describes how IPv4 client traffic gets routed over a dialer interface for reaching IPv4 internet sites and services.

Figure 3. Workflow for NAT DIA Dialer Interface Support
Workflow for NAT DIA Dialer Interface Support

Restrictions for Using a Dialer Interface with NAT DIA

Minimum supported releases: Cisco IOS XE Catalyst SD-WAN Release 17.9.1a, Cisco vManage Release 20.9.1

  • Only NAT DIA is supported with dialer interfaces.

  • No support for service-side NAT with dialer interfaces.

  • PPPoE jumbo frames are limited to 1800 bytes when using a device CLI or a CLI add-on template.

  • There is no support for configuring the following PPPoA dialer interface encapsulations: AAL5MUX, AAL5SNAP, AAL5NLPID, or bridge-dot1q using Cisco SD-WAN Manager feature templates. If you want to configure these PPPoA encapsulations, you need to configure the encapsulations using a CLI template.

  • NAT DIA tracker is not supported for a dialer interface with an ip unnumbered interface.

  • NAT DIA path preference is not supported with loopback on a WAN interface.

Configure a Dialer Interface with NAT DIA Using a CLI Template

Minimum supported releases: Cisco IOS XE Catalyst SD-WAN Release 17.9.1a, Cisco vManage Release 20.9.1

For more information on using CLI templates, see CLI Templates and CLI Add-On Feature Templates.

  1. Configure a PPPoE dialer interface with NAT DIA enabled.

    The dialer down-with-vInterface command, available from Cisco IOS XE Catalyst SD-WAN Release 17.9.1a and Cisco vManage Release 20.9.1, brings down the dialer interface when the PPP session goes down.

    interface interface-type-number
     pppoe enable group global
     pppoe-client dial-pool-number dialer-pool-number
    !
    interface Dialer dialer-number
     description interface vers le BAS
     mtu bytes
     ip address negotiated
     ip mtu bytes
     ip nat outside
     encapsulation encapsulation-type
     ip tcp adjust-mss bytes
     dialer pool dialer-pool-number
     dialer down-with-vInterface
     ppp chap hostname hostname
     ppp chap password password
     ppp authentication chap callin
     ppp ipcp route default
     service-policy output shape_Dialer dialer-number
  2. Enable ip nat outside over a dialer interface with interface overload mode.

    interface Dialer dialer-number
    ip nat outside
    ip nat inside source list nat-dia-vpn-hop-access-list interface Dialer dialer-number overload
  3. Configure a NAT DIA route for a service-side VPN.

    For more information on configuring a NAT DIA route for a service-side VPN, see Configure a NAT DIA Route.

    or

    Configure a NAT DIA route for a service-side VPN using a centralized data policy.

    ip nat route vrf vrf-id route-prefix prefix-mask global

Note


When dialer interface is deleted in the same transaction as NAT Mapping with Pool-overload-config, an extra no NAT configuration is generated. Remove each NAT configurations separately using different transactions as shown:

Device(config)# no ip nat inside source list global-list pool natpool-Dialer100-0 overload egress-interface Dialer100
Device(config)# commit
 
Device(config)# no interface Dialer100
Device(config)# commit

Here is the complete configuration example for configuring a dialer interface with NAT DIA.

interface Dialer100
 mtu 1492
 ip address negotiated
 ip nat outside
 encapsulation ppp
 ip tcp adjust-mss 1452
 dialer pool 100
 dialer down-with-vInterface
 endpoint-tracker tracker-google 
 ppp authentication chap callin
 ppp chap hostname branch1.ppp1
 ppp chap password 7 01100F175804
 ppp ipcp route default
 service-policy output shape_GigabitEthernet0/0/1
!
interface GigabitEthernet0/0/1
 no ip redirects
 pppoe enable group global
 pppoe-client dial-pool-number 100
!
sdwan
 interface Dialer100
  tunnel-interface
   encapsulation ipsec weight 1
   color mpls restrict
  exit
 exit
ip nat inside source list nat-dia-vpn-hop-access-list interface Dialer100 overload
ip nat route vrf 10 0.0.0.0 0.0.0.0 global

Verify a Dialer Interface Configuration

Minimum supported releases: Cisco IOS XE Catalyst SD-WAN Release 17.9.1a, Cisco vManage Release 20.9.1

The following sections provide information on verifying a dialer interface configuration.

Verify NAT DIA IP Route Configuration

The following is a sample output from the show ip route vrf command:

Device# show ip route vrf 10
Routing Table: 1
Codes: L - local, C - connected, S - static, R - RIP, M - mobile, B - BGP
D - EIGRP, EX - EIGRP external, O - OSPF, IA - OSPF inter area
N1 - OSPF NSSA external type 1, N2 - OSPF NSSA external type 2
E1 - OSPF external type 1, E2 - OSPF external type 2, m - OMP
n - NAT, Ni - NAT inside, No - NAT outside, Nd - NAT DIA
i - IS-IS, su - IS-IS summary, L1 - IS-IS level-1, L2 - IS-IS level-2
ia - IS-IS inter area, * - candidate default, U - per-user static route
H - NHRP, G - NHRP registered, g - NHRP registration summary
o - ODR, P - periodic downloaded static route, l - LISP
a - application route
+ - replicated route, % - next hop override, p - overrides from PfR
& - replicated local route overrides by connected

Gateway of last resort is 0.0.0.0 to network 0.0.0.0

n*Nd 0.0.0.0/0 [6/0], 4d01h, Null0
10.0.0.0/8 is variably subnetted, 3 subnets, 2 masks

In the sample output, n*Nd 0.0.0.0/0 is the configured NAT DIA route.

Verify Translation of IP Addresses

The following is a sample output from the show ip nat translations command:

Device# show ip nat translations
Pro   Inside global       Inside local        Outside local    Outside global
tcp   192.0.2.1:80        10.10.0.100:8080    ---               ---
---   192.0.2.2.198       10.10.0.254         ---               ---
tcp   192.0.2.1:8000      10.10.0.253:23      ---               ---
tcp   192.0.2.25:25185    10.0.0.1:43878      203.0.113.1:80    203.0.113.1:80
tcp   192.0.2.3:48871     10.0.0.2:48871      203.0.113.2:80    203.0.113.2:80
tcp   192.0.2.3:63242     10.0.0.2:63242      203.0.113.2:80    203.0.113.2:80
tcp   192.0.2.3:52929     10.0.0.2:52929      203.0.113.2:80    203.0.113.2:80
tcp   192.0.2.4:25184     10.0.0.4:28456      203.0.113.1:80    203.0.113.1:80
udp   192.0.2.3:64681     10.0.0.2:64681      203.0.113.1:53    203.0.113.1:53
udp   192.0.2.3:65504     10.0.0.2:64670      203.0.113.1:53    203.0.113.1:53
tcp   192.0.2.25:25186    10.0.0.1:28455      203.0.113.1:80    203.0.113.1:80
Total number of translations: 11

In the sample output, there are 11 translations.

Display Your PPPoE Sessions

The following is a sample output from the show pppoe session command:

Device# show pppoe session
     1 client session 

Uniq ID  PPPoE  RemMAC          Port                    VT  VA         State
           SID  LocMAC                                      VA-st      Type
    N/A    391  84b2.61cc.9903  Gi0/0/1.100           Di100 Vi2        UP      
                c884.a1f4.b981  VLAN: 100                   UP 

In this sample output, the PPPoE dialer interface displays as UP.

The following is a sample output from the show ppp all command:

Device# show ppp all
Interface/ID OPEN+ Nego* Fail-     Stage    Peer Address    Peer Name
------------ --------------------- -------- --------------- --------------------
Vi2          LCP+ IPCP+ CDPCP-     LocalT   172.16.100.1    SDWAN-AGGREGE   
Verify PPP Negotiation Information

The following is a sample output from the show interfaces Dialer command:

Device# show interfaces Dialer100
Dialer100 is up, line protocol is up 
  Hardware is Unknown
  Internet address is 172.16.100.101/32
  MTU 1492 bytes, BW 56 Kbit/sec, DLY 20000 usec, 
     reliability 255/255, txload 255/255, rxload 255/255
  Encapsulation PPP, LCP Closed, loopback not set
  Keepalive set (10 sec)
  DTR is pulsed for 1 seconds on reset
  Interface is bound to Vi2
  Last input 00:09:05, output 00:00:09, output hang never
  Last clearing of "show interface" counters 1w0d
  Input queue: 0/375/0/0 (size/max/drops/flushes); Total output drops: 0
  Queueing strategy: weighted fair
  Output queue: 0/1000/64/0 (size/max total/threshold/drops) 
     Conversations  0/0/16 (active/max active/max total)
     Reserved Conversations 0/0 (allocated/max allocated)
     Available Bandwidth 56 kilobits/sec
  5 minute input rate 42220429000 bits/sec, 23 packets/sec
  5 minute output rate 1520154000 bits/sec, 23 packets/sec
     755339342 packets input, 2706571669546067 bytes
     696497150 packets output, 97523835049377 bytes
Bound to:
Virtual-Access2 is up, line protocol is up 
  Hardware is Virtual Access interface
  Internet address will be negotiated using IPCP
  MTU 1492 bytes, BW 56 Kbit/sec, DLY 20000 usec, 
     reliability 255/255, txload 177/255, rxload 177/255
  Encapsulation PPP, LCP Open
  Stopped: CDPCP
  Open: IPCP

In this sample output, Dialer100 is up and the line protocol is up. Virtual-Access2 is also up and the line protocol is up.

Configuration Example for Using a Dialer Interface with NAT DIA

Minimum supported releases: Cisco IOS XE Catalyst SD-WAN Release 17.9.1a, Cisco vManage Release 20.9.1

This example shows the configuration of a dialer interface with a NAT pool, inside static NAT, and port forwarding.

ip nat pool natpool10 203.0.113.1 203.0.113.25 prefix-length 24
ip nat inside source list nat-dia-vpn-hop-access-list interface Dialer100 overload
ip nat inside source list nat-dia-vpn-hop-access-list pool natpool10 overload
egress-interface Dialer100
ip nat inside source static 10.10.80.254 10.1.1.198 vrf 10 egress-interface Dialer100
ip nat inside source static tcp 10.10.80.100 8080 interface Dialer100 8080 vrf 10
ip nat inside source static tcp 10.10.80.253 23 10.1.1.200 8201 vrf 10 egress-interface
Dialer100

NAT DIA Static NAT Mapping with HSRP

The following sections provide information about configuring NAT DIA static NAT mapping with HSRP.

Information About Static NAT Mapping with HSRP

Minimum supported releases: Cisco IOS XE Catalyst SD-WAN Release 17.9.1a, Cisco vManage Release 20.9.1

HSRP is a first-hop redundancy protocol (FHRP) designed to allow transparent failover of the first-hop IP device. HSRP provides high availability by providing first-hop routing redundancy for IP hosts on networks configured with a default gateway IP address. HSRP is used for identifying an active and standby device in a group of routers.

For more information on HSRP configuration, see the "Hot Standby Router Protocol (HSRP)" chapter of the Cisco Catalyst SD-WAN Systems and Interfaces Configuration Guide, Cisco IOS XE Release 17.x.

Address Resolution with ARP

Address Resolution Protocol (ARP) finds the hardware address, also known as a Media Access Control (MAC) address, of a host from its known IP address. ARP maintains a cache table in which MAC addresses are mapped to IP addresses.

Gratuitous ARP

When a host sends an ARP request to resolve its own IP address, it is called gratuitous ARP. In the ARP request packet, the source and destination IP addresses are filled with the same source IP address itself. The destination MAC address is the Ethernet broadcast address.

When a router becomes active, it broadcasts a gratuitous ARP packet with the HSRP virtual MAC address to the affected LAN segment. If the segment uses an Ethernet switch, this allows the switch to change the location of the virtual MAC address so that packets flow to the active router instead of the one that is no longer active. End devices do not need gratuitous ARP if routers use the default HSRP MAC address.

Static NAT Mapping with HSRP
  1. When an ARP query is triggered for an address that is configured with NAT static mapping and owned by the device, NAT responds with the virtual MAC address configured for this HSRP group. Two devices act as the HSRP active and standby. Configure the NAT inside interfaces of the active and standby devices to belong to an HSRP group.

  2. When both the active and standby routers are configured with the same static NAT mapping, only the active device responds to the ARP request for a static NAT mapping entry. Traffic that fails over from the HSRP active device to the standby device does not have to wait for the ARP request to time out before failing over.

  3. The new HSRP active device automatically resumes the ownership of the static NAT mapping entry without waiting for the ARP request to time out. The HSRP active device also sends out a gratuitous ARP request for the static NAT mapping entry. This is done by leveraging the HSRP group name that is mapped to the ip nat outside source static command.

For more information on static NAT mapping with HSRP, see the IP Addressing: NAT Configuration Guide.

Benefits of Static NAT Mapping with HSRP
  • Ensures redundancy because traffic does not have to wait for the ARP entry to time out before getting failed over

  • Only the HSRP active router responds to an incoming ARP request for a router configured with a NAT address

Restrictions for Static NAT Mapping with HSRP

Minimum supported releases: Cisco IOS XE Catalyst SD-WAN Release 17.9.1a, Cisco vManage Release 20.9.1

  • NAT64 and NAT66 are not supported with static NAT mapping with HSRP.

  • IPv6 addresses are not supported. Only IPv4 addresses are supported.

  • Service-side object tracker is not supported with outside static NAT.

  • Both HSRP routers (active and standby) should have the same group name and the same static NAT mapping.

Configure Static NAT Mapping with HSRP Using a CLI Template

Minimum supported releases: Cisco IOS XE Catalyst SD-WAN Release 17.9.1a, Cisco vManage Release 20.9.1

For more information on using CLI templates, see CLI Templates and CLI Add-On Feature Templates.

  1. Configure an active and a standby HSRP router with an HSRP group name and ip nat outside with the redundancy keyword for high availability.

    interface interface-type-number
     no shutdown
     vrf forwarding vrf-name
     ip address ip-address ip-address
     standby version number
     standby group-number ip ip-address
     standby group-number name hsrp_lan
     standby group-number preempt
     standby group-number priority priority-value
     standby group-number timers msec timer-value timer-value
     negotiation auto
    exit
    !
    ip nat inside source list global interface interface-type-number overload
    ip nat outside source static ip-address ip-address vrf vrf-name redundancy hsrp_lan match-in-vrf

    Note


    The redundancy keyword is supported for the ip nat outside source static command only. The redundancy keyword is not supported for the ip nat inside source static command.

    Configure both the HSRP active router and the standby router with the same HSRP group name and the same static NAT mapping.

    Configure the ip nat inside command for translating the source IP in addition to configuring the ip nat outside command for destination NAT.

    When you send a packet from the service side to the internet, NAT DIA translates the destination IP address, which can also be a private IP address, to a public IP address. This is known as destination NAT.

  2. Configure a centralized data policy to support ip nat outside functionality. The traffic bound for destination NAT may not fall under the policy sequence.

    policy
    data-policy policy-name
    vpn-list vpn_list
    sequence number
    match
    source-ip ip-address
    !
    action accept
    nat use-vpn 0
    !
    !
    sequence number
    match
    source-ip      ip-address
    destination-ip ip-address
    !
    action accept
    nat pool pool-number
    !
    !
    default-action accept
    !
    !
    lists
    vpn-list vpn_list
    vpn vpn-name
    vpn vpn-name
    !
    !

    The nat use-vpn 0 portion of the centralized policy ensures that matching traffic is sent to VPN 0 after the destination IP is translated.

Here is a complete configuration example for configuring static NAT mapping with HSRP.

!
interface GigabitEthernet1
ip address 209.165.201.96 255.255.255.0
ip nat outside
standby version 2
standby 300 ip 209.165.201.34
standby 300 priority 120
standby 300 preempt
standby 300 name hsrp_wan
!
interface GigabitEthernet3
vrf forwarding 2
ip address 192.168.0.96 255.255.255.0
standby version 2
standby 500 ip 192.168.0.94
standby 500 priority 120
standby 500 preempt
standby 500 name hsrp_lan
!
!
ip nat inside source list global interface GigabitEthernet1 overload
!
ip nat outside source static 209.165.201.1 192.168.0.1 vrf 2 redundancy hsrp_lan match-in-vrf
!

Here is a complete configuration example for configuring static NAT mapping with HSRP using a centralized data policy.

policy
data-policy test_policy
vpn-list vpn_list
sequence 10
match
source-ip 192.168.0.0/24
!
action accept
nat use-vpn 0
!
!
sequence 20
match
source-ip      192.168.0.0/24
destination-ip 209.195.201.0/32
!
action accept
nat pool 1
!
!
default-action accept
!
!
lists
vpn-list vpn_list
vpn 0
vpn 2
!
!

Verify Static NAT Mapping with HSRP

Minimum supported releases: Cisco IOS XE Catalyst SD-WAN Release 17.9.1a, Cisco vManage Release 20.9.1

The following sections provide information on verifying static NAT configuration with HSRP.

Display the IP Address Associated with the HSRP Group Name
The following is a sample output from the show ip nat redundancy command:
Device# show ip nat redundancy
IP             Redundancy-Name    ID     Use-count
192.168.0.200  hsrp_lan           0      1

The output above shows the IP address associated with the HSRP group name.

The number in the Use-count column indicates the number of static NAT CLIs that use this IP address.

A new command, show ip nat redundancy , is added for displaying the IP address associated with the HSRP group name. For more information, see the Cisco IOS XE Catalyst SD-WAN Qualified Command Reference Guide.

Display the Translated IP Addresses

The following is a sample output from the show ip nat translations command:

Device# show ip nat translations
Pro  Inside global         Inside local          Outside local         Outside global
---  ---                   ---                   192.168.0.200         209.165.201.1              
icmp 192.168.0.1:174       192.168.0.1:174       192.168.0.200:174     209.165.201.1:174
icmp 192.0.2.1:174         192.168.0.1:174       209.165.201.1:174     209.165.201.1:174
icmp 192.168.0.1:174       192.168.0.1:174       192.168.0.200:174     209.165.201.1:174
Total number of translations: 4

The output above shows that there are four translations.

Display Information for the HSRP Standby Router

The following is a sample output from the show standby command displaying information for the standby router:

Device# show standby
GigabitEthernet1 - Group 300 (version 2)
  State is Active
    1 state change, last state change 22:33:42
  Virtual IP address is 209.165.201.1
  Active virtual MAC address is 0000.0c9f.f12c (MAC In Use)
    Local virtual MAC address is 0000.0c9f.f12c (v2 default)
  Hello time 3 sec, hold time 10 sec
    Next hello sent in 1.584 secs
  Preemption enabled
  Active router is local
  Standby router is unknown
  Priority 120 (configured 120)
  Group name is "hsrp_wan" (cfgd)
  FLAGS: 1/1
GigabitEthernet3 - Group 500 (version 2)
  State is Active
    5 state changes, last state change 00:00:18
  Virtual IP address is 192.168.0.94
  Active virtual MAC address is 0000.0c9f.f1f4 (MAC In Use)
    Local virtual MAC address is 0000.0c9f.f1f4 (v2 default)
  Hello time 3 sec, hold time 10 sec
    Next hello sent in 0.544 secs
  Preemption enabled
  Active router is local
  Standby router is unknown
  Priority 120 (configured 120)
  Group name is "hsrp_lan" (cfgd)
  FLAGS: 1/1
Display the NAT IP Addresses in the ARP Table with Virtual MAC Addresses

The following is a sample output from the show arp vrf command:

Device# show arp vrf 2
Protocol  Address          Age (min)  Hardware Addr    Type   Interface
Internet  192.168.0.1             -   0000.0c9f.f1f4   ARPA   GigabitEthernet3
Internet  192.168.0.10           11  0050.56bc.780b    ARPA   GigabitEthernet3
Internet  192.168.0.11          100   0050.56bc.608e   ARPA   GigabitEthernet3
Internet  192.168.0.14           83   0050.56bc.4748   ARPA   GigabitEthernet3
Internet  192.168.0.94            -   0000.0c9f.f1f4   ARPA   GigabitEthernet3
Internet  192.168.0.96            -   0050.56bc.1378   ARPA   GigabitEthernet3
Internet  192.168.0.98           73   0050.56bc.3967   ARPA   GigabitEthernet3

The above output shows that the NAT address 192.168.0.1 is added to the ARP table with the virtual MAC address 0000.0c9f.f1f4.

Application-Level Gateways with NAT DIA

The following sections provide information about configuring application-level gateways (ALGs) with NAT DIA.

Information About Using ALGs with NAT DIA

Minimum supported releases: Cisco IOS XE Catalyst SD-WAN Release 17.9.1a, Cisco vManage Release 20.9.1

An application-level gateway (ALG), also known as an application-layer gateway, is an application that translates the IP address inside the payload of an application packet. You use an ALG to interpret the application-layer protocol and perform firewall and NAT translations.

Specific protocols that embed the IP address information within the packet payload require the support of an ALG. The following protocols require an ALG for NAT translations of the application payload:

  • Domain Network System (DNS)

  • File Transfer Protocol (FTP)

  • Session Initiation Protocol (SIP)

    SIP adds the ability to deploy NAT on VoIP solutions based on SIP.

Starting with Cisco vManage Release 20.11.1 and Cisco IOS XE Catalyst SD-WAN Release 17.11.1a, following protocols are supported:

  • Trivial File Transfer Protocol (TFTP)

  • Point-to-Point Tunneling Protocol (PPTP)

  • Sun Remote Procedure Call (SUNRPC)

  • Skinny Client Control Protocol (SCCP)

  • H.323


Note


If a zone-based firewall (ZBFW) is enabled for NAT DIA, the NAT ALG feature interoperates with the ZBFW.


For more information on ALGs, see the IP Addressing: NAT Configuration Guide.

Benefits of Using ALGs with NAT DIA
  • Allows client applications to use dynamic TCP or UDP ports to communicate with the server application.

  • Supports interoperability between NAT ALGs configured with NAT DIA and a zone-based firewall (ZBFW).

Restrictions for Using ALGs with NAT DIA

Minimum supported releases: Cisco IOS XE Catalyst SD-WAN Release 17.9.1a, Cisco vManage Release 20.9.1

  • No support for ALGs with service-side NAT. Only NAT DIA is supported.

    Cisco IOS XE Catalyst SD-WAN Release 17.15.1a, includes support for ALGs with service-side NAT.

  • No support for configuring an ALG using the ip nat outside source command.

  • A Domain Name System (DNS) ALG requires a static entry in a NAT translation table to modify the payload. If there is no static entry in the NAT translation table, DNS ALG does not work.

    Use the following command to create a static entry in a NAT translation table:

    ip nat inside source static local-ip global-ip vrf vrf-id egress-interface interface-type-number
  • If you run the clear ip nat translations command, the ALG session is cleared. To recreate translations by NAT, run new NAT commands. This is the expected behavior.

Configure ALGs with NAT DIA Using a CLI Template

For more information on using CLI templates, see CLI Templates and CLI Add-On Feature Templates.

  1. Configure NAT DIA.

    For more information, see Configure NAT DIA.

  2. Enable NAT ALG global support.

    ip nat service all-algs
  3. Enable NAT ALG per application protocol as shown in the following example:

    ip nat service dns tcp
    ip nat service dns udp
    ip nat service ftp
    ip nat service sip tcp port port-number
    ip nat service sip udp port port-number

Note


Starting from Cisco vManage Release 20.11.1 and Cisco IOS XE Catalyst SD-WAN Release 17.11.1a, the following protocols are supported on NAT ALG.

  • TFTP

  • PPTP

  • SUNRPC

  • SCCP

  • H.323


Here is a complete configuration example for configuring ALGs.

ip nat service all-algs
ip nat service sip tcp port 5060
ip nat service sip udp port 5060
ip nat service dns tcp
ip nat service dns udp
ip nat service ftp
ip nat service H323
ip nat service ras
ip nat service pptp
ip nat service tftp
ip nat service sunrpc tcp
ip nat service sunrpc udp
ip nat service skinny tcp port xxxx(default 2000)

Verify ALG Configuration

The following sections provide information on verifying NAT ALG configurations.

Display ALG Translations
show ip nat translations tcp 
tcp  10.1.15.15:5062       10.20.24.150:57497    10.1.15.150:21        10.1.15.150:21
tcp  10.1.15.15:5063       10.20.24.150:49732    10.1.15.150:20        10.1.15.150:20

Note


You cannot view the translation of the payload using a CLI template. To view the translation of a payload, capture a packet using Cisco SD-WAN Manager.

For more information on capturing packets using Cisco SD-WAN Manager, see Capture Packets in the Cisco Catalyst SD-WAN Monitor and Maintain Guide.


Verify the NAT Timeouts and Protocol Listening by NAT ALG
Device(config)# show platform hardware qfp active feature nat datapath summary 
Nat setting mode: sdwan-default
Number of pools configured: none
Timeouts: 86400(tcp), 300(udp), 60(icmp), 300(dns), 
          60(syn), 300(finrst), 86400(pptp), 3600(rmap-entry)
pool watermark: not configured
Nat active mapping inside:1 outside:0 static:0 static network:0
Nat debug: none
Nat synchronization: enabled
Nat bpa: not configured; pap: not configured
Nat gatekeeper: on
Nat limit configured: no
Vpns configured with match-in-vrf: no
Nat packet drop: true
Total active translations: 615 (0 static, 615 dynamic, 615 extended)
Platform specific maximum translations: 131072 configured: none
PAM table non-zero entries:
 0 0xeaa88be0 port=53, proto=6, appl_type=12
 12 0xeaa88c60 port=2000, proto=6, appl_type=8
 25 0xeaa88ba0 port=21, proto=6, appl_type=11
 34 0xeaa88c20 port=5060, proto=6, appl_type=9
 35 0xeaa889e0 port=496, proto=17, appl_type=16
 85 0xeaa88ce0 port=5060, proto=17, appl_type=9
 119 0xeaa88ca0 port=53, proto=17, appl_type=12

Port Forwarding with NAT DIA

The following sections provide information about configuring port forwarding with NAT DIA.

Information About Port Forwarding with NAT DIA

Minimum supported releases: Cisco IOS XE Catalyst SD-WAN Release 17.9.1a, Cisco vManage Release 20.9.1

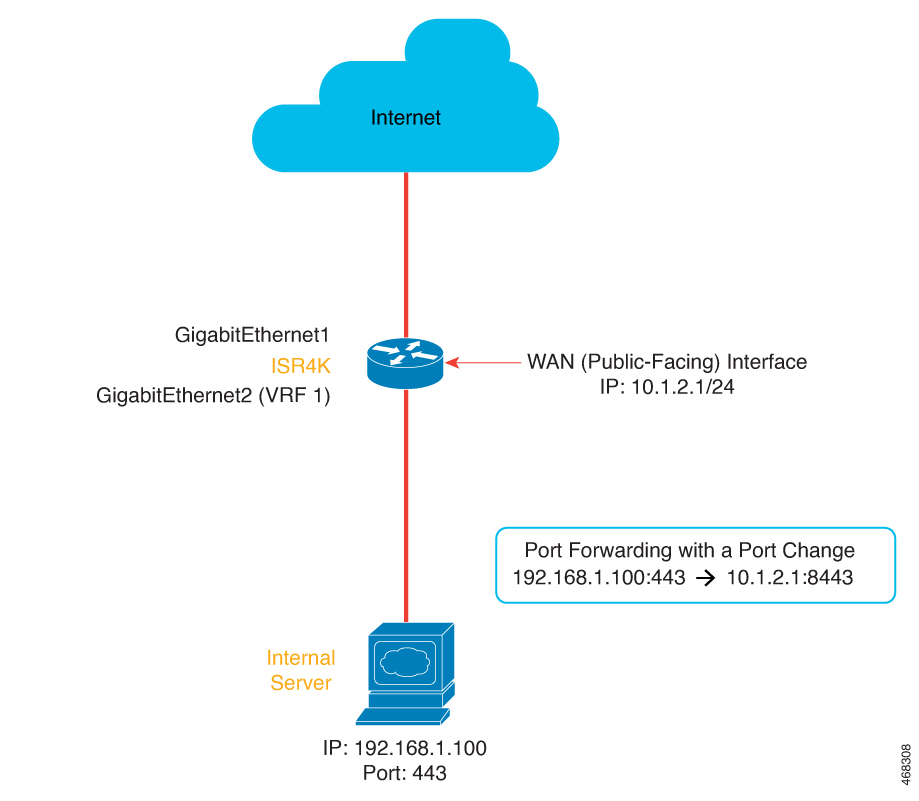
Port forwarding with NAT DIA provides users who run servers within a private network the ability to share a public IP address and a port number that maps to an inside local IP address and port number. This feature can forward different ports to different internal IP addresses, allowing multiple servers to be accessible from the same public IP address.

Prior to Cisco IOS XE Catalyst SD-WAN Release 17.9.1a and Cisco vManage Release 20.9.1, port forwarding was available only for service-side NAT.

Figure 4. NAT DIA Port Forwarding with a Port Change
NAT DIA Port Forwarding with a Port Change

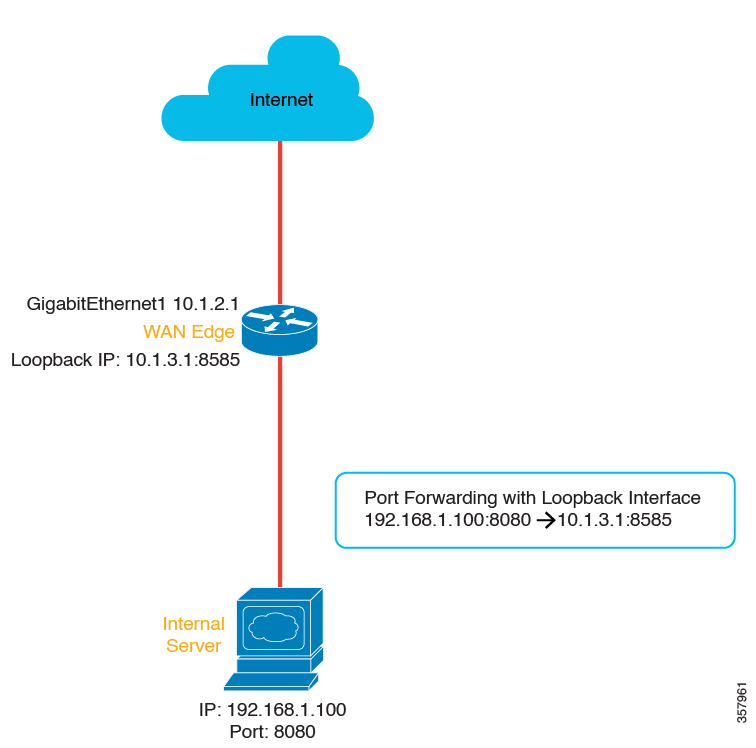
From Cisco IOS XE Catalyst SD-WAN Release 17.11.1a and later releases, you can configure loopback interfaces for port forwarding with NAT DIA. Loopback interfaces ensure that the IP address assigned to the interface is always reachable if the IP routing protocols continue to advertise the subnet that is assigned to the loopback interface. After the loopback interface and the port number are configured, the source IP address and the source port number are translated to the loopback IP address and port number respectively.

From Cisco IOS XE Catalyst SD-WAN Release 17.11.1a, you can configure loopback interfaces by either using device CLI templates or CLI add-on feature templates. For more information about configuring the loopback interface, see Configure Port Forwarding with NAT DIA Using a CLI Template.

Figure 5. NAT DIA Port Forwarding by Using a Loopback interface
Port forwarding with loopback interface
Benefits of Port Forwarding with NAT DIA
  • Allows you to reach servers in a private network (LAN) from the public domain

  • Allows you to forward different ports to different internal IP addresses, allowing multiple servers to be accessible from the same public IP address

Restrictions for Port Forwarding with NAT DIA

Minimum supported releases: Cisco IOS XE Catalyst SD-WAN Release 17.9.1a, Cisco vManage Release 20.9.1

  • TCP load balancing isn’t supported for port forwarding with NAT DIA.

  • Traffic can reach public IP addresses and ports from the public network only.

  • If you have configured static NAT, you can’t use the same static NAT IP addresses when configuring port forwarding.

  • You can’t use Cisco SD-WAN Manager-reserved ports when configuring port forwarding with NAT DIA.

  • No support for loopback interfaces in Cisco IOS XE Catalyst SD-WAN Release 17.10.1a or earlier releases.

    In Cisco IOS XE Catalyst SD-WAN Release 17.11.1a, you can configure loopback interfaces for port forwarding with NAT DIA. For more information about configuring the loopback interface, see Configure Port Forwarding with NAT DIA Using a CLI Template

  • No support for dialer virtual interfaces.

  • UDP ports 8000-48199 are reserved for VoIP traffic. If VoIP is enabled on a Cisco IOS XE Catalyst SD-WAN device, NAT DIA can’t use the same UDP ports that are reserved for VoIP traffic.

  • NAT DIA port forwarding for a TLOC egress interface doesn’t support fragmented packets sourced from outside the network.

  • Define up to 128 port-forwarding rules to allow requests from an external network to reach devices on the internal network.

  • An IP address plus a port number to an IP address plus a port number translation is supported using Cisco SD-WAN Manager feature templates and CLI templates.

  • Interface port forwarding is supported using a CLI template only.

    When you use an interface rather than an IP address in your port-forwarding rule, this is known as interface port forwarding.

Configure Port Forwarding with NAT DIA

Minimum supported releases: Cisco IOS XE Catalyst SD-WAN Release 17.9.1a, Cisco vManage Release 20.9.1

Create port-forwarding rules to allow access to a private network from the public domain.

Before You Begin
  1. Configure and apply a data policy.

  2. Configure a Cisco VPN Interface Ethernet template or edit an existing Cisco VPN Interface Ethernet template.

  3. Configure interface overload mode. Interface overload mode is enabled by default.

  4. Configure a NAT pool.

Configure Port Forwarding with NAT DIA
  1. From the Cisco SD-WAN Manager menu, choose Configuration > Templates.

  2. Click Feature Templates.


    Note


    In Cisco vManage Release 20.7.x and earlier releases, Feature Templates is titled Feature.


  3. To edit a Cisco VPN Interface Ethernet template, click adjacent to the template name and choose Edit.

  4. Click NAT.

  5. Under NAT Pool, click New NAT Pool.

  6. Enter the required NAT pool parameters.

    For more information on the NAT pool parameters, see Configure a NAT Pool and a Loopback Interface.

  7. Click Add.

  8. To create a port-forwarding rule, click Port Forward > New Port Forwarding Rule and configure the parameters as described in the table.

    Table 5. Port-Forwarding Parameters for NAT DIA

    Parameter Name

    Description

    Protocol

    Choose the TCP or UDP protocol to which to apply the port-forwarding rule. To match the same ports for both TCP and UDP traffic, configure two rules.

    Source IP Address

    Enter the source IP address to be translated.

    Source Port

    Enter a port number to define the source port to be translated.

    Range is 0 to 65535.

    Translated Source IP Address

    Specify the NAT IP address that will be advertised into OMP. Port forwarding is applied to traffic that is destined to this IP address from the overlay with the translated port match.

    Translate Port

    Enter the port number to apply port forwarding to.

    Range is 0 to 65535.

    Beginning with Cisco IOS XE Catalyst SD-WAN Release 17.5.1a, static translated source IP addresses must be within the configured dynamic NAT pool IP address range.

    Static NAT Direction

    Select the direction in which to perform network address translation.

    Source VPN ID

    Specify the service-side VPN from which the traffic is being sent.

  9. Click Update.

Configure Port Forwarding with NAT DIA Using a CLI Template

Minimum supported releases: Cisco IOS XE Catalyst SD-WAN Release 17.9.1a, Cisco vManage Release 20.9.1

For more information on using CLI templates, see CLI Templates and CLI Add-On Feature Templates.

  1. Configure ip nat outside on the WAN interface.

    interface interface-type-number
     ip address dhcp
     ip nat outside
     negotiation auto
     no mop enabled
     no mop sysid
    end
  2. Configure interface overload mode on the WAN interface.

    ip nat inside source list nat-acl interface interface-type-number overload
  3. Configure NAT DIA port forwarding using an egress interface.

    ip nat inside source static tcp ip-address port ip-address port vrf number egress-interface interface-type-number
    ip nat inside source static tcp ip-address port interface interface-type-number port vrf number

    The ip nat inside source static tcp ip-address port interface interface-type-number port vrf number command is an example of interface port forwarding, because you use an interface rather than an IP address in the port-forwarding rule.


    Note


    You can configure interface port forwarding using a Cisco SD-WAN Manager feature template.


Here is a complete configuration example for configuring port forwarding with NAT DIA.

interface GigabitEthernet1
 ip address 10.1.2.1 255.255.255.0
 ip nat outside
 negotiation auto
 no mop enabled
 no mop sysid
end

ip nat inside source list nat-dia-vpn-hop-access-list interface GigabitEthernet1 overload
ip nat inside source static tcp 192.168.1.100 443 interface GigabitEthernet1 8443 vrf 1
ip nat inside source static tcp 192.168.1.100 80 10.1.2.10 80 vrf 1 egress-interface GigabitEthernet1 
ip nat inside source static tcp 192.168.1.100 22 10.1.2.20 2020 vrf 1 egress-interface GigabitEthernet1
Port forwarding with NAT DIA using a loopback interface

From Cisco IOS XE Catalyst SD-WAN Release 17.11.1a, you can configure loopback interfaces for port forwarding with NAT DIA. While configuring a loopback interface, provide the egress interface, which is the internet-facing interface.

Here is a configuration example for configuring port forwarding with NAT DIA by using a loopback interface.

Configure ip nat outside on the WAN interface:

interface GigabitEthernet1
 ip address 10.1.2.1 255.255.255.0
 ip nat outside
 negotiation auto
 no mop enabled
 no mop sysid
exit

Define the loopback interface:

interface Loopback3
 ip address 10.1.3.1 255.255.255.255
exit

Configure the loopback interface:

ip nat inside source static tcp 192.168.1.100 8080 interface Loopback3 8585 vrf 1 egress-interface GigabitEthernet1
ip nat inside source static tcp 192.168.1.100 80 interface Loopback3 5050 egress-interface GigabitEthernet1 

In the preceding configuration example, the incoming TCP packet with the source IP address of 192.168.1.100 is translated to the IP address assigned to Loopback3, which is 10.1.3.1. The source port 8080 is translated to 8585.

If you specify a VRF number in the range of 1–512, port forwarding occurs within the service VPN. When you don’t specify a value for the VRF number, port forwarding is configured on the transport VPN, which is VPN 0, by default.

The loopback interface remains active till you run the shutdown command in the interface configuration mode.

Verify Configuration of Port Forwarding with NAT DIA

Verify Translations for Port Forwarding with NAT DIA

Minimum supported releases: Cisco IOS XE Catalyst SD-WAN Release 17.9.1a, Cisco vManage Release 20.9.1

The following is a sample output from the show ip nat translations command:

Device# show ip nat translations
Pro  Inside global         Inside local          Outside local         Outside global
tcp  10.0.1.7:2022         10.0.100.14:22        ---                   ---
tcp  10.0.1.7:2022         10.0.100.14:22        10.0.1.16:46275       10.0.1.16:46275
Total number of translations: 2

In the output above, inside global IP 10.0.1.7 with port 2022 is translated to an inside local IP of 10.0.100.14 with port 22.

Verify Translations for Port forwarding using a loopback interface

Minimum supported releases: Cisco IOS XE Catalyst SD-WAN Release 17.11.1a, Cisco vManage Release 20.11.1

The following is a sample output from the show ip nat translations command:

Device# show ip nat translations
Pro  Inside global         Inside local          Outside local         Outside global
tcp  10.1.3.1:5050         192.168.1.100:80        ---                   ---
tcp  10.1.3.1:8585         192.168.1.100:8080      ---                   ---
Total number of translations: 2

In the output above, the source IP 192.168.1.100 with port 8080 is translated to the loopback IP 10.1.3.1 with port 8585.

NAT High-Speed Logging

The following sections provide information on configuring Network Address Translator (NAT) High-Speed Logging (HSL) with NAT Direct Internet Access (DIA).

Information About NAT HSL

Minimum supported releases:
Cisco IOS XE Catalyst SD-WAN Release 17.9.1a
Cisco IOS XE Release 17.6.4 and later 17.6.x releases

NAT HSL lets you enable or disable NAT high-speed logging for virtual routing and forwarding (VRF) instances. When HSL is configured, NAT provides a log of the packets flowing through the routing devices (similar to the Version 9 NetFlow-like records) to an external collector. NAT translations exported to an external collector can include service-side VRF to global DIA and intra-service VRF (service-side VRF NAT) translations. When sessions are created and deleted, records are generated for each binding (binding is the address binding the local address and the global address to which the local address is translated).

You can turn on the collector for viewing the HSL information for NAT. You can turn on HSL only when required, and HSL log records are created and sent to the collector accordingly. This saves CPU cycles and bandwidth by not creating and sending HSL logging records when not needed.

Benefits of NAT HSL
  • Supports the sending of flow monitor records for NAT operations to an external collector.

  • Enables creation and sending of HSL records only when required, which saves CPU cycles and bandwidth.

  • Sends an HSL message automatically when a NAT pool runs out of addresses (also referred to as pool exhaustion).

Restrictions for NAT HSL

  • Service-side NAT VRF does not support IPv6 addresses.

  • Export of an IPv6 target in a service-side VRF is not supported.

  • Export of translations using IPv6 in a VRF is not supported.

Prerequisites for NAT HSL

  • Ensure that the NAT translations are available on the router.

  • Confirm that the log messages are being generated.

Best Practices for NAT HSL

  • Verify that the configured IP address and port address for logging are as per the configurations in the collector.

  • Use the show interface statistics command to verify the output packet counters and confirm the flow of packets from the router interface connecting to the collector.

Configure NAT HSL Using a CLI Template

For more information about using CLI templates, see CLI Add-On Feature Templates and CLI Templates.


Note


By default, CLI templates execute commands in global configuration mode.


The following is a sample CLI configuration to enable the high-speed logging of translations by NAT using a flow exporter:

ip nat log translations flow-export v9 udp destination IPv4address-port source interface-name interface-number 

The following is a configuration example to enable translation logging for a specific destination and source interface:

ip nat log translations flow-export v9 udp destination 10.10.0.1 1020 source gigabithethernet 0/0/1

Verify NAT HSL Configuration

The following is a sample output from the show ip nat translations command. You can view the translations log in the export target collector.

Device# show ip nat translations
Pro  Inside global      Inside local          Outside local         Outside global
------------------------------------------------------------------------------------------
tcp  10.0.0.16:5092     10.0.0.16:56991       209.165.202.129:80    209.165.202.129:80
tcp  10.0.0.16:5078     10.0.0.16:55951       172.16.128.7:80       172.16.128.7:80
tcp  10.0.0.16:5070     10.0.0.16:57141       172.16.128.7:80       172.16.128.7:80
tcp  10.0.0.16:5089     10.0.0.16:55823       209.165.202.129:80    209.165.202.129:80
tcp  10.0.0.16:5103     10.0.0.16:58717       172.16.128.7:80       172.16.128.7:80
tcp  10.0.0.16:5064     10.0.0.16:55413       209.165.202.129:80    209.165.202.129:80
tcp  10.0.0.16:5091     10.0.0.16:59331       209.165.202.129:80    209.165.202.129:80
tcp  10.0.0.16:5100     10.0.0.16:59795       209.165.202.129:80    209.165.202.129:80
tcp  10.0.0.16:5097     10.0.0.16:57695       209.165.202.129:80    209.165.202.129:80
tcp  10.0.0.16:5096     10.0.0.16:55665       209.165.202.129:80    209.165.202.129:80
tcp  10.0.0.16:5066     10.0.0.16:58671       172.16.128.7:80       172.16.128.7:80

The following is a sample output from the show platform hardware qfp active feature nat datapath hsl command that is used to verify the configurations:

Device# show platform hardware qfp active feature nat datapath hsl
HSL cfg dip 10.10.0.1 dport 1020 sip 10.21.0.16 sport 53738 vrf 0
nat hsl handle 0x3d007d template id 261 pool_exh template id 263
LOG_TRANS_ADD 132148
LOG_TRANS_DEL 132120
LOG_POOL_EXH 0 

The following is a sample output from the show vrf detail command:

Device# show vrf detail
VRF 1 (VRF Id = 1); default RD <not set>; default VPNID <not set>
  New CLI format, supports multiple address-families
  Flags: 0x1808
  Interfaces:
    Gi0/0/1      Gi0/0/2.102      Lo0    Vl103
Address family ipv4 unicast (Table ID = 0x1):
  Flags: 0x0
  No Export VPN route-target communities
  No Import VPN route-target communities
  No import route-map
  No global export route-map
  No export route-map
  VRF label distribution protocol: not configured
  VRF label allocation mode: per-prefix
Address family ipv6 unicast (Table ID = 0x1E000001):
  Flags: 0x0
  No Export VPN route-target communities
  No Import VPN route-target communities
  No import route-map
  No global export route-map
  No export route-map
  VRF label distribution protocol: not configured
  VRF label allocation mode: per-prefix
Address family ipv4 multicast not active
Address family ipv6 multicast not active

Source Port Preservation for Known Cisco Catalyst SD-WAN Ports

The following sections provide information for well-known Cisco Catalyst SD-WAN ports.

Information About Source Port Preservation for the Well-Known Cisco Catalyst SD-WAN Ports

Cisco Catalyst SD-WAN deployment uses UDP port number ranging 12346 to 12445 and TCP ports ranging 23456 to 24356 for control connections on Cisco IOS XE Catalyst SD-WAN devices. When an external Cisco IOS XE Catalyst SD-WAN device is behind the firewall during NAT, the control traffic port can translate to a different port. This is normally not an issue but when BFD sessions go down, NAT translates the new BFD control packet to a different port. The firewall doesn't accept the newly translated port and drops BFD packets as it has saved translated port of the older BFD session.

With this feature, you can configure Cisco IOS XE Catalyst SD-WAN devices to preserve the source ports for the known Cisco Catalyst SD-WAN ports during NAT. There is a set of reserved ports for the control traffic and within this range the ports are preserved during NAT. On enabling this feature, Cisco IOS XE Catalyst SD-WAN device preserves the source port from the known SD-WAN port range. Thus, firewall can handle Cisco Catalyst SD-WAN devices behind NAT.


Note


Ensure that no service side traffic uses these port ranges, else it results in control connections failure.


Enabling the feature allows source port preservation for control traffic using Cisco Catalyst SD-WAN known ports for the following NAT mapping conditions:

  • Interface overload

  • Loopback overload

Figure 6. Topology of Source Port Preservation in Cisco Catalyst SD-WAN Deployment
The topology depicts a dual route site SD-WAN deployment to reserve the source ports for the well-known SD-WAN ports.

The topology depicts a dual router site. cE1 has tloc-extension configured to use cE2 for INET connectivity to reach controllers. cE1 is using the known Cisco Catalyst SD-WAN port 12346, when the packet reaches cE2. The NAT functionality on cE2 preserves this source port number 12346 and doesn't change it before sending the packets out.

Features of Source Port Preservation

  • The traffic with the specified port within the reserved port range is translated to the same port after configuring ip nat settings preserve-sdwan-ports command.

  • As the locally generated traffic does not go through NAT, they always get port preservation in the reserved port range. If a local and an external device are using the same port in the reserved port range, the local traffic gets the preference.

  • Reserved ports for UDP are in the range 12346—12426, and for TCP reserved port range is 23456—24356.

  • TLS (TCP) control connections can take port value > 1024. As source port preservation is only supported for the reserved port range 23456—24356 for TCP, any other port value may not be preserved after translation.

Prerequisites for Source Port Preservation

If there are existing NAT mapping configurations, ensure that you reboot the device after configuring the ip nat settings preserve-sdwan-ports command to achieve the expected behavior. If not, add NAT mapping configurations after configuring the ip nat settings preserve-sdwan-ports command.

Restrictions for Source Port Preservation

  • Service-side traffic cannot use the reserved port range.

  • If the Cisco Catalyst SD-WAN well-known port is already allocated for a flow and another flow requests translation for the same port, then the packets for the new flows are dropped.

  • If there are existing NAT mapping configurations, reboot the device after executing the ip nat settings preserve-sdwan-ports command to achieve the expected behavior. If not, add the NAT mapping configurations after executing the ip nat settings preserve-sdwan-ports command.

Configure Source Port Preservation for DIA Interface Overload Using a CLI Template

For more information about using CLI templates, see CLI Add-On Feature Templates and CLI Templates.


Note


By default, CLI templates execute commands in global config mode.


This section provides example CLI configurations to configure source ports preservation for the known Cisco Catalyst SD-WAN ports during NAT.

  1. Enable source port preservation during NAT:

    ip nat settings preserve-sdwan-ports
  2. Enable NAT of the inside source address for DIA interface overload:

    ip nat inside source list nat-dia-vpn-hop-access-list interface GigabitEthernet1 overload
    
  3. Configure an interface type and enter the interface configuration mode:

    interface GigabitEthernet1
  4. Enable the interface:

    no shutdown
  5. Configure the IP address:

    ip address 10.1.16.16 255.255.255.0
  6. Connect the interface to the outside network:

    ip nat outside 
Here's the complete configuration examples for port preservation during DIA interface overload:

ip nat settings preserve-sdwan-ports
ip nat inside source list nat-dia-vpn-hop-access-list interface GigabitEthernet1 overload
!
interface GigabitEthernet1
 no shutdown
 ip address 10.1.16.16 255.255.255.0
 ip nat outside 

Configure Source Port Preservation for DIA Pool Overload Using a CLI Template

For more information about using CLI templates, see CLI Add-On Feature Templates and CLI Templates.


Note


By default, CLI templates execute commands in global config mode.


This section provides example CLI configurations to configure source ports preservation for the known Cisco Catalyst SD-WAN ports during NAT.

  1. Enable source port preservation during NAT:

    ip nat settings preserve-sdwan-ports
  2. Define a pool of IP addresses for NAT:

    
    ip nat pool natpool-GigabitEthernet1-0 10.1.16.201 10.1.16.250 prefix-length 24
  3. Enable NAT of the inside source address for DIA pool overload:

    
    ip nat inside source list global-list pool natpool-GigabitEthernet1-0 overload egress-interface GigabitEthernet1
  4. Configure an interface type and enter the interface configuration mode.

    interface GigabitEthernet1
  5. Enable the interface:

    no shutdown
  6. Configure the IP address.

    ip address 10.1.16.16 255.255.255.0
  7. Connect the interface to the outside network.

    ip nat outside 
Here's the complete configuration examples for port preservation during DIA pool overload:

ip nat settings preserve-sdwan-ports
ip nat pool natpool-GigabitEthernet1-0 10.1.16.201 10.1.16.250 prefix-length 24
ip nat inside source list global-list pool natpool-GigabitEthernet1-0 overload egress-interface GigabitEthernet1
!
interface GigabitEthernet1
 no shutdown
 ip address 10.1.16.16 255.255.255.0
 ip nat outside 

Configure Source Port Preservation for DIA Loopback Overload Using a CLI Template

For more information about using CLI templates, see CLI Add-On Feature Templates and CLI Templates.


Note


By default, CLI templates execute commands in global config mode.


This section provides example CLI configurations to configure source ports preservation for the known Cisco Catalyst SD-WAN ports during NAT.

  1. Enable source port preservation during NAT:

    ip nat settings preserve-sdwan-ports
  2. Enable NAT of the inside source address for DIA loopback overload:

    
    ip nat inside source list global-list interface Loopback16 overload egress-interface GigabitEthernet1
    
  3. Configure the loopback interface:

    interface Loopback16
  4. Configure the IP address on the loopback interface:

    ip address 10.20.16.16 255.255.255.0
  5. Configure an interface type and enter the interface configuration mode:

    interface GigabitEthernet1
  6. Configure the IP address:

    ip address 10.1.16.16 255.255.255.0
  7. Connect the interface to the outside network:

    ip nat outside 
Here's the complete configuration examples for port preservation during DIA loopback overload:

ip nat settings preserve-sdwan-ports
ip nat inside source list global-list interface Loopback16 overload egress-interface GigabitEthernet1
!
interface Loopback16
 ip address 10.20.16.16 255.255.255.0
!
interface GigabitEthernet1
 ip address 10.1.16.16 255.255.255.0
 ip nat outside 

Verify Source Port Preservation

The following is a sample output from the show ip nat translations command displaying the translations with well-known Cisco Catalyst SD-WAN source ports. Observe the inside local and inside global columns for the translations and verify the source ports being preserved:

Device# show ip nat translations
Pro  Inside global          Inside local          Outside local         Outside global
udp  10.1.16.201:12406      10.1.19.15:12406      10.0.5.21:12377       10.0.5.21:12377
udp  10.1.16.201:12406      10.1.19.15:12406      10.0.5.19:12355       10.0.5.19:12355
udp  10.1.16.201:12406      10.1.19.15:12406      10.0.5.11:12367       10.0.5.11:12367
udp  10.1.16.201:12406      10.1.19.15:12406      10.0.12.26:12346      10.0.12.26:12346
udp  10.1.16.201:12406      10.1.19.15:12406      10.1.14.14:12366      10.1.14.14:12366
udp  10.1.16.201:12406      10.1.19.15:12406      10.0.12.20:12356      10.0.12.20:12356
Total number of translations: 6

The following is a sample output from the show sdwan bfd sessions table command displaying the traffic with ports in control plane:

Device# show sdwan bfd sessions table
                               SRC    DST                   SITE                                     DETECT      TX                                 
SRC IP      DST IP      PROTO  PORT   PORT   SYSTEM IP      ID    LOCAL COLOR   COLOR         STATE  MULTIPLIER  INTERVAL  UPTIME      TRANSITIONS  
----------------------------------------------------------------------------------------------------------------------------------------------------
10.1.15.15  10.0.5.11   ipsec  12366  12367  172.16.255.11  100   lte           lte           up     7           1000      0:01:37:43  3            
10.1.19.15  10.0.5.11   ipsec  12406  12367  172.16.255.11  100   biz-internet  lte           up     7           1000      0:00:00:51  0            
10.1.15.15  10.1.14.14  ipsec  12366  12366  172.16.255.14  400   lte           lte           up     7           1000      0:01:37:43  3            
10.1.19.15  10.1.14.14  ipsec  12406  12366  172.16.255.14  400   biz-internet  lte           up     7           1000      0:00:00:51  0            
10.1.15.15  10.1.16.16  ipsec  12366  12386  172.16.255.16  600   lte           biz-internet  up     7           1000      0:00:31:41  0            
10.1.19.15  10.1.16.16  ipsec  12406  12386  172.16.255.16  600   biz-internet  biz-internet  down   7           1000      NA          0            
10.1.15.15  10.0.5.21   ipsec  12366  12377  172.16.255.21  100   lte           lte           up     7           1000      0:01:37:43  3            
10.1.19.15  10.0.5.21   ipsec  12406  12377  172.16.255.21  100   biz-internet  lte           up     7           1000      0:00:00:51  0            

Destination NAT

Minimum supported releases: Cisco IOS XE Catalyst SD-WAN Release 17.11.1a and Cisco vManage Release 20.11.1

The following sections provide information on configuring Destination NAT with NAT Direct Internet Access (DIA).

Information about Destination NAT

Minimum supported releases: Cisco IOS XE Catalyst SD-WAN Release 17.11.1a and Cisco vManage Release 20.11.1

When you send a packet from the service side to the internet, NAT Direct Internet Access (DIA) translates the destination IP address, which can also be a private IP address, to a public IP address. This is known as destination NAT.

Any WAN edge device situated between two endpoints can be used to perform destination NAT. Destination NAT is used to redirect incoming packets with the destination of a private IP address to a public IP address. It is generally used to redirect packets destined for a specific IP address on one host to a different address on a different host.

Restrictions for Destination NAT

Minimum supported releases: Cisco IOS XE Catalyst SD-WAN Release 17.11.1a and Cisco vManage Release 20.11.1

  • Only NAT DIA is supported with destination NAT.

  • Only traffic originating from inside to outside direction is supported.

  • Only data-policy-based DIA is supported.

  • Does not support route-based DIA configurations.

  • Does not support port forwarding with NAT DIA.

  • Same NAT rules for packets are not applicable on different VRFs.

  • NAT is not supported over SIG tunnel interface.

Use Case for Destination NAT

Minimum supported releases: Cisco IOS XE Catalyst SD-WAN Release 17.11.1a and Cisco vManage Release 20.11.1

A customer device using a Cisco VPN client initiates a DNS query to the device operating the firewall service, which is assigned with a private IP address. This private IP address is the overlay IP address. In case NAT DIA is not configured, the data policy uses VPN 0 fallback to the overlay to send the traffic to the firewall with the private IP address. The overlay IP address, which is a private IP address, is translated to a public IP address.

The prefered path for the traffic route is through the path with NAT DIA configured, where both the source and the destination IP addresses are translated.

Figure 7. Use Case for Destination NAT

1

Path without NAT configured

2

Path with NAT configured

Configure Destination NAT Using a CLI Template

Minimum supported releases: Cisco IOS XE Catalyst SD-WAN Release 17.11.1a and Cisco vManage Release 20.11.1

For more information on using CLI templates, see CLI Templates and CLI Add-On Feature Templates.


Note


By default, CLI templates execute commands in global config mode.


To enable NAT of the outside source address:

ip nat outside source static local-ip-address global-ip-address vrf vrf-name

Here's a complete configuration example for destination NAT:

ip nat outside source static 192.0.200.3 10.2.57.51 vrf 1

Verify Destination NAT

Minimum supported releases: Cisco IOS XE Catalyst SD-WAN Release 17.11.1a and Cisco vManage Release 20.11.1

The following is a sample output from the show sdwan policy from-vsmart command.


Device# show sdwan policy from-vsmart 

from-vsmart data-policy _1_vm5-vpn1-dia-policy
 direction all
 vpn-list 1
  sequence 1
   match
    source-ip      10.20.24.0/24
    destination-ip 10.2.57.51/24
   action accept
    nat use-vpn 0
    nat fallback
from-vsmart lists vpn-list 1
 vpn 1

In this example, you can check for the destination IP address and if the NAT fallback feature is configured.

The following is a sample output from the show ip nat translations command.


Device# show ip nat translations

Pro   Inside global    Inside local    Outside local     Outside global
---   ---              ---             10.2.57.51        192.0.2.1
tcp   203.0.113.1:5062 10.0.0.1:30427  10.2.57.51:1024   192.0.2.1:1024         

In this example, the outside local IP address shows the private IP address that is translated to a public IP address in outside global .

Troubleshoot Destination NAT

Minimum supported releases: Cisco IOS XE Catalyst SD-WAN Release 17.11.1a and Cisco vManage Release 20.11.1

To check the original and the translated IP address, use the show platform hardware qfp active feature nat datapath bind command.


Device# show platform hardware qfp active feature nat datapath bind 

Bind longest chain 1 avg non-zero bucket len 1 non-zero bkts 2
bind 0xed7739c0 oaddr 8.8.8.8 taddr 4.1.1.5 oport 0 tport 0 vrfid 1 tableid 1 proto 0 domain 1 create time 78840 refcnt 1 mask 0x0 cgn flags 0 timeout 0 ifhandle 0 wlan_info 0x0 flags 0x2100 mapping 0x0 cp_mapping_id 1 limit_type 0  last_use_ts 82071 mibp 0x0 bind_pool_id: 0 rg 0 nak_retry 0 parent 0x0 egress_ifh 0 in2out_pkts 0 out2in pkts 0

To check if the traffic is going on the DIA interface, check the packet count using the show sdwan policy data-policy-filter command.


Device# show sdwan policy data-policy-filter 
                                                   POLICER  OOS      OOS    
NAME  NAME   COUNTER NAME          PACKETS  BYTES  NAME     PACKETS  BYTES  
----------------------------------------------------------------------------
u5    vpn-1  DNAT-DIA-COUNTER      5        570                             
             default_action_count  158      14340 

To check the traffic flow on the fallback interface when the DIA interface is down, use the show plat hard qfp active feature sdwan datapath statistics | inc fallback


Device# show plat hard qfp active feature sdwan datapath statistics | inc fallback

data-policy-in-sig-fallback-flow-set-fail 0
data-policy-in-nat-fallback 0
data-policy-out-nat-fallback 0

NAT DIA Tracker

Table 6. Feature History

Feature Name

Release Information

Description

NAT DIA Tracker for Cisco IOS XE Catalyst SD-WAN Devices

Cisco IOS XE Catalyst SD-WAN Release 17.3.1a

Cisco vManage Release 20.3.1

This feature allows you to configure a system tracker to probe the transport interface periodically to determine if the internet or external network becomes unavailable.

You can configure the DIA tracker using the Tracker tab of the Cisco System template.

You can apply the tracker to a transport interface using either the Cisco VPN Interface Ethernet or the Cisco VPN Interface Cellular template.

Dual Endpoint Support for Interface Status Tracking on Cisco IOS XE Catalyst SD-WAN Devices

Cisco IOS XE Catalyst SD-WAN Release 17.7.1a

Cisco vManage Release 20.7.1

This feature allows you to configure tracker groups with dual endpoints using the Cisco SD-WAN Manager system template and associate each tracker group to an interface. Despite having an active Internet connection, a single endpoint may sometimes be inactive. This condition leads to false negatives. To overcome this disadvantage of a single endpoint tracker, you can use a dual endpoint tracker configuration.

NAT DIA Tracker for IPv6 Interface

Cisco IOS XE Catalyst SD-WAN Release 17.11.1a

Cisco vManage Release 20.11.1

NAT DIA tracker is now supported on IPv6 interfaces.

You can configure IPv6 DIA tracker using the IPv6-Tracker and IPv6-Tracker Group options under transport profile in configuration groups.

ICMP Endpoint Tracker for NAT DIA for IPv4 or IPv6 Interfaces

Cisco IOS XE Catalyst SD-WAN Release 17.13.1a

Cisco Catalyst SD-WAN Manager Release 20.13.1

This feature allows you to configure an ICMP endpoint tracker over a DIA path. You can configure ICMP probes for NAT DIA on IPv4 or IPv6 endpoints.

You can configure the ICMP tracker using the Tracker or the IPv6 Tracker features under transport profile in configuration groups.

Configure a Tracker DIA Stabilize Status setting in the Basic feature profile to stabilize rapid tracker status changes that cause interface flaps.

Information About NAT DIA Tracking

The DIA tracker helps determine if the internet or external network has become unavailable. The NAT DIA Tracking feature is useful when NAT is enabled on a transport interface in VPN 0 to allow data traffic from the router to exit directly to the internet.

Fore more information on NAT DIA, see NAT Direct Internet Access.

If the internet or external network becomes unavailable, the router continues to forward traffic based on the NAT route in the service VPN. Traffic that is forwarded to the internet gets dropped. To prevent the internet-bound traffic from being dropped, configure the DIA tracker on the edge router to track the status of the transport interface. The tracker periodically probes the interface to determine the status of the internet and return the data to the attach points that are associated with the tracker.

When the tracker is configured on the transport interface, the interface IP address is used as a source IP address for probe packets.

IP SLA monitors the status of probes and measures the round-trip time of these probe packets and compares the values with the configured latency in the probe. When the latency exceeds the configured threshold value, the tracker considers the network as unavailable.

If the tracker determines that the local internet is unavailable, the router withdraws the NAT route from Service VPN, and reroutes the traffic based on the local routing configuration, to overlay.

The local router continues to periodically check the status of the path to the interface. When it detects that the path is functioning again, the router reinstalls the NAT route to the internet.

From Cisco IOS XE Catalyst SD-WAN Release 17.7.1a, you can configure a tracker group with two trackers, and associate this tracker group to an interface. Probing a tracker group with two trackers (two endpoints) helps in avoiding false negatives that might be introduced when an internal or external network gets erroneously marked as unavailable.

From Cisco IOS XE Catalyst SD-WAN Release 17.11.1a, you can configure NAT DIA tracker on IPv6 interfaces. The tracker and tracker group address type should match IPv4 or IPv6 address types on the interface configuration. For example, if an IPv4 address is configured on a NAT DIA interface, only an IPv4 tracker can be applied. If an IPv6 address is configured on a NAT DIA interface, only an IPv6 tracker can be applied. If both IPv4 and IPv6 addresses are configured on a NAT DIA interface, both IPv4 and IPv6 tracker can be applied correspondingly.

ICMP Endpoint Tracker for NAT DIA

From Cisco IOS XE Catalyst SD-WAN Release 17.13.1a, you can configure ICMP endpoint trackers on any NAT-enabled IPV4 or IPv6 transport interfaces used for NAT DIA. The ICMP tracker detects failures along the internet path to a given external service by sending probes to a configured external endpoint and monitors whether the probes fail or succeed. If the number of probes exceed the configured multiplier value, or if the ICMP probes exceed the configured threshold, the tracker considers the external endpoint unreachable and makes the transport interface unavailable for DIA.

ICMP probes ensure shorter failovers when the transport interface becomes unavailable for DIA. You can configure either endpoint IP or the endpoint DNS name for ICMP endpoint trackers. You can create a tracker group if you have configured more than one IPv4 or IPv6 tracker.


Warning


Ensure that you configure a host route to egress through the DIA interface where you've configured the ICMP tracker. This ensures that the intended tracker interface receives the ICMP probe. When an endpoint is reachable through an interface other than the interface configured for ICMP tracker, the ICMP probes may be sent to the interface which is not tracked, causing ICMP probes to egress via an unintended interface.

You can configure the following types of ICMP Endpoint Tracker for NAT DIA:

Table 7. Types of ICMP Endpoint Trackers

Tracker

Supported Tracker Type

Single NAT DIA ICMP tracker

Tracker type:

  • IPv4

  • IPv6

Tracker endpoint type:

  • Endpoint IP

  • DNS

NAT DIA ICMP tracker group

Tracker type:

  • IPv4

  • IPv6

Tracker endpoint type:

  • Endpoint IP

NAT DIA Mixed Tracker Group (HTTP and ICMP)

Tracker type:

  • IPv4

  • IPv6

Tracker endpoint type:

  • Endpoint IP

Supported Devices for ICMP Trackers

Minimum supported releases: Cisco IOS XE Catalyst SD-WAN Release 17.13.1a, Cisco Catalyst SD-WAN Manager Release 20.13.1.

Restrictions for ICMP Trackers

  • You cannot configure ICMP endpoint tracker type through feature templates.

  • You cannot configure both an IPv4 and an IP6 tracker type in the same tracker group.

  • You can configure the ICMP endpoint tracker for NAT DIA for the following interfaces only:

    • Ethernet Interfaces

    • Ethernet (PPPoE) Interfaces

    • Subinterfaces

  • If only one DIA interface (default route) is configured, and the ICMP tracker goes down, the default route is withdrawn.

Supported Interfaces for NAT DIA Tracker

You can configure the NAT DIA tracker for the following interfaces:

  • Cellular Interfaces


    Note


    Cellular interfaces don't support negotiated IP addresses.
  • Ethernet Interfaces

  • Ethernet (PPPoE) Interfaces

  • Subinterfaces

  • DSL Dialer Interfaces (PPPoE and PPPoA)


Note


IPv6 NAT DIA tracker is supported only on physical and subinterfaces of Ethernet interfaces.


Restrictions for NAT DIA Tracker

Restrictions for Cisco IOS XE Catalyst SD-WAN Release 17.10.1a and Earlier Releases

  • In Cisco IOS XE Release 17.6.x and earlier, the NAT DIA tracker is not supported on dialer interfaces. From Cisco IOS XE Catalyst SD-WAN Release 17.7.1a, subinterfaces and dialer interfaces support single endpoint and dual endpoint trackers.

  • DNS URL endpoint is not supported on Cisco IOS XE Catalyst SD-WAN devices.

  • You can apply only one tracker or tracker group to an interface.

  • The NAT fallback feature is supported only from Cisco IOS XE Catalyst SD-WAN Release 17.3.2.

  • The IP address of the tunnel with address 169.254.x.x is not supported to track the zScaler endpoint on manual tunnels.

  • You must configure a minimum of two single endpoint trackers to configure a tracker group.

  • A tracker group can incorporate only a maximum of two single endpoint trackers.

  • In Cisco IOS XE Release 17.10.1 and previous releases, you cannot configure IPv4 tracker on a IPv6 interface or vice versa. The tracker will not be active.

Restrictions for Cisco IOS XE Catalyst SD-WAN Release 17.11.1a

  • API URL endpoint is supported only on IPv6 DIA tracker and not supported on IPv4 DIA tracker.

  • Both IPv4 and IPv6 trackers cannot be used in the same tracker group.

  • You must configure the allow service all command under the TLOC tunnel interface for IPv6 trackers to work with a TLOC tunnel interface.

  • Multiple NAT66 DIA interfaces are not supported.

  • NAT fallback on centralized data policy is not supported.

Restrictions for Cisco IOS XE Catalyst SD-WAN Release 17.13.1a

  • Endpoint DNS elements are not supported in a tracker group.

Workflow for NAT DIA Tracker on IPv4 Interfaces

Minimum supported release: Cisco IOS XE Catalyst SD-WAN Release 17.7.1a and Cisco vManage Release 20.7.1

  1. Configure an interface tracker using a Cisco System template. From Cisco IOS XE Catalyst SD-WAN Release 17.7.1a, you can configure a dual tracker or a tracker group. For more information on configuring a tracker, see Configure a Tracker.

  2. Apply the tracker to a transport interface. For more information on configuring a NAT DIA tracker, see Configure NAT DIA Tracker.

  3. Verify NAT DIA tracker configuration. For more information on monitoring a NAT DIA tracker configuration, see Monitor NAT DIA Tracker Configuration.

Configure NAT DIA Tracker on IPv4 Interfaces in Cisco SD-WAN Manager

Minimum supported release: Cisco IOS XE Catalyst SD-WAN Release 17.7.1a and Cisco vManage Release 20.7.1

Use the Cisco System template to track the status of transport interfaces.

  1. From the Cisco SD-WAN Manager menu, choose Configuration > Templates.

  2. Click Feature Templates.


    Note


    In Cisco vManage Release 20.7.x and earlier releases, Feature Templates is titled Feature.


  3. Click adjacent to the Cisco System template that you want to modify and choose Edit.

  4. Click Tracker, and click New Endpoint Tracker to configure the tracker parameters.

    Table 8. Tracker Parameters

    Parameter Field

    Description

    Name

    Name of the tracker. The name can be up to 128 alphanumeric characters. You can configure up to eight trackers.

    Threshold

    Duration to wait for the probe to return a response before declaring that the transport interface is down. Range: 100 to 1000 milliseconds. Default: 300 milliseconds

    Interval

    Frequency at which a probe is sent to determine the status of the transport interface. Range: 20 to 600 seconds. Default: 60 seconds (1 minute)

    Multiplier

    Number of times a probe can be resent before declaring that the transport interface is down. Range: 1 to 10. Default: 3

    Tracker Type

    Choose Interface to configure the DIA tracker.

    End Point Type: IP Address

    IP address of the end point. This is the destination in the internet to which the router sends probes to determine the status of the transport interface. Make sure that the IP address is enabled to respond to HTTP port 80 probes.

    End Point Type: DNS Name

    DNS name of the end point. This is the destination in the internet to which the router sends probes to determine the status of the transport interface.

  5. Click Add.

  6. To create a tracker group and configure the parameters, click Tracker Groups > New Endpoint Tracker Groups.

    Table 9. Tracker Group Parameters

    Parameter Field

    Description

    Tracker Type: Tracker Elements

    This field is displayed only if you chose Tracker Type as the Tracker Group. Add the existing interface tracker names (separated by a space). When you add this tracker to the template, the tracker group is associated with these individual trackers, and you can then associate the tracker group to an interface.

    Tracker Type: Tracker Boolean

    This field is displayed only if you chose Tracker Type as the Tracker Group. Select AND or OR.

    OR is the default boolean operation. An OR ensures that the transport interface status is reported as active if either one of the associated trackers of the tracker group reports that the interface is active.

    If you select the AND operation, the transport-interface status is reported as active if both the associated trackers of the tracker group, report that the interface is active.


    Note


    Ensure that you have configured two single endpoint trackers before configuring a tracker group.


  7. Click Add.

  8. Click Advanced and enter the Track Interface information.

    Enter the name of the tracker to track the status of transport interfaces that connect to the internet.


    Note


    Tracking the interface status is useful when you enable NAT in a transport interface in VPN 0 to allow data traffic from the router to exit directly to the internet rather than having to first go to a router in a data center. In this situation, enabling NAT in the transport interface splits the TLOC between the local router and the data center into two, with one going to the remote router and the other going to the internet. When you enable transport tunnel tracking, the software periodically probes the path to the internet to determine whether it is up. If the software detects that this path is down, it withdraws the route to the internet destination, and traffic destined to the internet is then routed through the data center router. When the software detects that the path to the internet is functioning again, the route to the internet is reinstalled.


    Note


    Ensure that you complete filling all the mandatory fields before you update the template.


  9. Click Update.

Configure NAT DIA Tracker

Minimum supported release: Cisco IOS XE Catalyst SD-WAN Release 17.7.1a and Cisco Catalyst SD-WAN Control Components Release 20.7.1.

From Cisco IOS XE Catalyst SD-WAN Release 17.13.1a, you can configure ICMP trackers for NAT DIA.

Configure NAT DIA Tracker on IPv4 Interfaces using Configuration Groups in Cisco SD-WAN Manager

Minimum supported release: Cisco IOS XE Catalyst SD-WAN Release 17.11.1a and Cisco vManage Release 20.11.1

  1. From the Cisco SD-WAN Manager menu, choose Configuration > Configuration Groups.

    In Cisco IOS XE Catalyst SD-WAN Release 17.11.1a and earlier, choose Configuration > Templates > Configuration Groups.

    For more information on creating a configuration group, see Configuration Group Workflows.

  2. Add a feature to the configuration group.

    For more information on adding a feature, see Feature Management.

  3. Under Transport and Management Profile, configure Tracker and Tracker Group.

    For more information on configuring a tracker on an IPv4 interface, see Tracker and tracker group on an IPv4 interface, see Tracker Group.

  4. Under Transport and Management Profile, click adjacent to an interface under VPN 0 feature.

    • If you choose Associate Sub Feature, check the pre-configured Tracker and Tracker Group check-box as needed.

    • If you choose Add Sub Feature, select the Tracker and Tracker Group from the drop-down list and follow the configuration steps from Step 3.

    For more information on VPN 0 configuration, see Ethernet Interface.

  5. After you create a configuration group, add devices to the group. For more information, see Add Devices to a Configuration Group. You can then go ahead and deploy the devices associated to the configuration group. For more information, see Deploy Devices.

Configure NAT DIA Tracker on IPv4 Interfaces Using the CLI

Minimum supported release: Cisco IOS XE Catalyst SD-WAN Release 17.7.1a and Cisco vManage Release 20.7.1

Configure a NAT DIA Tracker Using the CLI (Single Endpoint)

You can configure NAT DIA tracking using a CLI add-on feature template or CLI device template. For more information on configuring using CLI templates, see CLI Templates.

Device# config-transaction
Device(config)# endpoint-tracker tracker1
Device(config-endpoint-tracker)# endpoint-ip ip-address 
Device(config-endpoint-tracker)# threshold value 
Device(config-endpoint-tracker)# multiplier value 
Device(config-endpoint-tracker)# interval value 
Device(config-endpoint-tracker)# tracker-type interface
Configure Tracker Groups

You can create tracker groups to probe NAT DIA tracker from Cisco IOS XE Catalyst SD-WAN Release 17.7.1a:

Device# config-transaction
Device(config)# endpoint-tracker tracker-name1
 Device(config-endpoint-tracker)# tracker-type interface
Device(config-endpoint-tracker)# endpoint-ip ip-address 
Device(config-endpoint-tracker)# threshold value 
Device(config-endpoint-tracker)# multiplier value 
Device(config-endpoint-tracker)# interval value 
Device# config-transaction
Device(config)# endpoint-tracker tracker-name2 
Device(config-endpoint-tracker)# tracker-type interface
Device(config-endpoint-tracker)# endpoint-dns-name <dns-name>
Device(config-endpoint-tracker)# threshold value 
Device(config-endpoint-tracker)# multiplier value 
Device(config-endpoint-tracker)# interval value 
Device(config)# endpoint-tracker tracker-group-name 
Device(config-endpoint-tracker)# tracker-type tracker-group
Device(config-endpoint-tracker)# boolean or
Device(config-endpoint-tracker)# tracker-elements tracker-name1  tracker-name2 
Device(config)# interface GigabitEthernet0/0/1
Device(config-if)# endpoint-tracker tracker-group-name 

Note


A tracker group can have a mix of endpoint trackers. You can combine an IP-address tracker with a DNS tracker to create a tracker group.


Configure an ICMP Tracker for NAT DIA Using the CLI

Configure an ICMP Tracker for NAT DIA Using the CLI

Minimum supported release: Cisco IOS XE Catalyst SD-WAN Release 17.13.1a and Cisco Catalyst SD-WAN Manager Release 20.13.1.

You can configure ICMP tracking for NAT DIA by using a CLI add-on profile or the Transport profile in a configuration group. For more information, see Configuration Groups and Feature Profiles.

To configure single endpoints:

Device# config-transaction
Device(config)# endpoint-tracker t1
Device(config-endpoint-tracker)# tracker-type interface-icmp
Device(config-endpoint-tracker)# endpoint-ip ip-address
Device(config-endpoint-tracker)# threshold value
Device(config-endpoint-tracker)# multiplier value
Device(config-endpoint-tracker)# icmp-interval value

To configure a tracker group:

Device# config-transaction
Device(config)# endpoint-tracker tracker-name1
Device(config-endpoint-tracker)# tracker-type interface-icmp
Device(config-endpoint-tracker)# endpoint-ip <ip-address>
Device(config-endpoint-tracker)# threshold <value>
Device(config-endpoint-tracker)# multiplier <value>
Device(config-endpoint-tracker)# icmp-interval <value>
Device# config-transaction
Device(config)# endpoint-tracker <tracker-name2>
Device(config-endpoint-tracker)# tracker-type interface-icmp
Device(config-endpoint-tracker)# endpoint-dns-name <dns-name>
Device(config-endpoint-tracker)# threshold <value>
Device(config-endpoint-tracker)# multiplier <value>
Device(config-endpoint-tracker)# icmp-interval <value>
Device(config)# endpoint-tracker tracker-group-name
Device(config-endpoint-tracker)# tracker-type tracker-group
Device(config-endpoint-tracker)# boolean or
Device(config-endpoint-tracker)# tracker-elements tracker-name1 tracker-name2
Device(config)# interface GigabitEthernet0/0/1
Device(config-if)# endpoint-tracker tracker-group-name

The following example shows how to configure a tracker with endpoint IP address:

Device(config)# endpoint-tracker tracker1
Device(config-endpoint-tracker)# endpoint-ip 10.1.1.1
Device(config-endpoint-tracker)# threshold 100
Device(config-endpoint-tracker)# multiplier 5
Device(config-endpoint-tracker)# interval 2
Device(config-endpoint-tracker)# tracker-type interface

The following example shows how to configure a tracker with endpoint as a DNS:

Device(config)# endpoint-tracker tracker2
Device(config-endpoint-tracker)# endpoint-dns-name www.example.com
Device(config-endpoint-tracker)# threshold 100
Device(config-endpoint-tracker)# multiplier 5
Device(config-endpoint-tracker)# interval 2

The following example shows how to configure an ICMP tracker with endpoint IP address:

Device(config)# endpoint-tracker tracker3
Device(config-endpoint-tracker)# tracker-type interface-icmp
Device(config-endpoint-tracker)# endpoint-ip 10.1.1.1
Device(config-endpoint-tracker)# threshold 100
Device(config-endpoint-tracker)# multiplier 5
Device(config-endpoint-tracker)# icmp-interval 2

The following example shows how to configure an ICMP tracker with endpoint as a DNS:

Device(config)# endpoint-tracker tracker4
Device(config-endpoint-tracker)# tracker-type interface-icmp
Device(config-endpoint-tracker)# endpoint-dns-name www.example.com
Device(config-endpoint-tracker)# threshold 100
Device(config-endpoint-tracker)# multiplier 5
Device(config-endpoint-tracker)# icmp-interval 2

Configuration Examples for NAT DIA Tracking on IPv4 Interfaces Using the CLI

Minimum supported release: Cisco IOS XE Catalyst SD-WAN Release 17.7.1a and Cisco vManage Release 20.7.1

The following sections provide examples for configuring NAT DIA trackers using the CLI.

Configuration Example: Single Endpoint NAT DIA Tracker Using the CLI

This example shows how to configure a single endpoint NAT DIA tracker:

config-transaction
    endpoint-tracker tracker1
    tracker-type interface
    endpoint-ip 10.1.1.1
    threshold 100
    multiplier 5
    interval 20
exit
Configuration Example: Tracker Groups
This example shows how to configure a tracker group with two trackers (two endpoints). You can create tracker groups to probe an interface from Cisco IOS XE Catalyst SD-WAN Release 17.7.1a.
config-transaction
    endpoint-tracker tracker1
    endpoint-ip 10.1.1.1
    interval 20
    threshold 100
    multiplier 1
    tracker-type interface
exit
endpoint-tracker tracker2
    endpoint-dns-name www.cisco.com
    interval 600
    threshold 1000
    multiplier 10
    tracker-type interface
exit
endpoint-tracker group1
    tracker-type tracker-group
    boolean or
    tracker-elements tracker1 tracker2
exit

This example shows how to apply a tracker group to an interface and configure it in the supported interfaces:

interface GigabitEthernet0/0/1
    endpoint-tracker group1

Stabilize NAT DIA Tracker Status

From Cisco IOS XE Catalyst SD-WAN Release 17.13.1a, you can configure a global configuration setting called Tracker DIA Stabilize Status using the Basic feature profile in Cisco SD-WAN Manager. Alternatively, you can use the dia-stabilize-status command by using the CLI. This configuration is applied to all endpoint-tracker state changes across DIA interfaces, both HTTP, and ICMP to stabilize the tracker states and avoid rapid interface flaps due to rapid status changes.

When you configure the endpoint tracker for an interface, the tracker starts tracking that endpoint by sending HTTP or ICMP probes. If the endpoint is reachable, or when the probe is successful, the tracker is marked as UP. If the endpoint is not reachable, or when the probe is unsuccessful, the tracker is marked as DOWN. To avoid a continuous change in the tracker status, a multiplier is applied to ensure that the tracker status changes only after a significant number of probes.

The Multiplier specifies the number of times probes are sent before declaring that the endpoint is down. The range is 1–10 and the default is 3. The multiplier is used to probe the tracker repeatedly, based on the configured value, and marks the tracker as UP if the probe is successful only after the expiry of the multiplier. For example, if the multiplier is configured as 3, the status of the tracker changes to UP after 3 continuous successful probes.

The configured multiplier or retry value is applied to ensure that the probes are successful in bringing the tracker object up and notifying NAT. When the tracker state is up, NAT installs the route. This avoids interface flaps since the retries ensure that the tracker object is up. Prior to Cisco IOS XE Catalyst SD-WAN Release 17.13.1a, for HTTP probes, the tracker is marked as down after probing for a number of times, as configured by the multiplier. Tracker is marked UP after the first successful probe. This mechanism causes network flaps. The dia-stabilize-status command stabilizes this behavior by using the value 'Multiplier+1' to change the status of the tracker. For example, if the value for the multiplier is 3, a tracker whose status is DOWN, is pinged 3+1 times (2 seconds apart, based on the ICMP interval). After the fourth probe is successful, the tracker is marked as UP.

In Cisco IOS XE Catalyst SD-WAN Release 17.12.x and earlier, the multiplier was used for SIG trackers (from UP to DOWN and DOWN to UP) and HTTP trackers (from UP to DOWN). From Cisco IOS XE Catalyst SD-WAN Release 17.13.1a, the dia-stabilize-status setting is applied to ICMP and HTTP trackers to track status transitions from DOWN to UP.

Configure Using CLI

Minimum supported release: Cisco IOS XE Catalyst SD-WAN Release 17.13.1a and Cisco Catalyst SD-WAN Manager Release 20.13.1

The following example shows how to configure this feature using the CLI:

device(config)# endpoint-tracker-settings dia-stabilize-status
Configure Using Cisco Catalyst SD-WAN Manager

Minimum supported release: Cisco IOS XE Catalyst SD-WAN Release 17.13.1a and Cisco Catalyst SD-WAN Manager Release 20.13.1

  1. From the Cisco SD-WAN Manager menu, choose Configuration > Configuration Groups.

    For more information on creating a configuration group, see Configuration Group Workflows.

  2. Add a feature to the configuration group.

    For more information on adding a feature, see Feature Management.

  3. Under System Profile, configure the Basic feature.

    For more information about configuring the Basic feature, see Basic.

  4. Click Track Settings.

  5. Under Tracker DIA Stabilize Status, choose Global from the drop-down list, and enable the setting.

  6. Click Save.

Monitor NAT DIA Tracker Configuration on IPv4 Interfaces

Minimum supported release: Cisco IOS XE Catalyst SD-WAN Release 17.7.1a and Cisco vManage Release 20.7.1

View Interface DIA Tracker

To view information about DIA tracker on a transport interface:

  1. From the Cisco SD-WAN Manager menu, choose Monitor > Devices.

    Cisco vManage Release 20.6.x and earlier: From the Cisco SD-WAN Manager menu, choose Monitor > Network.

  2. Choose a device from the list of devices.

  3. Click Real Time.

  4. For single endpoint tracker, from the Device Options drop-down list, choose Endpoint Tracker Info.

  5. For dual endpoint tracker, from the Device Options drop-down list, choose Endpoint Tracker Group Info.

Verify the Configurations for NAT DIA Tracker on IPv4 Interfaces

Minimum supported release: Cisco IOS XE Catalyst SD-WAN Release 17.7.1a and Cisco vManage Release 20.7.1

You can check the command syntax after you attach a template to a device. The following sample configuration shows tracker definition for the NAT DIA tracker and how to apply a tracker to a transport interface:
endpoint-tracker tracker-t1
  threshold 1000 
  multiplier 3
  interval 20
  endpoint-ip 10.1.16.13 
  tracker-type interface
interface GigabitEthernet1
 no shutdown
 endpoint-tracker tracker-t1 
 ip nat outside

The following sample configuration shows how to verify if the configuration is committed:

Device# show endpoint-tracker interface GigabitEthernet1

Interface          Record Name          Status        RTT in msecs    Probe ID        Next Hop 
GigabitEthernet1   tracker-t1              UP              2               1          10.1.16.13

The following sample configuration shows timer-related information about the tracker, to help debug tracker-related issues, if any:

Device# show endpoint-tracker records 
Record Name            Endpoint       EndPoint Type   Threshold    Multiplier   Interval     Tracker-Type   
p1                     10.1.16.13          IP              300          3          60         interface

Verify Configuration for an ICMP Tracker

From Cisco IOS XE Catalyst SD-WAN Release 17.13.1a, you can check the command syntax after you configure the ICMP tracker. The following sample configuration shows ICMP tracker definition for the NAT DIA tracker and how to apply a tracker to a transport interface:
endpoint-tracker tracker-t2
  tracker-type interface-icmp
  endpoint-ip 10.1.16.13 
  threshold 1000 
  multiplier 3
  icmp-interval 2
  
  
interface GigabitEthernet1
 no shutdown
 endpoint-tracker tracker-t2 

The following sample configuration shows how to verify if the configuration is committed:

Device# show endpoint-tracker interface GigabitEthernet1

Interface          Record Name          Status        RTT in msecs    Probe ID        Next Hop 
GigabitEthernet1   tracker-t2              UP              2               1          10.1.16.13

Dual-Tracker Show Commands

The following is a sample output of the show endpoint-tracker tracker-group command:

Device# show endpoint-tracker tracker-group 
Tracker Name               Element trackers name       Status      RTT in msec    Probe ID
interface-tracker-group     tracker1, tracker2      UP(UP OR UP)      1,1          53, 54
Device# show ip sla summary

IPSLAs Latest Operation Summary
Codes: * active, ^ inactive, ~ pending
All Stats are in milliseconds. Stats with u are in microseconds

ID           Type        Destination       Stats       Return Code     Last Run                                                             
*9           dns         10.1.1.1           RTT=3       OK          12 seconds ago
*10          http        10.1.1.10 .        RTT=89      OK          23 seconds ago
Device# show endpoint-tracker records 
Record Name            Endpoint       EndPoint Type   Threshold    Multiplier   Interval     Tracker-Type   
group1          tracker1 OR tracker2       N/A            N/A          N/A         N/A       tracker-group
group3          tracker3 OR tracker4       N/A            N/A          N/A         N/A       tracker-group
tracker1             198.168.20.2          IP             300          3            60         interface
tracker2             198.168.20.3          IP             300          3            60         interface
tracker3         www.cisco.com.com      DNS_NAME          300          3            60         interface
tracker4         www.cisco.com.com      DNS_NAME          300          3            60         interface

The following is a sample output of the show ip sla summary command:

Device# show ip sla summary
IPSLAs Latest Operation Summary
Codes: * active, ^ inactive, ~ pending
All Stats are in milliseconds. Stats with u are in microseconds
ID            Type       Destination      Stats   Return Code       Last Run
*53           http         10.1.1.1       RTT=2        OK        35 seconds ago
*54           http         10.1.1.10      RTT=2        OK        1 minute, 35 seconds ago

The following is a sample output of the show endpoint-tracker tracker-group command for ICMP endpoint trackers:

Device# show endpoint-tracker tracker-group
Tracker Name     Element trackers name     Address Family    Status            RTT in msec      Probe ID
trackergroup1    tracker1, tracker2        IPv4              UP(UP OR UP)      1, 2             5, 4

The following is a sample output of the show ip sla summary command for the ICMP endpoint tracker:

Device# show ip sla summary
IPSLAs Latest Operation Summary
Codes: * active, ^ inactive, ~ pending
All Stats are in milliseconds. Stats with u are in microseconds
ID            Type       Destination      Stats   Return Code       Last Run
*4           icmp-echo    10.1.29.99      RTT=1        OK        1 seconds ago

Workflow for NAT DIA Tracker on IPv6 Interfaces

Minimum supported release: Cisco IOS XE Catalyst SD-WAN Release 17.11.1a and Cisco vManage Release 20.11.1

Configure NAT DIA Tracker on IPv6 Interfaces using Configuration Groups in Cisco SD-WAN Manager

Minimum supported releases: Cisco IOS XE Catalyst SD-WAN Release 17.11.1a and Cisco vManage Release 20.11.1


Note


You can configure the IPv6 DIA Tracker feature using a configuration group, device CLI template, or CLI-Add on feature template. This feature cannot be configured through a feature template.


  1. From the Cisco SD-WAN Manager menu, choose Configuration > Configuration Groups.

    In Cisco IOS XE Catalyst SD-WAN Release 17.11.1a and earlier, choose Configuration > Templates > Configuration Groups.

    For more information on creating a configuration group, see Configuration Group Workflows.

  2. Add a feature to the configuration group.

    For more information on adding a feature, see Feature Management.

  3. Under Transport and Management Profile, configure IPv6-Tracker and IPv6-Tracker Group.

    For more information on configuring IPv6 tracker, see IPv6 Tracker and IPv6 tracker group, see IPv6 Tracker Group.

  4. Under Transport and Management Profile, click adjacent to VPN 0 feature and choose Associate Sub Feature.

    • If you choose Associate Sub Feature, check the pre-configured IPv6-Tracker and IPv6-Tracker Group check-box as needed.

    • If you choose Add Sub Feature, select the IPv6-Tracker and IPv6-Tracker Group from the drop-down list and follow the configuration steps from Step 3.

    For more information on VPN 0 configuration, see Ethernet Interface.

  5. After you create a configuration group, add devices to the group. For more information, see Add Devices to a Configuration Group. You can then go ahead and deploy the devices associated to the configuration group. For more information, see Deploy Devices.

Configure NAT DIA Tracker on IPv6 Interfaces using a CLI Template

Minimum supported releases: Cisco IOS XE Catalyst SD-WAN Release 17.11.1a and Cisco vManage Release 20.11.1

For more information about using CLI templates, see CLI Add-On Feature Templates and CLI Templates.


Note


You can't configure ICMP tackers using CLI templates.
Configure IPv6 Endpoint Tracker
  1. Configure the endpoint tracker for tracking the status of an endpoint:

    endpoint-tracker tracker-name

  2. Configure the tracker type for the tracker:

    tracker-type ipv6-interface


    Note


    From Cisco IOS XE Catalyst SD-WAN Release 17.13.1a, you can configure ICMP tracking for NAT DIA using ipv6-interface-icmp .


  3. Configure the IPv6 address of an endpoint:

    ipv6-endpoint ipv6-address


Note


You can't configure an IPv4 and an IPv6 tracker in the same tracker group.

Here is the complete configuration example to configure an IPv6 endpoint tracker:


endpoint-tracker t1
   tracker-type ipv6-interface
   ipv6-endpoint 2001:DB8:1::1

Here is the complete configuration example to configure an IPv6 endpoint ICMP tracker:


endpoint-tracker t1
   tracker-type ipv6-interface-icmp
   ipv6-endpoint 2001:DB8:1::1
Configure DNS Tracker
  1. Configure the endpoint tracker for tracking the status of an endpoint:

    endpoint-tracker tracker-name

  2. Configure the tracker type for the tracker:

    tracker-type ipv6-interface


    Note


    From Cisco IOS XE Catalyst SD-WAN Release 17.13.1a, you can configure ICMP tracking for NAT DIA using ipv6-interface-icmp .


  3. Configure the domain name of an endpoint:

    endpoint-dns-name dns-name

Here is the complete configuration example to configure DNS tracker:


endpoint-tracker dns_t1
   tracker-type ipv6-interface
   endpoint-dns-name cisco.com

Here is the complete configuration example to configure DNS ICMP tracker:


endpoint-tracker dns_t1
   tracker-type ipv6-interface-icmp
   endpoint-dns-name cisco.com
Configure IPv6 Tracker Group
  1. Configure an HTTP or ICMP IPv6 endpoint tracker.

  2. Configure an HTTP or ICMP DNS tracker in IPv6 interface.

  3. Configure the endpoint tracker for tracking the status of an endpoint:

    endpoint-tracker tracker-group-name

  4. Configure the tracker type for the tracker:

    tracker-type tracker-group


    Note


    From Cisco IOS XE Catalyst SD-WAN Release 17.13.1a, you can configure ICMP tracking for NAT DIA using ipv6-interface-icmp .


  5. Enable Boolen logic while configuring a tracker group:

    boolean{and | or}

  6. Add tracker names to create a dual endpoint tracker group:

    tracker-elements tracker1 tracker2

Here is the complete configuration example to configure IPv6 tracker group:


endpoint-tracker t1
   tracker-type ipv6-interface
   ipv6-endpoint 2001:DB8:1::1
!
endpoint-tracker t2
   tracker-type ipv6-interface
   endpoint-dns-name cisco.com
!
endpoint-tracker groupv6
   tracker-type tracker-group 
   boolean or
   tracker-elements t1 t2 

Here is the complete configuration example to configure IPv6 ICMP tracker group:


endpoint-tracker t3
   tracker-type ipv6-interface-icmp
   ipv6-endpoint 2001:DB8:1::1
!
endpoint-tracker t4
   tracker-type ipv6-interface-icmp
   endpoint-dns-name cisco.com
!
endpoint-tracker groupv7
   tracker-type tracker-group 
   boolean or
   tracker-elements t3 t4 
Configure Both IPv4 and IPv6 Trackers on the Same Interface
  1. Configure the IPv4 endpoint tracker:

    
    endpoint-tracker t1
       tracker-type interface-ip
       endpoint-ip 10.1.1.1
    
  2. Configure a DNS tracker in IPv4 interface.

    
    endpoint-tracker t2
       tracker-type interface-ip
       endpoint-dns-name example.com
    
  3. Configure an IPv6 endpoint tracker.

    
    endpoint-tracker t3
       tracker-type ipv6-interface
       ipv6-endpoint 2001:DB8:1::1
    
    
  4. Configure a DNS tracker in IPv6 interface.

    
    endpoint-tracker t4
       tracker-type ipv6-interface
       endpoint-dns-name cisco.com
    
  5. Add IPv4 trackers to a tracker group:
    
    endpoint-tracker groupv4
       tracker-type tracker-group 
       boolean and
       tracker-elements t1 t2
    
  6. Add IPv6 trackers to a tracker group:

    
    endpoint-tracker groupv6
       tracker-type tracker-group 
       boolean or
       tracker-elements t3 t4
    
  7. Apply the tracker group to an interface:

    
    interface GigabitEthernet1
     endpoint-tracker groupv4
     ipv6-endpoint-tracker groupv4
    

Here is the complete configuration example to configure both IPv4 and IPv6 trackers on the same interface:


endpoint-tracker t1
   tracker-type interface-ip
   endpoint-ip 10.1.1.1
!
endpoint-tracker t2
   tracker-type interface-ip
   endpoint-dns-name example.com
!
endpoint-tracker t3
   tracker-type ipv6-interface
   ipv6-endpoint 2001:DB8:1::1
!
endpoint-tracker t4
   tracker-type ipv6-interface
   endpoint-dns-name cisco.com
!
endpoint-tracker groupv4
   tracker-type tracker-group 
   boolean and
   tracker-elements t1 t2
!
endpoint-tracker groupv6
   tracker-type tracker-group 
   boolean or
   tracker-elements t3 t4
Configure an HTTP and an ICMP Tracker for a Tracker Group

Configure an HTTP IPv4 tracker and an ICMP IPv6 tracker, or vice versa on Cisco Catalyst SD-WAN devices, from Cisco IOS XE Catalyst SD-WAN Release 17.13.1a

  1. Configure an HTTP IPv4 endpoint tracker:

    
    endpoint-tracker t1
       tracker-type interface
       endpoint-ip 10.1.1.1
    
  2. Configure an ICMP IPv4 endpoint tracker.

    
    endpoint-tracker t2
       tracker-type ipv6-interface-icmp
       endpoint-ip 10.1.1.2
    
  3. Configure a tracker group with an HTTP and an ICMP endpoint tracker.

    
    endpoint-tracker t3
       tracker-type tracker-group
       tracker-elements t1 t2
    
  4. Apply the tracker group to an interface.

    interface GigabitEthernet1
        endpoint-tracker t3
    
Apply a Defined IPv6 Tracker or Tracker Group to a Supported IPv6 Interface
  1. Configure an interface type and enter the interface configuration mode:

    interface GigabitEthernet1
  2. Apply a predefined IPv6 endpoint tracker name:

    ipv6-endpoint-tracker tracker-name

Here is the complete configuration example to apply a tracker to an interface and configure it in the supported interfaces:


interface GigabitEthernet1
    ipv6-endpoint-tracker t1

Verify the Configurations for NAT DIA Tracker on IPv6 Interfaces

Minimum supported releases: Cisco IOS XE Catalyst SD-WAN Release 17.11.1a and Cisco vManage Release 20.11.1

The following is a sample output from the show endpoint-tracker command for a single IPv6 endpoint tracker configuration.


Device# show endpoint-tracker

endpoint-tracker t1
ipv6-endpoint 2001:DB8:1::1
tracker-type ipv6-interface
 

The following is a sample output from the show endpoint-tracker command for a single IPv6 endpoint tracker applied to an interface.


Device# show endpoint-tracker

Interface                    Record Name            Status          Address Family   RTT in msecs    Probe ID        Next Hop      
GigabitEthernet1                  t1                  Up              IPv6             1               6               2001:DB8:1::1          

The following is a sample output from the show endpoint-tracker command for a DNS tracker configuration.


Device# show endpoint-tracker

Interface                    Record Name            Status          Address Family   RTT in msecs    Probe ID        Next Hop      
GigabitEthernet1                dns_t1              Up              IPv6             1               9               2001:DB8:1::1

The following is a sample output from the show endpoint-tracker tracker-group command for an IPv6 tracker group configuration.


Device# show endpoint-tracker tracker-group 

Tracker Name                     Element trackers name              Address Family   Status                       RTT in msec      Probe ID       
groupv6                              t1, t2                           IPv6             UP(UP OR UP)                 1, 0             10, 11          

The following is a sample output from the show endpoint-tracker command when both IPV4 and IPv6 trackers are configured on the same interface.


Device# show endpoint-tracker

Interface                    Record Name            Status          Address Family   RTT in msecs    Probe ID        Next Hop      
GigabitEthernet1                 t1                  Up              IPv4             1               7               10.0.29.99
GigabitEthernet1                 t2                  Up              IPv6             1               8               2001:DB8:1::1
Verify Configuration for an ICMP Tracker

From Cisco IOS XE Catalyst SD-WAN Release 17.13.1a, you can check the command syntax after you attach a template to a device.

The following is a sample output from the show endpoint-tracker command for a single IPv6 ICMP endpoint tracker applied to an interface.


Device# show endpoint-tracker

Interface                    Record Name            Status          Address Family   RTT in msecs    Probe ID        Next Hop      
GigabitEthernet1                  t2                  Up              IPv6             1               6               2001:DB8:1::1          

Service-Side NAT

Table 10. Feature History

Feature Name

Release Information

Description

Service-Side NAT on Cisco IOS XE Catalyst SD-WAN Devices

Cisco IOS XE Catalyst SD-WAN Release 17.3.1a

Cisco vManage Release 20.3.1

This feature allows you to configure inside and outside NAT on data traffic traveling to and from the service-side hosts of the network overlay.

The service-side NAT configuration allows you to translate the source IP addresses for data traffic from service-side hosts to the overlay and traffic from the overlay to service-side hosts.

Intra-VPN Service-Side NAT Support

Cisco IOS XE Catalyst SD-WAN Release 17.7.1a

Cisco vManage Release 20.7.1

Intra-VPN allows service-side LAN interfaces to communicate with other service-side LAN interfaces within the same VPN. Configure the ip nat outside command on the LAN interface for which you require translation of the source IP addresses to the outside local addresses. You can apply static or dynamic NAT rules for packets to be routed from other LAN interfaces to the interface configured as the outside interface.

You can configure intra-VPN service-side NAT using a device CLI template or a CLI add-on template.

Service-Side Conditional Static NAT Support

Cisco IOS XE Catalyst SD-WAN Release 17.8.1a

This feature allows you to translate the same source IP address to different IP addresses based on the destination IP addresses.

You can configure service-side conditional static NAT using a device CLI.

Service-Side Static Network NAT Support

Cisco IOS XE Catalyst SD-WAN Release 17.8.1a

Cisco vManage Release 20.8.1

This feature supports configuration of service-side static NAT for a subnet. Instead of configuring multiple static NAT pools, you can configure a single static NAT pool for an entire subnet.

You can configure service-side static network NAT using Cisco SD-WAN Manager or a device CLI template.

Application-Level Gateway (ALG) in Service-Side NAT

Cisco IOS XE Catalyst SD-WAN Release 17.15.1a

Cisco Catalyst SD-WAN Manager Release 20.15.1

Use an application-level gateway (ALG) to interpret the application-layer protocol and perform service-side NAT translations for FTP protocol.

Information About Service-Side NAT

On a Cisco IOS XE Catalyst SD-WAN device, you can configure NAT on the service-side of the device so that data traffic is NATed before entering the overlay tunnel that is located in the transport VPN. The service-side NAT masks the IP address of data traffic it receives.

You can configure both dynamic and 1:1 static NAT on the service-side of a device. To do this, you configure a NAT pool interface within a service VPN on the device, and then you configure a centralized data policy on the Cisco Catalyst SD-WAN Controller. The policy directs data traffic with the desired prefixes to the service-side NAT. You configure either dynamic NAT or static NAT on the desired NAT pool interface.

When service-side NAT is enabled, all matching prefixes in VPN 1 are directed to the NAT pool interface. This traffic is NATed, with the NAT swapping out the service-side IP address and replacing it with its NAT pool IP address. The packet then gets forwarded to its destination.

You can configure NAT for data that enters or exits the service-side of the network. The service-side NAT translates data traffic, of inside and outside host addresses, that match a configured centralized data policy.

Inside Source Address Translation

When service-side or LAN-side hosts send traffic to remote branches, the inside address translation services allow the source IP address (inside host) translation. This translation occurs before the data traffic is sent out to the overlay tunnels. The NAT inside pool and the inside static NAT addresses are redistributed to the overlay. These addresses are advertised to all the remote branches using the Overlay Management Protocol (OMP). Thus, the remote host is aware of the path to reach inside hosts.

For inside-address translation, the data traffic from service-side is matched with the centralized data policy match condition for dynamic NAT. If the source IP address satisfies the match condition, the data traverses the NAT configured on the service VPN before entering the remote edge router through the overlay. Address translation occurs on the tunnel egress interface. In releases before Cisco IOS XE Catalyst SD-WAN Release 17.4.1a and earlier up to Cisco IOS XE Catalyst SD-WAN Release 17.3.1a, the static-inside NAT does not need a match condition in a centralized data policy. The static translation occurs if the source IP address matches the configured IP address for static NAT.

Starting from Cisco IOS XE Catalyst SD-WAN Release 17.5.1a, you can map static NAT to a pool and static NAT is applied to the traffic if there is a data policy match.

Outside Source Address Translation

When the traffic from a remote site traverses through the overlay tunnels, the outside address translation service translates the remote host source IP address (outside host). The translation occurs before the traffic is sent to the LAN (VPN) side of the network. If route redistribution is configured, the NAT outside pool address or routes are redistributed to the LAN side of the network through Open Shortest Path First (OSPF) or other protocols. Thus, the inside host is aware of the path to reach remote hosts.

In releases before Cisco IOS XE Catalyst SD-WAN Release 17.4.1a and earlier up to Cisco IOS XE Catalyst SD-WAN Release 17.3.1a, both inside and outside service-side NAT must be a dynamic NAT configuration. You can also configure 1:1 static NAT mapping for both inside and outside address translation.

Starting from Cisco IOS XE Catalyst SD-WAN Release 17.5.1a, you can configure a NAT pool action for static NAT as well, using a centralized data policy.


Note


Configure dynamic NAT before you configure static NAT.


Data Policy for Service-Side NAT

To enable NAT on the Cisco IOS XE Catalyst SD-WAN devices, configure a centralized data policy for static and dynamic NAT. A data policy provides the match criteria and NAT pool action for dynamic NAT.

Starting from Cisco IOS XE Catalyst SD-WAN Release 17.5.1a, you can create a data policy to configure match criteria and a NAT pool action for static NAT.

Benefits of Service-Side NAT

  • Provides translation of source IPv4 addresses to destination IPv4 addresses

  • Maps a public IPv4 address to a private source IPv4 address

  • Provides a way for service providers to implement a seamless transition to IPv6

Traffic Flows for Service-Side NAT

The following are the two data traffic flows for service-side NAT:

  • Source translation for traffic from service-side of the network destined to the remote edge through the overlay network

  • Source translation for traffic destined to the service-side of the network from the remote edge through the overlay network

NAT Feature Invocation Array (FIA) from service-side—When the traffic is from the service-VPN that is destined to the remote edge through the tunnel, NAT FIA is enabled on the egress interface, which is the tunnel interface. The data policy direction is configured as from-service.

NAT FIA from-tunnel—When the traffic is from the remote edge that comes through the tunnel and reaches the service VPN, NAT FIA is enabled on the egress interface, which is the service VPN LAN interface. The data policy direction is configured as from-tunnel.

When the data policy direction is configured as all (all directions), NAT FIA is enabled on service VPN interfaces and tunnel interfaces.


Note


The IP addresses of a centralized data policy and static NAT source IP address must not overlap in Cisco IOS XE Catalyst SD-WAN Release 17.4.1a and earlier releases up to Cisco IOS XE Catalyst SD-WAN Release 17.3.1a. The centralized data policy must be clearly defined so that there are no overlapping traffic match conditions.

Restrictions for Service-Side NAT

  • Only NAT pool translations are supported.

  • Translations between different VRFs are not supported.

  • In Cisco SD-WAN Manager, you can configure a maximum of 31 pools.

  • Specify the NAT pool name as natpool natpool-number , where natpool-number must match the NAT pool value specified in the data policy.

    Example: natpool10

  • In Cisco IOS XE Catalyst SD-WAN Release 17.4.1a, Cisco IOS XE Catalyst SD-WAN Release 17.3.1a, and Cisco IOS XE Catalyst SD-WAN Release 17.3.2, a static NAT address must not be shared in pool addresses.

  • Starting from Cisco IOS XE Catalyst SD-WAN Release 17.5.1a, the static NAT address may belong to the configured NAT pool address list, if it is used along with a data policy.

  • A data policy and dynamic NAT pool must be defined for static NAT for a VRF.

  • IPv4 translations for NAT64 are not supported.

  • Each service VPN must have a unique NAT pool number.

  • NAT entries cannot be edited after they are first created.

Configure Service-Side NAT

Workflow for Configuring Service-Side NAT

  1. Configure a centralized data policy for the Cisco Catalyst SD-WAN Controller to include a NAT pool number and action. The direction of the centralized data policy for NAT inside must be from-service. The direction of the policy for NAT outside must be from-tunnel.

  2. Configure a dynamic NAT pool number using a Cisco VPN template, which is a service-side VPN.

  3. Configure dynamic NAT mappings using a Cisco VPN template.

  4. (Optional) Configure a static NAT mapping using a Cisco VPN template.

    Starting from Cisco IOS XE Catalyst SD-WAN Release 17.5.1a, you can configure a NAT pool for static NAT and create a data policy to provide match criteria and a NAT pool action for static NAT.

    For more information on configuring service-side static NAT, see Configure Service-Side Static NAT.

  5. For NAT inside, the NAT pool subnet and static NAT translation of IP addresses are automatically advertised into OMP. For NAT outside, you can manually configure redistribution of the NAT pool subnet and static NAT translation of IPv4 addresses to the service-side protocols.


    Note


    If the data policy action is configured for VPN 0, the action is configured for DIA traffic. If the data policy action is configured for any of the service VPNs (example: VPN 1), which includes a NAT pool configuration, the action is for service-side NAT.

Create and Apply a Centralized Data Policy for Service-Side NAT

A centralized data policy is a policy that is configured on a Cisco Catalyst SD-WAN Controller and that affects data traffic being transmitted between the routers on the Cisco Catalyst SD-WAN overlay network.

  1. From the Cisco SD-WAN Manager menu, choose Configuration > Policies.

  2. Click Centralized Policy.

  3. Click Add Policy.

    The policy configuration wizard opens. For more information on creating a centralized data policy, see Configure Centralized Policies Using Cisco SD-WAN Manager.

  4. Create policy lists.

    For more information on configuring groups of interest, see Configure Groups of Interest for Centralized Policy.

  5. Configure traffic rules.

    For more information on configuring traffic rules, see Configure Traffic Rules.

  6. Apply policies to sites and VPNs.

    For more information on applying policies to sites and VPNs, see Apply Policies to Sites and VPNs.

    Choose the direction for applying the policy as All, From Tunnel, or From Service.

    Table 11. Dynamic and Static NAT Application
    NAT Configuration Data-Policy Direction
    Dynamic NAT Inside only (NAT Pool) From-service
    Dynamic NAT Outside only (NAT Pool) From-tunnel
    Dynamic NAT Inside (NAT Pool) + Static NAT Inside only From-service
    Dynamic NAT Inside (NAT Pool) + Static Port Forwarding only From-service
    Dynamic NAT Outside (NAT Pool) + Static NAT Outside only From-tunnel
    Two or more of above combinations all
  7. Activate the policy.

    For more information on activating a policy, see Activate a Centralized Data Policy.

Configure Service-Side Dynamic NAT

Before You Begin
  1. Configure a centralized data policy for the Cisco Catalyst SD-WAN Controller to include a NAT pool number and an action.

  2. Create a new Cisco VPN template or edit an existing Cisco VPN template. The Cisco VPN template corresponds to the service-side VPN you want to configure NAT for.

Configure a Dynamic NAT Pool
  1. From the Cisco SD-WAN Manager menu, choose Configuration > Templates.

  2. Click Feature Templates.


    Note


    In Cisco vManage Release 20.7.x and earlier releases, Feature Templates is titled Feature.


  3. To edit a Cisco VPN template, click adjacent to the template name and choose Edit.

  4. Click NAT.

  5. Under NAT Pool, click New NAT Pool.

  6. Enter the required parameters and click Update.

    Table 12. NAT Pool Parameters

    Parameter Name

    Description

    NAT Pool Name

    Enter a NAT pool number configured in the centralized data policy. The NAT pool name must be unique across VPNs and VRFs. You can configure up to 31 (1–31) NAT pools per router.

    NAT Pool Prefix Length

    Enter the NAT pool prefix length.

    NAT Pool Range Start

    Enter a starting IP address for the NAT pool.

    1. Change the scope from Default to Global to enable the field.

    2. Enter the last IP address for the NAT pool.

    NAT Pool Range End

    Enter a closing IP address for the NAT pool.

    1. Change the scope from Default to Global to enable the field.

    2. Enter the last IP address for the NAT pool.

    NAT Overload

    Click On to enable per-port translation. Default is On.

    If NAT Overload is set to Off, only dynamic NAT is configured on the end device. Per-port NAT is not configured.

    NAT Direction

    Choose the NAT direction.

Configure Service-Side Static NAT

Before You Begin
  1. Configure and apply a data policy.

  2. Configure a Cisco VPN template or edit an existing Cisco VPN template.

  3. Configure dynamic NAT.

Configure Service-Side Static NAT
  1. From the Cisco SD-WAN Manager menu, choose Configuration > Templates.

  2. Click Feature Templates.


    Note


    In Cisco vManage Release 20.7.x and earlier releases, Feature Templates is titled Feature.


  3. To edit a Cisco VPN template, click adjacent to the template name and choose Edit.

  4. Click NAT.

  5. Click Static NAT.

  6. Under Static NAT, click New Static NAT.

  7. Enter the required parameters and click Update.

    Table 13. Static NAT Parameters

    Parameter Name

    Description

    NAT Pool Name

    Starting from Cisco IOS XE Catalyst SD-WAN Release 17.5.1a, you can use a NAT pool for static NAT as well. Choose the NAT pool number using the Global settings option.

    Source IP Address

    Enter the inside local address as the source IP address.

    Translated Source IP Address

    Enter the inside global address as the translated source IP address. Maps a public IP address to a private source address.

    In Cisco IOS XE Catalyst SD-WAN Release 17.5.1a, if using a NAT pool for static NAT, static translated source IP addresses must be within the configured dynamic NAT pool IP address range.

    Static NAT Direction

    Select the direction in which to perform network address translation.

    Inside

    Select Inside to translate the IP address of packets that are coming from the service-side of the device and are destined for the transport side of the router.

    Outside

    Select Outside to translate the IP address of packets that are coming to the device from the transport-side device and are destined for a service-side device.


    Note


    In Cisco IOS XE Catalyst SD-WAN Release 17.4.1a and earlier releases up to Cisco IOS XE Catalyst SD-WAN Release 17.3.1a (when the service-side NAT feature was introduced), static NAT IP addresses must not overlap with NAT pool IP addresses.

    In Cisco IOS XE Catalyst SD-WAN Release 17.5.1a, static translated source IP addresses may be within the configured dynamic NAT pool IP address range.


Configure Service-Side Port Forwarding for NAT

You can configure port forwarding rules to allow requests from an external network to reach devices on the internal network.

Before You Begin
  1. Configure and apply a data policy.

  2. Configure a Cisco VPN template or edit an existing Cisco VPN template.

  3. Configure a NAT pool.

Configure Service-Side Port Forwarding for NAT
  1. From the Cisco SD-WAN Manager menu, choose Configuration > Templates.

  2. Click Feature Templates.


    Note


    In Cisco vManage Release 20.7.x and earlier releases, Feature Templates is titled Feature.


  3. To edit a Cisco VPN template, click adjacent to the template name and choose Edit.

  4. Click NAT.

  5. Under NAT Pool, click New NAT Pool.

  6. Enter the required NAT pool parameters.

    For more information on the NAT pool parameters, see Configure a NAT Pool and a Loopback Interface.

  7. Click Add.

  8. To create a port forwarding rule, click Port Forward > Add New Port Forwarding Rule and configure the required parameters.

    You can define up to 128 port-forwarding rules to allow requests from an external network to reach devices on the internal network.

    Table 14. Port-Forwarding Parameters

    Parameter Name

    Description

    NAT Pool Name

    Starting from Cisco IOS XE Catalyst SD-WAN Release 17.5.1a, you can use a NAT pool for static NAT. Choose the NAT pool number using the Global settings option.

    Source Port

    Enter a port number to define the source port to be translated.Range: 0 through 65535

    Source IP Address

    Enter the source IP address to be translated.

    Translate Port

    Enter the port number to apply port forwarding to.

    Range: 0 through 65535

    In Cisco IOS XE Catalyst SD-WAN Release 17.5.1a, static translated source IP addresses must be within the configured dynamic NAT pool IP address range.

    Protocol

    Choose the TCP or UDP protocol to which to apply the port-forwarding rule. To match the same ports for both TCP and UDP traffic, configure two rules.

    Translated Source IP Address

    Specify the NAT IP address that will be advertised into OMP. Port forwarding is applied to traffic that is destined to this IP address from the overlay with the translated port match.

  9. Click Update.

Configure Service-Side NAT Using the CLI

Configure a Centralized Data Policy: Match Condition for Source to Any Destination

Configure a centralized data policy that includes a match condition for a source IP to any destination IP.

policy
 data-policy edge1
  vpn-list vpn_1
   sequence 101
    match
     source-ip 192.168.11.0/24
    !
    action accept
     count nat_vrf_1
     nat pool 1
    !
   !
   default-action accept
  !
  vpn-list vpn_2
   sequence 102
    match
     source-ip 192.168.22.0/24
    !
    action accept
     count nat_vrf_2
     nat pool 2
    !
   !
   default-action accept
  !
  vpn-list vpn_3
   sequence 103
    match
     source-ip 192.168.13.0/24
    !
    action accept
     count nat_vrf_3
     nat pool 3
    !
   !
   default-action accept
  !
 !
 lists
  vpn-list vpn_1
   vpn 1
  !
  vpn-list vpn_2
   vpn 2
  !
  vpn-list vpn_3
   vpn 3
  !
  site-list edge1
   site-id 500
  !
 !
! 

Configure Inside Dynamic and Static NAT

Configure inside dynamic and static NAT for the NAT pools.

ip nat pool natpool1 10.11.11.1 10.11.11.2 prefix-length 24
ip nat inside source static 192.168.11.10 10.11.11.10 vrf 1 match-in-vrf
ip nat inside source list global-list pool natpool1 vrf 1 match-in-vrf overload
!
ip nat pool natpool2 10.22.22.1 10.22.22.2 prefix-length 24
ip nat outside source list global-list pool natpool2 vrf 2 overload match-in-vrf
ip nat outside source static 192.168.22.10 10.22.22.10 vrf 2 match-in-vrf
!
ip nat pool natpool3 10.13.13.1 10.13.13.2 prefix-length 24
ip nat inside source list global-list pool natpool3 vrf 3 match-in-vrf overload
ip nat inside source static tcp 192.168.13.10 80 10.13.13.10 8080 vrf 3 extendable match-in-vrf

Configure Static NAT Using NAT Pool for Inside Static NAT (Starting Cisco IOS XE Catalyst SD-WAN Release 17.5.1a)

Configure static NAT inside for a NAT pool.

ip nat pool natpool1 10.11.11.1 10.11.11.30 prefix-length 24
ip nat pool natpool2 10.11.11.5 10.11.11.6 prefix-length 24
ip nat inside source list global-list pool natpool1 vrf 1 match-in-vrf
ip nat inside source list global-list pool natpool2 vrf 1 match-in-vrf
ip nat inside source static 192.168.11.10 10.11.11.10 vrf 1 match-in-vrf pool natpool1

Configure static NAT inside and static NAT outside for a NAT pool.

ip nat pool natpool1 10.11.11.1 10.11.11.30 prefix-length 24
ip nat pool natpool2 10.11.11.5 10.11.11.6 prefix-length 24
ip nat inside source list global-list pool natpool1 vrf 1 match-in-vrf
ip nat inside source list global-list pool natpool2 vrf 1 match-in-vrf
ip nat inside source static 192.168.11.10 10.11.11.10 vrf 1 match-in-vrf pool natpool1
ip nat outside source static 192.168.21.10 10.22.22.10 vrf 1 match-in-vrf pool natpool1

Use Case 1: Inside Static NAT Using an Inside NAT Pool

In this example, when only the static inside NAT is mapped to the NAT pool, sequence 101 specifies the data-policy configuration for static NAT traffic destined to the service-side of the network from the remote edge through the overlay network (in to out). Sequence 102 specifies the data-policy configuration for traffic from service-side of the network destined to the remote edge device for a destination global IP address of 10.11.11.10 (out to in).

policy
 data-policy edge1
  vpn-list vpn_1
   sequence 101
    match
     source-ip 192.168.11.0/24
     destination-ip 192.168.21.0/24
    !
    action accept
     count nat_vrf_1
     nat pool 1
    !
   !
   default-action accept
  !
 sequence 102  
    match
     source-ip 192.168.21.0/24
     destination-ip 10.11.11.0/27
    !
    action accept
     count nat_vrf_2
     nat pool 2
    !
   !
   default-action accept
  !
   default-action accept
  !
 !

Use Case 2: Static Inside NAT and Static Outside NAT Mapped to Inside NAT Address Pool

In this example, when the static inside NAT and static outside NAT are mapped to the NAT pool, sequence 101 specifies the data-policy configuration for static NAT traffic destined to the service-side of the network from the remote edge devices through the overlay network (in to out). Sequence 102 specifies the data-policy configuration for traffic from service-side of the network destined to the remote edge device for a destination global IP address of 10.11.11.10 (out to in).

policy
data-policy vedge1
  vpn-list vpn_1
   sequence 101 
    match
     source-ip 192.168.11.0/24
     destination-ip 10.22.22.10/27
    !
    action accept
     count nat_vrf_1
     nat pool 1
    !
   !
   sequence 102
    match
     source-ip 192.168.21.0/24
     destination-ip 10.11.11.0/27
    action accept
     nat pool 1
   default-action accept
  !

Note


Starting from Cisco IOS XE Catalyst SD-WAN Release 17.3.1a, the ip nat settings central-policy command is required for NAT on Cisco IOS XE Catalyst SD-WAN devices to work in Cisco Catalyst SD-WAN mode. If you use a Cisco SD-WAN Manager feature template to enable NAT on the device, Cisco SD-WAN Manager automatically pushes this command to the device. However, if you are using a device CLI template only to configure NAT on the device, you need to add the ip nat settings central-policy command to the device CLI template configuration.


Verify Configuration of Service-Side NAT

Example for VRF 1

Traffic from 192.168.11.10 gets translated based on the static NAT rule. Traffic from any other source in 192.168.11.0/24 gets translated to a pool IP.

Device# show ip nat translations
Pro  Inside global         Inside local          Outside local         Outside global
tcp  10.13.13.10:8080      192.168.13.10:80      ---                   ---
---  ---                   ---                   10.22.22.10           192.168.22.10         
---  10.11.11.10           192.168.11.10         ---                   ---
icmp 10.11.11.1:18193      192.168.11.2:18193    192.168.21.2:18193    192.168.21.2:18193
tcp  10.11.11.10:59888     192.168.11.10:59888   192.168.21.10:21      192.168.21.10:21
tcp  10.11.11.10:50069     192.168.11.10:50069   192.168.21.10:35890   192.168.21.10:35890
tcp  10.11.11.10:39164     192.168.11.10:39164   192.168.21.10:80      192.168.21.10:80
Total number of translations: 7
Example for VRF 2

Traffic from 192.168.22.10 gets translated to 10.22.22.10 based on the static NAT rule. Traffic from any other source 192.168.22.0/24 gets translated to a pool IP.

Device# show ip nat translations
Pro  Inside global         Inside local          Outside local         Outside global
tcp  10.13.13.10:8080      192.168.13.10:80      ---                   ---
---  ---                   ---                   10.22.22.10           192.168.22.10         
---  10.11.11.10           192.168.11.10         ---                   ---
tcp  192.168.12.10:21      192.168.12.10:21      10.22.22.10:56602     192.168.22.10:56602
tcp  192.168.12.10:46238   192.168.12.10:46238   10.22.22.10:49532     192.168.22.10:49532
icmp 10.22.22.1:18328      192.168.22.2:18328    192.168.12.2:18328    192.168.12.2:18328
tcp  192.168.12.10:80      192.168.12.10:80      10.22.22.10:46340     192.168.22.10:46340
Total number of translations: 7
Example for VRF 3

Any traffic to 10.13.13.10:8080 gets translated to 192.168.13.10:80. Any other traffic from 192.168.11.0/24 gets translated to a pool IP.

Device# show ip nat translations
Pro  Inside global         Inside local          Outside local         Outside global
tcp  10.13.13.10:8080      192.168.13.10:80      ---                   ---
---  ---                   ---                   10.22.22.10           192.168.22.10         
---  10.11.11.10           192.168.11.10         ---                   ---
tcp  10.13.13.1:43162      192.168.13.10:43162   192.168.23.10:21      192.168.23.10:21
tcp  10.13.13.1:41753      192.168.13.10:41753   192.168.23.10:34754   192.168.23.10:34754
icmp 10.13.13.1:19217      192.168.13.2:19217    192.168.23.2:19217    192.168.23.2:19217
tcp  10.13.13.10:8080      192.168.13.10:80      192.168.23.10:40298   192.168.23.10:40298
tcp  10.13.13.1:43857      192.168.13.10:43857   192.168.23.10:80      192.168.23.10:80
Total number of translations: 8
Verify Service-Side NAT when a NAT Pool is Used for Static NAT (From Cisco IOS XE Catalyst SD-WAN Release 17.5.1a)

The following sample output shows UDP traffic from client 1 (192.168.11.10) to server 2 (192.168.21.11):

Device# show ip nat translations
Pro  Inside global         Inside local          Outside local         Outside global
---  10.11.11.2            192.168.11.10         ---                   ---
---  10.11.11.5            192.168.11.10         ---                   ---
udp  10.11.11.5:5001       192.168.11.10:5001    192.168.21.11:5001    192.168.21.11:5001 ----> NAT IP from Pool 2
Total number of translations: 3

The following sample output shows UDP traffic from client 1 (192.168.11.10) to server 1 (192.168.21.10):

Device# show ip nat translations
Pro  Inside global         Inside local          Outside local         Outside global
---  10.11.11.2            192.168.11.10         ---                   ---
---  10.11.11.5            192.168.11.10         ---                   ---
udp  10.11.11.5:5001       192.168.11.10:5001    192.168.21.11:5001    192.168.21.11:5001 ----> NAT IP from Pool 2
udp  10.11.11.2:5001       192.168.11.10:5001    192.168.21.10:5001    192.168.21.10:5001 ----> NAT IP as per static NAT rule mapped to Pool 1
Total number of translations: 4

The following sample output shows UDP traffic from client 2 (192.168.11.11) to server 2 (192.168.21.11):

Device# show ip nat translations
Pro  Inside global         Inside local          Outside local         Outside global
---  10.11.11.2            192.168.11.10         ---                   ---
---  10.11.11.6            192.168.11.11         ---                   ---
---  10.11.11.5            192.168.11.10         ---                   ---
udp  10.11.11.5:5001       192.168.11.10:5001    192.168.21.11:5001    192.168.21.11:5001 ----> NAT IP from pool 2
udp  10.11.11.6:5001       192.168.11.11:5001    192.168.21.11:5001    192.168.21.11:5001 ----> NAT IP from pool 2
udp  10.11.11.2:5001       192.168.11.10:5001    192.168.21.10:5001    192.168.21.10:5001 ----> NAT IP as per static NAT rule mapped to Pool 1
Total number of translations: 6

Configuration Examples for Service-Side NAT

Example: NAT Configuration on a Cisco VPN Interface Ethernet Template
ip nat inside source list nat-dia-vpn-hop-access-list interface GigabitEthernet1 overload
  ip nat translation tcp-timeout 3600
  ip nat translation udp-timeout 60
  ip nat route vrf 1 10.0.0.1 10.0.0.1 global
  
interface GigabitEthernet1
   no shutdown
   arp timeout 1200
   ip address 10.1.15.15 255.255.255.0
   ip redirects
   ip mtu    1500
   ip nat outside
Example: Configuration of Dynamic NAT
ip nat pool natpool-gigabitethernet1-0 198.51.100.1 198.51.100.2 prefix-length 24
ip nat inside source list global-list pool natpool-gigabitethernet1-0 egress-interface GigabitEthernet1
Example: Configuration of Interface Overload
ip nat pool natpool-gigabitethernet1-0 209.165.201.1 209.165.201.2 prefix-length 24
ip nat inside source list global-list pool natpool-gigabitethernet1-0 overload egress-interface GigabitEthernet1
Example: Configuration of Interface Overload with a Loopback Interface
ip nat inside source list global-list interface loopback1 overload egress-interface GigabitEthernet1

Intra-VPN Service-Side NAT

The following sections provide information about configuring intra-VPN service-side NAT.

Information About Intra-VPN Service-Side NAT

Intra-VPN service-side NAT is an extension to service-side NAT, which allows a service-side LAN interface to communicate with another service-side LAN interface within the same VPN. Intra-VPN service-side NAT uses static or dynamic NAT so that data traffic can be initiated in either direction. You can apply static or dynamic NAT rules for packets to be routed from other LAN interfaces to the interface configured as the outside interface using the ip nat outside command.

You configure intra-VPN service-side NAT using a device CLI template or a CLI add-on template.

You can configure port forwarding for intra-VPN service-side NAT.

For more information on configuring port forwarding for intra-VPN service-side NAT, see Configure Service-Side Port Forwarding for NAT.

Benefits of Intra-VPN Service-Side NAT
  • Supports LAN-to-LAN traffic in the same VPN

  • Supports static or dynamic NAT for a mapping between real and mapped IP addresses

  • Supports bidirectional traffic between two LAN interfaces within the same VPN

Restrictions for Intra-VPN Service-Side NAT

  • NAT for a service-side LAN interface to a remote branch is not supported.

  • Direct Internet Access (DIA) is not supported for packets from a service-side LAN interface.

  • A service-to-service-side LAN interface must be in the same VPN.

    NAT is not supported across different VPNs.

  • Firewall, AppNav-XE, and multicast are not supported.

  • Configure intra-VPN service-side NAT using a device CLI template or a CLI add-on template. Cisco SD-WAN Manager feature template support is not available for Cisco IOS XE Catalyst SD-WAN Release 17.7.1a.


    Note


    If you use a Cisco SD-WAN Manager feature template for other NAT-related features, ip nat outside configuration is removed from the interface. Consequently, intra-VPN service-side NAT functionality is not available.


  • Configure the data policy direction as All (all directions).

  • Only LAN-side physical interfaces and Ethernet sub interfaces are supported. Loopback and Bridge Domain Interface (BDI) interfaces are not supported.

  • NAT DIA with port forwarding is not supported.

Configure Intra-VPN Service-Side NAT

Workflow for Configuring Intra-VPN Service-Side NAT
  1. Configure a centralized data policy for the Cisco Catalyst SD-WAN Controller for static or dynamic NAT mapping.

    For more information on configuring a centralized data policy, see Create and Apply a Centralized Data Policy for NAT.

  2. Configure static or dynamic NAT using a Cisco VPN template.

  3. (Optional) Configure a pool name for static or dynamic NAT mapping.

    For more information on configuring a pool name for static or dynamic NAT mapping, see Configure Service-Side Static NAT.

  4. Use a device CLI template or a CLI add-on template to configure an outside interface for NAT translation and apply the configurations to the device.

  5. Attach the device CLI template or the CLI add-on template to the device.

Configure Intra-VPN Service-Side NAT Using a CLI Add-On Template

Before You Begin

Create a new CLI add-on template or edit an existing CLI add-on template.

For more information on CLI add-on feature templates, see CLI Add-On Feature Templates.

Configure Intra-VPN Service-Side NAT Using a CLI Add-On Template
  1. From the Cisco SD-WAN Manager menu, choose Configuration > Templates.

  2. Click Feature Templates.


    Note


    In Cisco vManage Release 20.7.x and earlier releases, Feature Templates is titled Feature.


  3. Click Add Template.

  4. Choose a device from the device list.

  5. Click CLI Add-On Template under OTHER TEMPLATES.

  6. In CLI Add-On Template area, enter the configuration.

  7. Configure an outside interface using the ip nat outside command.

  8. Click Save.

    The CLI add-on template that you created is displayed in the CLI Configuration table.

  9. Attach the CLI add-on template to your device.

Configuration Examples for Intra-VPN Service-Side NAT

Example: Policy Configuration

The following is a sample configuration of a centralized data policy for the Cisco Catalyst SD-WAN Controller that includes a NAT pool:

Device# show running policy
policy
data-policy cedge1
vpn-list vpn_1
sequence 101
match
source-ip 192.168.11.0/24
!
action accept
count nat_vrf_1
nat pool 1
!
!
default-action accept
!
!
lists
vpn-list vpn_1
vpn 1
!
site-list cedge1
site-id 500
.
.
.
Example: LAN Interface 1 Configured with IP NAT Outside

The following example shows that an ip nat outside interface has been configured on the GigabitEthernet 5.102 interface.

Device# interface GigabitEthernet5.102
encapsulation dot1Q 102
vrf forwarding 1
ip address 192.168.12.1 255.255.255.0
ip mtu 1496
ip nat outside
ip ospf dead-interval 40
ip ospf 1 area 0
pool configuration:
ip nat pool natpool1 10.11.11.1 10.11.11.2 prefix-length 24
ip nat inside source list global-list pool natpool1 vrf 1 match-in-vrf overload

static nat inside config:
ip nat inside source static 192.168.11.10 10.11.11.10 vrf 1 match-in-vr
end
Example: LAN Interface 2

The following example shows that the GigabitEthernet 5.101 interface has been configured on the same VPN and VRF.

Device# interface GigabitEthernet5.101
encapsulation dot1Q 101
vrf forwarding 1
ip address 192.168.11.1 255.255.255.0
ip mtu 1496
ip ospf dead-interval 40
ip ospf 1 area 0
pool configuration:
ip nat pool natpool1 10.11.11.1 10.11.11.2 prefix-length 24
ip nat inside source list global-list pool natpool1 vrf 1 match-in-vrf overload

static nat inside config:
ip nat inside source static 192.168.11.10 10.11.11.10 vrf 1 match-in-vr
end

Service-Side Conditional Static NAT

The following sections provide information about configuring service-side conditional static NAT.

Information About Service-Side Conditional Static NAT

Configure service-side conditional static NAT to translate the same source IP address to different global IP addresses based on the destination IP addresses.

Service-side conditional static NAT allows you to configure the same source IP address within another configured static NAT pool IP address range. Prior to Cisco IOS XE Catalyst SD-WAN Release 17.8.1a, this functionality was not supported.

Configure service-side conditional static NAT using a device CLI.

Benefits of Service-Side Conditional Static NAT
  • Translates the same source IP address to different IP addresses based on the destination IP addresses in a data policy.

  • Allows you to use the same source IP address within another configured static NAT pool IP address range.

Restrictions for Service-Side Conditional Static NAT

  • Service-side conditional static NAT is for inside static NAT and service-side traffic only.

  • Outside static NAT is not supported.

  • DIA traffic is not supported.

Workflow for Configuring Service-Side Conditional Static NAT

  1. Configure a centralized data policy and configure the sequences with different destination IP addresses.

    For more information, see Create and Apply a Centralized Data Policy for Service-Side NAT.

  2. Configure at least two NAT pools with the same local IP address.

    For more information on configuring service-side conditional static NAT using the CLI, see Configure Service-Side Conditional Static NAT Using the CLI.

  3. Verify the translations for the destination IP addresses.

    For more information on verifying the translations for the destination IP addresses, see Verify Conditional Static NAT Using the CLI.

Configure Service-Side Conditional Static NAT Using the CLI

  1. Configure a centralized data policy and configure the sequences:

    data-policy EDGE1
    vpn-list vpn_1
    sequence 101
    match
    source-ip 192.168.11.10/32
    destination-ip 192.168.21.10/32
    !
    action accept
    count vrf1_In2Out1
    nat pool 1
    !
    !
    sequence 102
    match
    source-ip 192.168.11.10/32
    destination-ip 192.168.21.2/32
    !
    action accept
    count vrf1_In2Out2
    nat pool 2
    !
    !
    default-action accept
    !
    !
    lists
    vpn-list vpn_1
    vpn 1
    !
    site-list EDGE1
    site-id 500
    !
    !
    !
  2. Configure at least two NAT pools:

    Device(config)# ip nat pool natpool1 10.11.11.1 10.11.11.10 prefix-length 24
    Device(config)# ip nat pool natpool2 10.22.22.1 10.22.22.10 prefix-length 24
  3. Configure inside static NAT using the same source IP address for the corresponding NAT pools:

    Device(config)# ip nat inside source static 192.168.11.10 10.11.11.10 vrf 1 match-in-vrf pool natpool1
    Device(config)# ip nat inside source static 192.168.11.10 10.22.22.10 vrf 1 match-in-vrf pool natpool2
    Device(config)# ip nat inside source list global-list pool natpool1 vrf 1 match-in-vrf overload
    Device(config)# ip nat inside source list global-list pool natpool2 vrf 1 match-in-vrf overload

Verify Service-Side Conditional Static NAT Configuration

Sample Source IP Translations for NAT Pool 1 and NAT Pool 2

For natpool1, the Cisco IOS XE Catalyst SD-WAN device translates the source IP address 192.168.11.10 to 10.11.11.10, which is destined for 192.168.21.10.

Device# show ip nat translations
Pro  Inside global         Inside local          Outside local         Outside global
---  10.11.11.10           192.168.11.10         ---                   ---
---  10.22.22.10           192.168.11.10         ---                   ---
icmp 10.22.22.10:8371      192.168.11.10:8371    192.168.21.2:8371    192.168.21.2:8371
icmp 10.11.11.10:8368      192.168.11.10:8368    192.168.21.10:8368   192.168.21.10:8368
Total number of translations: 4

For natpool2, the Cisco IOS XE Catalyst SD-WAN device translates the source IP address 192.168.11.10 to 10.22.22.10, which is destined for 192.168.21.2.

Service-Side Static Network NAT

The following sections provide information about configuring service-side static network NAT.

Information About Service-Side Static Network NAT

You can configure service-side static NAT for an entire network using one configuration.

You can configure service-side static network NAT using Cisco SD-WAN Manager or a device CLI template.

Benefits of Service-Side Static Network NAT
  • Supports configuration of a single static NAT pool for configuring an entire subnet.

  • Supports the object tracker functionality for LAN prefixes and LAN interfaces.

Restrictions for Service-Side Static Network NAT

  • Configuration using a centralized data policy is not supported.

  • Overlapping of NAT pool addresses is not supported.

  • Only inside service-side network NAT is supported.

  • Outside static network NAT is not supported.

  • DIA configuration is not supported.

Configure Service-Side Static Network NAT

Before You Begin
  • Configure and apply a data policy.

    For more information on creating and applying a centralized data policy for service-side NAT, see Create and Apply a Centralized Data Policy for Service-Side NAT.

  • Configure a Cisco VPN template or edit an existing Cisco VPN template.

  • Configure service-side static NAT.


    Note


    You need to configure a NAT pool prior to configuring service-side static network NAT.


    For more information on configuring service-side static NAT and a NAT pool, see Configure Service-Side Static NAT.

Configure Service-Side Static Network NAT
  1. From the Cisco SD-WAN Manager menu, choose Configuration > Templates.

  2. Click Feature Templates.

  3. To edit a Cisco VPN template, click adjacent to the template name and choose Edit.

  4. Click NAT.

  5. Click Static NAT.

  6. Under Static NAT, click New Static NAT Subnet.

  7. Enter the required parameters.

    Table 15. New Static NAT Subnet Parameters

    Parameter Name

    Description

    Source IP Subnet

    Enter the inside local address as the source IP subnet address.

    Translated Source IP Subnet

    Enter the outside global subnet address as the translated source IP subnet address. Maps a public IP address to a private source address.

    Network Prefix Length

    Enter the network prefix length.

    Static NAT Direction

    Select the direction for the network address translation.

    Choose Inside as the direction for performing network address translation.

    Add Object /Group Tracker

    (Optional) Enter the object ID number if you want to track an object.

    The object tracker functionality is supported for service-side static network NAT.

  8. Click Update.

Configure Service-Side Static Network NAT Using the CLI

  1. Configure service-side static network NAT using the following command:

    Device(config)# ip nat inside source static network 192.168.11.0 192.168.70.0 /24 vrf 1
    match-in-vrf
  2. (Optional) Configure a service-side NAT object tracker.

    For more information, see Configure Service-Side NAT Object Tracker.

Verify Service-Side Static Network NAT Configuration

The following sections provide information on how to verify service-side static network NAT configuration.

Verify Translations for Service-Side Static Network NAT

The following is a sample output from the show ip nat translations command:

Device# show ip nat translations
Pro  Inside global         Inside local          Outside local         Outside global
---  192.168.70.0          192.168.11.0          ---                   ---
---  192.168.70.11         192.168.11.11         ---                   ---
---  192.168.70.10         192.168.11.10         ---                   ---
icmp 192.168.70.11:16528   192.168.11.11:16528   192.168.21.11:16528   192.168.21.11:16528
icmp 192.168.70.10:16525   192.168.11.10:16525   192.168.21.10:16525   192.168.21.10:16525
icmp 192.168.70.10:16526   192.168.11.10:16526   192.168.21.10:16526   192.168.21.10:16526
icmp 192.168.70.10:16527   192.168.11.10:16527   192.168.21.10:16527   192.168.21.10:16527
Verify Service-Side Static Network NAT Route Creation
The following is a sample output from the show ip route vrf command:
Device# show ip route vrf 1
Routing Table: 1
Codes: L - local, C - connected, S - static, R - RIP, M - mobile, B - BGP
       D - EIGRP, EX - EIGRP external, O - OSPF, IA - OSPF inter area 
       N1 - OSPF NSSA external type 1, N2 - OSPF NSSA external type 2
       E1 - OSPF external type 1, E2 - OSPF external type 2, m - OMP
       n - NAT, Ni - NAT inside, No - NAT outside, Nd - NAT DIA
       i - IS-IS, su - IS-IS summary, L1 - IS-IS level-1, L2 - IS-IS level-2
       ia - IS-IS inter area, * - candidate default, U - per-user static route
       H - NHRP, G - NHRP registered, g - NHRP registration summary
       o - ODR, P - periodic downloaded static route, l - LISP
       a - application route
       + - replicated route, % - next hop override, p - overrides from PfR
       & - replicated local route overrides by connected

Gateway of last resort is not set

      10.0.0.0/8 is variably subnetted, 5 subnets, 2 masks
n Nd     10.0.1.0/24 [6/0], 2d00h, Null0
C        10.0.100.0/24 is directly connected, GigabitEthernet8
L        10.0.100.15/32 is directly connected, GigabitEthernet8
C        10.20.24.0/24 is directly connected, GigabitEthernet5
L        10.20.24.15/32 is directly connected, GigabitEthernet5
n Ni  192.168.70.0/24 [7/0], 00:00:12, Null0

Application-Level Gateways with Service-Side NAT

The following sections provide information about configuring application-level gateways (ALGs) with Service-Side NAT.

Information About Using ALGs with Service-Side NAT

Minimum supported releases: Cisco IOS XE Catalyst SD-WAN Release 17.15.1a, Cisco Catalyst SD-WAN Manager Release 20.15.1

An application-level gateway (ALG), also known as an application-layer gateway, is an application that translates the IP address inside the payload of an application packet. Use an ALG to interpret the application-layer protocol and perform firewall and NAT translations.

Specific protocols that embed the IP address information within the packet payload require the support of an ALG. The following protocol requires an ALG for NAT translations of the application payload:

  • File Transfer Protocol (FTP)

For more information about ALGs, see the IP Addressing: NAT Configuration Guide.

Benefits of Using ALGs with Service-Side NAT
  • Allows client applications to use dynamic TCP or UDP ports to communicate with the server application.

Restrictions for Using ALGs with Service-Side NAT

Minimum supported releases: Cisco IOS XE Catalyst SD-WAN Release 17.15.1a, Cisco Catalyst SD-WAN Manager Release 20.15.1

  • Outside NAT:

    • You cannot configure ALGs with Service-Side NAT using the ip nat outside source command.

Configure ALGs with Service-Side NAT Using a CLI Template

For more information on using CLI templates, see CLI Templates and CLI Add-On Feature Templates.


Note


By default, CLI templates execute commands in global config mode.

This section provides example CLI configurations to configure ALGs with service-side NAT:

  1. Configure service-side NAT.

    For more information, see Configure Service-Side NAT.

  2. Enable NAT ALG global support.

    ip nat service all-algs 
  3. Enable NAT ALG for FTP as shown in the following example:

    
    ip nat service ftp 
    
  4. Configure NAT pool on the router

    
    ip nat pool pool-name pool-range prefix/length 
    ip nat inside  source list global-list pool pool-name vrf number match-in-vrf overload 
    

Here's the complete configuration example for configuring ALGs.

Configure a centralized data policy that includes a match condition for a source IP to any destination IP

policy
 data-policy vedge1
  vpn-list vpn_1
   sequence 101
    match
     destination-ip 203.0.113.21/32
    !
    action accept
     count nat_vrf_1
     nat pool 1
    !
   sequence 102
    match
     source-ip 198.51.100.150/32
    !
    action accept
     count nat_vrf_1
     nat pool 1
   !
   default-action accept
  !
 !
 lists
  vpn-list vpn_1
   vpn 1
  !
  site-list vedge1
   site-id 500
  !
 !
!
apply-policy
 site-list vedge1
  data-policy vedge1 all
Enable NAT ALG global support
ip nat service all-algs 

Enable NAT ALG for FTP


ip nat service ftp 

Configure NAT pool on the router


ip nat pool natpool1 203.0.113.21 203.0.113.21 prefix-length 24
ip nat inside source static 192.0.2.150 203.0.113.99 vrf 1 match-in-vrf pool natpool1
ip nat inside source list global-list pool natpool1 vrf 1 match-in-vrf overload

Verify ALG Configuration

The following sections provide information about verifying configuration of ALG with service-side NAT.

Display NAT Translations
show ip nat translations tcp 
tcp  203.0.113.21:37713     192.0.2.150:37713    198.51.100.150:21       198.51.100.150:21
tcp  203.0.113.21:40586     192.0.2.150:40586    198.51.100.150:38366    198.51.100.150:38366

Note


You cannot view the translation of the payload using a CLI template. To view the translation of a payload, capture a packet using Cisco SD-WAN Manager.

For more information on capturing packets using Cisco SD-WAN Manager, see Capture Packets in the Cisco Catalyst SD-WAN Monitor and Maintain Guide.


Display ALG Translations
Device(config)# show platform hardware qfp active feature nat datapath sess-dump  
id 0xeec305c0 io 192.0.2.150 oo 198.51.100.150 io 51967 oo 27734 it 203.0.113.21 ot 198.51.100.150 it 51967 ot 27734 pro 6 vrf 5 tableid 5 bck 8490 in_if 0 out_if 0 ref 1 flags 0xc0204014 ext_flags 0x0 in_pkts 783 in_bytes 1073640 out_pkts 435 out_bytes 13928 flowdb in2out fh 0x0 flowdb out2in fh 0x0 rg 0 
id 0xeec30470 io 192.0.2.150 oo 198.51.100.150 io 37715 oo 21 it 203.0.113.21 ot 198.51.100.150 it 37715 ot 21 pro 6 vrf 5 tableid 5 bck 12489 in_if 0 out_if 0 ref 1 flags 0xc0204014 ext_flags 0x0 in_pkts 15 in_bytes 597 out_pkts 16 out_bytes 788 flowdb in2out fh 0x0 flowdb out2in fh 0x0 rg 0
Display NAT Statistics
Device(config)# show platform hardware qfp active feature nat datapath stats 

Counter                                                       Value
------------------------------------------------------------------------
number_of_session                                                 2
udp                                                               0
tcp                                                               2
icmp                                                              0
non_extended                                                      1
statics                                                           1
static_net                                                        0
entry_timeouts                                                    0
hits                                                              0
misses                                                            0
cgn_dest_log_timeouts                                             0
ipv4_nat_alg_bind_pkts                                            5
ipv4_nat_alg_sd_not_found                                         0
ipv4_nat_alg_sd_tail_not_found                                    0
ipv4_nat_rx_pkt                                               21686
ipv4_nat_tx_pkt                                               21892
ipv4_nat_flowdb_hits                                              0
ipv4_nat_stick_rx_pkts                                            0
ipv4_nat_stick_i2o_pkts                                           0
ipv4_nat_stick_o2i_pkts                                           0
ipv4_nat_stick_forus_hits_pkts                                    0
ipv4_nat_stick_hit_sb                                             0
ipv4_nat_stick_ha_divert_pkts                                     0
ipv4_nat_stick_ha_ar_pkts                                         0
ipv4_nat_stick_ha_tcp_fin                                         0
ipv4_nat_stick_ha_failed_pkts                                     0
ipv4_nat_non_natted_in2out_pkts                                2762
ipv4_nat_non_nated_out2in_pkts                                18955
ipv4_nat_bypass_pkts                                              0
ipv4_nat_unmarked_pkts                                        16330
ipv4_nat_res_port_in2out_pkts                                     0
ipv4_nat_res_port_out2in_pkts                                     0
ipv4_nat_ipc_retry_fail                                           0
ipv4_nat_cfg_rcvd                                                 9
ipv4_nat_cfg_rsp                                                 13 

Service-Side NAT Object Tracker

Table 16. Feature History

Feature Name

Release Information

Description

Service-Side NAT Object Tracker Support

Cisco IOS XE Catalyst SD-WAN Release 17.8.1a

Cisco vManage Release 20.8.1

This feature adds support for tracking LAN prefixes and LAN interfaces for service-side inside static NAT.

When the object tracker that is associated with a NAT route changes state (up or down), the NAT OMP route is added or removed from the routing table. You can view notifications in Cisco SD-WAN Manager for monitoring the NAT routes and interfaces that are added or removed.

You can configure the service-side NAT object tracker using Cisco SD-WAN Manager, a device CLI template, or a CLI add-on template.

Information About Service-Side NAT Object Tracker

The service-side NAT object tracker provides support for tracking the following:

  • LAN prefixes: Tracks the prefixes in the Route Information Base (RIB) of a routing table.


    Note


    If a prefix is missing in the routing table, the service-side NAT object tracker removes the OMP route of the NAT prefix.


  • LAN interfaces: Tracks whether the LAN interface is up or down.

Each tracked object is identified by a unique number that is specified in Cisco SD-WAN Manager, a device CLI, or a CLI add-on template. Client processes use this number to track a specific object.

The tracking process periodically polls the tracked objects and notes changes in values, if any. The changes in the tracked object are communicated to interested client processes, either immediately or after a specified delay. The object values are reported as either up or down.

Depending on the state of the LAN prefix or LAN interface, NAT route advertisements through OMP are either added or removed. You can view event logs in Cisco SD-WAN Manager for monitoring which NAT route advertisements are added or removed.

For more information on monitoring object tracker event logs in Cisco SD-WAN Manager, see Monitor Service-Side NAT Object Tracker.

You can configure the service-side NAT object tracker using Cisco SD-WAN Manager, a device CLI, or a CLI add-on template.

A track keyword is added to the ip nat inside source command.

For more information on the track keyword, see the ip nat inside source command in the Cisco Catalyst SD-WAN Qualified Command Reference.

Benefits of Service-Side NAT Object Tracker

  • Adds or removes NAT route advertisements through OMP, based on the state of the object tracker.

  • Provides Cisco SD-WAN Manager event log notifications for monitoring the NAT route advertisements that are added or removed.

  • Provides object tracker support for LAN prefixes and LAN interfaces.

Restrictions for Service-Side NAT Object Tracker

  • Service-side static NAT object tracker is supported only for inside static NAT and inside dynamic NAT.

  • Outside static NAT or NAT DIA is not supported.

  • Outside translations and port forwarding are not supported.

  • Cisco SD-WAN Manager does not support tracking of IP routes. You can track IP routes using a device CLI template or a CLI add-on template. You can track an interface as an object using Cisco SD-WAN Manager.

Use Case for Service-Side NAT Object Tracker

If a LAN interface or a LAN prefix is down, the service-side NAT object tracker goes down automatically. You can view event logs in Cisco SD-WAN Manager for monitoring which NAT route advertisements are added or removed.

Workflow for Configuring the Service-Side NAT Object Tracker

  1. Configure a centralized data policy for the Cisco Catalyst SD-WAN Controller to include a NAT pool number and an action.

    For more information on configuring and applying a centralized data policy for the service-side NAT object tracker, see Create and Apply a Centralized Data Policy for Service-Side NAT.

  2. Configure a service-side NAT object tracker or a tracker group using a Cisco System template.

    For more information on configuring a service-side NAT object tracker, see Configure Service-Side NAT Object Tracker.

  3. (Optional) Configure service-side dynamic NAT.

    For more information on configuring service-side dynamic NAT, see Configure Service-Side Dynamic NAT.

  4. Configure a NAT pool for service-side static NAT.

    For more information on configuring a NAT pool for service-side static NAT, see Configure Service-Side Static NAT.

  5. Associate the service-side NAT object tracker with the static inside NAT pool using a Cisco VPN template.

    For more information on associating the service-side NAT object tracker with the static inside NAT pool using a Cisco VPN template, see Associate the Service-Side NAT Object Tracker with a NAT Pool Using a Cisco VPN Template.

Configure Service-Side NAT Object Tracker

  1. From the Cisco SD-WAN Manager menu, choose Configuration > Templates.

  2. Click Feature Templates.

  3. To edit a Cisco System template, click adjacent to the template name and choose Edit.

  4. Click Tracker and choose New Object Tracker to configure the service-side NAT object tracker parameters.

    Table 17. Service-Side NAT Object Tracker Parameters

    Field

    Description

    Tracker Type

    Choose Interface or Route to configure object tracking for a LAN interface or a LAN prefix.

    Object ID

    Enter the object ID number.

    The object number identifies the tracked object and can be from 1 to 1000.

    Interface

    Choose a global or device-specific interface.

  5. Click Add.

  6. Click Update.

  7. (Optional) To create a tracker group, choose Tracker, and click Tracker Groups > New Object Tracker Groups to configure the service-side NAT object tracker.


    Note


    Ensure that you have created two trackers to create a tracker group.


    Table 18. Service-Side NAT Object Tracker Group Parameters

    Field

    Description

    Group Tracker ID

    Enter the name of the tracker group.

    Tracker ID

    Enter the name of the object tracker that you want to group.

    Criteria

    Choose AND or OR.

    If you choose the AND operation, the transport interface status is reported as active if both the associated trackers of the tracker group report that the route is active.

    OR ensures that the transport interface status is reported as active if either one of the associated trackers of the tracker group reports that the route is active.

  8. Click Add.

  9. Click Update.

Associate the Service-Side NAT Object Tracker with a NAT Pool Using a Cisco VPN Template

  1. From the Cisco SD-WAN Manager menu, choose Configuration > Templates.

  2. Click Feature Templates.

  3. To edit a Cisco VPN template, click adjacent to the template name and choose Edit.

  4. Configure a NAT pool for dynamic or static NAT.

    For more information on configuring a NAT pool for dynamic or static NAT, see Configure Service-Side Static NAT.

  5. In the NAT Direction field, change the scope from Default to Global, and then choose Inside from the drop-down list.

  6. In the Add Object/Object Group Tracker field, enter the object ID number for the interface or route that you want to track.

  7. Click Add.

  8. Click Update.

Configure Service-Side NAT Object Tracker Using the CLI

  1. Configure a centralized data policy for the Cisco Catalyst SD-WAN Controller that includes a NAT pool number and an action as shown in the following example.

    policy
     data-policy ssn_policy
      vpn-list ssn_vpn_list
       sequence 10
        match
         destination-ip 192.168.21.0/24 
    !
        action accept
         count counter_dst_192
         nat pool 1
        !
       !
       sequence 20
        match
         destination-ip 10.11.11.0/27  
      !
        action accept
         count counter_dst_10   
         nat pool 2
        !
       !
       sequence 101
        match
         source-ip 192.168.11.0/24   
         protocol  1
        !
        action accept
         nat pool 1
        !
       !
       default-action accept
      !
     !
     lists
      vpn-list ssn_vpn_list
       vpn 1
      !
      site-list ssn_site_list
       site-id 500
      !
     !
    !
    apply-policy
     site-list ssn_site_list
      data-policy ssn_policy all
     !
    !
  2. Configure the inside static NAT with a tracker name and a tracker ID:

    Device(config)# ip nat inside source static 192.168.11.10 10.11.11.10 vrf 1 
    match-in-vrf track 1
  3. Configure an inside static NAT pool with a prefix length:

    Device(config)# ip nat pool natpool2 10.11.11.0 10.11.11.25 prefix-length 27 
  4. Configure an inside static NAT global pool with overload mode, a tracker name, and a tracker ID:

    Device(config)# ip nat inside source list global-list pool natpool2 vrf 1 match-in-vrf overload track 1
  5. Track the reachability of an IP route:

    Device(config)# track 1 ip route 192.168.11.0 255.255.255.0 reachability
    Device(config-track)# ip vrf 1

    Note


    A tracked object is considered to be up when a routing table entry exists for the route, and the route is accessible.


  6. Track the line-protocol state of an interface:

    Device(confige)# track 1 interface GigabitEthernet5.101 line-protocol

Configure Service-Side NAT Object Tracker Using a CLI Add-On Template

Before You Begin

Create a new CLI add-on template or edit an existing CLI add-on template.

For more information on CLI add-on feature templates, see CLI Add-On Feature Templates.

Configure Service-Side NAT Object Tracker Using a CLI Add-On Template

  1. From the Cisco SD-WAN Manager menu, choose Configuration > Templates.

  2. Click Feature Templates.

  3. Click Add Template.

  4. Choose a device from the device list.

  5. Click CLI Add-On Template under OTHER TEMPLATES.

  6. In CLI Add-On Template area, enter the configuration as shown in the following example:

    track 1 ip route 192.168.11.0 255.255.255.0 reachability 
    ip vrf 1
    ip nat pool natpool1 10.11.11.1 10.11.11.30 prefix-length 24
    ip nat inside source static 192.168.11.10 10.11.11.10 vrf 1 match-in-vrf pool natpool1 track 1
    ip nat inside source list global-list pool natpool1 vrf 1 match-in-vrf overload track 1
  7. Click Save.

    The CLI add-on template that you created is displayed in the CLI Configuration table.

  8. Attach the CLI add-on template to your device.

Verify the Service-Side NAT Object Tracker Configuration

The following sections provide information on verifying the service-side NAT object tracker configuration.

Verify the State of the Service-Side NAT Object Tracker

The following is a sample output from the show track object-id command:

Device# show track 1
 Track 1
  Interface GigabitEthernet5.101 line-protocol
  Line protocol is Up
    1 change, last change 01:38:57
  Tracked by:
    NAT 0

In this output, Line protocol is Up (OMP), indicates that the service-side object tracker is up.

Verify that NAT Routes Through OMP are Added to the Routing Table

The following is a sample output from the show ip route vrf command:

Device# show ip route vrf 1
Routing Table: 1
Codes: L - local, C - connected, S - static, R - RIP, M - mobile, B - BGP
       D - EIGRP, EX - EIGRP external, O - OSPF, IA - OSPF inter area
       N1 - OSPF NSSA external type 1, N2 - OSPF NSSA external type 2
       E1 - OSPF external type 1, E2 - OSPF external type 2, m - OMP
       n - NAT, Ni - NAT inside, No - NAT outside, Nd - NAT DIA
       i - IS-IS, su - IS-IS summary, L1 - IS-IS level-1, L2 - IS-IS level-2
       ia - IS-IS inter area, * - candidate default, U - per-user static route
       H - NHRP, G - NHRP registered, g - NHRP registration summary
       o - ODR, P - periodic downloaded static route, l - LISP
       a - application route
       + - replicated route, % - next hop override, p - overrides from PfR
       & - replicated local route overrides by connected
Gateway of last resort is not set
      10.0.0.0/24 is subnetted, 3 subnets
m        10.11.11.1 [251/0] via 192.168.11.10, 04:03:35, Sdwan-system-intf
m        10.11.11.6 [251/0] via 192.168.13.10, 04:03:35, Sdwan-system-intf
m        10.11.11.30 [251/0] via 192.168.11.21, 04:03:35, Sdwan-system-intf

In this output, Ni - NAT inside is configured.

In this output, the lines beginning with m indicate that the NAT routes are added to the routing table.

Monitor Service-Side NAT Object Tracker

You can monitor the NAT routes and interfaces that are added or removed within Cisco SD-WAN Manager.

  1. From the Cisco SD-WAN Manager menu, choose Monitor > Logs.

  2. Click Events.