Configuring AAA Services
This module describes the implementation of the administrative model of task-based authorization used to control user access in the software system. The major tasks required to implement task-based authorization involve configuring user groups and task groups.
User groups and task groups are configured through the software command set used for authentication, authorization and accounting (AAA) services. Authentication commands are used to verify the identity of a user or principal. Authorization commands are used to verify that an authenticated user (or principal) is granted permission to perform a specific task. Accounting commands are used for logging of sessions and to create an audit trail by recording certain user- or system-generated actions.
AAA is part of the software base package and is available by default.
Prerequisites for Configuring AAA Services
The following are the prerequisites to configure AAA services:
-
You must be in a user group associated with a task group that includes the proper task IDs. The command reference guides include the task IDs required for each command. If you suspect user group assignment is preventing you from using a command, contact your AAA administrator for assistance.
-
Establish a root system user using the initial setup dialog. The administrator may configure a few local users without any specific AAA configuration. The external security server becomes necessary when user accounts are shared among many routers within an administrative domain. A typical configuration would include the use of an external AAA security server and database with the local database option as a backup in case the external server becomes unreachable.
Restrictions for Configuring AAA Services
This section lists the restrictions for configuring AAA services.
Compatibility
Compatibility is verified with the Cisco freeware TACACS+ server and FreeRADIUS only.
Interoperability
Router administrators can use the same AAA server software and database (for example, CiscoSecure ACS) for the router and any other Cisco equipment that does not currently run the Cisco software. To support interoperability between the router and external TACACS+ servers that do not support task IDs, see the “Task IDs for TACACS+ and RADIUS Authenticated Users” section.
Configure Task group
Task-based authorization employs the concept of a task ID as its basic element. A task ID defines the permission to execute an operation for a given user. Each user is associated with a set of permitted router operation tasks identified by task IDs. Users are granted authority by being assigned to user groups that are in turn associated with task groups. Each task group is associated with one or more task IDs. The first configuration task in setting up an authorization scheme to configure the task groups, followed by user groups, followed by individual users.
Specific task IDs can be removed from a task group by specifying the no prefix for the task command.
The task group itself can be removed. Deleting a task group that is still referred to elsewhere results in an error.
Before you begin
Before creating task groups and associating them with task IDs, you should have some familiarity with the router list of task IDs and the purpose of each task ID. Use the show aaa task supported command to display a complete list of task IDs.
 Note |
Only users with write permissions for the AAA task ID can configure task groups. |
Procedure
|
Step 1 |
configure Example:Enters mode. |
|
Step 2 |
taskgroup taskgroup-name Example:Creates a name for a particular task group and enters task group configuration submode.
|
|
Step 3 |
description string Example:(Optional) Creates a description of the task group named in Step 2. |
|
Step 4 |
task {read | write | execute | debug} taskid-name Example:Specifies a task ID to be associated with the task group named in Step 2.
|
|
Step 5 |
Repeat for each task ID to be associated with the task group named in Step 2. |
|
Step 6 |
Use the commit or end command. commit —Saves the configuration changes and remains within the configuration session.
|
What to do next
After completing configuration of a full set of task groups, configure a full set of user groups as described in the Configuring User Groups section.
Configure User Groups
User groups are configured with the command parameters for a set of users, such as task groups. Entering the usergroup command accesses the user group configuration submode. Users can remove specific user groups by using the no form of the usergroup command. Deleting a usergroup that is still referenced in the system results in a warning.
Before you begin
Note |
Only users associated with the WRITE:AAA task ID can configure user groups. User groups cannot inherit properties from predefined groups, such as owner-sdr. |
Procedure
|
Step 1 |
configure Example:Enters mode. |
|
Step 2 |
usergroup usergroup-name Example:Creates a name for a particular user group and enters user group configuration submode.
|
|
Step 3 |
description string Example:(Optional) Creates a description of the user group named in Step 2. |
|
Step 4 |
inherit usergroup usergroup-name Example:
|
|
Step 5 |
taskgroup taskgroup-name Example:Associates the user group named in Step 2 with the task group named in this step.
|
|
Step 6 |
Repeat Step for each task group to be associated with the user group named in Step 2. |
|
Step 7 |
Use the commit or end command. commit —Saves the configuration changes and remains within the configuration session.
|
Configure First User on Cisco Routers
When a Cisco Router is booted for the very first time, and a user logs in for the first time, a root-system username and password must be created. Configure the root-system username and password, as described in the following procedure:
Step 1. Establish a connection to the Console port.
This initiates communication with the router. When you have successfully connected to the router through the Console port, the router displays the prompt:
Enter root-system usernameStep 2. Type the username for the root-system login and press Enter.
Sets the root-system username, which is used to log in to the router.
Step 3. Type the password for the root-system login and press Enter.
Creates an encrypted password for the root-system username. This password must be at least six characters in length. The router displays the prompt:
Enter secretStep 4. Retype the password for the root-system login and press Enter.
Allows the router to verify that you have entered the same password both times. The router displays the prompt:
Enter secret againNote |
If the passwords do not match, the router prompts you to repeat the process. |
Step 5. Log in to the router.
Establishes your access rights for the router management session.
Note |
In case of Router reload, when there is no stored username and password, you must create a new username and password. |
For more information on minimum password length, see Minimum Password Length for First User Creation.
Example
The following example shows the root-system username and password configuration for a new router, and it shows the initial login:
/* Administrative User Dialog */
Enter root-system username: cisco
Enter secret:
Enter secret again:

RP/0/0/CPU0:Jan 10 12:50:53.105 : exec[65652]: %MGBL-CONFIG-6-DB_COMMIT : 'Administration configuration committed by system'.
Use 'show configuration commit changes 2000000009' to view the changes. Use the 'admin' mode 'configure' command to modify this configuration.
/* User Access Verification */
Username: cisco
Password:
RP/0/0/CPU0:ios#
The secret line in the configuration command script shows that the password is encrypted. When you type the password during configuration and login, the password is hidden.
Configure Users
Perform this task to configure a user.
Each user is identified by a username that is unique across the administrative domain. Each user should be made a member of at least one user group. Deleting a user group may orphan the users associated with that group. The AAA server authenticates orphaned users but most commands are not authorized.
From Cisco IOS XR Software Release 24.3.1 and later, the router synchronizes up to 100 valid Linux-compatible users to the Linux infrastructure (/etc/passwd file), and up to 20 users to the standby route processor (RP) in a dual-RP router setup.
Procedure
|
Step 1 |
configure Example:Enters mode. |
|
Step 2 |
username user-name Example:Creates a name for a new user (or identifies a current user) and enters username configuration submode.
|
|
Step 3 |
Do one of the following:
Example:or Specifies a password for the user named in step 2.
|
|
Step 4 |
group group-name Example:Assigns the user named in step 2 to a user group that has already been defined through the usergroup command.
|
|
Step 5 |
Repeat step 4 for each user group to be associated with the user specified in step 2. |
|
Step 6 |
Use the commit or end command. commit —Saves the configuration changes and remains within the configuration session.
|
Password Masking For Type 7 Password Authentication
|
Feature Name |
Release Information |
Feature Description |
|---|---|---|
|
Password Masking |
Release 7.3.1 |
With this feature, when you key in a password or secret, it is not displayed on the screen. This enhances security. The feature is enabled by default. The following options are added to the username command:
|
When you key in a password, to ensure that it is not displayed on the screen, use the masked-password option. Details:
Use the username command as shown below, and enter the password.
The following command contains the username us3, and 0 to specify a cleartext password.
Router(config)# username us3 masked-password 0

Enter password:
Re-enter password:

Router(config)#commit
View the encrypted password:
Router# show run aaa
..

username us3
 password 7 105A1D0D
Enable Type 7 password authentication and enter the encrypted password 105A1D0D. You can also use a password encrypted earlier.
Router(config)# username us3 masked-password 7

Enter password:
Re-enter password:


Router(config)#commit
If there is a password mismatch between the two entries, an error message is displayed.
Configure Type 8 and Type 9 Passwords
When configuring a password, user has the following two options:
-
User can provide an already encrypted value, which is stored directly in the system without any further encryption.
-
User can provide a cleartext password that is internally encrypted and stored in the system.
The Type 5, Type 8, and Type 9 encryption methods provide the above mentioned options for users to configure their passwords.
For more information about configuring users with Type 8 and Type 9 encryption methods, see Configure Users section.
Configuration Example
Directly configuring a Type 8 encrypted password:
Router(config)# username demo8
Router(config-un)#secret 8 $8$dsYGNam3K1SIJO$7nv/35M/qr6t.dVc7UY9zrJDWRVqncHub1PE9UlMQFs
Configuring a clear-text password that is encrypted using Type 8 encryption method:
Router(config)# username demo8
Router(config-un)#secret 0 enc-type 8 PASSWORD
Directly configuring a Type 9 encrypted password:
Router(config)# username demo9
Router(config-un)# secret 9 $9$nhEmQVczB7dqsO$X.HsgL6x1il0RxkOSSvyQYwucySCt7qFm4v7pqCxkKM
Configuring a clear-text password that is encrypted using Type 9 encryption method:
Router(config)# username demo9
Router(config-un)#secret 0 enc-type 9 PASSWORD
Password Masking For Type 5, Type 8, Type 9 And Type 10 Password Authentication
When you key in a password, to ensure that it is not displayed on the screen, use the masked-secret option. Steps:
Use the username command as shown below, and enter the password.
The following command contains the username us6, 0 to specify a cleartext password, and the encryption type (5, 8, 9, or 10).
Router(config)# username us6 masked-secret 0 enc-type 8

Enter secret:
Re-enter secret:

Router(config)# commit
View the encrypted secret:
Router# show running-config aaa
..
username us6
 secret 8 $8$mlcSk/Ae5Qu/5k$RJdI3SQ8B4iP7rdxxQvVlJVeRHSubZzcgcaLYxjg36s
Enter the username, 8 to specify Type 8 secret authentication, and enter the Type 8 secret. You can also use a secret encrypted earlier.
Router(config)# username us6 masked-secret 8

Enter secret:
Re-enter secret:

Router(config)# commmit
If there is a password mismatch between the two entries, an error message is displayed.
Related Topics
Associated Commands
-
secret
-
username
Configure Type 10 Password
You can use these options to configure Type 10 password (that uses SHA512 hashing algorithm) for the user:
Configuration Example
From Release 7.0.1 and later, Type 10 is applied by default for the passwords when you create a user with a clear-text password.
Router#configure
Router(config)#username user10 secret testpassword
Router(config-un)#commit
Also, a new parameter '10' is available for the secret option under the username command to configure explicitly the Type 10 passwords.
Router#configure
Router(config)#username root secret 10 $6$9UvJidvsTEqgkAPU$3CL1Ei/F.E4v/Hi.UaqLwX8UsSEr9ApG6c5pzhMJmZtgW4jObAQ7meAwyhu5VM/aRFJqe/jxZG17h6xPrvJWf1
Router(config-un)#commit
In scenarios where you have to enter the clear-text password, you can specify the encryption algorithm to be used by using the enc-type keyword and the clear-text password as follows:
Router#configure
Router(config)#username user10 secret 0 enc-type 10 testpassword
Router(config-un)#commit
The preceding configuration configures the user with the Type10 password.
In System Admin VM, you can specify the Type 10 encrypted password as follows:
Router#admin
sysadmin-vm:0_RP0# configure
sysadmin-vm:0_RP0(config)# aaa authentication users user user10 password testpassword
sysadmin-vm:0_RP0(config)# commit
Commit complete.
sysadmin-vm:0_RP0(config)# end
sysadmin-vm:0_RP0# exit
Router#
Running Configuration
Router#show running-configuration username user10
!
username user10
secret 10 $6$9UvJidvsTEqgkAPU$3CL1Ei/F.E4v/Hi.UaqLwX8UsSEr9ApG6c5pzhMJmZtgW4jObAQ7meAwyhu5VM/aRFJqe/jxZG17h6xPrvJWf1
!
In System Admin VM:
sysadmin-vm:0_RP0#show running-configuration aaa authentication users user user10
Tue Jan 14 07:32:44.363 UTC+00:00
aaa authentication users user user10
password $6$MMvhlj1CzSd2nJfB$Bbzvxzriwx4iLFg75w4zj15YK3yeoq5UoRyc1evtSX0c4EuaMlqK.v7E3zbY1yKKxkN6rXpQuhMJOuyRHItDc1
!
sysadmin-vm:0_RP0#
Similarly, you can use the admin show running-configuration aaa authentication users user user10 command in XR VM, to see the details of the password configured for the user.
Related Topics
Associated Commands
Backward Compatibility for Password Types
When you downgrade from Cisco IOS XR Software Release 7.0.1 to lower versions, you might experience issues such as configuration loss, authentication failure, termination of downgrade process or XR VM being down. These issues occur because Type 5 (MD5 ) is the default encryption for older releases.
It is recommended to follow these steps to avoid such backward compatibility issues during downgrade:
-
Perform all install operations for the downgrade except the install activate step.
-
Before performing the install activate step, take the backup of user configurations on both the VMs. You can use the show running-configuration username | file harddisk:/filename command for the same.
-
Delete all users on both the VMs and initiate the install activate step.
-
When the router boots up with the lower version, it prompts for the first root-system user creation.
-
After your login with the credentials of the first user, apply the previously saved configuration to both the VMs.
For example, consider an authentication failure scenario after a downgrade. The downgrade process does not affect any existing user name configuration with Type 5 secret. Such users can log in without any issue using the clear-text password. But, the users with Type 10 configuration might experience authentication failure, and may not be able to log in. In such cases, the system treats the whole string “10<space><sha512-hashed-text>” as a clear-text password and encrypts it to Type 5 (MD5) password. Use that "10<space><sha512-hashed-text> string as the password for that Type 10 user to log in. After you log in with the preceding step, you must explicitly configure the clear-text password in XR VM and System Admin VM as described in the Configuration Example section.
Configure AAA Password Policy
To configure the AAA password policy, use the aaa password-policy command in the global configuration mode.
Configuration Example
This example shows how to configure a AAA password security policy, test-policy . This test-policy is applied to a user by using the username command along with password-policy option.
RP/0/RP0/CPU0:router(config)#aaa password-policy test-policy
RP/0/RP0/CPU0:router(config-aaa)#min-length 8
RP/0/RP0/CPU0:router(config-aaa)#max-length 15
RP/0/RP0/CPU0:router(config-aaa)#lifetime months 3
RP/0/RP0/CPU0:router(config-aaa)#min-char-change 5
RP/0/RP0/CPU0:router(config-aaa)#authen-max-attempts 3
RP/0/RP0/CPU0:router(config-aaa)#lockout-time days 1
RP/0/RP0/CPU0:router(config-aaa)#commit

RP/0/RP0/CPU0:router(config)#username user1 password-policy test-policy password 0 pwd1
Running Configuration
aaa password-policy test-policy
 min-length 8
 max-length 15
 lifetime months 3
 min-char-change 5
 authen-max-attempts 3
 lockout-time days 1
 !
Verification
Use this command to get details of the AAA password policy configured in the router:
RP/0/RP0/CPU0:router#show aaa password-policy

Fri Feb  3 16:50:58.086 EDT
Password Policy Name : test-policy
  Number of Users : 1
  Minimum Length : 8
  Maximum Length : 15
  Special Character Len : 0
  Uppercase Character Len : 0
  Lowercase Character Len : 1
  Numeric Character Len : 0
  Policy Life Time :
    seconds : 0
    minutes : 0
    hours : 0
    days : 0
    months : 3
    years : 0
  Lockout Time :
    seconds : 0
    minutes : 0
    hours : 0
    days : 1
    months : 0
    years : 0
  Character Change Len : 5
  Maximum Failure Attempts : 3
Password Masking For AAA Password Policies
When you key in a password, to ensure that it is not displayed on the screen, use the masked-password option. Steps:
Create a AAA password security policy and enter the cleartext password.
In this example, a policy called security is created, and 0 is specified for a cleartext password.
Router(config)# aaa password-policy security
Router(config)# username us6 password-policy security masked-password 0

Enter password:
Re-enter password:

Router(config)#commit
View the encrypted password:
Router# show run aaa
..

aaa password-policy security
..
username us6
 password-policy security password 7 0835585A
Enter the username, 7 to specify Type 7 password authentication, and enter the password 0835585A. You can also use a password encrypted earlier.
Router(config)# username us6 password-policy test-policy masked-password 7

Enter password:
Re-enter password:


Router(config)#commit
If there is a password mismatch between the two entries, an error message is displayed.
Related Topic
Associated Commands
-
aaa password-policy
-
show aaa password-policy
-
username
Configure Password Policy for User Secret and Password
A new option, policy is added to the existing username command to apply the password policy to the user. This policy is common to the password and the secret. After applying the policy to the user, the system validates any change to the secret or password against that particular policy.
On Cisco IOS XR 64 bit platforms, the first user is synced from XR VM to System Admin VM. If the user is configured for a secret policy, then the password compliance is checked during the configuration. The password is then synced to System Admin VM. When system administrators need to explicitly configure the user, then the username configurations on System Admin VM are not checked for the password compliance. This is because, the password policy configuration is not applicable on System Admin VM.
Note |
The configuration model for the AAA component on System Admin VM is the YANG file. A change in the YANG model can cause configuration inconsistencies during an upgrade on downgrade scenario. |
Guidelines to Configure Password Policy for User Secret
You must follow these guidelines while configuring policy for user password or secret:
-
If there is no policy already configured while configuring the user secret, then the system does not have any policy validation to do for that secret. So, you must ensure that the policy is configured first and then applied to the username configuration, before configuring the secret. Especially when you copy and paste the username configurations.
-
If you change the user secret at the time of log in, the system applies the same hashing type as it was applied in the username configuration. For example, if the secret was applied as Type 5 in the username configuration, then the system applies Type 5 itself if the secret is modified at the time of log in.
-
Password and secret are different entities. Hence, if restrict-old-count is configured in the policy while changing the password, the system checks for compliance only with the history of old passwords; not with the history of old secrets.
-
Similarly, the system does not check for old password history while changing the secret and conversely. So, if the same secret (in clear text) was used before as password for the user, then the system allows that secret configuration. And, conversely, for the password configuration.
-
The restrict-old-count applies to both secret and password. So, the configured secret or password overwrites the old secret or password in the FIFO order.
-
When you try to assign a different policy to a username which already has a password or secret associated to a policy, then the system rejects that configuration. The error message indicates to remove the existing password or secret in order to apply the new policy to the user.
-
The system does not allow any configuration that requires the secret to be validated against the previous composition of the cleartext secret. This is because, you cannot retrieve the clear text format of the secret that was once hashed, for comparison. Hence, the following configurations do not have any effect on the secret configuration of the user:
-
max-char-repetition
-
min-char-change
-
restrict-password-reverse
-
restrict-password-advanced
-
-
As the new policy configuration for the user is common to password and secret, the existing password-policy configuration becomes redundant. So, these configurations must be mutually exclusive. When any one of these configurations is already present, and if you try to configure the other policy, then the system rejects it. The error message says that password-policy and policy are not allowed together.
Configuration Example
This example shows how to configure a password policy for the user, that applies to both the password and the secret of the user.
Router#configure
Router(config)#username user1
Router(config-un)#policy test-policy1
Router(config-un)#secret 10 $6$dmwuW0Ajicf98W0.$y/vzynWF1/OcGxwBwHs79VAy5ZZLhoHd7TicR4mOo8IIVriYCGAKW0A.w1JvTPO7IbZry.DxHrE3SN2BBzBJe0
Router(config-un)#commit
Running Configuration
username user1
policy test-policy1
secret 10 $6$dmwuW0Ajicf98W0.$y/vzynWF1/OcGxwBwHs79VAy5ZZLhoHd7TicR4mOo8IIVriYCGAKW0A.w1JvTPO7IbZry.DxHrE3SN2BBzBJe0
!
The below examples show different possible combinations to check for password or secret compliance against the policy:
username user2
policy test-policy1
password 7 09604F0B
!
username user3
policy test-policy1
secret 10 $6$U3GZl1VINwJ4Dl1.$8X6av2kQ.AWvMKGEz5TLvZO7OXj6DgeOqLoQKIf7XJxKayViFJNateZ0no6gO6DbbXn4bBo/Dlqitro3jlsS40
password 7 080D4D4C
!
username user4
secret 10 $6$mA465X/m/UQ5....$rSKRw9B/SBYC/N.f7A9NCntPkrHXL6F4V26/NTjWXnrSnna03FxW3bcyfDAyveOexJz7/oak0XB6tjLF5CO981
password-policy test-policy1 password 7 0723204E
!
username user5
password-policy test-policy1 password 7 09604F0B
!
The compliance check for password or secret in the above examples works as described below:
-
When you change the secret for user1, the system checks the secret compliance against the policy, test-policy1.
-
When you change the password for user2, the system checks the password compliance against the policy, test-policy1.
-
When you change the password or secret for user3, the system checks the password or secret compliance against the policy, test-policy1.
-
When you change the secret for user4, the system does not check for compliance against any policy. Whereas, when you change the password for user4, the system checks the password compliance against the policy, test-policy1.
-
When you change the password for user5, the system checks the password compliance against the policy, test-policy1.
The below example shows the order of configurations when performed in a single commit (say, by copy and paste). In such scenarios, if there is any username entry with a secret and policy configured, the system checks for secret compliance against that policy. In this example, the system does not check for any password compliance during the commit. So, the following configurations can be put in any order in a single commit.
(1)aaa password-policy pol1
 lifetime minutes 1
 upper-case 1
 restrict-old-count 2
!

username lab2
 group root-lr
(2) policy pol1
(3) secret 10 $6$gphqA0RfBXOn6A0.$wRwWG1l0TIpHPdVQ66fUiIM5P46ggoGMGgFuaZd0LD2DLFYDlDPaRyXQLi8Izjb49tC7H7tkTLrc1.GELFpiK.
  password 7 1533292F200F2D
!
Related Topics
Associated Commands
-
aaa password-policy
-
policy
-
username
Password Policy to Restrict Consecutive Characters
|
Feature Name |
Release Information |
Feature Description |
|---|---|---|
|
Password Policy to Restrict Consecutive Characters |
Release 7.7.1 |
We have enhanced the router security by enforcing a strong password policy for all users configured on the router. You can now specify a new password policy for the user that restricts the usage of a specific number of consecutive characters for the login passwords. These characters include English alphabets, the sequence of QWERTY keyboard layout, and numbers, such as, 'abcd', 'qwer', '1234', and so on. Apart from passwords, the feature is also applicable for secrets–the one-way encrypted secure login passwords that are not easy to decrypt to retrieve the original unencrypted password text. The password policy is applicable only for the users configured on the local AAA server on the router; not those configured on the remote AAA server. The feature introduces the restrict-consecutive-characters command. |
Most often you create passwords and secrets which are easy to remember, such as the ones that use consecutive characters from English alphabets, or numbers. Such passwords and secrets are easy to compromise, thereby making the router vulnerable to security attacks. From Cisco IOS XR Software Release 7.7.1 and later, you can enhance the security of your user passwords and secrets by defining a password policy that restricts the usage of consecutive characters from English alphabets, QWERTY layout keyboard English alphabets, and numbers (such as, 'abcd', 'qwer', 'zyxw', '1234', and so on). You can also restrict a cyclic wrapping of the alphabet and the number (such as, 'yzab', 'opqw', '9012', and so on). The feature also gives you the flexibility to specify the number of consecutive alphabets or numbers to be restricted.
Certain key aspects of this feature are:
-
The feature is disabled, by default.
-
The security administrator must have write permission for AAA tasks to create the password policies.
-
All password policies are applicable only to locally-configured users; not to users who are configured on remote AAA servers.
This table depicts the examples of valid and invalid passwords and secrets when the password policy to restrict consecutive characters (say, 4 in this example) is in place.
|
Use Case |
Examples of Invalid Password and Secret |
Examples of Valid Password and Secret |
|---|---|---|
|
Restrict 4 consecutive English alphabets |
AbcD, ABCD, TestPQRS, DcbA, TestZYxW123, DCBA, ihgf |
AbcPqR, Xyzdef, Yzab, zabC |
|
Restrict 4 consecutive English alphabets and decimal numbers from QWERTY keyboard layout |
Qwer, QWER, Mnbv, aQwerm, Test1234, TestT7890, 5678, fghj |
Opas, xzLk, sapo, saqw3210, Test9012 |
|
Restrict 4 consecutive English alphabets along with cyclic wrapping |
Yzab, TestYZAB, zabc |
1234, Qwer, QWER, Mnbv, aQwerm, Test1234, TestT0987 |
|
Restrict 4 consecutive English alphabets and numbers from QWERTY keyboard layout along with cyclic wrapping |
9012, 8901, Test3210, TestT0987, Opqw, klas, dsal, Cxzm, nmzx |
AbcD, ABCD, Yzab, TestYZAB, zabc |
How to Restrict Consecutive Characters for User Passwords and Secrets
To enable the feature to restrict consecutive characters for user passwords and secrets, use the restrict-consecutive-characters command in aaa password policy configuration mode. To disable the feature, use the no form of the command.
You can use the optional keyword, cyclic-wrap , to restrict the cyclic wrapping of characters and numbers.
After creating the password policies, you must explicitly apply those policies to the user profiles so that the password policies take effect in the password and secret configuration.
Configuration Example
Enabling the feature using CLI:
Router(config)#aaa password-policy test-policy
Router(config-pp)#restrict-consecutive-characters english-alphabet 4
Router(config-pp)#restrict-consecutive-characters qwerty-keyboard 5
The keyword, cyclic-wrap , to restrict cyclic wrapping is an optional parameter. If configured, then the feature also restricts the cyclic wrapping of characters and numbers.
Router(config-pp)#restrict-consecutive-characters english-alphabet 4 cyclic-wrap
Router(config-pp)#restrict-consecutive-characters qwerty-keyboard 5 cyclic-wrap
Applying the password policy to the user profile:
Router(config)#username user1
Router(config-un)#policy test-policy
Router(config-un)#commit
Running Configuration
This is a sample running configuration that shows that you have configured a AAA password policy that restricts six consecutive characters from the QWERTY keyboard, and cyclic wrapping of four consecutive English alphabets.
Router(config-pp)#show running-config aaa password-policy
Tue May 17 10:53:16.532 UTC

!
aaa password-policy test-policy
 restrict-consecutive-characters qwerty-keyboard 6
 restrict-consecutive-characters english-alphabet 4 cyclic-wrap
!
Verification
You can use the show aaa password-policy command to know if the feature to restrict consecutive characters for user passwords and secrets is applied on the password policy.
Router#show aaa password-policy test-policy
Tue May 17 10:54:24.064 UTC
Password Policy Name : test-policy
  Number of Users : 0
  Minimum Length : 2
  Maximum Length : 253
  Special Character Len : 0
  Uppercase Character Len : 0
  Lowercase Character Len : 0
  Numeric Character Len : 0
  Policy Life Time :
    seconds : 0
    minutes : 0
    hours : 0
    days : 0
    months : 0
    years : 0
  Warning Interval :
    seconds : 0
    minutes : 0
    hours : 0
    days : 0
    months : 0
    years : 0
  Lockout Time :
    seconds : 0
    minutes : 0
    hours : 0
    days : 0
    months : 0
    years : 0
  Restrict Old Time :
    days : 0
    months : 0
    years : 0
  Character Change Len : 2
  Maximum Failure Attempts : 0
  Reference Count : 0
  Error Count : 0
  Lockout Count Attempts : 0
  Maximum char repetition : 0
  Restrict Old count : 0
  Restrict Username : 0
  Restrict Username Reverse  : 0
  Restrict Password Reverse  : 0
  Restrict Password Advanced : 0
  Restrict Consecutive Character :
    English Alphabet characters: 4
    English Alphabet Cyclic Wrap: True
    Qwerty Keyboard characters: 6
    Qwerty Keyboard Cyclic Wrap: False
Router#
Password or Secret Configuration Failure Scenarios:
You notice these logs or error messages on the router console when password or secret configuration fails because of the policy violation to restrict consecutive characters or numbers:
Router(config)#username user1
Router(config-un)#policy test-policy
Router(config-un)#password DEFg
Router(config-un)#commit
Tue Dec  7 10:17:56.843 UTC

% Failed to commit and rollback one or more configuration items. Please issue 'show configuration failed [inheritance]' from this session to view the errors
Router(config-un)#show  configuration failed
username user1
 password 7 03205E0D01
!!% 'LOCALD' detected the 'fatal' condition 'Password contains consecutive characters from qwerty keyboard or English alphabet'
!
End
Router(config)#username user1
RP/0/RP0/CPU0:ios(config-un)#masked-secret
Fri Dec  3 12:33:44.354 UTC

Enter secret:
Re-enter secret:

secret is not compliant with policy to restrict consecutive letters or numbers
RP/0/RP0/CPU0:ios(config-un)#
Router(config)#username user1
Router(config-un)#policy test-policy
Router(config-un)#secret qwerty
                                    ^
% Invalid input detected at '^' marker.
Router(config-un)#
YANG Data Model to Restrict Consecutive Characters for User Passwords and Secrets
You can use the Cisco-IOS-XR-aaa-locald-cfg native YANG data model to restrict consecutive characters for user passwords and secrets. Cisco-IOS-XR-um-aaa-locald-cfg is the corresponding unified model (UM). You can access the data models from the Github repository.
The following is a sample format to enable the feature using the native YANG data model.
<rpc message-id="101" xmlns="urn:ietf:params:xml:ns:netconf:base:1.0">
 <edit-config>
 <target>
<candidate/>
</target>
 <config xmlns:xc="urn:ietf:params:xml:ns:netconf:base:1.0">
 <aaa xmlns="http://cisco.com/ns/yang/Cisco-IOS-XR-aaa-lib-cfg">
<password-policies xmlns="http://cisco.com/ns/yang/Cisco-IOS-XR-aaa-locald-cfg">
<password-policy>
     <name>test-policy</name>
     <restrict-consecutive-characters>
      <qwerty-keyboard>
       <characters>4</characters>
	<cyclic-wrap></cyclic-wrap>
      </qwerty-keyboard>
      <english-alphabet>
       <characters>4</characters>
       <cyclic-wrap></cyclic-wrap>
      </english-alphabet>
</restrict-consecutive-characters>
</password-policy>
</password-policies>
</aaa>
</config>
</edit-config>
</rpc>
##
To learn more about the data models and to put them to use, see the Programmability Configuration Guide.
Configure Router to RADIUS Server Communication
This task configures router to RADIUS server communication. The RADIUS host is normally a multiuser system running RADIUS server software from Cisco (CiscoSecure ACS), Livingston, Merit, Microsoft, or another software provider. Configuring router to RADIUS server communication can have several components:
-
Hostname or IP address
-
Authentication destination port
-
Accounting destination port
-
Retransmission value
-
Timeout period
-
Key string
RADIUS security servers are identified on the basis of their hostname or IP address, hostname and specific User Datagram Protocol (UDP) port numbers, or IP address and specific UDP port numbers. The combination of the IP address and UDP port numbers creates a unique identifier, allowing different ports to be individually defined as RADIUS hosts providing a specific AAA service. In other words, this unique identifier enables RADIUS requests to be sent to multiple UDP ports on a server at the same IP address. If two different host entries on the same RADIUS server are configured for the same service—for example, accounting—the second host entry configured acts as an automatic switchover backup to the first one. Using this example, if the first host entry fails to provide accounting services, the network access server tries the second host entry configured on the same device for accounting services. (The RADIUS host entries are tried in the order they are configured.)
A RADIUS server and a Cisco router use a shared secret text string to encrypt passwords and exchange responses.To configure RADIUS to use the AAA security commands, you must specify the host running the RADIUS server daemon and a secret text (key) string that it shares with the router.
The timeout, retransmission, and encryption key values are configurable globally for all RADIUS servers, on a per-server basis, or in some combination of global and per-server settings. To apply these settings globally to all RADIUS servers communicating with the router, use the three unique global commands: radius-server timeout, radius-server retransmit, and radius-server key. To apply these values on a specific RADIUS server, use the radius-server host command.
You can configure a maximum of 30 global RADIUS servers.
Note |
You can configure both global and per-server timeout, retransmission, and key value commands simultaneously on the same Cisco network access server. If both global and per-server functions are configured on a router, the per-server timer, retransmission, and key value commands override global timer, retransmission, and key value commands. |
Procedure
|
Step 1 |
configure Example:Enters mode. |
||
|
Step 2 |
radius-server host {hostname | ip-address} [auth-port port-number] [acct-port port-number] [timeout seconds] [retransmit retries] [key string] Example:Specifies the hostname or IP address of the remote RADIUS server host.
|
||
|
Step 3 |
radius-server retransmit retries Example:Specifies the number of times the software searches the list of RADIUS server hosts before giving up.
|
||
|
Step 4 |
radius-server timeout seconds Example:Sets the number of seconds a router waits for a server host to reply before timing out.
|
||
|
Step 5 |
radius-server key {0 clear-text-key | 7 encrypted-key | clear-text-key} Example:Sets the authentication and encryption key for all RADIUS communications between the router and the RADIUS daemon. |
||
|
Step 6 |
radius source-interface type instance [vrf vrf-id] Example:(Optional) Forces RADIUS to use the IP address of a specified interface or subinterface for all outgoing RADIUS packets.
The vrf keyword enables the specification on a per-VRF basis. |
||
|
Step 7 |
Repeat step 2 through step 6 for each external server to be configured. |
||
|
Step 8 |
Use the commit or end command. commit —Saves the configuration changes and remains within the configuration session.
|
||
|
Step 9 |
show radius Example:(Optional) Displays information about the RADIUS servers that are configured in the system. |
Radius Summary Example
radius source-interface Mgm0/rp0/cpu0/0 vrf default
radius-server timeout 10
radius-server retransmit 2
!
! OOB RADIUS
radius-server host 123.100.100.186 auth-port 1812 acct-port 1813
key cisco123
timeout 10
retransmit 2
!
radius-server host 123.100.100.187 auth-port 1812 acct-port 1813
key cisco123
timeout 10
retransmit 2
!
aaa group server radius radgrp
server 123.100.100.186 auth-port 1812 acct-port 1813
server 123.100.100.187 auth-port 1812 acct-port 1813
!
aaa authorization exec radauthen group radgrp local
aaa authentication login radlogin group radgrp local
!
line template vty
authorization exec radauthen
login authentication radlogin
timestamp disable
exec-timeout 0 0
!
vty-pool default 0 99 line-template vty
Configure RADIUS Dead-Server Detection
The RADIUS Dead-Server Detection feature lets you configure and determine the criteria that is used to mark a RADIUS server as dead. If no criteria is explicitly configured, the criteria is computed dynamically on the basis of the number of outstanding transactions. The RADIUS dead-server detection configuration results in the prompt detection of RADIUS servers that have stopped responding. The prompt detection of nonresponding RADIUS servers and the avoidance of swamped and dead-to-live-to-dead-again servers result in less deadtime and quicker packet processing.
You can configure the minimum amount of time, in seconds, that must elapse from the time that the router last received a valid packet from the RADIUS server to the time the server is marked as dead. If a packet has not been received since the router booted, and there is a timeout, the time criterion is treated as though it was met.
In addition, you can configure the number of consecutive timeouts that must occur on the router before the RADIUS server is marked as dead. If the server performs both authentication and accounting, both types of packets are included in the number. Improperly constructed packets are counted as though they are timeouts. Only retransmissions are counted, not the initial transmission. For example, each timeout causes one retransmission to be sent.
Note |
Both the time criterion and the tries criterion must be met for the server to be marked as dead. |
The radius-server deadtime command specifies the time, in minutes, for which a server is marked as dead, remains dead, and, after this period, is marked alive even when no responses were received from it. When the dead criteria are configured, the servers are not monitored unless the radius-server deadtime command is configured
Procedure
|
Step 1 |
configure Example:Enters mode. |
|
Step 2 |
radius-server deadtime minutes Example:Improves RADIUS response times when some servers might be unavailable and causes the unavailable servers to be skipped immediately. |
|
Step 3 |
radius-server dead-criteria time seconds Example:Establishes the time for the dead-criteria conditions for a RADIUS server to be marked as dead. |
|
Step 4 |
radius-server dead-criteria tries tries Example:Establishes the number of tries for the dead-criteria conditions for a RADIUS server to be marked as dead. |
|
Step 5 |
Use the commit or end command. commit —Saves the configuration changes and remains within the configuration session.
|
|
Step 6 |
show radius dead-criteria host ip-addr [auth-port auth-port] [acct-port acct-port] Example:(Optional) Displays dead-server-detection information that has been requested for a RADIUS server at the specified IP address. |
Configure TACACS+ Server
This task configures a TACACS+ server.
The port, if not specified, defaults to the standard port number, 49. The timeout and key parameters can be specified globally for all TACACS+ servers. The timeout parameter specifies how long the AAA server waits to receive a response from the TACACS+ server. The key parameter specifies an authentication and encryption key shared between the AAA server and the TACACS+ server.
The single-connection parameter specifies to multiplex all TACACS+ requests to the TACACS+ server over a single TCP connection. The single-connection-idle-timeout parameter specifies the timeout value for this single connection.
You can configure a maximum of 30 global TACACS+ servers.
Procedure
|
Step 1 |
configure Example:Enters mode. |
|
Step 2 |
tacacs-server host host-name port port-number Example:Specifies a TACACS+ host server and optionally specifies a server port number.
|
|
Step 3 |
tacacs-server host host-name timeout seconds Example:Specifies a TACACS+ host server and optionally specifies a timeout value that sets the length of time the AAA server waits to receive a response from the TACACS+ server.
|
|
Step 4 |
tacacs-server host host-name key [0 | 7] auth-key Example:Specifies a TACACS+ host server and optionally specifies an authentication and encryption key shared between the AAA server and the TACACS+ server.
|
|
Step 5 |
tacacs-server host host-name single-connection Example:Prompts the router to multiplex all TACACS+ requests to this server over a single TCP connection. By default, a separate connection is used for each session. |
|
Step 6 |
tacacs-server host host-name single-connection-idle-timeout timeout-in-seconds Example:Sets the timeout value, in seconds, for the single TCP connection (that is created by configuring the single-connection command) to the TACACS+ server. The range is:
|
|
Step 7 |
tacacs source-interface type instance Example:(Optional) Specifies the source IP address of a selected interface for all outgoing TACACS+ packets.
|
|
Step 8 |
Repeat step 2 through step 6 for each external server to be configured. |
|
Step 9 |
Use the commit or end command. commit —Saves the configuration changes and remains within the configuration session.
|
|
Step 10 |
show tacacs Example:(Optional) Displays information about the TACACS+ servers that are configured in the system. |
Tacacs Summary Example:
! OOB TAC
tacacs-server host 123.100.100.186 port 49
key lm51
!
tacacs-server host 123.100.100.187 port 49
key lm51
!
aaa group server tacacs+ tacgrp
server 123.100.100.186
server 123.100.100.187
!
aaa group server tacacs+ eem
server 123.100.100.186
server 123.100.100.187
!
aaa authorization exec tacauthen group tacgrp local
aaa authentication login taclogin group tacgrp local
!
line console
authorization exec tacauthen
login authentication taclogin
timeout login response 30
timestamp
exec-timeout 0 0
session-timeout 15
!
vty-pool default 0 99 line-template console
Configure RADIUS Server Groups
This task configures RADIUS server groups.
The user can enter one or more server commands. The server command specifies the hostname or IP address of an external RADIUS server along with port numbers. When configured, this server group can be referenced from the AAA method lists (used while configuring authentication, authorization, or accounting).
You can configure a maximum of:
-
30 servers per RADIUS server group
-
30 private servers per RADIUS server group
Before you begin
For configuration to succeed, the external server should be accessible at the time of configuration.
Procedure
|
Step 1 |
configure Example:Enters mode. |
||
|
Step 2 |
aaa group server radius group-name Example:Groups different server hosts into distinct lists and enters the server group configuration mode. |
||
|
Step 3 |
server {hostname | ip-address} [auth-port port-number] [acct-port port-number] Example:Specifies the hostname or IP address of an external RADIUS server.
|
||
|
Step 4 |
Repeat step 4 for every external server to be added to the server group named in step 3. |
||
|
Step 5 |
deadtime minutes Example:Configures the deadtime value at the RADIUS server group level.
The example specifies a one-minute deadtime for RADIUS server group radgroup1 when it has failed to respond to authentication requests for the deadtime command
|
||
|
Step 6 |
Use the commit or end command. commit —Saves the configuration changes and remains within the configuration session.
|
||
|
Step 7 |
show radius server-groups [group-name [detail]] Example:(Optional) Displays information about each RADIUS server group that is configured in the system. |
What to do next
After configuring RADIUS server groups, define method lists by configuring authentication, authorization, and accounting.
Configure TACACS+ Server Groups
This task configures TACACS+ server groups.
You can enter one or more server commands. The server command specifies the hostname or IP address of an external TACACS+ server. Once configured, this server group can be referenced from the AAA method lists (used while configuring authentication, authorization, or accounting).
Before you begin
For successful configuration, the external server should be accessible at the time of configuration. When configuring the same IP address for global and vrf configuration, server-private parameters are required (see Configure Per VRF TACACS+ Server Groups section).
Procedure
|
Step 1 |
configure Example:Enters mode. |
||
|
Step 2 |
aaa group server tacacs+ group-name Example:Groups different server hosts into distinct lists and enters the server group configuration mode. |
||
|
Step 3 |
server {hostname | ip-address} Example:Specifies the hostname or IP address of an external TACACS+ server.
|
||
|
Step 4 |
Repeat step 3 for every external server to be added to the server group named in step 2. |
||
|
Step 5 |
server-private {hostname | ip-address in IPv4 or IPv6 format} [port port-number] [timeout seconds] [key string] Example:Configures the IP address of the private TACACS+ server for the group server.
|
||
|
Step 6 |
(Optional) vrf vrf-id Example:The vrf option specifies the Virtual Private Network (VPN) routing and forwarding (VRF) reference of an AAA TACACS+ server group. |
||
|
Step 7 |
Use the commit or end command. commit —Saves the configuration changes and remains within the configuration session.
|
||
|
Step 8 |
show tacacs server-groups Example:(Optional) Displays information about each TACACS+ server group that is configured in the system. |
Configure Per VRF TACACS+ Server Groups
The Cisco IOS XR software supports per VRF AAA to be configured on TACACS+ server groups. You must use the server-private and vrf commands as listed below to configure this feature.
The global server definitions can be referred from multiple server groups, but all references use the same server instance and connect to the same server. In case of VRF, you do not need the global configuration because the server status, server statistics and the key could be different for different VRFs. Therefore, you must use the server-private configuration if you want to configure per VRF TACACS+ server groups. If you have the same server used in different groups with different VRFs, ensure that it is reachable through all those VRFs.
If you are migrating the servers to a VRF, then it is safe to remove the global server configuration with respect to that server.
Prerequisites
You must ensure these before configuring per VRF on TACACS+ server groups:
-
Be familiar with configuring TACACS+, AAA, per VRF AAA, and group servers.
-
Ensure that you have access to the TACACS+ server.
-
Configure the VRF instance before configuring the specific VRF for a TACACS+ server and ensure that the VRF is reachable.
Configuration Example
Router#configure

/* Groups different server hosts into distinct lists and enters the server group configuration mode.
You can enter one or more server commands. The server command specifies the hostname or IP address of an external TACACS+ server.
Once configured, this server group can be referenced from the AAA method lists (used while configuring authentication, authorization, or accounting). */

Router(config)# aaa group server tacacs+ tacgroup1

/* Configures the IP address and the secret key of the private TACACS+ server that is reachable through specific VRF.
You can have multiple such server configurations which are reachable through the same VRF.*/

Router(config-sg-tacacs+)# server-private 10.1.1.1 port 49 key a_secret

/* The vrf option specifies the VRF reference of a AAA TACACS+ server group */
Router(config-sg-tacacs+)# vrf test-vrf
Router(config-sg-tacacs+)# commit
Running Configuration
aaa group server tacacs+ tacgroup1
 vrf test-vrf
 server-private 10.1.1.1 port 49
  key 7 0822455D0A16
 !
 server-private 10.1.1.2 port 49
  key 7 05080F1C2243
 !
 server-private 2001:db8:1::1 port 49
  key 7 045802150C2E
 !
 server-private 2001:db8:1::2 port 49
  key 7 13061E010803
 !
!
Verify Per VRF TACACS+ Server Groups
Router#show tacacs
Fri Sep 27 11:14:34.991 UTC

Server: 10.1.1.1/49 vrf=test-vrf [private]
        opens=0 closes=0 aborts=0 errors=0
        packets in=0 packets out=0
        status=up single-connect=false family=IPv4

Server: 10.1.1.2/49 vrf=test-vrf [private]
        opens=0 closes=0 aborts=0 errors=0
        packets in=0 packets out=0
        status=up single-connect=false family=IPv4

Server: 2001:db8:1::1/49 vrf=test-vrf [private]
        opens=0 closes=0 aborts=0 errors=0
        packets in=0 packets out=0
        status=up single-connect=false family=IPv6

Server: 2001:db8:1::2/49 vrf=test-vrf [private]
        opens=0 closes=0 aborts=0 errors=0
        packets in=0 packets out=0
        status=up single-connect=false family=IPv6
Associated Commands
-
server-private
-
vrf
Create Series of Authentication Methods
Authentication is the process by which a user (or a principal) is verified. Authentication configuration uses method lists to define an order of preference for the source of AAA data, which may be stored in a variety of data sources. You can configure authentication to define more than one method list and applications (such as login) can choose one of them. For example, console ports may use one method list and the vty ports may use another. If a method list is not specified, the application tries to use a default method list.
Note |
Applications should explicitly refer to defined method lists for the method lists to be effective. |
The authentication can be applied to tty lines through use of the login authentication line configuration submode command. If the method is RADIUS or TACACS+ servers, rather than server group, the RADIUS or TACACS+ server is chosen from the global pool of configured RADIUS and TACACS+ servers, in the order of configuration. Servers from this global pool are the servers that can be selectively added to a server group.
The subsequent methods of authentication are used only if the initial method returns an error, not if the request is rejected.
Before you begin
Note |
The default method list is applied for all the interfaces for authentication, except when a non-default named method list is explicitly configured, in which case the named method list is applied. The group radius, group tacacs+ , and group group-name forms of the aaa authentication command refer to a set of previously defined RADIUS or TACACS+ servers. Use the radius server-host or tacacs-server host command to configure the host servers. Use the aaa group server radius or aaa group server tacacs+ command to create a named group of servers. |
Procedure
|
Step 1 |
configure Example:Enters mode. |
|
Step 2 |
aaa authentication {login} {default | list-name} method-list Example:Creates a series of authentication methods, or a method list.
|
|
Step 3 |
Use the commit or end command. commit —Saves the configuration changes and remains within the configuration session.
|
|
Step 4 |
Repeat Step 1 through Step 3 for every authentication method list to be configured. |
Create Series of Authorization Methods
Method lists for authorization define the ways authorization will be performed and the sequence in which these methods will be performed. A method list is a named list describing the authorization methods to be used (such as TACACS+), in sequence. Method lists enable you to designate one or more security protocols to be used for authorization, thus ensuring a backup system if the initial method fails. The software uses the first method listed to authorize users for specific network services; if that method fails to respond, the software selects the next method listed in the method list. This process continues until there is successful communication with a listed authorization method, or until all methods defined have been exhausted.
Note |
The software attempts authorization with the next listed method only when there is no response or an error response (not a failure) from the previous method. If authorization fails at any point in this cycle—meaning that the security server or local username database responds by denying the user services—the authorization process stops and no other authorization methods are attempted. |
When you create a named method list, you are defining a particular list of authorization methods for the indicated authorization type. When defined, method lists must be applied to specific lines or interfaces before any of the defined methods are performed. Do not use the names of methods, such as TACACS+, when creating a new method list.
“Command” authorization, as a result of adding a command authorization method list to a line template, is separate from, and is in addition to, “task-based” authorization, which is performed automatically on the router. The default behavior for command authorization is none. Even if a default method list is configured, that method list has to be added to a line template for it to be used.
The aaa authorization commands command causes a request packet containing a series of attribute value (AV) pairs to be sent to the TACACS+ daemon as part of the authorization process. The daemon can do one of the following:
-
Accept the request as is.
-
Refuse authorization.
Note |
To avoid lockouts in user authorization, make sure to allow local fallback (by configuring the local option for aaa authorization command) when configuring AAA. For example, aaa authorization commands default tacacs+ local . |
Use the aaa authorization command to set parameters for authorization and to create named method lists defining specific authorization methods that can be used for each line or interface.
Note |
If you have configured AAA authorization to be subjected to TACACS+ authorization, then you must ensure that the server group is configured (use the aaa group server tacacs+ command for this) for that TACACS+ server. Else, authorization fails. For example, |
Procedure
|
Step 1 |
configure Example:Enters mode. |
|
Step 2 |
aaa authorization {commands | eventmanager | exec | network} {default | list-name} {none | local | group {tacacs+ | radius | group-name}} Example:Creates a series of authorization methods, or a method list.
|
|
Step 3 |
Use the commit or end command. commit —Saves the configuration changes and remains within the configuration session.
|
Create Series of Accounting Methods
Use the aaa accounting command to create default or named method lists defining specific accounting methods that can be used for each line or interface.
Currently, the software supports both the TACACS+ and RADIUS methods for accounting. The router reports user activity to the TACACS+ or RADIUS security server in the form of accounting records. Each accounting record contains accounting AV pairs and is stored on the security server.
Method lists for accounting define the way accounting is performed, enabling you to designate a particular security protocol to be used on specific lines or interfaces for particular types of accounting services. When naming a method list, do not use the names of methods, such as TACACS+.
For minimal accounting, include the stop-only keyword to send a “stop accounting” notice at the end of the requested user process. For more accounting, you can include the start-stop keyword, so that the external AAA server sends a “start accounting” notice at the beginning of the requested process and a “stop accounting” notice at the end of the process. In addition, you can use the aaa accounting update command to periodically send update records with accumulated information. Accounting records are stored only on the TACACS+ or RADIUS server.
When AAA accounting is activated, the router reports these attributes as accounting records, which are then stored in an accounting log on the security server.
Procedure
|
Step 1 |
configure Example:Enters mode. |
||
|
Step 2 |
Do one of the following:
Example:
Creates a series of accounting methods, or a method list.
|
||
|
Step 3 |
Use the commit or end command. commit —Saves the configuration changes and remains within the configuration session.
|
Generate Interim Accounting Records
This task enables periodic interim accounting records to be sent to the accounting server. When the aaa accounting update command is activated, software issues interim accounting records for all users on the system.
Note |
Interim accounting records are generated only for network sessions, such as Internet Key Exchange (IKE) accounting, which is controlled by the aaa accounting command with the network keyword. System, command, or EXEC accounting sessions cannot have interim records generated. |
Procedure
|
Step 1 |
configure Example:Enters mode. |
||
|
Step 2 |
aaa accounting update {newinfo | periodic minutes} Example:Enables periodic interim accounting records to be sent to the accounting server.
|
||
|
Step 3 |
Use the commit or end command. commit —Saves the configuration changes and remains within the configuration session.
|
Apply Method List
After you use the aaa authorization command to define a named authorization method list (or use the default method list) for a particular type of authorization, you must apply the defined lists to the appropriate lines in order for authorization to take place. Use the authorization command to apply the specified method lists (or, if none is specified, the default method list) to the selected line or group of lines.
Procedure
|
Step 1 |
configure Example:Enters mode. |
|
Step 2 |
line { console | default | template template-name} Example:Enters line template configuration mode. |
|
Step 3 |
authorization {commands | exec} {default | list-name} Example:Enables AAA authorization for a specific line or group of lines.
|
|
Step 4 |
Use the commit or end command. commit —Saves the configuration changes and remains within the configuration session.
|
What to do next
After applying authorization method lists by enabling AAA authorization, apply accounting method lists by enabling AAA accounting.
Enable Accounting Services
This task enables accounting services for a specific line of group of lines.
Procedure
|
Step 1 |
configure Example:Enters mode. |
|
Step 2 |
line { console | default | template template-name} Example:Enters line template configuration mode. |
|
Step 3 |
accounting {commands | exec} {default | list-name} Example:Enables AAA accounting for a specific line or group of lines.
|
|
Step 4 |
Use the commit or end command. commit —Saves the configuration changes and remains within the configuration session.
|
What to do next
After applying accounting method lists by enabling AAA accounting services, configure login parameters.
Configure Login Parameters
This task sets the interval that the server waits for reply to a login.
Procedure
|
Step 1 |
configure Example:Enters mode. |
|
Step 2 |
line template template-name Example:Specifies a line to configure and enters line template configuration mode. |
|
Step 3 |
timeout login response seconds Example:Sets the interval that the server waits for reply to a login.
|
|
Step 4 |
Use the commit or end command. commit —Saves the configuration changes and remains within the configuration session.
|
Task Maps
For users who are authenticated using an external TACACS+ server and RADIUS server, Cisco IOS XR software AAA supports a method to define task IDs remotely.
Format of the Task String
The task string in the configuration file of the TACACS+ server consists of tokens delimited by a comma (,). Each token contains either a task ID name and its permissions or the user group to include for this particular user, as shown in the following example:
task = “ permissions : taskid name , # usergroup name , ...”
Note |
Cisco IOS XR software allows you to specify task IDs as an attribute in the external RADIUS or TACACS+ server. If the server is also shared by non-Cisco IOS XR software systems, these attributes are marked as optional as indicated by the server documentation. For example, CiscoSecure ACS and the freeware TACACS+ server from Cisco require an asterisk (*) instead of an equal sign (=) before the attribute value for optional attributes. If you want to configure attributes as optional, refer to the TACACS+ server documentation. |
For example, to give a user named user1 BGP read, write, and execute permissions and include user1 in a user group named operator, the username entry in the external server’s TACACS+ configuration file would look similar to the following:
user = user1{
member = some-tac-server-group
opap = cleartext "lab"
service = exec {
task = "rwx:bgp,#operator"
}
}
The r,w,x, and d correspond to read, write, execute and debug, respectively, and the pound sign (#) indicates that a user group follows.
Note |
The optional keyword must be added in front of “task” to enable interoperability with systems based on Cisco IOS software. |
If CiscoSecure ACS is used, perform the following procedure to specify the task ID and user groups:
Procedure
|
Step 1 |
Enter your username and password. |
|
Step 2 |
Click the Group Setup button to display the Group Setup window. |
|
Step 3 |
From the Group drop-down list, select the group that you want to update. |
|
Step 4 |
Click the Edit Settings button. |
|
Step 5 |
Use the scroll arrow to locate the Shell (exec) check box. |
|
Step 6 |
Check the Shell (exec) check box to enable the custom attributes configuration. |
|
Step 7 |
Check the Custom attributes check box. |
|
Step 8 |
Enter the following task string without any blank spaces or quotation marks in the field: Example: |
|
Step 9 |
Click the Submit + Restart button to restart the server. The following RADIUS Vendor-Specific Attribute (VSA) example shows that the user is part of the sysadmin predefined task group, can configure BGP, and can view the configuration for OSPF: Example:After user1 successfully connects and logs in to the external TACACS+ server with username user1 and appropriate password, the show user tasks command can be used in XR EXEC mode to display all the tasks user1 can perform. For example: Example:Alternatively, if a user named user2, who does not have a task string, logs in to the external server, the following information is displayed: Example: |
How to Configure Hold-Down Timer for TACACS+
By default, the hold-down timer for TACACS+ is disabled. To enable the hold-down timer, use the holddown-time command under respective configuration modes as per the following hierarchy levels:
-
Global Level: Applicable to all TACACS+ servers that are configured on the router.
-
Server Group Level: Applicable only to TACACS+ servers that are configured in a particular server group. This configuration overrides the global hold-down timer configuration.
-
Server Level: Applicable only to a particular TACACS+ server (that also includes the private server). This configuration overrides the timer value at all other levels.
-
Private Server Level: Applicable only to a particular private TACACS+ server.
While selecting the timer at various configuration levels, the router gives preference to the one which is more specific to the server. That is, the server-level timer has the highest precedence, followed by server group-level and finally, the global-level timer.
Guidelines for Configuring Hold-Down Timer for TACACS+
-
You must configure the TACACS+ servers for this feature to take effect.
-
A timer value of zero indicates that the feature is disabled.
-
The timer value is decided by the configuration that is closest to the server regardless of its value. That is, if the server-level timer is configured as 0, the system disables the feature for that particular server, even if a positive value exists at other levels. So, if you need to disable the feature for some servers or server-groups, and not for others, you can configure a zero value for those specific servers or server-groups, and configure a positive value at the global level.
-
The system assigns priority to the servers based on the order in which they are configured in the router. The server that is configured first is used first. If the first server becomes unavailable or unreachable, the second server is used, and so on.
-
Avoid configuring a large timer value, as it marks the server as being down for a longer period. Also, the router does not use that server for further client requests during the hold-down time, even if the server becomes available in between. As a result, we recommend that you configure an optimal timer value of say, one or two minutes.
-
If there is a process restart or router reload while the timer is running, the timer immediately expires, and the router considers the unresponsive server as being up.
Syslog for Hold-Down Timer
The TACACS+ hold-down timer feature introduces a new syslog to notify that the server is marked as being down, and that the hold-down timer has started. This syslog replaces the old syslog which was invoked during earlier scenarios when server was down. If the feature is not enabled, the router continues to display the old syslog.
The syslog without enabling hold-down timer:
RP/0/RP0/CPU0:Aug 21 17:42:49.664 UTC: tacacsd[1226]: %SECURITY-TACACSD-6-SERVER_DOWN :
TACACS+ server 10.10.10.2/2020 is DOWN [vrf: 0x60000000, server-private: No]- Socket 116: No route to host
The syslog with hold-down timer enabled:
RP/0/RP0/CPU0:ios#RP/0/RP0/CPU0:Aug 21 16:00:25.200 UTC: tacacsd[1227]: %SECURITY-TACACSD-6-HOLDDOWN_TIME_START :
TACACS+ server 10.105.236.103/2020 is DOWN [vrf: 0x60000000, server-private: Yes]. Server will be marked as DOWN for 20 seconds: Success
Configuration Example
-
Global Level:
Router#configure Router(config)#tacacs-server holddown-time 30 -
Server Level:
Router(config)#tacacs-server host 10.105.236.102 port 2020 Router(config-tacacs-host)#holddown-time 35 -
Server-Group Level:
Router#configure Router(config)#aaa group server tacacs+ test-group Router(config-sg-tacacs)#holddown-time 40 -
Private Server Level:
Router(config)#aaa group server tacacs+ test-group
Router(config-sg-tacacs)#server-private 10.105.236.109 port 2020
Router(config-sg-tacacs-private)#holddown-time 55
Running Configuration
Router#show running-config
!
tacacs-server holddown-time 30
!
tacacs-server host 10.105.236.102 port 2020
 holddown-time 35
!
aaa group server tacacs+ test-group
 holddown-time 40
 server-private 10.105.236.109 port 2020
  holddown-time 55
 !
!
How to Disable Hold-Down Timer for TACACS+
You can disable the hold-down timer for TACACS+ at respective levels either by using the no form of the holddown-time command, or by configuring a timer value of zero.
For example,
Router(config)#no tacacs-server holddown-time 30
OR
Router(config)#tacacs-server holddown-time 0
Verification
A new field, on-hold , is introduced in the output field of the show tacacs command to indicate whether a server is on hold due to the hold-down timer or the server probe is in progress. A value of true indicates that the server is marked as being down. The router does not use that server for addressing any client request.
Router#show tacacs
Wed Oct 21 06:45:38.341 UTC
Server: 10.105.236.102/2020 opens=1 closes=1 aborts=1 errors=0
       packets in=0 packets out=0
       status=down single-connect=false family=IPv4
       idle-timeout=0 on-hold=true

Server: 10.105.236.103/2020 vrf=default [private]
        opens=0 closes=0 aborts=0 errors=0
        packets in=0 packets out=0
        status=up single-connect=false family=IPv4
        on-hold=true
The following is a sample output with on-hold value as false , which indicates that the server is not marked as being down. The router considers that server as being available for addressing client requests.
Router#show tacacs
Fri Aug 21 15:57:02.139 UTC

Server: 10.105.236.102/2020 opens=0 closes=0 aborts=0 errors=0
        packets in=0 packets out=0
        status=up single-connect=false family=IPv4
        idle-timeout=0 on-hold=false

Server: 10.105.236.103/2020 vrf=default [private]
        opens=0 closes=0 aborts=0 errors=0
        packets in=0 packets out=0
        status=up single-connect=false family=IPv4
        on-hold=false
Related Topics
Associated Commands
-
holddown-time
Overview on AAA Services
This section lists all the conceptual information that a software user must understand before configuring user groups and task groups through AAA or configuring Remote Authentication Dial-in User Service (RADIUS) or TACACS+ servers. Conceptual information also describes what AAA is and why it is important.
User, User Groups, and Task Groups
User attributes form the basis of the Cisco software administrative model. Each router user is associated with the following attributes:
-
User ID (ASCII string) that identifies the user uniquely across an administrative domain
-
Length limitation of 253 characters for passwords and one-way encrypted secrets
-
List of user groups (at least one) of which the user is a member (thereby enabling attributes such as task IDs).
User Categories
Router users are classified into the following categories:
-
Root Secure Domain Router (SDR) user (specific SDR administrative authority)
-
SDR user (specific SDR user access)
Root System Users
The root system user is the entity authorized to “own” the entire router chassis. The root system user functions with the highest privileges over all router components and can monitor all secure domain routers in the system. At least one root system user account must be created during router setup. Multiple root system users can exist.
The root system user can perform any configuration or monitoring task, including the following:
-
Configure secure domain routers.
-
Create, delete, and modify root SDR users (after logging in to the secure domain router as the root system user).
-
Create, delete, and modify secure domain router users and set user task permissions (after logging in to the secure domain router as the root system user).
-
Access fabric racks or any router resource not allocated to a secure domain router, allowing the root system user to authenticate to any router node regardless of the secure domain router configurations.
Root SDR Users
A root SDR user controls the configuration and monitoring of a particular SDR. The root SDR user can create users and configure their privileges within the SDR. Multiple root SDR users can work independently. A single SDR may have more than one root SDR user.
A root SDR user can perform the following administrative tasks for a particular SDR:
-
Create, delete, and modify secure domain router users and their privileges for the SDR.
-
Create, delete, and modify user groups to allow access to the SDR.
-
Manage nearly all aspects of the SDR.
A root SDR user cannot deny access to a root system user.
Secure Domain Router (SDR) Users
A SDR user has restricted access to an SDR as determined by the root SDR user. The SDR user performs the day-to-day system and network management activities. The tasks that the secure domain router user is allowed to perform are determined by the task IDs associated with the user groups to which the SDR user belongs. Multiple SDRs in a chasis are not supported.
User Groups
A user group defines a collection of users that share a set of attributes, such as access privileges. Cisco software allows the system administrator to configure groups of users and the job characteristics that are common in groups of users. Users are not assigned to groups by default hence the assignment needs to be done explicitly. A user can be assigned to more than one group.
Each user may be associated with one or more user groups. User groups have the following attributes:
-
A user group consists of the list of task groups that define the authorization for the users. All tasks, except cisco-support, are permitted by default for root system users.
-
Each user task can be assigned read, write, execute, or debug permission.
Predefined User Groups
The Cisco software provides a collection of user groups whose attributes are already defined. The predefined groups are as follows:
-
cisco-support: This group is used by the Cisco support team.
-
maintenance: Has the ability to display, configure and execute commands for network, files and user-related entities.
-
netadmin: Has the ability to control and monitor all system and network parameters.
-
operator: A demonstration group with basic privileges.
-
provisioning: Has the ability to display and configure network, files and user-related entities.
-
read-only-tg: Has the ability to perform any show command, but no configuration ability.
-
retrieve: Has the ability to display network, files and user-related information.
-
root-lr: Has the ability to control and monitor the specific secure domain router.
-
serviceadmin: Service administration tasks, for example, Session Border Controller (SBC).
-
sysadmin: Has the ability to control and monitor all system parameters but cannot configure network protocols.
To verify the individual permissions of a user group, assign the group to a user and execute the show user tasks command.
User-Defined User Groups
Administrators can configure their own user groups to meet particular needs.
User Group Inheritance
A user group can derive attributes from another user group. (Similarly, a task group can derive attributes from another task group). For example, when user group A inherits attributes from user group B, the new set of task attributes of the user group A is a union of A and B. The inheritance relationship among user groups is dynamic in the sense that if group A inherits attributes from group B, a change in group B affects group A, even if the group is not reinherited explicitly.
Task Groups
Task groups are defined by lists of permitted task IDs for each type of action (such as read, write, and so on). The task IDs are basically defined in the router system. Task ID definitions may have to be supported before task groups in external software can be configured.
Task IDs can also be configured in external TACACS+ or RADIUS servers.
Predefined Task Groups
The following predefined task groups are available for administrators to use, typically for initial configuration:
-
cisco-support: Cisco support personnel tasks
-
netadmin: Network administrator tasks
-
operator: Operator day-to-day tasks (for demonstration purposes)
-
root-lr: Secure domain router administrator tasks
-
sysadmin: System administrator tasks
-
serviceadmin: Service administration tasks, for example, SBC
User-Defined Task Groups
Users can configure their own task groups to meet particular needs.
Group Inheritance
Task groups support inheritance from other task groups. (Similarly, a user group can derive attributes from another user group. For example, when task group A inherits task group B, the new set of attributes of task group A is the union of A and B.
Command Access in XR and Admin Modes
The XR user group and task is mapped to the System Admin VM group when the System Admin mode is accessed from XR mode using admin command. The corresponding access permission on System Admin VM is available to the user. Currently, only aaa, admin task and root-lr groups are mapped to System Admin VM group or task. The other tasks like protocols are not mapped as these services are not supported in System Admin VM. The disaster-recovery user of System Admin VM is synced with the Host VM.
|
XR Task or Group |
Sysadmin VM Group |
Access |
Example |
|---|---|---|---|
|
root-lr |
Root-system group |
Full access to the system configuration. |
|
|
Admin-r/w/x/d |
Admin-r |
Read only commands on Sysadmin VM |
|
|
Netadmin or sysadmin group Admin-r/ wx /d, aaa -r/w/x/d |
Aaa -r and admin -r |
Read only commands on Sysadmin VM |
|
Admin Access for NETCONF and gRPC Sessions
|
Feature Name |
Release Information |
Feature Description |
|---|---|---|
|
Admin Access for NETCONF and gRPC Sessions |
Release 7.4.1 |
This feature allows all authorized users on XR VM to access administration data on the router through NETCONF or gRPC interface, similar to accessing the CLI. This functionality works by internally mapping the task group of the user on XR VM to a predefined group on System Admin VM. Therefore, the NETCONF and gRPC users can access the admin-related information on the router even if their user profiles do not exist on System Admin VM. Prior to this release, only those users who were authorized on XR VM could access System Admin VM through CLI, by using the admin command. Users that were not configured on System Admin VM were denied access through the NETCONF or gRPC interfaces. |
NETCONF is an XML-based protocol used over Secure Shell (SSH) transport to configure a network. Similarly, gRPC is an open-source remote procedure call framework. The client applications can use these protocols to request information from the router and make configuration changes to the router. Prior to Cisco IOS XR Software Release 7.4.1, users who use NETCONF, gRPC or any other configuration interface, other than CLI, to access the admin-related information on the router, had to belong to user groups that are configured on System Admin VM. Otherwise, the router would issue an UNAUTHORIZED access error message and deny access through that client interface.
By default, XR VM synchronizes only the first-configured user to System Admin VM. If you delete the first-user in XR VM, the system synchronizes the next user in the root-lr group (which is the highest privilege group in XR VM for Cisco IOS XR 64-bit platforms) to System Admin VM only if there are no other users configured in System Admin VM. The system does not automatically synchronize the subsequent users to System Admin VM. Therefore, in earlier releases, users whose profiles did not exist in System Admin VM were not able to perform any NETCONF or gRPC operations on System Admin VM.
From Cisco IOS XR Software Release 7.4.1 and later, the system internally maps the users who are authorized on XR VM to System Admin VM of the router, based on the task table of the user on XR VM. With this feature, the NETCONF and gRPC users can access admin-related information on the router even if their user profiles do not exist on System Admin VM. By default, this feature is enabled.
To know more about NETCONF and gRPC operations, see the Use NETCONF Protocol to Define Network Operations with Data Models chapter and Use gRPC Protocol to Define Network Operations with Data Models chapter in the Programmability Configuration Guide.
User Profile Mapping from XR VM to System Admin VM
User privileges to execute commands and access data elements on the router are usually specified using certain command rules and data rules that are created and applied on the user groups.
For details on user groups, command rules and data rules, see the Create User Profiles and Assign Privilege chapter in the System Setup and Software Installation Guide for Cisco NCS 560 Series Routers.
When the internal process for AAA starts or when you create the first user, the system creates the following set of predefined groups, command rules and data rules in System Admin VM. These configurations are prepopulated to allow users of different groups (such as root-system , admin-r and aaa-r ) in System Admin VM.
You can use the show running-configuration aaa command to view the AAA configurations.
aaa authentication groups group aaa-r gid 100 users %%__system_user__%%
!
aaa authentication groups group admin-r gid 100 users %%__system_user__%%
!
aaa authentication groups group root-system gid 100 users "%%__system_user__%% "
!
aaa authorization cmdrules cmdrule 1 context * command * group root-system ops rx action accept
!
aaa authorization cmdrules cmdrule 2 context * command "show running-config aaa" group aaa-r ops rx action accept
!
aaa authorization cmdrules cmdrule 3 context * command "show tech-support aaa" group aaa-r ops rx action accept
!
aaa authorization cmdrules cmdrule 4 context * command "show aaa" group   aaa-r ops rx action accept
!
aaa authorization cmdrules cmdrule 5 context * command show group   admin-r ops rx action accept
!
aaa authorization datarules datarule 1 namespace * context * keypath * group root-system ops rwx action accept
!
aaa authorization datarules datarule 2 namespace * context * keypath /aaa group aaa-r ops r action accept
!
aaa authorization datarules datarule 3 namespace * context * keypath /aaa group admin-r ops rwx action reject
!
aaa authorization datarules datarule 4 namespace * context * keypath / group admin-r ops r action accept
!
The admin CLI for the user works based on the above configurations. The root-system is the group with the highest privilege in System Admin VM. The admin-r group has only read and execute access to all data. The aaa-r group has access only to AAA data. With the introduction of the admin access feature for all users, the NETCONF and gRPC applications can also access the admin data based on the above rules and groups.
User Profile Mapping Based on Task-ID
This table shows the internal mapping of XR VM users to System Admin VM. The users in XR VM belong to various user groups such as aaa , admin , root-lr and root-system .
|
XR VM User Group:Task-ID |
System Admin VM User Group |
|---|---|
| aaa:rwxd | aaa-r |
| aaa:rwx | aaa-r |
| aaa:rw | aaa-r |
| aaa:wx | aaa-r |
| aaa:rx | aaa-r |
| aaa:r | aaa-r |
| aaa:w | aaa-x |
| aaa:x | aaa-x |
| root-system:rwxd | root-system |
| root-lr:rwxd | root-system |
| admin:rwxd | admin-r |
| admin:rwx | admin-r |
| admin:rw | admin-r |
| admin:r | admin-r |
How to Allow Read Access to Administration Data for NETCONF and gRPC Clients
NETCONF and gRPC users access the administration data on the router through GET operations as defined by the respective protocols. To allow this read access to administration data for users belonging to admin-r group, you must configure a new command rule specifically for the NETCONF or gRPC client.
Configuration Example
Router#admin
sysadmin-vm:0_RP0#configure
sysadmin-vm:0_RP0(config)#aaa authorization cmdrules cmdrule 6
sysadmin-vm:0_RP0(config-cmdrule-6)#context netconf
sysadmin-vm:0_RP0(config-cmdrule-6)#command get
sysadmin-vm:0_RP0(config-cmdrule-6)#group admin-r
sysadmin-vm:0_RP0(config-cmdrule-6)#ops rx
sysadmin-vm:0_RP0(config-cmdrule-6)#action accept
sysadmin-vm:0_RP0(config)#commit
Running Configuration
aaa authorization cmdrules cmdrule 6
 context netconf
 command get
 group   admin-r
 ops     rx
 action  accept
!
Associated Command
-
aaa authorization (System Admin-VM)
Administrative Model
The router operates in two planes: the administration (admin) plane and secure domain router (SDR) plane. The admin (shared) plane consists of resources shared across all SDRs, while the SDR plane consists of those resources specific to the particular SDR.
Each SDR has its own AAA configuration including, local users, groups, and TACACS+ and RADIUS configurations. Users created in one SDR cannot access other SDRs unless those same users are configured in the other SDRs.
Administrative Access
Administrative access to the system can be lost if the following operations are not well understood and carefully planned.
-
Configuring authentication that uses remote AAA servers that are not available, particularly authentication for the console.
Note |
The none option without any other method list is not supported. |
-
Configuring command authorization or XR EXEC mode authorization on the console should be done with extreme care, because TACACS+ servers may not be available or may deny every command, which locks the user out. This lockout can occur particularly if the authentication was done with a user not known to the TACACS+ server, or if the TACACS+ user has most or all the commands denied for one reason or another.
To avoid a lockout, we recommend these:
-
Before turning on TACACS+ command authorization or XR EXEC mode authorization on the console, make sure that the user who is configuring the authorization is logged in using the appropriate user permissions in the TACACS+ profile.
-
If the security policy of the site permits it, use the none option for command authorization or XR EXEC mode authorization so that if the TACACS+ servers are not reachable, AAA rolls over to the none method, which permits the user to run the command.
-
Make sure to allow local fallback when configuring AAA. See, Create Series of Authorization Methods.
-
If you prefer to commit the configuration on a trial basis for a specified time, you may do so by using the commit confirmed command, instead of direct commit .
AAA Database
The AAA database stores the users, groups, and task information that controls access to the system. The AAA database can be either local or remote. The database that is used for a specific situation depends on the AAA configuration.
Local Database
AAA data, such as users, user groups, and task groups, can be stored locally within a secure domain router. The data is stored in the in-memory database and persists in the configuration file. The stored passwords are encrypted.
Note |
The database is local to the specific secure domain router (SDR) in which it is stored, and the defined users or groups are not visible to other SDRs in the same system. |
You can delete the last remaining user from the local database. If all users are deleted when the next user logs in, the setup dialog appears and prompts you for a new username and password.
Note |
The setup dialog appears only when the user logs into the console. |
Remote Database
AAA data can be stored in an external security server, such as CiscoSecure ACS. Security data stored in the server can be used by any client (such as a network access server [NAS]) provided that the client knows the server IP address and shared secret.
Remote AAA Configuration
Products such as CiscoSecure ACS can be used to administer the shared or external AAA database. The router communicates with the remote AAA server using a standard IP-based security protocol (such as TACACS+ or RADIUS).
Client Configuration
The security server should be configured with the secret key shared with the router and the IP addresses of the clients.
User Groups
User groups that are created in an external server are not related to the user group concept that is used in the context of local AAA database configuration on the router. The management of external TACACS+ server or RADIUS server user groups is independent, and the router does not recognize the user group structure. The remote user or group profiles may contain attributes that specify the groups (defined on the router) to which a user or users belong, as well as individual task IDs.
Configuration of user groups in external servers comes under the design of individual server products. See the appropriate server product documentation.
Task Groups
Task groups are defined by lists of permitted task IDs for each type of action (such as read, write, and so on). The task IDs are basically defined in the router system. Task ID definitions may have to be supported before task groups in external software can be configured.
Task IDs can also be configured in external TACACS+ or RADIUS servers.
AAA Configuration
This section provides information about AAA configuration.
Method Lists
AAA data may be stored in a variety of data sources. AAA configuration uses method lists to define an order of preference for the source of AAA data. AAA may define more than one method list and applications (such as login) can choose one of them. For example, console ports may use one method list and the vty ports may use another. If a method list is not specified, the application tries to use a default method list. If a default method list does not exist, AAA uses the local database as the source.
Rollover Mechanism
AAA can be configured to use a prioritized list of database options. If the system is unable to use a database, it automatically rolls over to the next database on the list. If the authentication, authorization, or accounting request is rejected by any database, the rollover does not occur and the request is rejected.
The following methods are available:
-
Local: Use the locally configured database (not applicable for accounting and certain types of authorization)
-
TACACS+: Use a TACACS+ server (such as CiscoSecure ACS)
-
RADIUS: Use a RADIUS server
-
Line: Use a line password and user group (applicable only for authentication)
-
None: Allow the request (not applicable for authentication)
Note |
If the system rejects the authorization request and the user gets locked out, you can try to rollback the previous configuration or remove the problematic AAA configuration through auxiliary port. To log in to the auxiliary port, use the local username and password; not the tacacs+ server credentials. The config_rollback -n 0x1 command can be used to rollback the previous configuration. If you are not able to access the auxiliary port, a router reload might be required in such scenarios. |
Server Grouping
Instead of maintaining a single global list of servers, the user can form server groups for different AAA protocols (such as RADIUS and TACACS+) and associate them with AAA applications (such as PPP and XR EXEC mode).
Authentication
Authentication is the most important security process by which a principal (a user or an application) obtains access to the system. The principal is identified by a username (or user ID) that is unique across an administrative domain. The applications serving the user (such as or Management Agent) procure the username and the credentials from the user. AAA performs the authentication based on the username and credentials passed to it by the applications. The role of an authenticated user is determined by the group (or groups) to which the user belongs. (A user can be a member of one or more user groups.)
Authentication of Non-Owner Secure Domain Router User
When logging in from a non-owner secure domain router, the root system user must add the “@admin” suffix to the username. Using the “@admin” suffix sends the authentication request to the owner secure domain router for verification. The owner secure domain router uses the methods in the list-name remote for choosing the authentication method. The remote method list is configured using the aaa authentication login remote method1 method2 ... command.
Authentication of Owner Secure Domain Router User
An owner secure domain router user can log in only to the nodes belonging to the specific secure domain router associated with that owner secure domain router user. If the user is member of a root-sdr group, the user is authenticated as an owner secure domain router user.
Authentication of Secure Domain Router User
Secure domain router user authentication is similar to owner secure domain router user authentication. If the user is not found to be a member of the designated owner secure domain router user group, the user is authenticated as a secure domain router user.
Authentication Flow of Control
AAA performs authentication according to the following process:
-
A user requests authentication by providing a username and password (or secret).
-
AAA verifies the user’s password and rejects the user if the password does not match what is in the database.
-
AAA determines the role of the user (root SDR user, or SDR user).
-
If the user has been configured as a member of an owner secure domain router user group, then AAA authenticates the user as an owner secure domain router user.
-
If the user has not been configured as a member of an owner secure domain router user group, AAA authenticates the user as a secure domain router user.
Clients can obtain a user’s permitted task IDs during authentication. This information is obtained by forming a union of all task group definitions specified in the user groups to which the user belongs. Clients using such information typically create a session for the user (such as an API session) in which the task ID set remains static. Both the XR EXEC mode and external API clients can use this feature to optimize their operations. XR EXEC mode can avoid displaying the commands that are not applicable and an EMS application can, for example, disable graphical user interface (GUI) menus that are not applicable.
If the attributes of a user, such as user group membership and, consequently, task permissions, are modified, those modified attributes are not reflected in the user’s current active session; they take effect in the user’s next session.
Password Types
In configuring a user and that user’s group membership, you can specify two types of passwords: encrypted or clear text.
The router supports both two-way and one-way (secret) encrypted user passwords. Secret passwords are ideal for user login accounts because the original unencrypted password string cannot be deduced on the basis of the encrypted secret. Some applications (PPP, for example) require only two-way passwords because they must decrypt the stored password for their own function, such as sending the password in a packet. For a login user, both types of passwords may be configured, but a warning message is displayed if one type of password is configured while the other is already present.
If both secret and password are configured for a user, the secret takes precedence for all operations that do not require a password that can be decrypted, such as login. For applications such as PPP, the two-way encrypted password is used even if a secret is present.
Type 8 and Type 9 Passwords
This feature provides the options for Type 8 and Type 9 passwords in AAA security services. The Type 8 and Type 9 passwords provide more secure and robust support for saving passwords w.r.t each username. Thus, in scenarios where a lot of confidential data need to be maintained, these encryption methods ensure that the admin and other user passwords are strongly protected.
The implementation of Type 8 password uses SHA256 hashing algorithm, and the Type 9 password uses scrypt hashing algorithm.
Note |
The Type 8 and Type 9 passwords are supported on the IOS XR 64-bit operating system starting from Cisco IOS XR Software Release 7.0.1. |
Type 10 Password
The Cisco IOS XR 64-bit software introduces the support for Type 10 password that uses SHA512 encryption algorithm. The SHA512 encryption algorithm provides improved security to the user passwords compared to the older algorithms such as MD5 and SHA256 . With this feature, SHA512 becomes the default encryption algorithm for the passwords in user name configuration, even for the first user creation scenario. Prior to the introduction of Type 10 password, MD5 was used as the default algorithm.
To configure Type 10 password, see Configure Type 10 Password.
Restrictions for Type 10 Password Usage
These restrictions apply to the usage of Type 10 password:
-
Backward compatibility issues such as configuration loss, authentication failure, and so on, are expected when you downgrade to lower versions that still use MD5 or SHA256 encryption algorithms. Convert the passwords to Type 10 before such downgrades to minimize the impact of such issues. For details, see Backward Compatibility for Password Types.
-
In a first user configuration scenario or when you reconfigure a user, the system syncs only the Type 5 and Type 10 passwords from XR VM to System Admin VM and Host VM. It doesn't sync the Type 8 and Type 9 passwords in such scenarios.
AAA Password Security for FIPS Compliance
Cisco IOS XR Software introduces advanced AAA password strengthening policy and security mechanism to store, retrieve and provide rules or policy to specify user passwords. This password policy is applicable only for local users, and not for remote users whose profile information are stored in a third party AAA server. This policy is not applicable to secrets of the user. If both secret and password are configured for a user, then secret takes precedence, and password security policy does not have any effect on authentication or change of password for such users. This AAA password security policy works as such for Cisco IOS XR platforms. Whereas, this feature is supported only on XR VM, for Cisco IOS XR 64 bit platforms.
High Availability for AAA Password Security Policy
The AAA password policy configurations and username configurations remain intact across RP failovers or process restarts in the system. The operational data such as, lifetime of the password and lockout time of the user are not stored on system database or disk. Hence, those are not restored across RP failovers or process restarts. Users start afresh on the active RP or on the new process. Hence, users who were locked out before RP failover or process restart are able to login immediately after the failover or restart.
To configure AAA password policy, see Configure AAA Password Policy.
AAA Password Security Policies
AAA password security for FIPS compliance consists of these policies:
Password Composition Policy
Passwords can be composed by any combination of upper and lower case alphabets, numbers and special characters that include: "!", "@", "#", "$", "%", "^", "&", "*", "(", and ")". Security administrator can also set the types and number of required characters that comprise the password, thereby providing more flexibility for password composition rules. The minimum number of character change required between passwords is 4, by default. There is no restriction on the upper limit of the number of uppercase, lowercase, numeric and special characters.
Password Length Policy
The administrator can set the minimum and maximum length of the password. The minimum configurable length in password policy is 2, and the maximum length is 253.
Password Lifetime Policy
The administrator can configure a maximum lifetime for the password, the value of which can be specified in years, months, days, hours, minutes and seconds. The configured password never expires if this parameter is not configured. The configuration remains intact even after a system reload. But, the password creation time is updated to the new time whenever the system reboots. For example, if a password is configured with a life time of one month, and if the system reboots on 29th day, then the password is valid for one more month after the system reboot. Once the configured lifetime expires, further action is taken based on the password expiry policy (see the section on Password Expiry Policy).
Password Expiry Policy
If the password credential of a user who is trying to login is already expired, then the following actions occur:
-
User is prompted to set the new password after successfully entering the expired password.
-
The new password is validated against the password security policy.
-
If the new password matches the password security policy, then the AAA data base is updated and authentication is done with the new password.
-
If the new password is not compliant with the password security policy, then the attempt is considered as an authentication failure and the user is prompted again to enter a new password. The max limit for such attempts is in the control of login clients and AAA does not have any restrictions for that.
As part of password expiry policy, if the life time is not yet configured for a user who has already logged in, and if the security administrator configures the life time for the same user, then the life time is set in the database. The system checks for password expiry on the subsequent authentication of the same user.
Password expiry is checked only during the authentication phase. If the password expires after the user is authenticated and logged in to the system, then no action is taken. The user is prompted to change the password only during the next authentication of the same user.
Debug logs and syslog are printed for the user password expiry only when the user attempts to login. This is a sample syslog in the case of password expiry:
RP/0/RSP1/CPU0:Jun 21 09:13:34.241 : locald_DSC[308]: %SECURITY-LOCALD-5-USER_PASSWD_EXPIRED :
Password for user 'user12' has expired.
Password Change Policy
Users cannot change passwords at will. A password change is triggered in these scenarios:
-
When the security administrator needs to change the password
-
When the user is trying to get authenticated using a profile and the password for the profile is expired
-
When the security administrator modifies the password policy which is associated to the user, and does not immediately change the password according to the policy
You can use the show configuration failed command to display the error messages when the password entered does not comply with the password policy configurations.
When the security administrator changes the password security policy, and if the existing profile does not meet the password security policy rules, no action is taken if the user has already logged in to the system. In this scenario, the user is prompted to change the password when he tries to get authenticated using the profile which does not meet the password security rules.
When the user is changing the password, the lifetime of the new password remains same as that of the lifetime that was set by the security administrator for the old profile.
When password expires for non-interactive clients (such as dot1x), an appropriate error message is sent to the clients. Clients must contact the security administrator to renew the password in such scenarios.
Service Provision after Authentication
The basic AAA local authentication feature ensures that no service is performed before a user is authenticated.
User Re-authentication Policy
A user is re-authenticated when he changes the password. When a user changes his password on expiry, he is authenticated with the new password. In this case, the actual authentication happens based on the previous credential, and the new password is updated in the database.
User Authentication Lockout Policy
AAA provides a configuration option, authen-max-attempts , to restrict users who try to authenticate using invalid login credentials. This option sets the maximum number of permissible authentication failure attempts for a user. The user gets locked out when he exceeds this maximum limit, until the lockout timer ( lockout-time ) is expired. If the user attempts to login in spite of being locked out, the lockout expiry time keep advancing forward from the time login was last attempted.
This is a sample syslog when user is locked out:
RP/0/RSP1/CPU0:Jun 21 09:21:28.226 : locald_DSC[308]: %SECURITY-LOCALD-5-USER_PASSWD_LOCKED :
User 'user12’ is temporarily locked out for exceeding maximum unsuccessful logins.
This is a sample syslog when user is unlocked for authentication:
RP/0/RSP1/CPU0:Jun 21 09:14:24.633 : locald_DSC[308]: %SECURITY-LOCALD-5-USER_PASSWD_UNLOCKED :
User 'user12' is unlocked for authentications.
Password Policy Creation, Modification and Deletion
Security administrators having write permission for AAA tasks are allowed to create password policy. Modification is allowed at any point of time, even when the policy is associated to a user. Deletion of password policy is not allowed until the policy is un-configured from the user.
After the modification of password policy associated with a user, security administrator can decide if he wants to change passwords of associated users complying to the password policy. Based on this, there are two scenarios:
-
If the administrator configures the password, then the user is not prompted to change the password on next login.
-
If the administrator does not configure the password, then the user is prompted to change the password on next login.
In either of the above cases, at every password expiry interval, the user is prompted to change the password on next login.
Debug messages are printed when password policies are created, modified and deleted.
Minimum Password Length for First User Creation
To authenticate the user for the first time, Cisco router prompts you to create a username and password, in any of the following situations:
-
When the Cisco Router is booted for the very first time.
-
When the router is reloaded with no username configuration.
-
When the already existing username configurations are deleted.
By default, the minimum length for passwords in a Cisco router is limited to two characters. Due to noise on the console, there is a possibility of the router being blocked out. Therefore, the minimum length for password has been increased to six characters for a first user created on the box, in each of the situations described above. This reduces the probability of the router being blocked out. It avoids the security risks that are caused due to very small password length. For all other users created after the first one, the default minimum length for password is still two characters.
For more information about how to configure a first user, see Configure First User on Cisco Routers.
Password Policy for User Secret
The Cisco IOS XR Software extends the existing password policy support for the user authentication to all types of user secret. The types of secret include Type 5 (MD5 ), 8 (SHA256 ), 9 (sCrypt ) and 10 (SHA512 ). Prior to this release, the support for password policy was only for the Type 7 passwords. The new policy is common to both password and secret of the user. Using irreversible hashed-secrets has the benefit that the other modules in the device cannot retrieve the clear-text form of these secrets. Thus, the enhancement provides more secure secrets for the user names. This policy for user secrets is applicable for local and remote users.
The classic Cisco IOS XR platforms support the password policy for secrets on the XR and the Admin plane. Whereas, the 64-bit Cisco IOS XR platforms support this feature only on XR VM; not on System Admin VM.
To configure password policy for user secret, see Configure Password Policy for User Secret and Password.
Task-based Authorization
AAA employs “task permissions” for any control, configure, or monitor operation through CLI or API. The Cisco IOS software concept of privilege levels has been replaced in software by a task-based authorization system.
Task IDs
The operational tasks that enable users to control, configure, and monitor Cisco software are represented by task IDs. A task ID defines the permission to run an operation for a command. Users are associated with sets of task IDs that define the breadth of their authorized access to the router.
Task IDs are assigned to users through the following means:
Each user is associated with one or more user groups. Every user group is associated with one or more task groups; in turn, every task group is defined by a set of task IDs. Consequently, a user’s association with a particular user group links that user to a particular set of task IDs. A user that is associated with a task ID can execute any operation associated with that task ID.
General Usage Guidelines for Task IDs
Most router control, configuration, or monitoring operation (CLI, Netconf, Restconf, XML API) is associated with a particular set of task IDs. Typically, a given CLI command or API invocation is associated with at least one or more task IDs. Neither the config nor the commit commands require any specific task id permissions. The configuration and commit operations do not require specific task ID permissions. Aliases also don't require any task ID permissions. You cannnot perform a configuration replace unless root-lr permissions are assigned. If you want to deny getting into configuration mode you can use the TACACS+ command authorization to deny the config command. These associations are hard-coded within the router and may not be modified. Task IDs grant permission to perform certain tasks; task IDs do not deny permission to perform tasks. Task ID operations can be one, all, or a combination of classes that are listed in this table.
Note |
Restconf will be supported in a future release. |
|
Operation |
Description |
|---|---|
|
Read |
Specifies a designation that permits only a read operation. |
|
Write |
Specifies a designation that permits a change operation and implicitly allows a read operation. |
|
Execute |
Specifies a designation that permits an access operation; for example ping and Telnet. |
|
Debug |
Specifies a designation that permits a debug operation. |
The system verifies that each CLI command and API invocation conforms with the task ID permission list for the user. If you are experiencing problems using a CLI command, contact your system administrator.
Multiple task ID operations separated by a slash (for example read/write) mean that both operations are applied to the specified task ID.
Multiple task ID operations separated by a comma (for example read/write, execute) mean that both operations are applied to the respective task IDs. For example, the copy ipv4 access-list command can have the read and write operations applied to the acl task ID, and the execute operation applied to the filesystem task ID.
If the task ID and operations columns have no value specified, the command is used without any previous association to a task ID and operation. In addition, users do not have to be associated to task IDs to use ROM monitor commands.
Users may need to be associated to additional task IDs to use a command if the command is used in a specific configuration submode. For example, to execute the show redundancy command, a user needs to be associated to the system (read) task ID and operations as shown in the following example:
RP/0/RP0/CPU0:router# show redundancy
Task IDs for TACACS+ and RADIUS Authenticated Users
Cisco software AAA provides the following means of assigning task permissions for users authenticated with the TACACS+ and RADIUS methods:
-
Specify the text version of the task map directly in the configuration file of the external TACACS+ and RADIUS servers.
-
Specify the privilege level in the configuration file of the external TACACS+ and RADIUS servers.
-
Create a local user with the same username as the user authenticating with the TACACS+ and RADIUS methods.
-
Specify, by configuration, a default task group whose permissions are applied to any user authenticating with the TACACS+ and RADIUS methods.
Privilege Level Mapping
For compatibility with TACACS+ daemons that do not support the concept of task IDs, AAA supports a mapping between privilege levels defined for the user in the external TACACS+ server configuration file and local user groups. Following TACACS+ authentication, the task map of the user group that has been mapped from the privilege level returned from the external TACACS+ server is assigned to the user. For example, if a privilege level of 5 is returned from the external TACACS server, AAA attempts to get the task map of the local user group priv5. This mapping process is similar for other privilege levels from 1 to 13. For privilege level 14 maps to the user group owner-sdr.
For example, with the Cisco freeware tac plus server, the configuration file has to specify priv_lvl in its configuration file, as shown in the following example:
user = sampleuser1{
    member = bar
    service = exec-ext {
        priv_lvl = 5
    }
}
The number 5 in this example can be replaced with any privilege level that has to be assigned to the user sampleuser.
XML Schema for AAA Services
The extensible markup language (XML) interface uses requests and responses in XML document format to configure and monitor AAA. The AAA components publish the XML schema corresponding to the content and structure of the data used for configuration and monitoring. The XML tools and applications use the schema to communicate to the XML agent for performing the configuration.
The following schema are published by AAA:
-
Authentication, Authorization and Accounting configuration
-
User, user group, and task group configuration
-
TACACS+ server and server group configuration
-
RADIUS server and server group configuration
Netconf and Restconf for AAA Services
Just as in XML schemas, in Netconf and Restconf, username and password is controlled by either local or triple A (AAA) services.
Note |
Restconf will be supported in a future release. |
About RADIUS
RADIUS is a distributed client/server system that secures networks against unauthorized access. In the Cisco implementation, RADIUS clients run on Cisco routers and send authentication and accounting requests to a central RADIUS server that contains all user authentication and network service access information.
RADIUS is a fully open protocol, distributed in source code format, that can be modified to work with any security system currently available on the market.
Cisco supports RADIUS under its AAA security paradigm. RADIUS can be used with other AAA security protocols, such as TACACS+, Kerberos, and local username lookup.
Note |
RADIUS is supported on all Cisco platforms, but some RADIUS-supported features run only on specified platforms. |
RADIUS has been implemented in a variety of network environments that require high levels of security while maintaining network access for remote users.
Use RADIUS in the following network environments that require access security:
-
Networks with multiple-vendor access servers, each supporting RADIUS. For example, access servers from several vendors use a single RADIUS server-based security database. In an IP-based network with multiple vendors’ access servers, dial-in users are authenticated through a RADIUS server that has been customized to work with the Kerberos security system.
-
Turnkey network security environments in which applications support the RADIUS protocol, such as in an access environment that uses a “smart card” access control system. In one case, RADIUS has been used with Enigma security cards to validate users and grant access to network resources.
-
Networks already using RADIUS. You can add a Cisco router with RADIUS to the network. This might be the first step when you make a transition to a Terminal Access Controller Access Control System Plus (TACACS+) server.
-
Networks in which a user must access only a single service. Using RADIUS, you can control user access to a single host, utility such as Telnet, or protocol such as Point-to-Point Protocol (PPP). For example, when a user logs in, RADIUS identifies this user as having authorization to run PPP using IP address 10.2.3.4 and the defined access list is started.
-
Networks that require resource accounting. You can use RADIUS accounting independent of RADIUS authentication or authorization. The RADIUS accounting functions allow data to be sent at the start and end of services, indicating the amount of resources (such as time, packets, bytes, and so on) used during the session. An Internet service provider (ISP) might use a freeware-based version of RADIUS access control and accounting software to meet special security and billing needs.
-
Networks that support preauthentication. Using the RADIUS server in your network, you can configure AAA preauthentication and set up the preauthentication profiles. Preauthentication enables service providers to better manage ports using their existing RADIUS solutions and to efficiently manage the use of shared resources to offer differing service-level agreements.
Network Security Situations in Which RADIUS is Unsuitable
RADIUS is not suitable in the following network security situations:
- Multiprotocol access
environments. RADIUS does not support the following protocols:
-
NetBIOS Frame Control Protocol (NBFCP)
-
NetWare Asynchronous Services Interface (NASI)
-
X.25 PAD connections
-
-
Router-to-router situations. RADIUS does not provide two-way authentication. RADIUS can be used to authenticate from one router to a router other than a Cisco router if that router requires RADIUS authentication.
-
Networks using a variety of services. RADIUS generally binds a user to one service model.
RADIUS Operation
When a user attempts to log in and authenticate to an access server using RADIUS, the following steps occur:
-
The user is prompted for and enters a username and password.
-
The username and encrypted password are sent over the network to the RADIUS server.
-
The user receives one of the following responses from the RADIUS server:
-
ACCEPT—The user is authenticated.
-
REJECT—The user is not authenticated and is prompted to reenter the username and password, or access is denied.
-
CHALLENGE—A challenge is issued by the RADIUS server. The challenge collects additional data from the user.
-
CHANGE PASSWORD—A request is issued by the RADIUS server, asking the user to select a new password.
The ACCEPT or REJECT response is bundled with additional data used for XR EXEC mode or network authorization. You must first complete RADIUS authentication before using RADIUS authorization. The additional data included with the ACCEPT or REJECT packets consists of the following:
-
-
Services that the user can access, including Telnet, rlogin, or local-area transport (LAT) connections, and PPP, Serial Line Internet Protocol (SLIP), or XR EXEC mode services.
-
Connection parameters, including the host or client IP address, access list, and user timeouts.
RADIUS with TLS protection
|
Feature Name |
Release Information |
Feature Description |
|---|---|---|
|
RADIUS with TLS protection |
Release 24.4.1 |
Remote Authentication Dial-In User Service (RADIUS) over Transport Layer Security (TLS) or RADSEC is now supported on Cisco IOS XR NCS 540 routers. You can configure the RADIUS protocol on the Cisco router (RADIUS client) to redirect RADIUS packets to a remote RADIUS server connected over TLS for Authentication, Authorization, and Accounting (AAA) services. Without TLS, RADIUS packets may be subject to potential security vulnerabilities, including data exposure, replay attacks, weak authentication, and encryption vulnerabilities, especially when transmitted across untrusted networks. The feature introduces these changes: CLI:
YANG Data Models:
(see GitHub, YANG Data Models Navigator) |
Topology for RADIUS with TLS protection
Traditionally, RADIUS has been used for Authentication, Authorization, and Accounting (AAA). However, to meet modern security demands it is important to enhance its encryption and authentication. To increase the resilience against threats and maintain a secure network environment, TLS is now utilized as the transport protocol for RADIUS.
This feature supports TLS version 1.3.
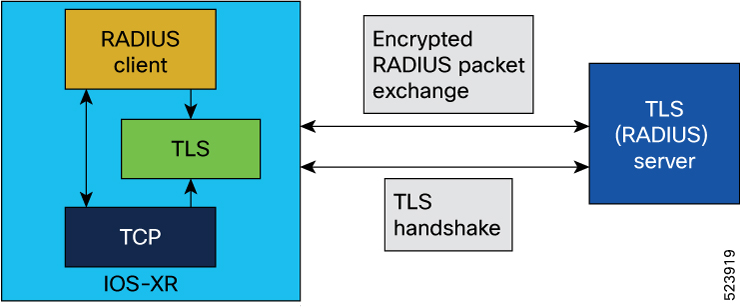
Let's understand how you can establish RADIUS communication with TLS.
Establish TLS session: The RADIUS client initiates the process to establish a secure TLS session with the RADIUS server, which acts as the TLS server. This session is built upon a TCP socket that the RADIUS client creates.
Store TLS context: Upon successful TLS connection, the TLS context is preserved within the TLS connection context. This, in turn, is stored within the RADIUS context for the specified server, ensuring a persistent secure environment for subsequent communications.
RADIUS packet handling: The format of the RADIUS packet remains consistent with that used in RADIUS over TCP. The application constructs a RADIUS packet using standard methods. Instead of sending it via a TCP socket, the packet is handed over to the TLS layer for secure encapsulation. TLS effectively becomes the transport layer for RADIUS, hence the designation "RADIUS/TLS."
Secure data transmission: The RADIUS packets are securely transmitted over the TLS layer with data encryption/decryption.
This approach ensures that the RADIUS communications are secure, especially in roaming environments where the packets may pass through various administrative domains and untrusted networks. TLS provides a robust security layer, addressing the vulnerabilities associated with traditional RADIUS over UDP.
Optimized RADIUS session control:
-
To manage RADIUS sessions effectively, the RADIUS client employs Path MTU discovery before initiating traffic.
-
The RADIUS client avoids using the same source socket for both RADIUS/UDP and RADIUS/TLS traffic to different servers.
-
Once a TLS session is established, TLS heartbeats monitor connectivity with the server.
-
Additionally, an application-layer watchdog algorithm checks server responsiveness. The client proactively closes idle sessions; sessions indicated as inactive by the TLS heartbeat, or those with only watchdog traffic for three timeouts.
-
RADIUS sessions are terminated when RADIUS packets fail validation or contain invalid authenticators. When a session fails validation, the session is validated again using the next specified failover mechanism.
Restrictions for RADIUS with TLS Protection
The list provides the restrictions that apply to RADIUS with TLS protection:
-
Broadband Network Gateway (BNG) applications are not supported.
-
The default destination port for RADIUS over TLS is TCP 2083 for authentication and accounting. There is no support for custom ports.
-
The maximum number of concurrent TLS sessions supported is 50.
-
RADIUS over TLS supports IPv4 addresses only.
-
A combination of TLS, UDP, and DTLS server types under one server group over RADIUS is not recommended.
Supported ciphers
TLS ciphers are encryption algorithms that secure RADIUS traffic. Here are some supported TLS ciphers:
-
TLS_AES_256_CGM_SHA384
-
TLS_CHACHA20_POLY1305_SHA256
-
TLS_AES_128_CGM_SHA256
-
TLS_ECDHE_ECDSA_WITH_AES_256_CGM_SHA384
-
TLS_ECDHE_RSA_WITH_AES_256_CGM_SHA384
-
TLS_DHE_RSA_WITH_AES_256_CGM_SHA384
-
TLS_ECDHE_ECDSA_WITH_CHACHA20_POLY1305_SHA256
-
TLS_ECDHE_RSA_WITH_CHACHA20_POLY1305_SHA256
-
TLS_DHE_RSA_WITH_CHACHA20_POLY1305_SHA256
-
TLS_ECDHE_ECDSA_WITH_AES_128_GCM_SHA256
-
TLS_ECDHE_RSA_WITH_AES_128_GCM_SHA256
-
TLS_DHE_RSA_WITH_AES_128_GCM_SHA256
-
TLS_ECDHE_ECDSA_WITH_AES_256_CBC_SHA384
-
TLS_ECDHE_RSA_WITH_AES_256_CBC_SHA384
-
TLS_DHE_RSA_WITH_AES_256_CBC_SHA256
-
TLS_ECDHE_ECDSA_WITH_AES_128_CBC_SHA256
-
TLS_ECDHE_RSA_WITH_AES_128_CBC_SHA256
-
TLS_DHE_RSA_WITH_AES_128_CBC_SHA256
-
TLS_DHE_RSA_WITH_AES_256_CBC_SHA
-
TLS_ECDHE_ECDSA_WITH_AES_128_CBC_SHA
-
TLS_ECDHE_RSA_WITH_AES_128_CBC_SHA
-
TLS_DHE_RSA_WITH_AES_128_CBC_SHA
-
TLS_RSA_WITH_AES_256_GCM_SHA384
-
TLS_RSA_WITH_AES_128_GCM_SHA256
-
TLS_RSA_WITH_AES_256_CBC_SHA256
-
TLS_RSA_WITH_AES_128_CBC_SHA256
-
TLS_RSA_WITH_AES_256_CBC_SHA
-
TLS_RSA_WITH_AES_128_CBC_SHA
-
TLS_EMPTY_RENEGOTIATION_INFO_SCSV
The cipher suite negotiated between the client and the server when both support TLS 1.3 is:
-
TLS_AES_256_GCM_SHA384
Configure RADIUS with TLS protection
To configure RADIUS with TLS protection, use the command radius-server host with keyword radsec-server .
Before you begin
Before configuring RADIUS with TLS protection, complete these steps on the Cisco router. See Implementing Certification Authority Interoperability for more information.
-
Configure a trustpoint.
-
Import the CA certificate.
-
Enroll the trustpoint and generate a client certificate on CA.
-
Import the client certificate.
Procedure
|
Step 1 |
Enter the hostname or IP address of the RADIUS server. |
|
Step 2 |
Enter the name of the trusted point so that the router can verify certificates issued to peers. Your router need not enroll with the CA that issued the certificates to the peers. |
|
Step 3 |
Commit the changes. |
|
Step 4 |
Verify that TLS is enabled by using the show radius command. |
|
Step 5 |
Verify the configuration settings by using the show running-configuration command. |
Hold-Down Timer for TACACS+
|
Feature Name |
Release Information |
Feature Description |
|---|---|---|
|
Hold-Down Timer for TACACS+ |
Release 7.4.1 |
TACACS+ servers provide AAA services to the user. When a TACACS+ server becomes unreachable, the router sends the client request to another server, leading to considerable delay in addressing requests. To prevent this delay, you can set a hold-down timer on the router. The timer gets triggered after the router marks the TACACS+ server as down. During this period, the router does not select the server that is down for processing any client requests. When the timer expires, the router starts using that TACACS+ server for client transactions. This feature improves latency in providing AAA services to the user by limiting the client requests from being sent to unresponsive servers. This feature introduces the holddown-time command. |
The TACACS+ server is a AAA server with which the router communicates to provide authentication, authorization, and accounting services for users. When a TACACS+ server goes down, the router is not made aware. After sending a AAA request, the client waits for a response from the server for a configured timeout. If the router does not receive a response within that time frame, it sends the request to the next available server or discards the request if no other servers are available. A new request also needs to follow the same procedure in the same order of servers. The overall process results in sending multiple requests to servers that are down and therefore delays the client request from reaching an active server.
With the TACACS+ hold-down timer feature, you can mark an unresponsive TACACS+ server as down, and also set a duration for which the router does not use that server for further client transaction. After the timer expires, the router starts using that server again for processing client requests. This feature in turn allows you to control the participation of a TACACS+ server in AAA functions, without removing the TACACS+ server configuration from the router.
The hold-down timer value, in seconds, ranges from 0 to 1200. To enable hold-down timer, use the holddown-time command under the various configuration modes listed in the How to Configure Hold-Down Timer for TACACS+ section.
How Does the Hold-Down Timer for TACACS+ Function?
The following image depicts the functionality of TACACS+ hold-down timer.
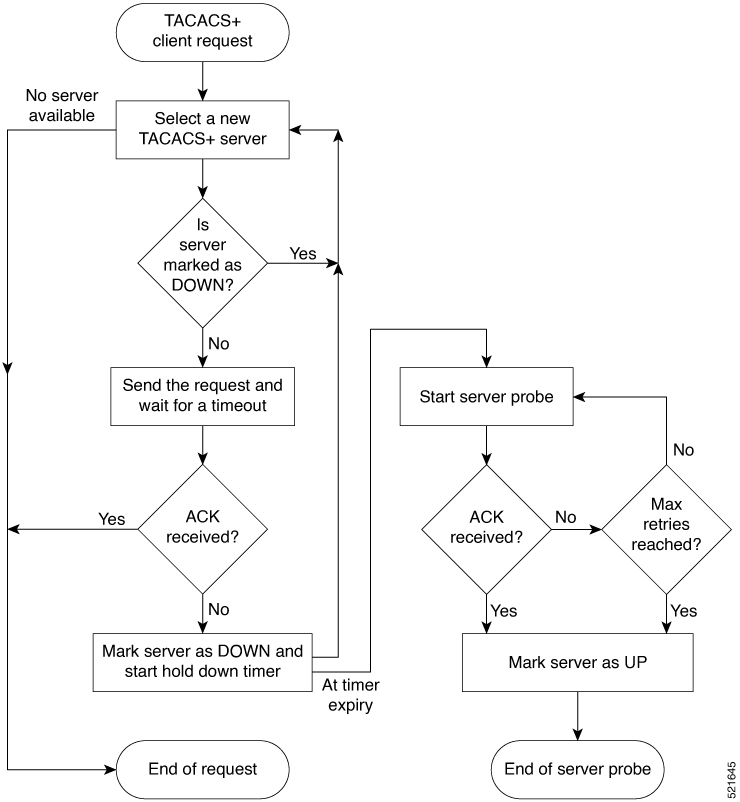
When a TACACS+ client request comes, the router selects a TACACS+ server and checks whether that server is marked as down. If the server is marked as down, the router selects another server until it finds an available server. If the server is not marked as down, the router sends the client request to that server. If the router does not receive an acknowledgment message from the server, it marks that server as down and initiates the hold-down timer. After the timer expires, an internal server probe begins, which checks the connectivity of the down server. The probe tries to connect to the server every 20 seconds, for a maximum of three times (these values are non-configurable). If connection is successful in any of these attempts, then the router marks that server as up, and ends the server probe. Even if the connection fails on all retries of the server probe, the router still marks the server as up before exiting the server probe. After exiting the server probe, the router considers that server as available again to accept client requests.
If an unresponsive server is still not reachable after the hold-down timer expiry, then the system continues to regard that server as being down, and does not use it for client transactions for some more time (that is, approximately, one minute). The router starts using that server again for further client transactions only after this short delay.
In case the TACACS+ server comes up while the hold-down timer continues, the router continues to consider that server as down until the timer expires.
Model-based AAA
|
Feature Name |
Release Information |
Description |
|---|---|---|
|
NETCONF Access Control Model (NACM) for Protocol Operations and Authorization |
Release 7.4.1 |
NACM is defined in AAA subsystem to manage access control for NETCONF Remote Procedure Calls (RPCs). NACM addresses the need to authenticate the user or user groups, authorize whether the user has the required permission to perform the operation. With this feature, you can configure the authorization rules, groups and rule lists containing multiple groups and rules using CLI commands in addition to existing support for YANG data models. This feature also introduces |
The Network Configuration Protocol (NETCONF) protocol does not provide any standard mechanisms to restrict the protocol operations and content that each user is authorized to access. The NETCONF Access Control Model (NACM) is defined in AAA subsystem to manage access-control for NETCONF/YANG RPC requests.
The NACM module provides the ability to control the manageability activities of NETCONF users on the router. You can manage access privileges, the kind of operations that users can perform, and a history of the operations that were performed on the router. The NACM functionality accounts for all the operations that are performed on the box over the NETCONF interface. This functionality authenticates the user or user groups and authorizes permissions for users to perform the operation.
Prerequisites for Model Based AAA
Working with the model based AAA feature requires prior understanding of the following :
-
NETCONF-YANG
-
RFC 6536: Network Configuration Protocol (NETCONF) Access Control Model
Initial Operation
These are the NACM default values. By default a user is denied write permission, hence you’ll not be able to edit the NACM configurations after enabling NACM authorization using AAA command.
<enable-nacm>false</enable-nacm>
<read-default>permit</read-default>
<write-default>deny</write-default>
<exec-default>permit</exec-default>
<enable-external-groups>true</enable-external-groups>
Therefore we recommend to enable NACM after configuring the required NACM configurations, or after changing the default NACM configurations. Here are few sample configurations:
Note |
If |
<aaa xmlns="http://cisco.com/ns/yang/Cisco-IOS-XR-aaa-lib-cfg">
<usernames xmlns="http://cisco.com/ns/yang/Cisco-IOS-XR-aaa-locald-cfg">
<username>
<ordering-index>3</ordering-index>
<name>username</name>
<password>password</password>
     <usergroup-under-usernames>
      <usergroup-under-username>
       <name>root-lr</name>
      </usergroup-under-username>
      <usergroup-under-username>
       <name>cisco-support</name>
      </usergroup-under-username>
     </usergroup-under-usernames>
</username>
</usernames>
</aaa>

<nacm xmlns="http://cisco.com/ns/yang/Cisco-IOS-XR-aaa-nacm-cfg">
<read-default>permit</read-default>
<write-default>permit</write-default>
<exec-default>permit</exec-default>
<enable-external-groups>true</enable-external-groups>
<groups>
    <group>
    <name>nacm_group</name>
    <user-name>lab</user-name>
    </group>
</groups>
<rule-list>
<name>Rule-list-1</name>
<group>Group_nacm_0_test</group>
<rule>
    <name>Rule-1</name>
    <access-operations>read</access-operations>
    <action>permit</action>
    <module-name>ietf-netconf-acm</module-name>
    <rpc-name>edit-config</rpc-name>
                <access-operations>*</access-operations>
                <path>/</path>
                <action>permit</action>
            </rule>
       </rule-list>
</nacm>
The NACM configuration allows to choose the precedence of external groups over the local groups.
NACM Configuration Management and Persistence
The NACM configuration can be modified using NETCONF or RESTCONF. In order for a user to be able to acccess the NACM configuration, they must have explicit permission to do so, that is, through a NACM rule. Configuration under the /nacm subtree persists when the copy running-config startup-config EXEC command is issued, or the cisco-ia:save-config RPC is issued.
<rpc message-id="101" xmlns="urn:ietf:params:xml:ns:netconf:base:1.0">
<save-config xmlns="http://cisco.com/yang/cisco-ia"/>
</rpc>
Overview of Configuring NACM
Here are the steps involved in configuring NACM:
-
Configure all NACM rules
-
Enable NACM
-
Disconnect all active NETCONF sessions
-
Launch new NETCONF session
Note |
Enabling or disabling NACM does not affect any existing NETCONF sessions. |
NACM Rules
As per the RFC 6536, NACM defines two categories of rules:
-
Global Rules—It includes the following:
-
Enable/Disable NACM
-
Read-Default
-
Write-Default
-
Exec-Default
-
Enable External Groups
-
-
Access Control Rules—It includes the following:
-
Module (used along with protocol rule / data node rule)
-
Protocol
-
Data Node
-
|
Operation |
Description |
|---|---|
|
all |
Rule is applied to all types of protocol operations |
|
create |
Rule is applied to all protocol operations, which create a new data node such as edit-config operation |
|
read |
Rule is applied to all protocol operations, which reads the data node such as get, get-config or notification |
|
update |
Rule is applied to all protocol operations, which alters a data node such as edit-config operation |
|
exec |
Rule is applied to all exec protocol access operations such as action RPC |
|
delete |
Rule is applied to all protocol operations that removes a data node |
Note |
Before enabling NACM using NETCONF RPC, any user with access to the system can create NACM groups and rules. However, after NACM is enabled, only authorised users can change the NACM configurations. |
Note |
Only users who belong to |
<rpc message-id="101" xmlns="urn:ietf:params:xml:ns:netconf:base:1.0" >
<edit-config>
  <target><candidate/></target>
<config xmlns:xc="urn:ietf:params:xml:ns:netconf:base:1.0">
  <nacm xmlns="urn:ietf:params:xml:ns:yang:ietf-netconf-acm">
    <groups>
      <group>
        <name>group1</name>
        <user-name>user1</user-name>
        <user-name>user2</user-name>
        <user-name>user3</user-name>
      </group>
    </groups>
  </nacm>
</config>
</edit-config>
</rpc>
The following sample configuration shows a NACM rule list configuration:
<rpc
xmlns="urn:ietf:params:xml:ns:netconf:base:1.0"message-id="101">
<edit-config>
  <target>
    <candidate/>
  </target>
 <config>
  <nacm xmlns="http://cisco.com/ns/yang/Cisco-IOS-XR-aaa-nacm-cfg">
  <rulelist-classes>
  <rulelist-class>
  <ordering-index>1</ordering-index>
 <rulelist-name>GlobalRule</rulelist-name>
 <group-names>
  <group-name>root-system</group-name>
   <group-name>AdminUser</group-name>
 </group-names>
 </rulelist-class>
 </rulelist-classes>
</nacm>
</config>
</edit-config>
</rpc>Router(config)#nacm rule-list 1 GlobalRule
Router(config-rlst)#groupnames root-system AdminUser
<rpc message-id="101" xmlns="urn:ietf:params:xml:ns:netconf:base:1.0" >
<edit-config>
  <target><candidate/></target>
<config xmlns:xc="urn:ietf:params:xml:ns:netconf:base:1.0">
  <nacm xmlns="urn:ietf:params:xml:ns:yang:ietf-netconf-acm">
    <read-default>permit</read-default>
    <write-default>permit</write-default>
    <exec-default>permit</exec-default>
    <enable-external-groups>false</enable-external-groups>
  </nacm>
</config>
</edit-config>
</rpc>Router(config)#nacm read-default [ permit | deny ]
Router(config)#nacm write-default [ permit | deny ]
Router(config)#nacm exec-default [ permit | deny ]
Router(config)#nacm enable-external-groups [ true | false ]Note |
You must have NACM task permissions to make changes. |
<rpc message-id="101"
xmlns="urn:ietf:params:xml:ns:netconf:base:1.0" >
<edit-config>
<target><candidate/></target>
<config xmlns:xc="urn:ietf:params:xml:ns:netconf:base:1.0">
  <nacm xmlns="urn:ietf:params:xml:ns:yang:ietf-netconf-acm">
    <rule-list>
     <name>GlobalRule</name>
     <rule>
       <name>rule1</name>
       <module-name>ietf-netconf-acm</module-name>
       <rpc-name>edit-config</rpc-name>
       <access-operations>*</access-operations>
       <action>permit</action>
     </rule>
    <rule>
      <name>rule2</name>
      <module-name>ietf-netconf-acm</module-name>
      <rpc-name>get-config</rpc-name>
      <access-operations>create read update exec</accessoperations>
      <action>permit</action>
    </rule>
   </rule-list>
  </nacm>
 </config>
 </edit-config>
</rpc>
Note |
'*’ refers to all operations. |
Router(config)#nacm rule-list 1 GlobalRule
Router(nacm-rlst)#groupnames AdminUser
Router(nacm-rlst)#rule 1 rule1
Router(nacm-rule)#action permit
Router(nacm-rule)#module-name ietf-netconf-acm
Router(nacm-rule)#rule-type rpc edit-config
Router(nacm-rule)#access-operations create read update exec
Router(nacm-rlst)#rule 2 rule2
Router(nacm-rule)#action deny
Router(nacm-rule)#module-name ietf-netconf-acm
Router(nacm-rule)#rule-type rpc get-config
Router(nacm-rule)#access-operations create read update exec
<rpc message-id="101"xmlns="urn:ietf:params:xml:ns:netconf:base:1.0" >
<edit-config>
<target><candidate/></target>
  <config xmlns:xc="urn:ietf:params:xml:ns:netconf:base:1.0">
    <nacm xmlns="urn:ietf:params:xml:ns:yang:ietf-netconf-acm">
     <rule-list>
        <name>GlobalRule</name>
      <rule>
       <name>rule4</name>
       <module-name>*</module-name>
       <path>/nacm/groups/group</path>
       <access-operations>*</access-operations>
       <action>permit</action>
      </rule>
      <rule>
       <name>rule5</name>
       <module-name>ietf-netconf-acm</module-name>
       <path>/nacm/rule-list</path>
       <access-operations>read</access-operations>
       <action>deny</action>
      </rule>
     </rule-list>
   </nacm>
  </config>
 </edit-config>
</rpc>
Note |
'*’ refers to all modules, and all operations. |
nacm rule-list 1 GlobalRule
 groupnames AdminUser
  rule 4 rule4
   action permit
   module-name *
   rule-type data-node /nacm/groups/group
   access-operations all
  rule 5 rule5
   action deny
   module-name ietf-netconf-acm
   rule-type data-node /nacm/rule-list
   access-operations all
Enabling NACM
NACM is disabled on the router by default. Users with root-lr or ‘aaa’ write task privilege users can enable/disable the NACM via CLI.
To enable NACM, use the following command in the Global configuration mode:
Router(config)#aaa authorization nacm default localCisco IOS XR Software Release 7.4.1 introduces support for external group names.
Router(config)#aaa authorization nacm default prefer-external group tacacs+ locallocal keyword refers to the locald (AAA local database) and not the NACM database.
Router(config)#aaa authorization nacm default only-external localVerification
Use the show nacm summary command to verify the default values after enabling NACM:
Router# show nacm summary
Mon Jan 15 16:47:43.549 UTC
 NACM SUMMARY
 --------------------------------------------------------------------------------
 Enable Nacm : True
 Enable External Groups : True
 Number of Groups : 0
 Number of Users : 0
 Number of Rules : 0
 Number of Rulelist : 0
 Default Read : permit
 Default Write : deny
 Default Exec : permit
 Denied Operations : 0
 Denied Data Writes : 0
 Denied Notifications : 0
Associated Commands
-
Router#show nacm summary -
Router#show nacm users [user-name] -
Router#show nacm rule-list [rule-list-name] [rule [rule-name]] -
Router#show nacm groups [group-name]secret
Verify the NACM Configurations
Use the show nacm summary command to verify the NACM configurations:
Router# show nacm summary
Mon Jan 15 17:02:46.696 UTC
 NACM SUMMARY
 --------------------------------------------------------------------------------
 Enable Nacm : True
 Enable External Groups : True
 Number of Groups : 3
 Number of Users : 3
 Number of Rules : 4
 Number of Rulelist : 2
 Default Read : permit
 Default Write : permit
 Default Exec : permit
 Denied Operations : 1
 Denied Data Writes : 0
 Denied Notifications : 0
------------------------------------------------------------------------------------
Associated Commands
-
Router#show nacm summary -
Router#show nacm users [user-name] -
Router#show nacm rule-list [rule-list-name] [rule [rule-name]] -
Router#show nacm groups [group-name]secret
Disabling NACM
There are two ways you can disable NACM. Use one of the following commands:
Router(config)# aaa authorization nacm default noneor
Router(config)# no aaa authorization nacm defaultVerification
Router# show nacm summary

Mon Jan 15 17:02:46.696 UTC
 NACM SUMMARY
 --------------------------------------------------------------------------------
 Enable Nacm : False
 Enable External Groups : True
 Number of Groups : 0
 Number of Users : 0
 Number of Rules : 0
 Number of Rulelist : 0
 Default Read : permit
 Default Write : deny
 Default Exec : permit
 Denied Operations : 0
 Denied Data Writes : 0
 Denied Notifications : 0
Command Authorization Using Local User Account
|
Feature Name |
Release Information |
Feature Description |
|---|---|---|
|
Command Authorization Using Local User Account |
Release 7.5.1 |
This feature allows locally authenticated users—authenticated by the AAA server internal to the router—to run all XR VM commands even if a remote TACACS+ AAA server is not reachable for authorization. It prevents a complete router lockdown. The feature also prevents remotely authenticated users—authenticated using a remote AAA server (say, TACACS+ server)—from running any non-permitted commands on the router, and thus prevents misuse of user privileges. This feature modifies the aaa authorization commands default command to include the local option for XR VM command authorization. |
Currently, when a user tries to execute a command on XR VM, the router checks to see whether the user has required permissions to execute it. The router does this authorization process in two steps. First, the system compares the task-IDs of the user with the required task-IDs for the command. If the user has all required task-IDs, and if AAA authorization is configured, then the system sends an authorization request to the local or remote AAA server, based on that configuration. Based on the response from the AAA server, the system allows or rejects the command execution. If authorization is not configured or if it configured with option none, then the system bypasses authorization check and allows user to execute the command.
Similarly, the existing remote authorization process using TACACS+ server has two options—remote authorization using tacacs+ and none. The authorization process using TACACS+ option uses an external TACACS+ server for authorization. The authorization using none option allows the user to execute the command without any authorization check. TACACS+ authorization has the advantage of fine-tuning authorization rules and providing more control on system access that cannot be otherwise done locally. However, if the remote server is not reachable, a user who leverages TACACS+ authorization might get into an unpredictable state of router, as mentioned in these scenarios:
-
Remote authorization using TACACS+ with failover option as none (that is, with the aaa authorization commands default group tacacs+ none configuration)
If TACACS+ server is not reachable, then the system bypasses the authorization check and allows user to execute the command. A user who does not have permission to execute certain commands due to additional authorization rules on the TACACS+ server, then gets permission to execute those commands in this scenario. This action introduces a privilege escalation.
-
Remote authorization using TACACS+ without any failover option (that is, with the aaa authorization commands default group tacacs+ configuration)
If TACACS+ server is not reachable, then the system does not authorize the command at all. Because the user then cannot execute any command, the router gets locked out.
With the introduction of command authorization using local user account feature in Cisco IOS XR Software Release 7.5.1, locally authenticated users can execute commands even if a TACACS+ server is not reachable. This behavior is similar to the behavior with the failover option none, with the only difference that only locally authenticated users can execute commands in this case. This functionality thereby prevents a complete lockdown of the router as mentioned in one of the previously existing scenarios mentioned earlier. At the same time, the feature also prevents users who are authenticated remotely (that is, TACACS+ authenticated users) from executing any non-permitted command on the router. This behavior in turn helps to prevent any sort of misuse of user privileges on the router.
Call Flow of Command Authorization
Consider a scenario where the user is remotely authenticated. In the event of timeout from the TACACS+ server, the command authorization fails. The user cannot execute any command until the TACACS+ server is reachable again, thereby preventing misuse of user privileges on the router.
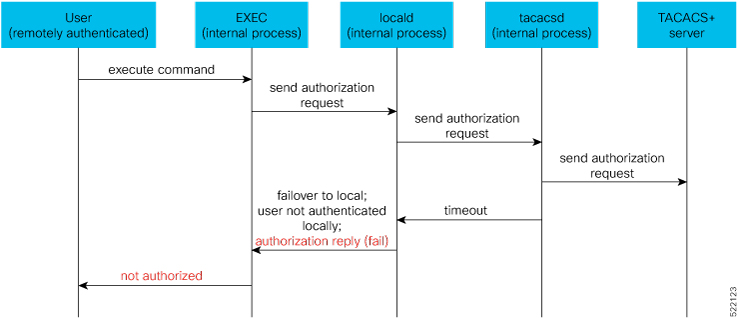
Consider a scenario where the user is locally authenticated. The command authorization still succeeds even if the authorization request to the TACACS+ server times out. There is no additional check done by the local AAA component in the router. As a result, the user can execute the command irrespective of the fact that the TACACS+ server is not reachable. This functionality prevents a complete lockdown of the router.

Configure Command Authorization Using Local User Account
Guidelines
Although there is no restriction in configuring local command authorization, you must be cautious to prevent any potential lockout due to misconfiguration. For instance, if local is the only method of authorization specified for the commands, a remotely authenticated user configuring command authorization using local user account feature cannot execute further commands.
Configuration Example
To configure command authorization using local user account, use the local option in the aaa authorization command in any of these formats:
Router#configure
Router(config)#aaa authorization commands default group tacacs+ local
Or
Router(config)#aaa authorization commands default local
Running Configuration
Router#show run aaa
!
aaa authorization commands default group tacacs+ local
!
Router#show run aaa
!
aaa authorization commands default local
!
Verification
Router#show user authentication method
local
Feature Behavior and Use Case Scenarios
Feature Behavior With Various Local Command Authorization Options
This table lists the feature behavior scenarios with various local command authorization options.
|
AAA Configuration |
Expected Behavior |
|---|---|
|
aaa authorization commands default group tacacs+ local |
If TACACS+ server is not reachable, system allows locally authenticated users to execute the command. If TACACS+ server is reachable and if it returns an authorization failure, then the system does not perform any failover to local authentication with this configuration. |
|
aaa authorization commands default local |
This configuration allows only locally authenticated users to execute commands. System completely blocks remote users from executing any command. |
|
aaa authorization commands default local group tacacs+ |
In this scenario, system chooses local authorization first and grants access if the user is locally authenticated. If not, the request fails over to TACACS+ server. This combination of command options is useful when both local and remote authenticated users want to execute commands when TACACS+ server is reachable. |
|
aaa authorization commands default local none |
Although configurable, this combination of command options does not provide any additional security with respect to user access. It is equivalent to having no authorization. |
Use Case Scenarios of Command Authorization
In the following scenarios, local user refers to user whose is authenticated locally and whose profile is available locally, but not available on the remote server (TACACS+ server). Similarly, remote user refers to user whose is authenticated remotely and whose profile is available on the remote server, but not available locally. And, both local user and remote user are considered to have root-lr permission to execute the commands, in these scenarios.
|
Type of User (local or remote) |
AAA Configuration Summary |
Use Case Scenario |
Expected Behavior |
|---|---|---|---|
|
Local and remote user |
No command authorization configured |
Execute a command |
Command authorization succeeds if the required task-IDs are available |
|
Local user |
Only tacacs+ command authorization configured. |
Execute a command when TACACS+ server is reachable |
Command authorization fails |
|
Execute a command when TACACS+ server is not reachable |
Command authorization fails |
||
|
Remote user |
Only tacacs+ command authorization configured |
Execute a command when TACACS+ server is reachable |
Command authorization succeeds |
|
Execute a command when TACACS+ server is not reachable |
Command authorization fails |
||
|
Local user |
Only tacacs+ command authorization configured with failover option as none. |
Execute a command when TACACS+ server is reachable |
Command authorization fails |
|
Execute a command when TACACS+ server is not reachable |
Command authorization succeeds |
||
|
Remote user |
Only tacacs+ command authorization configured with failover option as none. |
Execute a command that is restricted only to that user when TACACS+ server is reachable |
Command authorization fails |
|
Execute a command that is restricted only to that user when TACACS+ server is not reachable |
Command authorization succeeds |
||
|
Local user |
Only local command authorization configured. |
Execute a command |
Command authorization succeeds |
|
Remote user |
Only local command authorization configured. |
Execute a command |
Command authorization fails |
|
Local user |
Only tacacs+ command authorization configured with failover option as local. |
Execute a command when TACACS+ server is reachable |
Command authorization fails |
|
Execute a command when TACACS+ server is not reachable |
Command authorization succeeds |
||
|
Remote user |
Only tacacs+ command authorization configured with failover option as local. |
Execute a command when TACACS+ server is reachable |
Command authorization succeeds |
|
Execute a command when TACACS+ server is not reachable |
Command authorization fails |
 Feedback