Deploy Router Using Secure ZTP

With Secure Zero Touch Provisioning, you can securely and seamlessly provision thousands of network devices accurately within minutes and without any manual intervention.

Table 1. Feature History Table

Feature

Release Information

Feature Description

Secure Zero Touch Provisioning with Removable Storage Device

Release 7.3.2

This feature allows you to securely sign onboarding data in a removable storage device so that you can use the device for secure ZTP operations. This support gives you the plug-and-play flexibility for ZTP without any additional infrastructure requirements.

Secure Zero Touch Provisioning

Release 7.3.1

This feature allows devices in the network to establish a secure connection with the ZTP server and authenticate information using a three-step validation process involving validation of the network device, the ZTP server, and onboarding information. This eliminates security risks or malicious actions during remote provisioning.

The ztp secure-mode enable command is introduced.

In a secured network such as datacenter, the zero-touch provisioning mechanism helps you provision hundreds of remote devices without your intervention. But, the access devices are typically in an insecure network. There is a high risk of malicious actions on the device, such as adding an unauthorized or infected device. Security is a critical aspect while remotely provisioning the network devices.

Secure ZTP combines seamless automation with security. Network devices can securely establish a connection with the ZTP server and authenticate the onboarding information that it receives. The process eliminates any security risks or malicious actions during the provisioning of remote devices.

  • ZTP helps you remotely provision a router securely anywhere in the network. Thus, eliminate the risk of malicious attacks or unauthorized ownership claims.

  • Secure ZTP authenticates not only the onboarding network device but also validates the server authenticity and provisioning information that it is receiving from the ZTP server.

The following are the topics covered in this chapter:

On board Devices Using Three-Step Validation

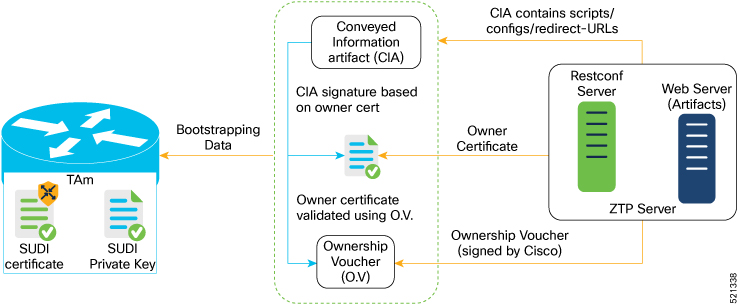
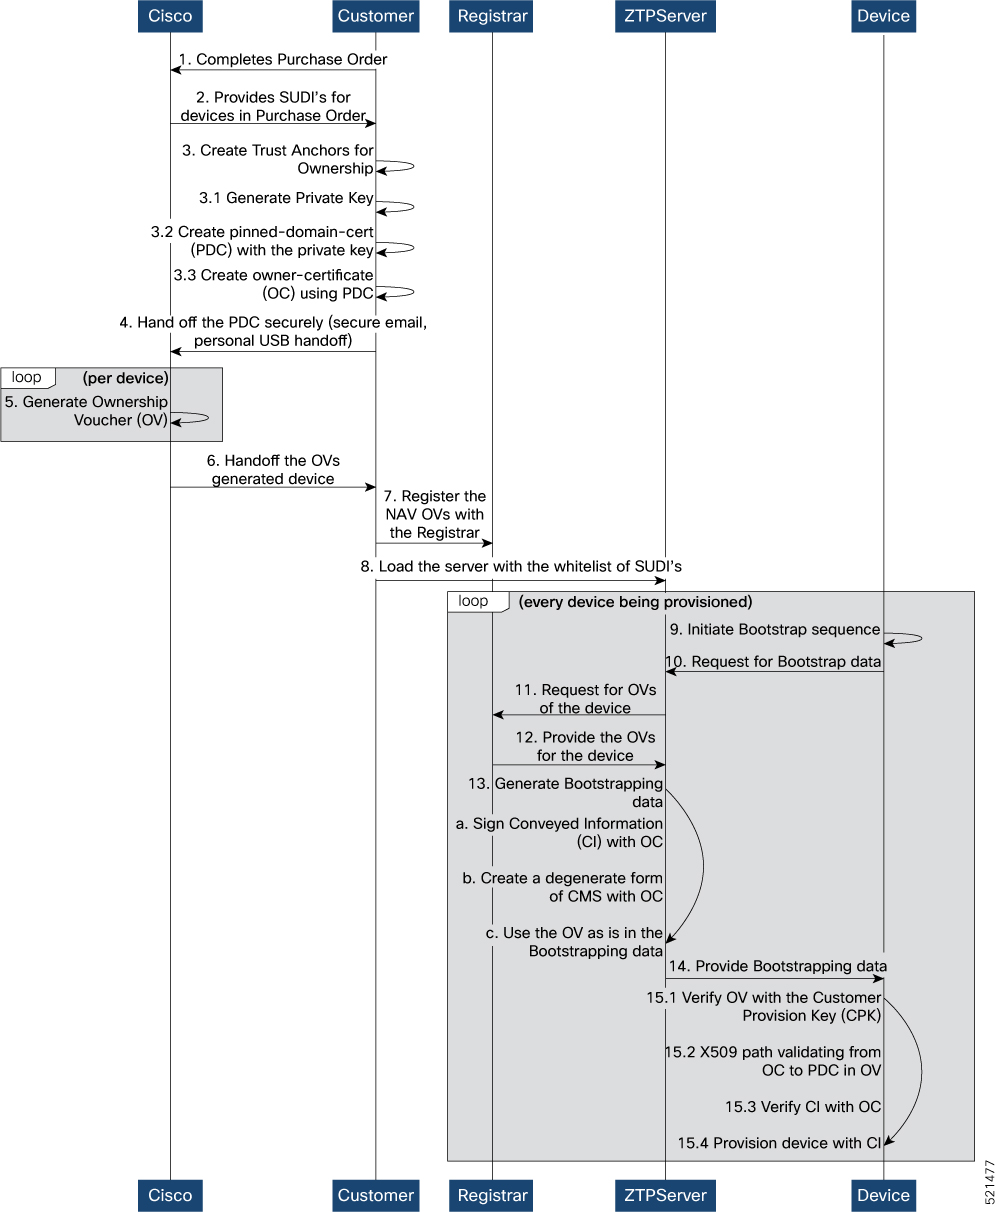
The Cisco IOS XR software implements the secure zero touch provisioning capabilities as described in RFC 8572. Secure ZTP uses a three-step validation process to on board the remote devices securely:

  1. Router Validation: The ZTP server authenticates the router before providing bootstrapping data using the Trust Anchor Certificate (SUDI certificate). Ensure that you have preinstalled the CA certificate chain for Cisco, as this is a prerequisite for the Cisco CA on ZTP server to verify the client/router SUDI certificates. The required certificates are:

    • subject=O = Cisco, CN = ACT2 SUDI CA

    • subject=O = Cisco Systems, CN = Cisco Root CA 2048

    • subject=CN = High Assurance SUDI CA, O = Cisco

    • subject=O = Cisco, CN = Cisco Root CA 2099

  2. Server Validation: The router device in turn validates the ZTP server to make sure that the on board happens to the correct network. Upon completion, the ZTP server sends the bootstrapping data (for example, a YANG data model) or artifact to the router. See Secure ZTP Components.

  3. Artifact Validation: The configuration validates the bootstrapping data or artifact that is received from the ZTP server.

Secure ZTP Components

Let's first understand the components required for secure ZTP.

Table 2. Components used in Secure ZTP

Components

Description

Onboarding Device (Router)

The router is a Cisco device that you want to provision and connect to your network. Secure ZTP is supported only on platforms that have Hardware TAM support. Routers with HW TAM have the SUDI embedded in TAM.

DHCP Server

The secure ZTP process relies on the DHCP server to provide the URL to access the bootstrapping information.

ZTP Server

A ZTP server is any server used as a source of secure ZTP bootstrapping data and can be a RESTCONF or HTTPs server.

Note


Currently, ZTP only supports single name-server. When the DHCP server has more than one server address configured, ZTP fails to apply the server configuration.

The ZTP server contains the following artifacts:

  • Cisco IOS XR software images: You can download Cisco images, SMU, and patches using the Cisco Support & Downloads page.

  • ZTP scripts: Contains the following libraries and you can build a script to initiate the ZTP process. See Build your Configuration File.

    • Python library: Includes IOS XR CLI (show commands and configuration commands) and YANG-XML (ncclient, native Netconf client).

    • BASH library: Includes IOS XR CLI show commands, configuration commands

  • Bootstrapping Data

Bootstrapping Data

Bootstrapping data is the collection of data that the router obtains from the ZTP server during the secure ZTP process. You must create and upload the bootstrapping data in the ZTP server. For more information, refer RFC 8572.

  • The bootstrapping data mainly has three artifacts:

    • Conveyed Information: Conveyed Information contains the required bootstrapping data for the device. It contains either the redirect information or onboarding information to provision the device.

      For example:

      module: ietf-sztp-conveyed-info
      
                 yang-data conveyed-information:
                   +-- (information-type)
                      +--:(redirect-information)
                      |  +-- redirect-information
                      |     +-- bootstrap-server* [address]
                      |        +-- address         inet:host
                      |        +-- port?           inet:port-number
                      |        +-- trust-anchor?   cms
                      +--:(onboarding-information)
                         +-- onboarding-information
                            +-- boot-image
                            |  +-- os-name?              string
                            |  +-- os-version?           string
                            |  +-- download-uri*         inet:uri
                            |  +-- image-verification* [hash-algorithm]
                            |     +-- hash-algorithm    identityref
                            |     +-- hash-value        yang:hex-string
                            +-- configuration-handling?      enumeration
                            +-- pre-configuration-script?    script
                            +-- configuration?               binary
                            +-- post-configuration-script?   script
      • Redirect Information: Redirect information is used to redirect a device to another bootstrap server. The redirect information contains a list of bootstrap servers along with a hostname, an optional port, and an optional trust anchor certificate that the device uses to authenticate the bootstrap server.

        For Example:

        
        {
             "ietf-sztp-conveyed-info:redirect-information" : {
               "bootstrap-server" : [
                 {
                   "address" : "sztp1.example.com",
                   "port" : 8443,
                    "trust-anchor" : "base64encodedvalue=="
                 },
                 {
                   "address" : "sztp2.example.com",
                   "port" : 8443,
                   "trust-anchor" : "base64encodedvalue=="
                 },
                 {
                   "address" : "sztp3.example.com",
                   "port" : 8443,
                   "trust-anchor" : "base64encodedvalue=="
                 }
               ]
             }
           }
        
      • Onboarding Information: Onboarding information provides data necessary for a device to bootstrap itself and establish secure connections with other systems. It specifies details about the boot image, an initial configuration the device must commit, and scripts that the device must execute.

        For Example:


        {
             "ietf-sztp-conveyed-info:onboarding-information" : {
               "boot-image" : {
                 "os-name" : "VendorOS",
                 "os-version" : "17.2R1.6",
                 "download-uri" : [ "https://example.com/path/to/image/file" ],
                 "image-verification" : [
                   {
                     "hash-algorithm" : "ietf-sztp-conveyed-info:sha-256",
                     "hash-value" : "ba:ec:cf:a5:67:82:b4:10:77:c6:67:a6:22:ab:\
           7d:50:04:a7:8b:8f:0e:db:02:8b:f4:75:55:fb:c1:13:b2:33"
                   }
                 ]
               },
               "configuration-handling" : "merge",
               "pre-configuration-script" : "base64encodedvalue==",
               "configuration" : "base64encodedvalue==",
               "post-configuration-script" : "base64encodedvalue=="
             }
           }
        
    • Owner Certificate: The owner certificate is installed on the router with the public key of your organization. The router uses the owner certificate to verify the signature in the conveyed information artifact using the public key that is available in the owner certificate.

    • Ownership Voucher: Ownership Voucher is used to identify the owner of the device by verifying the owner certificate that is stored in the device. Cisco supplies Ownership Voucher in response to your request. You must submit the Pinned Domain Certificate and device serial numbers with the request. Cisco generates and provides the Ownership Voucher to you.

Report Progress

When the device obtains the onboarding information from a ZTP server, the router reports the bootstrapping progress to the ZTP server using the API calls.

See RFC 8572 for the detailed report-progress messages that can be sent to the ZTP server.

The following is the structure of the report-progress sent the progress message to a ZTP server.

+---x report-progress {onboarding-server}?
          +---w input
             +---w progress-type         enumeration
             +---w message?              string
             +---w ssh-host-keys
             |  +---w ssh-host-key* []
             |     +---w algorithm    string
             |     +---w key-data     binary
             +---w trust-anchor-certs
                +---w trust-anchor-cert*   cms

The following example illustrates a device using the Yang module to post a progress report to a ZTP server with a bootstrap complete message:

{
        'progress-type': 'bootstrap-complete',
        'message': 'example message',
        'trust-anchor-certs': [{
                'trust-anchor-cert': 'base64encodedvalue=='
        'ssh-host-keys': [{
                'key-data': 'base64encodedvalue==',
                'algorithm': 'ssh-rsa'
        }, {
                'key-data': 'base64encodedvalue==',
                'algorithm': 'rsa-sha2-256'
        }]
}
RESPONSE from the ZTP server

   HTTP/1.1 204 No Content
   Date: Sat, 31 Oct 2015 17:02:40 GMT
   Server: example-server

Secure Zero Touch Provisioning

When you boot the device, the secure ZTP process initiates automatically if the device does not have a prior configuration.

During the process, the router verifies the list of sources and receives the information of the configuration file accordingly. The following are the sources that can provide the configuration file information.

  • Removable storage: A directly attached removable storage device, for example, USB flash drive.

  • DHCP server

The section covers the following topics:

Secure ZTP with Removable Storage Device

A Removable storage device such as a USB drive is an untrusted source of bootstrapping data. So, the onboarding information present in the removable storage device must always be signed.

Whenever the data is signed, it's mandatory that the Owner Certificate and Ownership Voucher must also be available. The removable storage device must contain the following three artifacts. For more information on the three artifacts, see Secure ZTP Components.

  • Conveyed Information

  • Owner Certificate

  • Ownership Voucher

This section covers the following topics:

Prepare Removable Storage Device to Provision Secure ZTP

The network administrator performs the following tasks as part of the initial setup for secure ZTP:

Before performing the following tasks, ensure to enable secure ZTP on the router using the ztp secure-mode enable command and then reload the router.

  1. Contact Cisco Support to obtain a voucher. Provide the following details to request for ownership voucher certificate:

    • Pinned Domain certificate (PDC): PDC is an X.509 v3 certificate structure that uses Distinguished Encoding Rules (DER). This certificate is used by the router to trust a public key infrastructure in order to verify a domain certificate supplied to the router separately in the bootstrapping data. This certificate could be an end-entity certificate, including a self signed entity.

    • Order details with the Serial numbers of the routers

    For example,

    { ​​
           "expires-on": "2016-10-21T19:31:42Z", ​​
           "assertion": "verified", ​​
           "serial-number": "JADA123456789", ​​
           "idevid-issuer": "base64encodedvalue==", ​​
           "pinned-domain-cert": "base64endvalue==", ​​
           "last-renewal-date": "2017-10-07T19:31:42Z" ​​
        } ​​
  2. Copy the following data to the removable storage device in the EN9 directory in its root:

    • Conveyed information: Conveyed information must be named as conveyed-information.cms and must contain only the onboarding information and not the redirect information.

      • Onboarding Information: The conveyed information consists of the following onboarding information:

        • Cisco IOS XR software images: You can download Cisco images, SMU, and patches using the Cisco Support & Downloads page.

          1. Click Routers and select the product that you want to download the image for.

          2. On the product home page, select the required Product model from the Downloads tab.

          3. From the Software Available For This Product page, download the required Cisco image, SMU, and patches.

        • ZTP scripts that include IOS XR configurations, pre, and post configuration scripts.

          During the secure ZTP process, secure ZTP executes the scripts to provision the router. You can build your script using one of the following methods:

          1. Python library: Includes IOS XR CLI (show commands and configuration commands) and YANG-XML (ncclient, native Netconf client).

          2. BASH library: Includes IOS XR CLI show commands, configuration commands.

            See Build your Configuration File.

    • Owner certificate: The owner certificate must be named as owner-certificate.cms.

    • Ownership vouchers: The ownership vouchers must be named as ownership-voucher.vcj.

    The artifacts must be stored inside the subdirectory named after the RP serial number of the router.The following example shows a directory structure for the router with RP serial number FOC2202R293 containing all three artifacts:

    EN9
    └── FOC2202R293
        └── bootstrapping-data
            ├── conveyed-information.cms
            ├── owner-certificate.cms
            └── ownership-voucher.vcj
  3. Plug in the removable storage device into the router.

  4. Power on the router.

How Does Secure ZTP Work with Removable Storage Device?

Before you begin, complete the task to prepare the removable storage device. See Prepare Removable Storage Device to Provision Secure ZTP.

Here is the high-level workflow of the Secure ZTP process using a removable storage device:

  1. When you boot the device with an IOS-XR image, the secure ZTP process verifies if the secure ZTP mode (secure-ztp mode) is enabled. If not enabled, the device boots normally.

  2. The device verifies if the USB is enabled in the ztp.ini file. By default, the USB is enabled and assigned the highest priority in the fetcher priority in the ztp.ini file.

    Fetcher priority defines how secure ZTP can get the provisioning details. By default, each port has a fetcher priority defined in the ztp.ini file. The fetcher priority range is from 0 to 9. The lower the number higher is the priority. The value 0 has the highest priority and 9 has the lowest priority. For more information, see Customize ZTP Initialization File.

    The following example shows the sample of the ztp.ini file:


    [Startup]
    start: True
    retry_forever: True
    
    [Fetcher Priority]
    USB: 0 
    
    Mgmt4:  1 
    Mgmt6:  2 
    DPort4: 3 
    DPort6: 4 
  3. Secure ZTP checks for a removable storage device on the router. If the removable storage device isn't available, the secure ZTP process moves to the next fetcher as defined in the fetcher priority of the ztp.inifile.

  4. If a removable storage device is available, the router scans for the EN9 directory in the root of the removable storage device.

    If the EN9 directory isn't available, the secure ZTP process moves to the next fetcher as defined in the fetcher priority of the ztp.inifile.

  5. Artifact Validation:

    The router validates the artifacts received from the removable storage device.

    1. The router validates the ownership voucher and extracts the pinned-domain-cert node, an X.509 certificate from the ownership voucher to verify the owner certificate.

    2. The router authenticates the owner certificate by performing the X.509 certificate path verification process on the trusted certificate.

    3. Finally, the router verifies whether the conveyed information artifact is signed by the validated owner certificate.

  6. Provision the router:

    1. The device first processes the boot image information.

    2. Executes the preconfiguration script and then commits the initial configuration.

    3. Execute the post configuration script.

  7. After the onboarding process is completed, router is operational.


Note


If there is a failure in any of the steps, the secure ZTP process moves to the next fetcher as defined in the fetcher priority of the ztp.ini file.


Secure ZTP with DHCP

When you boot the device, the ZTP process initiates automatically if the device does not have a prior configuration. During the process, the router receives the details of the configuration file from the DHCP server.

This section covers the following topics:

Initial Set Up for Secure ZTP

The network administrator performs the following tasks as part of the initial setup for secure ZTP:

  1. Contact Cisco Support to obtain a voucher. Provide the following details to request for ownership voucher certificate:

    • Pinned Domain Certificate: A trusted digital certificate issued by the Certificate Authority (CA) and pinned by the operator.

    • Order details with the Serial numbers of the routers

    • For example,

      { ​​
             "expires-on": "2016-10-21T19:31:42Z", ​​
             "assertion": "verified", ​​
             "serial-number": "JADA123456789", ​​
             "idevid-issuer": "base64encodedvalue==", ​​
             "pinned-domain-cert": "base64endvalue==", ​​
             "last-renewal-date": "2017-10-07T19:31:42Z" ​​
          } ​​
  2. Upload the following bootstrapping data to the ZTP server. Steps to upload may vary depending on the server that you're using, refer to the documentation provided by your vendor.

    • Cisco IOS XR software images: You can download Cisco images, SMU, and patches using the Cisco Support & Downloads page.

    • ZTP scripts that include IOS XR configurations, pre, and post configuration scripts. Build a script to initiate the ZTP process. See Build your Configuration File.

      • Python library: Includes IOS XR CLI (show commands and configuration commands) and YANG-XML (ncclient, native Netconf client).

      • BASH library: Includes IOS XR CLI show commands, configuration commands

    • Serial numbers of the routers you plan to onboard using ZTP

    • Owner certificates

    • Pinned Domain Certificate (PDC)

    • Ownership vouchers

  3. Set up the DHCP server to provide the redirect URL to the router:

    Before triggering the secure ZTP process, configure the DHCP server to provide the location of the IOS-XR image to the router. For information on how to configure the DHCP server, see your DHCP server documentation.

    Configure the following parameters in the DHCP server:

    • option-code: The DHCP SZTP redirect Option has the following parameters:

      • OPTION_V4_SZTP_REDIRECT (143): Use this DHCP v4 code for IPV4.

      • OPTION_V6_SZTP_REDIRECT (136): Use this DHCP v4 code for IPV6.

      For example, option dhcp6.bootstrap-servers code 136 = text;

    • option-length: The option length in octets

    • bootstrap-servers: A list of servers for the onboarding device to contact the servers for the bootstrapping data.

    • bootfile-url : The URI of the SZTP bootstrap server should use the HTTPS URI scheme and it should be in the following format:

      "https://<ip-address-or-hostname>[:<port>]".
  4. Power on the router.

  5. Enable the secure ZTP option on the onboarding device. Execute the following command on your router to enable secure ZTP:

    
    Router# ztp secure-mode enable

How Does Secure ZTP Work?

Before you begin, ensure that you configure the network with the DHCP and ZTP server. See Initial Set Up for Secure ZTP.

  1. When you boot the device with an IOS-XR image, the secure ZTP process verifies if the secure ZTP mode (secure-ztp mode) is enabled. If not enabled, the device boots normally.


    Note


    When secure-ztp mode is enabled, the ZTP process accepts only the secure-redirect-URL and ignores the presence of boot file name option from the DHCP response.


  2. DHCP discovery:

    1. The router initiates a DHCP request to the DHCP server.

    2. The DHCP server responds with a DHCPv4 143 address option (for IPv4 addressing) or a DHCPv6 136 option (for IPv6 addressing). In addition, URLs to access bootstrap servers for further configuration is also listed.

    Figure 1. DHCP discovery
  3. Router validation:

    1. After receiving the URL from the DHCP server, the router sends an HTTPs request to the RESTCONF or HTTPs server using the specified URL. Along with the HTTPs request, the device sends the client certificate that is provided by the manufacturer (also called SUDI certificate). This certificate identifies and authenticates itself to the ZTP server.

      Figure 2. Router Validation
    2. The RESTCONF or HTTPs server verifies the received SUDI certificate with the public certificate that it contains. Cisco issues the public certificate to ensure that the onboarding device is an authorized Cisco device.

    3. After the onboarding device is authenticated, the web server sends the required artifacts along with the secure ZTP yang model to the onboarding device.

  4. Server validation :

    The router receives the yang model that contains Owner Certificate, Ownership Voucher, and Conveyed Information artifact. The router verifies the ownership voucher by validating its signature to one of its preconfigured trusts anchors and downloads the image. When the router obtains the onboarding information, it reports the bootstrapping progress to the ZTP server. See RFC 8572 for the progress information.

    Figure 3. Server Validation
  5. Artifact Validation:

    The router validates the artifact received from the ZTP server.

    1. The device extracts the pinned-domain-cert node, an X.509 certificate from the ownership voucher to verify the owner certificate.

    2. The device authenticates the owner certificate by performing the X.509 certificate path verification process on the trusted certificate.

    3. Finally, the device verifies whether the conveyed information artifact is signed by the validated owner certificate.

  6. Provision the device:

    1. The device first processes the boot image information.

    2. Executes the pre-configuration script and then commits the initial configuration

    3. Execute the post configuration script.

  7. After the onboarding process is completed, the network device is operational.

The following figure illustrates the end-to-end sequence of the Secure ZTP process:

Figure 4. End-to-end sequence of the Secure ZTP process

Upgrade Image Using Secure ZTP

You can upgrade the system image using one of the following methods:

  • Default installation method

  • Preconfiguration script


Note


Use only the preconfiguration script method to upgrade from Cisco IOS XR release 7.3.1 to either 7.7.21, 7.9.2, or 7.10.1.


Even though there are multiple ways of upgrading the software image using the default installation method, each router platform has a different installation behaviour. The default installation method uses a combination of install add <> and install activate reload id <> commands, which aren’t optimized for all platforms. There’s no single command in Cisco IOS XR that works on all platforms across all scenarios. Therefore, the recommended method is to use the preconfiguration script, which allows the use of any installation command. Also, this method allows you to modify traffic or rate-related configuration for download.

Here is a sample preconfiguration script:

[xr-vm_nodehost_CPU0:/misc/scratch]$ cat /disk0\:/ztp/customer/pre_config.candidate
#!/bin/bash
 
# !!!!!!!!!!!!!!!!!!!!!!!! WARNING !!!!!!!!!!!!!!!!!!!!!!!!
# For this script to work on Cisco IOSXR OS use Unix style
# EOL character - LF, not Windows style - CRLF
 
exec &> /dev/console # send logs to console
source /pkg/bin/ztp_helper.sh
export LOGFILE=/disk0:/ztp/user-script.log
 
#Set to 1 for GISO image upgrade
GISO_UPGRADE=0
 
# Crosswork parameters
HOST_IP="5.10.18.112"
PORT="5002"
 
# Software upgrade parameters
TARGET_SOFTWARE_VERSION="7.9.1.33I"
IMAGE_FILENAME="ncs5500-mini-x.iso"
IMAGE_MD5_CHECKSUM="20d020d9912eb01ce4b242532544cc0e"
#IMAGE_PACKAGE="ncs5500-mini-x-7.9.1.33I"
IMAGE_URL="http://${HOST_IP}:${PORT}/images/ncs7/${IMAGE_FILENAME}"
 
function ztp_log(){
    echo "$(date +"%b %d %H:%M:%S") "$1 >> $LOGFILE
}
 
 
function check_version(){
    # returns 0 is version matches, 1 otherwise
    local current_ver=`xrcmd "show version" | grep Version | grep Cisco | cut -d " " -f 6`;
    ztp_log "### ZTP version check current=$current_ver, target=$TARGET_SOFTWARE_VERSION ###";
    if [[ "$current_ver" = "$TARGET_SOFTWARE_VERSION" ]]; then
        ztp_log "### ZTP software version check result: match ###";
        return 0
    else
        ztp_log "### ZTP software version check result: mismatch ###";
        return 1
    fi
}
 
function download_image(){
    # Download image to harddisk:
    ztp_log "### IOS-XR INSTALL - downloading image $IMAGE_FILENAME from $IMAGE_URL ###"
    /usr/bin/wget ${IMAGE_URL} -O /harddisk:/$IMAGE_FILENAME 2>&1 >> $LOGFILE
    if [[ "$?" != 0 ]]; then
        ztp_log "### IOS-XR INSTALL - error downloading $IMAGE_FILENAME, check /var/log/ztp_user_script.log for details ###"
        exit 1
    else
        ztp_log "### IOS-XR INSTALL - $IMAGE_FILENAME download completed ###";
    fi
 
    # check MD5 hash checksum
    ztp_log "### IOS-XR INSTALL - verifying image md5 checksum ###"
    local checksum=`xrcmd "show md5 file /harddisk:/$IMAGE_FILENAME"`;
    if [[ "$checksum" != *"$IMAGE_MD5_CHECKSUM"* ]]; then
        ztp_log "### IOS-XR INSTALL - error, image checksum $checksum does not match $IMAGE_MD5_CHECKSUM, exiting ###"
        exit 1
    else
        ztp_log "### IOS-XR INSTALL - md5 checksum verification successful ###"
    fi
}
 
#optional
function install_commit_packages(){
    local output
 
    ztp_log "### IOS-XR INSTALL - Commit packages ###"
    output=$(xrcmd "install commit")
    ztp_log "$output"
}
 
#optional
function remove_inactive_packages(){
    local output
 
    # remove inactive packages if any
    ztp_log "### IOS-XR INSTALL - removing inactive packages ###"
    output=$(xrcmd "install remove inactive all synchronous")
    ztp_log "$output"
}
 
function install_giso_target_image(){
    local output
    touch /disk0\:/ztp/state/state_is_install_started
    # do GISO image install
    ztp_log "### IOS-XR INSTALL - doing GISO install replace ###"
    output=$(xrcmd "install replace /harddisk:/$IMAGE_FILENAME noprompt commit")
    ztp_log "$output"
    if [[ "$output" != *"aborted"* ]]; then
        ztp_log "### IOS-XR INSTALL - GISO install replace completed ###"
        ztp_log "### Upgraded IOS-XR to $TARGET_SOFTWARE_VERSION, device should reboot ###";
    else
        ztp_log "### IOS-XR INSTALL - error, GISO install replace failed, check 'show install log' ###"
        return 1
    fi
}
 
function install_add_image(){
    local output
 
    # do  image install add
    ztp_log "### IOS-XR INSTALL - doing  install add ###"
    output=$(xrcmd "install add source /misc/disk1/ $IMAGE_FILENAME")
    ztp_log "$output"
    install_add_id=$(echo $output | awk '{print $5}')
    if [[ "$output" != *"aborted"* ]]; then
        ztp_log "### IOS-XR INSTALL -  install add completed ###"
    else
        ztp_log "### IOS-XR INSTALL - error,  install add failed, check 'show install log' ###"
        return 1
    fi
}
 
function install_target_image(){
    local output
    touch /disk0\:/ztp/state/state_is_install_started
    # do  image install
    ztp_log "### IOS-XR INSTALL - doing  install activate ###"
    output=$(xrcmd "install activate id $install_add_id noprompt synchronous")
    ztp_log "$output"
    if [[ "$output" != *"aborted"* ]]; then
        ztp_log "### IOS-XR INSTALL -  install activate completed ###"
        ztp_log "### Upgraded IOS-XR to $TARGET_SOFTWARE_VERSION, device should reboot ###";
    else
        ztp_log "### IOS-XR INSTALL - error,  install activate failed, check 'show install log' ###"
        return 1
    fi
}
 
# ==== Script entry point ==== #
# run version check and decide if need to download target image
check_version;
if [[ "$?" = 1 ]]; then
    ztp_log "### Software Version mismatch, downloading IOS-XR $TARGET_SOFTWARE_VERSION ###";
    download_image;
    NEED_UPGRADE=1
    ztp_log "### Downloaded IOS-XR $TARGET_SOFTWARE_VERSION image ###";
else
    NEED_UPGRADE=0
    ztp_log "### Image Download: Software Version match $TARGET_SOFTWARE_VERSION, nothing to do ###";
fi
 
# do software upgrade
if [[ $NEED_UPGRADE = 1 ]]; then
    ztp_log "### Software Version mismatch, upgrading IOS-XR to $TARGET_SOFTWARE_VERSION ###";
    install_commit_packages;
    remove_inactive_packages;
    if [[ $GISO_UPGRADE = 1 ]]; then
        install_giso_target_image;
    else
        install_add_image;
        install_target_image;
    fi
else
    ztp_log "### Upgrade: Software Version match $TARGET_SOFTWARE_VERSION, nothing to do ###";
fi
 
ztp_log "### ZTP DONE ###";

Disable Secure ZTP

Execute the following commands to disable the secure ZTP:


Router# request consent-token generate-challenge secure-ztp auth-timeout 15
Router# request consent-token accept-challenge secure-ztp