Bring-up the Router

After installing the hardware, boot the router. Connect to the XR console port and power on the router. The router completes the boot process using the pre-installed operating system (OS) image. If no image is available within the router, the router can be booted using PXE boot or an external bootable USB drive.

After booting is complete, create the root username and password, and then use it to log on to the XR console and get the router prompt. The first user created in XR console is synchronized to the System Admin console. From the XR console, access the System Admin console to configure system administration settings.

In a large-scale environment, to provision routers remotely without any manually intervention, we recommend you to use Zero Touch Provisioning (ZTP) mechanism. ZTP offers the following implementation choices worth considering in advance:

  • You can use Classic Zero Touch Provisioning, when you want to provision the devices within a secured network. See Deploy Router Using Classic ZTP.

  • You can use Secure ZTP when you must securely provision remote network devices, transverse through public internet for provisioning, or when the devices are from third-party manufacturers. See Deploy Router Using Secure ZTP.

Boot the Router

Use the console port on the Route Processor (RP) to connect to a new router. The console port connect to the XR console by default. If necessary, subsequent connections can be established through the management port, after it is configured.

Procedure


Step 1

Connect a terminal to the console port of the RP

Step 2

Start the terminal emulation program on your workstation.

In the COM1 Properties window, select the Port Settings tab, and enter the following settings:

The console settings are:

  • For modular chassis RP, the console settings are baud rate 9600 bps, no parity, 1 stop bits and 8 data bits

  • For fixed chassis, the console settings are baud rate 115200 bps, no parity, 1 stop bits and 8 data bits.

The baud rate is set by default and cannot be changed.

Step 3

Power on the router.

Connect the power cord to Power Module. Turn on the router by switching the power switch to the "ON" position. The power switch is usually located near the power module. The router boots up. The boot process details are displayed on the console screen of the terminal emulation program.

Step 4

Press Enter.

The boot process is complete when the system prompts to enter the root-system username. If the prompt does not appear, wait for a while to give the router more time to complete the initial boot procedure, then press Enter.

Important


If the boot process fails, it may be because the preinstalled image on the router is corrupt. In this case, the router can be booted using an external bootable USB drive.

Note


We recommended that you check the md5sum of the image after copying from source location to the server from where router boots up with new version. This ensures that if md5sum mismatch is observed, you can remove the corrupted file and ensure that a working copy of the image file is available for setup to begin.


What to do next

Specify the root username and password. For more information, see Setup Root User Credentials.
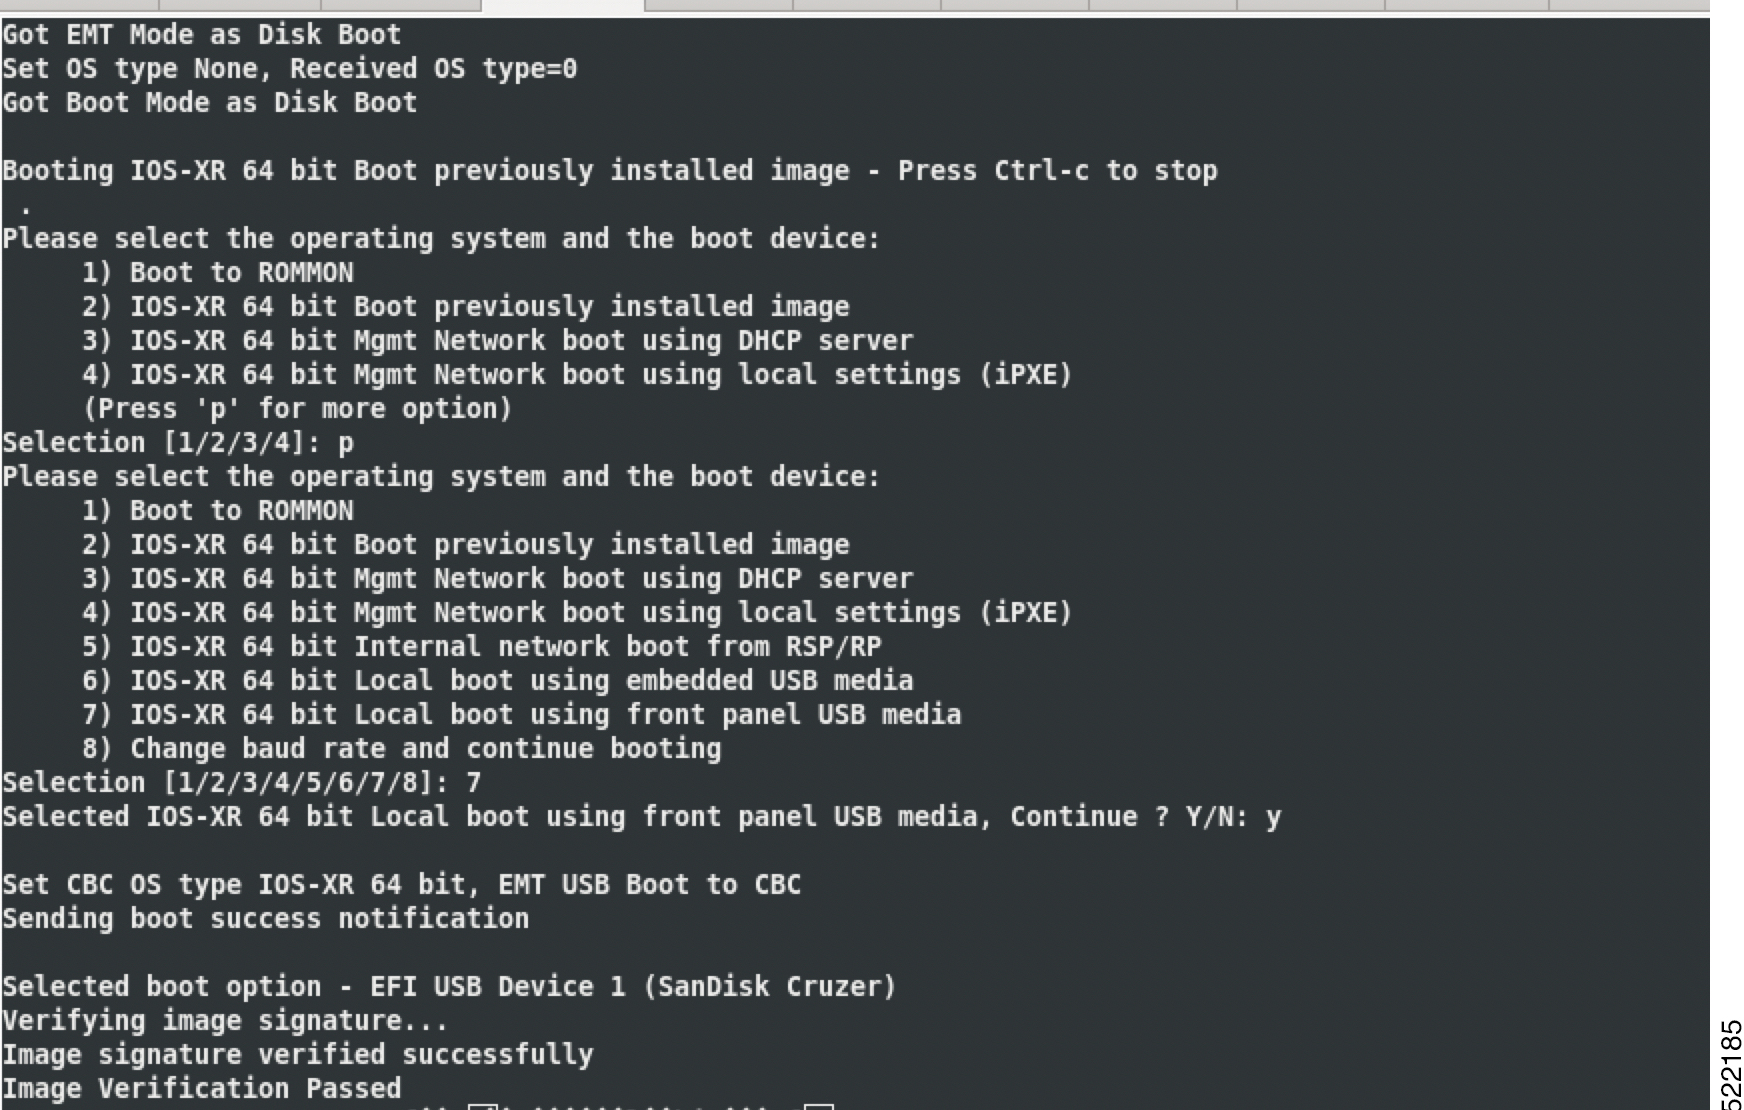
Boot the Router Using USB

The bootable USB drive is used to re-image the router for the purpose of system upgrade, password recovery or boot the router in case of boot failure. The USB on router is mounted as disk 2.

Before you begin

Ensure you have completed the following prerequisites:

  • You have access to a USB drive with a storage capacity that is between 8GB (min) and 32 GB (max). USB 2.0 and USB 3.0 are supported.

  • Copy the compressed boot file from the Software Download Center to your local machine. The file name for the compressed boot file is in the format ncs5500-usb_boot-<release_number>.zip.

Procedure


Step 1

Create a bootable USB drive.

Note


The content of the zipped file ("EFI" and "boot" directories) should be extracted directly into root of the USB drive. If the unzipping application places the extracted files in a new folder, move the "EFI" and "boot" directories to root of the USB drive.

  1. Connect the USB drive to your local machine and format it with FAT32 or MS-DOS file system using the Windows Operating System or Apple MAC Disk Utility.

  2. Copy the ncs5500-usb_boot-<release_number>.zip compressed boot file to the USB drive.

  3. Verify that the copy operation is successful. To verify, compare the file size at source and destination. Additionally, verify the MD5 checksum value.

  4. Extract the content of the compressed boot file by unzipping it inside the USB drive. This converts the USB drive to a bootable drive.

  5. Eject the USB drive from your local machine.

Step 2

Insert the USB on the active RP, and reload or reset the power of the router.

Note


Use this procedure only on active RP; the standby RP must either be removed from the chassis, or stopped at the boot menu. After the active RP is installed with images from USB, boot the standby RP.

Step 3

On active XR console, press CTRL-C to view BIOS menu. From the menu, select IOS-XR 64 bit Local boot using front panel USB media.

If active and standby RPs are not stopped at the boot menu, the previously used boot option is used. If the system is inactive in the boot menu for 30 minutes, the system resets automatically.

Step 4

If standby RP is present and it was stopped in step 2, boot the standby RP after the active RP starts to boot. From the boot options select IOS-XR 64 bit Internal network boot from RSP/RP.

Example:

Please select the operating system and the boot device:
     1) IOS-XR (32 bit Classic XR)
     2) IOS-XR 64 bit Boot previously installed image
     3) IOS-XR 64 bit Mgmt Network boot using DHCP server
     4) IOS-XR 64 bit Mgmt Network boot using local settings (iPXE)
     5) IOS-XR 64 bit Internal network boot from RSP/RP
     6) IOS-XR 64 bit Local boot using embedded USB media
     7) IOS-XR 64 bit Local boot using front panel USB media
Selection [1/2/3/4/5/6/7]:

Select option 5 and proceed with the boot up. After the router boots up, specify the root username and password.


Boot the Router Using iPXE

iPXE is a pre-boot execution environment that is included in the network card of the management interfaces and works at the system firmware (UEFI) level of the router. iPXE is used to re-image the system, and boot the router in case of boot failure or in the absence of a valid bootable partition. iPXE downloads the ISO image, proceeds with the installation of the image, and bootstraps within the new installation.

iPXE acts as a boot loader and provides the flexibility to choose the image that the system will boot based on the Platform Identifier (PID), the Serial Number, or the management mac-address. iPXE must be defined in the DHCP server configuration file.


Note


PID and serial number is supported only if iPXE is invoked using the command (admin) hw-module location all bootmedia network reload all. If iPXE is selected manually from BIOS, PID and serial number is not supported.

iPXE boot can be performed during the following scenarios:

  • migration from 32-bit to 64-bit using migration script

  • recover password

  • boot-up failure with 64-bit image

Before you begin

Take a backup of configuration to a TFP or FTP path to load the configuration back after the iPXE boot.

Procedure


Step 1

Login to the system admin console.

Example:

sysadmin-vm:0_RSP0# hw-module location all reload
Tue Mar  6  08:12:47.605 UTC
Reload hardware module ? [no,yes] yes
result Card graceful reload request on all acknowledged.
sysadmin-vm:0_RSP0#

Step 2

If the router is unable to boot, press Ctrl +C to stop the boot process when the following information is displayed.

Note

 
Use this procedure only on active RP; the standby RP must either be removed from the chassis, or stopped at the boot menu. After the active RP is installed with images from iPXE boot, boot the standby RP.

Example:

IOFPGA Information:
Booted from : Primary FPGA
Revison : 0x1001B
ID : 0x20171FD3
Date : 0x20191205
Fab Revision : 0x5
Base Board Presence : 0x80000015

Board is : Turin CPU Board
Booting from Primary BIOS
Booting IOS-XR (32 bit Classic XR) - Press Ctrl-c to stop

Step 3

Choose option 4 for iPXE boot.

Example:

Please select the operating system and the boot device:
     1) IOS-XR (32 bit Classic XR)
     2) IOS-XR 64 bit Boot previously installed image
     3) IOS-XR 64 bit Mgmt Network boot using DHCP server
     4) IOS-XR 64 bit Mgmt Network boot using local settings (iPXE)
     5) IOS-XR 64 bit Internal network boot from RSP/RP
     6) IOS-XR 64 bit Local boot using embedded USB media
     7) IOS-XR 64 bit Local boot using front panel USB media
Selection [1/2/3/4/5/6/7]:

Step 4

Manually update iPXE ROMMON details before booting using FTP or TFTP.

Note


If you are using an iPXE server, skip Step4 and proceed to Steps5 and 6.

Example:

iPXE>set cisco/cisco-server-url:string tftp://<path>/ncs5500-mini-x.iso
iPXE>set cisco/cisco-ipv4-address:string 1.3.24.202
iPXE>set cisco/cisco-netmask-address:str 255.255.0.0
iPXE>set cisco/cisco-gateway-address:str 1.3.0.1

Step 5

Open the connected management port (0/1).

Example:

iPXE>ifclose net0   
iPXE>ifclose net1   
iPXE>ifopen net1

where net0 and net1 represents management port0 and port1 respectively.

Step 6

Boot the required image from FTP or TFTP location.

Example:

iPXE> set net0/ip 5.26.8.50
iPXE> set net0/netmask 255.255.0.0
iPXE> set net0/gateway 5.26.0.1
iPXE> ifopen net0
iPXE> boot t ftp://<path>/ncs5500-mini-x-<release-number>.iso
t ftp://<path>/ncs5500-mini-x-<release-number>.iso... Operation canceled ( http://ipxe.org/0b072095)
iPXE>
iPXE> ping 5.0.0.183
64 bytes from 5.0.0.183: seq=1
64 bytes from 5.0.0.183: seq=2
64 bytes from 5.0.0.183: seq=3
Finished: Operation canceled ( http://ipxe.org/0b072095)
iPXE> boot http://<path>/ncs5500-goldenk9-x-<release-number>-PROD_BUILD_<release-number>_DT_IMAGE__OPTIMISED.iso
http://<path>/ncs5500-goldenk9-x-<release-number>-PROD_BUILD_<release-number>_DT_IMAGE__OPTIMISED.iso... ok
Memory required for image[ncs5500-goldenk9-x-<release-number>-PROD_BUILD_<release-number>_DT_IMAGE__OPTIMISED.iso]: 2345863168, available: 29061079040
Certificate parsing success

Step 7

After the active RP is up and running, boot the standby RP. From the boot options select IOS-XR 64 bit Internal network boot from RSP/RP.

Example:


Please select the operating system and the boot device:
     1) IOS-XR (32 bit Classic XR)
     2) IOS-XR 64 bit Boot previously installed image
     3) IOS-XR 64 bit Mgmt Network boot using DHCP server
     4) IOS-XR 64 bit Mgmt Network boot using local settings (iPXE)
     5) IOS-XR 64 bit Internal network boot from RSP/RP
     6) IOS-XR 64 bit Local boot using embedded USB media
     7) IOS-XR 64 bit Local boot using front panel USB media
Selection [1/2/3/4/5/6/7]:

Setup Root User Credentials

When you boot the router for the first time, the system prompts you to configure root credentials (username and password). These credentials have been set up for the root user on the XR console (root-lr), the System Admin VM (root-system), and for disaster recovery purposes.

Procedure


Step 1

Enter root-system username: username

Enter the username of the root user. The character limit is 1023. In this example, the name of the root user is "root".

Important


The specified username is mapped to the "root-lr" group on the XR console. It is also mapped as the "root-system" user on the System Admin console.

When starting the router for the first time, or after resetting the router's operating system to its default state, the router does not have any user configuration. In such cases, the router prompts you to specify the "root-system username". However, if the router has been configured previously, the router prompts you to enter the "username", as described in Step 4.

Step 2

Enter secret: password

Enter the password for the root user. The character range of the password is from 6 through 253 characters. The password that you type is not displayed on the CLI for security reasons.

The root-system username and password must be safeguarded as they have superuser privileges. They are used to access the complete router configuration.

Step 3

Enter secret again: password

Reenter the password for the root-system user. The password that you type is not displayed on the CLI for security reasons.

Step 4

Username: username

Enter the root-system username to login to the XR VM console.

Step 5

Password: password

Enter the password of the root-system user. The correct password displays the router prompt. You are now logged into the XR VM console.

Step 6

(Optional) show run username

Displays user details.


username root
 group root-lr
 group cisco-support
 secret 5 $1$NBg7$fHs1inKPZVvzqxMv775UE/
!

What to do next

  • Configure routing functions from the XR console.

  • Configure system administration settings from the System Admin prompt. The System Admin prompt is displayed on accessing the System Admin console. For details on how to get the System Admin prompt, see Access the System Admin Console.

Access the System Admin Console

You must log in to the System Admin console through the XR console to perform all system administration and hardware management setup.

Procedure


Step 1

Log in to the XR console as the root user.

Step 2

(Optional) Disable the login banner on console port when accessing the System Admin mode from XR mode.

  1. configure

  2. service sysadmin-login-banner disable

    Example:

    RP/0/RP0/CPU0:router(config)#service sysadmin-login-banner disable

    Disable the login banner on console port in System Admin mode.

  3. commit

  4. end

Step 3

admin

Example:

The login banner is enabled by default. The following example shows the command output with the login banner enabled:
RP/0/RP0/CPU0:router#admin

Mon May 22 06:57:29.350 UTC
 
root connected from 127.0.0.1 using console on host
sysadmin-vm:0_RP0# exit
Mon May  22 06:57:32.360 UTC
The following example shows the command output with the login banner disabled:
RP/0/RP0/CPU0:router#admin
Thu Mar 01:07:14.509 UTC
sysadmin-vm:0_RP0# exit

Step 4

(Optional) exit

Return to the XR mode from the System Admin mode.


Configure the Management Port

To use the Management port for system management and remote communication, you must configure an IP address and a subnet mask for the management ethernet interface. To communicate with devices on other networks (such as remote management stations or TFTP servers), you need to configure a default (static) route for the router.

Before you begin

  • Consult your network administrator or system planner to procure IP addresses and a subnet mask for the management interface.

  • Physical port Ethernet 0 and Ethernet 1 on RP are the management ports. Ensure that the port is connected to management network.

SUMMARY STEPS

  1. configure
  2. interface MgmtEth rack/slot/port
  3. (Optional) vrf vrf-id
  4. ipv4 address ipv4-address subnet-mask
  5. ipv4 address ipv4 virtual address subnet-mask
  6. no shutdown
  7. exit
  8. router static address-family ipv4 unicast 0.0.0.0/0 default-gateway
  9. Use the commit or end command.

DETAILED STEPS


Step 1

configure

Example:


RP/0/RP0/CPU0:router# configure

Enters global configuration mode.

Step 2

interface MgmtEth rack/slot/port

Example:

RP/0/RP0/CPU0:router(config)#interface mgmtEth 0/RP0/CPU0/0

Enters interface configuration mode for the management interface of the primary RP.

Step 3

(Optional) vrf vrf-id

Example:

RP/0/RP0/CPU0:router(config-sg-tacacs+)# vrf vrf-id 

Specifies the Virtual Private Network (VPN) routing and forwarding (VRF) reference.

Step 4

ipv4 address ipv4-address subnet-mask

Example:

RP/0/RP0/CPU0:router(config-if)#ipv4 address 10.1.1.1/8

Assigns an IP address and a subnet mask to the interface.

Step 5

ipv4 address ipv4 virtual address subnet-mask

Example:

RP/0/RP0/CPU0:router(config-if)#ipv4 address 1.70.31.160 255.255.0.0

Assigns a virtual IP address and a subnet mask to the interface.

Step 6

no shutdown

Example:

RP/0/RP0/CPU0:router(config-if)#no shutdown

Places the interface in an "up" state.

Step 7

exit

Example:

RP/0/RP0/CPU0:router(config-if)#exit

Exits the Management interface configuration mode.

Step 8

router static address-family ipv4 unicast 0.0.0.0/0 default-gateway

Example:

RP/0/RP0/CPU0:router(config)#router static address-family ipv4 unicast 0.0.0.0/0 12.25.0.1

Specifies the IP address of the default-gateway to configure a static route; this is to be used for communications with devices on other networks.

Step 9

Use the commit or end command.

commit —Saves the configuration changes and remains within the configuration session.

end —Prompts user to take one of these actions:
  • Yes — Saves configuration changes and exits the configuration session.

  • No —Exits the configuration session without committing the configuration changes.

  • Cancel —Remains in the configuration session, without committing the configuration changes.


What to do next

Connect to the management port to the ethernet network. With a terminal emulation program, establish a SSH or telnet connection to the management interface port using its IP address. Before establishing a telnet session, use the telnet ipv4|ipv6 server max-servers command in the XR Config mode, to set number of allowable telnet sessions to the router.

Perform Clock Synchronization with NTP Server

There are independent system clocks for the XR console and the System Admin console. To ensure that these clocks do not deviate from true time, they need to be synchronized with the clock of a NTP server. In this task you will configure a NTP server for the XR console. After the XR console clock is synchronized, the System Admin console clock will automatically synchronize with the XR console clock.

Before you begin

Configure and connect to the management port.

Procedure


Step 1

configure

Example:


RP/0/RP0/CPU0:router# configure

Enters global configuration mode.

Step 2

ntp server server_address

Example:

RP/0/RP0/CPU0:router(config)#ntp server 64.90.182.55

The XR console clock is configured to be synchronized with the specified sever.