Upgrading Nexus Dashboard Fabric Controller

Upgrade Prerequisites and Guidelines

The following sections describe the various requirements for upgrading an existing Nexus Dashboard Fabric Controller (NDFC) or the earlier DCNM software to this release.

  • Ensure that your current Nexus Dashboard cluster is healthy.

    You can check the system status on the Overview page of the Nexus Dashboard's Admin Console or by logging in to one of the nodes as rescue-user and ensuring that the acs health command returns All components are healthy.

  • If you are upgrading a virtual Nexus Dashboard cluster deployed in VMware ESX, ensure that the ESX version is still supported by the target release.


    Note


    If you need to upgrade the ESX server, you must do that before upgrading your Nexus Dashboard to the target release:

    1. Upgrade one of the ESX hosts as you typically would with your existing Nexus Dashboard node VM running.

    2. After the host is upgraded, ensure that the Nexus Dashboard cluster is still operational and healthy.

    3. Repeat the upgrade on the other ESX hosts one at a time.

    4. After all ESX hosts are upgraded and the existing Nexus Dashboard cluster is healthy, proceed with upgrading your Nexus Dashboard to the target release as described in the following section.


  • If you are upgrading from release 12.1.1, ensure that the VRF is correctly set on all existing switches.

    For additional information and context, see the Discovery VRF on Existing Switches section below.

  • If you take a backup of the NDFC configuration when upgrading from DCNM release 11.5.4, and then you restore on another release of NDFC (such as NDFC 12.1.3), in some situations during the initial setup, you might see an error message such as Failed to allocate VLAN or Loopback ID/IP due to range exhausted. This might happen if multiple networks or VRFs, or a combination of networks and VRFs, have the same default VLAN specified and are attached to the same switch, which will result in the default VLAN being set to -1 for the second attached entity. To fix this issue, you must specify an override VLAN to be used on that switch.

  • You must perform configuration backups of your Nexus Dashboard and Nexus Dashboard Fabric Controller before the upgrade to safeguard data and minimize any potential risk before proceeding with the upgrade.

  • If you are upgrading from DCNM release 11.5.4, the trap-ip used in DCNM must not be the Nexus Dashboard management or data IP address. Instead, the IP must be configured in the Nexus Dashboard persistent IP address pool.

    For more information about configuring persistent IPs, see the "Persistent IP addresses" section of the Cisco Nexus Dashboard Infrastructure Management article.

  • You must disable all preview/beta features and delete the associated data.

    In the Settings > Feature Management page, disable all BETA features.

    In the Settings > Server Settings > LAN Fabric page, ensure that Enable Preview Features is disabled.


    Note


    Disabling a beta feature does not remove any created configurations. For example, if you had enabled the ECL preview feature and created/discovered an ECL fabric, disabling the feature does not remove the existing configuration. In this case, in addition to disabling the feature, you must also delete the configuration before the upgrade.


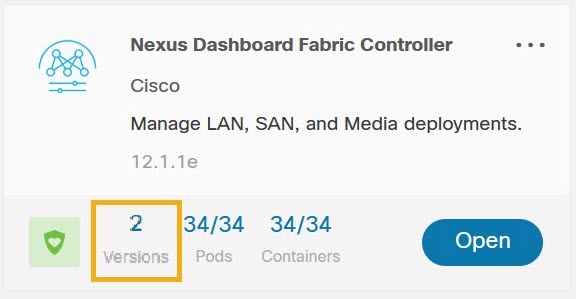
  • Ensure that you have deleted all NDFC versions except the currently enabled one from your Nexus Dashboard.

    You must not have multiple NDFC release images coexisting in the same cluster during the upgrade. Before you upgrade to the next release, navigate to the Nexus Dashboard's Services page, click the ... menu in the NDFC service tile, choose Versions and remove all non-active versions:

  • Ensure that you have enough external IP addresses configured in your Nexus Dashboard for the Fabric Controller service.

    If there are not enough IPs available, such if the IPs are consumed by another service, the NDFC service would not be able to start.

  • You must be running Nexus Dashboard release 2.2(1) or later to upgrade directly to release 3.0(1).


    Note


    If you are upgrading from NDFC release 12.0.2 or earlier, direct upgrades are not supported. You must first upgrade to release 12.1.1 and then to release 12.1.3. See the upgrade workflows table below for additional information.


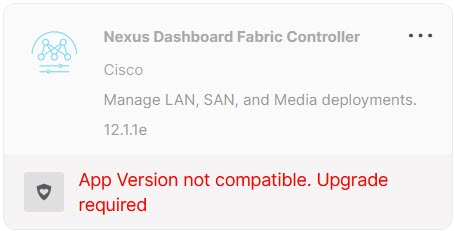
  • You must disable all services running in the cluster before upgrading to release 3.0(1) or later.


    Note


    After you have upgraded your Nexus Dashboard to release 3.0(1), you must not re-enable the existing NDFC versions that you had disabled prior to the Nexus Dashboard upgrade.

    You must also not delete the existing versions of the service, which may now display an App Version not compatible. Upgrade required. error:


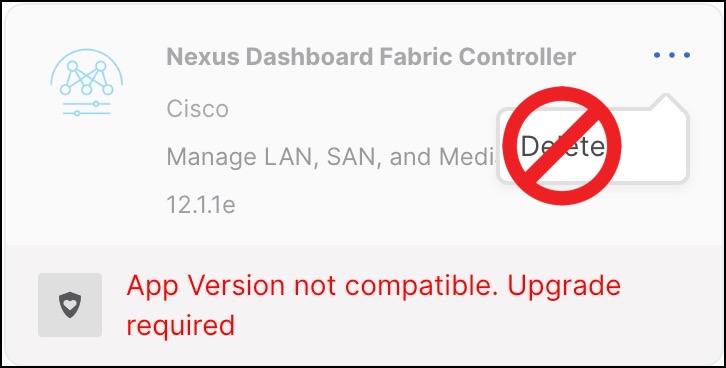
  • Ensure that no configuration changes are made to the cluster, such as adding worker or standby nodes, while the upgrade is in progress.

  • Nexus Dashboard and Nexus Dashboard Fabric Controller do not support software downgrades.

    If you want to downgrade to an earlier release, you will need to deploy a new cluster and reinstall the services.

  • We recommend that you do not upgrade any underlying third-party software separately. All the necessary software components will be updated during the inline upgrade procedure. Upgrading the components outside of Nexus Dashboard Fabric Controller upgrade may cause functionality issues.

Discovery VRF on Existing Switches


Note


The following information applies to NDFC upgrades from release 12.1.1; if you are upgrading from release 12.1.2, you can skip this subsection.


Reachability from NDFC to the switches is controlled by the routes configuration in the Nexus Dashboard cluster. By default, all NDFC pods have their default gateway set to the Nexus Dashboard's data interface gateway. However, for pods with persistent IPs (External Service IPs), the default gateway is set based on the specific management or data interface associated with the persistent IP pool:

  • If a pod is using an external service IP from the management subnet, its default gateway is set to the Nexus Dashboard's management interface gateway.

  • If a pod is using an external service IP from the data subnet pool, its default gateway is set to the Nexus Dashboard's data interface gateway.

NDFC's discovery pod requires IP reachability to the switches and does not have a persistent IP, so the pod's reachability to the switches depends on how routing is configured from the switches to the Nexus Dashboard cluster that is hosting the NDFC service. However, some of the pod's operations require reverse reachability from the switches to NDFC. For example, when NDFC is set as a trap-host destination for a switch, you must specify the VRF over which this IP is reachable in addition to the NDFC syslog-trap External Service IP configuration on that switch. Similarly, when a switch executes an SCP copy command to copy images for Image Management purposes, the VRF must be specified for the switch to reach the SCP destination IP (External Service IP associated with NDFC's poap-scp pod). As a result, for every switch, you must associate a VRF that can be used for connectivity from the switch to NDFC.

When NDFC's LAN Device Management Connectivity is set to Management (default setting), the POAP-SCP and SNMP-Trap pods get persistent IPs from the Management External Service IP pool. In this case, switches must be imported into NDFC using the switches' mgmt0 IP address, which must be reachable from NDFC over the Nexus Dashboard's management interface. For switches that are reachable via Layer 3, this requires static routes to be configured in the Nexus Dashboard's Admin > System Settings > Routes > Management Network Routes (previously, Infrastructure > Cluster Configuration). For these switches, the VRF associated with the switch gets set to management.

On the other hand, when NDFC's LAN Device Management Connectivity is set to Data, the POAP-SCP and SNMP-Trap pods get persistent IPs from the Data External Service IP pool and are reachable over the Nexus Dashboard data interface. In this case, you must also enable the When LAN Device Management Connectivity is set to Data, rely on LAN discovery to always populate VRF for all Nexus Switches option for the VRF to be properly populated for the switch.

In NDFC release 12.1.1, the above option was disabled by default, which means that any switch imported into NDFC had its VRF set to “default”. In this case, you had to enable reachability from the switch to NDFC via the front-panel interface or update the discovery VRF for the switch for the persistent IPs associated with the POAP-SCP and SNMP-Trap pods to be reachable. However, if you did not use Image Management or trap-related functionality and did not enable reachability from the switch to NDFC, you would not notice that the reverse communication from the switch to NDFC was not working because NDFC-to-switch communication would continue to function via either Nexus Dashboard's management or data interface.

Beginning with release 12.1.2, the When LAN Device Management Connectivity is set to Data, rely on LAN discovery to always populate VRF for all Nexus Switches option is enabled by default. So NDFC would properly populate the discovery VRF from the switch configuration during switch discovery.

As a result of the default setting change, if you are upgrading from release 12.1.1, you may run into an issue where the VRF is not set on the switch and you must manually update it using the GUI or API to establish proper reachability from your existing switches to NDFC. Note that if you had already explicitly configured the VRF for your existing switches, it is preserved during the upgrade but any switch whose VRF is currently set to "default" is not updated regardless of the change in default value of the When LAN Device Management Connectivity is set to Data, rely on LAN discovery to always populate VRF for all Nexus Switches setting unless the switch is removed and re-added.

Upgrade Workflow Overview

The following table summarizes the upgrade workflows required to upgrade from your current NDFC release to release 12.1.3.

Current Release Nexus Dashboard Version for the Current Release Upgrade workflow when upgrading to release 12.1.3

12.1.2

2.3.x

  1. Create a configuration backup from the Operations > Backup & Restore page.

  2. Disable Nexus Dashboard Fabric Controller service on Nexus Dashboard

  3. Upgrade your Nexus Dashboard to release 3.0.1.

  4. Upgrade the NDFC service to release 12.1.3.

For detailed instructions, see Upgrading From NDFC Release 12.1.x.

12.1.1e

2.2.x

  1. Create a configuration backup from the Operations > Backup & Restore page.

  2. Disable Nexus Dashboard Fabric Controller service on Nexus Dashboard

  3. Upgrade your Nexus Dashboard to release 3.0.1.

  4. Upgrade the NDFC service to release 12.1.3.

For detailed instructions, see Upgrading From NDFC Release 12.1.x.

12.0.2f

2.1.2d

Direct upgrade is not supported.

We recommend upgrading your NDFC to release 12.1.2 as described in the Nexus Dashboard Fabric Controller Installation and Upgrade Guide, Release 12.1.2e before returning to this document to upgrade to release 12.1.3.

12.0.1a

2.1.1e

Direct upgrade is not supported.

We recommend upgrading your NDFC to release 12.1.2 as described in the Nexus Dashboard Fabric Controller Installation and Upgrade Guide, Release 12.1.2e before returning to this document to upgrade to release 12.1.3.

11.5(4)

Not Applicable

  1. Backup using DCNM_To_NDFC_Upgrade_Tool_OVA_ISO

  2. Install Nexus Dashboard version 3.0.1

  3. Install NDFC Release 12.1.3

  4. Restore on Web UI > Operations > Backup & Restore

For detailed instructions, see Upgrading from DCNM (Data Center Network Manager).

Upgrading From NDFC Release 12.1.x

The following steps described how to upgrade from release 12.1.x to release 12.1.3.

Before you begin

Ensure that you have:

Procedure


Step 1

Back up existing configuration.

You can back up the configuration as you typically would from the Operations > Backup & Restore page.

If you take a local backup, download the copy and store it for later use if needed; if you take a remote backup, save the backup file in a secure remote location.

For additional information about backups, see Backup & Restore chapter in the Cisco NDFC Configuration Guide.

Step 2

Disable the existing NDFC service.

You can disable the service by navigating to the Nexus Dashboard's Services page and choosing Disable from the actions menu (...) on the NDFC tile.

Step 3

Upgrade your Nexus Dashboard to release 3.0.1.

Note


Ensure that your NDFC service is disabled as described in the previous step before starting the Nexus Dashboard upgrade.

Detailed information about upgrading your Nexus Dashboard, including any additional prerequisites and guidelines is available in Nexus Dashboard Deployment Guide.

Step 4

After the Nexus Dashboard upgrade is completed, navigate to the Services page in the ND UI.

Note


You must not re-enable or delete the current version of NDFC. Simply ignore the message and proceed to the next step.

At this point, you will see the following error in the NDFC service tile:

Step 5

Upgrade the NDFC service using the Cisco App Store.

Note


The App Store allows you to upgrade to the latest available version of the service only. If a later release is available on the App Store when you are upgrading to this release, you must skip this step and manually upload the new service image as described in the next step.

  1. Navigate to the Nexus Dashboard > Services page.

  2. Choose the App Store tab.

  3. In the App Store's NDFC tile, click Update.

  4. Accept the License Agreement.

    This starts the NDFC image download and installation.

  5. Choose the Installed Services tab and wait for the image to be downloaded and installed.

Step 6

Upgrade the NDFC service by manually upload an image.

Note


If you already used the App Store to upgrade as described above, skip this step.

You can choose to upgrade the service by manually uploading the new releases's image:

  1. Obtain the upgrade image.

    You can download this release's image from the Cisco App Center.

    Optionally, you can choose to host the image on a web server in your environment. When you upload the image to your Nexus Dashboard cluster, you will have an option to provide a direct URL to the image.

  2. Navigate to the Nexus Dashboard > Services page.

  3. Choose the Installed Services tab.

  4. From the Actions menu, choose Upload Service.

  5. Choose the image you downloaded in a previous substep and click Upload.

    You can choose to either upload the image from your local machine or provide a full URL if you hosted the image on a server in your environment.

  6. Wait for the image to upload and initialize.

    It may take up to 30 minutes for the service to replicate to all nodes and fully deploy.

Step 7

Enable the new image.

  1. On the Nexus Dashboard Fabric Controller tile, click the actions menu () and choose Available Versions.

  2. Click Enable next to the 12.1.3 version.

    Note


    You must not delete the previous version at this time as it would result in a loss of the service's data before the upgrade completes.

Step 8

Wait for the final upgrade processes to complete.

When the process is done, the Open button on the NDFC's tile becomes available.

Wait until all the pods and containers are up and running.

Step 9

Click Open to launch Nexus Dashboard Fabric Controller release 12.1.3 UI.

The single sign-on (SSO) feature allows you to log in to the application using the same credentials that you used for Nexus Dashboard.

Caution


You must not delete the previous NDFC image after the upgrade as it can cause a service disruption if the cluster is rebooted. Should you encounter this issue, contact Cisco TAC for assistance.


Upgrading from DCNM (Data Center Network Manager)

The following sections contain information specific to upgrades from an 11.x release of DCNM before the software moved to the Nexus Dashboard platform and was renamed to Nexus Dashboard Fabric Controller.


Note


If you current release is already deployed in Nexus Dashboard, skip the following subsections.


Persona and Feature Compatibility After Upgrading From Cisco DCNM 11.5(4)

Persona Compatibility

By using the appropriate Upgrade Tool, you can restore data that is backed up from DCNM Release 11.5(4) on a newly deployed Cisco Nexus Dashboard Fabric Controller for the personas as mentioned in the following table:

Backup from DCNM 11.5(4) Persona Enabled in NDFC 12.1.3 after Upgrade
DCNM 11.5(4) LAN Fabric Deployment on OVA/ISO/SE Fabric Controller + Fabric Builder
DCNM 11.5(4) PMN Deployment on OVA/ISO/SE Fabric Controller + IP Fabric for Media (IPFM)
DCNM 11.5(4) SAN Deployment on OVA/ISO/SE SAN Controller
DCNM 11.5(4) SAN Deployment on Linux SAN Controller
DCNM 11.5(4) SAN Deployment on Windows SAN Controller

Feature Compatibility Post Upgrade

The following table lists caveats associated with features that are restored from DCNM 11.5(4) backup after upgrade to NDFC, Release 12.1.3.

Feature in DCNM 11.5(4)

Upgrade Support

Nexus Dashboard Insights configured

Refer to Cisco Nexus Dashboard User Guide for more information.

Supported

Container Orchestrator (K8s) Visualizer

Supported

VMM Visibility with vCenter

Supported

Nexus Dashboard Orchestrator configured

Not Supported

Preview features configured

Not supported

LAN switches in SAN installations

Not supported

Switches discovered over IPv6

Not supported

DCNM Tracker

Not supported

Fabric Backups

Not supported

Report Definitions and Reports

Not supported

Switch images and Image Management policies

Not supported

SAN CLI templates

Not carried over from 11.5(4) to 12.1.3

POAP and CLI TEMPLATES

Not carried over from 11.5(4) to 12.1.3

Workaround: Copy these templates over prior to the upgrade. Once the upgrade/migration is completed, reapply these templates into NDFC.

Switch images/Image Management data

Not carried over from 11.5(4) to 12.1.3

Slow drain data

Not carried over from 11.5(4) to 12.1.3

Infoblox configuration

Not carried over from 11.5(4) to 12.1.3

Endpoint Locator configuration

You must reconfigure Endpoint Locator (EPL) post upgrade to Release 12.1.3. However, historical data is retained up to a maximum size of 500 MB.

Alarm Policy configuration

Not carried over from 11.5(4) to 12.1.3

Performance Management data

CPU/Memory/Interface statistics up to 90 days is restored post upgrade.


Note


SAN Insights and VMM Visualizer features are not enabled after restore. You must choose check boxes on Settings > Feature Management and click Save to enable these features after restore.


Download NDFC Upgrade Tool

To download Upgrade tool to upgrade from Cisco DCNM to Nexus Dashboard Fabric Controller, perform the following steps:

Before you begin

  • Identify the deployment type of Cisco DCNM Release 11.5(x) setup.

Procedure


Step 1

Browse to the NDFC download page: https://software.cisco.com/download/home/281722751/type/282088134/.

A list of the latest release software for Cisco Nexus Dashboard Fabric Controller available for download is displayed.

Step 2

In the Latest Releases list, choose release 12.1.3.

Step 3

Based on your Cisco DCNM 11.5(x) deployment type, locate the DCNM_To_NDFC_Upgrade_Tool and click the Download icon.

The following table displays the DCNM 11.5(x) deployment type, and the corresponding Nexus Dashboard Fabric Controller upgrade tool that you must download.

Table 1. DCNM 11.5(x) Deployment type and Upgrade Tool Compatibility Matrix

DCNM 11.5(x) deployment type

UpgradeTool Name

ISO/OVA

DCNM_To_NDFC_Upgrade_Tool_OVA_ISO

Linux

DCNM_To_NDFC_Upgrade_Tool_LIN_WIN.zip

Windows

DCNM_To_NDFC_Upgrade_Tool_LIN_WIN.zip

Step 4

Save the appropriate Upgrade Tool to the 11.5(x) server using sysadmin credentials.


Back Up Configuration Using Upgrade Tool

Stop Performance Management collection before running backup script for large scaled DCNM. To stop the Performance Management collection, perform the following steps:

  • Navigate to Administration > DCNM Server > Server Status.

  • Click on Stop Service of Performance Collector and wait a few seconds.

  • Click on the refresh icon on the top right to check the status. Make sure it shows Stopped.

The backup tool collects last 90 days Performance Management data.

To run the DCNM_To_NDFC_Upgrade_Tool to take a backup of all the applications and data on DCNM 11.5, perform the following steps:

Before you begin

  • On Cisco DCNM Release 11.5(1), ensure that you validate each fabric before proceeding to take backup. Choose Cisco DCNM Web UI > Administration > Credentials Management > SAN Credentials. Select each fabric and click Validate to validate credentials before taking backup.

  • Ensure that you've copied the appropriate Upgrade Tool to the server of your DCNM 11.5(x) setup.

Procedure


Step 1

Log on to the Cisco DCNM Release 11.5(x) appliance console.

Step 2

Run the following command to create a screen session.

dcnm# screen

This creates a session which allows you to execute the commands. The commands continue to run even when the window is not visible or if you get disconnected.

Step 3

Log on to the /root/ directory, by using the su command.

dcnm# su
Enter password: <<enter-password>>
[root@dcnm]#

Step 4

Execute the upgrade tool, by using the ./DCNM_To_NDFC_Upgrade_Tool command.

Ensure that you have enabled execution permissions to the Upgrade tool. Use chmod +x . to enable executable permissions.

For OVA/ISO-

[root@dcnm]# chmod +x ./DCNM_To_NDFC_Upgrade_Tool_OVA_ISO
[root@dcnm]# ./DCNM_To_NDFC_Upgrade_Tool_OVA_ISO /* for OVA/ISO

For Windows/Linux-

[root@dcnm]# chmod +x ./DCNM_To_NDFC_Upgrade_Tool_LIN_WIN
root@dcnm]# unzip DCNM_To_NDFC_Upgrade_Tool_LIN_WIN.zip
[root@dcnm-rhel]# cd DCNM_To_NDFC_Upgrade_Tool_LIN_WIN/
[root@dcnm-rhel DCNM_To_NDFC_Upgrade_Tool_LIN_WIN]# ls
DCNMBackup.bat  DCNMBackup.sh  jar
[root@rhel DCNM_To_NDFC_Upgrade_Tool_LIN_WIN]# ./DCNMBackup.sh        /* Enter this command for Linux appliance */
OR
[root@rhel DCNM_To_NDFC_Upgrade_Tool_LIN_WIN]# ./DCNMBackup.bat        /* Enter this command for Windows appliance */

The upgrade tool analysis the DCNM appliance data, and determines whether you can upgrade to Cisco Nexus Dashboard Fabric Controller Release 12.1.3 or not.

Note


The backup that is generated by using this tool can be used to restore data on NDFC 12.1.3 only.

Step 5

At the prompt to continue with backup, press y .

*******************************************************************************
Welcome to DCNM-to-NDFC Upgrade Tool for OVA/ISO.
This tool will analyze this system and determine whether you can move to NDFC 12.1.3 or not.
If upgrade to NDFC 12.1.3 is possible, this tool will create files to be used for performing the upgrade.
NOTE: only backup files created by this tool can be used for upgrading, older backup files created with 'appmgr backup'
CAN NOT be used for upgrading to NDFC 12.1.3
Thank you!
*******************************************************************************

Continue? [y/n]: y

Collect operational data (e.g. PM, EPL)? [y/n]: y

Does this DCNM 11.5(1) have DCNM Tracker feature enabled on any switch on any fabric? [y/n]: n

Step 6

Enter the encryption key to the backup file.

Note


You must provide this encryption key when you're restoring the backup file. Ensure that you save the encryption key in a safe location. If you loose the encryption key, you cannot restore the backup.

Sensitive information will be encrypted using an encryption key.
This encryption key will have to be provided when restoring the backup file generated by this tool.

Please enter the encryption key:      /* enter the encryption key for the backup file */
Enter it again for verification:      /* re-enter the encryption key for the backup file */

...
...
Creating backup file
Done.
Backup file: backup11_dcnm-172-23-87-224_20210928-093355.tar.gz        /* backup file name*/
[root@dcnm]#

The encrypted backup file is created.

Step 7

Copy the backup file to a safe location and shut down the application 11.5(x) DCNM appliance.


Example

Example for taking backup using the DCNM backup Tool
  • Taking backup on DCNM 11.5(x) OVA/ISO appliance

    [root@dcnm]# chmod +x DCNM_To_NDFC_Upgrade_Tool_OVA_ISO
    [root@dcnm]# ./DCNM_To_NDFC_Upgrade_Tool_OVA_ISO
    *******************************************************************************
    
    Welcome to DCNM-to-NDFC Upgrade Tool for OVA/ISO.
    
    This tool will analyze this system and determine whether you can move to 
    NDFC 12.1.3 or not.
    
    If upgrade to NDFC 12.1.3 is possible, this tool will create files 
    to be used for performing the upgrade.
    
    NOTE:
    only backup files created by this tool can be used for upgrading, 
    older backup files created with 'appmgr backup' CAN NOT be used 
    for upgrading to NDFC 12.1.3
    
    Thank you!
    
    *******************************************************************************
    
    Continue? [y/n]: y
    
    Collect operational data (e.g. PM, EPL)? [y/n]: y
    
    Does this DCNM 11.5(1) have DCNM Tracker feature enabled on any switch on any fabric? [y/n]: n
    
    Sensitive information will be encrypted using an encryption key.
    This encryption key will have to be provided when restoring 
    the backup file generated by this tool.
    
    Please enter the encryption key:      /* enter the encryption key for the backup file */
    Enter it again for verification:      /* re-enter the encryption key for the backup file */
    
    Adding backup header
    Collecting DB table data
    Collecting DB sequence data
    Collecting stored credentials
    Collecting Custom Templates
    Collecting CC files
    Collecting L4-7-service data
    Collecting CVisualizer data
    Collecting EPL data
    Collecting PM data - WARNING: this will take a while!
    Collecting AFW app info
    Decrypting stored credentials
    Creating backup file
    Done.
    Backup file: backup11_dcnm-172-23-87-224_20210913-012857.tar.gz        /* backup file name*/
    [root@dcnm]#
    
  • Taking backup on DCNM 11.5(x) Windows/Linux appliance

    [root@dcnm]# chmod +x DCNM_To_NDFC_Upgrade_Tool_LIN_WIN
    [root@dcnm]# unzip DCNM_To_NDFC_Upgrade_Tool_LIN_WIN.zip
    Archive:  DCNM_To_NDFC_Upgrade_Tool_LIN_WIN.zip
        creating: DCNM_To_NDFC_Upgrade_Tool_LIN_WIN/
        creating: DCNM_To_NDFC_Upgrade_Tool_LIN_WIN/jar/
       inflating: DCNM_To_NDFC_Upgrade_Tool_LIN_WIN/jar/bcprov-jdk15on-1.68.jar 
       inflating: DCNM_To_NDFC_Upgrade_Tool_LIN_WIN/jar/DCNMBackup.java
       inflating: DCNM_To_NDFC_Upgrade_Tool_LIN_WIN/jar/sequences.info.oracle
       inflating: DCNM_To_NDFC_Upgrade_Tool_LIN_WIN/jar/slf4j-simple-1.7.21.jar
       inflating: DCNM_To_NDFC_Upgrade_Tool_LIN_WIN/jar/jnm.jar
       inflating: DCNM_To_NDFC_Upgrade_Tool_LIN_WIN/jar/not-going-to-be-commons-ssl-0.3.20.jar
       inflating: DCNM_To_NDFC_Upgrade_Tool_LIN_WIN/jar/tables.info.postgres
       inflating: DCNM_To_NDFC_Upgrade_Tool_LIN_WIN/jar/jarchivelib-0.7.1-jar-with-dependencies.jar
       inflating: DCNM_To_NDFC_Upgrade_Tool_LIN_WIN/jar/tables.info.oracle
       inflating: DCNM_To_NDFC_Upgrade_Tool_LIN_WIN/jar/sequences.info.postgres
       inflating: DCNM_To_NDFC_Upgrade_Tool_LIN_WIN/jar/log4j.properties
       inflating: DCNM_To_NDFC_Upgrade_Tool_LIN_WIN/DCNMBackup.sh
       inflating: DCNM_To_NDFC_Upgrade_Tool_LIN_WIN/DCNMBackup.bat
    
    [root@dcnm-rhel]# cd DCNM_To_NDFC_Upgrade_Tool_LIN_WIN/
    [root@dcnm-rhel DCNM_To_NDFC_Upgrade_Tool_LIN_WIN]# ls
    DCNMBackup.bat  DCNMBackup.sh  jar
    [root@rhel DCNM_To_NDFC_Upgrade_Tool_LIN_WIN]# ./DCNMBackup.sh        /* Enter this command for Linux appliance */
    OR
    [root@rhel DCNM_To_NDFC_Upgrade_Tool_LIN_WIN]# ./DCNMBackup.bat        /* Enter this command for Windows appliance */
    
    Enter DCNM root directory [/usr/local/cisco/dcm]:
    
    Initializing, please wait...
    
    Note: ./jar/DCNMBackup.java uses unchecked or unsafe operations.
    Note: Recompile with -Xlint:unchecked for details.
    *******************************************************************************
    
    Welcome to DCNM-to-NDFC Upgrade Tool for Linux/Windows.
    
    This tool will analyze this system and determine whether you can move to NDFC 12.1.3 or not.
    
    If upgrade to NDFC 12.1.3 is possible, this tool will create files to be used for performing the upgrade.
    
    Thank you!
    
    *******************************************************************************
    
    This tool will backup config data. Exporting Operational data like Performance(PM) might take some time.
    
    Do you want to export operational data also? [y/N]: y
    *******************************************************************************
    
    Sensitive information will be encrypted using an encryption key.
    This encryption key will have to be provided when restoring the backup file generated by this tool.
    
    Please enter the encryption key:       /* enter the encryption key for the backup file */
    Enter it again for verification:       /* re-enter the encryption key for the backup file */
    2021-09-13 14:36:31 INFO  DCNMBackup:223 - Inside init() method
    2021-09-13 14:36:31 INFO  DCNMBackup:245 - Loading properties....
    2021-09-13 14:36:31 INFO  DCNMBackup:301 - Inside checkLANSwitches...
    2021-09-13 14:36:32 INFO  DCNMBackup:315 - LAN Switch count: 0
    2021-09-13 14:36:32 INFO  DCNMBackup:342 - Inside exportDBTables...
    2021-09-13 14:36:32 INFO  DCNMBackup:358 - Exporting ---------> statistics
    2021-09-13 14:36:32 INFO  DCNMBackup:358 - Exporting ---------> sequence
    ...
    ...
    ...
    2021-09-13 14:49:48 INFO  DCNMBackup:1760 - ###### Total time to export Hourly data: 42 seconds.
    
    
    2021-09-13 14:49:48 INFO  DCNMBackup:1767 - Exporting SanPort Daily entries.
    2021-09-13 14:49:48 INFO  DCNMBackup:1768 - Total number of ports: 455
    2021-09-13 14:49:48 INFO  DCNMBackup:1769 - This might take a while, please wait...
    2021-09-13 14:50:23 INFO  DCNMBackup:1791 - Total number of Json data entries in backup/es/pmdb_sanportratedata_daily.data ==> 13751
    2021-09-13 14:50:23 INFO  DCNMBackup:1795 - ###### Total time to export Daily data: 34 seconds.
    
    
    2021-09-13 14:50:23 INFO  DCNMBackup:1535 - ###### Total time to export PM data: 81 seconds.
    
    
    2021-09-13 14:50:23 INFO  DCNMBackup:879 - Creating final tar.gz file....
    2021-09-13 14:50:30 INFO  DCNMBackup:892 - Final tar.gz elapsed time: 7049 in ms
    2021-09-13 14:50:30 INFO  DCNMBackup:893 - Backup done.
    2021-09-13 14:50:30 INFO  DCNMBackup:894 - Log file: backup.log
    2021-09-13 14:50:30 INFO  DCNMBackup:895 - Backup file: backup11_rhel77-160_20210913-149215.tar.gz        /* backup file name*/
    [root@rhel DCNM_To_NDFC_Upgrade_Tool_LIN_WIN]#
    

Upgrading from Cisco DCNM Release 11.5(4) to Cisco NDFC Release 12.1.3

To upgrade to Cisco Nexus Dashboard Fabric Controller Release 12.1.3 from DCNM Release 11.5(4), perform the following steps:

Before you begin

  • Ensure that you’ve access to the Backup file created from 11.5(4) appliance. For instructions to take backup of all the applications and data on DCNM 11.5(4), see Back Up Configuration Using Upgrade Tool.


    Note


    If you do not have the encryption key, you cannot restore from the backup file.


  • Ensure that you’ve installed the required form factor of Cisco Nexus Dashboard. For instructions, refer to Cisco Nexus Dashboard Deployment Guide.

  • Ensure that you've installed a fresh installation of Cisco NDFC. For instructions to install Cisco NDFC, refer to:

  • If your existing configuration used smart licensing with direct connectivity to Cisco Smart Software Management (CSSM), you must ensure that your Nexus Dashboard has the routes required to reach the CSSM website.

    Ensure that subnets for IP addresses on https://smartreceiver.cisco.com are added to the route table in the Nexus Dashboard running NDFC. Navigate to Admin > System Settings > Routes. Click Edit in the Management Network Routes area and add the necessary IP addresses/subnets, then click Save to confirm.

    You can ping https://smartreceiver.cisco.com to find the most recent subnet. For example:

    $ ping smartreceiver.cisco.com
    PING smartreceiver.cisco.com (146.112.59.81): 56 data bytes
    64 bytes from 146.112.59.81: icmp_seq=0 ttl=52 time=48.661 ms
    64 bytes from 146.112.59.81: icmp_seq=1 ttl=52 time=44.730 ms
    64 bytes from 146.112.59.81: icmp_seq=2 ttl=52 time=48.188 ms

    In addition, because NDFC is considered a new product instance, you must re-establish trust. If you took the backup with an expired Trust Token, you must manually run the Smart Licensing Configuration wizard and enter a valid token after the upgrade.

Procedure


Step 1

Log on to Cisco Nexus Dashboard Web UI using correct credentials.

Step 2

From the One View drop-down list, select Nexus Dashboard Fabric Controller.

On the Nexus Dashboard Fabric Controller Web UI, Feature Management screen is displayed.

Note that none of the personas are selected on the freshly installed Nexus Dashboard Fabric Controller.

Step 3

Click Restore.

The Operations > Backup & Restore window opens.

Step 4

Click Restore.

The Restore now window appears.

Step 5

Under Type, select your desired format to restore.

Note


Select Config only or Full based on the backup that was created on DCNM Release 11.5(4).

  • Choose Config only to restore only configuration data.

    You can choose either Config only or Full backup files.

  • Choose Full to restore all previous version data to this application.

    You must choose Full backup files.

Step 6

Choose the appropriate destination where you have stored the backup file.

  • Choose Upload File if the file is stored in a local directory.

    1. Open the directory where you’ve saved the backup file.

    2. Drag and drop the backup file to the Restore now window

      or

      Click Browse. Navigate to the directory where you’ve saved the backup file. Select the backup file and click Open.

    3. Enter the Encryption Key to the backup file.

  • Choose Import from SCP server or Import from SFTP serverif the backup file is stored in a remote directory.

    1. In the Server field, provide the server IP Address.

    2. In the File Path field, provide the relative file path to the backup file.

    3. In the Username and Password fields, enter appropriate details.

    4. In the Encryption Key field, enter the Encryption Key to the backup file.

Step 7

Leave Ignore External Service IP Configuration unchecked.

This option is not used during the upgrade.

Step 8

Click Restore.

A progress bar appears showing the completed percentage and the description of the operation. The Web UI is locked while the upgrade is in progress. After the restore is complete, the backup file appears in the table on Backup & Restore screen. The time required to restore depends on the data in the backup file.

Note


An error appears if you've not allocated with IP pool addresses on the Cisco Nexus Dashboard. For more information, refer to Cluster Configuration section in Cisco Nexus Dashboard User Guide.

After successful restoration, a notification banner appears as below:

Reload the page to see latest changes.

Click Reload the page, or refresh the browser page to complete restore and begin using you Cisco Nexus Dashboard Fabric Controller Web UI.


Post Upgrade Tasks

The following sections describe the tasks that must be performed post upgrading to Cisco NDFC, Release 12.1.3.

Post Upgrade tasks for SAN Controller

After restoring the data from backup, all the server-smart licenses are OutofCompliance.

To migrate to Smart Licensing using Policy, launch Nexus Dashboard Fabric Controller. On the Web UI, choose Operations > License Management > Smart tab. Establish trust with CCSM using SLP. For instructions, refer to License Management chapter in Cisco Nexus Dashboard Fabric Controller Configuration Guides.

Post Upgrade tasks for Fabric Controller

The following features are not carried over when you upgrade from DCNM 11.5(x) to Cisco NDFC 12.1.3:

  • Endpoint Locator must be reconfigured

  • IPAM Integration must be reconfigured

  • Alarm Policies must be reconfigured

  • Custom topologies must be recreated and saved

  • PM collection must be re-enabled on fabrics

  • Switch images must be uploaded

Managing Trap IP on Nexus Dashboard and Nexus Dashboard Fabric Controller

Deployment Type in Release 11.5(x)

In 11.5(x), trap IP address is collected from

LAN Device Management Connectivity

In 12.1.3, trap IP address belongs to

Result

LAN Fabric

Media Controller

eth1 (or vip1 for HA systems)

Management

Belongs to Management subnet

Honored

There is no configuration difference. No further action required.

LAN Fabric

Media Controller

eth0 (or vip0 for HA systems)

Management

Does not belong to Management subnet

Ignored, another IP from the Management pool will be used as trap IP.

Configuration difference is created. On the Web UI > LAN > Fabrics > Fabrics, double click on the Fabric to view Fabric Overview. From Fabrics Actions drop-down list, select Recalculate Config. Click Deploy Config.

LAN Fabric

Media Controller

eth0 (or vip0 for HA systems)

Data

Belongs to Data subnet

Honored

There is no configuration difference. No further action required.

LAN Fabric

Media Controller

eth0 (or vip0 for HA systems)

Data

Does not belong to Data subnet

Ignored, another IP from the Data pool will be used as trap IP.

Configuration difference is created. On the Web UI > LAN > Fabrics > Fabrics, double click on the Fabric to view Fabric Overview. From Fabrics Actions drop-down list, select Recalculate Config. Click Deploy Config.

SAN Management

OVA/ISO –

  • trap.registaddress (if set)

  • eth0 (if trap.registaddress is not set)

Windows/Linux –

  • trap.registaddress (if set)

  • Interface based on event-manager algorithm (if trap.registaddress is not set

Not applicable

Belongs to Data subnet

Honored

There is no configuration difference. No further action required.

Not applicable

Does not belong to Data subnet

Ignored, another IP from the Data pool will be used as trap IP.

Feature Management

After restoring the backup, based on the type of deployment, Nexus Dashboard Fabric Controller Release 12.1.3 is deployed with one of the following personas:

  • Fabric Controller

  • SAN Controller

The status on the Feature Management changes to Starting. Additionally, you can select the features that you want to enable. Check the Feature check box and click Save & Continue.

Changing across Feature-Set

Nexus Dashboard Fabric Controller 12 allows you to switch from one feature set to another. Choose Settings > Feature Management. Select the desired feature set and applications in the table below. Click Save & Continue. Refresh the browser to begin using Cisco Nexus Dashboard Fabric Controller with the new feature set and applications.

There are a few features/applications supported with specific deployments. When you change the feature set, some of these features are not supported in the new deployment. The following table provides details about the pre-requisites and criteria based on which you can change the feature set.

Table 2. Supported Switching between deployments

From/To

Fabric Discovery

Fabric Controller

SAN Controller

Fabric Discovery

-

Only monitor mode fabric is supported in Fabric Discovery deployment. When you change the feature set, the fabric can be used in the Fabric Controller deployment.

Not supported

Fabric Controller

You must delete the existing fabrics before changing the fabric set.

If you’re changing from Easy Fabric to IPFM fabric application, you must delete the exiting fabrics.

Not supported

SAN Controller

Not supported

Not supported

-