Upgrading or Downgrading MSO Application

Overview

The following sections describe how to upgrade or downgrade Cisco Multi-Site Orchestrator, Release 3.2(1) or later that is deployed in Cisco Nexus Dashboard.

If you are running an earlier release deployed in VMware ESX VMs or Cisco Application Services Engine, you must deploy a brand new cluster and then transfer the configuration from your existing cluster, as described in the "Migrating Existing Cluster to Nexus Dashboard" chapter of the Multi-Site Orchestrator Deployment Guide.
Prerequisites and Guidelines

Before you upgrade or downgrade your Cisco Multi-Site Orchestrator cluster:

  • Stateful upgrades from releases prior to Release 3.2(1) are not supported.

    If you are upgrading from an earlier release, skip the rest of this chapter and follow the instructions described in the "Migrating Existing Cluster to Nexus Dashboard" section of the Multi-Site Orchestrator Deployment Guide.

  • Ensure that your current Nexus Dashboard cluster is healthy.

    You can check the Nexus Dashboard cluster health in one of two ways:

    • By logging into your Nexus Dashboard GUI and verifying system status in the System Overview page.

    • By logging into any one of the nodes directly as rescue-user and running the following command:

      # acs health
      All components are healthy
  • Ensure that your current Cisco Multi-Site Orchestrator is running properly.

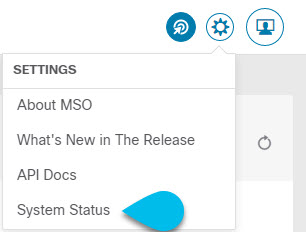
    You can check the status of you Multi-Site Orchestrator application by navigating to Settings > System Status:

    Then ensure that the status of all nodes and services is healthy:

  • You can upgrade the MSO application in one of two ways:

    • Using the Nexus Dashboard's App Store, as described in Upgrading MSO Application Using Cisco App Store.

      In this case, the Cisco DC App Center must be reachable from the Nexus Dashboard via the Management Network directly or using a proxy configuration. Nexus Dashboard proxy configuration is described in the Nexus Dashboard User Guide.


      Note

      The App Store allows you to upgrade to the latest available version of the application only.


    • By manually uploading the new app image, as described in Upgrading MSO Application Manually.

      You can use this approach if you are unable to establish the connection to the DC App Center or if you want to upgrade to a version of the application that is not the latest available release.

  • If you plan to add and manage new Cloud APIC sites after you upgrade your Multi-Site Orchestrator to release 3.3(1) or later, you must ensure that they are running Cloud APIC release 5.2(1) or later.

    On-boarding and managing Cloud APIC sites running earlier releases is not support in Multi-Site Orchestrator 3.3(1).

  • Downgrading to releases prior to release 3.3(1) is not supported.

    If you want to downgrade to an earlier release, you must deploy a new Multi-Site Orchestrator cluster on a platform supported by the earlier release, then restore the older configuration backup. Restoring backups created on Release 3.3(1) or later to an older MSO cluster is not supported.

    If you downgrade to an earlier release of Multi-Site Orchestrator, you must also downgrade all Cloud APIC sites to a release prior to Release 5.2(1).

Upgrading MSO Application Using Cisco App Store

This section describes how to upgrade Cisco Multi-Site Orchestrator, Release 3.2(1) or later.

Before you begin

  • Ensure that you have completed the prerequisites described in Prerequisites and Guidelines.

  • Ensure that Cisco DC App Center is reachable from the Nexus Dashboard via the Management Network directly or using a proxy configuration.

    Nexus Dashboard proxy configuration is described in the Nexus Dashboard User Guide

Procedure


Step 1

Log in to your Nexus Dashboard..

Step 2

From the left navigation menu, select Service Catalog.

Step 3

Upgrade the application using the App Store.

  1. In the Service Catalog screen, select the App Store tab.

  2. In the Multi-Site Orchestrator tile, click Upgrade.

  3. In the License Agreement window that opens, click Agree and Download.

Step 4

Wait for the new image to initialize.

It may take up to 20 minutes for the new application image to become available.

Step 5

Activate the new image.

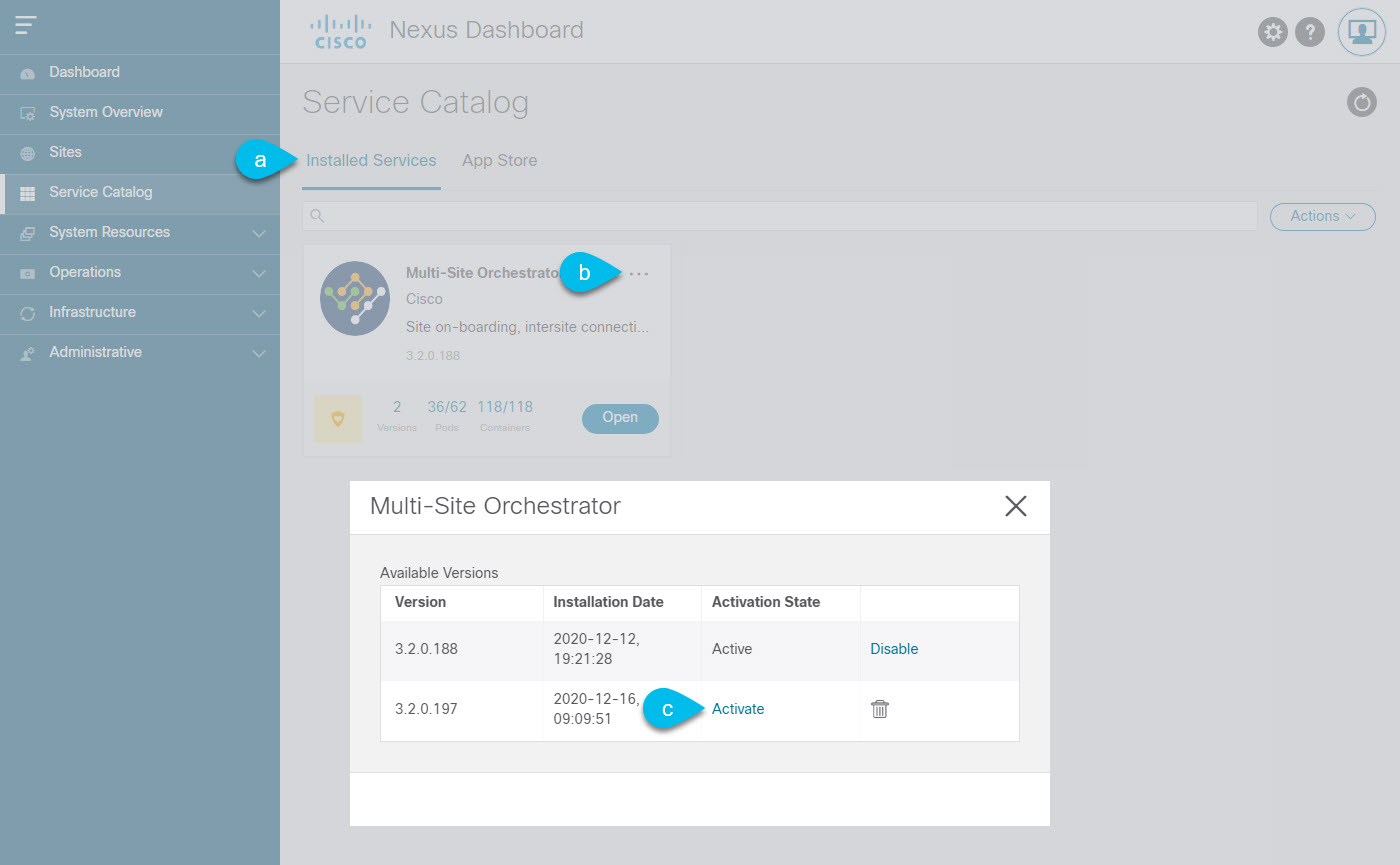
  1. In the Service Catalog screen, select the Installed Services tab.

  2. In the top right of the Multi-Site Orchestrator tile, click the menu (...) and choose Available Versions.

  3. In the available versions window, click Activate next to the new image.

    Note 

    Do not Disable the currently running image before activating the new image. The image activation process will recognize the currently running image and perform the upgrade workflows necessary for the currently running app version.

    It may take up to 20 additional minutes for all the application services to start and the GUI to become available. The page will automatically reload when the process is completed.

Step 6

(Optional) Delete the old application image.

You can choose to retain the old application version in case you ever want to downgrade. Or you can delete it as described in this step.

  1. In the Service Catalog screen, select the Installed Services tab.

  2. In the top right of the Multi-Site Orchestrator tile, click the menu (...) and choose Available Versions.

  3. In the available versions window, click the delete icon next to the image you want to delete.

    It may take up to 20 additional minutes for all the application services to start and the GUI to become available. The page will automatically reload when the process is completed.

Step 7

Launch the app.

To launch the app, simply click Open on the application tile in the Nexus Dashboard's Service Catalog page.

The single sign-on (SSO) feature allows you to log in to the application using the same credentials as you used for the Nexus Dashboard.


Upgrading MSO Application Manually

This section describes how to upgrade Cisco Multi-Site Orchestrator, Release 3.2(1) or later.

Before you begin

Procedure


Step 1

Download the target release image.

  1. Browse to the Multi-Site Orchestrator page on DC App Center:

    https://dcappcenter.cisco.com/nexus-dashboard-orchestrator.html
  2. From the Version drop-down, choose the version you want to install and click Download.

  3. Click Agree and download to accept the license agreement and download the image.

Step 2

Log in to your Nexus Dashboard..

Step 3

Upload the image to your Nexus Dashboard.

  1. From the left navigation menu, select Service Catalog.

  2. In the Nexus Dashboard's Service Catalog screen, select the Installed Services tab.

  3. From the Actions menu in the top right of main pane, select Upload App.

  4. In the Upload App window, choose the location of the image

    If you downloaded the application image to your system, choose Local.

    If you are hosting the image on a server, choose Remote.

  5. Choose the file.

    If you chose Local in the previous substep, click Select File and select the app image you downloaded.

    If you chose Remote, provide the full URL to the image file, for example http://<ip-address>:<port>/<full-path>/cisco-mso-<version>.aci.

  6. Click Upload to add the app to the cluster.

    A new tile will appear with the upload progress bar. Once the image upload is completed, the Nexus Dashboard will recognize the new image as an existing application and add it as a new version.

Step 4

Wait for the new image to initialize.

It may take up to 20 minutes for the new application image to become available.

Step 5

Activate the new image.

  1. In the Service Catalog screen, select the Installed Services tab.

  2. In the top right of the Multi-Site Orchestrator tile, click the menu (...) and choose Available Versions.

  3. In the available versions window, click Activate next to the new image.

    Note 

    Do not Disable the currently running image before activating the new image. The image activation process will recognize the currently running image and perform the upgrade workflows necessary for the currently running app version.

    It may take up to 20 additional minutes for all the application services to start and the GUI to become available. The page will automatically reload when the process is completed.

Step 6

(Optional) Delete the old application image.

You can choose to retain the old application version in case you ever want to downgrade. Or you can delete it as described in this step.

  1. In the Service Catalog screen, select the Installed Services tab.

  2. In the top right of the Multi-Site Orchestrator tile, click the menu (...) and choose Available Versions.

  3. In the available versions window, click the delete icon next to the image you want to delete.

    It may take up to 20 additional minutes for all the application services to start and the GUI to become available. The page will automatically reload when the process is completed.

Step 7

Launch the app.

To launch the app, simply click Open on the application tile in the Nexus Dashboard's Service Catalog page.

The single sign-on (SSO) feature allows you to log in to the application using the same credentials as you used for the Nexus Dashboard.