Viewing Inventory Information
Beginning with Cisco DCNM release 6.x, you can view the inventory and the performance for both SAN and LAN switches by using the global Scope pane. You can select LAN, SAN, or both to view the inventory information. You can also export and print the inventory information.
You can either Print this information or export to Microsoft Excel.
 Note |
You can use the Print icon to print the information that is displayed or you can also use the Export icon to export the information that is displayed to a Microsoft Excel spreadsheet. You can also choose the column that you want to display. |
The Inventory menu includes the following submenus:
Viewing Inventory Information for Switches
Procedure
|
Step 1 |
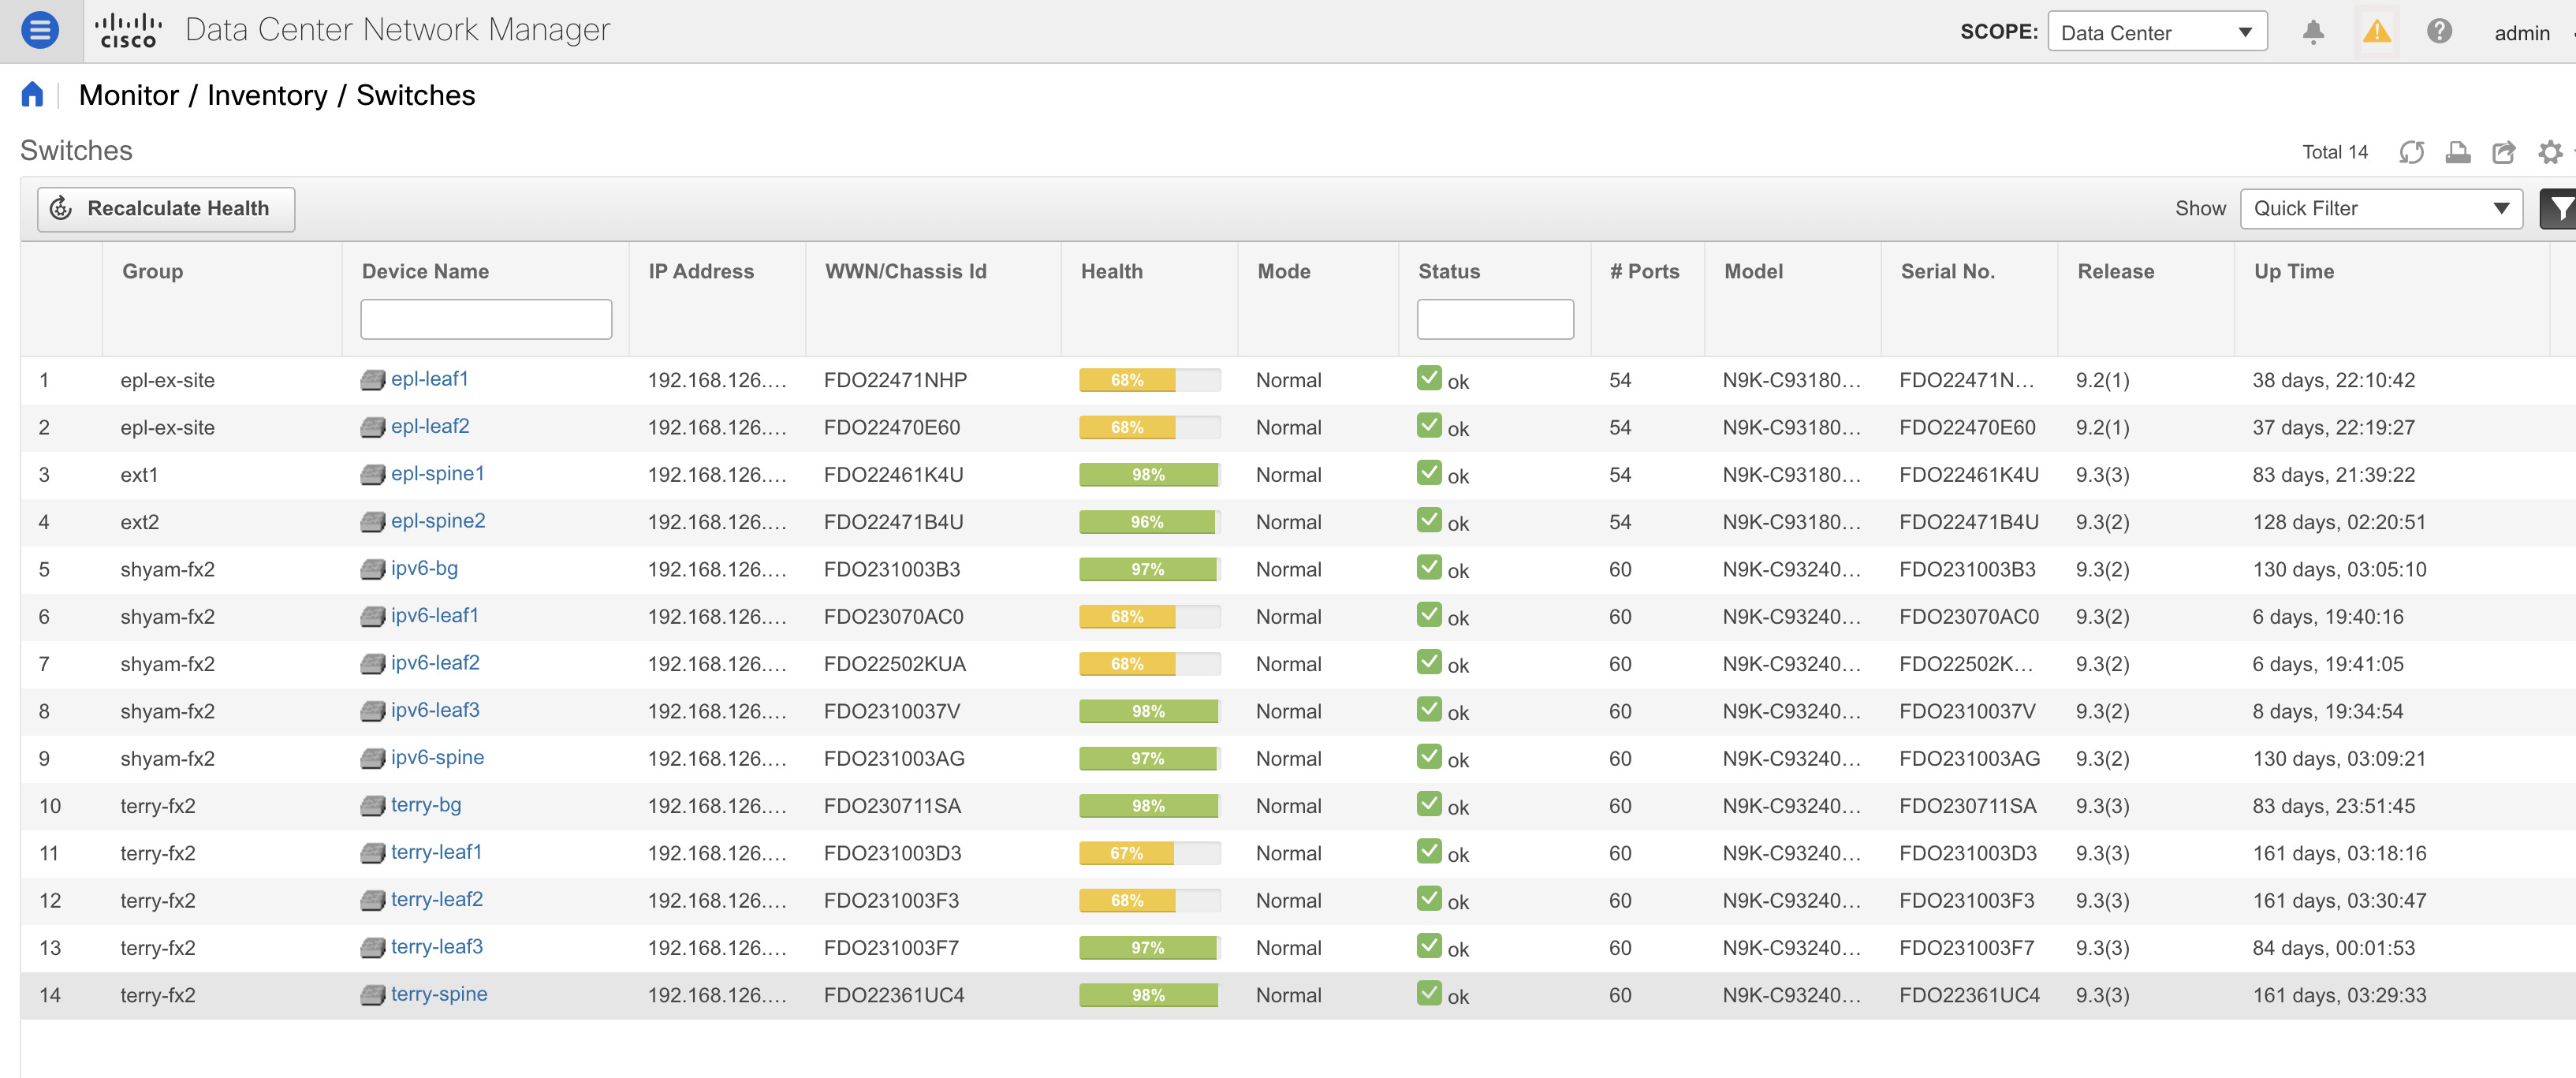
Choose Inventory > View > Switches. The Switches window with a list of all the switches for a selected Scope is displayed. |
||
|
Step 2 |
You can also view the following information.
 |
||
|
Step 3 |
Click Health to access the Health score window for a device. The Health score window includes health score calculation and health trend. The Overview tab displays the overall health score. All the modules, switch ports and alarms are taken into consideration while calculating the health score. Hover over the graph under Health Trend for detailed information on specific dates. Hover over the info icon next to Alarms to display the number of Critical, Major, Minor, and Warning alarms that have been generated.  Click the Modules tab to display information about the various modules in the device. This tab displays information such as Name, Model name, Serial number, Status, Type, Slot, Hardware revision and Software revision. 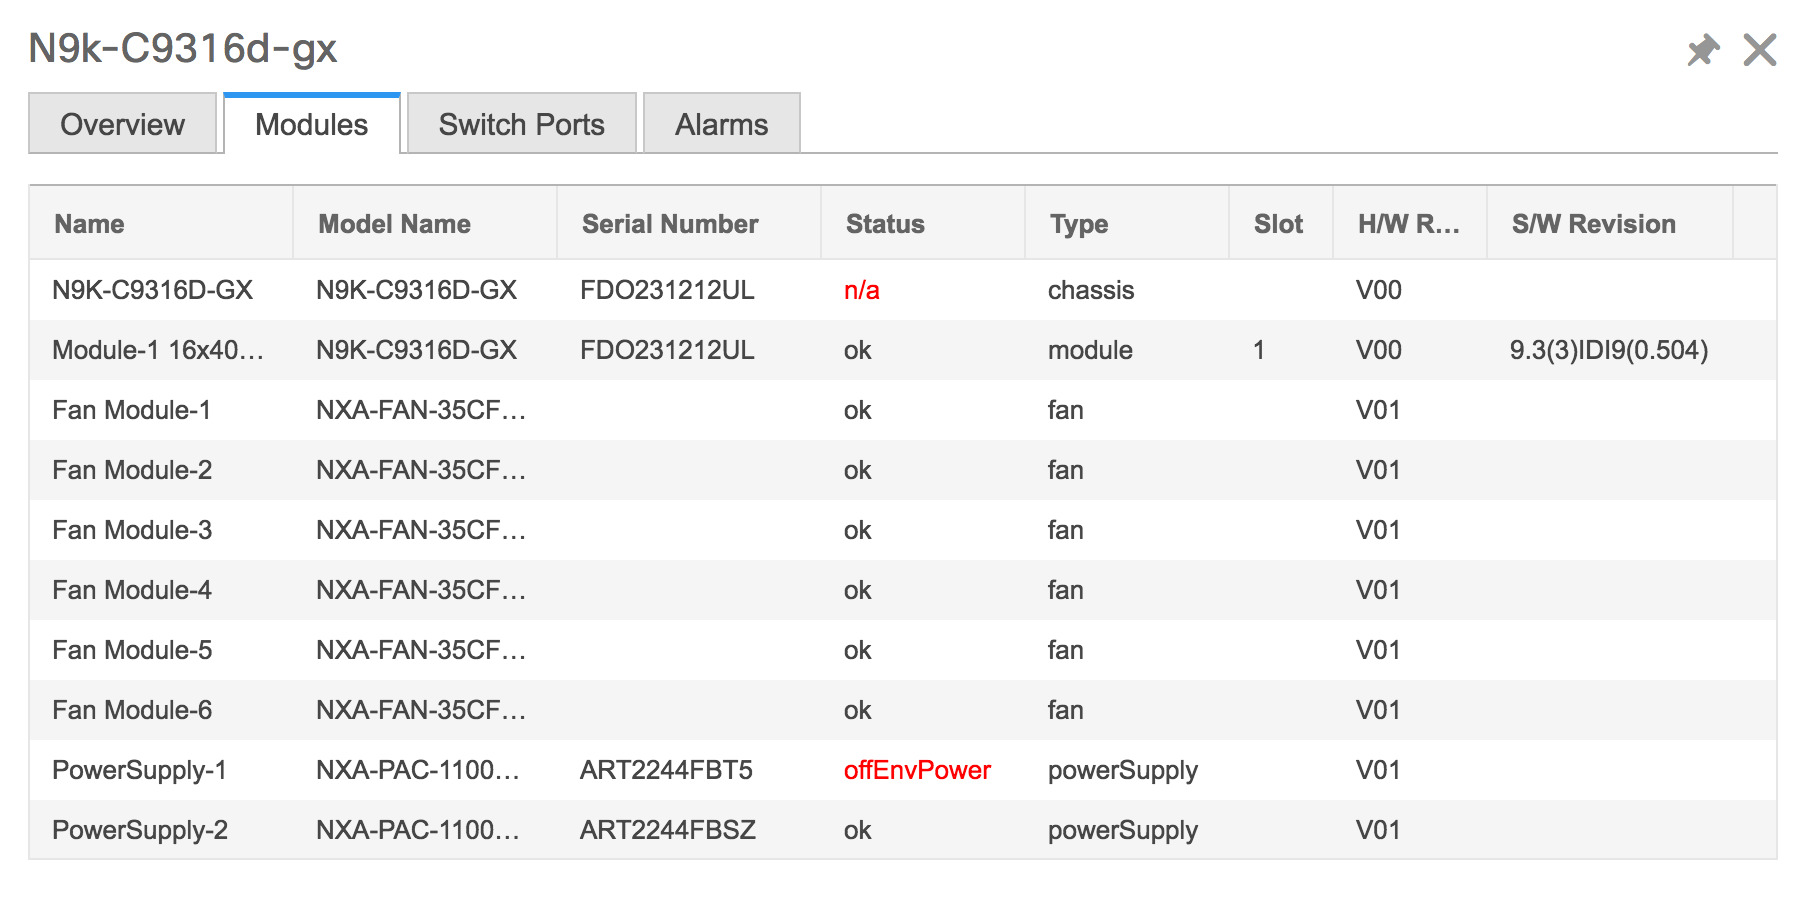 Click the Switch Ports tab to display information about the device ports. This tab displays information such as Name, Description, Status, Speed, and the device to which a port is connected . 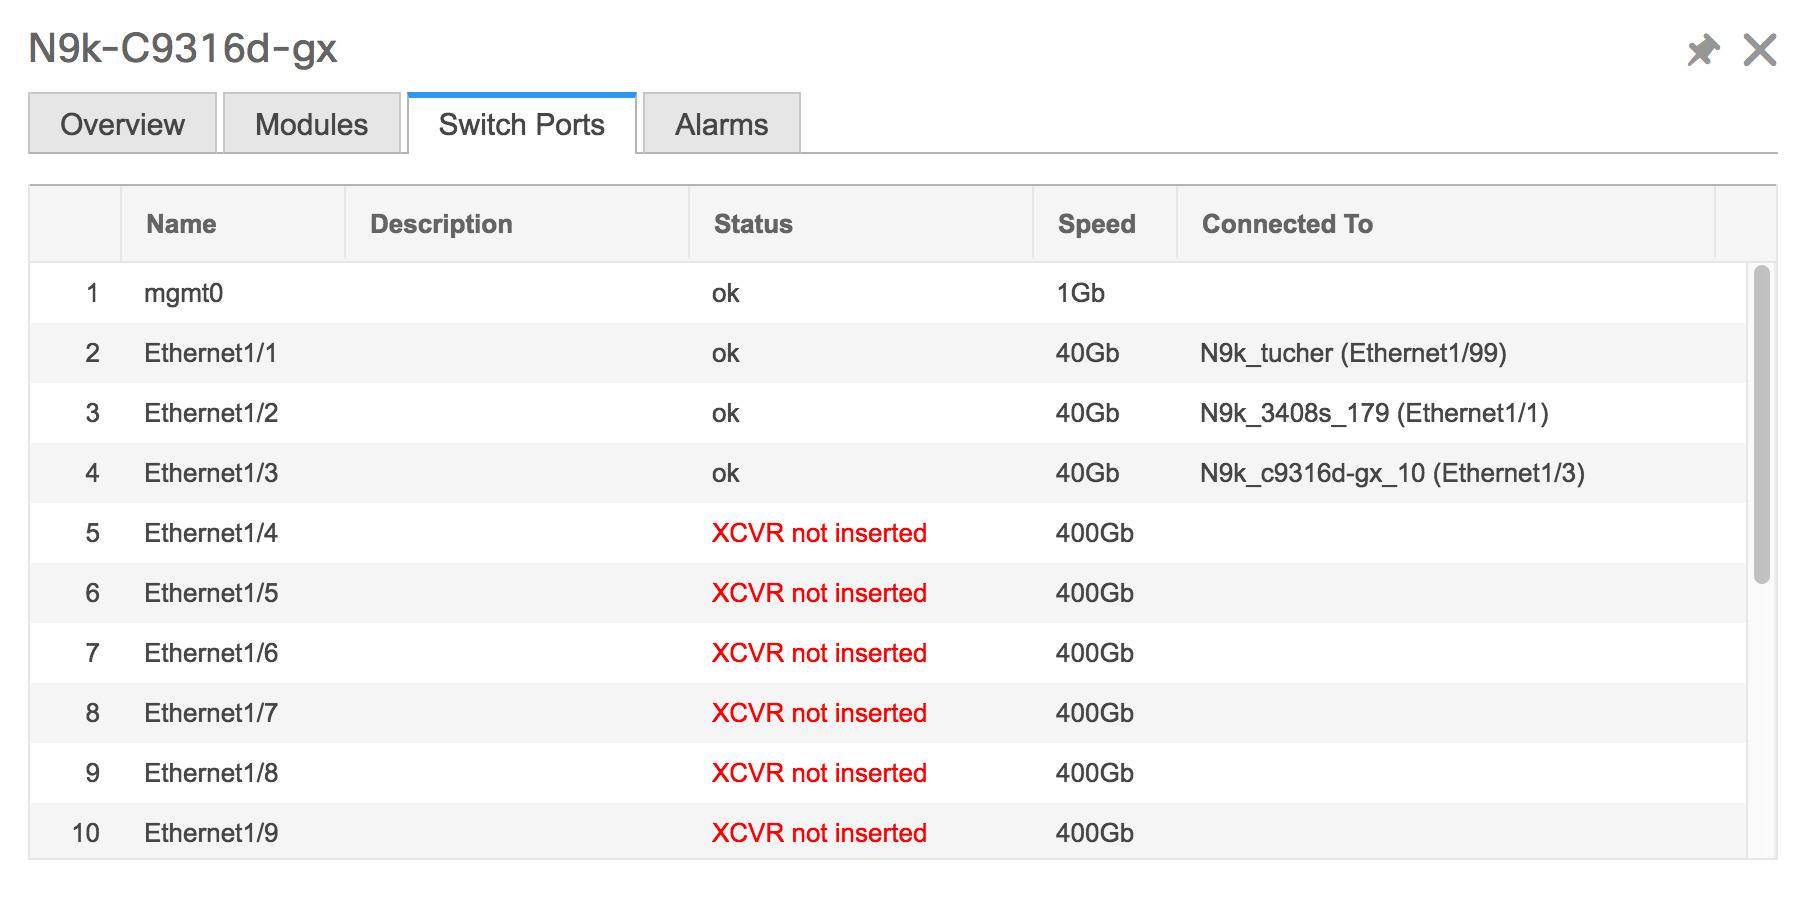 Click the Alarms tab to display information about the alarms that have been generated. This tab displays information such as alarm Severity, Message, Category, and the Policy that has been activated due to which the alarm is generated. 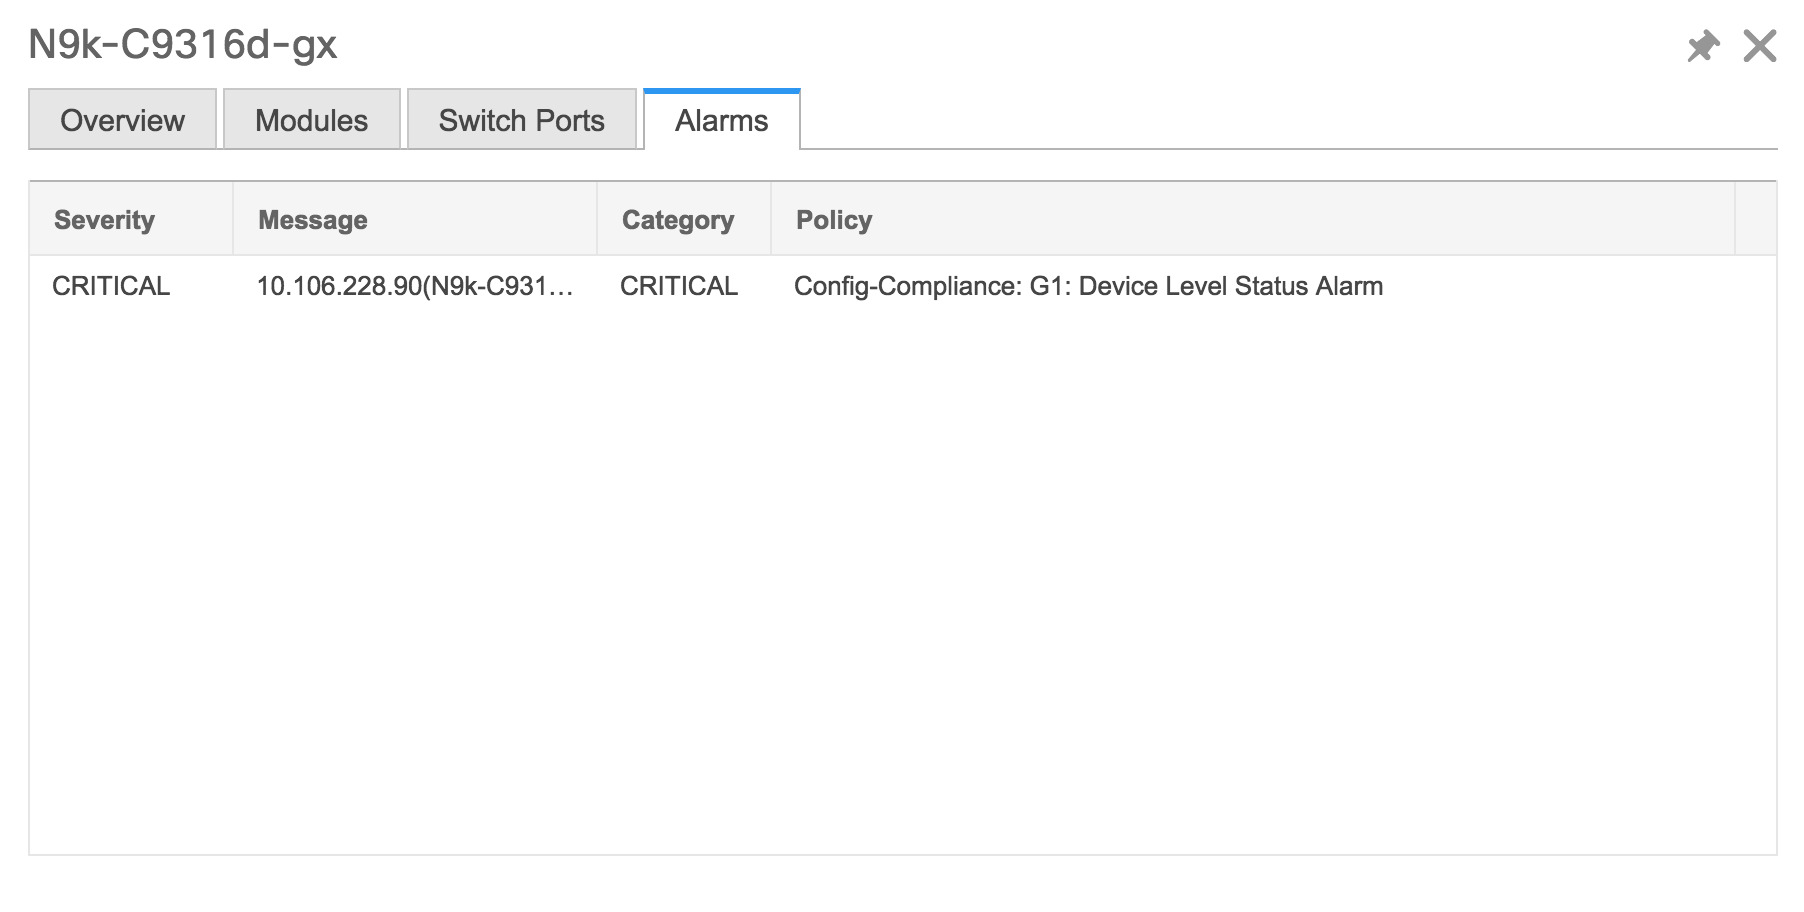 In the Health column, the switch health is calculated by the capacity manager based on the following parameters:
|
||
|
Step 4 |
The value in the Health column is calculated based on the following:
You may also have your own health calculation formula by implementing the common interface class: com.cisco.dcbu.sm.common.rif.HealthCalculatorRif. The default Java class is defined as: health.calculator=com.cisco.dcbu.sm.common.util.HealthCalculatorAlarms.
Starting from Cisco DCNM 11.3(1) Release, you can view information about switch health along with the switch summary by clicking on a switch in the Topology window or by choosing Control>Fabrics>Fabric Builder, selecting a fabric and clicking on a switch in the Fabric Builder window. |
Viewing System Information
The switch dashboard displays the details of the selected switch.
Procedure
|
Step 1 |
From the Cisco DCNM home page, choose Inventory > View > Switches. An inventory of all the switches that are discovered by Cisco DCNM Web UI is displayed. |
|
Step 2 |
Click a switch in the Device Name column. The Switch dashboard that corresponds to that switch is displayed along with the following information: |
|
Step 3 |
Click the System Information tab. This tab displays detailed system information such as group name, health, module, time when system is up, serial number, the version number, contact, location, DCNM license, status, system log sending status, CPU and memory utilization, and VTEP IP address are displayed. Click Health to access the Health score screen, which includes health score calculation and health trend. The popup contains Overview, Modules, Switch Ports, and Events tabs.
|
Collecting Technical Support from Devices
You can choose the protocol while generating technical support from a device in Cisco DCNM Web Client. To collect technical support from a device in Cisco DCNM Web UI, perform the following steps:
Procedure
|
Step 1 |
Choose Inventory > View > Switches. An inventory of all the switches that are discovered by Cisco DCNM is displayed. |
||
|
Step 2 |
Click a switch in the Device Name column. The switch dashboard that corresponds to that switch appears. |
||
|
Step 3 |
In the Actions area, click Generate tac-pac. The Generate tac-pac dialog box appears. |
||
|
Step 4 |
Choose a management interface by clicking the appropriate radio button. Valid values are default, vrf management, and vrf default. The default value selected is default.
|
||
|
Step 5 |
Choose the transport protocol from switch to DCNM by clicking the appropriate radio button. Valid values are TFTP, SCP, and SFTP.
|
||
|
Step 6 |
Click Ok. After the tac-pac is generated and saved on server, a dialog box appears to open or save the file on your local machine. |
Viewing Device Manager Information
 Note |
After you install Cisco DCNM for Windows, you must edit and provide credentials in the Cisco DCNM SAN Services to Log on. Navigate to Services > Cisco DCNM SAN Server > Cisco DCNM SAN Server Properties > Log On tab. Select This account radio button, and provide username and password. Click Ok. Log on to SSH and stop DCNM services. After you start the DCNM services, you must be able to use Device Manager. |
 Note |
After you install Cisco DCNM for Linux, perform the procedure that is provided on the screen for Device Manager to be functional. Device Manager requires graphical environment that is configured properly in the Linux/OVA DCNM server. |
The switch dashboard displays the details of the selected switch.
Procedure
|
Step 1 |
From the left menu bar, choose Inventory > View > Switches. An inventory of switches discovered by Cisco DCNM Web Client is displayed. |
|
Step 2 |
Click a switch in the Device Name column. The Switch dashboard that corresponds to that switch is displayed along with the following information: |
|
Step 3 |
Click the Device Manager tab. The Device Manager login dialog box appears. Log into the Device Manager application. The Device Manager provides a graphic representation of the installed switching modules, the supervisor modules, the status of each port within each module, the power supplies, and the fan assemblies. For more information about the Device Manager, go to the following URL: |
Installing a Switch License
Procedure
|
Step 1 |
Choose Inventory > View > Switches. Alternatively, you can choose Inventory > View > Switches. |
|
Step 2 |
Click License in the switch dashboard. |
|
Step 3 |
Click Install to install the switch license file on a switch. A Switch License Install window appears. |
|
Step 4 |
Click Select License File, and select the license file from your local system. |
|
Step 5 |
Select the transport method. The available options are:
|
|
Step 6 |
Enter the username and password to connect to the DCNM server. |
|
Step 7 |
Click Install. |
Rediscovering Switch Licenses
Procedure
|
Step 1 |
Choose Inventory > View > Switches. Alternatively, you can choose Inventory > View > Switches. |
|
Step 2 |
Choose a switch in the Device Name column. |
|
Step 3 |
Click the License tab in the switch dashboard. |
|
Step 4 |
Click Rediscover to rediscover switch licenses on a switch. Rediscovering the switch licenses takes some time. |
|
Step 5 |
Click the Last Updated icon to refresh the licenses. |
Interfaces
Displaying Interface Show Commands
Procedure
|
Step 1 |
Choose Inventory > View > Switches. |
|
Step 2 |
In the Device Name column, select a switch to display Switch Dashboard. |
|
Step 3 |
Click the Interfaces tab. |
|
Step 4 |
Click Show to display the interface show commands. The Interface Show Commands window helps you to view commands and execute them. |
Rediscovering Interfaces
Procedure
|
Step 1 |
Choose Inventory > View > Switches. The Switches window is displayed showing a list of all the switches for a selected Scope. |
|
Step 2 |
In the Device Name column, select a switch to display Switch Dashboard. |
|
Step 3 |
Click the Interfaces tab. |
|
Step 4 |
Click Rediscover to rediscover the selected interfaces. For example, after you edit or enable an interface, you can rediscover the interface. |
Viewing Interface History
Procedure
|
Step 1 |
Choose Inventory > View > Switches. You see the Switches window displaying a list of all the switches for a selected Scope. |
|
Step 2 |
In the Device Name column, select a switch to display Switch Dashboard. |
|
Step 3 |
Click the Interfaces tab. |
|
Step 4 |
Click Interface History to display the interface history details such as Policy Name, Time of Execution, and so on. |
VLAN
You create a VLAN by assigning a number to it; you can delete VLANs and move them from the active operational state to the suspended operational state.
To configure VLANs, choose Inventory > View > Switches, and then click a switch in the Device Name column.
The following table describes the buttons that appear on this page.
|
Field |
Description |
|---|---|
|
Clear Selections |
Allows you to unselect all the VLANs that you selected. |
|
Add |
Allows you to create Classical Ethernet or Fabric Path VLANs. |
|
Edit |
Allows you to edit a VLAN. |
|
Delete |
Allows you to delete a VLAN. |
|
No Shutdown |
Allows you to enable a VLAN. |
|
Shutdown |
Allows you to disable a VLAN. |
|
Show |
Allows you to display the VLAN show commands. |
This section contains the following:
Adding a VLAN
Procedure
|
Step 1 |
Choose Inventory > View > Switches. You see the Switches window displaying a list of all the switches for a selected Scope. |
|
Step 2 |
In the Device Name column, select a switch to display the Switch Dashboard. |
|
Step 3 |
Click the VLAN tab. |
|
Step 4 |
Click Add to create Classical Ethernet or Fabric Path VLANs. In the Add VLAN window, specify the following fields:
|
Editing a VLAN
Procedure
|
Step 1 |
Choose Inventory > View > Switches. The Switches window is displayed with a list of all the switches for a selected Scope. |
|
Step 2 |
In the Device Name column, select a switch to display the Switch Dashboard. |
|
Step 3 |
Select one or more VLANs, and then click the Edit. |
Deleting a VLAN
Procedure
|
Step 1 |
Choose Inventory > View > Switches. You see the Switches window displaying a list of all the switches for a selected Scope. |
|
Step 2 |
In the Device Name column, select a switch to display the Switch Dashboard. |
|
Step 3 |
Click VLAN tab. |
|
Step 4 |
Select the VLAN that you want to delete, and then click Delete. |
Shutting Down a VLAN
Procedure
|
Step 1 |
Choose Inventory > View > Switches. You see the Switches window displaying a list of all the switches for a selected Scope. |
|
Step 2 |
In the Device Name column, select a switch to display Switch Dashboard. |
|
Step 3 |
Click the VLAN tab. |
|
Step 4 |
Click Shutdown to disable a VLAN. To enable a VLAN, click No Shutdown button. For example, if you want to start traffic flow on a VLAN you can enable it. |
Displaying VLAN Show Commands
Procedure
|
Step 1 |
Choose Inventory > View > Switches. The Switches window is displayed, showing a list of all the switches for a selected Scope. |
|
Step 2 |
In the Device Name column, select a switch to display Switch Dashboard. |
|
Step 3 |
Click the VLAN tab. |
|
Step 4 |
Click Show to display the VLAN show commands. Based on the VLAN selection, you can show the VLAN commands. Interface Show Commands window displays the commands and allows you to execute them. |
FEX
The Fabric Extender feature allows you to manage a Cisco Nexus 2000 Series Fabric Extender and its association with the Cisco NX-OS switch that it is attached to. A Fabric Extender is connected to the switch through physical Ethernet interfaces or a Port Channel. By default, the switch does not allow the attached Fabric Extender to connect until it has been assigned a chassis ID and is associated with the connected interface. You can configure a Fabric Extender host interface port as a routed or Layer 3 port. However, no routing protocols can be tied to this routed interface.
 Note |
FEX feature is available on LAN devices only. Therefore, you will see FEX on Cisco DCNM Inventory Switches. If a Cisco Nexus Switch is discovered as part of SAN fabric, FEX feature is not available. FEX is also not supported on Cisco Nexus 1000V devices. |
 Note |
4x10G breakout for FEX connectivity is not supported on Cisco Nexus 9500 Switches. |
 Note |
The Fabric Extender may connect to the switch through several separate physical Ethernet interfaces or at most one port channel interface. |
This section describes how to manage Fabric Extender (FEX) on Cisco Nexus Switches through Cisco DCNM.
You can create and manage FEX from Cisco DCNM Inventory > Switches.
 Note |
FEX tab is visible only if you choose a LAN device. |
The following table describes the fields that appear on this page.
|
Field |
Description |
|---|---|
|
Add |
Click to add a new FEX to a Cisco Nexus Switch. |
|
Edit |
Select any active FEX radio button and click Edit to edit the FEX configuration. You can create an edit template and use it for editing FEX. Select template type as POLICY and sub type as FEX. |
|
Delete |
Select the FEX radio button, and click Delete icon to delete the FEX associated with the switch. |
|
Show |
Allows you to view various configuration details for the selected FEX ID. You can select the following from the drop-down list.
The variables for respective show commands are displayed in the Variables area. Review the Variables and click Execute. The output appears in the Output area. You can create a show template for FEX. Select template type as SHOW and sub type as FEX. |
|
FEX History |
Allows you to view the history of the FEX configuration tasks for a particular FEX. You can review the Event Type, Policy Name, Status, Time of Execution, User Name for the selected FEX. |
|
Field |
Description |
||
|---|---|---|---|
|
Fex Id |
Uniquely identifies a Fabric Extender that is connected to a Cisco NX-OS device. |
||
|
Fex Description |
Description that is configured for the Fabric Extender. |
||
|
Fex Version |
Specifies the version of the FEX that is associated with the switch. |
||
|
Pinning |
An integer value that denotes the maximum pinning uplinks of the Fabric Extender that is active at a time. |
||
|
State |
Specifies the status of the FEX as associated with the Cisco Nexus Switch. |
||
|
Model |
Specifies the model of the FEX. |
||
|
Serial No. |
Specifies the configured serial number.
|
||
|
Port Channel |
Specifies the port channel number to which the FEX is physically connected to the Switch. |
||
|
Ethernet |
Refers to the physical interfaces to which the FEX is connected. |
||
|
vPC ID |
Specifies the vPC ID configured for FEX. |
This chapter includes the following sections:
Add FEX
To add single-home FEX from the Cisco DCNM Web UI, perform the following steps:
Before you begin
You can add a Fabric Extender (FEX) to the Cisco Nexus Switches through the Cisco DCNM Web Client. If the FEX is physically connected to the switch, FEX will become online after it is added. If the FEX is not physically connected to the switch, the configuration is deployed to the switch, which in turn enables FEX when connected.
 Note |
You can create only single homed FEX through Inventory > Switches > FEX > Add FEX. To create a dual-homed FEX, use the vPC wizard through Configure > Deploy > vPC. |
Ensure that you have successfully discovered LAN devices and configured LAN credentials before you configure FEX.
Procedure
|
Step 1 |
Choose Inventory > Switches > FEX. The FEX window is displayed. |
||
|
Step 2 |
Click the Add FEX icon. |
||
|
Step 3 |
In the General tab, in the PORTCHANNEL field, enter the interface port channel number which is connected to the FEX. |
||
|
Step 4 |
In the INT_RANGE field, enter the interface range within which the FEX is connected to the switch.
|
||
|
Step 5 |
In the FEX_ID field, enter the ID for FEX that is connected to a Cisco NX-OS device. The identifier must be an integer value between 100 to 199. |
||
|
Step 6 |
Click Add. The configured Single-home FEX appears in the list of FEXs associated to the device. |
Edit FEX
To edit and deploy FEX from the Cisco DCNM Web UI, perform the following steps:
Procedure
|
Step 1 |
Choose Inventory > Switches > FEX. The FEX window is displayed. |
||
|
Step 2 |
Select the FEX radio button that you must edit. Click Edit FEX icon. |
||
|
Step 3 |
In the Edit Configuration window, from the Policy drop-down list, select Edit_FEX to edit the FEX configuration. |
||
|
Step 4 |
Edit the pinning and FEX_DESC fields, as required.
|
||
|
Step 5 |
Click Preview. You can view the generated configuration for the selected FEX ID. The following is a configuration example for FEX ID 101. |
||
|
Step 6 |
After you review the configuration summary on the Preview window, on the Edit Configuration screen, click Deploy to deploy the FEX for the switch. |
VDCs
This section describes how to manage Virtual Device Contexts (VDCs) on Cisco Nexus 7000 Switches through Cisco DCNM.
Users with the network administrator (network-admin) role can create Virtual Device Contexts (VDCs). VDC resource templates limit the amount of physical device resources available to the VDC. The Cisco NX-OS software provides a default resource template, or you can create resource templates.
You can create and manage VDCs from Cisco DCNM Inventory > Switches > VDCs. As Cisco DCNM supports DCNM on Cisco Nexus 7000 Series only, click an active Cisco Nexus 7000 Switch. After you create a VDC, you can change the interface allocation, VDC resource limits, and the high availability (HA) policies.
The following table describes the fields that appear on this page.
|
Field |
Description |
||||
|---|---|---|---|---|---|
|
Add |
Click to add a new VDC. |
||||
|
Edit |
Select any active VDC radio button and click Edit to edit the VDC configuration. |
||||
|
Delete |
Allows you to delete the VDC. Select any active VDC radio button and click Delete to remove the VDC associated with the device. |
||||
|
Resume |
Allows you to resume a suspended VDC. | ||||
|
Suspend |
Allows you to suspend an active non-default VDC. Save the VDC running configuration to the startup configuration before suspending the VDC. Otherwise, you will lose the changes to the running configuration.
|
||||
|
Rediscover |
Allows you to resume a non-default VDC from the suspended state. The VDC resumes with the configuration that is saved in the startup configuration. |
||||
|
Show |
Allows you to view the Interfaces and Resources that are allocated to the selected VDC. In the Interface tab, you can view the mode, admin-status, and operational status for each interface associated with the VDC. In the Resource tab, you can view the allocation of resources and current usage of these resources. |
|
Field |
Description |
|---|---|
|
Name |
Displays the unique name for the VDC |
|
Type |
Species the type of VDC. The two types of VDCs are:
|
|
Status |
Specifies the status of the VDC. |
|
Resource Limit-Module Type |
Displays the allocated resource limit and module type. |
|
HA-Policy
|
Specifies the action that the Cisco NX-OS software takes when an unrecoverable VDC fault occurs. You can specify the HA policies for single supervisor module and dual supervisor module configurations when you create the VDC. The HA policy options are as follows: Single supervisor module configuration:
Dual supervisor module configuration:
The default HA policies for a non-default VDC that you create is restart for a single supervisor module configuration and switchover for a dual supervisor module configuration. The default HA policy for the default VDC is reload for a single supervisor module configuration and switchover for a dual supervisor module configuration. |
|
Mac Address |
Specifies the default VDC management MAC address. |
|
Management Interface
|
Species the IP Address of the VDC Management interface. The status shows if the interface if up or down. |
|
SSH |
Specifies the SSH status |
 Note |
If you change the VDC hostname of a neighbor device after initial configuration, the link to the old VDC hostname is not replaced with the new hostname automatically. As a workaround, we recommend manually deleting the link to the old VDC hostname. |
This chapter includes the following sections:
Add VDCs
To add VDC from the Cisco DCNM Web UI, perform the following steps:
Before you begin
Ensure that you have discovered the physical device using a username that has the network-admin role.
Obtain an IPv4 or IPv6 address for the management interface (mgmt 0) if you want to use out-of-band management for the VDC.
Create a storage VDC to run FCoE. The storage VDC cannot be the default VDC and you can have one storage VDC on the device.
Procedure
|
Step 1 |
Choose Inventory > Switches > VDC. The VDC window is displayed. |
|
Step 2 |
Click the Add VDC icon. |
|
Step 3 |
From the drop-down list, select the VDC type. You can configure the VDC in two modes. The default VDC type is Ethernet. |
|
Step 4 |
Click OK. |
Configuring Ethernet VDCs
To configure VDC in Ethernet mode from the Cisco DCNM Web UI, perform the following steps:
Procedure
|
Step 1 |
In the General Parameter tab, specify the VDC Name, Single supervisor HA-policy, Dual supervisor HA-policy, and Resource Limit - Module Type. |
|||||||||||||||||||||||||||||||||||||||||||||||||||||||||||||||
|
Step 2 |
In the Allocate Interface tab, select the network interfaces (dedicated interfaces membership) to be allocated to the VDC. Click Next. |
|||||||||||||||||||||||||||||||||||||||||||||||||||||||||||||||
|
Step 3 |
In the Allocate Resource tab, specify the resource limits for the VDC. Select the radio button and choose Select a Template from existing Templates or Create a New Resource Template. VDC resource templates describe the minimum and maximum resources that the VDC can use. If you do not specify a VDC resource template when you create a VDC, the Cisco NX-OS software uses the default template, vdc-default.
You can edit individual resource limits for a single VDC through the Cisco DCNM Web Client > Inventory > Switches > VDC. Click Next. |
|||||||||||||||||||||||||||||||||||||||||||||||||||||||||||||||
|
Step 4 |
In the Authenticate tab, you can allow the Admin to configure the password and also authenticate users using AAA Server Groups. In the Admin User Area:
In the AAA Server Groups area:
Click Next. |
|||||||||||||||||||||||||||||||||||||||||||||||||||||||||||||||
|
Step 5 |
In the Management Ip tab, enter IPv4 or IPv6 Address information. Click Next. |
|||||||||||||||||||||||||||||||||||||||||||||||||||||||||||||||
|
Step 6 |
In the Summary tab, review the VDC configuration. Click Previous to edit any parameters. Click Deploy to configure VDC on the device. |
|||||||||||||||||||||||||||||||||||||||||||||||||||||||||||||||
|
Step 7 |
In the Deploy tab, the status of the VDC deployment is displayed. A confirmation message appears. Click Know More to view the commands that are executed to deploy the VDC. Click Finish to close the VDC configuration wizard and revert to view the list of VDCs configured on the device. |
|||||||||||||||||||||||||||||||||||||||||||||||||||||||||||||||
Configuring Storage VDCs
To configure VDCs in storage mode from the Cisco DCNM Web UI, perform the following steps:
Before you begin
Create a separate storage VDC when you run FCoE on the device. Only one of the VDCs can be a storage VDC, and the default VDC cannot be configured as a storage VDC.
You can configure shared interfaces that carry both Ethernet and Fibre Channel traffic. In this specific case, the same interface belongs to more than one VDC. The shared interface is allocated to both an Ethernet and a storage VDC.
Procedure
|
Step 1 |
In the General Parameter tab, specify the VDC Name, Single supervisor HA-policy, Dual supervisor HA-policy, and Resource Limit - Module Type. |
||
|
Step 2 |
In the Allocate FCoE Vlan tab, select the available Ethernet Vdc from the drop-down list. The existing Ethernet VLANs range is displayed. Select None not to choose any available Ethernet VDCs. You can allocate specified FCoE VLANs to the storage VDC and specified interfaces. Click Next. |
||
|
Step 3 |
In the Allocate Interface tab, add the dedicated and shared interfaces to the FCoE VDC.
You can configure shared interfaces that carry both Ethernet and Fibre Channel traffic. In this specific case, the same interface belongs to more than one VDC. FCoE VLAN and shared interface can be allocated from same Ethernet VDC. Click Next. |
||
|
Step 4 |
In the Authenticate tab, you can allow the Admin to configure the password and also authenticate users using AAA Server Groups. In the Admin User Area:
In the AAA Server Groups area:
Click Next. |
||
|
Step 5 |
In the Management Ip tab, enter IPv4 or IPv6 Address information. Click Next. |
||
|
Step 6 |
In the Summary tab, review the VDC configuration. Click Previous to edit any parameters. Click Deploy to configure VDC on the device. |
||
|
Step 7 |
In the Deploy tab, the status of the VDC deployment is displayed. A confirmation message appears. Click Know More to view the commands that are executed to deploy the VDC. Click Finish to close the VDC configuration wizard and revert to view the list of VDCs configured on the device. |
Edit VDC
To edit VDC from the Cisco DCNM Web UI, perform the following steps:
Procedure
|
Step 1 |
Choose Inventory > Switches > VDC. The VDC window is displayed. |
|
Step 2 |
Select the VDC radio button that you must edit. Click the Edit VDC icon. |
|
Step 3 |
Modify the parameters as required. |
|
Step 4 |
After you review the configuration summary on the Summary tab, click Deploy the VDC with the new configuration. |
Viewing Inventory Information for Modules
Procedure
|
Step 1 |
Choose Inventory > View > Modules. The Modules window is displayed with a list of all the switches and its details for a selected Scope. |
|
Step 2 |
You can view the following information.
|
Viewing Inventory Information for Licenses
Procedure
|
Step 1 |
Choose Inventory > View > Licenses. The Licenses window is displayed based on the selected Scope. |
|
Step 2 |
You can view the following information.
|




 Feedback