Configuring Connectivity Between Cloud APIC-Managed Cloud Site and Non-ACI Remote Site

The sections in this chapter describe how to configure connectivity between a Cisco Cloud APIC-managed cloud site and a non-ACI remote site, either by using express route gateway or without using express route gateway.

Configuring Connectivity Using Express Route Gateway

Beginning with release 5.1(2), support is available for express route gateway deployment, where you can deploy an express route gateway in the hub VNet using redirect or without using redirect. The express route gateway is used to provide connectivity between a Cloud APIC-managed cloud site and a non-ACI remote site. The external EPG for the non-ACI remote site (in this case, connected by an express route gateway) has a contract with the cloud EPG in the hub or spoke VNet.

About Deploying Express Route Gateway Using Redirect

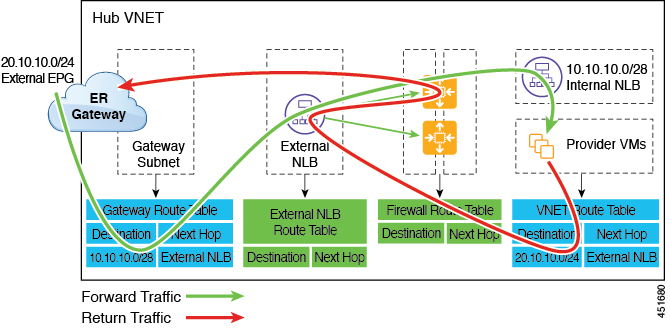
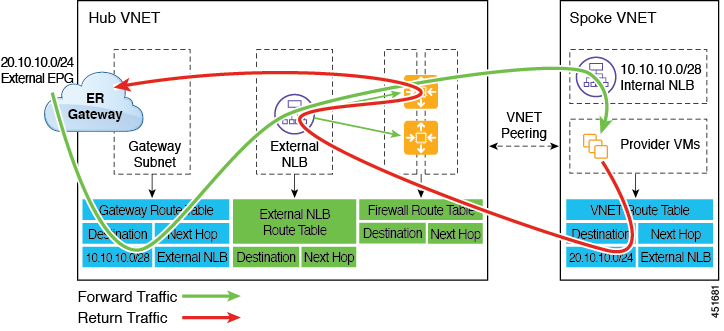
In situations where you are deploying a connection between a cloud endpoint and an external network through an express route gateway, you can insert a service device between them using redirect.

For this use case, the external EPG connected by the express route gateway has a contract with the cloud EPG in either the hub or the spoke VNet. In this situation:

  • The redirect is configured on the gateway subnet route table by the Cloud APIC. The traffic destined to the provider cloud EPG is redirected to the service device deployed in the hub VNet as the next hop.

  • You should have the service device that is used in the redirect in the same VNet as the external EPG connected by the express route gateway (in this case, in the hub VNet).

  • Having the provider cloud EPG stretched across regions is supported in this case.

The following figure shows an example of a redirect for express route gateway to the provider EPG in the hub VNet.
The following figure shows an example of a redirect for express route gateway to the provider EPG in the spoke VNet.
The following table describes how redirect is programmed.

Consumer

Provider

Redirect on Gateway Subnet Route Table

Redirect on Provider VNet

External EPG connected by the express route gateway

Cloud EPG with subnet-based endpoint selector

Redirect for the consumer-to-provider traffic using the subnets of the provider

Redirect for the provider-to-consumer traffic using the subnets of the external EPG

Deploying Express Route Gateway Using Redirect

Before you begin

Review the information provided in About Deploying Express Route Gateway Using Redirect before proceeding with these procedures.

Procedure

Step 1

Enable VNet peering on your Cloud APIC.

Refer to Configuring VNET Peering for Cloud APIC for Azure for those instructions.

The gateway subnet in the hub VNet that is required for the express route gateway is deployed by the Cloud APIC when VNet peering is enabled. This is done to prepare the hub VNet for the deployment of the express route gateway.

Step 2

Create an external EPG in the hub VNet that represents the network for the non-ACI remote site.

Step 3

Through the Azure portal, deploy the express route gateway in the hub VNet using the gateway subnet that you configured in Step 1.

Depending on the number of regions that you selected when you enabled VNet peering in Step 1, if you need express route gateway access on multiple regions that the Cloud APIC will manage, deploy express route gateways in each of those regions separately.

  1. In the Azure portal, navigate to the Resource Manager virtual network where you want to create a virtual network gateway.

  2. On the left side, select Create a resource, and type Virtual Network Gateway in search.

  3. Locate Virtual network gateway in the search return and click the entry.

  4. On the Virtual network gateway page, choose Create.

  5. On the Create virtual network gateway page, enter the appropriate information for these fields:

    • Subscription: Verify that the correct subscription is selected.

    • Resource Group: The resource group will automatically be chosen once you choose the virtual network.

    • Name: The name of your express route gateway.

    • Region: Change the Region field to point to the location where your virtual network is located. If the location isn't pointing to the region where your virtual network is, the virtual network won't appear in the Choose a virtual network dropdown.

    • Gateway type: Choose ExpressRoute.

    • SKU: Choose the gateway SKU from the dropdown.

    • Virtual network: Choose the virtual network that was created by the Cloud APIC in Step 1.

    • Public IP address: Choose Create new.

    • Public IP address name: Provide a name for the public IP address.

  6. Select Review + Create, and then Create to begin creating the gateway.

    The settings are validated and the gateway deploys. Creating virtual network gateway can take up to 45 minutes to complete.

    To verify that the express route gateway was deployed successfully, navigate to the network gateways page in the Azure portal and verify that a network gateway with the type express route was created.

    If you need express route gateway access on additional regions, repeat these steps for each of those regions.

Step 4

Configure the service device for the redirect.

To configure a service device for redirect using the GUI or REST API, see Deploying Layer 4 to Layer 7 Services.

Step 5

Configure a contract between the cloud EPG and the external EPG connected by the express route gateway.


About Deploying Express Route Gateway Without Redirect

For this type of deployment, route propagation to the spoke VNet is automatically enabled by the Cloud APIC. This allows your non-ACI remote site subnet routes to be available to the spoke VNet through the hub VNet using VNet peering with gateway transit (also referred to as transit peering). VNet peering with gateway transit is also automatically enabled by the Cloud APIC in this situation.

As part of this configuration, you will deploy the express route gateway in the hub VNet. When the Cloud APIC detects that the express route gateway has been configured in the hub VNet, it automatically sets the transit peering properties, one for the hub → spoke peering and the other for the spoke → hub peering, in the Azure portal:

  • Hub VNet: Automatically set to Use this virtual network's gateway

  • Spoke VNet: Automatically set to Use remote virtual network's gateway in the spoke VNet that is managed by the Cloud APIC

In order to have the route propagation enabled for the egress route table of the spoke VNet, you must configure a contract between the cloud EPG in the spoke VNet and the external EPG connecting to the non-ACI remote site.

The following figure shows an example of this type of deployment.
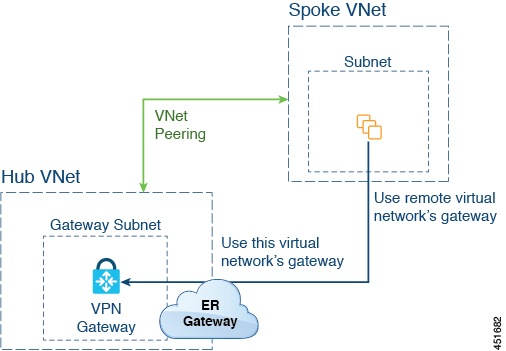
In this example:

  • The following configurations are done automatically by the Cloud APIC:

    • The spoke VNet uses VNet peering with gateway transit (transit peering)

    • The VPN gateway in the hub VNet is connected to an on-premises non-ACI remote site

    • When the Cloud APIC detects that the express route gateway is deployed in the hub VNet, the transit peering properties are automatically set on each side of the peering (hub → spoke and spoke → hub):

      • Hub VNet: Automatically set to Use this virtual network's gateway

      • Spoke VNet: Automatically set to Use remote virtual network's gateway in the spoke VNet that is managed by the Cloud APIC

  • The on-premises non-ACI routes learned by the VPN gateway are available to the spoke VNet if the EPG in the spoke VNet has a contract with the external EPG

  • The hub VNet allows traffic from the EPG in the spoke VNet destined to the on-premises non-ACI remote site through the VPN gateway

Deploying Express Route Gateway Without Redirect
Before you begin

Review the information provided in About Deploying Express Route Gateway Without Redirect before proceeding with these procedures.

Procedure

Step 1

Enable VNet peering on your Cloud APIC.

Refer to Configuring VNET Peering for Cloud APIC for Azure for those instructions.

The gateway subnet in the hub VNet that is required for the express route gateway is deployed by the Cloud APIC when VNet peering is enabled. This is done to prepare the hub VNet for the deployment of the express route gateway.

Step 2

Create an external EPG in the hub VNet that represents the network for the non-ACI remote site.

Step 3

Through the Azure portal, deploy the express route gateway in the hub VNet using the gateway subnet that you configured in Step 1.

Depending on the number of regions that you selected when you enabled VNet peering in Step 1, if you need express route gateway access on multiple regions that the Cloud APIC will manage, deploy express route gateways in each of those regions separately.

  1. In the Azure portal, navigate to the Resource Manager virtual network where you want to create a virtual network gateway.

  2. On the left side, select Create a resource, and type Virtual Network Gateway in search.

  3. Locate Virtual network gateway in the search return and click the entry.

  4. On the Virtual network gateway page, choose Create.

  5. On the Create virtual network gateway page, enter the appropriate information for these fields:

    • Subscription: Verify that the correct subscription is selected.

    • Resource Group: The resource group will automatically be chosen once you choose the virtual network.

    • Name: The name of your express route gateway.

    • Region: Change the Region field to point to the location where your virtual network is located. If the location isn't pointing to the region where your virtual network is, the virtual network won't appear in the Choose a virtual network dropdown.

    • Gateway type: Choose ExpressRoute.

    • SKU: Choose the gateway SKU from the dropdown.

    • Virtual network: Choose the virtual network that was created by the Cloud APIC in Step 1.

    • Public IP address: Choose Create new.

    • Public IP address name: Provide a name for the public IP address.

  6. Select Review + Create, and then Create to begin creating the gateway.

    The settings are validated and the gateway deploys. Creating virtual network gateway can take up to 45 minutes to complete.

    To verify that the express route gateway was deployed successfully, navigate to the network gateways page in the Azure portal and verify that a network gateway with the type express route was created.

    If you need express route gateway access on additional regions, repeat these steps for each of those regions.

Step 4

Configure a contract between the cloud EPG and the external EPG connected by the express route gateway.


Configuring Connectivity Using VPN Gateway (Virtual Network Gateway)

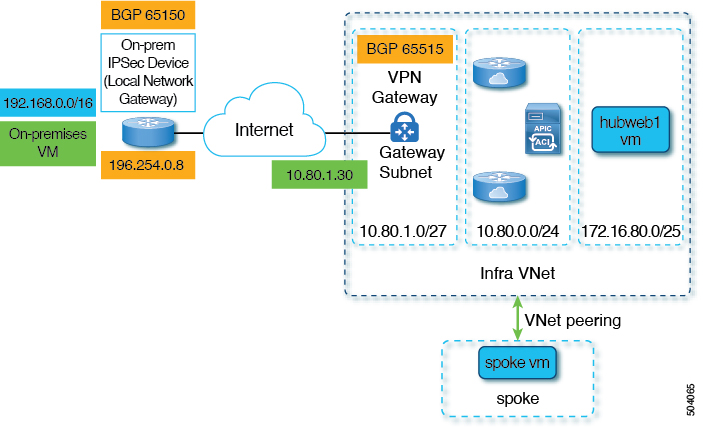
Beginning with release 25.0(2), support is available for providing connectivity between a Cloud APIC-managed cloud site and a non-ACI remote site using VPN gateway. For this type of connectivity, a virtual network gateway (VNG) is deployed in the infra (hub) VNet, allowing you to connect from the Cloud APIC-managed cloud site to a non-ACI remote branch site. BGP runs over the IPsec tunnels as the routing protocol between the CCR routers and VNG in the infra VNet and the on-premises IPsec device (local network gateway) in the non-ACI remote branch site.

The following figure shows an example configuration with this type of connectivity.

The following procedures describe how to configure this type of connectivity, where the end result is to have reachability between the on-premises virtual machine residing in the 192.168.20.0/24 subnet and the hubweb virtual machine residing in the 172.16.80.0/25 subnet.

Configuring Connectivity Using VPN Gateway

Before you begin

Review the information provided in Configuring Connectivity Using VPN Gateway (Virtual Network Gateway) before proceeding with these procedures.

Procedure


Step 1

Enable VNet peering on your Cloud APIC, if necessary.

Refer to Configuring VNET Peering for Cloud APIC for Azure for those instructions.

Step 2

Add the second subnet for the VPN gateway subnet.

  1. In the Cloud APIC GUI, click the Intent icon ( ) and select Cloud APIC Setup.

  2. In the Region Management area, click Edit Configuration.

  3. In the Regions to Manage window, click Next.

    The General Connectivity window appears.

  4. Under the General area, in the Subnet Pools for Cloud Routers field, click Add Subnet Pool for Cloud Routers.

  5. Enter the information for the second subnet for the VPN gateway router.

    For example, using the example configuration in Configuring Connectivity Using VPN Gateway (Virtual Network Gateway), you would add 10.80.1.0/24 for the second subnet for the VPN gateway router in this field.

  6. Click Next, then enter the necessary information in the following page and click Save and Continue.

    Cloud APIC will create the subnet for the VPN gateway router after you have completed the Cloud APIC Setup process. You can verify that the configuration for the subnet for the VPN gateway router was pushed to Azure successfully by navigating to the Subnets page in the Azure portal and locating the GatewaySubnet entry.

Step 3

Create an infra-hosted VRF and use that VRF for the site-external EPG.

You will create an infra-hosted VRF, where you have a VRF that is hosted within the parent infra VNet, and you will use that VRF for the site-external EPG that you will create in the next step.

  1. In the Cloud APIC GUI, navigate to Application Management > VRFs.

  2. Click Actions > Create VRF.

    The Create VRF window appears.
  3. Enter a name for this infra-hosted VRF, then click Select Tenant and select infra for the tenant and click Select.

  4. Enter a description if necessary, then click Save.

Step 4

Create an external EPG in the hub VNet that represents the network for the non-ACI remote site.

Step 5

Through the Azure portal, create the virtual network gateway in the infra VNet for the VPN gateway subnet that you configured in Step 2.

In these steps, you will build the IPsec and BGP connections from the on-premises site to the Azure VPN gateway. For more information, see the following article in the Azure site:

https://docs.microsoft.com/en-gb/azure/virtual-network/virtual-network-configure-vnet-connections

  1. In the Azure portal, create the virtual network gateways by navigating to the Resource Manager virtual network where you want to create a virtual network gateway.

  2. On the left side, select Create a resource, and type Virtual Network Gateway in search.

  3. Locate Virtual network gateway in the search return and click the entry.

  4. On the Virtual network gateway page, choose Create.

  5. On the Create virtual network gateway page, enter the appropriate information for these fields:

    • Subscription: Verify that the correct subscription is selected.

    • Resource Group: The resource group will automatically be chosen once you choose the virtual network.

    • Name: The name of your virtual network gateway.

    • Region: Change the Region field to point to the location where your virtual network is located. If the location isn't pointing to the region where your virtual network is, the virtual network won't appear in the Choose a virtual network dropdown.

    • Gateway type: Choose VPN.

    • VPN type: Choose Route-based.

    • SKU: Choose VpnGw1.

    • Generation: Choose Generation1.

    • Virtual network: Choose overlay-1.

    • Public IP address: Choose Create new.

    • Public IP address name: Provide a name for the public IP address.

    • Enable active-active mode: Set to Disabled.

    • Configure BGP: Set to Enabled.

    • Autonomous system number (ASN): Enter the appropriate BGP ASN value for the VPN gateway. By default, Azure uses an ASN value of 65515.

  6. Select Review + Create, and then Create to begin creating the gateway.

    The settings are validated and the gateway deploys. Creating a virtual network gateway can take up to 45 minutes to complete.

    To verify that the virtual network gateway was deployed successfully, navigate to the virtual network gateways page and select the virtual network gateway that you just created, then click on Settings: Configuration to view and verify the configuration settings for the virtual network gateway.

Step 6

Create the local network gateway.

For this configuration, the local network gateway is an object that represents the on-premises IPsec device. Prepare the following parameters before creating the local network gateway:

  • BGP autonomous system number (ASN)

  • Public IP address

  • An appropriate address space for the on-premises subnet that needs to be advertised to the virtual network gateway

  1. In the Azure portal, create the local network gateway by navigating to the Resource Manager local network where you want to create a local network gateway.

  2. On the left side, select Create a resource, and type Local Network Gateway in search.

  3. Locate Local network gateway in the search return and click the entry.

  4. On the Local network gateway page, choose Create.

  5. On the Create local network gateway page, enter the appropriate information for these fields:

    • Name: The name of your local network gateway.

    • Endpoint: Choose IP address.

    • IP address: Enter the appropriate IP address for the local network gateway.

    • Address space: Enter the appropriate value for the address space. For example, using the example configuration in Configuring Connectivity Using VPN Gateway (Virtual Network Gateway), you would add 192.168.0.0/16 in this field.

    • Configure BGP settings: Click the checkbox to enable this setting.

    • Autonomous system number (ASN): Enter the appropriate BGP ASN value for the local network gateway. This is the ASN value of the remote device. For example, using the example configuration in Configuring Connectivity Using VPN Gateway (Virtual Network Gateway), you would add 65150 in this field.

    • BGP peer IP address: Enter the BGP peer IP address that you will use for the on-premises device in this field (not the Azure virtual network gateway). For example, using the example configuration in Configuring Connectivity Using VPN Gateway (Virtual Network Gateway), you would add 196.254.0.8 in this field.

    • Subscription: Choose the same subscription that you used for the virtual network gateway in Step 5.

    • Resource group: Choose the same resource group that you used for the virtual network gateway in Step 5.

    • Location: Choose the same location (region) that you used for the virtual network gateway in Step 5.

  6. Select Review + Create, and then Create to begin creating the gateway.

    The settings are validated and the gateway deploys.

    To verify that the local network gateway was deployed successfully, navigate to the local network gateways page and select the local network gateway that you just created, then click on Settings: Configuration to view and verify the configuration settings for the local network gateway.

Step 7

Create the VPN connection from the Azure virtual network gateway to the local network gateway (the on-premises IPsec device).

  1. In the Azure portal, navigate to the virtual network gateway page and locate the Azure virtual network gateway that you created in Step 5.

  2. Select the virtual network gateway that you created and click on Settings: Connections.

  3. Click Add.

    The Add connection window appears.

  4. Fill in the necessary information to add this VPN connection from the Azure virtual network gateway to the local network gateway (the on-premises IPsec device).

    • In the Connection type field, select Site-to-site (IPsec).

    • In the Virtual network gateway field, select the Azure virtual network gateway that you created in Step 5.

    • In the Local network gateway field, select the local network gateway that you created in Step 6.

    • In the Enable BGP field, click the checkbox to enable BGP for this connection.

    • In the IKE Protocol field, select IKEv2.

  5. Click OK when you have finished entering the configuration information for this VPN connection.

Step 8

Download the VPN configuration template from Azure.

  1. In the Azure portal, navigate to the virtual network gateway page and locate the Azure virtual network gateway that you created in Step 5.

  2. Select the virtual network gateway that you created and click on Settings: Connections.

  3. Select the name of the VPN connection that you just configured.

    The overview page for that VPN connection appears.

  4. Click Download configuration.

    The Download configuration page appears.

  5. Make the following selections in the Download configuration page:

    • In the Device vendor field, select Cisco.

    • In the Device family field, select IOS (ISR, ASR).

    • In the Firmware version field, select 15.x (IKEv2).

  6. Click Download configuration.

Step 9

Open the downloaded configuration template file in a text editor and make the necessary edits using the instructions in the configuration template.

Typically, the only changes needed in the configuration template are the following fields in the BGP configuration:

Step 10

Save and close the edited configuration template.

Step 11

Apply the edited configuration template to the on-premises IPsec device.

Following is an example edited configuration template based on the example configuration in Configuring Connectivity Using VPN Gateway (Virtual Network Gateway):


access-list 101 permit ip 192.168.0.0 0.0.255.255 10.80.0.0 0.0.0.127
access-list 101 permit ip 192.168.0.0 0.0.255.255 10.80.0.128 0.0.0.127
access-list 101 permit ip 192.168.0.0 0.0.255.255 10.80.1.0 0.0.0.127
access-list 101 permit esp host 52.152.235.192 host 173.39.125.130
access-list 101 permit udp host 52.152.235.192 eq isakmp host 173.39.125.130
access-list 101 permit udp host 52.152.235.192 eq non500-isakmp host 173.39.125.130
!
crypto ikev2 proposal Azure-Ikev2-Proposal
  encryption aes-cbc-256
  integrity sha1
  group 2
  exit
!
crypto ikev2 policy Azure-Ikev2-Policy
  proposal Azure-Ikev2-Proposal
  match address local 173.39.125.130
  exit
! 
crypto ikev2 keyring singaporeisr-keyring
  peer 52.152.235.192
    address 52.152.235.192
    pre-shared-key 0123456789cisco
    exit
  exit

crypto ikev2 profile Azure-Ikev2-Profile
  match address local 173.39.125.130
  match identity remote address 52.152.235.192 255.255.255.255
  authentication remote pre-share
  authentication local pre-share
  lifetime 28800       
  dpd 10 5 on-demand
  keyring local singaporeisr-keyring
  exit
!
crypto ipsec transform-set Azure-TransformSet esp-aes 256 esp-sha256-hmac
  mode tunnel
  exit
!
crypto ipsec profile Azure-IPsecProfile
  set transform-set Azure-TransformSet
  set ikev2-profile Azure-Ikev2-Profile
  set security-association lifetime seconds 3600
  ! Note: PFS (perfect-forward-secrecy) is an optional feature (commented out)
  !set pfs None
  exit
!
int tunnel 11
  ip address 169.254.0.1 255.255.255.255
  tunnel mode ipsec ipv4
  ip tcp adjust-mss 1350
  tunnel source 173.39.125.130
  tunnel destination 52.152.235.192
  tunnel protection ipsec profile Azure-IPsecProfile
  exit

interface Loopback 11
  ip address 196.254.0.8 255.255.255.255
  exit
!
router bgp 65150
  bgp log-neighbor-changes
  neighbor 10.80.1.30 remote-as 65515
  neighbor 10.80.1.30 ebgp-multihop 255
  neighbor 10.80.1.30 update-source loopback 11

  address-family ipv4
    network 192.168.0.0 mask 255.255.0.0 
    neighbor 10.80.1.30 activate    
    exit
  exit
!
ip route 10.80.0.0 255.255.255.128 Tunnel 11
ip route 10.80.0.128 255.255.255.128 Tunnel 11
ip route 10.80.1.0 255.255.255.128 Tunnel 11
ip route 10.80.1.30 255.255.255.255 Tunnel 11
Step 12

Verify the VPN connections.

  1. In the Azure portal, navigate to the virtual network gateway page and locate the Azure virtual network gateway that you created in Step 5.

  2. Select the virtual network gateway that you created and click on Settings: Connections.

  3. Verify that the VPN connection that you created is shown as Connected in the Status column.

Step 13

Determine if you are deploying the virtual network gateway with or without redirect.

  • If you are deploying the virtual network gateway without redirect, go to Step 14.

  • If you deploying the virtual network gateway with redirect, configure the service device for the redirect.

    To configure a service device for redirect using the GUI or REST API, see Deploying Layer 4 to Layer 7 Services.

Step 14

Configure a contract between the cloud EPG and the external EPG connected by the virtual network gateway.