Introduction
This document describes how SocialMiner can emit IM Notificiations with the use of the XMPP (Extensible Messaging and Presence Protocol) to any server which can process these Notifications. This guide walks us through the configuration that is used for the creation of the IM Notifications to a Jabber Client with the help of the CUPS (Cisco Unified Presence Server).
Prerequisites
Requirements
Cisco recommends that you have knowledge of these topics:
- Contact Center Express (UCCX) knowledge and a system integrated with Cisco SocialMiner for WebChat with Finesse
- Integration of Cisco Unified Communications Manager (CUCM) with Cisco Unified Presence (CUPS) for the presence and IM (Instant Messaging) of Jabber Clients
Components Used
The information in this document is based on these software and hardware versions:
- Cisco Unified Contact Center Express (11.0 or higher)
- Cisco SocialMiner (11.5 or higher)
- Cisco Unified Presence Server (11.0 or higher)
- Jabber Client (11.0 or higher)
- Cisco Unified Communications Manager (11.0 or higher)
The information in this document was created from the devices in a specific lab environment. All of the devices used in this document started with a cleared (default) configuration. If your network is live, make sure that you understand the potential impact of any command.
Background Information
Many of the Unified Communications (UC) deployments have Presence server in the environment to connect via Jabber. A Jabber user may also be an administrator of the company who need not be a part of the Contact Center environment and would like to receive notifications when a Chat Contact arrives into the Contact Center. This would be a Custom Notification sent via SocialMiner to the corresponding Jabber User.
Note: Although this is not a completely tested solution from Cisco, the configuration helps to create the Notifications for the Jabber clients. However, this document does not take custom configurations that could potentially stop the feature to work from the Presence side into consideration.
Note: The versions listed in the above section are the ones in which the configuration worked successfully. This feature may or may not work in the previous/later releases on each of the corresponding product. Also SocialMiner 11.5 along with other UC products such as CCX would be available tentatively by July 2016.
Configure
The configuration of Agent based WebChat with Finesse remains the same. This configuration is valid only if UCCX based WebChat with Finesse is working with Cisco SocialMiner.
Procedure to configure IM Notifications with Presence server:
1. Install and deploy Cisco Unified Presence Server in your environment. Starting 10.x and later, the Presence Server is added as a System Node in the Call Manager Configuration page, as shown in the image.

2. After the blue screen installation of Presence Server, ensure that all of the required Services on Presence is started and activated, as shown in the image.

As shown in the image, ensure that the Network Services has the XCP Router Service is up and running:

3. Ensure that there are users synched to CUPS from Call Manager, as shown in the image.

For a user to be successfully synched to Presence, we need to have the following settings on Call Manager.
Note: These screenshots show the configuration for one of the users, the other user is exactly the same.
End User page ensures that the user is selected for IM and Presence. Also the user must be associated with the CSF Device, as shown in the image.

The End User also needs to have the following groups and roles:

The corresponding UC Service Profile and the UC Service are created from User Management - User Settings section.


4. Log in to Jabber via the jabberuser account. Note that the configuration above also shows a second user called socialjabber which has the exact same configuration. However, there is no need to login to Jabber with this user because the SocialMiner needs a user for authentication who will send IM Notifications to all the other users on behalf of this user.
5. Log in to SocialMiner Administration page:
Step 1. Configure the XMPP server in SocialMiner.

The Username used here is the user on behalf of which SocialMiner will authenticate, establish a XMPP connection and send out the messages. This may be a bot account that we might provision on the IM/Presence server or any normal individual account.
Also ensure that the DNS resolution to that XMPP server happens fine from SocialMiner and that the host with port is reachable from SocialMiner.
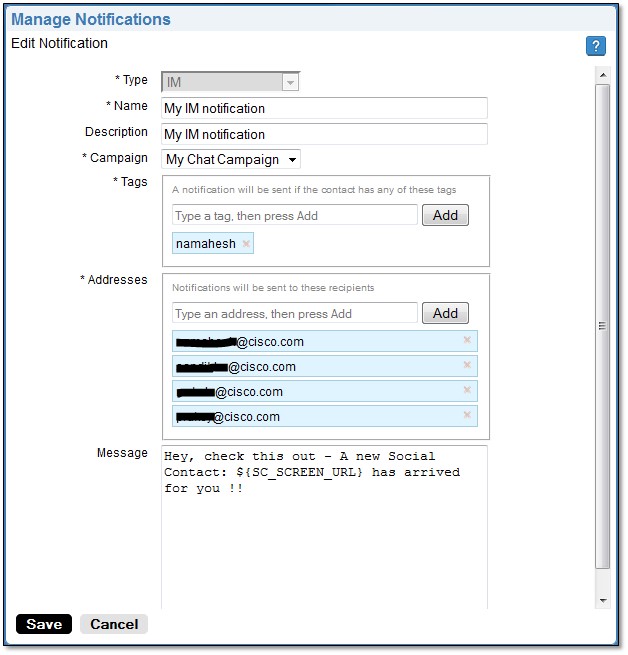
Step 2. Create an IM Notification in SocialMiner.

- Choose the CCX Chat Campaign in the Campaign field (the screenshot says My Chat Campaign as it was taken for a standalone Chat session with SocialMiner so this needs to change to CCX Chat Campaign)
- In the tags, add the same tags that the CCX Chat Feed has, so chat contacts which matches those tags will be picked up and sent
- Provide a list of addresses to whom you want to send the IM messages every time a chat contact comes through
- In the message, you can provide any kind of message. Use the in-built variable ${SC_SCREEN_URL} which will provide a link to this chat contact
Steps 3. Inject a chat request and test it
- Inject a chat request into the chat feed.
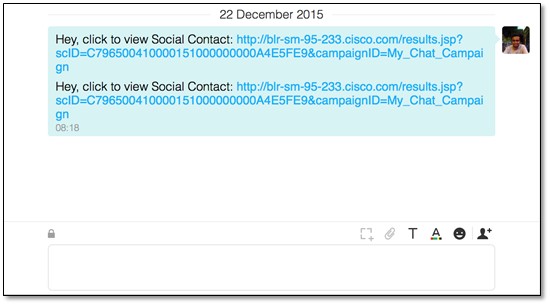
- If it all goes well, addresses listed in the IM notification created in Step 2 should get a ping with the chat contact information, as shown in the image.

- Also, you can validate everything in SocialMiner by checking the notification status and XMPP connection status, both of which should be green with a tick-mark.

Verify
There is currently no verification procedure available for this configuration.
Troubleshoot
This section provides information you can use in order to troubleshoot your configuration,
These logs on Cisco SocialMiner should help in identifying any issue with the above configuration:
- Cisco SocialMiner Runtime Service
- Cisco SocialMiner XMPP Server
