Cisco CMX Commands

Using the Command-Line Interface

Starting from Cisco CMX 10.3.1, you can use the Tab key to auto complete any Cisco CMX command on the command line interface. If you enter cmxos and then click the Tab key, the CLI displays the available keywords. If you enter a partial string and then click the Tab key, the CLI then displays the complete string.

cassandraexport

To export Cisco CMX history data from Cassandra to a CSV file, use the cassandraexport command.

cassandraexport { --date <yyyy/mm/dd> } [ --table <tablename> | --file <filename> | --sql <sql statement> | --rowsperfetch <rows per fetch> ]

Syntax Description

--date <yyyy/mm/dd>

Date on which the export is to be performed. This is required.

--table <table name>

(Optional) Name of the table to export.

--file <filename>

(Optional) Name of the CSV file. The default is /tmp/CassandraExport_sql.csv.

--sql <sql statement>

This option is not currently supported.

--rowsperfetch <rows per fetch>

(Optional) The default is 1000 rows.

Command Default

None.

Command Modes

cmxadmin (non-root) user

Command History

Release Modification

Cisco CMX Release 10.3.0

This command was introduced.

Usage Guidelines

This command extracts a maximum of only one day of data, starting from midnight of the date given to the time when the command is issued.

You can use these methods to export Cisco CMX data from Cassandra:
  • The method that we most recommend is through the Notifications feature (Manage > Notifications> New Notification). For more information, see the “Managing Notifications from Applications” section in the Cisco Connected Mobile Experiences Configuration Guide for this release at: http://www.cisco.com/c/en/us/support/wireless/mobility-services-engine/products-installation-and-configuration-guides-list.html

  • An alternative method is to use the cassandraexport command, and to export daily. We recommend that you schedule the export during a quiet period of the day, for example 2:00 A.M. If you use this method during a time when the system is continuously changing, a timeout can occur.

  • Use the Cisco CMX History API only if your export does not exceed 2000 records, for example 100 floors.

Examples

The following example shows how to export Cisco CMX data from Cassandra to a CSV file:

[cmxadmin]$ /opt/cmx/bin/cassandraexport --date 2017/06/14

Data exported into the file /tmp/CassandraExport_201706150220-02.csv

cmxctl checkdb

To check the database for schema integrity, use the cmxctl checkdb command.

cmxctl checkdb { cassandra | postgres }

Syntax Description

cassandra

Checks the cassandra schema.

postgres

Checks the postgres schema.

Command Default

None.

Command History

Release Modification

Cisco CMX Release 10.3

This command was introduced.

Examples

The following example shows how to the schemen integrity for cassandra and postgres database:

[root@server]# cmxctl checkdb cassandra

Schema passed analytics
Schema passed loc
Schema passed mse
Cassandra passed schema validation

[root@server]# cmxctl checkdb postgres
Schema passed analytics
Schema passed loc
Schema passed mse
Postgres passed schema validation

cmxctl checklogs

To check logs and generate a report, use the cmxctl checklogs command.

cmxctl checklogs

Command Default

None

Usage Guidelines

After a report is generated, the specific log that shows the error can be viewed for additional details. For example, /opt/cmx.var.log.cmxjobs.log.3 has 108 errors, use the command more /opt/cmx.var.log.cmxjobs.log.3 to view the corresponding file.

Examples

The following example shows how to check logs and generate a report:

[root@server]# cmxctl checklogs

************************************************************************
Checking /opt/cmx/var/log/cmxjobs.log.3 for errors..
/opt/cmx/var/log/cmxjobs.log.3 has 108 errors
**********************************************************************
Checking /opt/cmx/var/log/system-cron.log for errors..
/opt/cmx/var/log/system-cron.log has 0 errors
************************************************************************
Checking /opt/cmx/var/log/cmxjobs.log for errors..
/opt/cmx/var/log/cmxjobs.log has 81 errors
************************************************************************
Checking /opt/cmx/var/log/collectd.log for errors..
/opt/cmx/var/log/collectd.log has 0 errors
***********************************************************************
Checking /opt/cmx/var/log/consul.log for errors..
/opt/cmx/var/log/consul.log has 0 errors
************************************************************************
Checking /opt/cmx/var/log/qless-py-worker.log for errors..
/opt/cmx/var/log/qless-py-worker.log has 0 errors
************************************************************************
Checking /opt/cmx/var/log/influxdb.log for errors..
/opt/cmx/var/log/influxdb.log has 0 errors
************************************************************************
Checking /opt/cmx/var/log/cmxjobs.log.4 for errors..
/opt/cmx/var/log/cmxjobs.log.4 has 108 errors
***********************************************************************

cmxctl config aps delete

To delete an access point from Cisco CMX, use the cmxctl config aps delete command.

cmxctl config aps delete MAC Address

Syntax Description

MAC Address

Displays the MAC address of the access point.

Command Default

None.

Command Modes

Admin root user

Command History

Release Modification
Cisco CMX Release 10.4

This command was introduced.

Usage Guidelines

This command should be run at the cmxadmin level.

cmxctl config audit

To enable and manage the remote logging of system events (syslogs), use the cmxctl config audit settings command. To view logged files, use the cmxctl config audit view command.

cmxctl config audit { status |  settings  |  view }

Syntax Description

status

Displays whether audit logging is running on CMX, or is disabled. For example, Remote Audit Logging = Disabled .

settings

Enables, disables and configures audit log settings. See Usage Guidelines for information.

view

Displays all or specific log files. See Usage Guidelines for information.

Command Default

By default, remote system logging is disabled.

Command Modes

Admin root user

Command History

Release Modification

Cisco CMX Release 10.5.0

This command was introduced.

Usage Guidelines

  • The command cmxctl config audit settings prompts you to enter the following configuration questions. If you enter no value, CMX selects the default value, shown in [brackets].


    Note

    To enable remote audit logging, enter a remote syslog IP address, port number and domain name. Otherwise, only local audit logging is enabled.

    [root@server]# cmxctl config audit settings

    Enable or Disable Remote Syslogging [Enable / Disable] [Enable]:
    If logs size goes beyond lgb, drop or overwrite messages? [drop / overwrite] [overwrite]:
    Please enter rsyslog IP:
    Please enter rsyslog port [514]:
    Please enter rsyslog DNS name: yoursyslogserver.yourco.com
     

    Follow the prompts to select what events you would like logged:

    Please select the events to be logged
    All Events [yes/no] [yes]: 
     

    If you enter yes, all events are logged. If no, answer the following prompts:

    Enter day [today(1)/yesterday(2)/last week(3)/last month(4)/all(5)] [5]:
    Enter event type [MGMT_EVENT(1)/CONN_EVENT(2)/AUTH_EVENT(3)/CONF_EVENT(4)/ALL(5) [5]:
    Enter identity [root(1)/admin(2)/all(3)] [3]:
    Enter status [success(1)/failure(2)/all(3) [3]:
     
  • The command cmxctl config audit view prompts you to enter which types of logs you want to view.

    Show all logs [yes/no] [yes]:
     

    If you enter If you enter yes , all logged events are displayed. If no , answer the following prompts, or Enter to accept the default vaule.

    Enter day [today(1)/yesterday(2)/last week(3)/last month(4)/all(5)] [5]:
    Enter event type [MGMT_EVENT(1)/CONN_EVENT(2)/AUTH_EVENT(3)/CONF_EVENT(4)/ALL(5) [5]:
    Enter identity [root(1)/admin(2)/all(3)] [3]:
    Enter status [success(1)/failure(2)/all(3) [3]:
     

Examples

The following example shows how to enable remote system logging of all events:

[root@server]# cmxctl config audit settings

Enable or Disable Remote Syslogging [Enable / Disable] [Enable]:
If logs size goes beyond lgb, drop or overwrite messages? [drop / overwrite] [overwrite]:
Please enter rsyslog IP: 168.172.1.20
Please enter rsyslog port [514]: 514
Please enter rsyslog DNS name: sls1296@wowco.com
Remote Audit Logging = Enabled
Please select the events to be logged
All Events [yes/no] [yes]: yes
Settings saved
Restarting rsyslog service 
Shutting down system logger: [OK] 
Starting system logger: [OK]
 

The following example shows how to display all admin-level success status logs for the current day.

[root@server]# cmxctl config audit view

Show all logs [yes/no] [yes]: no
Enter day [today(1)/yesterday(2)/last week(3)/last month(4)/all(5)] [5]: 1
Enter event type [MGMT_EVENT(1)/CONN_EVENT(2)/AUTH_EVENT(3)/CONF_EVENT(4)/ALL(5) [5]: 5
Enter identity [root(1)/admin(2)/all(3)] [3]: 2
Enter status [success(1)/failure(2)/all(3) [3]: 1

CMX displays the selected logs.

cmxctl config auth

To set strong CMX authentication requirements for passwords, logging in, and session timeout, use the cmxctl config auth settings command. To view these authentication settings, use the cmxctl config auth show command.

cmxctl config auth { settings |  show }

Syntax Description

settings

Configures CMX authentication settings.

show

Displays CMX authentication settings.

Command Default

By default, strong authentication is not enabled.

Command Modes

Admin root user

Command History

Release Modification

Cisco CMX Release 10.5.0

This command was introduced.

Usage Guidelines

The command cmxctl config auth prompts you to set the following values:

Enable strong password: yes/no
Minimum password length: 8-20 characters
Unsuccessful login attempts before account lock: 3-5 attempts
Set session timeout in minutes: 10-60 minutes

Examples

The following example shows how to display security parameters for CMX:

[root@server]# cmxctl config auth show

Enable strong password : yes
Minimum password length : 10
Unsuccessful login attempts before account lock : 3
Session timeout in minutes : 20

cmxctl config authinfo get

To view the the SHA1 (keyHash) and SHA2(sha2KeyHash) strings, use the cmxctl config authinfo get command.

cmxctl config authinfo get

Command Modes

Admin root user

Command History

Release Modification

Cisco CMX Release 10.4

This command was introduced.

Usage Guidelines

This command gets the authorization information for NMSP connections to the controllers.

Examples

The following example shows how to get the authorization information:

[cmxadmin@cmx-nortech ~]$ cmxctl config authinfo get
+-------------------+------------------------------------------+------------------------------------------------------------------+
| macAddress        | keyHashString                            | sha2KeyHashString                                                |
+-------------------+------------------------------------------+------------------------------------------------------------------+
| 00:0c:29:07:36:84 | e743ac54029ce36282c582f04bfb45ec187c824d | 560d69882adb90dda10227651da0c6a2850999620b50f83ed0d157fb87d1a920 |
+-------------------+------------------------------------------+------------------------------------------------------------------+

cmxctl config banner

To create and manage a banner that displays when users log into CMX, use the cmxctl config banner command.

cmxctl config banner { edit |  show }

Syntax Description

edit

Edit the login banner text.

show

Display the login banner.

Command Default

By default, CMX has no login banner.

Command Modes

Admin root user

Command History

Release Modification

Cisco CMX Release 10.5.0

This command was introduced.

Usage Guidelines

None

Examples

The following example shows how to create the login banner “CentOS release 7.0.”

hostname# cmxctl config banner edit

Current Login Banner = []
Enter text to be displayed as login banner. Enter a single period on a line to terminate.
CentOS release 7.0
.
Stopping sshd:                                             [  OK  ]
Starting sshd:                                             [  OK  ]
 
When you log into the CLI, you would see something like this:

login as: cmxadmin
CentOS release 7.0
cmxadmin@168.172.1.20’s password:
Last login: 6/5/2018 1:10 PM

When you log into CMX from a browser, the banner message appears in a pop-up window on the login page.

cmxctl config certs

To create, import, or manage security key certificates, use the cmxctl config certs command.

cmxctl config certs { clear  |  creatcsr  |  importcacert filename.pem |  importcrl filename.pem |  importcrlurl URL |  importservercert filename.pem  |  installnewcerts  |  keytype { RSA  |  ECDSA } |  show }

Syntax Description

clear

Clears certificate files in the /opt/cmx/srv/certs directory.

createcsr

Creates a new public and private keypair, and generates a corresponding Certificate Signing Request (CSR).

importcacert filename.pem

Imports a Certificate of Authority (CA) Privacy Enhanced Mail (pem) file.

importcrl filename.pem

Imports a Certificate Revocation List (CRL) pem file.

importcrlurl URL

Imports the URL of the CRL online, to keep the CRL current.

importservercert filename.pem

Imports the signed certificate and private key for the CMX server, concatenated into a single pem file.

installnewcerts

Generates new self-signed certificates.

keytype

Selects your encryption algorithm key type.

  • RSA — Install the Rivest–Shamir–Adleman (RSA) encryption algorithm.

  • ECDSA — Install the Elliptic Curve Digital Signature Algorithm (ECDSA).

show

Displays certificate details.

Command Default

By default, authentication certificates are not created, imported, or validated.

Command Modes

Admin root user

Command History

Release Modification

Cisco CMX Release 10.5.0

This command was introduced.

Usage Guidelines


Note

Certificates and keys are stored in the /opt/cmx/srv/certs folder.

Cisco recommends following this deployment order for cmxctl config certs commands.

  1. cmxctl config certs clear — Optional, but recommended. Clears any certificates from the /opt/cmx/srv/certs directory.

  2. cmxctl config certs keytype — Selects your key type: RSA (the default) or ECDSA.

  3. cmxctl config certs installnewcerts — Generates new self-signed certificates in the /opt/cmx/srv/certs directory.

  4. cmxctl config certs createcsr — Creates a Certificate Signing Request (CSR).

    • Private key — /opt/cmx/srv/certs/cmxserverkey.pem

    • CSR — /opt/cmx/srv/certs/cmxservercsr.pem

  5. Send the CSR to an external CA, to obtain a signed certificate for the CMX server.

  6. cmxctl config certs importcacert — Installs the CA certifications. At the prompt, provide an export and import password specific to this command.

  7. cmxctl config certs importservercert — Installs the CA-signed server certificate and the private key as a concatenated pem file. At the prompt, provide an export and import password specific to this command.

Examples

The following example shows how to clear out old certificates from the /opt/cmx/srv/certs directory.

[root@server]# cmxctl config certs clear

Clear Certificates
 

The following example shows how to select key type ECDSA:

[root@server]# cmxctl config certs keytype

Please enter key type [RSA / ECDSA] [RSA]:ECDSA
Keytype is set to ECDSA.
 

The following example shows how to generate new self-signed certification files in the /opt/cmx/srv/certs directory using an RSA key:

[root@server]# cmxctl config certs installnewcerts

Keytype is RSA, generating RSA key with length  4096
Generating RSA private key, 4096 bit long modulus
.......................
...............................
e is 65537 (0x10001)
Generating RSA private key, 4096 bit long modulus
..............................................
..........................
e is 65537 (0x10001)
Signature ok
subject=/C=US/ST=CA/L=San Jose/O=MSE/CN=ServerCrt
Getting CA Private Key
Certificates are valid.
 

The following example shows how to create a new certificate signing request (CSR):

[root@server]# cmxctl config certs createcsr

Keytype is RSA, so generating RSA key with length  4096
Generating RSA private key, 4096 bit long modulus
...........
........
e is 65537 (0x10001)
You are about to be asked to enter information that will be incorporated
into your certificate request.
What you are about to enter is what is called a Distinguished Name or a DN.
There are quite a few fields but you can leave some blank
For some fields there will be a default value,
If you enter '.', the field will be left blank.
-----
Country Name (2 letter code) [AU]: US
State or Province Name (full name) [Some-State]: CA
Locality Name (eg, city) []: San Jose
Organization Name (eg, company) [Internet Widgits Pty Ltd]: Yourco, Inc.
Organizational Unit Name (eg, section) []: Gulag 10
Common Name (e.g. server FQDN or YOUR name) []: Wireless
Email Address []:email@yourco.com

Please enter the following 'extra' attributes
to be sent with your certificate request
A challenge password []:
An optional company name []:
The CSR is in: /opt/cmx/srv/certs
The Private key is in: /opt/cmx/srv/certs

CSR created successfully.
 

Sometimes two or more files need to be combined (or concatenated) before you can import the resulting file. For example, you may have intermediate CA certificates as well as root certs. This example shows how to concatenate the files root-ca-cert.pem and intermediate-ca-cert.pem, and import the resulting file to CMX.

  1. Concatenate the files:

    [root@server]# cat root-ca-cert.pem intermediate-ca-cert.pem > ca-chain.pem

  2. Import the new file ca-chain.pem :

    [root@server]# cmxctl config certs importcacerts ca-chain.pem

    Importing CA certificate.....
    Enter Export Password: caexportpw
    Verifying - Enter Export Password: caexportpw
    Enter Import Password: caimportpw
    Import CA Certificate successful
    0
     

The importservercert command requires you to combine the server key and the server certificate into one pem file. The following example shows how to combine the files and import the resulting file.


Note

Import CA chain certificates before importing the server certificate.
  1. Concatenate the files:

    [root@server]# cat cmxserverkey.pem signed-cert.pem > server-key-cert.pem

  2. Import the new file server-key-cert.pem :

    [root@server]# cmxctl config certs importservercerts server-key-cert.pem

    Importing Server certificate.....
    
    Successfully transferred the file
     

    At the prompts, provide an export and import password specific to this command.

    
    Enter Export Password: svrexportpw
    Verifying - Enter Export Password: svrexportpw
    Enter Import Password: svrimportpw
    Private key present in the file: /home/cmxadmin/server-key-cert.pem
    Enter Import Password: svrimportpw
    verifying SAN
    Validation is Successful
    Import Server Certificate successful
    No CRL found
    Restart CMX services for the changes to take effect.
    0
     

The following example shows how to display the details of the server certificate and all CA chain certificates:

[root@server]# cmxctl config certs show

Certificate details

*************************  Certificate Listing  ********************
====================================================================
***********************  CA Certificate(s)  ************************
====================================================================
Certificate:
    Data:
        Version: 3 (0x2)
        Serial Number:
            b6:c0:fc:05:f6:27:45:1a
    Signature Algorithm: sha256WithRSAEncryption
        Issuer: C=US, ST=CA, L=San Jose, O=MSE, CN=RootCA
        Validity
            Not Before: Jan 19 05:17:33 2018 GMT
            Not After : Jan 18 05:17:33 2021 GMT
        Subject: C=US, ST=CA, L=San Jose, O=MSE, CN=RootCA
        Subject Public Key Info:
            Public Key Algorithm: rsaEncryption
                Public-Key: (4096 bit)
                Modulus:
                    00:ba:f2:2b:cd:87:90:23:f0:64:f5:83:d5:f2:90:
                    43:1a:16:36:c9:67:1a:82:f1:8f:6b:eb:1c:47:f1:
                    c4:fd:bf:55:98:ab:06:c0:90:dc:d7:13:1f:d3:2f:
                    12:e8:f2:74:66:65:7c:49:12:72:0c:27:9c:2e:84:
                    7e:29:a8:b6:18:62:5f:c2:97:a4:1c:e7:45:a2:cb:
                    f3:35:f3:64:15:e5:f0:27:6f:f1:07:61:41:9b:4c:
                    96:b3:56:d4:28:a4:85:90:86:52:4c:04:bc:da:38:
                    cc:f8:05:5b:3e:5c:03:b4:59:ec:8b:c9:5d:eb:61:
                    76:ba:20:3f:64:6c:25:5d:50:1e:85:37:ad:09:b2:
                    4a:fa:58:15:89:91:d9:5f:b8:9d:dd:64:31:8b:a4:
                    df:99:ff:ae:72:19:f8:a3:93:81:b9:4e:07:74:74:
                    95:b6:42:7b:5a:7d:38:92:4a:f4:86:5a:54:66:f0:
                    c1:fe:38:31:df:24:1c:40:94:36:67:8b:b3:56:93:
                    62:26:29:c2:cd:7f:7d:66:9d:f1:78:54:88:4f:6c:
                    b3:b7:80:54:05:03:09:c9:f9:14:65:8a:21:00:b5:
 

cmxctl config connect

To manage Cisco CMX Connect service data, use the cmxctl config connect command.

cmxctl config connect deleteClientAll

Syntax Description

deleteClientAll

Deletes all the client data.

Command Default

None.

Command Modes

Admin root usert

Command History

Release Modification

Cisco CMX Release 10.5

This command was introduced.

Examples

The following example shows how to delete all CMX connect clients:

[root@server]# cmxctl config connect deleteClientsAll 
Successfully Deleted Connect Data, deleted 1 clients

cmxctl config controllers

To manage Cisco Wireless Controllers (Cisco WLC), use the cmxctl config controllers command.

cmxctl config controllers { activeaps  | add  | delete  | floors wlc-ip-address  | import  | missingaps  | show }

Syntax Description

activeaps

Displays active access points.

add

Adds a Cisco WLC.

delete

Deletes a Cisco WLC.

floors wlc-ip-address

Displays floors managed by Cisco WLCs.

import Imports a Cisco WLC from Cisco Prime Infrastructure by providing the corresponding credentials, or by placing an exported Cisco Prime Infrastructure MAP file in the /opt directory of the Cisco CMX server and providing the path to the exported MAP file.
missingaps

Lists the access points from which Cisco CMX has received data, but the access points are not yet placed on a map.

show

Displays information pertaining to a Cisco WLC.

Command Default

None.

Command History

Release Modification

Cisco CMX Release 10.3.1

The missingaps and floors keywords were added.

Cisco CMX Release 10.3.0

This command was introduced.

Usage Guidelines

The message "controller added successfully" after a Cisco WLC is added, refers only to the correct parsing of the command. You should issue a cmxctl controllers show command to ensure that the Cisco WLC is not active.

The missingaps keyword uses SNMP to retrieve the AP's MAC addresses from the access point’s configuration cache every six hours. If the AP MAC address is not present, it will be displayed as NA on the CLI.

In addition, the AP MAC address will be displayed only if you have enabled the configuration.apimport feature flag by using the cmxctl config featureflags configuration.apimport: true command. For example:

[root@server]# cmxctl config featureflags configuration.apimport true

+---------------------------------+-------+
| location.compactlocationhistory | false |
+---------------------------------+-------+
| configuration.apimport          | true  |


The AP MAC address import occurs every 6 hours, so for new APs added to the controller, the AP MAC value for missingap will be available only after the next job run.

Examples

Starting from Cisco CMX Release 10.3.1, you can specify SNMP settings when you use the cmxctl config controllers add command. For example:

[root@server]# cmxctl config controllers add
Please enter controller type [WLC / NGWC] [WLC]: WLC
Please enter controller ip: 0.0.0.0
Please enter the controller version [Optional]:
Please enter controller SNMP version [v1 / v2c / v3] [v2c]: v2c
Please enter controller SNMP write community [private]:
....................................................................
Controller Added 0.0.0.0

The following example shows how to display the Cisco WLC information:

[root@server]# cmxctl config controllers show

+--------------+------+------------+----------------+------+--------+
| IP Address | Type | Version | Device Version | SHA2 | Status |
+--------------+------+------------+----------------+------+--------+
| 30.30.30.65 | WLC | 8.0.72.141 | - | No | ACTIVE |
+--------------+------+------------+----------------+------+--------+
| 30.30.30.44 | WLC | 8.0.72.141 | - | No | ACTIVE |
+--------------+------+------------+----------------+------+--------+
| 30.30.30.46 | WLC | 8.0.72.141 | - | No | ACTIVE |
+--------------+------+------------+----------------+------+--------+
| 30.30.30.70 | WLC | 8.0.72.141 | - | No | ACTIVE |
+--------------+------+------------+----------------+------+--------+
| 30.30.30.93 | WLC | 8.0.72.141 | - | No | ACTIVE |
+--------------+------+------------+----------------+------+--------+
| 30.30.30.97 | WLC | 8.0.72.141 | - | No | ACTIVE |
+--------------+------+------------+----------------+------+--------+
| 30.30.30.35 | WLC | 8.0.72.141 | - | No | ACTIVE |
+--------------+------+------------+----------------+------+--------+
| 30.30.30.58 | WLC | 8.0.72.141 | - | No | ACTIVE |
+--------------+------+------------+----------------+------+--------+
| 30.30.30.82 | WLC | 8.0.72.141 | - | No | ACTIVE |
+--------------+------+------------+----------------+------+--------+
| 30.30.30.84 | WLC | 8.0.72.141 | - | No | ACTIVE |
+--------------+------+------------+----------------+------+--------+
| 30.30.30.53 | WLC | 8.0.72.141 | - | No | ACTIVE |
+--------------+------+------------+----------------+------+--------+

cmxctl config data

To manage history data, use the cmxctl config data command.

cmxctl config data deleteAll

Syntax Description

deleteALL

Deletes all client history and analytics raw data.

Command Default

None.

Command Modes

Admin root user

Command History

Release Modification

Cisco CMX Release 10.5

This command was introduced.

Examples

This example shows how to delete client history and raw analytics data.

[root@server]# cmxctl config data deleteAll
Do you wish to continue? All client history data, analytics data will be deleted and CMX services will be restarted. [y/N]: y
Stopping all the services
All the Application services are stopped
Data Deletion Began
Deleting All Analytics Raw Visits Data
Deleting All Clients History Data
Starting all the services
All the Application services are restarted

cmxctl config featureflags

To list and toggle feature flags, use the cmxctl config featureflags command.

cmxctl config featureflags { feature name } { true | false }

Syntax Description

service.featurename

Name of the Cisco CMX service and feature.

  • analytics.areatransition

  • configuration.apimport:

  • monit

  • container.influxdbreporter

  • halo

  • analytics.queuetime

true

Enables the feature of the service.

false

Disables the feature of the service

Command Default

None

Command History

Release Modification

Cisco CMX Release 10.2.2

This command was changed. The display default for analytics.sma was changed to false.

Cisco CMX Release 10.2.0

This command was introduced.

Examples

The following example shows how to list the feature flags:

[root@server]# cmxctl config featureflags
+---------------------------------+-------+
| location.compactlocationhistory | true  |
+---------------------------------+-------+
| configuration.apimport          | true  |
+---------------------------------+-------+
| location.rogueapclienthistory   | true  |
+---------------------------------+-------+
| monit                           | true  |
+---------------------------------+-------+
| container.influxdbreporter      | true  |
+---------------------------------+-------+
| configuration.highendbypass     | false |
+---------------------------------+-------+
| apiserver.enabled               | true  |
+---------------------------------+-------+
| analytics.queuetime             | false |
+---------------------------------+-------+

cmxctl config gateway

To change the gaetway configuration for cloud beacon management, use the cmxctl config gateway command.

cmxctl config gateway { cmx_cloud_url | URL | show }

Syntax Description

cmx_cloud_url

Configure the cloud URL for Beacon Management.

URL

Enter the cloud URL for Beacon Management.

show

Displays the cloud URL configured for Beacon Management.

Command Default

None

Command Modes

Admin root user

Command History

Release Modification

Cisco CMX Release 10.5

This command was introduced.

Usage Guidelines

Examples

[root@server]#  cmxctl config gateway show

CMX_CLOUD_SERVER: demo.com

cmxctl config get

To display configuration information for Cisco CMX services, use the cmxctl config get command.

cmxctl config get  [ analytics |  cache_6378 |  cache_6379 |  cache_6380 |  cache_6381 |  cache_6382 |  cache_6383 |  cache_6385 |  cache_6378 |  cassandra  |  configuration  |  connect  |  database  |  haproxy  |  hyperlocation  |  location  |  matlabengine  |  metrics  |  nmsplb ]

Syntax Description

analytics

Performs analytics on calculated location data.

agent

Manages Cisco CMX system lifecycle. Starts, stops, and monitors all the services running in Cisco CMX.

cache_6378

Caches the service used by location service.

cache_6379

Caches the service used by location service.

cache_6380

Caches the service used by analytics service.

cache_6381

Caches the service used by analytics service.

cache_6382

Caches the service used by analytics service.

cache_6383

Caches the service used by analytics service.

cache_6385

Caches the service used by analytics service.

cassandra

Enables cassandra database service used by the location service for historical data.

configuration

Configures nodes and clusters.

connect

Enables connect services.

database

Enables the database service used by analytics and configuration service.

haproxy

Enables the TCP or HTTP load balancer gateway to all service APIs.

hyperlocation

Enables hyperlocation.

location

Enables location service to compute location.

matlabengine

Provides access point heatmap for location service.

metrics

Collects system metrics.

nmsplb

Enables the load balancer service used for distributing Network Mobility Services Protocol (NMSP) messages to location services.

Command Default

The default command cmxctl config get displays configuration information for all supported services when executed without options.

Command Modes

Admin root user

Command History

Release Modification

Cisco CMX Release 10.5

Additional services were documented.

Cisco CMX Release 10.3.0

This command was introduced.

Usage Guidelines

Examples

The following example shows how to display configuration information for the CMX analytics service.

[root@server]# cmxctl config get analytics

{
    "services": {
        "analytics": {
            "maxdirectmemory": "1536M",
            "maxnewsize": "400M",
            "mem": "1536M"
        }
    }
}

Optionally, you can filter the results by using one of the listed configuration keywords. For example:

[root@server]$ cmxctl config get cassandra
{
    "services": {
        "cassandra": {
            "keycachesize": "100",
            "maxnewsize": "800M",
            "mem": "4096M"
        }
    }
}
[root@server]$ cmxctl config get cassandra maxnewsize
{"maxnewsize": "800M"}

cmxctl config heatmaps summary

To show the details of the heapmap from the location service, use the cmxctl config heatmaps summary command.

cmxctl config heatmaps summary

Command Default

None.

Command Modes

Admin root user

Command History

Release Modification
Cisco CMX Release 10.4

This command was introduced.

Usage Guidelines

This command should be run at the cmxadmin level.

cmxctl config hyperlocation mixmode

To manage mixed mode for hyperlocation for a specified floor, use the cmxctl config hyperlocation mixmode command.

cmxctl config hyperlocation mixmode Floor ID { enable | disable }

Syntax Description

Floor ID

Provides the specific floor ID.

enable

Enables mixed mode support for hyperlocation for the specified floor.

disable

Disables mixed mode support for hyperlocation for the specified floor.

Command Default

None

Command Modes

Admin root user

Command History

Release Modification

Cisco CMX Release 10.4

This command was introduced.

Usage Guidelines

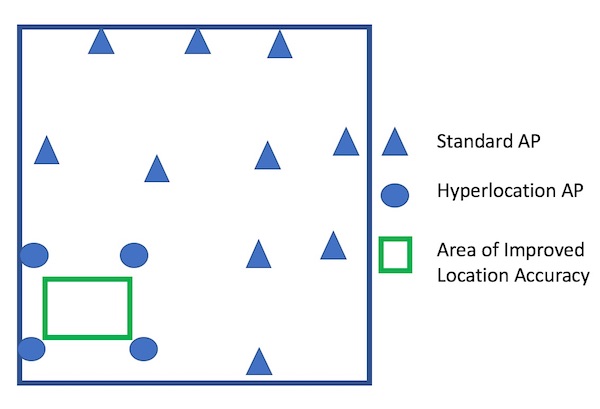
We recommened that you use this command in a scenario where on a single floor there are both Hyperlocation enabled AP and non Hyperlocation APs. The improved location accuracy that comes from the use of Hyperlocation AP will occur within the convex hull of the Hyperlocation APs. Outside of this convex, standard location accuracy results will occur. At the edges of the convex hull there may also be lower accuracy, when clients are at least 10M inside of the convex hull.

This command does not support the interspersion of Hyperlocation AP with non Hyperlocation AP. If this is type of deployment is used, then there will be no improvement in location over standard probe RSSI based location.

The following is an example of a supported deployment:

Figure 1. Supported Hyperlocation Mixed Mode Deployment

cmxctl config import

To import a map and Cisco Wireless Controller (Cisco WLC) from Cisco Prime Infrastructure, use the cmxctl config import command.

cmxctl config import { prime | status }

Syntax Description

prime

Imports maps from Cisco Prime Infrastructure.

status

Shows import status.

Command Default

None.

Examples

The following example shows how to import a map and Cisco WLC from Cisco Prime Infrastructure:

[root@server]# cmxctl config import prime

Please enter PI ip address: x.x.x.x
Please enter PI username [root]: root
Please enter PI password [Public123]:
Import successfully started from PI x.x.x.x. Check import status using cmxctl config
import status.

cmxctl config maps address

To set a directory path to an optional map address file, use the cmxctl config maps address command.

cmxctl config maps address --path filepath

Syntax Description

‑‑path filepath

Sets the directory path to an optional map address file. See Usage Guidelines for more information.

Command Default

None.

Command Modes

Admin root user

Usage Guidelines

Use the cmxctl config maps address command to access an optional map address file that you can associate with a map. This is not a necessary step for maps you create in CMX and PI, but you may have a map from another source that requires a valid address.


Note

The first entry in each line of the map address file should be the fully-qualified name and address in Campus>Building format. For example: My Campus>My Building, 123 Road St, San Jose CA 95137.

Command History

Release Modification

Cisco CMX Release 10.5

Additional keywords were documented.

Cisco CMX Release 10.3.0

This command was introduced.

Examples

The following example shows how to set the path to a map address file, which you can then associate with a map.

[root@server]# cmxctl config maps address --path /home/cmxadmin/campusPath.csv
cmxctl config maps address --path /home/cmxadmin/campusPath.csv
Now importing address for: North Campus>Building 9

Done importing addresses

cmxctl config maps aplist

To display a list of access points (APs) and their status for a specified floor, use the cmxctl config maps aplist command.

cmxctl config maps aplist  [ ‑‑active  |  ‑‑inactive ]  floorID

Syntax Description

‑‑active

Optional. Display only the active access points (APs) on the specified floor.

‑‑inactive

Optional. Display only the inactive access points (APs) on the specified floor.

floorID

The identifying number for the floor. Use the cmxctl config maps floors command to see the Floor ID.

Command Default

All access points display for the designated floor.

Command Modes

Admin root user

Usage Guidelines

To see all the APs on a floor, use the cmxctl config maps aplist command without additional arguments.

To get the Floor ID for a CMX floor map, use the cmxctl config maps floors command.

Command History

Release Modification

Cisco CMX Release 10.5

Additional keywords were documented.

Cisco CMX Release 10.3.0

This command was introduced.

Examples

The following example shows how to list all the APs on the Registration Floor of Bld-4.

First, use the cmxctl config maps floors command to get the Location Floor ID for the floor you want to view:

[root@server]# cmxctl config maps floors
+------------------------------------+--------------------+--------------------+
| Floor Name                         | Location Floor ID  | Analytics Floor ID |
+------------------------------------+--------------------+--------------------+
| North Campus>Bld-4>Registration    | 727035700041482593 | 35                 |
+------------------------------------+--------------------+--------------------+
Now run the cmxctl config maps aplist command, and paste in the Floor ID:
[root@server]# cmxctl config maps aplist 72703570082593
+---------------+-------------------+-------------------+----------------+----------+
| Name          | EthMacAddress     | RadioMacAddress   | FloorId        | Status   |
+---------------+-------------------+-------------------+----------------+----------+
| CMX-AP05-7069 | None              | 70:69:5a:51:48:40 | 72703570082593 | INACTIVE |
+---------------+-------------------+-------------------+----------------+----------+
| CMX-AP01-7070 | 40:01:7a:b2:c7:a2 | 70:70:8b:06:19:60 | 72703570082593 | ACTIVE   |
+---------------+-------------------+-------------------+----------------+----------+
| CMX-AP02-7071 | 40:01:7a:b2:c8:86 | 70:70:8b:06:1d:e0 | 72703570082593 | ACTIVE   |
+---------------+-------------------+-------------------+----------------+----------+
| CMX-AP06-7072 | 4c:77:6d:9e:61:9e | 70:69:5a:51:52:80 | 72703570082593 | ACTIVE   |
+---------------+-------------------+-------------------+----------------+----------+
| CMX-AP03-7073 | 40:01:7a:b2:c7:92 | 70:70:8b:06:19:20 | 72703570082593 | ACTIVE   |
+---------------+-------------------+-------------------+----------------+----------+
| CMX-AP04-7074 | 4c:77:6d:9e:61:04 | 70:69:5a:51:48:e0 | 72703570082593 | ACTIVE   |
+---------------+-------------------+-------------------+----------------+----------+

cmxctl config maps buildings

To see a list of buildings for a CMX Campus or for all buildings, use the cmxctl config maps buildings command.

cmxctl config maps buildings  [ --campus campusname  | --csv ]

Syntax Description

--campus

Optional. Restricts the list of buildings to a particular campus.

campusname

The name of the campus you would like to include.

--csv

Optional. Displays the results in comma-separated values (CSV) format, which can be cut and pasted into a spreadsheet.

Command Default

Running the command without arguments will display all buildings on all campuses.

Command Modes

CMX Admin

Command History

Release Modification

Cisco CMX Release 10.5

Additional keywords were documented.

Cisco CMX Release 10.3.0

This command was introduced.

Usage Guidelines

Command options must follow the last command keyword with a space and two dashes. For example: [root@server]# command keyword ‑‑option1 ‑‑option2.

When you select the option --csv , the map information you specify is displayed in comma-separated values (CSV) format, which can be cut and pasted into a spreadsheet.

Examples

The following example shows how to display a list of all buildings, in CSV format. The output format is Campus Name > Building Name , Location Building ID , Analytics Building ID .

[root@server]# cmxctl config maps buildings --csv
System Campus>TMT,749980497668473090,18
System Campus>LCN,727001546461545854,16
System Campus>PCH,769481534004431937,15
North Campus>Newtech Building,732849996352089441,13
 

The following example shows how to display a list of building maps for North Campus:

[root@server]# cmxctl config maps buildings --campus North Campus
+------------------------------+----------------------+-----------------------+
| Building Name                | Location Building ID | Analytics Building ID |
+------------------------------+----------------------+-----------------------+
| North Campus>Newtech 1       | 727001546461544629   | 48                    |
+------------------------------+----------------------+-----------------------+
| North Campus>Newtech 2       | 725930212039482938   | 49                    |
+------------------------------+----------------------+-----------------------+
 

cmxctl config maps campuses

To see a list of your CMX Campuses, use the cmxctl config maps campuses command.

cmxctl config maps campuses [--csv]

Syntax Description

‑‑csv

Optional. Displays the results in comma-separated values (CSV) format, which can be cut and pasted into a spreadsheet.

Command Default

Running the command without arguments will display all campuses in table format.

Command Modes

CMX Admin

Command History

Release Modification

Cisco CMX Release 10.5

Additional keywords were documented.

Cisco CMX Release 10.3.0

This command was introduced.

Usage Guidelines

Command options must follow the last command keyword with a space and two dashes. For example: [root@server]# command keyword ‑‑option1 ‑‑option2.

When you select the option --csv , the map information you specify is displayed in comma-separated values (CSV) format, which can be cut and pasted into a spreadsheet.

Examples

The following example shows how to display a list of campus maps:

[root@server]# cmxctl config maps campuses
+----------------+--------------------+---------------------+
| Campus Name    | Location Campus ID | Analytics Campus ID |
+----------------+--------------------+---------------------+
| North Campus   | 727001546461544473 | 14                  |
+----------------+--------------------+---------------------+
| South Campus   | 384920494820170003 | 15                  |
+----------------+--------------------+---------------------+
 

If you want the campus map to be displayed in CSV format, add the --csv flag:

[root@server]# cmxctl config maps campuses –-csv
North Campus,727001546461545275,14
South Campus,384920494820170003,15
 

cmxctl config maps delete

To delete a map, or all maps in your CMX network, use the cmxctl config maps delete command.

cmxctl config maps delete  [ --name mapname  | --all ]

Syntax Description

--name

Optional. Deletes a specific map.

mapname

The name of the map you want to delete.

--all

Optional. Deletes all CMX maps.

Command Default

The default for all delete options are not to confirm the delete.

Command Modes

CMX admin

Command History

Release Modification

Cisco CMX Release 10.5

Additional keywords were documented.

Cisco CMX Release 10.3.0

This command was introduced.

Usage Guidelines

For all cmxctl config maps delete command options, you are asked to confirm the deletion.

If you enter the cmxctl config maps delete command without optional flags, you are asked to provide the map heirarchy in campus-name>building-name>floor-name format.

Please enter the hierarchy to be deleted (campus-name>building-name>floor-name):

Examples

This example shows how to delete the Newtech 1 Security floor in North Campus:

[root@server]# cmxctl config maps delete
Please enter the hierarchy to be deleted (campus-name>building-name>floor-name):
North Campus>Newtech 1>Security
map deleted.

This example shows how to delete the map named NorthCampus.

[root@server]# cmxctl config maps delete --name NorthCampus
Confirm delete hierarchy: NorthCampus ? [y/N]: y
Map deleted.

cmxctl config maps floors

To list the floor maps in a selected campus, building, or all floors, use the cmxctl config maps floors command.

cmxctl config maps  floors  [ ‑‑campus mapname  ‑‑building mapname  --csv ]

Syntax Description

--campus

Optional. Restricts the list of floors to a particular campus.

mapname

The name of the campus you would like to include.

--building

Optional. Restricts the list of floors to a particular building.

mapname

The name of the building you would like to include.

--csv

Optional. Displays the results in comma-separated values (CSV) format, which can be cut and pasted into a spreadsheet.

Command Default

None.

Command Modes

Admin root user

Usage Guidelines

Command options must follow the last command keyword with a space and two dashes. For example: [root@server]# command keywords ‑‑option1 ‑‑option2.

When you select the option --csv , the map information you specify is displayed in comma-separated values (CSV) format, which can be cut and pasted into a spreadsheet.

Command History

Release Modification

Cisco CMX Release 10.5

Additional keywords were documented.

Cisco CMX Release 10.3.0

This command was introduced.

Examples

The following example shows how to display a list of floor maps for North Campus, building A9:

[root@server]# cmxctl config maps floors --campus North Campus ‑‑building A9

+----------------------------------+--------------------+--------------------+
| Floor Name                       | Location Floor ID  | Analytics Floor ID |
+----------------------------------+--------------------+--------------------+
| North Campus>A9>Main Floor       | 615446507270015464 | 16                 |
+----------------------------------+--------------------+--------------------+
| North Campus>A9>Lab Floor        | 727001546461544650 | 17                 |
+----------------------------------+--------------------+--------------------+
| North Campus>A9>Offices Floor    | 615447265700154640 | 18                 |
+----------------------------------+--------------------+--------------------+
 

cmxctl config maps import

To import CMX location maps, use the cmxctl config maps import command.

cmxctl config maps import   ‑‑type  { PI  |  FILE }  ‑‑path importpath   ‑‑override  { yes  |  no }  ‑‑importzones  { yes  |  no }

Syntax Description

‑‑type  {PI |  FILE }

Identifies the source of the map you want to import.

  • PI —Imports a Cisco Prime Infrastructure map.

  • FILE —Imports a maps archive file.

 ‑‑path importpath

Designates the path to the map you want to import.

 ‑‑override  {yes | no }

Resolves how the import should handle duplicate map names:

  • yes —Overwrites any duplicate map names.

  • no —Does not overwrite duplicate map names. See Usage Guidelines for more information.

 ‑‑importzones {yes | no }

This option resolves how the import should handle duplicate zone names:

  • yes —Overwrites any duplicate zone names.

  • no —Does not overwrite duplicate zone names. See Usage Guidelines for more information.

Command Default

None.

Command Modes

Admin root user

Usage Guidelines

  • When CMX accepts your request to import a map from Cisco Prime Infrastructure, you are prompted to answer the following questions. The defaults are in [brackets].

    Please enter PI ip address: 
    Please enter PI username [root]: 
    Please enter PI password [Public123]: 
     
  • When the ‑‑override or ‑‑importzones options are set to yes, existing maps or zones with the same names will be overwritten by the import. If you select no, the import will fail if there are conflicting map or zone names. You will need to resolve the conflict by changing the name and importing it again.

  • Starting from Cisco CMX Release 10.3.1, you must provide the full (absolute) path to the tar file when using the cmxctl config maps import command. For example:

    /opt/cmx/srv/floormaps/Importfile.tar.gz .
  • Command options must follow the last command keyword with a space and two dashes. For example: [root@server]# command keyword ‑‑option1 ‑‑option2.

Command History

Release Modification

Cisco CMX Release 10.5

Additional keywords were documented.

Cisco CMX Release 10.3.1

The import keyword was modified.

Cisco CMX Release 10.3.0

This command was introduced.

Examples

The following example shows how to import a map, overwriting any existing maps or zones with the same name:

[root@server]# cmxctl config maps import ‑‑type PI ‑‑path 
/opt/Import_fdff5788ad650.tar.gz ‑‑override yes ‑‑importzones yes
Please enter PI ip address: 168.172.206.3
Please enter PI username [root]: root
Please enter PI password [Public123]: ********
Import successfully started from PI 168.172.206.3. 
 

cmxctl config maps reprocessimage

When CMX floor map images occasionally become misaligned, use the cmxctl config maps reprocessimage command to realign them.

cmxctl config maps reprocessimage ‑‑imagename imagename 

Syntax Description

‑‑imagename

Identify the image needing reprocessing.

imagename

The name of the image you would like to reprocess.

Command Default

None.

Command Modes

CMX Admin

Command History

Release Modification

Cisco CMX Release 10.5

Additional keywords were documented.

Cisco CMX Release 10.3.0

This command was introduced.

Usage Guidelines

Sometimes maps can become misaligned. When this happens, the cmxctl config maps reprocess image command reprocesses the image and realigns the map.

The default folder path for CMX maps is /opt/cmx/srv/floormaps.

Examples

The following example shows how to reprocess floor tile images when they become misaligned:

[root@server]$ cmxctl config maps reprocessimage --imagename domain_2_147753.png
File domain_2_147753.png exists in /opt/cmx/srv/floormaps. Proceeding...
Image processing job submitted for domain_2_147753.png.

cmxctl config maps zones

To list the floor maps in a selected campus, building, or all floors, use the cmxctl config maps floors command.

cmxctl config maps zones [ ‑‑campus mapname  ‑‑building mapname  ‑‑csv ]

Syntax Description

--campus

Optional. Restricts the list of floors to a particular campus.

mapname

The name of the campus you would like to include.

--building

Optional. Restricts the list of floors to a particular building.

mapname

The name of the building you would like to include.

--csv

Optional. Displays the results in comma-separated values (CSV) format, which can be cut and pasted into a spreadsheet.

Command Default

All zones display when the command is run without options.

Command Modes

Admin root user

Usage Guidelines

Command options must follow the last command keyword with a space and two dashes. For example: [root@server]# command keywords ‑‑option1 ‑‑option2.

When you select the option --csv , the map information you specify is displayed in comma-separated values (CSV) format, which can be cut and pasted into a spreadsheet.

Command History

Release Modification

Cisco CMX Release 10.5

Additional keywords were documented.

Cisco CMX Release 10.3.0

This command was introduced.

Examples

The following example shows how to display a list of zones for North Campus Bld-4:

[root@server]# cmxctl config maps floors --campus North Campus building Bld-4
[cmxadmin@cmx-nortech-server ~]$ cmxctl config maps zones
+------------------------------------+-----------+-------------------+
| Floor Name                         | Zone Name | Analytics Zone ID |
+------------------------------------+-----------+-------------------+
| North Campus>Bld-4>1st Floor       | NOC       | 376               |
+------------------------------------+-----------+-------------------+
| North Campus>Bld-4>1st Floor       | School    | 375               |
+------------------------------------+-----------+-------------------+


cmxctl config qlesspyworker

To manage qlesspyworker, use the cmxctl config qlesspyworker command.

cmxctl config qlesspyworker cleanRedis

Syntax Description

cleanRedis

Removes stale and invalid qlesspyworker history data.

Command Default

None.

Command Modes

Admin root user

Command History

Release Modification

Cisco CMX Release 10.5

This command was introduced.

Usage Guidelines

Examples

[root@server]#  cmxctl config qlesspyworker cleanRedis
QlessHistoryCleanupTask started
Deleted 0 qless-job-history records that were idle for 1209600 seconds.
Found 0 SMA-job records, deleted all.
QlessHistoryCleanupTask completed

cmxctl config reload

To forcefully generate a configuration file, use the cmxctl config reload command.

cmxctl config reload

Command Default

None

Examples

The following example shows how to forcefully generate a configuration file:

[root@server]# cmxctl config reload

2015-03-10T17:45:50Z cmx-vmdev117 -verbose[17174]: WARNING Skipping confd config file.
2015-03-10T17:45:50Z cmx-vmdev117 -verbose[17174]: INFO Target config
/opt/cmx/etc/analytics.conf in sync
2015-03-10T17:45:50Z cmx-vmdev117 -verbose[17174]: INFO Target config
/opt/cmx/etc/cassandra/cassandra-env.sh in sync
2015-03-10T17:45:50Z cmx-vmdev117 -verbose[17174]: INFO Target config
/opt/cmx/etc/cassandra/cassandra.yaml in sync
2015-03-10T17:45:50Z cmx-vmdev117 -verbose[17174]: INFO Target config
/opt/cmx/etc/collectd.conf in sync
2015-03-10T17:45:50Z cmx-vmdev117 -verbose[17174]: INFO Target config
/opt/cmx/etc/configuration.conf in sync
2015-03-10T17:45:50Z cmx-vmdev117 -verbose[17174]: INFO Target config
/opt/cmx/etc/connect.conf in sync
2015-03-10T17:45:50Z cmx-vmdev117 -verbose[17174]: INFO Target config
/opt/cmx/etc/halo.conf in sync
2015-03-10T17:45:50Z cmx-vmdev117 -verbose[17174]: INFO Target config
/opt/cmx/etc/haproxy.cfg in sync
2015-03-10T17:45:50Z cmx-vmdev117 -verbose[17174]: INFO Target config
/opt/cmx/etc/influxdb.conf in sync
2015-03-10T17:45:50Z cmx-vmdev117 -verbose[17174]: INFO Target config
/opt/cmx/etc/location.conf in sync
2015-03-10T17:45:50Z cmx-vmdev117 -verbose[17174]: INFO Target config
/opt/cmx/etc/matlabengine.conf in sync
2015-03-10T17:45:50Z cmx-vmdev117 -verbose[17174]: INFO Target config
/opt/cmx/etc/nmsplb.conf in sync
2015-03-10T17:45:50Z cmx-vmdev117 -verbose[17174]: INFO Target config
/opt/cmx/etc/nmspproxy.conf in sync
2015-03-10T17:45:50Z cmx-vmdev117 -verbose[17174]: INFO Target config
/opt/cmx/etc/postgresql.conf in sync
2015-03-10T17:45:50Z cmx-vmdev117 -verbose[17174]: INFO Target config
/opt/cmx/etc/redis_6379.conf in sync
2015-03-10T17:45:50Z cmx-vmdev117 -verbose[17174]: INFO Target config
/opt/cmx/etc/redis_6380.conf in sync
2015-03-10T17:45:50Z cmx-vmdev117 -verbose[17174]: INFO Target config
/opt/cmx/etc/redis_6381.conf in sync
2015-03-10T17:45:50Z cmx-vmdev117 -verbose[17174]: ERROR template:
redis.template.conf:15:20: executing "redis.template.conf" at <getv ($tag | printf ...>:
error calling getv: key does not exist

cmxctl config rfid timeout

To set the timeout for maintaining RFID tags in Cisco CMX, use the cmxctl config rfid timeout command.

cmxctl config rfid timeout { get | | set value }

Syntax Description

get

Displays the timeout value.

set value

Sets the timeout value that Cisco CMX maintains RFID tags before expiring them.The time range is 600 to 10800 seconds. The default value is 900 seconds

Command Default

None.

Command Modes

Admin root user

Command History

Release Modification

Cisco CMX Release 10.3.1

This command was introduced.

Usage Guidelines

We recommend that the RFID tag timeout is as long as your longest RFID tag’s chirp interval. Otherwise, the tag will not be on the map or active clients because it timed out of the Cisco CMX cache.

Examples

The following example shows how to set the timeout for RFID tags, and then verify the setting:

[root@server]# cmxctl config rfid timeout set

need to include a timeout within 600 to 10800 seconds
[root@server]# cmxctl config rfid timeout set 600
[root@server]# cmxctl config rfid timeout get
600 seconds

cmxctl config set

To set a config key for a Cisco CMX service, use the cmxctl config set command.

cmxctl config set { analytics |  cache_6378 |  cache_6379 |  cache_6380 |  cache_6381 |  cache_6382 |  cache_6383 |  cache_6385 |  cache_6378 |  cassandra  |  configuration  |  connect  |  database  |  haproxy  |  hyperlocation  |  location  |  matlabengine  |  metrics  |  nmsplb }

Syntax Description

analytics

Performs analytics on calculated location data.

agent

Manages Cisco CMX system lifecycle. Starts, stops, and monitors all the services running in Cisco CMX.

cache_6378

Caches the service used by location service.

cache_6379

Caches the service used by location service.

cache_6380

Caches the service used by analytics service.

cache_6381

Caches the service used by analytics service.

cache_6382

Caches the service used by analytics service.

cache_6383

Caches the service used by analytics service.

cache_6385

Caches the service used by analytics service.

cassandra

Enables cassandra database service used by the location service for historical data.

configuration

Configures nodes and clusters.

connect

Enables connect services.

database

Enables the database service used by analytics and configuration service.

haproxy

Enables the TCP or HTTP load balancer gateway to all service APIs.

hyperlocation

Enables hyperlocation.

location

Enables location service to compute location.

matlabengine

Provides access point heatmap for location service.

metrics

Collects system metrics.

nmsplb

Enables the load balancer service used for distributing Network Mobility Services Protocol (NMSP) messages to location services.

Command Default

None.

Command Modes

Admin root user.

Command History

Release Modification

Cisco CMX Release 10.5

Additional options were documented.

Cisco CMX Release 10.4

This command was introduced.

Examples

This example shows how to generate a key for the service location .

[root@server]$ cmxctl config set location key 2512
{"key": "2512"}
Change will take effect on service restart.

Restart the service.

[root@server]$ cmxctl restart location
Done
The nodeagent service is currently running with PID: 3299
Attempting to restart Location
............
Service Location has successfully restarted

To verify the key, use the cmxctl config get location command:

[root@server]$ cmxctl config get location
{
    "services": {
        "location": {
            "key": "2512",
            "maxdirectmemory": "1536M",
            "maxnewsize": "800M",
            "mem": "6144M"
        }
    }
}

cmxctl config sma

To manage social media analytics (SMA), use the cmxctl config sma command.

cmxctl config sma { proxy | twitter }

Syntax Description

proxy

Sets HTTP proxy.

twitter

Sets Twitter credentials.

Command Default

None.

Usage Guidelines

After setting the SMA proxy, restart the qlesspyworker for the changes to take effect.

Examples

The following example shows how to manage SMA:

[root@server]# cmxctl config sma proxy
Please enter value for http proxy: http://proxy.cisco.com:80
Please enter value for https proxy: http://proxy.cisco.com:80
SMA Proxies have been set. Please restart qlesspyworker for the changes to take effect.

cmxctl config verify

To verify the Cisco Connected Mobile Experiences (Cisco CMX) installation and configuration, use the cmxctl config verify command.

cmxctl config verify

Command Default

None.

Command Modes

Examples

The following example shows how to verify the Cisco CMX installation and configuration:

[root@server]# cmxctl config verify
Verifying node configuration...
NetworkManager: unrecognized service
Consul v0.4.1
Consul Protocol: 2 (Understands back to: 1)
confd 0.6.0
+-----------------+--------------------------------+------------+-------------------------+
| module | check | passed | msg
|
+=================+================================+============+========================+
| netman_stopped | NetworkManager service is not | Success |
|
| | running | |
|
+-----------------+--------------------------------+------------+-------------------------
--+
| matlabengine | http://matlabengine.service.co | Failed | check the log files
under |
| | nsul:5577/api/services/matlabe | | /opt/cmx/var/log
|
| | ngine/status | |
|
+-----------------+--------------------------------+------------+-------------------------+
| database | connect to database port:5432 | Success |
|
+-----------------+--------------------------------+------------+-------------------------+
| consul_dns | 127.0.0.1 (consul) is present | Success |
|
| | as dns server in | |
|
| | /etc/resolv.conf | |
|
+-----------------+--------------------------------+------------+-------------------------
--+
| etchost_hacks | consul service hostnames not | Success |
|
| | static in /etc/hosts | |
|
+-----------------+--------------------------------+------------+-------------------------+
| analytics | http://analytics.service.consu | Failed | check the log files
under |
| | l:5556/api/services/analytics/ | | /opt/cmx/var/log
|
| | status | |
|
+-----------------+--------------------------------+------------+-------------------------+
| hostname_ping | ping to hostname:cmx-master-1 | Success |
|
+-----------------+--------------------------------+------------+-------------------------
--+
| location | http://location.service.consul | Failed | check the log files
under |
| | :5555/api/services/location/st | | /opt/cmx/var/log
|
| | atus | |
|
+-----------------+--------------------------------+------------+-------------------------
--+
| confd_installed | Confd is installed | Success |
|
+-----------------+--------------------------------+------------+-------------------------+
| consul_installe | Consul is installed | Success |
|
| d | | |
|
+-----------------+--------------------------------+------------+-------------------------
--+
| nmsplb | http://nmsplb.service.consul:6 | Failed | check the log files
under |
| | 001/api/services/nmsplb/status | | /opt/cmx/var/log
|
+-----------------+--------------------------------+------------+-------------------------+
| configuration | http://configuration.service.c | Failed | check the log files
under |
| | onsul:6000/api/services/config | | /opt/cmx/var/log
|
| | uration/status | |
|
+-----------------+--------------------------------+------------+-------------------------+
| cassandra | connect to cassandra port:9042 | Success |
|
+-----------------+--------------------------------+------------+-------------------------+

cmxctl debug

To create a debug tarball in the current directory, use the cmxctl debug command.

cmxctl debug

Command Default

None.

Command History

Release Modification

Cisco CMX Release 10.4

This command is depreciated.

Usage Guidelines

The debug tarball that is created will be approximately 300 MB in size, and takes at 90 seconds to complete. This command should to be run using the cmxadmin (non-root) account. This commnd is depreciated in Cisco CMX release 10.4 and we recommend that you use cmxos techsupport command.

Examples

The following example shows how to create a debug tarball in the current directory:

[cmxadmin@10.10.10.10:~]$ cmxctl debug
running locally
Dumping debug information...
[localhost] Executing task 'dump_config'
cp: cannot stat `/opt/cmx/share/upgrade.answers': No such file or directory
[localhost] Executing task 'dump_state'
running 'ps aux'
running 'ifconfig -a'
running 'cmxctl status'
running 'ulimit -a'
running 'ps -u root,postgres -o %cpu,%mem,cmd'
running 'netstat -o -n -a'
running 'df -h'
running 'ntpdate -d 172.19.28.250'
running 'consul members'
[localhost] Executing task 'dump_apis'
getting /api/config/v1/clusters
getting /api/config/v1/nodes
[localhost] Executing task 'dump_hosts'
pinging configuration.service.consul
pinging location.service.consul
pinging 6379.cache.service.consul
pinging 6380.cache.service.consul
pinging 6381.cache.service.consul
pinging database.service.consul
pinging analytics.service.consul
pinging halo.service.consul
Done.

cmxctl disable

To disable a service, use the cmxctl disable command.

cmxctl disable { consul | qlesspyworker | cassandra | iodocs | cache_6382 | cache_6383 | cache_6380 | cache_6381 | cache_6384 | cache_6385 | influxdb | metrics | confd | cache_6379 | cache_6378 | haproxy | database | analytics | connect | gateway | location | configuration | matlabengine | hyperlocation | nmsplb | agent }

Syntax Description

analytics

Performs analytics on calculated location data.

agent

Manages Cisco CMX system lifecycle. starts, stops, and monitors all the services running in Cisco CMX.

cache_6378

Caches the service used by location service.

cache_6379

Caches the service used by location service.

cache_6380

Caches the service used by analytics service.

cache_6381

Caches the service used by analytics service.

cache_6382

Caches the service used by analytics service.

cache_6383

Caches the service used by analytics service.

cache_6385

Caches the service used by analytics service.

cassandra

Enables cassandra database service used by the location service for historical data.

confd

Internal service.

configuration

Configures nodes and clusters.

connect

Enables connect services.

consul

Internal service.

database

Enables the database service used by analytics and configuration service.

haproxy

Enables the TCP or HTTP load balancer gateway to all service APIs.

hyperlocation

Enables hyperlocation.

location

Enables location service to compute location.

matlabengine

Provides access point heatmap for location service.

metrics

Collects system metrics.

nmsplb

Enables the load balancer service used for distributing Network Mobility Services Protocol (NMSP) messages to location services.

influxdb

Enables database services used for storing statistics from various services.

iodocs

Enables online document service for REST API offered by various services.

qlesspyworker

Internal service.

gateway

Enables gateway services that establishes secure bidirectional communication with Cisco CMX Cloud applications.

Command Default

None

Examples

The following example shows how to disable the cassandra database service:

[root@server]# cmxctl disable cassandra
Done
The nodeagent service is currently running with PID: 31776
Stopping cassandra process...
Done
Successfully shutdown cassandra Process.

cmxctl dump

To create a configuration tarball in the current directory, use the cmxctl dump command.

cmxctl dump

Command Default

None

Examples

The following example shows how to create a configuration tarball in the current directory:

[root@server]# cmxctl dump
running locally
Dumping configuration information...
[localhost] Executing task 'dump_config'
Done.

cmxctl enable

To enable a service, use the cmxctl enable command.

cmxctl enable { consul | qlesspyworker | cassandra | iodocs | cache_6382 | cache_6383 | cache_6380 | cache_6381 | cache_6384 | cache_6385 | influxdb | metrics | confd | cache_6379 | cache_6378 | haproxy | database | analytics | connect | gateway | location | configuration | matlabengine | hyperlocation | nmsplb | agent }

Syntax Description

analytics

Performs analytics on calculated location data.

agent

Manages Cisco CMX system lifecycle. starts, stops, and monitors all the services running in Cisco CMX.

cache_6378

Caches the service used by location service.

cache_6379

Caches the service used by location service.

cache_6380

Caches the service used by analytics service.

cache_6381

Caches the service used by analytics service.

cache_6382

Caches the service used by analytics service.

cache_6383

Caches the service used by analytics service.

cache_6385

Caches the service used by analytics service.

cassandra

Enables cassandra database service used by the location service for historical data.

confd

Internal service.

configuration

Configures nodes and clusters.

connect

Enables connect services.

consul

Internal service.

database

Enables the database service used by analytics and configuration service.

haproxy

Enables the TCP or HTTP load balancer gateway to all service APIs.

hyperlocation

Enables hyperlocation.

location

Enables location service to compute location.

matlabengine

Provides access point heatmap for location service.

metrics

Collects system metrics.

nmsplb

Enables the load balancer service used for distributing Network Mobility Services Protocol (NMSP) messages to location services.

influxdb

Enables database services used for storing statistics from various services.

iodocs

Enables online document service for REST API offered by various services.

qlesspyworker

Internal service.

gateway

Enables gateway services that establishes secure bidirectional communication with Cisco CMX Cloud applications.

Command Default

None.

Examples

The following example shows how to enable analytics service:

[root@server]# cmxctl enable analytics
The nodeagent service is not running.
Agent is not running, starting it now.
Starting nodeagent Process...
Retrying..
Done
Started nodeagent service with PID: 31027

cmxctl heterarchy

To manage the deployment hierarchy, use the cmxctl heterarchy command.

cmxctl heterarchy { backup | rebuild | repair | restore | retire | verify }

Syntax Description

backup

Backs up the deployment hierarchy.

rebuild

Rebuilds the deployment hierarchy.

repair

Repairs the deployment hierarchy.

restore

Restores the deployment hierarchy.

retire

Retires the deployment hierarchy.

verify

Verifies the deployment hierarchy.

Command Default

None

Command History

Release Modification

Cisco CMX Release 10.2

This command was introduced.

Examples

The following example shows how to verify the heterarchy:

[root@server]# cmxctl heterarchy verify
Verifying heterarchy...
Checking user levels
Heterarchy is healthy.

cmxctl influxdb wipe

To wipe the influx database, use the cmxctl influxdb wipe --silent command.

cmxctl influxdb wipe --silent

Syntax Description

silent Silently wipe the influx database

Command Default

None.

Command History

Release Modification

Cisco CMX Release 10.3

This command was introduced.

Examples

The following example shows how to wipe the influx database:

[root@server]# cmxctl influxdb wipe
This command will wipe the Influx database. All system metric data will be erased.
Do you want to continue?: y
Stopping influxdb Process...
executing shutdown
Retrying..
Retrying...
Retrying....
Done
Successfully shutdown influxdb Process.
Cleaning Influx database directories
Configuring InfluxDB

cmxctl jobs

To configure recurring background jobs, use the cmxctl jobs command.

cmxctl jobs { cancel | jobname | list | run | jobname | runnow | jobname }

Syntax Description

cancel jobname

Cancels a scheduled job.

list

Lists all the scheduled jobs.

run jobname

Runs a job at a specified time.

runnow jobname

Triggers a one-time run of the job.

Command Default

None.

Usage Guidelines

The Apache Cassandra database stores location history data. Pruning should be performed to maintain disk usage. Cisco CMX 10.2 introduces the option to prune database size. The default disk-pruning task runs at an interval of 90 days. You can also use the cmxctl jobs runnow cleanupcassandra command to run an on-demand job of cleaning up the Cassandra database, which is a normal scheduled task that runs once every two days.

Examples

The following example shows how to run a background job:

[root@server]# cmxctl jobs run LocationIndexCleanup
submitted the job, verify using cmxctl jobs list.

cmxctl metrics notification

To generate notification metrics for a Cisco Connected Mobile Experiences (Cisco CMX) file, use the cmxctl metrics notification command.

cmxctl metrics notification

Command Default

None

Usage Guidelines

The notification keyword provides metrics for notification.

Examples

The following example shows how to generate metrics for a Cisco CMX file:

[root@server]# cmxctl metrics notification
+--------------------------------+------------+------------+-----------------+------------+
| EndPoint | Success | Failure | SuccessRate |
FailureRate |
+================================+============+============+=================+===========+
+--------------------------------+------------+------------+-----------------+------------+

cmxctl node

To manage node installation, use the cmxctl node command.

cmxctl node { sslmode | { enable | | { --key key-file-location | | --pem pem-file-location } | disable } }

Syntax Description

sslmode

Enables or disables Secure Sockets Layer (SSL).

enable

Enables Secure Sockets Layer (SSL).

--key key-file-location

Location of the SSL key file.

--pem pem-file-location

Location of the SSL pem file.

disable

Disables Secure Sockets Layer (SSL).

Command Default

None.

Usage Guidelines

Before initiating the import process, ensure that you have a self-signed or a Certificate Authority (CA)-signed certificate and the key file. The certificate and the key file must have minimum global read permissions (0644). Starting from Cisco CMX Release 10.3.1, you can install a new Cisco CMX certificate by using the key and pem keywords. For example:
[root@server]# cmxctl node sslmode enable --pem /home/cmxadmin/cert.pem --key
/home/cmxadmin/host.key

Command History

Release Modification

Cisco CMX Release 10.3.1

This command was modified. The sslmode enable keyword was modified.

Cisco CMX Release 10.3.0

This command was introduced.

Examples

The following example shows how to manage node installation:

[root@server]# 	cmxctl node sslmode enable --pem <pem-file-location> --key <key-file-location>
enabling ssl
ssl enabled

cmxctl restart

To restart a Cisco Connected Mobile Experiences (Cisco CMX) service, use the cmxctl restart command.

cmxctl restart { consul | qlesspyworker | cassandra | iodocs | cache_6382 | cache_6383 | cache_6380 | cache_6381 | cache_6384 | cache_6385 | influxdb | metrics | confd | cache_6379 | cache_6378 | haproxy | database | analytics | connect | gateway | location | configuration | matlabengine | hyperlocation | nmsplb | agent }

Syntax Description

analytics

Performs analytics on calculated location data.

agent

Manages Cisco CMX system lifecycle. Starts, stops, and monitors all the services running in Cisco CMX.

cache_6378

Caches the service used by location service.

cache_6379

Caches the service used by location service.

cache_6380

Caches the service used by analytics service.

cache_6381

Caches the service used by analytics service.

cache_6382

Caches the service used by analytics service.

cache_6383

Caches the service used by analytics service.

cache_6385

Caches the service used by analytics service.

cassandra

Enables cassandra database service used by the location service for historical data.

confd

Internal service.

configuration

Configures nodes and clusters.

connect

Enables connect services.

consul

Internal service.

database

Enables the database service used by analytics and configuration service.

haproxy

Enables the TCP or HTTP load balancer gateway to all service APIs.

hyperlocation

Enables hyperlocation.

location

Enables location service to compute location.

matlabengine

Provides access point heatmap for location service.

metrics

Collects system metrics.

nmsplb

Enables the load balancer service used for distributing Network Mobility Services Protocol (NMSP) messages to location services.

influxdb

Enables database services used for storing statistics from various services.

iodocs

Enables online document service for REST API offered by various services.

qlesspyworker

Internal service.

gateway

Enables gateway services that establishes secure bidirectional communication with Cisco CMX Cloud applications.

Command Default

None

Examples

The following example shows how to restart a Cisco CMX service:

[root@server bin]# cmxctl restart database
Done
The nodeagent service is currently running with PID: 16718
Stopping postgres Process...
Successfully shutdown postgres Process.
Starting postgres Process...
Done
Started postgres service with PID: 25702
Exception while notifying CE

cmxctl stack

To generate the jstack for a java service, use the cmxctl stack command.

cmxctl stack { cmx_service }

Syntax Description

cmx_service

Lists all Cisco CMX services. The services include: location, analytics, configuration, matlabengine, and nmsplb.

Command Default

None

Command History

Release Modification

Cisco CMX Release 10.2

This command was introduced.

Examples

The following example shows how to generate jstack for location services:

cmxctl start

To start a Cisco Connected Mobile Experiences (Cisco CMX) service, use the cmxctl start command.

cmxctl start { consul | qlesspyworker | cassandra | iodocs | cache_6382 | cache_6383 | cache_6380 | cache_6381 | cache_6384 | cache_6385 | influxdb | metrics | confd | cache_6379 | cache_6378 | haproxy | database | analytics | connect | gateway | location | configuration | matlabengine | hyperlocation | nmsplb | agent }

Syntax Description

analytics

Performs analytics on calculated location data.

agent

Manages Cisco CMX system lifecycle. starts, stops, and monitors all the services running in Cisco CMX.

cache_6378

Caches the service used by location service.

cache_6379

Caches the service used by location service.

cache_6380

Caches the service used by analytics service.

cache_6381

Caches the service used by analytics service.

cache_6382

Caches the service used by analytics service.

cache_6383

Caches the service used by analytics service.

cache_6385

Caches the service used by analytics service.

cassandra

Enables cassandra database service used by the location service for historical data.

confd

Internal service.

configuration

Configures nodes and clusters.

connect

Enables connect services.

consul

Internal service.

database

Enables the database service used by analytics and configuration service.

haproxy

Enables the TCP or HTTP load balancer gateway to all service APIs.

hyperlocation

Enables hyperlocation.

location

Enables location service to compute location.

matlabengine

Provides access point heatmap for location service.

metrics

Collects system metrics.

nmsplb

Enables the load balancer service used for distributing Network Mobility Services Protocol (NMSP) messages to location services.

influxdb

Enables database services used for storing statistics from various services.

iodocs

Enables online document service for REST API offered by various services.

qlesspyworker

Internal service.

gateway

Enables gateway services that establishes secure bidirectional communication with Cisco CMX Cloud applications.

Command Default

None

Examples

The following example shows how to display the status for the consul service:

[root@server]# cmxctl start consul
Done
The nodeagent service is currently running with PID: 16718
Done
The analytics service is already running with pid: 1099
Done
Exception while notifying CE
Done
The location service is already running with pid: 16005
Done
Exception while notifying CE
Done
The configuration service is already running with pid: 16165
Done
Exception while notifying CE
Done
The matlabengine service is already running with pid: 1251
Done
Exception while notifying CE
Done
The nmsplb service is already running with pid: 1377
Done
Exception while notifying CE

cmxctl status

To view the status of one or all Cisco Connected Mobile Experiences (Cisco CMX) services, use the cmxctl status command.

cmxctl status { analytics | agent | cache_6378 | cache_6379 | cache_6380 | cache_6381 | cache_6382 | cache_6383 | cache_6385 | cassandra | configuration | confd | consul | database | haproxy | location | matlabengine | metrics | nmsplb | influxdb | iodocs | qlesspyworker }

Syntax Description

analytics

Performs analytics on calculated location data.

agent

Manages Cisco CMX system lifecycle. starts, stops, and monitors all the services running in Cisco CMX.

cache_6378

Caches the service used by location service.

cache_6379

Caches the service used by location service.

cache_6380

Caches the service used by analytics service.

cache_6381

Caches the service used by analytics service.

cache_6382

Caches the service used by analytics service.

cache_6383

Caches the service used by analytics service.

cache_6385

Caches the service used by analytics service.

cassandra

Enables cassandra database service used by the location service for historical data.

confd

Internal service.

configuration

Configures nodes and clusters.

connect

Enables connect services.

consul

Internal service.

database

Enables the database service used by analytics and configuration service.

haproxy

Enables the TCP or HTTP load balancer gateway to all service APIs.

hyperlocation

Enables hyperlocation.

location

Enables location service to compute location.

matlabengine

Provides access point heatmap for location service.

metrics

Collects system metrics.

nmsplb

Enables the load balancer service used for distributing Network Mobility Services Protocol (NMSP) messages to location services.

influxdb

Enables database services used for storing statistics from various services.

iodocs

Enables online document service for REST API offered by various services.

qlesspyworker

Internal service.

gateway

Enables gateway services that establishes secure bidirectional communication with Cisco CMX Cloud applications.

Usage Guidelines

After installing the ISO file on the Cisco MSE 3355 or 3365, use the cmxctl status command to check if the CMX services are running. If they are not running, use the cmxctl start command.

Examples

The following example shows how to display the status for the consul service:

[root@server]# cmxctl status consul
Done
The nodeagent service is currently running with PID: 6190
+----------------+---------------+---------+----------------+
| Host           | Service       | Status  | Uptime (HH:mm) |
+----------------+---------------+---------+----------------+
| CMX-LowEnd-200 | Analytics     | Running | 5 days, 05:49  |
+----------------+---------------+---------+----------------+
| CMX-LowEnd-200 | Cache_6378    | Running | 5 days, 05:52  |
+----------------+---------------+---------+----------------+
| CMX-LowEnd-200 | Cache_6379    | Running | 5 days, 05:49  |
+----------------+---------------+---------+----------------+
| CMX-LowEnd-200 | Cache_6380    | Running | 5 days, 05:49  |
+----------------+---------------+---------+----------------+
| CMX-LowEnd-200 | Cache_6381    | Running | 5 days, 05:49  |
+----------------+---------------+---------+----------------+
| CMX-LowEnd-200 | Cache_6382    | Running | 5 days, 05:49  |
+----------------+---------------+---------+----------------+
| CMX-LowEnd-200 | Cache_6383    | Running | 5 days, 05:49  |
+----------------+---------------+---------+----------------+
| CMX-LowEnd-200 | Cache_6385    | Running | 5 days, 05:49  |
+----------------+---------------+---------+----------------+
| CMX-LowEnd-200 | Cassandra     | Running | 5 days, 05:51  |
+----------------+---------------+---------+----------------+
| CMX-LowEnd-200 | Confd         | Running | 5 days, 05:49  |
+----------------+---------------+---------+----------------+
| CMX-LowEnd-200 | Configuration | Running | 5 days, 05:49  |
+----------------+---------------+---------+----------------+
| CMX-LowEnd-200 | Connect       | Running | 5 days, 05:49  |
+----------------+---------------+---------+----------------+
| CMX-LowEnd-200 | Consul        | Running | 5 days, 05:52  |
+----------------+---------------+---------+----------------+
| CMX-LowEnd-200 | Database      | Running | 5 days, 05:52  |
+----------------+---------------+---------+----------------+
| CMX-LowEnd-200 | Haproxy       | Running | 5 days, 05:49  |
+----------------+---------------+---------+----------------+
| CMX-LowEnd-200 | Hyperlocation | Running | 5 days, 05:47  |
+----------------+---------------+---------+----------------+
| CMX-LowEnd-200 | Influxdb      | Running | 5 days, 05:49  |
+----------------+---------------+---------+----------------+
| CMX-LowEnd-200 | Iodocs        | Running | 5 days, 05:50  |
+----------------+---------------+---------+----------------+
| CMX-LowEnd-200 | Location      | Running | 5 days, 05:49  |
+----------------+---------------+---------+----------------+
| CMX-LowEnd-200 | Matlabengine  | Running | 5 days, 05:48  |
+----------------+---------------+---------+----------------+
| CMX-LowEnd-200 | Metrics       | Running | 5 days, 05:49  |
+----------------+---------------+---------+----------------+
| CMX-LowEnd-200 | Nmsplb        | Running | 5 days, 05:47  |
+----------------+---------------+---------+----------------+
| CMX-LowEnd-200 | Qlesspyworker | Running | 5 days, 05:50  |
+----------------+---------------+---------+----------------+
| CMX-LowEnd-200 | gateway       | Running | 5 days, 05:50  |
+----------------+---------------+---------+----------------+

cmxctl stop

To shut down a Cisco Connected Mobile Experiences (Cisco CMX) service, use the cmxctl stop command.

cmxctl stop { analytics | agent | cache_6378 | cache_6379 | cache_6380 | cache_6381 | cache_6382 | cache_6383 | cache_6385 | cassandra | configuration | confd | consul | database | haproxy | location | matlabengine | metrics | nmsplb | influxdb | iodocs | qlesspyworker }

Syntax Description

analytics

Performs analytics on calculated location data.

agent

Manages Cisco CMX system lifecycle. starts, stops, and monitors all the services running in Cisco CMX.

cache_6378

Caches the service used by location service.

cache_6379

Caches the service used by location service.

cache_6380

Caches the service used by analytics service.

cache_6381

Caches the service used by analytics service.

cache_6382

Caches the service used by analytics service.

cache_6383

Caches the service used by analytics service.

cache_6385

Caches the service used by analytics service.

cassandra

Enables cassandra database service used by the location service for historical data.

confd

Internal service.

configuration

Configures nodes and clusters.

connect

Enables connect services.

consul

Internal service.

database

Enables the database service used by analytics and configuration service.

haproxy

Enables the TCP or HTTP load balancer gateway to all service APIs.

hyperlocation

Enables hyperlocation.

location

Enables location service to compute location.

matlabengine

Provides access point heatmap for location service.

metrics

Collects system metrics.

nmsplb

Enables the load balancer service used for distributing Network Mobility Services Protocol (NMSP) messages to location services.

influxdb

Enables database services used for storing statistics from various services.

iodocs

Enables online document service for REST API offered by various services.

qlesspyworker

Internal service.

Command Default

The services are running.

Usage Guidelines

Examples

The following example shows how to stop the analytics service:

[root@server]# cmxctl stop analytics
Done
The nodeagent service is currently running with PID: 16987
Stopping analytics Process...
Service analytics with pid: 19095
Retrying..
Done
Successfully shutdown analytics Process.

cmxctl trace mac

To enable MAC address tracing, use the cmxctl trace mac command.

cmxctl trace mac { add | delete | status } mac mac-address

Syntax Description

add

Add MAC address for tracing

delete

Delete MAC address for tracing

status

Display MAC address tracing settings

mac mac-address

MAC address to be configured

Command Default

None.

Command History

Release Modification

Cisco CMX Release 10.3

This command was introduced.

Usage Guidelines

Examples

[cmxadmin@CMX-LowEnd-200 ~]$ cmxctl trace mac status
+-------------------+
| MAC Address       |
+-------------------+
| 3c:a9:f4:6c:ee:44 |
+-------------------+
| ac:37:43:4b:cc:2f |
+-------------------+
| 3c:a9:f4:6c:5a:ac |

cmxctl trace status

To display current trace levels of each CMX service, use the cmxctl trace status command.

cmxctl trace status

Command Default

None.

Command History

Release Modification

Cisco CMX Release 10.3

This command was introduced.

Examples

The following example shows how to display current tarce levels:

[root@server]# cmxctl trace mac status
+-------------------+
| MAC Address       |
+-------------------+
| 00:01:02:03:04:05 |
+-------------------+

cmxctl trace update

To update the trace level of a CMX service, use the cmxctl trace update command.

cmxctl trace update { service service-to-update | level tracelevel | [ INFO  |  DEBUG ] }

Syntax Description

service service-to-update

Configure service to update.

level tracelevel

Configure trace level [INFO | DEBUG]

Command Default

None.

Command History

Release Modification

Cisco CMX Release 10.X

This command was introduced.

Usage Guidelines

Examples

cmxctl users

To list or to configure Cisco Connected Mobile Experiences (Cisco CMX) users using the CLI, use the cmxctl users command.

cmxctl users { list | passwd | username }

Syntax Description

list

Lists all the current users.

passwd

Sets the password for a user.

username

Username of a user in Cisco CMX.

Command Default

None.

Examples

The following example shows how to list Cisco CMX users using the CLI:

[root@server]# cmxctl users list
+----------+--------------+-----------+
| Username | Full Name | Roles |
+==========+==============+===========+
| monitor | Monitor User | Read Only |
+----------+--------------+-----------+
| admin | Admin User | Admin |
+----------+--------------+-----------+

cmxctl users unlock

To unlock CMX access for a CLI or GUI user after they have been locked out, use the cmxctl users unlock command.

cmxctl users unlock { cli username  | gui username }

Syntax Description

cli username

Unlocks the command line interface (CLI) user.

gui username

Unlocks the graphical user interface (GUI) user.

Command Default

By default, active accounts will automatically unlock in 30 minutes. Dormant accounts—accounts inactive for 35 days or more—do not automatically unlock.

Command Modes

Admin root user

Command History

Release Modification

Cisco CMX Release 10.5.0

This command was introduced.

Usage Guidelines

The CMX admin can unlock accounts before the 30-minute expiry time.

Examples

The following example shows how to unlock the CMX GUI user someguy:

[root@server]# cmxctl users unlock gui someguy

Account unlocked successfully

cmxctl version

To know the Cisco Connected Mobile Experiences (Cisco CMX) version, use the cmxctl version command.

cmxctl version

Command Default

None.

Examples

The following example shows how to display version information for Cisco CMX:

[root@server]# cmxctl version
Build Version : 10.1.0-27
Build Time : 2015-05-05 03:06:45.437430
----------------------------------------------------------------------
Name : cmx-ng-container
Commit Count : 17
Short Hash : bf20ec1
----------------------------------------------------------------------
Name : cmx-ng-location
Commit Count : 5
Short Hash : efc84fa
----------------------------------------------------------------------
Name : cmx-ng-ui
Commit Count : 5
Short Hash : d793df7
----------------------------------------------------------------------
Name : cmx-ova
Build Time : Fri Feb 20 06:34:38 UTC 2015
----------------------------------------------------------------------

cmxloc delete

To delete a location accuracy test in Cisco CMX, use the cmxloc delete command.

cmxloc delete

Command Default

None.

Command Modes

Admin root user

Command History

Release Modification

Cisco CMX Release 10.4

This command was introduced.

Usage Guidelines

This command should be run at the cmxadmin level.

cmxloc download

To view the link to download the log files, use the cmxloc download command.

cmxloc download test name

Command Default

None

Command Modes

Admin root user

Command History

Release Modification

Cisco CMX Release 10.4

This command was introduced.

Usage Guidelines

This command will move the log files into a location and can be downloaded using a browser.

cmxloc find

To search for the MAC address provided and return all the current attributes for the device, use the cmxloc find command.

cmxloc find MAC address

Syntax Description

MAC Address

MAC address of the device.

Command Default

None.

Command Modes

Admin root user

Command History

Release Modification

Cisco CMX Release 10.4

This command was introduced.

Usage Guidelines

This command should be run at the cmxadmin level.

cmxloc list

To list the accuracy tests in Cisco CMX, use the cmxloc list command.

cmxloc list

Command Default

None

Command Modes

Admin root user

Command History

Release Modification

Cisco CMX Release 10.4

This command was introduced.

Usage Guidelines

This command should be run at the cmxadmin level.

Examples

The following example shows how to list all Cisco CMX accuracy tests:

[cmxadmin@cmx-nortech ~]$ cmxloc list
+-------+----------+-------------------+---------------+---------------+---------+---------+-------------+
| Name  | Status   | MAC Address       | Comp Freq (s) | Avg Error (m) | 90% (m) | 50% (m) | Test Points |
+-------+----------+-------------------+---------------+---------------+---------+---------+-------------+
| FB1   | PAUSED   | 98:07:2d:2a:11:fa | 0.0           | 0.0           | 0.0     | 0.0     | 0           |
+-------+----------+-------------------+---------------+---------------+---------+---------+-------------+
| Test1 | FINISHED | 98:07:2d:2a:11:fa | 61.0          | 2.45          | 3.23    | 1.93    | 1           |
+-------+----------+-------------------+---------------+---------------+---------+---------+-------------+
| Test2 | FINISHED | 98:07:2d:2a:11:fa | 33.25         | 4.36          | 6.27    | 3.44    | 4           |
+-------+----------+-------------------+---------------+---------------+---------+---------+-------------+

cmxloc monitor

To monitor the location accuracy test, use the cmxloc monitor command.

cmxloc monitor MAC Address

Syntax Description

MAC Address

MAC address of the device.

Command Default

None.

Command Modes

Admin root userx

Command History

Release Modification

Cisco CMX Release 10.4

This command was introduced.

Usage Guidelines

This command searches for a client and returns the attributes. The command monitors for any location changes and will update the screen for the new location attributes. Press the enter key to terminate the command execution.

cmxloc start

To start a location accuracy test, use the cmxloc start command.

cmxloc start MAC Address Test Name X, Y Locations Time

Syntax Description

MAC Address

MAC address of the device to run the location accuracy test.

Test Name

Name of the new location accuarcy test.

X, Y Locations

X and Y location information.

Time

Estimated time to run the test.

Command Default

None

Command Modes

Admin root user

Command History

Release Modification

Cisco CMX Release 10.4

This command was introduced.

Usage Guidelines

This command triggers the location accuracy test.

cmxos addswap

To add a 10 GB space to the operating system,, use the cmxos addswap command.

cmxos addswap

Command Default

This command has no arguments or keywords.

Usage Guidelines

This command should be run at the root user level.

Examples

The following example shows how to increase disk space in the operating system:

[root@server]# cmxos addswap
10485760+0 records in
10485760+0 records out
10737418240 bytes (11 GB) copied, 29.6845 s, 362 MB/s
Setting up swapspace version 1, size = 10485756 KiB
no label, UUID=2734f069-e687-4635-b2d6-9381241bc7ee
swap added, run system info to verify
[root@cmx-vmdev146 ~]#

cmxos adminui

To start, stop, and restart the administrator UI, use the cmxos adminui command.

cmxos adminui { start | stop | restart }

Syntax Description

start

Starts the administrator UI.

stop

Stops the administrator UI.

restart

Restarts the administrator UI.

Command Default

None

Command History

Release Modification

Cisco CMX Release 10.2

This command was introduced.

Examples

The following example shows how to stop the administrator UI:

[root@server]# cmxos adminui stop
Stopping adminui...

cmxos apiserver disable

To disable Cisco CMX API server, use the cmxos apiserver disable command.

cmxos apiserver disable

Syntax Description

disable

Disables the Cisco CMX API server.

Command Default

None

Command Modes

Admin root user

Command History

Release Modification

Cisco CMX Release 10.4

This command was introduced.

Examples

The following example shows how to disable the Cisco CMX API server:

[root@server]# cmxos apiserver disable
Starting CMX API Server...

cmxos apiserver enable

To enable Cisco CMX API server, use the cmxos apiserver enable command.

cmxos apiserver enable

Syntax Description

enable

Enables the Cisco CMX API server.

Command Default

None

Command Modes

Admin root user

Command History

Release Modification

Cisco CMX Release 10.4

This command was introduced.

Examples

The following example shows how to enable the Cisco CMX API server:

[root@server]# cmxos apiserver enable
Enabling CMX API Server...
Starting CMX API Server...

cmxos apiserver reset

To reset the configuration of the Cisco CMX API server, use the cmxos apiserver reset command.

cmxos apiserver reset

Syntax Description

reset

Resets CMX API Server configuration.

Command Default

None

Command Modes

Admin root user

Command History

Release Modification

Cisco CMX Release 10.4

This command was introduced.

Examples

The following example shows how to reset the Cisco CMX API server:

[root@server]# cmxos apiserver reset
Resetting CMX API Server...

cmxos apiserver restart

To restart Cisco CMX API server, use the cmxos apiserver restart command.

cmxos apiserver restart

Syntax Description

restart

Restarts the Cisco CMX API server.

Command Default

None

Command Modes

Admin root user

Command History

Release Modification

Cisco CMX Release 10.4

This command was introduced.

Examples

The following example shows how to start the Cisco CMX API server:

[root@server]# cmxos apiserver restart
Restarting CMX API Server...

cmxos apiserver start

To start Cisco CMX API server, use the cmxos apiserver command.

cmxos apiserver { start | stop | restart | enable | disable | status | user }

Syntax Description

start

Starts the Cisco CMX API server.

stop

Stops the Cisco CMX API server.

restart

Restarts the Cisco CMX API server.

enable

Enables the Cisco CMX API server.

disable

Disables the Cisco CMX API server.

status

Displays the current status of the Cisco CMX API server.

user

Sets the userid and password for the CMX API Server.

Command Default

None

Command Modes

Admin root user

Command History

Release Modification

Cisco CMX Release 10.4

This command was introduced.

Examples

The following example shows how to start the Cisco CMX API server:

[root@server]# cmxos apiserver start
Starting CMX API Server...

cmxos apiserver status

To view the status of Cisco CMX API server, use the cmxos apiserver status command.

cmxos apiserver status

Syntax Description

status

Displays the current status of the Cisco CMX API server.

Command Default

None

Command Modes

Admin root user

Command History

Release Modification

Cisco CMX Release 10.4

This command was introduced.

Examples

The following example shows how to view the status of Cisco CMX API server:

[root@server]# cmxos apiserver status
+--------------------------+
|  CMX API Server Status   |
+---------------+----------+
| Configuration | Enabled  |
+---------------+----------+
| Status        | Running  |
+---------------+----------+

cmxos apiserver stop

To stop the CMX API Server, use the cmxos apiserver stop command.

cmxos apiserver stop

Syntax Description

stop

Stops the Cisco CMX API server.

Command Default

None

Command Modes

Admin root user

Command History

Release Modification

Cisco CMX Release 10.4

This command was introduced.

Examples

The following example shows how to start the Cisco CMX API server:

[root@server]# cmxos apiserver stop
Stopping CMX API Server...

cmxos apiserver user

To manage user IDs and passwords for the Cisco CMX API server, use the cmxos apiserver user command.

cmxos apiserver user { add userid password | delete userid | list }

Syntax Description

add

Adds a new CMX API server user.

userid

Enter a user ID (username) for the new CMX API server user.

password

Enter a temporary password for the new user.

delete userid

Deletes the specified user ID.

list

Displays CMX API server user IDs.

Command Default

None

Command Modes

Admin root user

Command History

Release Modification

Cisco CMX Release 10.5

This command was modified.

Cisco CMX Release 10.4

This command was introduced.

Examples

The following example shows how to add a new user for the Cisco CMX API server:

[root@server]# cmxos apiserver user add
Please enter the userid for the CMX API Server: user1
Please enter the password for the CMX API Server: password
Please re-enter the password for the CMX API Server: password
Restarting CMX API Server...
Stopping CMX API Server...
Starting CMX API Server...
Successfully updated userid/password and restarted the CMX API Server

The following example shows how to list Cisco CMX API server users:

[root@server]# cmxos apiserver user list
+---------+
| User ID |
+=========+
| admin   |
+---------+
| user1   |
+---------+

cmxos backup

To back up a node, use the cmxos backup command.

cmxos backup { path | i | all | help }

Syntax Description

--path DIRECTORY

Path where the backup file will be created.

-i, --include_only TEXT

Backups selected parts only. Options are database, cache, cassandra, influxdb, consul, floormaps, licenses, setup, and connectimages.

--all

Includes InfluxDB data in backup bundle. If specific options are not selected, only the following services are included in the backup bundle: confd, database, cache, cassandra, floormaps, licenses, setup, and connectimages.

--HELP

Shows the help content.

Command Default

None.

Usage Guidelines

This command should to be run using the cmxadmin (non-root) account. The destination directory for backup file requires rwx permission. When you specify a backup directory other than /tmp, ensure that the directory has "r/w/x" permission by user:cmx.

Examples

The following example shows how to back up a node:

[cmxadmin@10.10.10.10:~]$ cmxos backup
Please enter the path for backup file [/tmp]:
[17:43:50] Preparing for backup...
[17:43:50] Backup Database...
[17:43:51] Backup Cache...
[17:43:51] Backup Cassandra...
[17:43:53] Backup InfluxDb...
[17:43:53] Backup Consul...
[17:43:53] Backup Floormaps...
[17:43:53] Backup node configuration...
[17:43:59] Creating tar file..
[17:43:59] Done Backup. Created backup file
/tmp/cmx_backup_cmx-vmdev117_2015_03_10_17_43.tar.gz

cmxos benchmark disk

To benchmark disk performance, use the cmxos benchmark disk command.

cmxos benchmark disk [ --verbose ]

Syntax Description

--verbose

Prints full output.

Command Default

None.

Command History

Release Modification

Cisco CMX Release 10.2

This command was introduced.

Usage Guidelines

You must manually stop all Cisco CMX services before executing this command.

Examples

The following example shows how to verify the disk performance:

[root@server]# cmxos benchmark disk
This process will check disk performance on /opt/cmx/srv/
You must stop all CMX services manually before running this command
Do you want to continue?: yes
Running disk performance...this may take a while...please wait...
READ IOPS: 6085, WRITE IOPS: 2024

cmxos checkpostgresdatasize

To display postgres data size, use the cmxos checkpostgresdatasize command.

cmxos checkpostgresdatasize

Command Default

None.

Command History

Release Modification

Cisco CMX Release 10.3

This command was introduced.

Examples

[root@server]# cmxos checkpostgresdatasize
651488	/opt/cmx/srv/postgres

cmxos clean

To clean up files on CMX, use the cmxos clean command.

cmxos clean { find | normal | { delete } }

Syntax Description

find

Find files over 1 Gigabyte in size.

normal

List files which can be cleaned.

delete

Remove the files listed.

Command Default

None.

Command History

Release Modification

Cisco CMX Release 10.3

This command was introduced.

Examples

The following example shows how to search for large files:

[root@server]# cmxos clean find
Starting search for large files
Size: 1.96G File: /tmp/cmx_backup_CMX-LowEnd-200_2017_01_18_17_56.tar.gz
Size: 2.36G File: /tmp/cmx_backup_CMX-LowEnd-200_2017_03_14_11_16.tar.gz
Size: 2.43G File: /tmp/cmx_backup_CMX-LowEnd-200_2017_03_20_14_36.tar.gz
Size: 2.32G File: /tmp/cmx_backup_CMX-LowEnd-200_2017_01_18_18_00.tar.gz
Size: 1.45G File: /var/log/maillog-20170212.gz
Size: 2.63G File: /var/log/maillog-20170205.gz
Size: 6.84G File: /home/cmxadmin/cmx_backup_CMX-LAC-210_2017_03_23_22_09.tar.gz
Size: 1.17G File: /home/cmxadmin/CISCO_CMX-10.3.0-58.cmx
Completed search for large files
[root@server]# cmxos clean normal
Files which can be removed in: /opt/cmx/var/log
/opt/cmx/var/log/adminui/adminui.pid
/opt/cmx/var/log/adminui/webui.ans
/opt/cmx/var/log/agent/server.log.3
/opt/cmx/var/log/agent/server.log.1
/opt/cmx/var/log/agent/server.log.5
/opt/cmx/var/log/agent/server.log.2
/opt/cmx/var/log/agent/server.log.4
/opt/cmx/var/log/backup.log.2
/opt/cmx/var/log/backup.log.3
/opt/cmx/var/log/setup.log.8
/opt/cmx/var/log/setup.log.7
/opt/cmx/var/log/cmxjobs.log.1
/opt/cmx/var/log/cmxjobs.log.5
[root@server]# cmxos clean normal --delete
Are you sure you wish to remove files? [y/N]: y
Removing files in: /opt/cmx/var/log
Remove: /opt/cmx/var/log/agent/server.log.2
Remove: /opt/cmx/var/log/agent/server.log.1
Remove: /opt/cmx/var/log/cmxjobs.log.5
Remove: /opt/cmx/var/log/cmxjobs.log.2
Remove: /opt/cmx/var/log/cmxjobs.log.4
Remove: /opt/cmx/var/log/cmxjobs.log.1
Remove: /opt/cmx/var/log/cmxjobs.log.3

cmxos configure

To configure the network and operating system parameter, use the cmxos configure command.

cmxos configure

Command Default

None

Usage Guidelines

This command should to be run at the root user level. You can use the --force option to force a fresh configuration if the device is already configured.

Examples

The following example shows how to configure the network and operating system parameters:

[root@server]# cmxos configure --force
*** The system is already configured
********************************************************************************
Checking if the machine meets required specification...
********************************************************************************
+----------+------------------------+--------------+--------+
| Check | expected | actual | Result |
+==========+========================+==============+========+
| memory | 8GB | 25GB | ? |
+----------+------------------------+--------------+--------+
| cpu | 4 | 8 | ? |
+----------+------------------------+--------------+--------+
| disk | 50GB | 51GB | ? |
+----------+------------------------+--------------+--------+
| hostname | rfc compliant hostname | cmx-vmdev146 | ? |
+----------+------------------------+--------------+--------+

cmxos encryptdisk

To encrypt CMX data on the /opt partition, use the cmxos encryptdisk command.

cmxos encryptdisk

Command Default

Encryption is not enabled.

Command Modes

Admin root user

Command History

Release Modification

Cisco CMX Release 10.5

This command was introduced.

Usage Guidelines

Use this command when your security protocol requires encryption of CMX data. For more information about this task, refer to Cisco CMX Configuration Guide, release 10.5.


Note

We recommend that you enable encryption at installation, or as soon as possible afterward. The encryption process requires time proportional to the amount of data present on the /opt partition.

Important

Encryption cannot be disabled or undone. It requires someone with root access credentials to manually enter the encrypted disk passphrase from the command line each time the device is rebooted or powered up.

Examples

The following example show how to enable encryption after CMX installation.

[root@server]# cmxos encryptdisk

Have you closed all SSH sessions to this CMX? [y/N]:y
Are you sure you want to encrypt the /opt partition of the disk ? [y/N]:y

Checking disk space requirements for backing up /opt folder...
Looks Good.

Proceed with stopping all CMX services? [y/N]:y
Backing up /opt folder into /var ...
tar backup done.
Press Enter key to enter rescue mode and begin the encryption.

Press Enter.

Shredding /opt ...
Shread: List of deleted folders
...
Formatting /opt ...
You will be prompted to set a passphrase for encrypted disk /opt.
Choose a passphrase, Enter and Verify it.

Note:
On every boot / power up, you will be prompted for this passphrase.
System will continue only if this passphrase is correct.
WARNING!
========
This will overwrite data on /opt irrevocably.
Are you sure? (Type uppercase yes): YES

Enter a passphrase.

Enter passphrase:
Verify passphrase:
Command successful.

Opening /opt ...
Enter passphrase for /opt:
Encryption of /opt is complete.

System will reboot now.
Upon (every) restart, when prompted to enter passphrase for /opt partition, 
enter the passphrase you just set.

Press Enter to continue with reboot

Press Enter.

Please enter passphrase for disk opt on /opt!:

cmxos etchosts

To configure etc hosts, use the cmxos etchosts command.

cmxos etchosts

Syntax Description

This command has no arguments or keywords.

Command Default

None.

Command History

Release Modification

Cisco CMX Release 10.2

This command was introduced.

Usage Guidelines

This command will run and returns no status.

Examples

[root@server]# cmxos etchosts
[root@cmx-vmdev185 cmxadmin]# cmxos etchosts --help
Usage: __main__.py etchosts [OPTIONS]
  Configure /etc/hosts properly
Options:
  --help  Show this message and exit.

cmxos firstboot

To set up the Cisco Connected Mobile Experiences (Cisco CMX) again, use the cmxos firstboot command.

cmxos firstboot

Command Default

None.

Usage Guidelines

This command should be run at the root user level. You can use the --force option to force a fresh configuration if the device is already configured.

Examples

The following example shows how to set up Cisco CMX again:

[root@server]# cmxos firstboot
Not first boot....Exiting...

cmxos fixhaproxy

To verify the HA proxy permissions on Cisco Connected Mobile Experiences (Cisco CMX), use the cmxos fixhaproxy command.

cmxos fixhaproxy

Command Default

None.

Usage Guidelines

This command should be run at the root user level.

Examples

The following example shows how to verify HA proxy permissions:

[root@server]# cmxos fixhaproxy
Raising haproxy setcap...

cmxos health

To check the health of a Cisco CMX system, use the cmxos health command.

cmxos health { filedescriptors | ntp }

Syntax Description

filedescriptors

Checks the CMX file descriptors for issues.

ntp

Checks the CMX NTP systems for issues.

Command Default

None.

Command History

Release Modification

Cisco CMX Release 10.5

This command was modified.

Cisco CMX Release 10.2

This command was introduced.

Usage Guidelines

The cmxos health filedescriptors command returns the total number of open file descriptors. The cmxos health ntp command returns the status of the CMX Network Time Protocol (NTP) systems.

Examples

The following example shows how to check the health of a Cisco CMX system:

[root@server]# cmxos health filedescriptors
2195 total file descriptors open

[root@server]# cmxos health ntp
NTP Synchronization error:
unsynchronised
  time server re-starting
   polling server every 8 s

cmxos inventory

To show full inventory of a node, use the cmxos inventory command.

cmxos inventory

Command Default

None.

Command History

Release Modification

Cisco CMX Release 10.2

This command was introduced.

Examples

The following example shows how to view the inventory details:

[root@server]# cmxos inventory
UDI: AIR-MSE-3365-K9 Serial Number -  FCH1904V055

State of the RAID array: Healthy and working normally
Capacity of the RAID array: 1.088 TB
Type of disks in RAID array: Spinning Disk Drive
All chassis fans operating normally
One of the power supplies in the chassis has failed or it has not been installed/connected
Disk Capacity: 1.0T
Disk space used: 33.2G
Memory installed: 63.00G 
CPUs  installed: 20
CPU Type:  Intel(R) Xeon(R) CPU E5-2650 v3 @ 2.30GHz
Server uptime: 6 Hours, 59 Minutes, 44 Seconds
Server boot time: Mon, 27 Mar 2017 16-44-36 
Number of server reboots: 1

cmxos kill

To kill services, use the cmxos kill command.

cmxos kill silent

Syntax Description

--silent

Slinetly kills services without confirmation.

Command Default

None.

Command History

Release Modification

Cisco CMX Release 10.2

This command was introduced.

Usage Guidelines

Examples

[root@cmx-vmdev185 cmxadmin]# cmxos kill
This command will force kill all CMX processes, for dev use only
Do you want to continue?:

cmxos monit

To manage the monitoring of Cisco CMX services, use the cmxos monit command.

cmxos monit { configure | start | stop | wipe }

Syntax Description

configure

Configures the default monitor settings.

start

Enables monitored services.

stop

Enables monitored services.

wipe
Deletes the default monitoring settings.
Note 

To reset to the default monitoring settings, use the cmxos monit configure command

Command Default

Disabled.

Command History

Release Modification

Release 10.2.0

This command was introduced.

Examples

The following example shows how to display the monitoring settings:

[cmxadmin]$ cmxos monit configure
Deleting all monit configurations....
Configuring monit mail settings...
Configuring monit OS settings...
Configuring monit CMX services settings...

The following example shows how to enable monitoring of Cisco CMX services:

[cmxadmin]$ cmxos monit start
Starting monit:

cmxos openports

To open ports, based on a node rule, use the cmxos openports command.

cmxos openports { analytics | location | database }

Syntax Description

analytics

Adds a 10-GB swap space to a node.

location

Configures the network and operating system parameters.

database

Sets up the Cisco Connected Mobile Experiences (Cisco CMX) database again.

Command Default

None.

Usage Guidelines

This command should be run at the root user level.

Examples

The following example shows how to open ports based on a node:

[root@server]# cmxos openports analytics
Opened port 6541
Opened port 6542
Successfully opened all ports. Saving iptables info...

cmxos reconfigure

To change network configuration information after deployment, use the cmxos reconfigure command.

cmxos reconfigure

Command Default

None

Usage Guidelines

This command, which should be run at the root user level, also allows you to change the IP address, netmask, default gateway, and DNS server information. Changing the hostname through command line is not supported. Use the cmxos reconfigure command to change a hostname, IP address, or any of the network parameters.

NTP server and timezone/date configurations are also executed by running this command.


Note

Do not execute the cmxos reconfigure command when Cisco CMX services are not installed. This will prevent execution failures.


Examples

The following example shows how to reconfigure the network after Cisco CMX installation:

[root@server]# cmxos reconfigure
This command will wipe all system metrics data when the configuration is changed
Do you want to continue?: yes
Please enter hostname [cisco-cmx-centos7-test0]:
Please enter IP address [192.0.2.1]:
Please enter netmask [255.255.255.0]:
Please enter gateway [192.0.2.2]:
Please enter DNS server [192.0.2.3]:
Please enter search domain name [example.com]:
Are the network settings correct?: yes
Stopping keepalived service
Verify keepalived service has been stopped
Successfully stopped the keepalived service.
Starting keepalived service
ERROR: Failed to start keepalived service.
********************************************************************************
Configuring NTP Server...
********************************************************************************
Please enter the NTP server name (blank for no NTP server) [ntp.esl.cisco.com]:
Setting ntp server ntp.esl.cisco.com
********************************************************************************
Configuring Timezone and date...
********************************************************************************
Please identify a location so that time zone rules can be set correctly.
Please select a continent or ocean.
 1) Africa
 2) Americas
 3) Antarctica
 4) Arctic Ocean
 5) Asia
 6) Atlantic Ocean
 7) Australia
 8) Europe
 9) Indian Ocean
10) Pacific Ocean
11) none - I want to specify the time zone using the Posix TZ format.
#? 10
Please select a country.
 1) Chile                      15) Northern Mariana Islands
 2) Cook Islands               16) Palau
 3) Ecuador                    17) Papua New Guinea
 4) Fiji                       18) Pitcairn
 5) French Polynesia           19) Samoa (American)
 6) Guam                       20) Samoa (western)
 7) Kiribati                   21) Solomon Islands
 8) Marshall Islands           22) Tokelau
 9) Micronesia                 23) Tonga
10) Nauru                      24) Tuvalu
11) New Caledonia              25) United States
12) New Zealand                26) US minor outlying islands
13) Niue                       27) Vanuatu
14) Norfolk Island             28) Wallis & Futuna
#? 25
Please select one of the following time zone regions.
 1) Eastern (most areas)              16) Central - ND (Morton rural)
 2) Eastern - MI (most areas)         17) Central - ND (Mercer)
 3) Eastern - KY (Louisville area)    18) Mountain (most areas)
 4) Eastern - KY (Wayne)              19) Mountain - ID (south); OR (east)
 5) Eastern - IN (most areas)         20) MST - Arizona (except Navajo)
 6) Eastern - IN (Da, Du, K, Mn)      21) Pacific
 7) Eastern - IN (Pulaski)            22) Alaska (most areas)
 8) Eastern - IN (Crawford)           23) Alaska - Juneau area
 9) Eastern - IN (Pike)               24) Alaska - Sitka area
10) Eastern - IN (Switzerland)        25) Alaska - Annette Island
11) Central (most areas)              26) Alaska - Yakutat
12) Central - IN (Perry)              27) Alaska (west)
13) Central - IN (Starke)             28) Aleutian Islands
14) Central - MI (Wisconsin border)   29) Hawaii
15) Central - ND (Oliver)
#? 21

The following information has been given:

        United States
        Pacific

Therefore TZ='America/Los_Angeles' will be used.
Local time is now:      Mon May 21 08:25:39 PDT 2018.
Universal Time is now:  Mon May 21 15:25:39 UTC 2018.
Is the above information OK?
1) Yes
2) No
#? 1
The Timezone selected is America/Los_Angeles

The current time is Mon May 21 08:25:40 PDT 2018

Enter Date (YYYY-mm-dd hh:mm:ss) (blank to sync with ntp):  []:
*** No changes were detected


Note

This command opens the Device Configuration window, where you can take the appropriate action, that is reconfigure the device or the DNS.


cmxos restore

To restore a node, use the cmxos restore command.

cmxos restore { file | path | i | ignore_version | ignore_licenses | help }

Syntax Description

--file PATH

Path where the restore file is located.

--path DIRECTORY

Path where the restore file will be created.

-i, --include_only TEXT

Restore selected parts only. Options are database, cache, cassandra, influxdb, consul, floormaps, licenses, setup, connectimages.

--ignore_version

Skip version check during restore.

--ignore_licenses

Skip restoring Cisco CMX licenses contained in the backup bundle and retain local licenses.

--HELP

Shows the help content.

Command Default

None.

Usage Guidelines

By default, this command performs restoration of all services excluding the InfluxDB data service. If you want to restore InfluxDB data, explicitly enter the InfluxDB service name along with other services by using --include_only while running the command.

Examples

The following example shows how to restore a node:

[root@server]# cmxos restore
Please enter the backup file path: /tmp/cmx_backup_cmx-vmdev117_2015_03_10_17_43.tar.gz
[17:44:12] Preparing for restore...
[17:44:12] Untarring backup file...
[17:44:13] Stopping all services...
[17:44:16] Restoring Database...
Restarting database...
[17:44:26] Restoring Cache...
Stopping cache_6379...
Restarting cache_6379...
Stopping cache_6381...
Restarting cache_6381...
Stopping cache_6380...
Restarting cache_6380...
[17:44:55] Restoring Cassandra...
Stopping Cassandra...
Restarting Cassandra...
...............
[17:45:19] Restoring Influxdb...
[17:45:19] Restoring consul...
[17:45:19] Restoring floormaps...
[17:45:19] Running Post Restore Tasks...
[17:45:19] Migrating Schemas...
[17:45:19] Migrating Cassandra schemas...
[17:45:20] Restarting all services...
[17:45:23] Done

cmxos sslcert

To replace default haproxy certificate, use the cmxos sslcert command.

cmxos sslcert

Command Default

None.

Command History

Release Modification

Cisco CMX Release 10.2

This command was introduced.

Examples

cmxos sysproxy

To enable an outbound proxy on your Cisco CMX server, use the cmxos sysproxy command.

cmxos sysproxy { clear | disable | enable | no_proxy | proxy | show | ftp_proxy | http_proxy | https_proxy }

Syntax Description

clear

Removes the proxy settings.

disable

Disables the use of the proxy settings.

enable

Enables the use of the proxy settings.

no_proxy

Sets the no_proxy environment variable.

proxy

Sets the proxy environment variables for http_proxy, https_proxy, ftp_or proxy.

show

Displays the proxy settings.

ftp_proxy

Sets the ftp proxy.

http_proxy

Sets the http proxy.

https_proxy

Sets the https proxy.

Command Default

Proxy is disabled.

Command Modes

Admin root user

Command History

Release Modification

Cisco CMX Release 10.3.1

This command was introduced.

Usage Guidelines

This command supersedes the information from this post: https://communities.cisco.com/docs/DOC-70904.

Use this command for environments where an outbound proxy is required on the Cisco CMX server. For example, if you happen to be in a secure internal network where even outbound traffic via HTTPS requires that it move through a proxy server.

If you set the proxy setting on the Cisco CMX server, make sure to use the no_proxy setting on the attached controllers to avoid interference with the NMSP Network Mobility Services Protocol (NMSP).

If you change the Cisco CMX proxy settings, you must restart Cisco CMX for the change to take effect. Use the cmxctl restart command to restart Cisco CMX.

Examples

The following example shows how to set a proxy on the Cisco CMX server, and then verify the change and restart Cisco CMX:

[root@server]# cmxos sysproxy proxy https://proxy-wsa.esl.cisco.com:80

[root@server]# cmxos sysproxy show
USE_PROXY=1
PROXY_URL=http://proxy-wsa.esl.cisco.com:80
NO_PROXY_LIST=""
[root@server]# cmxctl restart

The following example shows how to enable a proxy on the Cisco CMX server, and then verify the change and restart Cisco CMX:

[root@server]# cmxos sysproxy enable

[root@server]# cmxos sysproxy show
USE_PROXY=1
PROXY_URL=http://proxy-wsa.esl.cisco.com:80
NO_PROXY_LIST=""
[root@server]# cmxctl restart

The following example shows how to disable a proxy on the Cisco CMX server, and then verify the change and restart Cisco CMX:

[root@server]# cmxos sysproxy disable

[root@server]# cmxos sysproxy show
USE_PROXY=0
PROXY_URL=http://proxy-wsa.esl.cisco.com:80
NO_PROXY_LIST=""
[root@server]# cmxctl restart

The following example shows how to clear proxy settings, and then verify the change and restart Cisco CMX:

[root@server]# cmxos sysproxy clear

[root@server]# cmxos sysproxy show
USE_PROXY=0
PROXY_URL=""
NO_PROXY_LIST=""
[root@server]# cmxctl restart

cmxos techsupport

To collect technical support information, use the cmxos techsupport command.

cmxos techsupport { all | cmx | location | map | network | services | system }

Syntax Description

all

Collect all technical support information

cmx

Collect CMX information

location

Collect location support information

map

Collect map support information

network

Collect network information

services

Collect CMX services information.

system

Collect system information

silent

Silently run with prompting

Command Default

None.

Usage Guidelines

This command will return all CLI command outputs helpful for debugging.

Command History

Release Modification

Cisco CMX Release 10.3

This command was introduced.

cmxos techsupport dump

To dump all technical support information, use the cmxos techsupport dump command.

cmxos techsupport dump

Command Default

None.

Command History

Release Modification

Cisco CMX Release 10.3

This command was introduced.

cmxos upgrade

To upgrade Cisco Connected Mobile Experiences (Cisco CMX) with a new Red Hat Package Manager (RPM) or package, use the cmxos upgrade command.

cmxos upgrade

Command Default

None.

Usage Guidelines

This command should be run at the root user level. The CLI accepts either a local file or an HTTP URL. This command works only when you have a later version than the existing one to upgrade.

Examples

The following example shows how to upgrade the Cisco CMX using RPM or package:

[root@server]# cmxos upgrade
The nodeagent service is not running.
Agent is not running, starting it now.
Starting nodeagent Process...
Stopping nodeagent Process...
Done
Successfully shutdown nodeagent Process.
Stopping consul Process...
Successfully shutdown consul Process.
Stopping qlesspyworker Process...
Successfully shutdown qlesspyworker Process.
Stopping cassandra Process...
Successfully shutdown cassandra Process.
Stopping iodocs Process...
The iodocs service is not running.
Stopping redis6383 Process...
Successfully shutdown redis6383 Process.
Stopping redis6380 Process...
Successfully shutdown redis6380 Process.
Stopping redis6381 Process...
Successfully shutdown redis6381 Process.
Stopping influxdb Process...
The influxdb service is not running.
Stopping collectd Process...
The collectd service is not running.
Stopping confd Process...
The confd service is not running.
Stopping redis6379 Process...
Successfully shutdown redis6379 Process.
Stopping redis6378 Process...
Successfully shutdown redis6378 Process.
Stopping haproxy Process...
Stopping postgres Process...
Successfully shutdown postgres Process.
Stopping analytics Process...
The analytics service is not running.
Stopping location Process...
The location service is not running.
Stopping configuration Process...
The configuration service is not running.
Stopping halo Process...
The halo service is not running.
Stopping matlabengine Process...
The matlabengine service is not running.
Stopping nmsplb Process...
The nmsplb service is not running.
Shutting down

cmxos vacuumdb

To run the full vacuum command on the postgres database running within Cisco CMX, use the cmxos vacuumdb command.

cmxos vacuumdb

Command Default

None

Command Modes

Admin root user

Command History

Release Modification

Cisco CMX Release 10.4

This command was introduced.

Usage Guidelines

This command internally runs the ‘vacuumdb –vfa’ on the postgres DB. This command is an advanced command and should not be regularly used by the customer. In case of the postgres DB taking up too much disk space, this command may be run to compact the DB.

cmxos verify

To verify the virtual machine configuration, use the cmxos verify command.

cmxos verify

Command Default

None.

Examples

The following example shows how to verify the virtual machine configuration:

[root@server]# cmxos verify
+----------+------------------------+--------------+--------+
| Check | expected | actual | Result |
+==========+========================+==============+========+
| memory | 8GB | 25GB | ? |
+----------+------------------------+--------------+--------+
| cpu | 4 | 8 | ? |
+----------+------------------------+--------------+--------+
| disk | 50GB | 51GB | ? |
+----------+------------------------+--------------+--------+
| hostname | rfc compliant hostname | cmx-vmdev146 | ? |
+----------+------------------------+--------------+--------+