Replacing Components

This chapter contains the following topics:

Replacing a Fan Module

You can replace a fan module while the fabric interconnect is operating so long as you perform the replacement within one minute. If you cannot perform the replacement within one minute, leave the original fan module in the chassis to maintain the designed airflow until you have the replacement fan module on hand and can perform the replacement.


Caution

If you are replacing a module during operations, be sure that the replacement fan module has the correct direction of airflow, which means that it has the same airflow direction as the other modules in the chassis. Also, be sure that the airflow direction takes in air from a cold aisle and exhausts to a hot aisle. Otherwise, the fabric interconnect can overheat and shutdown.

If you are changing the airflow direction of all the modules in the chassis, you must shutdown the fabric interconnect before replacing all the fan and power supply modules with modules using the other airflow direction. During operations, all of the modules must have the same direction of airflow.


Fans intake air, blow it through the chassis, and exhausts heated air through the port side. Make sure to install fans correctly for proper airflow.
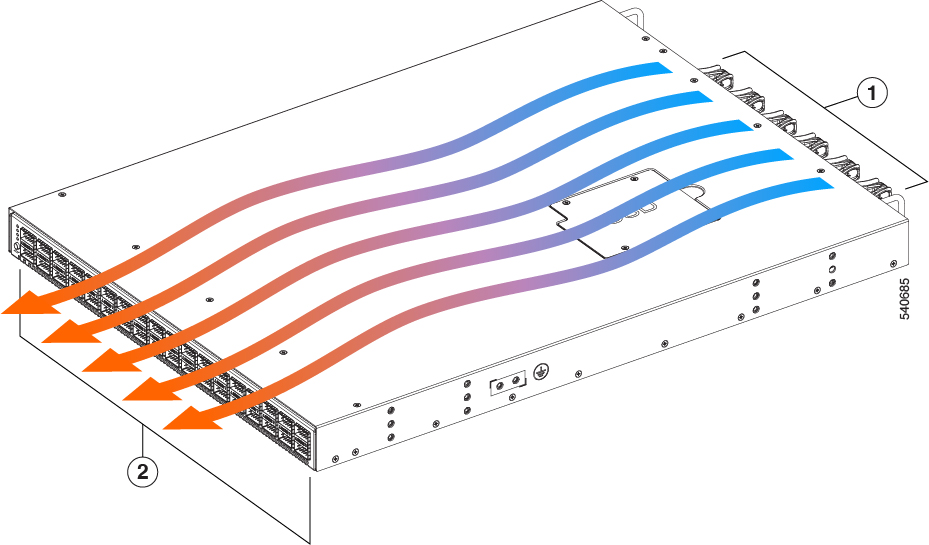
1

Fan side, intake air

2

Port side, exhaust air

Removing a Fan Module


Warning

The fans might still be turning when you remove the fan assembly from the chassis. Keep fingers, screwdrivers, and other objects away from the openings in the fan assembly's housing.


Procedure


Step 1

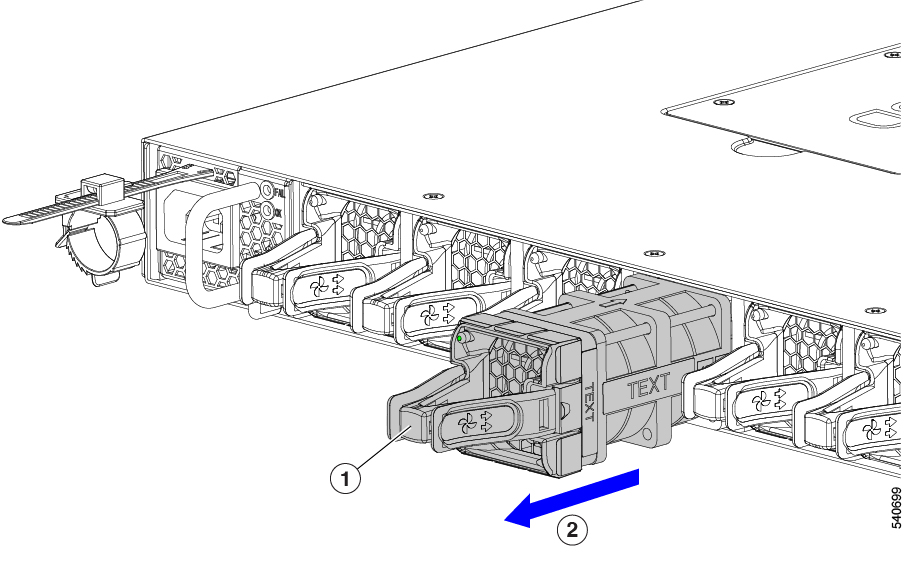
On the fan module that you are removing, press the two sides of the fan module handle next to where it connects to the fan module and pull on the handles enough to unseat it from its connectors.

Step 2

Holding the handle, pull the module out of the chassis.

Caution 

Do not touch the electrical connectors on the back side of the module and prevent anything else from coming into contact with and damaging the connectors.


Installing a Fan Module

Before you begin

  • A fan slot must be open and ready for the new fan module to be installed.

  • You must have a new fan module on hand and ready to install within one minute of removing the original fan module if the fabric interconnect is operating.

  • The new fan module must have the same airflow direction as the other fan and power supply modules installed in the fabric interconnect.

Procedure


Step 1

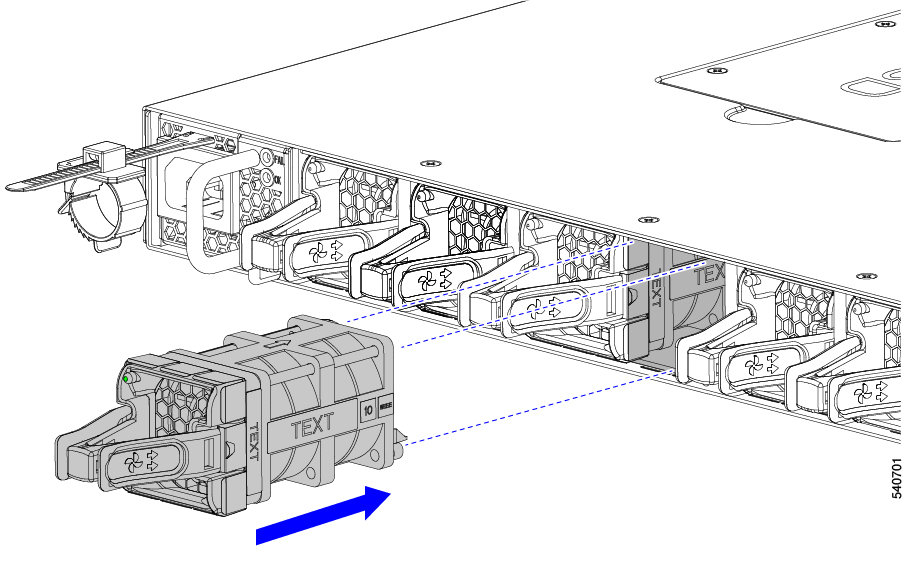
Holding the fan module by its handle, align the back of the fan module (the side with the electrical connectors) to the open fan slot in the chassis.

Step 2

Slide the fan module into the slot until it clicks in place.

Step 3

Verify that the Status LED turns on and becomes green.


Replacing a Power Supply Module

The fabric interconnect requires two power supplies for redundancy. With one power supply providing the necessary power for operations, you can replace the other power supply during operations so long as the new power supply has the same airflow direction as the other modules in the chassis.

You can replace a power supply with another supported power supply that has the same power source type and the same wattage rating as the other installed power supply. Additionally, the airflow direction of the power supply must match or conform to the airflow direction of the installed fan modules. For the airflow direction used by the fabric interconnect, see the coloring of the fan modules.

Removing an AC Power Supply

To remove an AC power supply, you must first disconnect the power cable and then remove the module from the chassis.

Before you begin

  • To replace a power supply during operations, you must have a functioning power supply providing power to the fabric interconnect while you replace the other power supply. If there is only one power supply installed in the fabric interconnect and you need to replace it, install the new power supply in the open slot and power it up before removing the original power supply.

  • Ensure that the chassis is grounded. For grounding instructions, see Grounding the Fabric Interconnect.

Procedure


Step 1

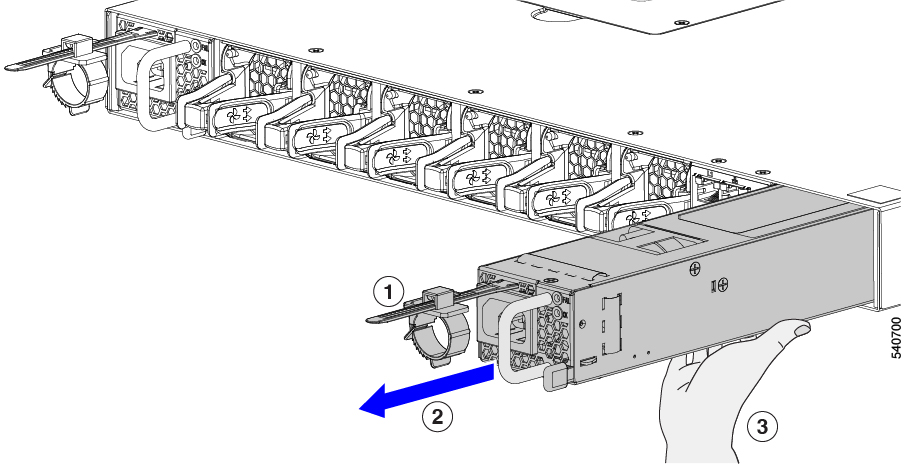
Pull the power cord out from the power receptacle on the power supply to be removed and verify that the LED turns off (1 in the following illustration).

Note 

The LED might be on and amber colored to indicate that the input power has been disconnected.

Step 2

Remove the power supply from the chassis by grasping the handle and pulling the power supply part way out of the chassis (2).

Step 3

Place your other hand under the power supply to support it while you slide it out of the chassis (3).

Either place the power supply on an antistatic surface or pack it in its packing materials.

Step 4

If the power supply slot is to remain empty, install a blank power supply filler panel (part number N2200-P-BLNK).


What to do next

You are ready to install the replacement power supply.

Installing an AC Power Supply

You can replace one power supply while the other one provides power to the fabric interconnect.

Before you begin

  • The power supply that you are installing must be capable of using the same airflow direction as the fan trays installed in the same fabric interconnect and it must use the same type of power source as the other power supply installed in the same fabric interconnect.


    Note

    If the power supply that you are replacing has a different color handle than the replacement power supply, verify that it has or will have the same airflow direction as the other modules in the fabric interconnect.


  • An AC power source must be within reach of the power cable that will be used with the replacement power supply. If you are using n+n power redundancy, there must be a separate power source for each power supply installed in the chassis. Otherwise, only one power source is required.

  • There must be an earth ground connection to the chassis that you are installing the replacement module. Typically, the chassis is grounded by its metal-to-metal connection with a grounded rack. If you need to ground the chassis, see Grounding the Fabric Interconnect.

Procedure


Step 1

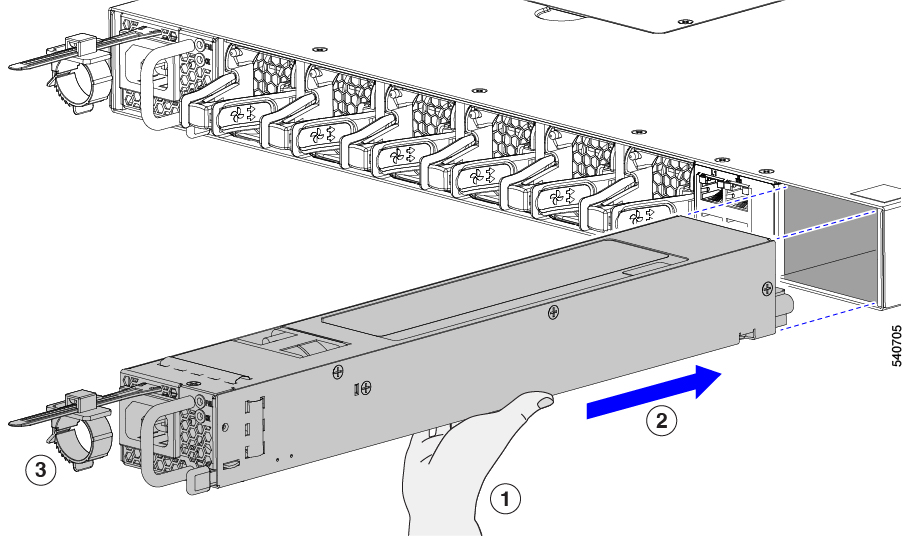
Holding the replacement power supply with one hand underneath the module (1 in the following illustration) and the other hand holding the handle, align the back end of the power supply (the end with the electrical connections) to the open power supply slot before carefully sliding the power supply all the way into the slot (2).

Note 

If the power supply does not fit into the open slot, turn the module over before sliding it carefully into the open slot.

Step 2

Test the installation by trying to pull the power supply out of the slot without using the release latch.

If the power supply does not move out of place, it is secured in the slot. If the power supply moves, carefully press it all the way into the slot until it clicks in place.

Step 3

Attach the power cable to the electrical outlet on the front of the power supply (3).

Step 4

Make sure that the other end of the power cable is attached to the appropriate power source for the power supply.

Note 

Depending on the outlet receptacle on your power distribution unit, you might need the optional jumper cable to connect the fabric interconnect to your outlet receptacle.

Step 5

Verify that the power supply is operational by making sure that the power supply OK LED is green and the FAIL LED is dark.


Recycling the PCBA

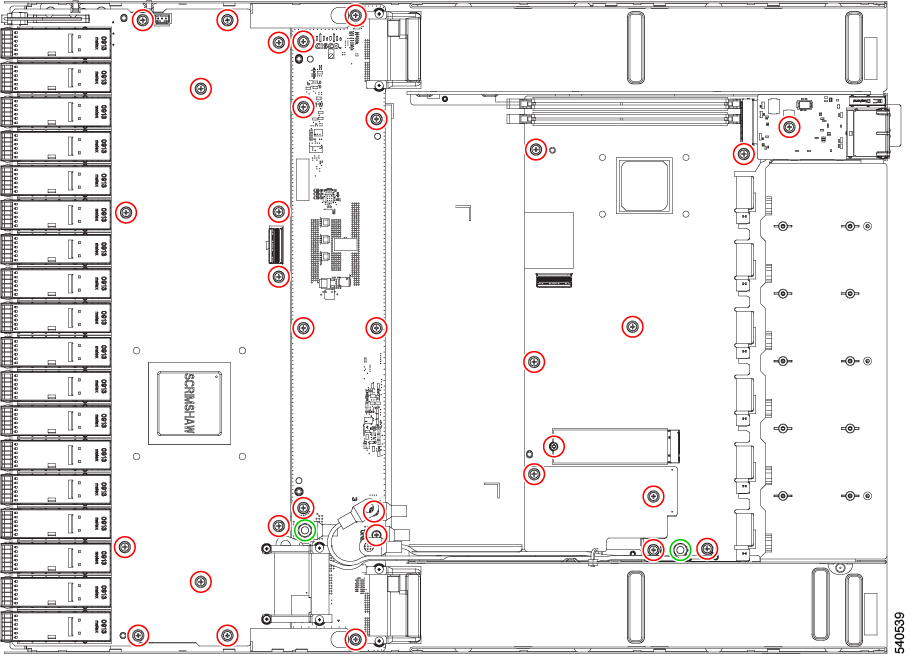
The PCBA is secured to the fabric interconnect's sheet metal through the following:

  • 32 M3 screws.

  • Two M5 hex nuts.

You must disconnect the PCBA from the sheet metal before recycling the PCBA.

Before you begin


Note

For Recyclers Only! This procedure is not a standard field-service option. This procedure is for recyclers who will be reclaiming the electronics for proper disposal to comply with local eco design and e-waste regulations.


To remove the printed circuit board assembly (PCBA), the following requirements must be met:

  • The fabric interconnect must be disconnected from facility power.

  • The fabric interconnect must be removed from the equipment rack.

Gather the following tools before you start this procedure:

  • #2 Phillips screwdriver

  • 8mm hex wrench

Procedure


Step 1

Remove the power supply units (PSUs).

See Removing a Fan Module.

Step 2

Remove the power supply units (PSUs).

See Removing an AC Power Supply

Step 3

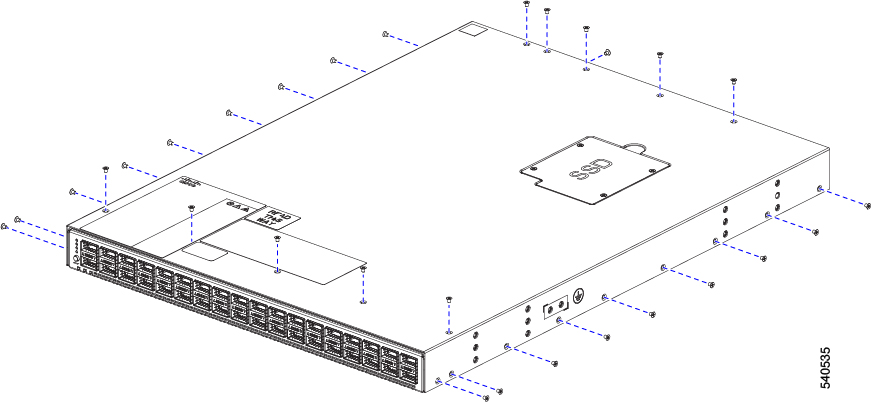
Remove the cover.

  1. Using a #2 Phillips screwdriver, remove 29 countersink screws.

  2. Lift the top cover off of the fabric interconnect.

Step 4

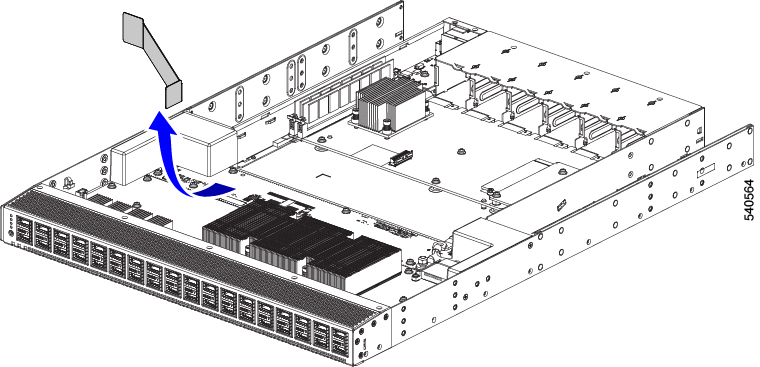
Grasp the center of the airflow baffle and pull it toward the port side of the fabric interconnect to remove it.

The airflow baffle is held in place by adhesive, so just apply enough force to break the adhesive.

Step 5

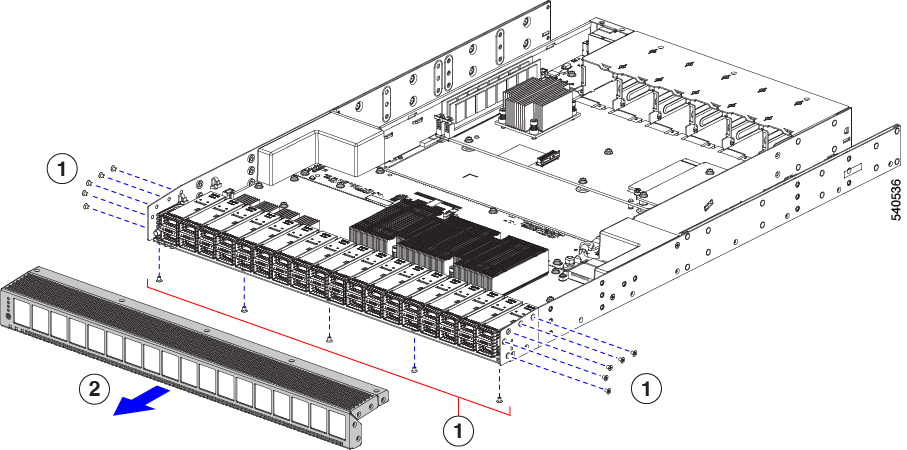
Remove the faceplate.

  1. Using a #2 Phillips screwdriver, remove 15 countersink screws.

  2. Slide the faceplate off of the fabric interconnect.

Step 6

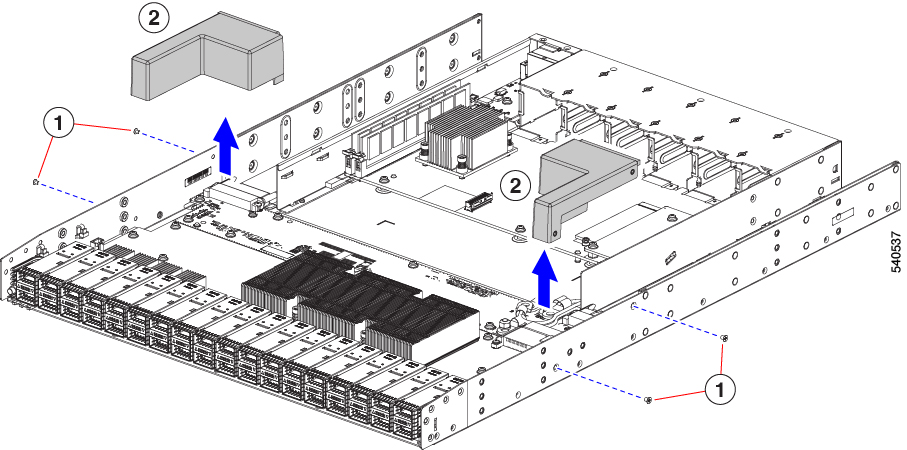
Remove the PSU baffles.

  1. Using a #2 Phillips screwdriver, remove four screws (2 screws per baffle.)

  2. Grasp each baffle and lift it off of the PCBA.

Step 7

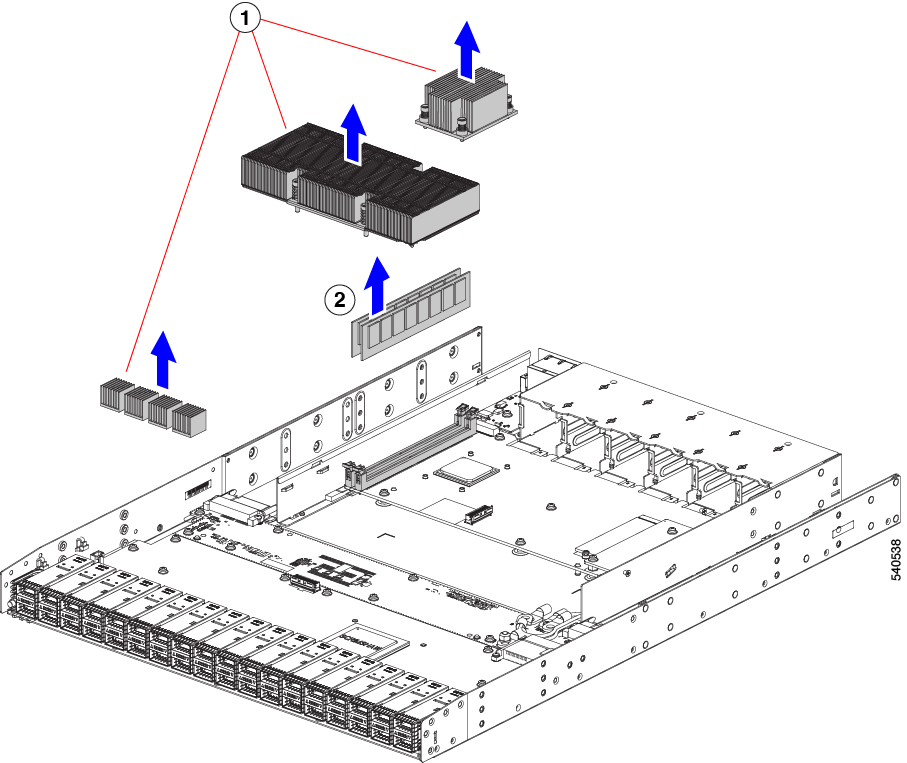
Remove the heatsinks and DIMMs.

  1. Using a #2 Phillips screwdriver, remove the screws that secure the heatsinks to the PCBA.

  2. Lift each of the heatsinks off of the PCBA.

  3. Grasp and remove the DIMMs from their sockets.

Step 8

Remove the PCBA.

  1. Using a #2 Phillips screwdriver, remove the 32 M3 screws (shown in red circles) that secure the PCBA to the sheet metal.

  2. Using an 8mm hex wrench, remove the two M5 hex nuts (shown in green circles) that secure the PCBA to the sheet metal.

  3. Lift the PCBA off of the sheet metal.

Step 9

Recycle or dispose of the PCBA in compliance with your local e-waste regulations.