Deploy the ASAv Using Hyper-V

You can deploy the ASAv using Microsoft Hyper-V.

Overview

You can deploy Hyper-V on a standalone Hyper-V server or through the Hyper-V Manager. For instructions to install using the Powershell CLI commands, see Install the ASAv on Hyper-V Using the Command Line, page 46. For instructions to install using the Hyper-V Manager, see Install the ASAv on Hyper-V Using the Hyper-V Manager, page 46. Hyper-V does not provide a serial console option. You can manage Hyper-V through SSH or ASDM over the management interface. See Configuring SSH, page 54 for information to set up SSH.

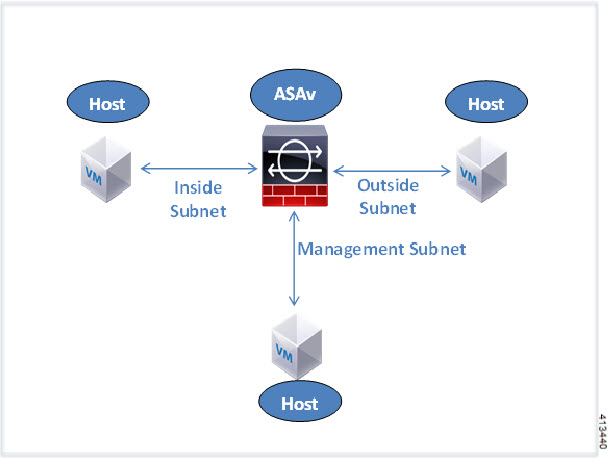
The following figure shows the recommended topology for the ASAv in Routed Firewall Mode. There are three subnets set up in Hyper-V for the ASAv—management, inside, and outside.

Figure 1. Recommended Topology for the ASAv in Routed Firewall Mode

Guidelines and Limitations

  • Platform Support

    • Cisco UCS B-Series servers

    • Cisco UCS C-Series servers

    • Hewlett Packard Proliant DL160 Gen8

  • OS Support

    • Windows Server 2019

    • Native Hyper-V


      Note


      The ASAv should run on most modern, 64-bit high-powered platforms used for virtualization today.


  • File format

    Supports the VHDX format for initial deployment of the ASAv on Hyper-V.

  • Day 0 configuration

    You create a text file that contains the ASA CLI configuration commands that you need. See Prepare the Day 0 Configuration File for the procedure.

  • Firewall Transparent Mode with Day 0 configuration

    The configuration line ‘firewall transparent’ must be at the top of the day 0 configuration file; if is appears anywhere else in the file, you could experience erratic behavior. See Prepare the Day 0 Configuration File for the procedure.

  • Failover

    The ASAv on Hyper-V supports Active/Standby failover. For Active/Standby failover in both routed mode and transparent mode you must enable MAC Address spoofing on all the virtual network adapters. See Configure MAC Address Spoofing. For transparent mode in the standalone ASAv, the management interface should not have the MAC address spoofing enabled because the Active/Standby failover is not supported.

  • Hyper-V supports up to eight interfaces. Management 0/0 and GigabitEthernet 0/0 through 0/6. You can use GigabitEthernet as a failover link.

  • VLANs

    Use the Set-VMNetworkAdapterVLan Hyper-V Powershell command to set VLANs on an interface in trunk mode. You can set the NativeVlanID for the management interface as a particular VLAN or ‘0’ for no VLAN. Trunk mode is not persistent across Hyper-V host reboots. You must reconfigure trunk mode after every reboot.

  • Legacy network adapters are not supported.

  • Generation 2 virtual machines are not supported.

  • Microsoft Azure is not supported.

Prerequisites

  • Install Hyper-V on MS Windows 2012.

  • Create the Day 0 configuration text file if you are using one.

    You must add the Day 0 configuration before the ASAv is deployed for the first time; otherwise, you must perform a write erase from the ASAv to use the Day 0 configuration. See Prepare the Day 0 Configuration File for the procedure.

  • Download the ASAv VHDX file from Cisco.com.

    http://www.cisco.com/go/asa-software


    Note


    A Cisco.com login and Cisco service contract are required.


  • Hyper-V switch configured with at least three subnets/VLANs.

  • For Hyper-V system requirements, see Cisco Secure Firewall ASA Compatibility.

Prepare the Day 0 Configuration File

You can prepare a Day 0 configuration file before you launch the ASAv. This file is a text file that contains the ASAv configuration that will be applied when the ASAv is launched. This initial configuration is placed into a text file named “day0-config” in a working directory you chose, and is manipulated into a day0.iso file that is mounted and read on first boot. At the minimum, the Day 0 configuration file must contain commands that will activate the management interface and set up the SSH server for public key authentication, but it can also contain a complete ASA configuration. The day0.iso file (either your custom day0.iso or the default day0.iso) must be available during first boot.

Before you begin

We are using Linux in this example, but there are similar utilities for Windows.

  • To automatically license the ASAv during initial deployment, place the Smart Licensing Identity (ID) Token that you downloaded from the Cisco Smart Software Manager in a text file named ‘idtoken’ in the same directory as the Day 0 configuration file.

  • If you want to deploy the ASAv in transparent mode, you must use a known running ASA config file in transparent mode as the Day 0 configuration file. This does not apply to a Day 0 configuration file for a routed firewall.

  • You must add the Day 0 configuration file before you boot the ASAv for the first time. If you decide you want to use a Day 0 configuration after you have initially booted the ASAv, you must execute a write erase command, apply the day 0 configuration file, and then boot the ASAv.

Procedure


Step 1

Enter the CLI configuration for the ASAv in a text file called “day0-config”. Add interface configurations for the three interfaces and any other configuration you want.

The fist line should begin with the ASA version. The day0-config should be a valid ASA configuration. The best way to generate the day0-config is to copy the desired parts of a running config from an existing ASA or ASAv. The order of the lines in the day0-config is important and should match the order seen in an existing show run command output.

Example:

ASA Version 9.5.1
!
interface management0/0
nameif management
 security-level 100
 ip address 192.168.1.2 255.255.255.0
 no shutdown
interface gigabitethernet0/0
 nameif inside
 security-level 100
 ip address 10.1.1.2 255.255.255.0
 no shutdown
interface gigabitethernet0/1
 nameif outside
 security-level 0
 ip address 198.51.100.2 255.255.255.0
 no shutdown
http server enable
http 192.168.1.0 255.255.255.0 management
crypto key generate rsa modulus 1024
username AdminUser password paSSw0rd
ssh 192.168.1.0 255.255.255.0 management
aaa authentication ssh console LOCAL

Step 2

(Optional) Download the Smart License identity token file issued by the Cisco Smart Software Manager to your computer.

Step 3

(Optional) Copy the ID token from the download file and put it a text file that only contains the ID token.

Step 4

(Optional) For automated licensing during initial ASAv deployment, make sure the following information is in the day0-config file:

  • Management interface IP address

  • (Optional) HTTP proxy to use for Smart Licensing

  • A route command that enables connectivity to the HTTP proxy (if specified) or to tools.cisco.com

  • A DNS server that resolves tools.cisco.com to an IP address

  • Smart Licensing configuration specifying the ASAv license you are requesting

  • (Optional) A unique host name to make the ASAv easier to find in CSSM

Step 5

Generate the virtual CD-ROM by converting the text file to an ISO file:

stack@user-ubuntu:-/KvmAsa$ sudo genisoimage -r -o day0.iso day0-config idtoken
I: input-charset not specified, using utf-8 (detected in locale settings)
Total translation table size: 0
Total rockridge attributes bytes: 252
Total directory bytes: 0
Path table size (byptes): 10
Max brk space used 0
176 extents written (0 MB)
stack@user-ubuntu:-/KvmAsa$

The Identity Token automatically registers the ASAv with the Smart Licensing server.

Step 6

Repeat Steps 1 through 5 to create separate default configuration files with the appropriate IP addresses for each ASAv you want to deploy.


Deploy the ASAv with the Day 0 Configuration File Using the Hyper-V Manager

After you set up the Day 0 configuration file (Prepare the Day 0 Configuration File), you can deploy it using the Hyper-V Manager.

Procedure


Step 1

Go to Server Manager > Tools > Hyper-V Manager.

Step 2

Click Settings on the right side of the Hyper-V Manager. The Settings dialog box opens. Under Hardware on the left, click IDE Controller 1.

Figure 2. Hyper-V Manager

Step 3

Under Media in the right pane, select the Image file radio button, and then browse to the directory where you keep your Day 0 ISO configuration file, and then click Apply. When you boot up your ASAv for the first time, it will be configured based on what is in the Day 0 configuration file.


Deploy the ASAv on Hyper-V Using the Command Line

You can install the ASAv on Hyper-V through the Windows Powershell command line. If you are on a standalone Hyper-V server, you must use the command line to install Hyper-V.

Procedure


Step 1

Open a Windows Powershell.

Step 2

Deploy the ASAv:

Example:

new-vm -name $fullVMName -MemoryStartupBytes $memorysize -Generation 1 -vhdpath
C:\Users\jsmith.CISCO\ASAvHyperV\$ImageName.vhdx -Verbose

Step 3

Depending on your ASAv model, change the CPU count from the default of 1.

Example:

set-vm -Name $fullVMName -ProcessorCount 4

Step 4

(Optional) Change the interface name to something that makes sense to you.

Example:

Get-VMNetworkAdapter -VMName $fullVMName -Name "Network Adapter" | Rename-vmNetworkAdapter -NewName
mgmt

Step 5

(Optional) Change the VLAN ID if your network requires it.

Example:

Set-VMNetworkAdapterVlan -VMName $fullVMName -VlanId 1151 -Access -VMNetworkAdapterName "mgmt"

Step 6

Refresh the interface so that Hyper-V picks up the changes.

Example:

Connect-VMNetworkAdapter -VMName $fullVMName -Name "mgmt" -SwitchName 1151mgmtswitch

Step 7

Add the inside interface.

Example:

Add-VMNetworkAdapter -VMName $fullVMName -name "inside" -SwitchName 1151mgmtswitch
Set-VMNetworkAdapterVlan -VMName $fullVMName -VlanId 1552 -Access -VMNetworkAdapterName "inside"

Step 8

Add the outside interface.

Example:

Add-VMNetworkAdapter -VMName $fullVMName -name "outside" -SwitchName 1151mgmtswitch
Set-VMNetworkAdapterVlan -VMName $fullVMName -VlanId 1553 -Access -VMNetworkAdapterName “outside"

Deploy the ASAv on Hyper-V Using the Hyper-V Manager

You can use the Hyper-V Manager to install the ASAv on Hyper-V.

Procedure


Step 1

Go to Server Manager > Tools > Hyper-V Manager.

Figure 3. Server Manager

Step 2

The Hyper-V Manager appears.

Figure 4. Hyper-V Manager

Step 3

From the list of hypervisors on the right, right-click the desired Hypervisor in the list and choose New > Virtual Machine.

Figure 5. Launch New Virtual Machine

Step 4

The New Virtual Machine Wizard appears.

Figure 6. New Virtual Machine Wizard

Step 5

Working through the wizard, specify the following information:

  • Name and location of your ASAv

  • Generation of your ASAv

    The only Generation supported for the ASAv is Generation 1.

  • Amount of memory for your ASAv (1024 MB for ASAv5, 2048 MB for ASAv 10, 8192 MB for ASAv30)

  • Network adapter (connect to the virtual switch you have already set up)

  • Virtual hard disk and location

    Choose Use an existing virtual hard disk and browse to the location of your VHDX file.

Step 6

Click Finish and a dialog box appears showing your ASAv configuration.

Figure 7. New Virtual Machine Summary

Step 7

If your ASAv has four vCPUs, you must modify the vCPU value before starting up your ASAv. Click Settings on the right side of the Hyper-V Manager. The Settings dialog box opens. Under the Hardware menu on the left, click Processor to get to the Processor pane. Change the Number of virtual processors to 4.

The ASAv5 and ASAv10 have one vCPU, and the ASAv 30 have four vCPUs. The default is 1.

The 100Mbps and 1Gbps entitlements have one vCPU, and the 2Gbps entitlement has four vCPUs. The default is 1.

Figure 8. Virtual Machine Processor Settings

Step 8

In the Virtual Machines menu, connect to your ASAv by right-clicking on the name of the ASAv in the list and clicking Connect. The console opens with the stopped ASAv.

Figure 9. Connect to the Virtual Machine

Step 9

In the Virtual Machine Connection console window, click the turquoise Start button to start the ASAv.

Figure 10. Start the Virtual Machine

Step 10

The boot progress of the ASAv is shown in the console.

Figure 11. Virtual Machine Boot Progress

Add a Network Adapter from the Hyper-V Manager

A newly deployed ASAv has only one network adapter. You need to add at least two more network adapters. In this example, we are adding the inside network adapter.

Before you begin

  • The ASAv must be in the off state.

Procedure


Step 1

Click Settings on the right side of the Hyper-V Manager. The Settings dialog box opens. Under the Hardware menu on the left, click Add Hardware, and then click Network Adapter.

Note


Do NOT use the Legacy Network Adapter.

Figure 12. Add Network Adapter

Step 2

After the network adapter has been added, you can modify the virtual switch and other features. You can also set the VLAN ID here if needed.

Figure 13. Modify Network Adapter Settings

Modify the Network Adapter Name

In Hyper-V, a generic network interface name is used, ‘Network Adapter.’ This can be confusing if the network interfaces all have the same name. You cannot modify the name using the Hyper-V Manager. You must modify it using the Windows Powershell commands.

Procedure


Step 1

Open a Windows Powershell.

Step 2

Modify the network adapters as needed.

Example:

$NICRENAME= Get-VMNetworkAdapter -VMName 'ASAvVM' -Name "Network Adapter"
rename-VMNetworkAdapter -VMNetworkAdapter $NICRENAME[0] -newname inside
rename-VMNetworkAdapter -VMNetworkAdapter $NICRENAME[1] -newname outside

MAC Address Spoofing

For the ASAv to pass packets in transparent mode and for HA Active/Standby failover, you must turn on MAC address spoofing for ALL interfaces. You can do this in the Hyper-V Manager or using Powershell commands.

Configure MAC Address Spoofing Using the Hyper-V Manager

You can use the Hyper-V Manager to configure MAC spoofing on Hyper-V.

Procedure


Step 1

Go to Server Manager > Tools > Hyper-V Manager.

The Hyper-V Manager appears.

Step 2

Click Settings on the right side of the Hyper-V Manager to open the settings dialog box.

Step 3

Under the Hardware menu on the left:

  1. Click Inside and expand the menu.

  2. Click Advanced Features to get to the MAC address option.

  3. Click the Enable MAC address spoofing radio button.

Step 4

Repeat for the Outside interface.


Configure MAC Address Spoofing Using the Command Line

You can use the the Windows Powershell command line to configure MAC spoofing on Hyper-V.

Procedure


Step 1

Open a Windows Powershell.

Step 2

Configure MAC address spoofing.

Example:

Set-VMNetworkAdapter -VMName $vm_name\
-ComputerName $computer_name -MacAddressSpoofing On\
-VMNetworkAdapterName $network_adapter\r"

Configure SSH

You can configure the ASAv for SSH access over the management interface from the Virtual Machine Connection in the Hyper-V Manager. If you are using a Day 0 configuration file, you can add SSH access to it. See Prepare the Day 0 Configuration File for more information.

Procedure


Step 1

Verify that the RSA key pair is present:

Example:

asav# show crypto key mypubkey rsa

Step 2

If there is no RSA key pair, generate the RSA key pair:

Example:

asav(conf t)# crypto key generate rsa modulus 2048

username test password test123 privilege 15
aaa authentication ssh console LOCAL
ssh 10.7.24.0 255.255.255.0 management
ssh version 2

Step 3

Verify that you can access the ASAv using SSH from another PC.


CPU Usage and Reporting

The CPU Utilization report summarizes the percentage of the CPU used within the time specified. Typically, the Core operates on approximately 30 to 40 percent of total CPU capacity during nonpeak hours and approximately 60 to 70 percent capacity during peak hours.

vCPU Usage in the ASA Virtual

The ASA virtual vCPU usage shows the amount of vCPUs used for the data path, control point, and external processes.

The Hyper-V reported vCPU usage includes the ASA virtual usage as described plus:

  • ASA Virtual idle time

  • %SYS overhead used for the ASA virtual machine

CPU Usage Example

The show cpu usage command can be used to display CPU utilization statistics.

Example

Ciscoasa#show cpu usage

CPU utilization for 5 seconds = 1%; 1 minute: 2%; 5 minutes: 1%

The following is an example in which the reported vCPU usage is substantially different:

  • ASA Virtual reports: 40%

  • DP: 35%

  • External Processes: 5%

  • ASA (as ASA Virtual reports): 40%

  • ASA idle polling: 10%

  • Overhead: 45%