Information About Application-Aware Routing

Application-aware routing tracks network and path characteristics of the data plane tunnels between Cisco SD-WAN devices and uses the collected information to compute optimal paths for data traffic. These characteristics include packet loss, latency, and jitter, and the load, cost and bandwidth of a link. The ability to consider factors in path selection other than those used by standard routing protocols—such as route prefixes, metrics, link-state information, and route removal on the Cisco SD-WAN device—offers a number of advantages to an enterprise:

  • In normal network operation, the path taken by application data traffic through the network can be optimized, by directing it to WAN links that support the required levels of packet loss, latency, and jitter defined in an application’s SLA.

  • In the face of network brownouts or soft failures, performance degradation can be minimized. The tracking of network and path conditions by application-aware routing in real time can quickly reveal performance issues, and it automatically activates strategies that redirect data traffic to the best available path. As the network recovers from the soft failure conditions, application-aware routing automatically readjusts the data traffic paths.

  • Network costs can be reduced because data traffic can be more efficiently load-balanced.

  • Application performance can be increased without the need for WAN upgrades.

Each Cisco SD-WAN device supports up to eight TLOCs, allowing a single Cisco SD-WAN device to connect to up to eight different WAN networks. This capability allows path customization for application traffic that has different needs in terms of packet loss and latency.

Application-Aware Routing Overview

Application-aware routing tracks network and path characteristics of the data plane tunnels between Cisco SD-WAN devices and uses the collected information to compute optimal paths for data traffic. These characteristics include packet loss, latency, and jitter, and the load, cost and bandwidth of a link. The ability to consider factors in path selection other than those used by standard routing protocols—such as route prefixes, metrics, link-state information, and route removal on the Cisco SD-WAN device—offers a number of advantages to an enterprise:

  • In normal network operation, the path taken by application data traffic through the network can be optimized, by directing it to WAN links that support the required levels of packet loss, latency, and jitter defined in an application’s SLA.

  • In the face of network brownouts or soft failures, performance degradation can be minimized. The tracking of network and path conditions by application-aware routing in real time can quickly reveal performance issues, and it automatically activates strategies that redirect data traffic to the best available path. As the network recovers from the soft failure conditions, application-aware routing automatically readjusts the data traffic paths.

  • Network costs can be reduced because data traffic can be more efficiently load-balanced.

  • Application performance can be increased without the need for WAN upgrades.

Each Cisco SD-WAN device supports up to eight TLOCs, allowing a single Cisco SD-WAN device to connect to up to eight different WAN networks. This capability allows path customization for application traffic that has different needs in terms of packet loss and latency.

Application-Aware Routing Support for Multicast Protocols

Starting from Cisco IOS XE Catalyst SD-WAN Release 17.3.1a, application-aware routing supports overlay multicast traffic on devices. In older releases, an application-route policy is supported only for unicast traffic.

The devices classify the multicast traffic based on the group address and sets the SLA class. The group address can be source IP, destination IP, source prefixes, and destination prefixes. In the forwarding plane, any traffic for group address must use only those TLOC paths that meet the SLA requirement. You can perform the path selection for a group based on the preferred color, backup color, or the default action.

Components of Application-Aware Routing

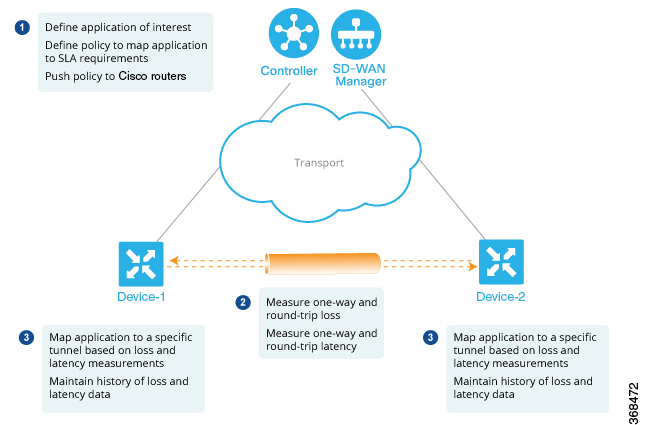
The Cisco SD-WAN Application-Aware Routing solution consists of three elements:

  • Identification—You define the application of interest, and then you create a centralized data policy that maps the application to specific SLA requirements. You single out data traffic of interest by matching on the Layer 3 and Layer 4 headers in the packets, including source and destination prefixes and ports, protocol, and DSCP field. As with all centralized data policies, you configure them on a Cisco Catalyst SD-WAN Controller, which then passes them to the appropriate Cisco SD-WAN devices.

  • Monitoring and measuring—The Cisco SD-WAN software uses BFD packets to continuously monitor the data traffic on the data plane tunnels between devices, and periodically measures the performance characteristics of the tunnel. To gauge performance, the Cisco SD-WAN device looks for traffic loss on the tunnel, and it measures latency by looking at the one-way and round-trip times of traffic traveling over the tunnel. These measurements might indicate suboptimal data traffic conditions.

  • Mapping application traffic to a specific transport tunnel—The final step is to map an application’s data traffic to the data plane tunnel that provides the desired performance for the application. The mapping decision is based on two criteria: the best-path criteria computed from measurements performed on the WAN connections and on the constraints specified in a policy specific to application-aware routing.

To create a data policy based on the Layer 7 application itself, configure the Cisco Catalyst SD-WAN Application Intelligence Engine (SAIE) flow with a centralized data policy. With the SAIE flow, you can direct traffic to a specific tunnel, based on the remote TLOC, the remote TLOC, or both. You cannot direct traffic to tunnels based on SLA classes.


Note


In Cisco vManage Release 20.7.1 and earlier releases, the SAIE flow is called the deep packet inspection (DPI) flow.


SLA Classes

Table 1. Feature History

Feature

Release Information

Description

Support for SLA Classes

Cisco SD-WAN Release 20.1.1

This feature allows you to configure up to a maximum of eight SLA classes on Cisco SD-WAN Controller. Using this feature, you can configure additional options in an application-aware routing policy.

Support for six SLA Classes per Policy

Cisco vManage Release 20.3.1

Cisco SD-WAN Release 20.3.1

This feature allows you to configure up to four SLA classes per policy on Cisco SD-WAN devices. This enhancement allows additional options in an application-aware routing policy.

SLA Class Support Enhancement

Cisco SD-WAN Release 20.6.1

Cisco vManage Release 20.6.1

This feature is an enhancement to support more than six SLA classes per policy on Cisco SD-WAN devices.

Application Aware Routing and Data Policy SLA Preferred Colors

Cisco SD-WAN Release 20.6.1

Cisco vManage Release 20.6.1

This feature provides different behaviors to choose preferred colors based on the SLA requirements when both application-aware routing policy and data policies are configured.

A service-level agreement (SLA) determines actions taken in application-aware routing. The SLA class defines the maximum jitter, maximum latency, maximum packet loss, or a combination of these values for data plane tunnels in Cisco SD-WAN devices. Each data plane tunnel comprises a local transport locators (TLOC) and a remote TLOC pair. You can configure SLA classes under the policy sla-class command hierarchy on Cisco SD-WAN Controllers. From Cisco SD-WAN Release 20.1.x, you can configure a maximum of eight SLA classes on Cisco SD-WAN Validator. However, you can define only four unique SLA classes in an application-aware route policy. In releases earlier than Cisco SD-WAN Release 20.1.x, you can configure a maximum of four SLA classes.


Note


In Cisco SD-WAN Release 20.3.1, you cannot configure more than four different SLA classes on Cisco SD-WAN devices. If you configure more than four different SLA classes, the application-aware routing policy gets rejected.


You can configure the following parameters in an SLA class.

Table 2. SLA Components

Description

Command

Value or Range

Maximum acceptable packet jitter on the data plane tunnel

jitter milliseconds

1–1000 milliseconds

Maximum acceptable packet latency on the data plane tunnel.

latency milliseconds

1–1000 milliseconds

Maximum acceptable packet loss on the data plane tunnel.

loss percentage

1–100 percent

SLA Support Enhancement

From Cisco SD-WAN Release 20.6.1 and Cisco vManage Release 20.6.1, you can configure more than six SLA classes per policy on Cisco SD-WAN devices.

vEdge Cloud Router platforms require another 250-MB RAM to support 7+1 SLA classes. vEdge Cloud Routers can be small or medium depending on the RAM size. Small vEdge Cloud Routers have RAM size less than 1.75 GB and the medium vEdge Cloud Routers have RAM size from 1.75 GB to 2.5 GB. (For example, when you upgrade to Cisco SD-WAN Release 20.6.1, vEdge Cloud Router with RAM size 1.5 GB is a small device.

This feature enhancement increases the number of SLA classes supported on Cisco SD-WAN Controller and SD-WAN Edge devices. With the increase in the SLA class support, you can align SLA classes to IP Virtual Private Networks (IP-VPN) on Multi-Protocol Label Switching (MPLS) networks for transporting traffic to a global network.

The SLA enhancement helps in multitenancy, where you can push different SLA classes for different tenants. The multitenancy feature requires the Cisco SD-WAN Controller to support more than eight SLA classes. To allocate SLA classes to different tenants, the global limit for policies must be 64.


Note


You cannot configure the default SLA. The default SLA is configured in all the devices to forward traffic when no user-defined SLA is met.


Table 3. Maximum SLA Classes Supported on Cisco SD-WAN Devices

Platform

User-configurable SLA Classes Prior to Cisco SD-WAN Release 20.6.1 (+1 Default SLA Class)

User-configurable SLA Classes from Cisco SD-WAN Release 20.6.1 (+1 Default SLA Class)

Cisco SD-WAN Controller

8

64

Cisco vEdge 5000

4

15

vEdge Cloud Router

4

7

Any other Cisco vEdge devices

4

4

SLA-Preferred Colors

From Cisco SD-WAN Release 20.6.1, when you configure both application-aware routing policy and data policy, and if data flow matches the app-route and data policy sequences, the following expected behaviors occur:

  • If the preferred colors that you configure in application-aware routing meet the SLA requirements, and these preferred colors have some colors that are common with data policy, the common preferred colors are chosen over others for forwarding. (Prior to Cisco SD-WAN Release 20.6.1, the data policy-preferred colors were forwarded and the application-aware routing policy preferences were ignored.)

  • If preferred colors in application-aware routing do not meet the SLA, but there are colors that are common with the data policy, and these colors meet the SLA in application-aware routing, then these colors take precedence and are chosen for forwarding.

  • If no tunnels or colors meet the SLA in application-aware routing, the data policy takes precedence and is chosen for forwarding. If the data policy has preferred colors, these colors are chosen. Otherwise, load balance occurs across all the colors in the data policy.

Measure Loss, Latency, and Jitter

When a data plane tunnel in the overlay network is established, a BFD session automatically starts on the tunnel. In the overlay network, each tunnel is identified with a color that identifies a specific link between a local TLOC and a remote TLOC. The BFD session monitors the liveness of the tunnel by periodically sending Hello packets to detect whether the link is operational. Application-aware routing uses the BFD Hello packets to measure the loss, latency, and jitter on the links.

By default, the BFD Hello packet interval is 1 second. This interval is user-configurable (with the bfd color interval command). Note that the BFD Hello packet interval is configurable per tunnel.

Calculate Average Loss, Latency, and Jitter

BFD periodically polls all the tunnels on the Cisco SD-WAN devices to collect packet latency, loss, jitter, and other statistics for use by application-aware routing. At each poll interval, application-aware routing calculates the average loss, latency, and jitter for each tunnel, and then calculates or recalculates each tunnel's SLA. Each poll interval is also called a "bucket."

By default, the poll interval is 10 minutes. With the default BFD Hello packet interval at 1 second, this means that information from about 600 BFD Hello packets is used in one poll interval to calculate loss, latency, and jitter for the tunnel. The poll interval is user-configurable (with the bfd app-route poll-interval command). Note that the application-aware routing poll interval is configurable per Cisco SD-WAN device; that is, it applies to all tunnels originating on a device.

Reducing the poll interval without reducing the BFD Hello packet interval may affect the quality of the loss, latency, and jitter calculation. For example, setting the poll interval to 10 seconds when the BFD Hello packet interval is 1 second means that only 10 Hello packets are used to calculate the loss, latency, and jitter for the tunnel.

The loss, latency, and jitter information from each poll interval is preserved for six poll intervals. At the seventh poll interval, the information from the earliest polling interval is discarded to make way for the latest information. In this way, application-aware routing maintains a sliding window of tunnel loss, latency, and jitter information.

The number of poll intervals (6) is not user-configurable. Each poll interval is identified by an index number (0 through 5) in the output of the show app-route statistics command.

Determine SLA Classification

To determine the SLA classification of a tunnel, application-aware routing uses the loss, latency, and jitter information from the latest poll intervals. The number of poll intervals used is determined by a multiplier. By default, the multiplier is 6, so the information from all the poll intervals (specifically, from the last six poll intervals) is used to determine the classification. For the default poll interval of 10 minutes and the default multiplier of 6, the loss, latency, and jitter information collected over the last hour is considered when classifying the SLA of each tunnel. These default values have to be chosen to provide damping of sorts, as a way to prevent frequent reclassification (flapping) of the tunnel.

The multiplier is user-configurable (with the bfd app-route multiplier command). Note that the application-aware routing multiplier is configurable per Cisco SD-WAN device; that is, it applies to all tunnels originating on a device.

If there is a need to react quickly to changes in tunnel characteristics, you can reduce the multiplier all the way down to 1. With a multiplier of 1, only the latest poll interval loss and latency values are used to determine whether this tunnel can satisfy one or more SLA criteria.

Based on the measurement and calculation of tunnel loss and latency, each tunnel may satisfy one or more user-configured SLA classes. For example, a tunnel with a mean loss of 0 packets and mean latency of 10 milliseconds would satisfy a class that has been defined with a maximum packet loss of 5 and a minimum latency of 20 milliseconds, and it would also satisfy a class that has been defined with a maximum packet loss of 0 and minimum latency of 15 milliseconds.

Regardless of how quickly a tunnel is reclassified, the loss, latency, and jitter information is measured and calculated continuously. You can configure how quickly application-aware routing reacts to changes by modifying the poll interval and multiplier.

Per-Class Application-Aware Routing

Table 4. Feature History

Feature Name

Release Information

Description

Per-Class Application-Aware Routing

Cisco SD-WAN Release 20.4.1

Cisco vManage Release 20.4.1

This feature enhances the capabilities of directing traffic to next-hop addresses based on the service level agreement (SLA) definitions. These SLA definitions along with the policy to match and classify traffic types can be used to direct traffic over specific Cisco Catalyst SD-WAN tunnels. The SLA definition comprises of values of loss, latency, and jitter, which are measured using the Bidirectional Forwarding Detection (BFD) channel that exists between two transport locators (TLOCs).

Per-Class Application-Aware Routing Overview

The SLA definition comprises of values of loss, latency, and jitter, which are measured using the BFD channel that exists between two TLOCs. These values collectively represent the status of the network and the BFD link. The BFD control messages are sent with a high priority Differentiated Services Code Point (DSCP) marking of 48.

The SLA metrics based on the high priority packet does not reflect the priority that is received by the actual data that flows through the edge device. The data, depending on the application class, can have different DSCP values in the network. Therefore, a more accurate representation of the loss, latency, and jitter for the traffic profiles is required for the networks to use such measurements to direct traffic types to the right tunnels.

Application-aware routing uses policies that constrain paths that can be used for forwarding the application. These constraints are usually expressed in terms of SLA classes that contain loss, latency, and jitter requirements that must be met. This requires that these metrics be measured on all the paths to the destination of the traffic using active probing or by passive monitoring.

Active probing methods include generation of synthetic traffic that is injected along with real traffic. The expectation is that the probes and the real traffic is forwarded in the same way. BFD probing, ICMP, periodic HTTP requests and IP SLA measurements are some examples of active probing mechanisms. The Cisco Catalyst SD-WAN solution uses BFD based probes for active measurements. Passive monitoring methods rely on the Cisco Catalyst SD-WAN Application Intelligence Engine (SAIE) flow and monitoring actual traffic. For example, RTP/TCP traffic is monitored for loss, latency, and jitter.


Note


In Cisco vManage Release 20.7.1 and earlier releases, the SAIE flow is called the deep packet inspection (DPI) flow.


Application Probe Class

An application probe class (app-probe-class) comprises of a forwarding class, color, and DSCP. This defines the marking per color of applications that are forwarded. The color or DSCP mapping is local to a Cisco SD-WAN network site. However, a few colors and the DSCP mapping for a color does not change per site. The forwarding class determines the QoS queue in which the BFD echo request is queued at the egress tunnel port. This is applicable only for BFD echo request packets. The packet-loss-priority for BFD packets is fixed to low. When BFD packets are sent with SLA class, they use the same DSCP value. When BFD packets are sent with app-probe-class along with SLA class, the BFD packets are sent for each SLA app-probe-class separately in a round-robin manner.

Default DSCP Values

The default DSCP value that is used in the DSCP control traffic is 48. However, there is a provision to change the default value along with the option to configure on the edge devices. All the network service providers may not necessarily use DSCP 48.

The BFD packet having the default DSCP can also be used for other features such as PMTU. A change in the default DSCP means that the other features are affected by the new default DSCP value. Therefore, we recommend that you configure the highest priority DSCP marking that the service provider provides (usually 48, but can be different based on the SLA agreement of the service provider). The color level overrides the global level default DSCP marking.

Configure Application-Aware Routing

Table 5. Feature History

Feature Name

Release Information

Description

Application-Aware Routing for Hub and Spoke

Cisco SD-WAN Release 20.9.1

Cisco vManage Release 20.9.1

This feature enables you to configure an application-aware routing policy on a hub device and apply the policy to packets that the hub device receives from a spoke device and sends to another spoke device. Applying the application-aware routing policy helps you realize the required SLA for spoke-hub-spoke traffic.

This topic provides general procedures for configuring application-aware routing. Application-aware routing policy affects only traffic that is flowing from the service side (the local/WAN side) to the tunnel (WAN) side of the Cisco SD-WAN device.

An application-aware routing policy matches applications with an SLA, that is, with the data plane tunnel performance characteristics that are necessary to transmit the applications' data traffic. The primary purpose of application-aware routing policy is to optimize the path for data traffic being transmitted by Cisco SD-WAN devices.

An application-aware routing policy is a type of centralized data policy: you configure it on the vSmart controller, and the controller automatically pushes it to the affected Cisco SD-WAN devices. As with any policy, an application-aware routing policy consists of a series of numbered (ordered) sequences of match-action pairs that are evaluated in order, from lowest sequence number to highest sequence number. When a data packet matches one of the match conditions, an SLA action is applied to the packet to determine the data plane tunnel to use to transmit the packet. If a packet matches no parameters in any of the policy sequences, and if no SLA class is configured for the default-action, the packet is accepted and forwarded with no consideration of SLA. Because application-aware routing policy accepts nonmatching traffic by default, it is considered as a positive policy. Other types of policies in the Cisco SD-WAN software are negative policies, because by default they drop nonmatching traffic.

Hub and Spoke Topology

Minimum releases: Cisco SD-WAN Release 20.9.1 and Cisco vManage Release 20.9.1

You can configure an application-aware routing policy on a hub device and apply the policy to packets that the hub device receives from a spoke device and sends to another spoke device.

Figure 1. Hub and Spoke Topology

Configure Application-Aware Routing Policies Using Cisco SD-WAN Manager

To configure application-aware routing policy, use the Cisco SD-WAN Manager policy configuration wizard. For Centralized Policy configuration details, see Configure Centralized Policies. The wizard consists of four sequential windows that guide you through the process of creating and editing policy components:

  • Create Applications or Groups of Interest: Create lists that group together related items and that you call in the match or action components of a policy. For configuration details, see Configure Groups of Interest.

  • Configure Topology: Create the network structure to which the policy applies. For topology configuration details, see Configure Topology and VPN Membership.

  • Configure Traffic Rules: Create the match and action conditions of a policy.

  • Apply Policies to Sites and VPNs: Associate policy with sites and VPNs in the overlay network.

In the first three policy configuration wizard windows, you are creating policy components or blocks. In the last window, you are applying policy blocks to sites and VPNs in the overlay network.

For an application-aware routing policy to take effect, you must activate the policy.

Configure Best Tunnel Path

Table 6. Feature History

Feature Name

Release Information

Description

Best of the Worst (BOW) Tunnel Selection

Cisco vManage Release 20.5.1

Cisco SD-WAN Release 20.5.1

This feature introduces a new policy action fallback-to-best-path to pick the best path or color out of the available colors.

When the data traffic does not meet any of the SLA class requirements, this feature allows you to select the best tunnel path criteria sequence using the Fallback Best Tunnel option under each SLA class to avoid packet loss.

Best Tunnel Path Overview

To avoid data packet loss and to configure the best application-aware routing tunnel selection when a SLA is not met, you can configure the following policy actions:

  • backup-preferred-color

  • fallback-to-best-path

Figure 2. Flow Chart for Application-Aware Routing Tunnel Selection

Recommendation for the Best Tunnel Path

  • Configure the fallback-to-best-path policy action in Cisco SD-WAN Manager when configuring a SLA class.

  • Configure the backup-preferred-color policy action in Cisco SD-WAN Manager when configuring traffic rules.

Configure SLA Class

  1. From the Cisco SD-WAN Manager menu, select Configuration > Policies. Centralized Policy is selected and displayed by default.

  2. Click Add Policy.

  3. In the create groups of interest page, from the left pane, click SLA Class, and then click New SLA Class List.

  4. In the SLA Class List Name field, enter a name for SLA class list.

  5. Define the SLA class parameters:

    1. In the Loss field, enter the maximum packet loss on the connection, a value from 0 through 100 percent.

    2. In the Latency field, enter the maximum packet latency on the connection, a value from 1 through 1,000 milliseconds.

    3. In the Jitter field, enter the maximum jitter on the connection, a value from 1 through 1,000 milliseconds.

    4. Choose the required app probe class from the App Probe Class drop-down list.

  6. (Optional) Check the Fallback Best Tunnel check box to enable the best tunnel criteria.

    This optional field is available from Cisco SD-WAN Release 20.5.1 to pick the best path or color from the available colors when a SLA is not met. When this option is selected, you can choose the required criteria from the drop-down. The criteria are a combination of one or more of loss, latency, and jitter values.

  7. Select the Criteria from the drop-down. The available criteria are:

    • None

    • Latency

    • Loss

    • Jitter

    • Latency, Loss

    • Latency, Jitter

    • Loss, Latency

    • Loss, Jitter

    • Jitter, Latency

    • Jitter, Loss

    • Latency, Loss, Jitter

    • Latency, Jitter, Loss

    • Loss, Latency, Jitter

    • Loss, Jitter, Latency

    • Jitter, Latency, Loss

    • Jitter, Loss, Latency

  8. (Optional) Enter the Loss Variance (%), Latency Variance (ms), and the Jitter Variance (ms) for the selected criteria.

    For more information, see Configure Variance for Best Tunnel Path.

  9. Click Add.

Configure Traffic Rules

To configure an application-aware routing policy:

  1. Click Application Aware Routing.

  2. From the Add Policy drop-down list, choose Create New.

  3. Click Sequence Type. A policy sequence containing the text string App Route is added in the left pane.

  4. Double-click the App Route text string and enter a name for the policy sequence. You can copy, delete, or rename a policy sequence. The name you enter is displayed both in the Sequence Type list in the left pane and in the right pane.

  5. In the right pane, click Sequence Rule. The Match/Actions dialog box opens, and Match is selected by default. The available policy match conditions are listed below the dialog box.

  6. In the Protocol drop-down list, choose one of the following option:

    • IPv4

    • IPv6

    • Both


    Note


    Depending on which protocol that you choose, the Match or Actions conditions may be different.


  7. Click and choose one or more Match conditions. Set the values as described in the following table:

    Table 7. Match Conditions

    Match Condition

    Procedure

    None (match all packets)

    Do not specify any match conditions.

    Application/Application Family List

    Click Application/Application Family List and choose an application list.

    Cloud Saas Application List

    Cisco SD-WAN Manager provides a list of several cloud applications that Cisco Catalyst SD-WAN Cloud OnRamp for SaaS can use to determine the best path selection for each SaaS application.

    For more information on Cisco Catalyst SD-WAN Cloud OnRamp for SaaS, see the Cisco Catalyst SD-WAN Cloud OnRamp Configuration Guide, Cisco IOS XE Release 17.x.

    Note


    Cloud Saas Application List displays as a match condition if you specify IPv4 as the Protocol option.

    In the drop-down list, choose a SaaS application from the drop-down list.

    DNS Application List

    In the drop-down list, select an application family.

    Destination Data Prefix

    To match a list of destination prefixes, choose the list from the drop-down list.

    To match an individual destination prefix, type the prefix in the Destination dialog box.

    Destination Region

    You can use Destination Region in a Cisco Catalyst SD-WAN network using Cisco Catalyst SD-WAN Multi-Region Fabric.

    Choose one of the following options from the drop-down list:

    • Primary: Match traffic if the destination site is in the same primary region (also called access region) as the source.

    • Secondary: Match traffic if the destination site is not in the same primary region as the source but is within the same secondary region as the source. This traffic can reach the destination using a direct tunnel, as described for secondary regions.

    • Other: Match traffic if the destination site is not in the same primary region or secondary region as the source. This traffic requires a multi-hop path from the source to the destination.

    For more information on how to configure Multi-Region Fabric, see the Cisco Catalyst SD-WAN Multi-Region Fabric (also Hierarchical SD-WAN) Configuration Guide.

    Destination Port

    Enter the port number. Specify a single port number, a list of port numbers (with numbers separated by a space), or a range of port numbers (with the two numbers separated with a hyphen [-]).

    Traffic To

    When creating a data policy or an application-aware policy for a border router for Multi-Region Fabric, you can use match criteria to match traffic flowing to the access region, the core region, or a service VPN.

    DNS (to enable split DNS)

    In the drop-down list, choose Request to process DNS requests for the DNS applications, and choose Response to process DNS responses for the applications.

    DSCP

    Type the DSCP value, a number from 0 through 63.

    PLP

    Choose Low or High. To set the PLP to High, apply a policer that includes the exceed remark option.

    Protocol

    Type the internet protocol number, a number from 0 through 255.

    ICMP Message

    For Protocol (IPv4), when you select a value as 1 in the Protocol field in the Match Conditions section, the ICMP Message field displays where you can select an ICMP message to apply to the data policy.

    For Protocol (IPv6), when you select a value as 58 in the Protocol field in the Match Conditions section, the ICMP Message field displays where you can select an ICMP message to apply to the data policy.

    Note


    This field is available from Cisco IOS XE Release 17.4.1 or Cisco SD-WAN Release 20.4.1, and also Cisco vManage Release 20.4.1.

    When Protocol is selected as Both, the ICMP Message or ICMPv6 Message field displays.

    Source Data Prefix

    To match a list of source prefixes, choose the list from the drop-down list.

    To match an individual source prefix, enter the prefix in the Source field.

    Source Port

    Enter the port number. Specify a single port number, a list of port numbers (with numbers separated by a space), or a range of port numbers (with the two numbers separated with a hyphen [-]).

  8. To select actions for the matched data traffic, click Actions. Set the values as described in the following table:

    Table 8. Actions
    Action Procedure
    Backup SLA Preferred Color

    Set the policy action for a Backup SLA Preferred Color match condition. When no tunnel matches the SLA, direct the data traffic to a specific tunnel. Data traffic is sent out the configured tunnel if that tunnel interface is available. If that tunnel interface is not available, traffic is sent out to another available tunnel. You can specify one or more colors. The backup SLA preferred color is a loose matching condition, not a strict matching condition.

    Click Backup SLA Preferred Color.

    In the drop-down list, choose one or more colors.

    Counter

    Set the policy action for a Counter match condition.

    Click Counter.

    In the Counter Name field, enter the name of the file in which to store packet counters.

    Log

    You can place a sampled set of packets that match the SLA class rule into system logging (syslog) files. In addition to logging the packet headers, a syslog message is generated the first time a packet header is logged and then every five minutes thereafter, as long as the flow is active.

    Click Log to enable logging.

    SLA Class List

    Set the policy action for an SLA Class List match condition. For the SLA class, all matching data traffic is directed to a tunnel whose performance matches the SLA parameters defined in the class. The device first tries to send the traffic through a tunnel that matches the SLA. If a single tunnel matches the SLA, data traffic is sent through that tunnel. If two or more tunnels match, traffic is distributed among them. If no tunnel matches the SLA, data traffic is sent through one of the available tunnels.

    Click SLA Class List.

    In the SLA Class drop-down list, choose one or more SLA classes.

    Optionally, in the Preferred Color drop-down list, choose the color of the data plane tunnel or tunnels to prefer. Traffic is load-balanced across all the tunnels. If no tunnels match the SLA, data traffic is sent through any available tunnel. That is, color preference is a loose matching, not a strict matching.

    Optionally, when the Preferred Color is not selected, you can choose the preferered color group from the Preferred Color Group drop-down list. Select the preferred color group of the data plane tunnel or tunnels to prefer. You can configure up to three levels of priority based on the color or path preference. This field is available from Cisco IOS XE Catalyst SD-WAN Release 17.9.1a and Cisco vManage Release 20.9.1.

    Click Strict/Drop to perform strict matching of the SLA class. If no data plane tunnel is available that satisfies the SLA criteria, traffic is dropped.

    Click Fallback to best path to select the best available tunnel to avoid a packet drop.

    Note

     
    The Fallback to best path option is available from Cisco IOS XE Catalyst SD-WAN Release 17.5.1a and Cisco SD-WAN Release 20.5.1.

    You can select the Fallback to best path action only when the Fallback Best Tunnel option is enabled while defining a SLA class. If the Fallback Best Tunnel option is not enabled, then the following error message displays in Cisco SD-WAN Manager:

    SLA Class selected, does not have Fallback Best Tunnel enabled. 
    Please change the SLA class or change to Strict/Drop.

    Click Load Balance to load balance traffic across all the tunnels.

    Cloud SLA

    Cloud SLA enables traffic to use the best path selection with Cisco Catalyst SD-WAN Cloud OnRamp for SaaS.

    Click Cloud SLA.

  9. Click Save Match and Actions.

  10. Create additional sequence rules as desired. Drag and drop to re-arrange them.

  11. Click Save Application Aware Routing Policy.

  12. Click Next to move to Apply Policies to Sites and VPNs in the wizard.

Default Action of Application-Aware Routing Policy

The default action of the policy defines how to handle packets that match none of the match conditions. For application-aware routing policy, if you do not configure a default action, all data packets are accepted and transmitted based on normal routing decisions, with no consideration of SLA.

To modify this behavior, include the default-action sla-class sla-class-name command in the policy, specifying the name of an SLA class you defined in the policy sla-class command.

When you apply an SLA class in a policy's default action, you cannot specify the strict option.

If no data plane tunnel satisfies the SLA class in the default action, the Cisco SD-WAN device selects one of the available tunnels by performing load-balancing across equal paths.

Expected behavior when data flow matches both AAR and data policies:

  1. When data policy local TLOC action is configured, the App-route preferred-color and backup-preferred-color actions are ignored.

  2. The sla-class and sla-strict actions are retained from the application routing configuration.

  3. The data policy TLOC takes precedence.

When there is a local-tloc-list action that has multiple options, choose the local-TLOC that meets SLA.

  • If no local-tloc meets SLA, then choose equal-cost multi-path routing (ECMP) for the traffic over the local-tloc-list.

  • If none of the local-tloc is up, then choose a TLOC that is up.

  • If none of the local-tloc is up and the DP is configured in restrict mode, then drop the traffic.

Configure Application Probe Class through Cisco Catalyst SD-WAN Manager

  1. From the Cisco SD-WAN Manager menu, choose Configuration > Policies.

  2. In Centralized Policy, click Add Policy. The Create Groups of Interest page appears.

  3. Choose the list type App Probe Class from the left navigation panel to create your groups of interest.

  4. Click New App Probe Class.

  5. Enter the probe class name in the Probe Class Name field.

  6. Choose the required forwarding class from the Forwarding Class drop-down list.

    If there are no forwarding classes, then create a class from the Class Map list page under the Localized Policy Lists in the Custom Options menu.

    To create a forwarding class:

    1. In the Custom Options drop-down, choose Lists from the Localized Policy options.

    2. In the Define Lists window, choose the list type Class Map from the left navigation panel.

    3. Click New Class List to create a new list.

    4. Enter Class and choose the Queue from the drop-down list.

    5. Click Save.

  7. In the Entries pane, choose the appropriate color from the Color drop-down list and enter the DSCP value.

    Click + sign, to add more entries as required.

  8. Click Save.

Add App-Probe-Class to an SLA Class

  1. From the left pane, select SLA Class.

  2. Click New SLA Class List.

  3. In the SLA Class List Name field, enter a name for SLA class list.

  4. Enter the required Loss (%), Latency (ms), and Jitter (ms).

  5. Choose the required app probe class from the App Probe Class drop-down list.

  6. Click Add.

    The new SLA Class created with loss, latency, jitter, and app probe class is added to the table.

Configure Default DSCP on Cisco BFD Template

  1. From the Cisco SD-WAN Manager menu, select Configuration > Templates.

  2. Click Feature Templates.


    Note


    In Cisco vManage Release 20.7.x and earlier releases, Feature Templates is titled Feature.


  3. Click Add Template.

  4. Select a device from the device list in the left pane.

  5. In the right pane, select the BFD template listed under Basic Information.

  6. Enter Template Name and Description in the respective fields.

  7. In the Basic Configuration pane, enter Multiplier and Poll Interval (milliseconds).

  8. In the Default DSCP value for BFD Packets field, enter the required device specific value or choose the default value for DSCP.

  9. (Optional) In the Color pane, choose the required color from the drop-down list.

  10. Enter the required Hello Interval (milliseconds) and Multiplier.

  11. Choose the Path MTU Discovery value.

  12. Enter the BFD Default DSCP value for tloc color.

  13. Click Add.

    The default DSCP and color values are configured on the BFD template.

Apply Policies to Sites and VPNs

In the last window of the policy configuration wizard, you associate the policy blocks that you created on the previous three windows with VPNs and with sites in the overlay network.

To apply a policy block to sites and VPNs in the overlay network:

  1. From the Cisco SD-WAN Manager menu, choose Configuration > Policies. Centralized Policy is selected and displayed by default.

  2. Click Add Policy. The Create Applications or Groups of Interest page is displayed.

  3. Click Next. The Network Topology window opens, and in the Topology bar, Topology is selected by default.

  4. Click Next. The Configure Traffic Rules window opens, and in the Application-Aware Routing bar, Application-Aware Routing is selected by default.

  5. Click Next. The Apply Policies to Sites and VPNs window opens.

  6. In the Policy Name field, enter a name for the policy. This field is mandatory and can contain only uppercase and lowercase letters, the digits 0 through 9, hyphens (–), and underscores (_). It cannot contain spaces or any other characters.

  7. In the Policy Description field, enter a description of the policy. It can contain up to 2048 characters. This field is mandatory, and it can contain any characters and spaces.

  8. From the Topology bar, select the type of policy block. The table then lists policies that you have created for that type of policy block.

  9. Click Add New Site List and VPN list. Select one or more site lists and select one or more VPN lists. Click Add.

  10. Click Preview to view the configured policy. The policy is displayed in CLI format.

  11. Click Save Policy. The Configuration > Policies page appears, and the policies table includes the newly created policy.

For an application-aware route policy to take effect, you apply it to a list of sites in the overlay network:

vSmart(config)# apply-policy site-list list-name app-route-policy policy-name

When you apply the policy, you do not specify a direction (either inbound or outbound). Application-aware routing policy affects only the outbound traffic on the Cisco SD-WAN devices.

For all app-route-policy policies that you apply with apply-policy commands, the site IDs across all the site lists must be unique. That is, the site lists must not contain overlapping site IDs. An example of overlapping site IDs are those in the two site lists site-list 1, site-id 1-100, and site-list 2 site-id 70-130. Here, sites 70 through 100 are in both lists. If you were to apply these two site lists to two different app-route-policy policies, the attempt to commit the configuration on the Cisco Catalyst SD-WAN Controller would fail.

The same type of restriction also applies to the following types of policies:

  • Centralized control policy (control-policy)

  • Centralized data policy (data-policy)

  • Centralized data policy used for cflowd flow monitoring (data-policy that includes a cflowd action and apply-policy that includes a cflowd-template command)

You can, however, have overlapping site IDs for site lists that you apply for different types of policy. For example, the sites lists for app-route-policy and data-policy policies can have overlapping site IDs. So for the two example site lists above, site-list 1, site-id 1-100, and site-list 2 site-id 70-130, you could apply one to a control policy and the other to a data policy.

As soon as you successfully activate the configuration on the Cisco Catalyst SD-WAN Controller by issuing a commit command, the controller pushes the application-aware routing policy to the Cisco SD-WAN devices at the specified sites.

To view the policy configured on the Cisco Catalyst SD-WAN Controller, use the show running-config command on the controller.

To view the policy that the Cisco Catalyst SD-WAN Controller has pushed to the device, issue the show policy from-vsmart command on the router.

To display flow information for the application-aware applications running on the device, issue the show app dpi flows command on the router.

How Application-Aware Routing Policy is Applied in Combination with Other Data Policies

If you configure a Cisco SD-WAN device with application-aware routing policy and with other policies, the policies are applied to data traffic sequentially.

On a Cisco SD-WAN device, you can configure the following types of data policy:

  • Centralized data policy. You configure this policy on the Cisco Catalyst SD-WAN Controller, and the policy is passed to the device. You define the configuration with the policy data-policy configuration command, and you apply it with the apply-policy site-list data-policy, or apply-policy site-list vpn-membership command.

  • Localized data policy, which is commonly called access lists. You configure access lists on the device with the policy access-list configuration command. You apply them, within a VPN, to an incoming interface with the vpn interface access-list in configuration command or to an outgoing interface with the vpn interface access-list out command.

  • Application-aware routing policy. Application-aware routing policy affects only traffic that is flowing from the service side (the local/LAN side) to the tunnel (WAN) side of the Cisco SD-WAN device. You configure application-aware routing policy on the Cisco Catalyst SD-WAN Controller with the policy app-route-policy configuration command, and you apply it with the apply-policy site-list app-route-policy command. When you commit the configuration, the policy is passed to the appropriate devices. Then, matching data traffic on the device is processed in accordance with the configured SLA conditions. Any data traffic that is not dropped as a result of this policy is passed to the data policy for evaluation. If the data traffic does not match and if no default action is configured, transmit it without SLA consideration.

You can apply only one data policy and one application-aware routing policy to a single site in the overlay network. When you define and apply multiple site lists in a configuration, you must ensure that a single data policy or a single application-aware routing policy is not applied to more than one site. The CLI does not check for this circumstance, and the validate configuration command does not detect whether multiple policies of the same type are applied to a single site.

For data traffic flowing from the service side of the router to the WAN side of the router, policy evaluation of the traffic evaluation occurs in the following order:

  1. Apply the input access list on the LAN interface. Any data traffic that is not dropped as a result of this access list is passed to the application-aware routing policy for evaluation.

  2. Apply the application-aware routing policy. Any data traffic that is not dropped as a result of this policy is passed to the data policy for evaluation. If the data traffic does not match and if no default action is configured, transmit it without SLA consideration.

  3. Apply the centralized data policy. Any data traffic that is not dropped as a result of the input access list is passed to the output access list for evaluation.

  4. Apply the output access list on the WAN interface. Any data traffic that is not dropped as a result of the output access list is transmitted out the WAN interface.

For data traffic coming from the WAN through the router and into the service-side LAN, the policy evaluation of the traffic occurs in the following order:

  1. Apply the input access list on the WAN interface. Any data traffic that is not dropped as a result of the input access list is passed to the data policy for evaluation.

  2. Apply the data policy. Any data traffic that is not dropped as a result of the input access list is passed to the output access list for evaluation.

  3. Apply the output access list on the LAN interface. Any data traffic that is not dropped as a result of the output access list is transmitted out the LAN interface, towards its destination at the local site.

As mentioned above, application-aware routing policy affects only traffic that is flowing from the service side (the local/LAN side) to the tunnel (WAN) side of the Cisco SD-WAN device, so data traffic inbound from the WAN is processed only by access lists and data policy.


Note


When both application-aware routing and data policies are configured, if the data policy rules that contain actions such as redirect DNS, NextHop, secure internet gateway, NAT VPN, or service, the traffic which matches those rules will skip AAR policy even though the traffic also matches rules defined in the AAR policy. Data policy actions override AAR rules.


Activate an Application-Aware Routing Policy

To activate a policy:

  1. From the Cisco SD-WAN Manager menu, choose Configuration > Policies. Centralized Policy is selected and displayed by default.

  2. For the desired policy, click ... and select Activate. The Activate Policy popup opens. It lists the IP addresses of the reachable Cisco SD-WAN Controllers to which the policy is to be applied.

  3. Click Activate.

When you activate an application-aware routing policy, the policy is sent to all the connected Cisco SD-WAN Controllers.

Monitor Data Plane Tunnel Performance

The Bidirectional Forwarding Detection (BFD) protocol runs over all data plane tunnels between Cisco SD-WAN devices, monitoring the liveness, and network and path characteristics of the tunnels. Application-aware routing uses the information gathered by BFD to determine the transmission performance of the tunnels. Performance is reported in terms of packet latency and packet loss on the tunnel.

BFD sends Hello packets periodically to test the liveness of a data plane tunnel and to check for faults on the tunnel. These Hello packets provide a measurement of packet loss and packet latency on the tunnel. The Cisco SD-WAN device records the packet loss and latency statistics over a sliding window of time. BFD keeps track of the six most recent sliding windows of statistics, placing each set of statistics in a separate bucket. If you configure an application-aware routing policy for the device, it is these statistics that the router uses to determine whether a data plane tunnel's performance matches the requirements of the policy's SLA.

The following parameters determine the size of the sliding window:

Parameters

Default

Configuration Command

Range

BFD Hello packet interval

1 second

bfd color color hello-interval seconds

1 through 65535 seconds

Polling interval for application-aware routing

10 minutes (600,000 milliseconds)

bfd app-route poll-interval milliseconds

1 through 4,294,967 (232 – 1) milliseconds

Multiplier for application-aware routing

6

bfd app-route multiplier number

1 through 6

Let us use the default values for these parameters to explain how application-aware routing works:

  • For each sliding window time period, application-aware routing sees 600 BFD Hello packets (BFD Hello interval x polling interval: 1 second x 600 seconds = 600 Hello packets). These packets provide measurements of packet loss and latency on the data plane tunnels.

  • Application-aware routing retains the statistics for 1 hour (polling interval x multiplier: 10 minutes x 6 = 60 minutes).

  • The statistics are placed in six separate buckets, indexed with the numbers 0 through 5. Bucket 0 contains the latest statistics, and bucket 5 the oldest. Every 10 minutes, the newest statistics are placed in bucket 0, the statistics in bucket 5 are discarded, and the remaining statistics move into the next bucket.

  • Every 60 minutes (every hour), application-aware routing acts on the loss and latency statistics. It calculates the mean of the loss and latency of all the buckets in all the sliding windows and compares this value to the specified SLAs for the tunnel. If the calculated value satisfies the SLA, application-aware routing does nothing. If the value does not satisfy the SLA, application-aware routing calculates a new tunnel.

  • Application-aware routing uses the values in all six buckets to calculate the mean loss and latency for a data tunnel. This is because the multiplier is 6. While application-aware always retains six buckets of data, the multiplier determines how many it actually uses to calculate the loss and latency. For example, if the multiplier is 3, buckets 0, 1, and 2 are used.

Because these default values take action only every hour, they work well for a stable network. To capture network failures more quickly so that application-aware routing can calculate new tunnels more often, adjust the values of these three parameters. For example, if you change just the polling interval to 1 minute (60,000 milliseconds), application-aware routing reviews the tunnel performance characteristics every minute, but it performs its loss and latency calculations based on only 60 Hello packets. It may take more than 1 minute for application-aware routing to reset the tunnel if it calculates that a new tunnel is needed.

To display the next-hop information for an IP packet that a device sends out a service side interface, use the show policy service-path command. To view the similar information for packets that the router sends out a WAN transport tunnel interface, use the show policy tunnel-path command.

Enable Application Visibility on Cisco SD-WAN Devices

You can enable application visibility directly on Cisco SD-WAN devices, without configuring application-aware routing policy so that you can monitor all the applications running in all VPNs in the LAN. To do this, configure application visibility on the router:

vEdge(config)#  policy app-visibility 

To monitor the applications, use the show app dpi applications and show app dpi supported-applications commands on the device.

Configure Application-Aware Routing Using CLIs

Following are the high-level steps for configuring an application-aware routing policy:

  1. Create a list of overlay network sties to which the application-aware routing policy is to be applied (in the apply-policy command):

    vSmart(config)# policy
    vSmart(config-policy)# lists site-list list-name
    vSmart(config-site-list)# site-id site-id

    The list can contain as many site IDs as necessary. Include one site-id command for each site ID. For contiguous site IDs, you can specify a range of numbers separated with a dash (–). Create additional site lists, as needed.

  2. Create SLA classes and traffic characteristics to apply to matching application data traffic:
    vSmart(config)# policy sla-class sla-class-name
    vSmart(config-sla-class)# jitter milliseconds
    vSmart(config-sla-class)# latency milliseconds
    vSmart(config-sla-class)# loss percentage
    vSmart(config-sla-class)# app-probe-class app-probe-class
    vSmart(config-sla-class)# fallback-best-tunnelcriterialatencylossjitter
    
  3. Create lists of applications, IP prefixes, and VPNs to use in identifying application traffic of interest (in the match section of the policy definition):

    vSmart(config)# policy lists
    vSmart(config-lists)# app-list list-name
    vSmart(config-app-list)# (app application-name | app-family family-name)
    
    vSmart(config-lists)# prefix-list list-name 
    vSmart(config-prefix-list)# ip-prefix prefix/length
    
    vSmart(config-lists)# vpn-list  list-name
    vSmart(config-vpn-list)# vpn vpn-id
  4. If you are configuring a logging action, configure how often to log packets to syslog files:

    vEdge(config)# policy log-frequency number
  5. Create an application-aware routing policy instance and associate it with a list of VPNs:

    vSmart(config)# policy app-route-policy policy-name
    vSmart(config-app-route-policy)# vpn-list list-name
  6. Within the policy, create one or more numbered sequence of match–action pairs, where the match parameters define the data traffic and applications of interest and the action parameters specify the SLA class to apply if a match occurs.

    1. Create a sequence:

      vSmart(config-app-route-policy)# sequence number
    2. Define match parameters for data packets:​

      ​​vSmart(config-sequence)# match  parameters
    3. Define the action to take if a match occurs:

      vSmart(config-sequence)# action sla-class sla-class-name [strict]
      vSmart(config-sequence)# action sla-class sla-class-name [strict] preferred-color colors
      vSmart(config-sequence)# <userinput>action backup-sla-preferred-color</userinput> <varname>colors</varname>

      The first two action options direct matching data traffic to a tunnel interface that meets the SLA characteristics in the specified SLA class:

      • sla-class sla-class-name—When you specify an SLA class with no additional parameters, data traffic that matches the SLA is forwarded as long as one tunnel interface is available. The software first tries to send the traffic through a tunnel that matches the SLA. If a single tunnel matches the SLA, data traffic is sent through that tunnel. If two or more tunnels match, traffic is distributed among them. If no tunnel matches the SLA, data traffic is sent through one of the available tunnels.

      • sla-class sla-class-name preferred-color color—To set a specific tunnel to use when data traffic matches an SLA class, include the preferred-color option, specifying the color of the preferred tunnel. If more than one tunnel matches the SLA, traffic is sent to the preferred tunnel. If a tunnel of the preferred color is not available, traffic is sent through any tunnel that matches the SLA class. If no tunnel matches the SLA, data traffic is sent through any available tunnel. In this sense, color preference is considered to be a loose matching, not a strict matching, because data traffic is always forwarded, whether a tunnel of the preferred color is available or not.

      • sla-class sla-class-name preferred-color colors—To set multiple tunnels to use when data traffic matches an SLA class, include the preferred-color option, specifying two or more tunnel colors. Traffic is load-balanced across all tunnels.

      If no tunnel matches the SLA, data traffic is sent through any available tunnel. In this sense, color preference is considered to be a loose matching, not a strict matching, because data traffic is always forwarded, whether a tunnel of the preferred color is available or not. When no tunnel matches the SLA, you can choose how to handle the data traffic:

      • strict—Drop the data traffic.

      • backup-sla-preferred-color colors—Direct the data traffic to a specific tunnel. Data traffic is sent out the configured tunnel if that tunnel interface is available; if that tunnel is unavailable, traffic is sent out another available tunnel. You can specify one or more colors. As with the preferred-color option, the backup SLA preferred color is loose matching. In a single action configuration, you cannot include both the strict and backup-sla-preferred-color options.

    4. Count the packets or bytes that match the policy:
      vSmart(config-sequence)# action count counter-name
    5. Place a sampled set of packets that match the SLA class rule into syslog files:

      vSmart(config-sequence)# action log
    6. The match–action pairs within a policy are evaluated in numerical order, based on the sequence number, starting with the lowest number. If a match occurs, the corresponding action is taken and policy evaluation stops.

  7. If a packet does not match any of the conditions in one of the sequences, a default action is taken. For application-aware routing policy, the default action is to accept nonmatching traffic and forward it with no consideration of SLA. You can configure the default action so that SLA parameters are applied to nonmatching packets:

    vSmart(config-policy-name)# default-action sla-class sla-class-name
  8. Apply the policy to a site list:

    vSmart(config)# apply-policy site-list list-name app-route-policy policy-name

Configure Application Probe Class Using CLI

Configure app-probe-class, real-time-video and map them with the SLA class as shown in the following example:

Device(config)# app-probe-class real-time-video
Device(config)# forwarding-class videofc
Device(config)# color mpls dscp 34
Device(config)# color biz-internet dscp 40
Device(config)# color lte dscp 0

Device(config)# sla-class streamsla
Device(config)# latency 20
Device(config)# loss 10
Device(config)# app-probe-class real-time-video

Configure the default value for DSCP using BFD template as shown:

Device(config)# bfd default-dscp 50 
Device(config)# bfd color mpls 15   

Application-Aware Routing Policy Configuration Example

This topic shows a straightforward example of configuring application-aware routing policy. This example defines a policy that applies to ICMP traffic, directing it to links with latency of 50 milliseconds or less when such links are available.

You configure application-aware routing policy on a Cisco Catalyst SD-WAN Controller. The configuration consists of the following high-level components:

  • Definition of the application (or applications)

  • Definition of App Probe Class (Optional)

  • Definition of SLA parameters

  • Definition of sites, prefixes, and VPNs

  • Application-aware routing policy itself

  • Specification of overlay network sites to which the policy is applied

The order in which you configure these components is immaterial from the point of view of the CLI. However, from an architectural design point of view, a logical order is to first define all the parameters that are invoked in the application-aware routing policy itself or that are used to apply the policy to various sites in the overlay network. Then, you specify the application-aware routing policy itself and the network sites to which you want to apply the policy.

Here is the procedure for configuring this application-aware routing policy on a Cisco Catalyst SD-WAN Controller:

  1. Define the SLA parameters to apply to matching ICMP traffic. In our example, we want to direct ICMP traffic to links that have a latency of 50 milliseconds or less:

    ​vSmart# config
    vSmart(config)# policy sla-class test_sla_class latency 50
    vSmart(config-sla-class-test_sla_class)#
  2. Define the site and VPN lists to which we want to apply the application-aware routing policy:

    vSmart(config-sla-class-test_sla_class)# exit
    vSmart(config-sla-class-test_sla_class)# lists vpn-list vpn_1_list vpn 1
    vSmart(config-vpn-list-vpn_1_list)# exit
    vSmart(config-lists)# site-list site_500 site-id 500
    vSmart(config-site-list-site_500)#
  3. Configure the application-aware routing policy. Note that in this example, we apply the policy to the application in two different ways: In sequences 1, 2, and 3, we specify the protocol number (protocol 1 is ICMP, protocol 6 is TCP, and protocol 17 is UDP).

    vSmart(config-site-list-site_500)# exit
    vSmart(config-lists)# exit
    vSmart(config-policy)# app-route-policy test_app_route_policy
    vSmart(config-app-route-policy-test_app_route_policy)# vpn-list vpn_1_list
    vSmart(config-vpn-list-vpn_1_list)# sequence 1 match protocol 6
    vSmart(config-match)# exit
    vSmart(config-sequence-1)# action sla-class test_sla_class strict
    vSmart(config-sequence-1)# exit
    vSmart(config-vpn-list-vpn_1_list)# sequence 2 match protocol 17
    vSmart(config-match)# exit
    vSmart(config-sequence-2)# action sla-class test_sla_class
    vSmart(config-sequence-2)# exit
    vSmart(config-vpn-list-vpn_1_list)# sequence 3 match protocol 1
    vSmart(config-match)# exit
    vSmart(config-sequence-3)# action sla-class test_sla_class strict
    vSmart(config-sequence-3)# exit
    vSmart(config-sequence-4)#
  4. Apply the policy to the desired sites in the Cisco SD-WAN overlay network:

    vSmart(config-sequence-4)# top
    vSmart(config)# apply-policy site-list site_500 app-route-policy test_app_route_policy
  5. Display the configuration changes:

    vSmart(config-site-list-site_500)# top
    vSmart(config)# show config
  6. Validate that the configuration contains no errors:

    vSmart(config)# validate
    Validation complete
  7. Activate the configuration:

    vSmart(config)# commit
    Commit complete.
  8. Exit from configuration mode:

    vSmart(config)# exit
    vSmart#

Putting all the pieces of the configuration together gives this configuration:

vSmart# show running-config policy
policy
 sla-class test_sla_class
  latency 50
 !
 app-route-policy test_app_route_policy
  vpn-list vpn_1_list
   sequence 1
    match
     protocol 6
    !
    action sla-class test_sla_class strict
   !
   sequence 2
    match
     protocol 17
    !
    action sla-class test_sla_class
   !
   sequence 3
    match
     protocol 1
    !
    action sla-class test_sla_class strict
   !
  !
 !
 lists
  vpn-list vpn_1_list
   vpn 1
  !
  site-list site_500
   site-id 500
  !
  site-list site_600
   site-id 600
  !
 !
!
apply-policy
 site-list site_500
  app-route-policy test_app_route_policy
 !
!

The following example defines the multicast protocol:


policy
!
 sla-class SLA_BEST_EFFORT
  jitter 900
 !
 sla-class SLA_BUSINESS_CRITICAL
  loss    1
  latency 250
  jitter  300
 !
 sla-class SLA_BUSINESS_DATA
  loss    3
  latency 400
  jitter  500
 !
 sla-class SLA_REALTIME
  loss    2
  latency 300
  jitter  60
 !
 app-route-policy policy_multicast
  vpn-list multicast-vpn-list
   sequence 10
    match
     source-ip      10.0.0.0/8
     destination-ip 10.255.255.254/8
    !
    action
     count mc-counter-10
     sla-class SLA_BUSINESS_CRITICAL
    !
   !
   sequence 15
    match
     source-ip      172.16.0.0/12
     destination-ip 172.31.255.254/12
    !
    action
     count mc-counter-15
     sla-class SLA_BEST_EFFORT
    !
   !
   sequence 20
    match
     destination-ip 192.168.0.1
    !
    action
     count mc-counter-20
     sla-class SLA_BUSINESS_CRITICAL
    !
   !
   sequence 25
    match
     protocol       17
    !
    action
     count mc-counter-25
     sla-class SLA_REALTIME
    !
   !
   sequence 30
    match
     source-ip      192.168.0.0/16
     destination-ip 192.168.255.254
     protocol       17
    !
    action
     count mc-counter-30
     sla-class SLA_BUSINESS_DATA preferred-color lte    
    !
   !
   default-action sla-class SLA_BEST_EFFORT
   !
   sequence 35
    match
     source-ip      10.0.0.0/8
     destination-ip 10.255.255.254/8
     protocol       17
    !
    action
     count mc-counter-35
     sla-class SLA_BUSINESS_DATA preferred-color lte
     backup-sla-preferred-color 3g
    !
   !
 lists
  vpn-list multicast-vpn-list
   vpn 1
   vpn 60
   vpn 4001-4010
   vpn 65501-65510
  !
  site-list multicast-site-list
   site-id 1100
   site-id 500
   site-id 600
  !
 !
!
apply-policy
 site-list multicast-site-list
  app-route-policy policy_multicast
 !
!

Ranking Color Prreference Example

app-route-policy SAMPLE _AAR
 vpn-list ONE
  sequence 10
   match
    dscp 46
   !
   action
    sla VOICE_SLA strict preferred-color-group GROUP2_COLORS
   !
  !
  sequence 20
   match
    dscp 34
   !
   action
    sla VOICE_SLA preferred-color-group GROUP1_COLORS
   !
  !
  sequence 30
   match
    dscp 28
   !
   action
    sla VOICE_SLA preferred-color-group GROUP3_COLORS
   !
  !
 !
policy lists
  preferred-color-group GROUP1_COLORS
   primary-preference
    color-preference biz-internet
    path-preference direct-tunnel
   ! 
   secondary-preference
    color-preference mpls
    path-preference multi-hop-path
   !
   tertiary-preference
    color-preference lte
   !
  !
  preferred-color-group GROUP2_COLORS
   primary-preference
    color-preference mpls 
   !
   secondary-preference
    color-preference biz-internet
   !
  !
  preferred-color-group GROUP3_COLORS
   primary-preference
    color-preference mpls biz-internet lte
   !


Note


You can configure path-preference option only if you enable the Multi-Region Fabric option in Cisco SD-WAN Manager.


AAR Policy for IPv6 Applications Example

policy
  sla-class Default
   jitter 100
   latency 300
   loss 25
  !
 app-route-policy _VPN1_AAR-Policy-for-IPv6-Traffic
  vpn-list VPN1
    sequence 1
     match
      app-list Msft-0365
     !
     action
      sla-class Default  preferred-color public-internet
     !
    !
 !
 lists
  app-list Msft-0365
   app ms-office-web-apps 
  !
  site-list SITE-100
   site-id 100 
  !
  vpn-list VPN1
   vpn 1 
  !
 !
!
apply-policy
 site-list SITE-100
  app-route-policy _VPN1_AAR-Policy-for-IPv6-Traffic
 !
!