Managing Tunnel Provisioning

This section describes how to configure IoT FND for tunnel provisioning and how to manage and monitor tunnels connecting FARs (CGRs and C800s) and HERs.

Overview

IoT FND sends the commands generated from processing the tunnel provisioning templates to FARs and HERs to provision secure tunnels between them. The default IoT FND templates contain CLI commands to set up and configure GRE and IPsec tunnels. One HER can serve up to 500 FARs, which may include multiple tunnels with the same HER EID and name.

Figure 1. Tunnels Connect FARs and their Corresponding HERs

To provision tunnels between HERs and FARs, IoT FND executes CLI tunnel configuration commands on these devices. By default, IoT FND provides basic tunnel configuration templates containing the CLI tunnel configuration commands. You can also use your own templates. Although the tunnel provisioning process is automatic, you must first complete the configuration steps outlined in Tunnel Provisioning Configuration Process. After that, whenever a FAR comes online, IoT FND automatically provisions it with a tunnel. Before you configure IoT FND for tunnel provisioning, ensure that the IoT FND TPS Proxy is installed and running.

ZTD without IPSec

Beginning with IoT FND Release 3.1.x, you have the option to initiate ZTD with no IPSec configured by ensuring that the Tunnel Provisioning Template is empty of any CLI. This initial approach of bringing up your network without a factory configuration does not preclude subsequent use of IPSec in your network

Tunnel Provisioning Configuration Process

To configure IoT FND for tunnel provisioning:

1

Configure the DHCP servers.

Configure DHCP servers to provide unique IP addresses to IoT FND. The default IoT FND tunnel provisioning templates configure a loopback interface and the IP addresses required to create the tunnels.

Cisco IOS CGRs/FARs use FlexVPN. Ensures that the template only contains addresses for the loopback interface.

Configuring the DHCP Server for Tunnel Provisioning

Note


In IoT FND 4.6.1 release and greater you can use the “Tunnel Provisioning Optimization” feature that allows the following:

When using a FlexVPN/DMVPN for a FAR, a new property ‘optimizeTunnelProv=true’ is used to tell FND to avoid HER configuration during the Tunnel Provisioning of the device (router). This property is uploaded for each router using the CSV file.

2

Configure the tunnel settings.

Configure the NMS URL and the DHCP proxy client settings on the Provisioning Settings page in IoT FND (ADMIN > System Management > Provisioning Settings).

See the Configuring Provisioning in Managing System Settings chapter.

3

Cisco IOS CGRs use the CGNA service

See Managing Devices chapter.

4

Configure HER management.

Configure HERs to allow management by IoT FND using NETCONF over SSH.

Configuring HERs before adding them to IoT FND.

5

Add HERs to IoT FND.

Adding HERs to IoT FND.

See Adding HER to IoT FND in Managing Devices chapter.

6

Review the IoT FND tunnel provisioning templates to ensure that they create the correct type of tunnel.

See Tunnel Provisioning Templates in Managing Tunnel Provisioning chapter.

7

(Optional) If you plan to use your own templates for tunnel provisioning, create one or more tunnel provisioning groups and modify the default tunnel provisioning templates.

Configuring Tunnel Provisioning Templates

8

Configure FARs to contact IoT FND over HTTPS through the IoT FND TPS proxy.

This step is typically performed at the factory where the FARs are configured to contact the TPS Proxy.

9

Add FARs to IoT FND.

Import the FARs into IoT FND using the Notice-of-Shipment XML file.

See Adding FARs to IoT FND in the Managing Devices chapter.

10

Map FARs to their corresponding HER.

Tunnel Provisioning Configuration Process

After completing the previous steps, deploy the FARs and power them on. Tunnel provisioning happens automatically.

This is the sequence of events after a FAR is turned on:

Before you begin

You must generate the keystore files on the IoT FND and TPS Proxy before configuring tunnel provisioning. Then, you configure IoT FND and the TPS Proxy to talk to one another (refer to Setting Up TPS Proxy, Configuring IoT FND to Use the TPS Proxy, and Starting the IoT FND TPS Proxy). Use the systemctl command for TPS proxy if the OS version is RHEL 8.x or greater.

RHEL Version Command

8.x

systemctl <start/stop/status/restart> tpsproxy

7.x

service tpsproxy <start/stop/status/restart>

Procedure


Step 1

Upon joining the uplink network after being turned on, the FAR sends a request for certificate enrollment.

Step 2

The FAR then requests tunnel provisioning to IoT FND through the IoT FND TPS Proxy.

Step 3

IoT FND looks up the FAR record in the IoT FND database and determines which tunnel provisioning templates to use. IoT FND also looks up which HERs to which to establish a tunnel.

Step 4

For Cisco IOS CGRs, the default templates configure the CGR to use FlexVPN. The FlexVPN client is configured on the CGR that will contact the HER and ask for a FlexVPN tunnel to be dynamically constructed. This is how the HER dynamically adds a new tunnel endpoint interface for the CGR.

Step 5

Before processing FAR templates, IoT FND processes the HER Tunnel Deletion template and sends the resulting commands to the HERs. This is done for each HER to remove existing tunnel configuration that may be associated with the FAR.

Step 6

IoT FND uses the FreeMarker template engine to process the FAR Tunnel Addition template. The engine converts the templates to text, which IoT FND assumes to be CLI configuration commands (Cisco IOS per the CGR). IoT FND uses these commands to configure and bring up one end of the tunnel on the FAR.

Step 7

IoT FND uses the FreeMarker template engine to process the HER Tunnel Addition template. The engine converts the templates to text, which IoT FND assumes to be commands for configuring the tunnel on the HERs.

Step 8

For Cisco IOS CGRs, if no errors occurred applying the commands generated by the templates to the FAR and HERs, IoT FND configures a new active CGNA profile “cg-nms-register,” and deactivates the cg-nms-tunnel profile. That cg-nms-register profile uses the IoT FND URL.

The specified URL uses the IoT FND registration port (default 9121) instead of the tunnel provisioning port. The Fully Qualified Domain Name (FQDN) in that URL is different and resolves to an IP address that is only reachable through the tunnels.


Configuring Tunnel Provisioning

This section describes how to configure IoT FND for tunnel provisioning.

Configuring the DHCP Server for Tunnel Provisioning

For tunnel provisioning to succeed, configure the DHCP server used by IoT FND to supply addresses to create tunnels between the FARs and HERs. For example, configure the DHCP server to provide IP addresses for tunnel provisioning on a permanent-lease basis.

IoT FND makes the DHCP requests based on the settings defined in the tunnel provisioning templates. During tunnel provisioning, the IoT FND templates can make two kinds of DHCP requests:

  • Request an IP address, and then make it available to the template.

  • Request a subnet with two IP addresses, and then make both addresses available to the template.

IoT FND can make these requests for IPv4 addresses and IPv6 addresses.

The ability to request DHCP addresses from the template gives you maximum flexibility when defining tunnel configurations because you allocate the exact address needed for each FAR and corresponding interface on the HER. The default tunnel provisioning templates provided address the most common use case: one IPsec tunnel between the FAR and its corresponding HER. Each end of this IPsec tunnel gets a dynamically allocated IPv4 address:

  • If your DHCP server supports subnet allocation, use it to obtain two addresses that belong to the same subnet.

  • If your DHCP server only supports address allocation, configure it so that the two DHCP address requests return addresses that can be used as ends of an IPsec tunnel.

  • If your routing plan calls for allocating unique IPv4 addresses for each FAR and assigning it to a loopback interface above the IPsec tunnel, allocate this address using the IoT FND template.

If you choose to build IPv6 GRE tunnels, allocate the IPv6 addresses for each end of the tunnel using DHCP prefix delegation or individual address requests.

This section describes example DHCP settings for tunnel provisioning. How you configure these settings depends on your installation. This section provides general guidelines for configuring the DHCP server for tunnel provisioning using the Cisco Network Registrar (CNR).

Configuring DHCP for Tunnel Provisioning Using CNR

The CNR CLI script in the following example configures the CNR DHCP server to service requests made by the default tunnel provisioning templates in IoT FND. When using this script, ensure that the subnets are appropriate for your DHCP server environment.

Example CNR DHCP Server Tunnel Provisioning Script

# These commented out commands support re-applying the configuration by first
# removing any previously applied configuration, in reverse order. This should
# not be done in a production environment, but may be useful when initially
# developing and testing a configuration.
 
# scope v4address-perm delete
# dhcp-address-block v4subnet-perm delete
# prefix v6subnet-perm delete
# prefix v6address-perm delete
# policy permanent delete
 
# Configure the server to automatically map any IPv4 or IPv6 user class
# option values to selection tags. By default CG-NMS includes a value of
# "CG-NMS" for the user class in its requests. The tag is used to insure
# prefixes and scopes configured to satisfy requests from CG-NMS are only
# used for that purpose.
 
dhcp set map-user-class-id=append-to-tags
 
# Since CG-NMS uses the leased addresses and subnets in router
# configuration the addresses and subnets must be permanently allocated
# for that purpose. Create a policy that instructs the DHCP server to
# offer a permanent lease.
 
policy permanent create
policy permanent set permanent-leases=enabled
 
# Configure DHCPv6.
 
# The default CG-NMS tunnel template will request IPv6 addresses for
# use with CGR loopback interfaces.
 
prefix v6address-perm create 2001:DB8:0:0:1::/80 dhcp-type=dhcp
prefix v6address-perm set description="Pool for leasing addresses for loopback 
interfaces."
prefix v6address-perm set policy=permanent
prefix v6address-perm set selection-tags=CG-NMS
 
# The default CG-NMS tunnel template will request IPv6 prefixes for
# use with GRE tunnels. Force use of a /127 prefix.
 
prefix v6subnet-perm create 2001:DB8:0:0:2::/80 dhcp-type=prefix-delegation
prefix v6subnet-perm set description="Pool for leasing prefixes for GRE tunnels."
prefix v6subnet-perm set policy=permanent
prefix v6subnet-perm set selection-tags=CG-NMS
prefix-policy v6subnet-perm set default-prefix-length=127
prefix-policy v6subnet-perm set shortest-prefix-length=127
 
# Configure DHCPv4.
 
# The default CG-NMS tunnel template will request IPv4 subnets for
# use with IPsec tunnels. Note that currently address pools for
# IPv4 subnet allocation can only be configured using the CLI as the
# CNR Web UI does not currently support them.
 
# If CNR allowed you to set a description on DHCP address blocks it would be:
# "Pool for leasing subnets for IPsec tunnels."
 
dhcp-address-block v4subnet-perm create 192.0.2.0/24
dhcp-address-block v4subnet-perm set default-subnet-size=31
dhcp-address-block v4subnet-perm set policy=permanent
dhcp-address-block v4subnet-perm set selection-tags=CG-NMS
 
# The default CG-NMS tunnel template will request IPv4 addresses for
# use with loopback interfaces.
 
scope v4address-perm create 198.51.100.0 255.255.255.0
scope v4address-perm set description="Pool for leasing addresses for 
loopback interfaces."
scope v4address-perm set policy=permanent
scope v4address-perm addRange 198.51.100.2 198.51.100.254
scope v4address-perm set selection-tag-list=CG-NMS
 
# Configure detailed logging of incoming and outgoing packets. This is useful when
# debugging issues involving DHCP, however this level of logging will lower the
# performance of the DHCP server. If this is a production server under heavy load
# it may be necessary to forgo detailed packet logging.
 
dhcp set log-settings=missing-options,incoming-packet-detail,
outgoing-packet-detail,unknown-criteria,client-detail,
client-criteria-processing,dropped-waiting-packets,v6-lease-detail
 
# Save the changes and reload the server to have them take effect.
save
dhcp reload
 
# List the current configuration.
 
policy list
prefix list
dhcp-address-block list
scope list
dhcp show

Configuring Tunnel Group Settings

You use groups in IoT FND to bulk configure tunnel provisioning. By default, all FARs are added to the appropriate default group (default-cgr, default-c800). Default groups contain the templates used for tunnel provisioning.

Creating Tunnel Groups

If you plan to use one set of templates for all FARs, whether using the default templates, modified default templates or custom templates, do not create additional groups. To define multiple sets of templates, create groups and customize the templates for these groups.


Note


CGRs and C800s can be in the same tunnel provisioning group if your custom templates are applicable to both router types.


To create a tunnel group:

Procedure

Step 1

Choose CONFIG > Tunnel Provisioning.

Step 2

Click + icon in left pane to add a group.

Step 3

Enter a name of the new group, and then click OK.

The group appears in the Tunnel Groups pane.

After creating a tunnel group, the next step is to move FARs from other groups to it, as described in Moving FARs to Another Group.


Deleting Tunnel Groups

Only empty groups can be deleted. Before you can delete a tunnel group, you must move the devices it contains to another group.

To delete an empty tunnel group:

Procedure

Step 1

Choose CONFIG > Tunnel Provisioning.

Step 2

In the TUNNEL GROUPS left pane, select the tunnel group to delete.

Step 3

Click (-) to delete the group.

Step 4

Click Yes to confirm deletion.


Viewing Tunnel Groups

The Tunnel Provisioning page lists information about existing tunnel groups.

Follow these steps to view the tunnel groups defined in IoT FND:

Procedure

Step 1

Choose CONFIG > Tunnel Provisioning.

Step 2

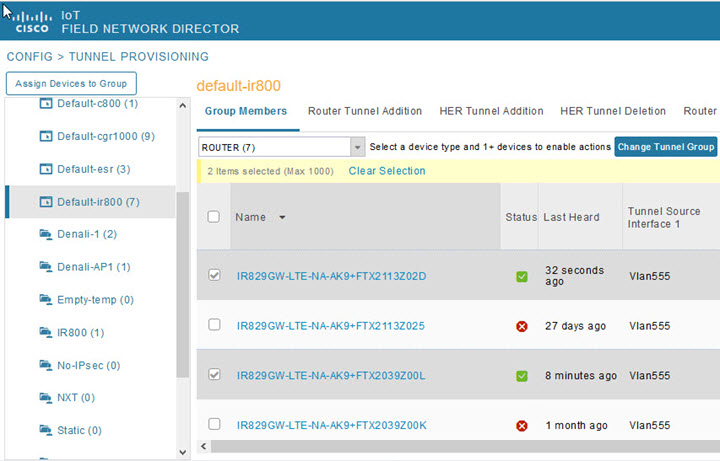
Click Group Members tab.

Step 3

In the TUNNEL GROUPS pane (left), select a group.

IoT FND displays the following Tunnel Group information for each router in the group. Not all routers support all fields.

Table 1. Tunnel Group Fields

Field

Description

Name

Router EID (device identifier).

Status

Status of the router:

  • Unheard—The router has not contacted IoT FND yet.

  • Unsupported—The router is not supported by IoT FND.

  • Up—The router is in operation.

  • Down—The router is turned off.

Last Heard

Last time the router contacted or sent metrics to IoT FND. If the router never contacted IoT FND, never appears in this field. Otherwise, IoT FND displays the date and time of the last contact, for example,4/10 19:06.

Tunnel Source Interface 1Tunnel Source Interface 2

Router interface used by the tunnel.

OSPF Area 1

OSPF Area 2

Open shortest path first (OSPF) areas 1 and 2.

OSPFv3 Area 1

OSPFv3 Area 1

OSPFv3 area 1

OSPFv3 area 2.

IPsec Dest Addr 1

IPsec Dest Addr 2

IPv4 destination address of the tunnel.

GRE Tunnel Dest Addr 1

GRE Tunnel Dest Addr 2

IPv6 destination address of the tunnel.

Certificate Issuer Common Name

Name of the CA that issued the certificate.


Renaming a Tunnel Group

In the Tunnel Provisioning page, there are two tunnel provisioning groups available, namely user-created group and default group. IoT FND allows you to rename the user-created Tunnel Provisioning Groups only. You cannot rename the default Tunnel Provisioning Groups.


Note


You can rename the user-created tunnel group at any time. Cisco recommends using short, meaningful names. Names cannot be more than 250 characters long.


To rename a tunnel group:

Procedure

Step 1

Choose CONFIG > Tunnel Provisioning.

Step 2

In the TUNNEL GROUPS pane, mouse over the tunnel group to rename and click the Edit pencil icon.

Note


The pencil icon does not appear for Default Tunnel Provisioning groups.

Step 3

Enter the new Group Name and then click OK.


What to do next

Note


When you enter an invalid character entry (such as, @, #, !, or +) in the entry field, the field is highlighted in red and disables the OK button.


Moving FARs to Another Group

You can move FARs to another group either in bulk or manually.

Moving FARs to Another Group Manually

To move FARs to another group manually:

Procedure

Step 1

Choose CONFIG > Tunnel Provisioning.

Step 2

Click the Group Members tab.

Step 3

In the TUNNEL GROUPS pane, select the tunnel group with the routers to move.

Step 4

Choose the device type from the Select a device type drop-down menu.

Step 5

Check the check boxes of the FARs to move.

To select all FARs in a group, click the check box at the top of the column. When you select devices, a yellow bar displays that maintains a count of selected devices and has the Clear Selection and Select All commands. The maximum number of devices you can select is 1000.

Step 6

Click the Change Tunnel Group button.

Step 7

From the drop-down menu, choose the tunnel group to which you want to move the FARs.

Step 8

Click Change Tunnel Group.

Step 9

Click OK to close the dialog box.


Moving FARs to Another Group in Bulk

You can move FARs in bulk to another group by importing a CSV or XML file containing the names of the FARs to move. Ensure that the file contains entries in the format shown the following example:

eid
CGR1120/k9+JSM1
CGR1120/k9+JSM2
CGR1120/k9+JSM3
CGR1120/k9+JSM4
C819HGW-S-A-K9+FTX174685V0

The first line is the header, which tells IoT FND to expect FAR EIDs in the remaining lines (one FAR EID per line).

To move FARs to another group in bulk:

Procedure

Step 1

Create a CSV or XML file with the EIDs of the devices to move to a different group.

Step 2

Choose CONFIG > Tunnel Provisioning

Step 3

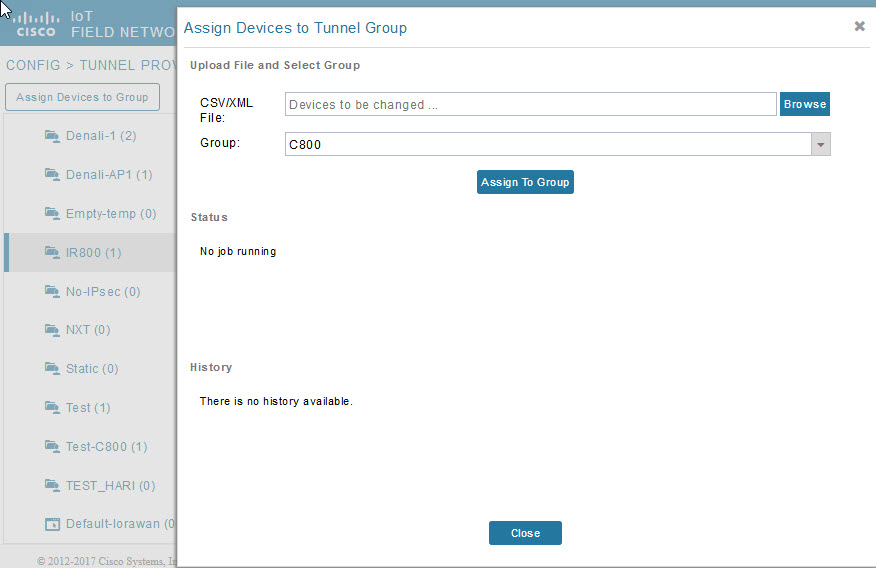
Click Assign Devices to Tunnel Group to open an entry panel.

Step 4

Click Browse and locate the file that contains the FARs that you want to move.

Step 5

From the Group drop-down menu, choose the destination tunnel group.

Step 6

Click Assign To Group.

Step 7

Click Close.


Configuring Tunnel Provisioning Templates

IoT FND has three default tunnel provisioning templates:

  • Field Area Router Tunnel Addition—IoT FND uses this template to generate the CLI configuration commands for creating one end of an IPsec tunnel on the FAR.

  • Head-End Router Tunnel Addition—IoT FND uses this template to generate the CLI configuration commands for creating the other end of the IPsec tunnel on the HER.

  • Head-End Router Tunnel Deletion—IoT FND uses this template to generate the CLI configuration commands for deleting any existing tunnel to the FAR at the other end of the tunnel.

Tunnel Provisioning Template Syntax

The IoT FND tunnel provisioning templates are expressed with the FreeMarker syntax. FreeMarker is an open-source Java-based engine for processing templates and is built into IoT FND. As shown in CLI Command Generation from Templates in IoT FND, FreeMarker takes as input the tunnel provisioning template and data supplied by IoT FND, and generates CLI commands that IoT FND runs on the FARs and HERs in the “configure terminal” context.

Figure 2. CLI Command Generation from Templates in IoT FND

In IoT FND, the tunnel provisioning templates consist of router CLI commands and FreeMarker variables and directives. The use of FreeMarker syntax allows IoT FND to define one template to provision multiple routers.

This section describes the basic FreeMarker syntax in the tunnel provisioning templates. For information about FreeMarker visit http://freemarker.sourceforge.net/.

Configuring the Field Area Router Tunnel Addition Template

To edit the FAR Tunnel Addition template to provide one end of an IPsec tunnel on FARs in the group:

Procedure

Step 1

Choose CONFIG > Tunnel Provisioning.

Step 2

In the TUNNEL GROUPS pane, select the tunnel group with the template to edit.

Step 3

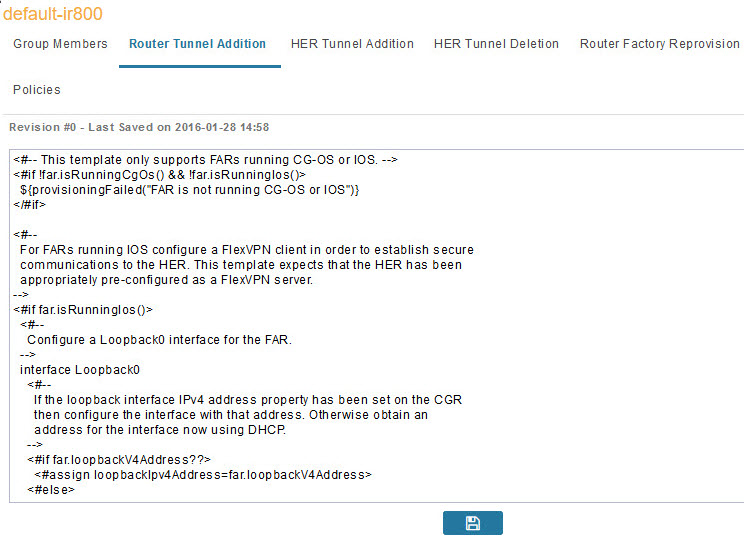
Click the Router Tunnel Addition tab.

Step 4

Modify the default template.

Tip


Use a text editor to modify templates and copy the text into the template field in IoT FND.

Step 5

Click the Disk icon to save changes.

Step 6

Click OK to confirm the changes.

See also, Tunnel Provisioning Template Syntax.


Configuring the Head-End Router Tunnel Addition Template


Note


To ensure that both endpoints are in a matching subnet, this template must use the same Identity Association Identifier (IAID) as the FAR template.


To edit the HER Tunnel Addition template to create the other end of the IPsec tunnel on HERs in the group:

Procedure

Step 1

Choose CONFIG > Tunnel Provisioning.

Step 2

In the TUNNEL GROUPS pane, select a tunnel group.

Step 3

Click the HER Tunnel Addition tab.

Step 4

Modify the default HER addition template.

Step 5

Click the Disk icon to save changes.

Step 6

Click OK to confirm the changes.


Configuring the HER Tunnel Deletion Template

To edit the HER tunnel deletion template to delete existing tunnels to FARs at the other end of the tunnel:

Procedure

Step 1

Choose CONFIG > Tunnel Provisioning.

Step 2

In the TUNNEL GROUPS pane, select the tunnel group whose template to edit.

Step 3

Click the HER Tunnel Deletion tab.

Step 4

Modify the default HER deletion template.

Step 5

Click the Disk icon to save changes.

Step 6

Click OK to confirm the changes.


Configuring FND for IXM

Cisco IoT FND supports the following configurations for the Cisco Wireless Gateway for LoRaWAN:

  • Firmware upgrade

  • Hardware monitoring and events reporting

  • IP networking configuration and operations (for example, IP address and IPsec)

  • Zero Touch provisioning that includes either installing Thingpark LRR software or configuring Common Packet Forwarder (CPF)

PNP Support for IXM

By default, PNP (Plug and Play) automatic discovery mode for Dynamic Host Configuration Protocol (DHCP), Domain Name System (DNS) and Cisco Connection Online (CCO) is enabled. When using DHCP server with option 43, for example, on boot-up, the IXM device gets the IP address from the DHCP server. The device gets the PNP Server IP address (TPS or FND IP) through option 43. The PNP request is sent to IoT FND. IoT FND applies the config to the running config and configures the startup config by executing the copy running-config startup-config command. IoT FND terminates the PNP profile when IoT FND pushes the configuration to IXM.

For CCO redirection, associate the root certificate with the PNP profile. For this, export the FND root certificate using the below command under /opt/cgms/server/cgms/conf.

keytool -export -alias root -file mydomain.der -keystore cgms_keystore && openssl x509 -inform der -in mydomain.der -out certificate_root.pem

Upload the root certificate in the PNP redirection page or along PNP profile.

Procedure


Step 1

Set the following property in cgms.properties to true in order to trust the (IXM) server.

trust-ixm-server-cert=true //Default value is false

Step 2

Restart FND service.

Note

 
To clean the startup config and trigger PNP, enter the following command.
archive download-sw firmware /factory /
force-reload <image file path>

Gateway Bootstrap Configuration Template

In the Config > Tunnel Provisioning page, choose Default-Lorawan. In the Gateway Bootstrap Configuration tab, enter the commands to LoRaWAN before triggering PnP on the device.

The sample config is given below.


hostname <hostname>
!crypto ipsec profile primary
   ipaddr <ipaddr> iketime 86000 keytime 86000 aes 256
  subnet <subnet> ip>/24
  exit
ip domain lookup
ip domain name cisco.com
ip host fnd.iot.cisco.com <fnd ip address>
!
interface Fast Ethernet 0/1
  ipaddress dhcp
  exit
!
ip default-gateway <default gateway ip>
!
username <username> password <password>
!
ip ssh authenticaton-retires 3
radio off
ip ssh admin-access
ip ssh port 22
!
ntp server ip <ntp server ip>
ipsec isakmp admin <password> group 19 <password>
ipsec enable
!
igma secure enable
!
igms event destination <FND IP> 5683
!
igma profile iot-fnd-register
  active
  add-command show fpga
  add-command show inventory
  add-command show ip interface FastEthernet 0/1
  add-command show ipsec status info
  add-command show platform status
  add-command show radio
  add-command show version
  interval 2
  url https://fnd.iot.cisco.com:9121/igma/register
  exit
!
igma local-trustpoint sudi

Preparing IoT FND for IXM Zero Touch Deployment

Follow these steps to prepare IoT FND for IXM Zero Touch Deployment (ZTD)

  • Using Thingpark LRR Software

  • Enabling CPF (Common Packet Forwarder)


Note


To enable CPF, set enable-cpf=true flag in cgms.properties file.

Procedure


Step 1

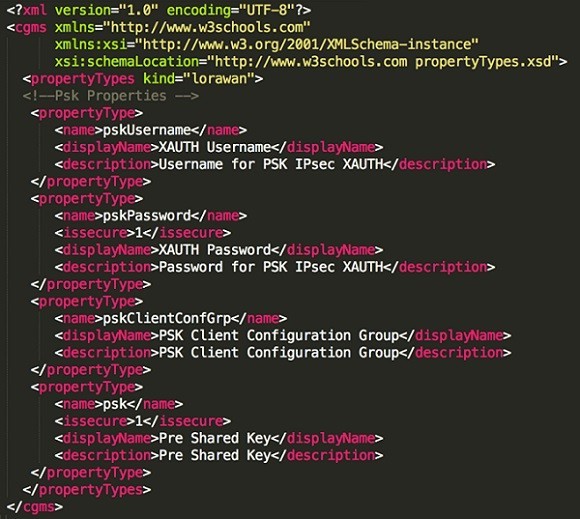
If you are using Pre-Shared Key (PSK) authentication for tunneling, add the userPropertyTypes.xml file to the IoT FND server under /opt/cgms/server/cgms/conf.

Step 2

Restart the IoT FND service after adding the following.

Note

 
If you are using Rivest-Shamir-Adleman (RSA), ignore this step.

The userPropertyTypes.xml is shown below.

Step 3

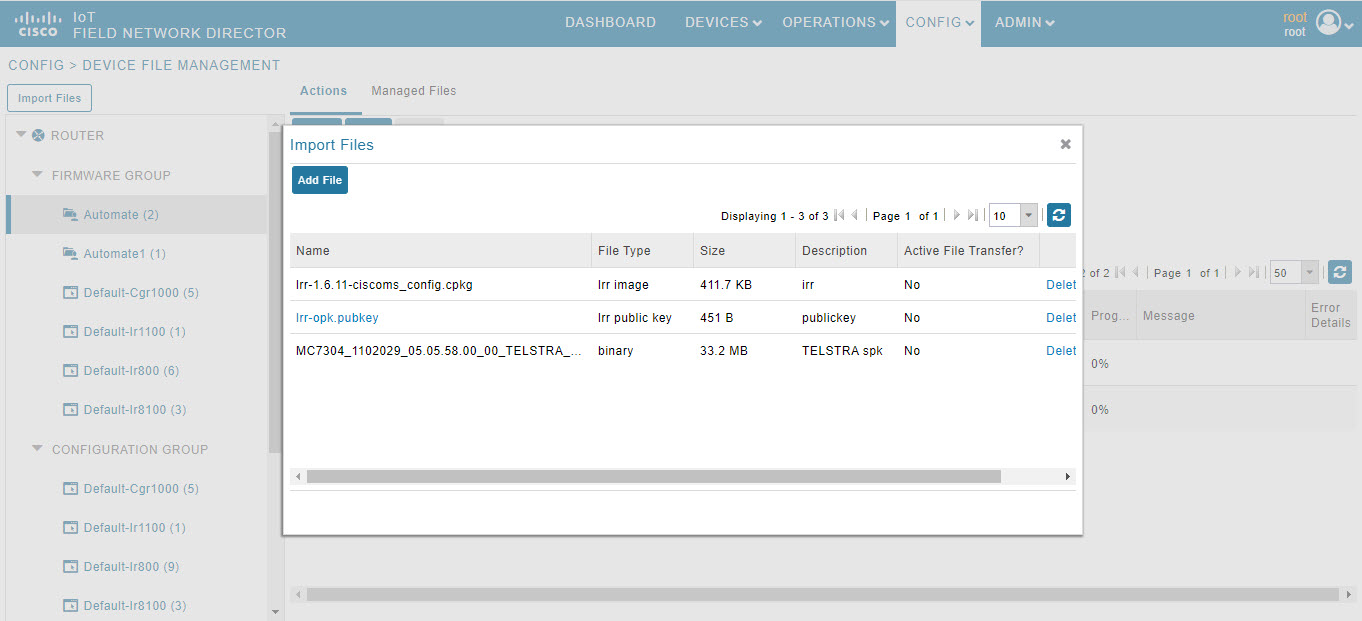
In the Config > Device File Management page, click Import Files.

Step 4

Click Add File to add the Actility LRR and public key to IoT FND.

Step 5

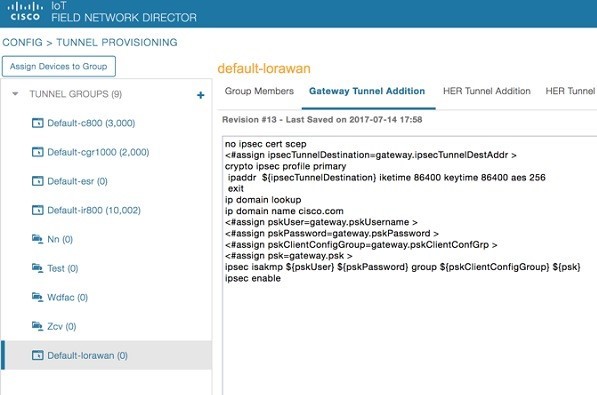
In the Config > Tunnel Provisioning page, update the tunnel configuration group with the following parameters in the Gateway Tunnel Addition tab and click Save.

Step 6

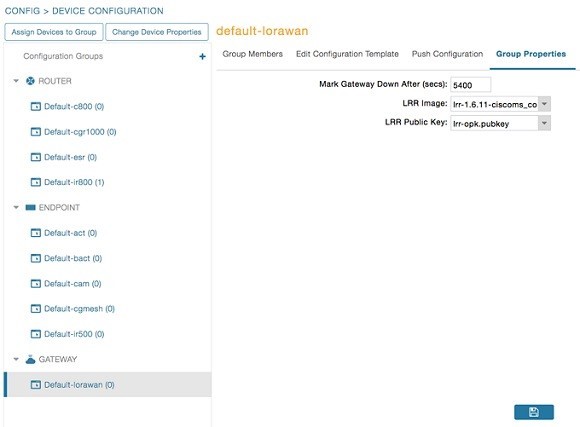
In Config > Device Configuration page, click the Group Properties tab. Update the device configuration group properties with the following parameters for Default–lorawan and click Save.

Step 7

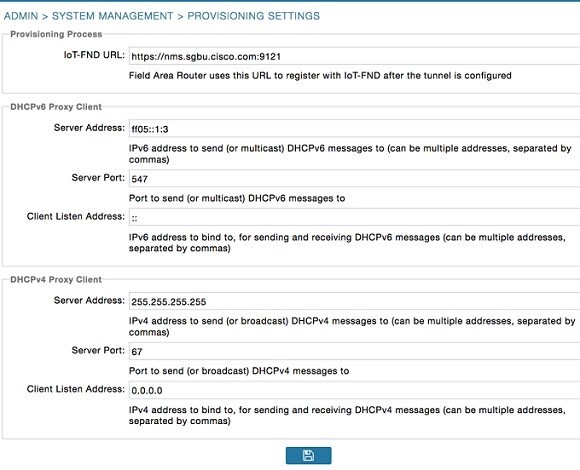
Go to Admin > System Management > Provisioning Settings page. The common name is populated in IoT-FND URL field.

Step 8

Make sure you have obtained certificates from the Certificate Authority (CA). Execute the show ipsec certs command to verify that the LDevID certs are enrolled by the device. Make sure the firewall allows ports 9120, 9121, 9122, and all the SSH, telnet, and DHCP ports. Make sure the TPS name is pingable and execute the copy running express-setup-config command.

Hostname IXM
!
ip domain lookup
ip domain name cisco.com
!
ip name-server 55.55.0.15
!
interface FastEthernet 0/1 description interface
ip address 4.4.4.2 255.255.255.0 exit
!
ip default-gateway 4.4.4.1
!
ntp server ip 55.55.0.1
!
clock timezone America/Los_Angeles
!
igma profile iot-fnd-tunnel


active
add-command show fpga interval 5
url https://ps.sgbu.cisco.com:9120/igma/tunnel exit

ipsec cert scep https://55.55.0.15/csertsrv/msecp.dll us ca mil 
cisco iot test true ndes true 2048

Note

 
You need to add the HER configuration manually, for example, the tunnel crypto profiles and transform sets. The following is a sample template, where VPN uses PSK as authentication.
username cisco password 0 cisco

crypto isakmp policy 1
    encr aes 256
    hash sha256
    authentication pre-share
    group 19
crypto isakmp keepalive 10
!
crypto isakmp client configuration group 19
    key cisco
    domain cisco.com
    pool POOL
    acl split
    save-password
    netmask 255.255.255.128
crypto isakmp profile test
    match identity group 19
    client authentication list AUTH
    isakmp authorization list NET
    client configuration address respond
    client configuration group 19
    virtual-template 1
!
!
crypto ipsec transform-set test esp-aes 256 esp-sha256-hmac 
 mode tunnel
!
!
crypto ipsec profile ipsecprof
    set security-association lifetime kilobytes disable
    set transform-set test
    set isakmp-profile test

interface Virtual-Template1 type tunnel
    tunnel protection ipsec profile ipsecprof
    ip unnumbered GigabitEthernet0/1
    tunnel source GigabitEthernet 0/1
    tunnel mode ipsec ipv4

ip local pool POOL 20.20.0.0 20.20.255.255

Step 9

Encrypt the PSK passwords using the signature-tool under /opt/cgms-tools/bin.

Step 10

Add the encrypted passwords in the CSV file and prepare it for upload.

Step 11

Add the modem to IoT FND and add ISR4K using the sample CSV shown below.

eid,netconfUsername,netconfPassword,ip,deviceType,lat,domain,lng,
ipsecTunnelDestAddr,tunnelHerEid, pskUsername,pskPassword,pskClientConfGrp,psk
IXM-LPWA-900-16-K9+FOC21028RAK,,,,lorawan,10,root,10,4.4.4.1,
C3900-SPE250/K9+FOC172417YT,cisco,ki8OjEO5Pr+
krJTtUooUMD0GoqmOAznc2JObiUUr4ismXyP0uXs8JRuSPOfojMDavGIHiO8unUUJm3zdxv0LP8b6fe5G+
oshy76A6IqX1jk7ymSFOaVPQBT8fUS6onjsuSThiLERS0B6Brn2gRx/
KpQMk9IdYQMOSsHh4khvtxbqBZy6j++pIjeG4+ dPz/v52DmJR+DOrE7ZQpfvS9PSHkJoaqC2o6PrKN5YZ50G9+
Tm+diPmbyv/PdHKtXn1ny3qBAdbfDwOjlA+NtJPld3/ 06vq6WhHsgujYwMJWs7Cuu3rR0/FVHF/
5wFxarakJsfo/zd69EpzrI8Hsic/QmMzA==,19, ki8OjEO5Pr+
krJTtUooUMD0GoqmOAznc2JObiUUr4ismXyP0uXs8JRuSPOfojMDavGIHiO8unUUJm3zdxv0LP8b6fe5G+
oshy76A6IqX1jk7ymSFOaVPQBT8fUS6onjsuSThiLERS0B6Brn2gRx/KpQMk9IdYQMOSsHh4khvtxbqBZy6j++pIjeG4+
dPz/v52DmJR+DOrE7ZQpfvS9PSHkJoaqC2o6PrKN5YZ50G9+Tm+diPmbyv/PdHKtXn1ny3qBAdbfDwOjlA+NtJPld3/
06vq6WhHsgujYwMJWs7Cuu3rR0/FVHF/5wFxarakJsfo/zd69EpzrI8Hsic/QmMzA==C3900-SPE250/K9+FOC172417YT,
nms,sgbu123!,55.55.0.18,isr3900,,,,,,,,,

Note

 
The sample CSV for CPF is shown below.
eid,netconfUsername,netconfPassword,ip,deviceType,lat,domain,lng,
ipsecTunnelDestAddr,tunnelHerEid, pskUsername,pskPassword,pskClientConfGrp,psk,
cpfNetworkServer,cpfServerPort,cpfAntOmniGain1,cpfAntLoss1,cpfAntOmniGain2,
cpfAntLoss2,cpfCountry,cpfGatewayId,cpfAuthMode
ki8OjEO5Pr+krJTtUooUMD0GoqmOAznc2JObiUUr4ismXyP0uXs8JRuSPOfo
jMDavGIHiO8unUUJm3zdxv0LP8b6fe5G+oshy76A6IqX1jk7ymSFOaVPQBT8fUS6onjsuSThi
LERS0B6Brn2gRx/KpQMk9IdYQMOSsHh4khvtxbqBZy6j++pIjeG4+
dPz/v52DmJR+DOrE7ZQpfvS9PSHkJoaqC2o6PrKN5YZ50G9+Tm+diPmbyv/
PdHKtXn1ny3qBAdbfDwOjlA+NtJPld3/
06vq6WhHsgujYwMJWs7Cuu3rR0/FVHF/5wFxarakJsfo/zd69EpzrI8Hsic/QmMzA==,19,
ki8OjEO5Pr+krJTtUooUMD0GoqmOAznc2JObiUUr4ismXyP0uX
s8JRuSPOfojMDavGIHiO8unUUJm3zdxv0LP8b6fe5G+
oshy76A6IqX1jk7ymSFOaVPQBT8fUS6onjsuSThiLERS0B6Brn2gRx/
KpQMk9IdYQMOSsHh4khvtxbqBZy6j++pIjeG4+dPz/v52DmJR+
DOrE7ZQpfvS9PSHkJoaqC2o6PrKN5YZ50G9+Tm+diPmbyv/PdHKtXn1ny3qBAdbfDwOjlA+NtJPld3/
06vq6WhHsgujYwMJWs7Cuu3rR0/FVHF/5wFxarakJsfo/zd69EpzrI8Hsic/
QmMzA==,19.19.19.2,5000,1,2,3,4,N/A,::1,none C3900-SPE250/K9+FOC172417YT,
nms,sgbu123!,55.55.0.18,isr3900,,,,,,,,,,,,,,,,,

Step 12

Once the modem is registered, the status of the IXM device is shown as up in IoT FND in the Device Info page. Click the modem link to view the detailed IXM modem information.

Note


Please check the following events if there are issues with ZTD.

Step 13

If configuration update is required or a new modem is added to the router, follow the steps from point 1 or you can invoke a configuration push.

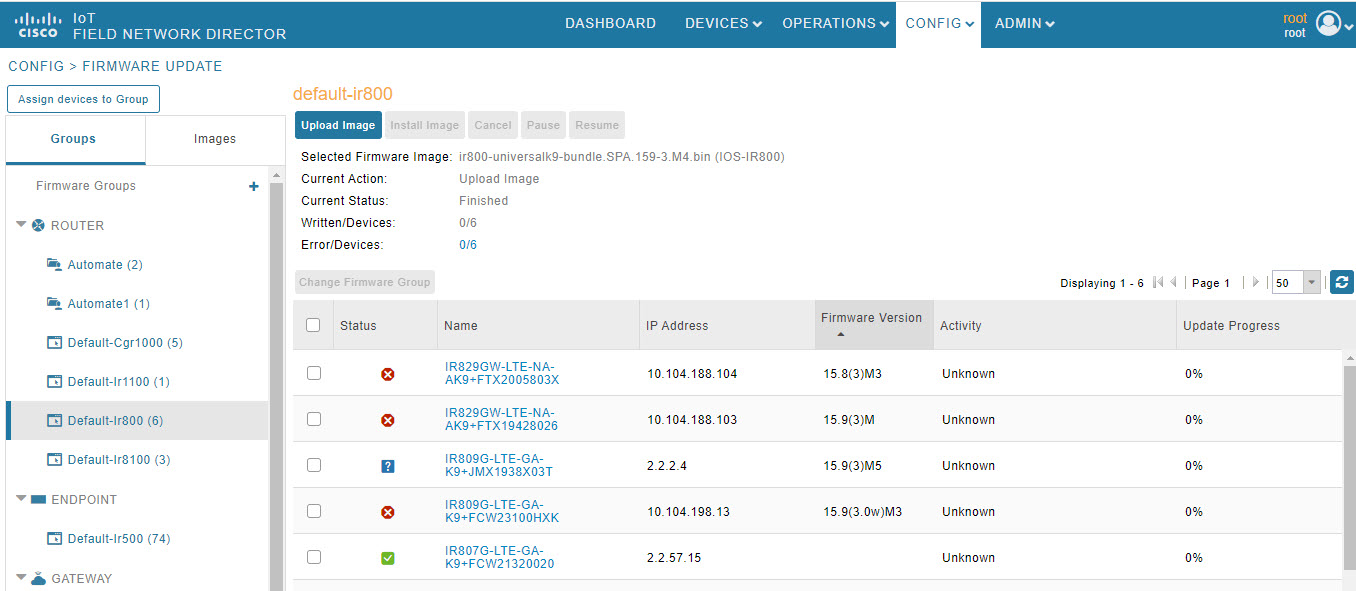
In the Config > Device Configuration page, click Default-IR800 and go to Push Configuration tab to invoke a configuration push. Select Push ROUTER Configuration from the drop-down and click Start.


IXM Firmware Update

Follow the steps for upgrading the firmware.

Procedure


Step 1

In Config > Firmware Update page, go to Images tab. Select Default-Lorawan under Gateway in the left pane and click + to open the entry panel.

Step 2

Browse and select the firmware file from local directory. Click Add File to load the firmware file to IoT FND.

Step 3

In the Firmware Update page, go to Groups tab. Select Default-Lorawan under Gateway in the left pane.

Step 4

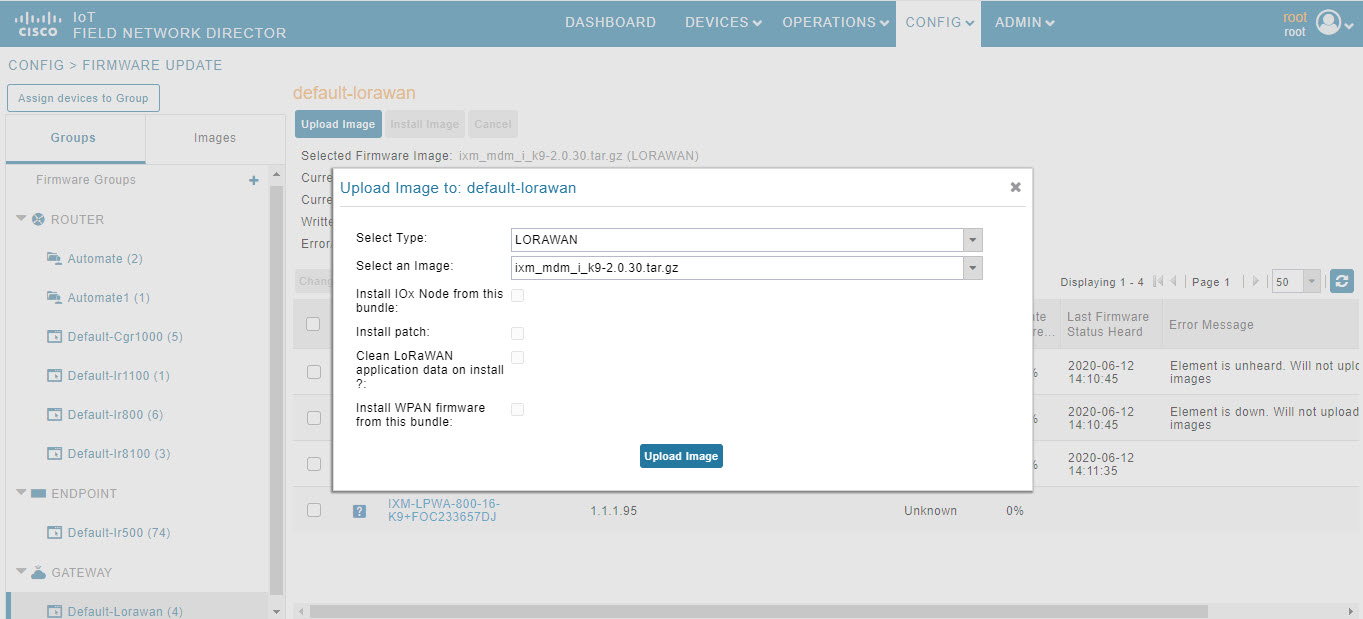
Click Upload Image to push the firmware to the IXM modem. For more information, see Uploading a Firmware Image to a Router Group.

Note

 
If you want to erase the LRR or public key, select Clean LoRaWAN application data on install ? option.

Note


Firmware image upload depends on interface speeds. You can set the timeout duration (in minutes) for firmware upload in cgms.properties file using "igma-idle-timeout" key. If you don’t set this duration, then default timeout duration will be 15 minutes.

Step 5

Click Install Image button to install the image once the upload is complete.


Troubleshoot

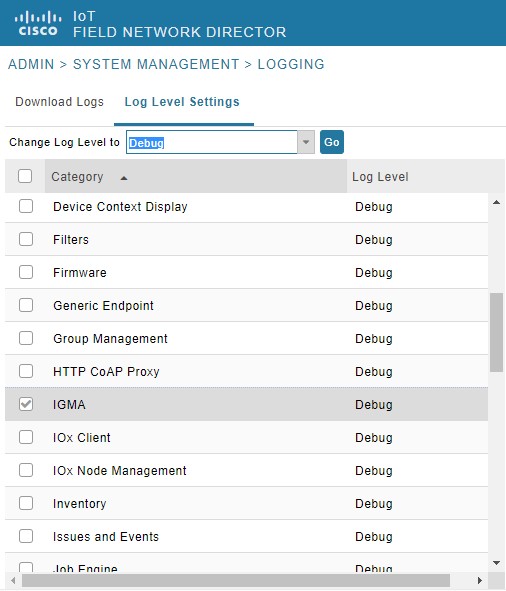
  • Click Admin > System Management > Logging to enable the following debug categories on IoT FND before troubleshooting.

  • TPS does not have any messages from IXM.

    • Check if the certificates are installed correctly on IXM and from the same CA as the FND certs.

    • Make sure the IGMA profile is pointing to the correct tunnel profile and the proxy name resolution is correct.

    • Make sure the proxy can be pinged.

    • Make sure the IGMA profile has the correct commands.

  • IoT FND does not have any messages from the IXM.

    • Check if the tunnel network is reachable from the FND cluster.

    • Make sure the IGMA profile is pointing to the correct FND profile and the name resolution is correct.

    • Make sure IoT FND can be pinged.

  • Tunnel provisioning request failed.

    • Check IoT FND tunnel template for command accuracy.

  • IoT FND registration failed.

    • Check IoT FND configuration template for command accuracy.

    • Tunnel issues (for example, flapping or disconnect).

Monitoring Tunnel Status

To view tunnel status, choose OPERATIONS > Tunnel Status. The Tunnel Status page lists devices and their provisioned tunnels and displays relevant information about tunnels and their status. Tunnels are provisioned between HERs and FARs.

When you select Show Filter at the top of the page (when selected, replaced by Hide Filter), a number of search fields appear. You can filter by all the Field Names listed in Tunnel Status Fields. The value entered in one search field will determine the available selections in the other fields. Select Hide Filter to remove the search fields.

Tunnel Status Fields describes the tunnel status fields. To change the sort order of tunnels in the list by name, click the HER Name column heading. A small arrow next to the heading indicates the sort order.


Note


It takes time for the status of the newly created tunnel to be reflected in IoT FND.
Table 2. Tunnel Status Fields

Field

Description

HER Name

The EID of the HER at one end of the tunnel. To view the HER details, click its EID.

Note


Because one HER can serve up to 500 FARs, there may be multiple tunnels in the list with the same HER EID.

The Network Interfaces area of the Device Info page displays a list of tunnels configured on the HER. The Config Properties and Running Config tabs also contain information about tunnels configured on this HER.

HER Interface

The name of the HER tunnel interface. These names are automatically generated when tunnels are created (Tunnel1, Tunnel2, Tunnel3, and so on) or Virtual-Interface1, Virtual-Interface 2 and so on).

Admin Status

The administrative status of the tunnel (up or down). This indicates if the administrator enabled or disabled the tunnel.

Oper. Status

The operational status of the tunnel (up or down). If the tunnel is down, traffic does not flow through the tunnel, which indicates a problem to troubleshoot. Ping the HER and FAR to determine if they are online, or log on to the routers over SSH to determine the cause of the problem.

Protocol

The protocol used by the tunnel (IPSEC, PIM, or GRE).

HER Tunnel IP Address

The IP address of the tunnel at the HER side. Depending on the protocol used, the IP address appears in dotted decimal (IPv4) or hexadecimal (IPv6) slash notation.

HER IP Address

The destination IP address of the tunnel on the HER side.

FAR IP Address

The destination IP address of the tunnel on the FAR side.

FAR Interface

The name of the interface on the FAR used by the tunnel.

FAR Tunnel IP Address

The IP address of the tunnel on the FAR side.

Note


The IP addresses on both sides of the tunnel are on the same subnet.

FAR Name

The EID of the FAR. To view the FAR details, click its EID.

The Network Interfaces area of the Device Info page displays a list of tunnels configured on the FAR. The Config Properties and Running Config tabs also contain information about tunnels configured on this FAR.

Reprovisioning CGRs

In IoT FND, CGR reprovisioning is a process for modifying the configuration files on CGRs.

CGR Reprovisioning Basics

This section explains CGR reprovisioning actions and sequence.

CGR Reprovisioning Sequence

When you start tunnel or factory reprovisioning on a tunnel provisioning group, the reprovisioning algorithm sequentially goes through 12 CGRs at a time and reprovisions them.

After IoT FND reprovisions a router successfully or if an error is reported, IoT FND starts the reprovisioning process for the next router in the group. IoT FND repeats the process until all CGRs are reprovisioned.

There is a timeout of 4 hours when reprovisioning each CGR in the group. If the CGR does not report successful reprovisioning or an error within the timeout period, then IoT FND changes the Reprovisioning Status of the CGR to Error and displays a timeout error and any further information displays in the Error Details field.

CGR Reprovisioning Actions

In IoT FND, you can perform the following two CGR reprovisioning actions at the Reprovisioning Actions pane of the Tunnel Provisioning page (CONFIG > Tunnel Provisioning > Reprovisioning Actions). You can also activate mesh firmware.


Tip


You can also type in the interface instead of selecting the preloaded interface values.


Table 3.

Reprovisioning Actions

Description

Factory Reprovisioning

Drop-down menu allows you to change the express-setup-config file loaded on the CGR during factory configuration.

This file contains a minimal set of information and is loaded on the CGR at the factory. This file provides the CGR with information to contact IoT FND (call home) through the TPS Proxy after the CGR is deployed and powered on.

Tunnel Reprovisioning

Drop-down menu allows you to change the golden-config file on a CGR. This file has the tunnel configuration defined on the CGR.

Mesh Firmware Activation

Drop-down menu allows you to select the Interface (such as cellular, Ethernet, etc.) and Interface Type (IPv6 or IPv4).

Reprovisioning Actions Pane Fields describes the fields on the Reprovisioning Actions pane.

Table 4. Reprovisioning Actions Pane Fields

Field

Description

Current Action

The current reprovisioning action being performed and the associated interface.

Reprovisioning Status

The status of the reprovisioning action.

Completed devices /All Scheduled Devices

The number of CGRs that were processed relative to the number of all CGRs scheduled to be processed.

Error devices/ All Scheduled Devices

The number of CGRs that reported an error relative to the number of all CGRs scheduled to be processed.

Name

The EID of the CGR.

Reprovisioning Status

The status of the reprovisioning action for this CGR.

Last Updated

The last time the status of the reprovisioning action for this CGR was updated.

Template Version

The version of the Field Area Router Factory Reprovision template being applied.

Error Message

The error message reported by the CGR, if any.

Error Details

The error details.

Tunnel Reprovisioning

If you make changes to the Field Area Router Tunnel Addition template and want all CGRs already connected to IoT FND reprovisioned with new tunnels based on the modified template, use the tunnel reprovisioning feature of IoT FND.

Tunnel reprovisioning places the CGR in a state where no tunnels are configured, and then initiates a new tunnel provisioning request. To reprovision tunnels, IoT FND sequentially goes through the FARs (12 at a time) in a tunnel provisioning group. For every CGR, IoT FND rolls back the configuration of the CGR to that defined in the ps-start-config template file.

After a rollback to ps-start-config, the CGR contacts IoT FND to request tunnel provisioning. IoT FND processes the Field Area Router Tunnel Addition template and sends the resultant configuration commands for creating new tunnels to the CGR.

For Cisco IOS routers, the checkpoint files are before-tunnel-config, before-registration-config, and Express-setup-config. You perform a configuration replace for Cisco IOS based CGRs.


Note


The Field Area Router Factory Reprovision template is not used when performing tunnel reprovisioning.


To configure and trigger tunnel reprovisioning:

Procedure


Step 1

Choose CONFIG > Tunnel Provisioning.

Step 2

In the TUNNEL GROUPS pane, select the tunnel group whose template to provision.

Step 3

Click the Reprovisioning Actions tab.

Step 4

From the Action drop-down menu, choose Tunnel Reprovisioning.

Step 5

Click Start.

IoT FND changes the Reprovisioning Status field to Initialized, and then to Running.

Note


If you click Stop while tunnel reprovisioning is running, IoT FND stops the reprovisioning process only for the FARs in the queue that were not selected. However, for those CGRs in the queue that were selected for reprovisioning, the process completes (success or error) and cannot be stopped.

The reprovisioning process completes after IoT FND finishes attempting to reprovision each CGR in the tunnel provisioning group. If a CGR cannot be reprovisioned, IoT FND displays the error message reported by the CGR.


Factory Reprovisioning

Use the Factory Reprovisioning feature in IoT FND to change the factory configuration of CGRs (express-setup-config).

Factory Reprovisioning involves these steps:

  1. Sending the roll back command to the CGR.

  2. Reloading the CGR.

  3. Processing the Field Area Router Factory Reprovision template, and pushing the resultant commands to the CGR.

  4. Saving the configuration in the express-setup-config file.

    After these steps complete successfully, IoT FND processes the Field Area Router Tunnel Addition, Head-End Router Tunnel Addition, and Head-End Router Tunnel Deletion templates and pushes the resultant commands to the CGR (see Tunnel Provisioning Configuration Process).

To configure and trigger factory reprovisioning:

Procedure


Step 1

Choose CONFIG > Tunnel Provisioning.

Step 2

In the TUNNEL GROUPS pane, select the tunnel group whose template you want to edit.

Step 3

Click the Router Factory Reprovision tab and enter the template that contains the configuration commands to apply.

Note


The Router Factory Reprovision template is processed twice during factory reprovisioning; once when pushing the configuration and again before saving the configuration in express-setup-config. Because of this, when making your own template, use the specific if/else condition model defined in the default template.

Step 4

Click Disk icon to Save.

Step 5

If needed, make the necessary modifications to the Field Area Router Tunnel Addition, Head-End Router Tunnel Addition, and Head-End Router Tunnel Deletion templates.

Step 6

Click Reprovisioning Actions tab.

Step 7

Select Factory Reprovisioning.

Step 8

From the Interface drop-down menu, choose the CGR interface for IoT FND to use to contact the FARs for reprovisioning.

Step 9

From the Interface Type drop-down menu, choose IPv4 or IPv6.

Step 10

Click the Start button.

IoT FND changes the Reprovisioning Status field to Initialized, and then to Running.

Note


If you click Stop while factory reprovisioning is running, IoT FND stops the reprovisioning process only for the FARs in the queue that were not selected. However, for those CGRs in the queue that were selected for reprovisioning, the process completes and cannot be stopped.

The reprovisioning process completes after IoT FND has finished attempting to reprovision each CGR in the tunnel provisioning group. If a CGR cannot be reprovisioned, IoT FND displays the error message reported by the CGR.

Sample Field Area Router Factory Reprovision Template

This sample template changes the WiFi SSID and passphrase in the factory configuration.

<#--IMPORTANT: This template is processed twice during factory
reprovisioning. The if/else condition described below is needed to 
determine which part of the template is applied.
In this example, if no schedule name wimaxMigrationRebootTimer is found in 
runningConfig, then the if part of the if/else section is applied. During 
the second pass, this template runs the commands in the else section and 
the no scheduler command is applied. If modifying this template, do not 
remove the if/else condition or else the template fails. -->
 
<#if !far.runningConfig.text?contains("scheduler schedule name 
wimaxMigrationRebootTimer")>
 
<#--Comment: This is a sample of generating wifi ssid and passphrase 
randomly-->
 
wifi ssid ${far.randomSSID("PREFIX_")}
authentication key-management wpa2
wpa2-psk ascii ${far.randomPassword(10)}
exit
 
feature scheduler
scheduler job name wimaxMigration
reload
exit
 
scheduler schedule name wimaxMigrationRebootTimer
time start +02:00
job name wimaxMigration
exit
 
<#else>
 
no scheduler job name wimaxMigration
no scheduler schedule name wimaxMigrationRebootTimer
 
</#if>