Configuring 400G Digital Coherent Optics

This chapter describes the 400G Digital Coherent QSFP-DD optical modules and their supported configurations.

400G Digital Coherent Optics Overview

Coherent optics uses phase and amplitude to encode data, unlike PAM4 optics (Pulse amplitude modulation) which only uses amplitude. This allows coherent optics to be more resistant to noise and support long-haul distance transmission.

For more information on Cisco 400G Digital Coherent Optics, see Cisco 400G Digital Coherent Optics QSFP-DD Optical Modules Data Sheet.

There are two variants of 400G Digital Coherent Optics.

  • ZR variant: The QSFP-DD ZR variant complies with OIF MSA, allowing to provide compatibility with the equivalent component compliant with the same MSA standard. The key application for the ZR standard is allowing the transmission of a 400G wavelength in point-to-point topology up to a distance of 120 km.

  • ZR Plus variant: The QSFP-DD OpenZR+ module complies with the OpenZR+ MSA. ZR+ pluggable coherent optics support regional to long-haul transmission of wavelengths with multiple amplification sites between endpoints. ZR+ supports multiple configuration options in terms of modulation scheme, shaping, and baud rates to support different network topologies and allows longest transmission distance (> 120 km).

400G Digital Coherent Optics Parameters

400G Digital Coherent Optics is configurable and allows configuration for the following parameters on the optics. For more information on configuration values, see Table 1:

  • Transponder/Muxponder mode: This parameter is used to configure a media line at 400G and have maximum 4 clients on a host side.

  • DAC rate: Digital Analog Conversion (DAC) parameter is used to set oversample (pulse shape enable or disable) and media line modem to Standard (S) or Enhanced (E).

  • FEC mode: Forward Error Correction (FEC) supports cFEC or oFEC modes on a media line and is used for controlling errors during data transmission.

  • Modulation: This parameter is used to control an optical wave or to encode information on a carrier optical wave. Supported modulations are 16 QAM, 8 QAM, and QPSK.

  • CD min/max: Chromatic Dispersion (CD) is a phenomenon that is an important factor in fiber optic communications. It is the result of the different colors, or wavelengths, in a light beam arriving at their destination at slightly different times. This parameter is used to set range for the device to get good optical signal and frequency.

    Muxponder-FEC-Modulation

    CD default High (ps/nm)

    CD default Low (ps/nm)

    Max provisionable CD High (ps/nm)

    Min. provisionable CD Low (ps/nm)

    400G-400GZR-cFEC-16QAM

    2400

    -2400

    2400

    -2400

    400G-400GZR-oFEC-16QAM

    13000

    -13000

    52000

    -52000

    200G-200GZR-oFEC-QPSK

    50000

    -50000

    100000

    -100000

    200G-200GZR-oFEC-8QAM

    26000

    -26000

    100000

    -100000

    200G-200GZR-oFEC-16QAM

    21000

    -21000

    85000

    -85000

    100G-100GZR-oFEC-QPSK

    80000

    -80000

    160000

    -160000

  • Tx power: The transmitted optical power refers to the output optical power of the light source at the transmitting end of the optical module, and the received optical power refers to the input optical power of the light source at the receiving end of the optical module.

    Each optical module has its own transmitting (TX) power range. You can change the transmitting (TX) power value based on the module capability.

    Optical Module Trunk Speed1,3 Optical Transmit Power (Tx) Shaping Interval Supported Range of Optical Transmit Power (Tx) Values (in units of 0.1dBm)2
    Minimum Value Maximum Typical Value Maximum Worst CaseValue
    QDD-400G-ZR-S 400G No 1 -150 -100 -100
    QDD-400G-ZRP-S 400G Yes 1 -150 -110 -130
    QDD-400G-ZRP-S 200G Yes 1 -150 -90 -105
    QDD-400G-ZRP-S 100G Yes 1 -150 -59 -75
  • Frequency: In fiber-optic communications, wavelength-division multiplexing (WDM) is a technology which multiplexes several Optical Carrier signals onto single optical fiber by using different wavelengths (i.e., colors) of laser light. This technique enables bidirectional communications over a single strand of fiber, also called wavelength-division duplexing, and multiplication of capacity. This parameter is used to set any frequency on ITU C-BAND table. For more information on the values, see ITU C-BAND table section.

    For more information on configuration, see Configuring 400G Digital Coherent Optics on ZR Module section.

The following table contains the possible traffic configuration values for the 400G Digital Coherent QSFP-DD optical modules, in the Transponder (TXP) and Muxponder (MXP) mode:

Table 1. 400G Digital Coherent QSFP-DD Traffic Configuration Values

Client Speed

Trunk Speed

Frequency

FEC

Modulation

DAC Rate

QDD-400G-ZR-S Transponder and Muxponder Configuration Values

1 client, 400G speed

1 trunk, 400G

C-Band, 196.1 To 191.3 THz

cFEC

16 QAM

1x1

QDD-400G-ZRP-S Transponder and Muxponder Configuration Values

1X400GA

UI-8

1 trunk, 400G speed

C-Band, 196.1 To 191.3 THz

cFEC

16 QAM

1x1

4X100GA

UI-2

1X400GA

UI-8

1 trunk, 400G speed

C-Band, 196.1 To 191.3 THz

cFEC

16 QAM

1x1.5

4X100GA

UI-2

1X400GA

UI-8

1 trunk, 400G speed

C-Band, 196.1 To 191.3 THz

oFEC

16 QAM

1x1.25

4X100GA

UI-2

1X400GA

UI-8

1 trunk, 400G speed

C-Band, 196.1 To 191.3 THz

oFEC

16 QAM

1x2

4X100GA

UI-2

1X400GA

UI-8

1 trunk, 400G speed

C-Band, 196.1 To 191.3 THz

oFEC

16 QAM

1x1

4X100GA

UI-2

1X400GA

UI-8

1 trunk, 400G speed

C-Band, 196.1 To 191.3 THz

oFEC

16 QAM

1x1.5

4X100GA

UI-2

2X100GA

UI-2

1 trunk, 200G speed

C-Band, 196.1 To 191.3 THz

oFEC

QPSK

1x1.5

QPSK

1

100G

1 trunk, 100G speed

C-Band, 196.1 To 191.3 THz

oFEC

QPSK

1x1.5

Traffic Configuration Parameters

The following table displays the different traffic configuration supported:

TXP/MXP Client Trunk Modulation FEC DAC Rate

400G-TXP

1 Client, 400G speed

1 trunk, 400G speed

16 QAM

oFEC

1x1,1x1.25, 1x1.5 and 1x2

400G-TXP

1 Client, 400G speed

1 trunk, 400G speed

16 QAM

cFEC

1x1, and 1x1.5

4x100G- MXP

4 clients, 100G speed

1 trunk, 400G speed

16 QAM

oFEC

1x1, 1x1.25, 1x1.5, and 1x2

4x100G- MXP

4 clients, 100G speed

1 trunk, 400G speed

16 QAM

cFEC

1x1, and 1x1.5

2x100G-MXP

2 clients, 100G speed

1 trunk, 200G speed

QPSK

oFEC

1x1, and 1x1.5

8 QAM

1x1.25

16 QAM

1x1.25

1x100G-MXP

1 client, 100G speed

1 trunk, 100G speed

QPSK

oFEC

1x1.5


Note


  • ZR supports only 1x400G transponder.

  • ZR supports only 1x1 DAC rate.

  • For configuring 4x100, and 2x100 muxponder, you need to perform interface breakout prior to ZRP configuration. For more information, see Configuring Breakout section.


Guidelines and Limitations for 400G Digital Coherent Optics

The 400G Digital Coherent Optics has the following guidelines and limitations:

  • Beginning with Cisco NX-OS Release 10.4(1)F, 400G Digital Coherent Optics (DCO) support is provided on Cisco Nexus 9300-GX2 and 9408 platform switches.

  • Beginning with Cisco NX-OS Release 10.4(2)F, QDD-400G-ZR-S and QDD-400G-ZRP-S optics support is provided on the following switches and line cards:

    • Cisco Nexus 93600CD-GX, 9316D-GX switches and Cisco Nexus 9508/9504 switches with X9716D-GX line cards.

    • Cisco Nexus 9804/9808 switches with Cisco Nexus X98900CD-A and X9836DM-A line cards.

  • The 1x100G transponder and 2x100G muxponder modes are not supported on Cisco Nexus 93600CD-GX, 9316D-GX switches and Cisco Nexus X98900CD-A and X9836DM-A line cards.

  • QDD-400G-ZR-S optics doesn’t support interface breakout.

  • QDD-400G-ZRP-S optics supports interface breakout. There are multiple breakouts maps supported for ZRP optics.

  • Use the breakout map 100g-2x-pam4 option for the 2x100 breakout interface.

  • For better system stability and efficiency, it is recommended to avoid frequent insertion and removal of DCO. For OIR, you must wait for at least one minute between back-to-back transceiver insertion and removal.

  • The optics maximum link-up time for the ZR/ZRP module can be up to 180 seconds.

  • To recover any Coherent optics port or MACsec port affected because of power restrictions, you must disable an active ZR/ZRP port, or unconfigure an existing MACsec session, and flap the affected port.


    Note


    N9K-C9332D-H2R switch does not have any limitation on number of MACSec sessions.


  • For some of the platforms, there is hardware power limitation due to which there is restriction on usage of the number of 400Gig-ZR/ZRP transceivers and MACsec configurations together.

  • Beginning with Cisco NX-OS Release 10.4(2)F, the 2X100 muxponder supports 8QAM and 16QAM modulation.

  • Beginning with Cisco NX-OS Release 10.4(3)F, the following transceivers are supported on Cisco Nexus C93400LD-H1 and N9K-C9332D-H2R switch:

    • QDD-400G-ZRP-S

    • QDD-400G-ZR-S


    Note


    On N9K-C93400LD-H1, QDD-400G-ZRP-S and QDD-400G-ZR-S transceivers can be inserted in either odd or even numbered ports. However, on N9K-C9332D-H2R switch, the QDD-400G-ZRP-S and QDD-400G-ZR-S transceivers must be inserted in odd numbered ports only. Inserting these transceivers to even numbered ports puts the port into error state due to hardware thermal limitation.


  • For DP04QSDD-HE0

    • From Release 10.4(3)F, DP04QSDD-HE0 is supported only in 1x400 and 1x100 mux ponder modes on GX/GX2 platform and X98900CD-A and X9836DM-A line cards, with the following dac rates.

      • dac_rate 1x1_50 with CFEC

      • dac_rates 1x1_25 and 1x1_50 with OFEC mode

    • The optics maximum link-up time can be up to 240 seconds.

    • From Cisco NX-OS Release 10.5(1)F, DP04QSDD-HE0(Bright-ZR) is supported in 4x100 and 2x100 mux ponder modes on GX/GX2 platform and X98900CD-A and X9836DM-A line cards.

  • The restrictions are as summarized below:

    • For Cisco Nexus 9364D-GX2A:

      • When system has 9 or more MACsec sessions configured and no ZR/ZRP transceiver is present, inserting a ZR/ZRP transceiver disables the corresponding port. The maximum number of MACsec sessions allowed is 16 when no ZR/ZRP transceiver is present.

      • When system has 9 or more ZR/ZRP transceivers in active state and no MACsec session exists, bringing-up of a new MACsec session will fail. The maximum number of active ZR/ZRP transceivers is 13 when no MACsec session is present in the system. Inserting a 14th ZR/ZRP transceiver disables the corresponding port.

      • When both MACsec sessions and active ZR/ZRP transceivers coexist, the combined limit is up to 8 MACsec session and up to 8 ZR/ZRP transceivers. Configuring the 9th MACsec session or adding the 9th active ZR/ZRP will disable the corresponding port.

      • The ZR/ZRP transceivers are supported only on the odd numbered front ports of this platform. Inserting a ZR/ZRP transceiver into an even numbered front port puts the port into error state.

    • For Cisco Nexus 9332D-GX2B:

      • When system has 5 or more MACsec sessions configured and no active ZR/ZRP transceiver is present, adding a ZR/ZRP transceiver disables the corresponding port. The maximum number of MACsec sessions allowed is 8 when no active ZR/ZRP transceiver is present. Configuring a 9th MACsec session disables the corresponding port.

      • When system has 5 or more active ZR/ZRP transceivers inserted and no MACsec session exists, bringing-up of a new MACsec session will fail. The maximum number of active ZR/ZRP transceivers is 8 when no MACsec session is present in the system. Inserting a 9th ZR/ZRP transceiver disables the corresponding port.

      • When both MACsec sessions and active ZR/ZRP transceivers coexist, the combined limit is up to 4 MACsec session and up to 4 active ZR/ZRP transceivers. Configuring the 5th MACsec session or inserting the 5th ZR/ZRP disables the corresponding port.

      • The ZR/ZRP transceivers are supported on any of the front ports of this platform.

    • For Cisco Nexus 9348D-GX2A:

      • The ZR/ZRP transceivers are supported on the following 24 front ports of this platform:

        • 3, 6, 9, 12, 15, 18, 21, 24, 27, 30, 33, 36, 39, 42, 45, 48, 26, 29, 32, 35, 38, 41, 44, 47


        Note


        Inserting ZR/ZRP transceivers to other front ports that are not in the above list puts the port into error state.


    • For Cisco Nexus 9408:

      • System can support up to 32 active ZR/ZRP transceivers irrespective of whether the MACsec configuration is present or not.

      • The ZR/ZRP transceivers are supported on only the Cisco Nexus X9400-8D module.

Configuring 400G Digital Coherent Optics on ZR Module

You can configure the coherent optics on the ZR module for DAC rate, muxponder mode, modulation, and FEC parameters.

Before you begin

Ensure that the following points are taken care during DCO configuration:
  • Without insertion of ZR optics, the coherent optics configuration will not work.

  • When we configure specific zr-optics on the ZRP module, the coherent configuration will not work.

  • When we configure specific zrp-optics on the ZR module, the coherent configuration will not work.

SUMMARY STEPS

  1. configure terminal
  2. interface ethernet {type slot/port}
  3. [no] zr-optics fec fec_val muxponder mxp_val modulation mod_val dac-rate dr_val
  4. (Optional) zr-optics cd-min cd_min cd-max cd_max
  5. (Optional) zr-optics transmit-power tx_pwr
  6. (Optional) zr-optics dwdm-carrier [ 100MHz-grid frequency freq_100mhz_val | 100GHz-grid frequency freq_100ghz_val | 50GHz-grid { frequency freq | itu-channel itu-chan | wavelength wavelen}]

DETAILED STEPS

  Command or Action Purpose

Step 1

configure terminal

Example:

switch# configure terminal
switch(config)#

Enters global configuration mode.

Step 2

interface ethernet {type slot/port}

Example:

switch(config)# interface ethernet 1/3
switch(config-if)# 

Specifies an interface to configure, and enters interface configuration mode.

Step 3

[no] zr-optics fec fec_val muxponder mxp_val modulation mod_val dac-rate dr_val

Example:

switch(config-if)# zr-optics fec cFEC muxponder 1x400 modulation 16QAM dac-rate 1x1

Configures the following parameters on ZR optics. For more information, see 400G Digital Coherent Optics Parameters section:

  • FEC

  • Muxponder

  • Modulation

  • DAC

Step 4

(Optional) zr-optics cd-min cd_min cd-max cd_max

Example:

switch(config-if)# zr-optics cd-min -2300 cd-max 2300
(Optional)

Configures chromatic dispersion on coherent optics with set minimum and maximum values. For more information, see 400G Digital Coherent Optics Parameters section.

Note


When you configure the maximum and minimum values of CD for any data rate, ensure that the minimum difference between the configured values is equal to or greater than 1000 ps/nm.

Step 5

(Optional) zr-optics transmit-power tx_pwr

Example:

switch(config-if)# zr-optics transmit-power -190
(Optional)

Sets the transmit power of the optical signal. For more information, see 400G Digital Coherent Optics Parameters section.

Note


The Tx power parameter is the best effort configuration which programs user configuration to hardware. However, the ZR/ZRP transceiver firmware will only use it as reference and calculates the actual optimal Tx power value at run time, which may or may not be the same as a user configuration.

Step 6

(Optional) zr-optics dwdm-carrier [ 100MHz-grid frequency freq_100mhz_val | 100GHz-grid frequency freq_100ghz_val | 50GHz-grid { frequency freq | itu-channel itu-chan | wavelength wavelen}]

Example:

switch(config-if)# zr-optics dwdm-carrier 100MHz-grid frequency 1913000
(Optional)

Configures frequency based on the configured frequency (100MHz-grid or 100GHz-grid or 50GHz-grid). The 50GHz-grid provide additional ITU-channel, or wavelength parameters. For more information, see 400G Digital Coherent Optics Parameters section.

Note


If the frequency is configured using 50Ghz-grid wavelength or 50Ghz-grid itu-channel option, the system calculates the frequency for a given wavelength or ITU-channel and use it to program the hardware.

Configuring 400G Digital Coherent Optics on ZRP Module

You can configure the coherent optics on the ZRP module for DAC rate, muxponder mode, modulation, and FEC parameters.

Before you begin

Ensure that the following points are taken care during DCO configuration:
  • Without insertion of ZRP optics, the coherent optics configuration will not work.

  • When we configure specific zr-optics on the ZRP module, the coherent configuration will not work.

  • When we configure specific zrp-optics on the ZR module, the coherent configuration will not work.

SUMMARY STEPS

  1. configure terminal
  2. interface ethernet {type slot/port}
  3. [no] zrp-optics fec fec_val muxponder mxp_val modulation mod_val dac-rate dr_val
  4. (Optional) zrp-optics cd-min cd_min cd-max cd_max
  5. (Optional) zrp-optics transmit-power tx_pwr
  6. (Optional) zrp-optics dwdm-carrier [ 100MHz-grid frequency freq_100mhz_val | 100GHz-grid frequency freq_100ghz_val | 50GHz-grid { frequency freq | itu-channel itu-chan | wavelength wavelen}]

DETAILED STEPS

  Command or Action Purpose

Step 1

configure terminal

Example:

switch# configure terminal
switch(config)#

Enters global configuration mode.

Step 2

interface ethernet {type slot/port}

Example:

switch(config)# interface ethernet 1/3
switch(config-if)# 

Specifies an interface to configure, and enters interface configuration mode.

Step 3

[no] zrp-optics fec fec_val muxponder mxp_val modulation mod_val dac-rate dr_val

Example:

switch(config-if)# zrp-optics fec cFEC muxponder 1x400 modulation 16QAM dac-rate 1x1

Configures the following parameters on ZRP optics. For more information, see 400G Digital Coherent Optics Parameters section:

  • FEC

  • Muxponder

  • Modulation

  • DAC

Step 4

(Optional) zrp-optics cd-min cd_min cd-max cd_max

Example:

switch(config-if)# zrp-optics cd-min -2400 cd-max 2400
(Optional)

Configures chromatic dispersion on coherent optics with set minimum and maximum values. For more information, see 400G Digital Coherent Optics Parameters section.

Note


When you configure the maximum and minimum values for chromatic dispersion for any data rate, ensure that the mimimum difference between the configured values is equal to or greater than 1000 ps/nm.

Step 5

(Optional) zrp-optics transmit-power tx_pwr

Example:

switch(config-if)# zrp-optics transmit-power -190
(Optional)

Sets the transmit power of the optical signal. For more information, see 400G Digital Coherent Optics Parameters section.

Note


The Tx power parameter is best effort configuration which programs user configuration to hardware. However, the ZR/ZRP transceiver firmware will only use it as reference and calculates the actual optimal Tx power value at run time, which may or may not be same as an user configuration.

Step 6

(Optional) zrp-optics dwdm-carrier [ 100MHz-grid frequency freq_100mhz_val | 100GHz-grid frequency freq_100ghz_val | 50GHz-grid { frequency freq | itu-channel itu-chan | wavelength wavelen}]

Example:

switch(config-if)# zrp-optics dwdm-carrier 100MHz-grid frequency 1913000
(Optional)

Configures frequency based on the configured frequency (100MHz-grid or 100GHz-grid or 50GHz-grid). The 50GHz-grid provide additional ITU-channel, or wavelength parameters. For more information, see 400G Digital Coherent Optics Parameters section.

Note


If the frequency is configured using 50Ghz-grid wavelength or 50Ghz-grid itu-channel option, the system calculates the frequency for a given wavelength or ITU-channel and use it to program the hardware.

Configuring Breakout

You can configure breakout on the interface for ZRP optics.

SUMMARY STEPS

  1. configure terminal
  2. interface breakout module {slot} port {port_num} map {breakoutmap}
  3. interface ethernet {type slot/port/sub-port}
  4. [no] zrp-optics fec fec_val muxponder mxp_val modulation mod_val dac-rate dr_val
  5. (Optional) show running interface ethernet {type slot/port}

DETAILED STEPS

  Command or Action Purpose

Step 1

configure terminal

Example:

switch# configure terminal
switch(config)#

Enters global configuration mode.

Step 2

interface breakout module {slot} port {port_num} map {breakoutmap}

Example:

switch(config)# interface breakout module 1 port 3 map 100g-2x-pam4

Configures interface breakout

Step 3

interface ethernet {type slot/port/sub-port}

Example:

switch(config)# interface ethernet 1/3/1
switch(config-if)# 

Specifies an interface to configure, and enters interface configuration mode.

Step 4

[no] zrp-optics fec fec_val muxponder mxp_val modulation mod_val dac-rate dr_val

Example:

switch(config-if)# zrp-optics fec oFEC muxponder 2x100 modulation QPSK dac-rate 1x1

Configures the ZRP configuration on the breakout interface.

Step 5

(Optional) show running interface ethernet {type slot/port}

Example:

switch(config-if)# show running interface ethernet1/3/1
(Optional)

Displays the configuration information set on the breakout interface.

Verifying 400G Digital Coherent Optics

To verify the 400G Digital Coherent Optics configuration information, perform one of the following tasks:

Command

Purpose

show running interface ethernet {type slot/port}

Displays the running configuration information of the interfaces configured to validate the coherent ZR/ZRP optics.

show interface ethernet {type slot/port} transceiver details

Displays the coherent ZR/ZRP optics configuration information of the interfaces.

Configuration Examples for 400G Coherent Optics

The following example show the running configuration with ZR/ZRP optics:
switch(config-if)# show running  interface ethernet1/3

!Command: show running-config interface Ethernet1/3
!Running configuration last done at: Mon Aug 28 12:16:40 2023
!Time: Mon Aug 17 12:17:40 2023

version 10.3(2) Bios:version 01.10 

interface Ethernet1/3
  zr-optics fec cFEC muxponder 1x400 modulation 16QAM dac-rate 1x1
  zr-optics cd-min -2400 cd-max 2400
  zr-optics transmit-power -190
  zr-optics dwdm-carrier 100MHz-grid frequency 1931000
  no shutdown
The following example shows how to verify the coherent configuration:
switch# show interface ethernet1/3 transceiver details 
Ethernet1/3
    transceiver is present
    type is QSFP-DD-400G-ZR-S
    name is CISCO-ACACIA
    part number is DP04QSDD-E20-190
    revision is A
    serial number is ACA254700F0
    nominal bitrate is 425000 MBit/sec per channel
    cisco id is 0x18
    cisco extended id number is 21
    cisco part number is 10-3495-01
    cisco product id is QDD-400G-ZR-S
    cisco version id is V01
    firmware version is 61.10
    Link length SMF is 12 km
    Nominal transmitter wavelength is 1547.70 nm
    Wavelength tolerance is 166.550 nm
    host lane count is 8
    media lane count is 1
    max module temperature is 80 deg C
    min module temperature is 0 deg C
    min operational voltage is 3.12 V
    vendor OUI is 0x7cb25c
    date code is 211125  
    clei code is INUIANYEAA
    power class is 8 (>14 W maximum)
    max power is 20.00 W
    near-end lanes used none
    far-end lane code for 8 lanes Undefined
    media interface is unknown value 0x10
    Advertising code is Optical Interfaces: SMF
    Host electrical interface code is 400GAUI-8 C2M (Annex 120E)

    FEC State: FEC cFEC
    Optics Status
        Optics Type: QSFP-DD-400G-ZR-S
        DWDM carrier Info: Frequency: 193.10 THz

        Alarm Status
        ------------
        DAC Rate: 1x1

    THRESHOLD VALUES
    ----------------
    Configured Tx Power: -400 dBm
    Modulation Type: 16QAM
    Muxponder Type: 1x400
    Configured CD-MIN: -2400 ps/nm     CD-MAX: 2400 ps/nm
Lane Number:1 Network Lane
  ----------------------------------------------------------------------------
                Current              Alarms                  Warnings
                Measurement     High        Low         High          Low
  ----------------------------------------------------------------------------
  Temperature   36.00 C        80.00 C     -5.00 C     75.00 C       15.00 C
  Voltage        3.36 V         3.46 V      3.13 V      3.43 V        3.16 V
  Current           N/A            N/A         N/A         N/A           N/A
  Tx Power          N/A         0.00 dBm  -18.23 dBm   -2.00 dBm    -16.02 dBm
  Rx Power          N/A         1.99 dBm  -23.01 dBm    0.00 dBm    -20.00 dBm
  Transmit Fault Count = 0
  ----------------------------------------------------------------------------
  Note: ++  high-alarm; +  high-warning; --  low-alarm; -  low-warning
The following sample shows how to configure the breakout configuration on the breakout interface:
switch(config)# interface ethernet 1/3/1
switch(config-if)# zrp-optics fec ofec muxponder 2x100 modulation QPSK dac-rate 1x1

switch (config-if)# show running interface ethernet1/3/1


interface Ethernet1/3/1
  zrp-optics fec oFEC muxponder 2x100 modulation QPSK dac-rate 1x1
  zrp-optics cd-min -50000 cd-max 50000
  zrp-optics transmit-power -190
  zrp-optics dwdm-carrier 100MHz-grid frequency 1913000
  no shutdown

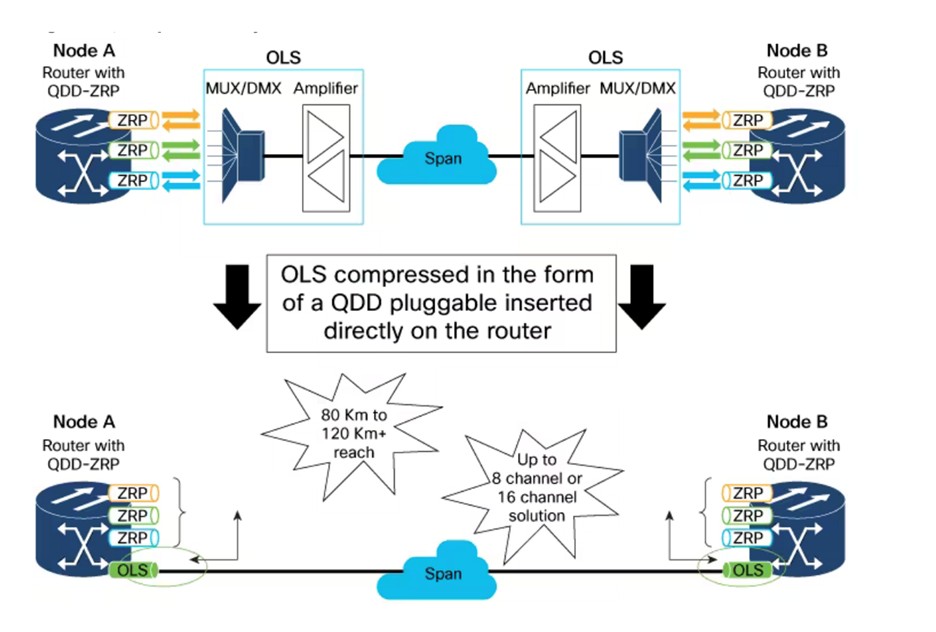
Overview of Optical Line System - Pluggable Support for QSFP-DD

The QDD Optical Line System (OLS) is a pluggable optical amplifier enabling connection between two routers or switches

  • for transmitting traffic on a limited number of coherent optical channels, and

  • as a single span point-to-point link.

OLS helps transport 8 or 16 optical channels without any additional optical hardware unit.

The OLS topology is displayed as follows:

Figure 1. OLS topology

Benefits

A QSFP-DD module plugged into a port of the router or switch has the ability to provide amplification. The benefits of having the OLS are:

  • provides compact solution for amplification,

  • provides extended reach,

  • increases fiber bandwidth, and

  • lowers power dissipation.

Cisco provided solution of the pluggable form of the QSFP-DD OLS for ZR and ZR Plus variant of Coherent optics helps in

  • reduction of more equipments, rack space and power,

  • avoid usage of external amplifiers and multiplexers,

  • extend the reach of a 400G QSFP-DD ZR or ZR plus link from 40 to 130 km or longer depending on fiber specification, the channel count, and the line rate of the signal, and

  • extend the reach of a 400G Bright QSFP-DD ZR or ZR+ link from 80 to 130 km or longer depending on fiber specification, the channel count, and the line rate of the signal

Supported Platforms

  • Cisco Nexus 9300 Series Switch

    • N9K-C9364D-GX2A

    • N9K-C9332D-GX2B

    • N9K-C9348D-GX2A

  • Cisco Nexus 9400 Series Switch (N9K-C9408 with N9K-X9400-8D LEM)

Guidelines and Limitations

OLS operational mode guidelines

The following are the guidelines for the configuration of OLS operational mode:

  • Use the command no shutdown on an interface to activate and apply the OLS configuration.

  • In automatic power control mode, amplifier output power is kept constant, irrespective of incoming signal strength.

  • In manual control mode, gain value is based on loss between RX on peer OLS and TX of transmitting OLS. Use link loss for configuring the correct gain on COM and LINE side to achieve high signal-to-noise ratio for critical applications.

    The gain value is based on loss between RX on peer OLS and TX of transmitting OLS. The link loss between two OLS (ols A and ols B) is A -> B = tx_power on ols A - rx_power on ols B. The loss is compensated by gain on ols B

    For example, if the link loss is 10db and ols-A tx power is 0db, then rx_power on ols B = 0-10 = -10dbm. The 10dbm gain is applied on ols B to compensate on com(receive) side.

Optical Safety Remote Interlock (OSRI) guidelines

When OSRI is enabled, the maximum output power can be -15dBm based on the input power.

OLS safety control mode

  • Safety control mode is enabled only on Line side.

  • When safety-control-mode is enabled and if LOS is detected on the line RX. The line TX normalizes the signal output power to 8 dBm putting the line amplifier in Automatic Power Reduction (APR). This prevents the launch of high level optical power on an open Line.

  • APR (Automatic Power Reduction) is a temporary condition that keeps the amplifier in a safe, fixed an well known power level (8dbm), if safety control is enabled and rx-los is detected. You can force APR permanently (independently by the link connectivity) to troubleshoot.

  • When the link connectivity is verified then the amplifier is moved to the final working state (either gain controlled or power controlled).

Recommendations for wavelength and frequency


Note


Ensure that there is a unique frequency while using coherent optics with OLS.


Channel Spacing

Total Bandwidth

Wavelength in nm

Frequency in THz

Start

End

Start

End

8 Channels – 200 GHz spaced

19.2 nm

1539.1

1558.4

192.375

192.775

16 Channels – 100 GHz spaced

2.4 THz

Recommendations for 8 Channel System

Table 2.

ITU XR Channel

Frequency (in THz)

Wavelength (in nm)

37

194.3

1542.94

41

194.1

1544.53

45

193.9

1546.12

49

193.7

1547.72

53

193.5

1549.32

57

193.3

1550.92

61

193.1

1552.52

65

192.9

1554.13

Recommendations for 16 Channel System

Table 3.

ITU XR Channel

Frequency (in THz)

Wavelength (in nm)

37

194.3

1542.94

39

194.2

1543.73

41

194.1

1544.53

43

194.0

1545.32

45

193.9

1546.12

47

193.8

1546.92

49

193.7

1547.72

51

193.6

1548.51

53

193.5

1549.32

55

193.4

1550.12

57

193.3

1550.92

59

193.2

1551.72

61

193.1

1552.52

63

193.0

1553.33

65

192.9

1554.13

67

192.8

1554.94

Configuring amplifier control mode

OLS has two amplifiers.

  • COM amplifier

    boosts incoming signal from the fiber network to connected Coherent optics for transmission.

  • LINE amplifier

    boosts the signal from Coherent optics to send over the fiber.

SUMMARY STEPS

  1. Enter global configuration mode.
  2. Enables or disables the amplifier control mode for the line and com.
    • manual for egress control.

    • powermode for egress control

DETAILED STEPS

  Command or Action Purpose

Step 1

Enter global configuration mode.

Example:

switch# configure terminal

configure terminal

Step 2

Enables or disables the amplifier control mode for the line and com.

  • manual for egress control.

  • powermode for egress control

Example:

switch(config)# ols com egress control manual

[no] ols { com | line } egress control <mode>

Default mode is manual. The parameter settings are defined in the table.

Side

Default

Minimum

Maximum

com

manual

power

manual

line

manual

power

manual

Configuring the gain control mode

SUMMARY STEPS

  1. Enter global configuration mode.
  2. Configure the desired gain value of the OLS pluggable for the line and com.

DETAILED STEPS

  Command or Action Purpose

Step 1

Enter global configuration mode.

Example:

switch# configure terminal

configure terminal

Step 2

Configure the desired gain value of the OLS pluggable for the line and com.

Example:

switch(config)# ols com egress gain 200

[no] { ols com egress <com_gain> | line egress gain <line_gain> }

The gain are in units of 0.1 dBm. The parameter settings are defined in the table.

Side

Default

Minimum

Maximum

com

200

30

250

line

210

70

250

Configuring the power control mode

SUMMARY STEPS

  1. Enter global configuration mode.
  2. Configure the desired output power (TX) of the OLS pluggable for the line and com.

DETAILED STEPS

  Command or Action Purpose

Step 1

Enter global configuration mode.

Example:

switch# configure terminal

configure terminal

Step 2

Configure the desired output power (TX) of the OLS pluggable for the line and com.

Example:

switch(config)# ols com egress power 20

[no] ols { com egress power <com_power> | line egress power <line_power> }

The power are in units of dBm. The parameter settings are defined in the table.

Side

Default

Minimum

Maximum

com

80

10

170

line

80

0

170

Configuring the power reduction mode

SUMMARY STEPS

  1. Enter global configuration mode.
  2. Enable or disable the power reduction mode.

DETAILED STEPS

  Command or Action Purpose

Step 1

Enter global configuration mode.

Example:

switch# configure terminal

configure terminal

Step 2

Enable or disable the power reduction mode.

Example:

switch(config)# ols com egress force power-reduction

[no] ols { com | line } egress force power-reduction

Side

Default

Minimum

Maximum

com

off

on

off

line

off

on

off

Configuring the Optical Safety Remote Interlock (OSRI) mode

To shut down the amplifier, use the Optical Safety Remote Interlock (OSRI) configuration. Use the configuration for maintaince of the pluggable and when the OLS pluggable is not in operation.

SUMMARY STEPS

  1. Enter global configuration mode.
  2. Enable or disable thepower reduction mode.

DETAILED STEPS

  Command or Action Purpose

Step 1

Enter global configuration mode.

Example:

switch# configure terminal

configure terminal

Step 2

Enable or disable thepower reduction mode.

Example:

switch(config)# ols com egress force power-reduction

[no] ols { com | line } egress force power-reduction

The default mode is off. The parameter settings are defined in the table.

Side

Default

Minimum

Maximum

com

off

on

off

line

off

on

off

Configuring the safety control mode

SUMMARY STEPS

  1. Enter global configuration mode.
  2. Enable or disable the safety control mode.
    • auto or

    • disabled

DETAILED STEPS

  Command or Action Purpose

Step 1

Enter global configuration mode.

Example:

switch# configure terminal

configure terminal

Step 2

Enable or disable the safety control mode.

  • auto or

  • disabled

Example:

switch(config)# ols ols line egress safety-control

[no] ols line egress safety-control

The default mode is auto.

Verify OLS configuration

Display the detailed OLS information

Use the show interface ethernet transceiver details command to verify the detailed OLS information.

switch# show interface ethernet 1/2 transceiver details 
Ethernet1/2
    transceiver is present
    type is ONS-QDD-OLS
    name is CISCO-ACCELINK
    part number is EDFA-211917-QDD
    revision is 27
    serial number is ACW2723Z007
    nominal bitrate is 425000 MBit/sec per channel
    cisco id is 24
    cisco extended id number is 237
    cisco part number is 1010045801
    cisco product id is ONS-QDD-OLS
    cisco version id is V01
    firmware version is 2.7
    host lane count is 0
    media lane count is 0
    max module temperature is 0 deg C
    min module temperature is 0 deg C
    min operational voltage is 0.00 V
    vendor OUI is 0x000000
    date code is 23070401
    clei code is WMOGAT2MAA
    power class is 2 (3.5 W maximum)
    max power is 3.50 W
    near-end lanes used none
    far-end lane code for 8 lanes Undefined
    media interface is others
    Advertising code is Optical Interfaces: SMF
    Host electrical interface code is Undefined
    media interface advertising code is Undefined
    Operational Parameters:
    ---------------------
       COM Side:
          Total Tx Power = -327.68 dBm
          Rx Signal Power = -327.68 dBm
          Tx Signal Power = -327.68 dBm
          Egress Ampli Gain = 0.0 dBm
          Egress Ampli OSRI = ON
          Egress Force APR = ON
       Line Side:
          Total Tx Power = -327.68 dBm
          Rx Signal Power = -327.68 dBm
          Tx Signal Power = -327.68 dBm
          Egress Ampli Gain = 0.0 dBm
          Egress Ampli Safety Control mode = disabled
          Egress Ampli OSRI = ON
          Egress Force APR = ON
    Configured Parameters:
    ----------------------
       COM Side:
          Egress Ampli Gain = 20.0 dBm
          Egress Ampli Power = 17.0 dBm
          Egress Ampli OSRI = ON
          Ampli Control mode = Power
          Rx Low Threshold = -300.0 dBm
          Tx Low Threshold = -50.0 dBm
          Egress Force APR = ON
       Line Side:
          Egress Ampli Gain = 20.0 dBm
          Egress Ampli Power = 17.0 dBm
          Egress Ampli Safety Control mode = disabled
          Egress Ampli OSRI = ON
          Ampli Control mode = Power
          Rx Low Threshold = -300.0 dBm
          Tx Low Threshold = -50.0 dBm
          Egress Force APR = ON
      Temperature = 19.70 Celsius
      Voltage = 3.34 V 

Display the brief OLS information

Use the show interface ethernet brief command to verify the OLS information in brief.

switch# show interface e1/2 brief 

--------------------------------------------------------------------------------
Ethernet        VLAN    Type Mode   Status  Reason                 Speed     Port
Interface                                                                    Ch #
--------------------------------------------------------------------------------
Eth1/2          --      eth  routed down    olsInserted              auto(D) --

Display the status of the optic

Use the show interface status command to verify the status of the optic.

switch# show interface e1/2 status 

--------------------------------------------------------------------------------
Port          Name               Status    Vlan      Duplex  Speed   Type
--------------------------------------------------------------------------------
Eth1/2        --                 olsInsert routed    auto    auto    ONS-QDD-OLS

Display the running configuration

Use the show running-config interface ethernet command to display the running configuraton of the OLS.

switch# show running-config interface ethernet1/2
!Command: show running-config interface Ethernet1/2
!Running configuration last done at: Mon Feb 26 12:39:24 2024
!Time: Mon Feb 26 13:03:34 2024
version 10.4(3) Bios:version 01.07 
interface Ethernet1/2
  ols com egress control power
  ols com egress osri
  ols com egress power 170
  ols line egress control power
  ols line egress osri
  ols line egress gain 200
  ols line egress power 170
  no ols line egress safety-control
  ols com egress force power-reduction
  ols line egress force power-reduction
  no shutdown