Upgrading NDO Service in Nexus Dashboard

Overview

The following sections describe how to upgrade Cisco Nexus Dashboard Orchestrator that is deployed in Cisco Nexus Dashboard.

If you are running an earlier release deployed in VMware ESX VMs or Cisco Application Services Engine, you must deploy a brand new cluster and then transfer the configuration from your existing cluster, as described in the "Migrating Existing MSO Cluster to Nexus Dashboard" chapter of the Cisco Nexus Dashboard Orchestrator Deployment Guide instead.

Prerequisites and Guidelines

Before you upgrade your Cisco Nexus Dashboard Orchestrator cluster:

  • When upgrading an existing Nexus Dashboard Orchestrator release 3.2(1) or later, we recommend upgrading to release 3.7(2).

    At this time, stateful upgrades from release 3.2(1) or later to release 4.x are not supported. You can migrate to a 4.x release as described in Cisco Nexus Dashboard Orchestrator Deployment Guide, Release 4.0(x), however we recommend upgrading to release 3.7(2) instead.

  • We recommend that you first familiarize yourself with the Nexus Dashboard platform and overall deployment overview and guidelines described in the Cisco Nexus Dashboard Deployment Guide and the Cisco Nexus Dashboard Orchestrator Deployment Guide for your release.


    Note

    Ensure that you have followed the Nexus Dashboard deployment prerequisites and guidelines (such as CPU, RAM, and disk requirements) for the cluster where you deploy your Nexus Dashboard Orchestrator. Specifically, if you have a virtual cluster, the CPU and RAM system requirements must be available with physical reservation.


  • Stateful upgrades from releases prior to Release 3.2(1) are not supported.

    If you are upgrading from an earlier release, skip the rest of this chapter and follow the instructions described in the "Migrating Existing Cluster to Nexus Dashboard" chapter of the Cisco Nexus Dashboard Orchestrator Deployment Guide.

  • Ensure that your current Nexus Dashboard cluster is healthy.

    You can check the Nexus Dashboard cluster health in one of two ways:

    • By logging into your Nexus Dashboard GUI and verifying system status in the System Overview page.

    • By logging into any one of the nodes directly as rescue-user and running the following command:

      # acs health
      All components are healthy
  • Ensure that your current Cisco Nexus Dashboard Orchestrator is healthy.

  • When upgrading to this release, you will manually download the upgrade image and install it as described in Upgrading NDO Service Manually.

    You must manually download the upgrade image because the DC App Center includes only the latest release of NDO and stateful upgrades from release 3.2(1) or later to release 4.x are not supported.

  • If you plan to add and manage new Cloud APIC sites after you upgrade your Nexus Dashboard Orchestrator to this release, you must ensure that they are running Cloud APIC release 5.2(1) or later.

    On-boarding and managing Cloud APIC sites running earlier releases is not support.

  • Ensure that there are no configuration drifts between the Orchestrator's configuration and what is actually deployed in the fabrics before you upgrade.


    Note

    Any templates that have configuration changes that are not yet deployed to the sites may cause the upgrade to fail.


    More information on resolving configuration drifts is available in the "Schemas" chapter of the Nexus Dashboard Orchestrator Configuration Guide for your current release.

  • Back up your existing Orchestrator configurations.

    Configuration backups are described in the "Backup and Restore" chapter of the Nexus Dashboard Orchestrator Configuration Guide for your release.

  • Back up your existing fabrics' configurations.

    We recommend creating configuration backups of all fabrics managed by your Nexus Dashboard Orchestrator:

  • Once you upgrade to this release, downgrading to an earlier release is not supported.

    If you want to revert to an earlier release, you will need to re-install the NDO service and restore a configuration backup from that release.

Upgrading NDO Service Manually

This section describes how to upgrade Cisco Nexus Dashboard Orchestrator.

Before you begin

Procedure


Step 1

Download the target release image.

  1. Browse to the Nexus Dashboard Orchestrator page on DC App Center:

    https://dcappcenter.cisco.com/nexus-dashboard-orchestrator.html
  2. From the Version dropdown, choose the version you want to install and click Download.

    Note 

    We recommend upgrading to release 3.7(2).

  3. Click Agree and download to accept the license agreement and download the image.

Step 2

Log in to your Nexus Dashboard.

Step 3

Upload the image to your Nexus Dashboard.

  1. From the left navigation menu, select Service Catalog.

  2. In the Nexus Dashboard's Service Catalog screen, select the Installed Services tab.

  3. From the Actions menu in the top right of main pane, select Upload App.

  4. In the Upload App window, choose the location of the image

    If you downloaded the application image to your system, choose Local.

    If you are hosting the image on a server, choose Remote.

  5. Choose the file.

    If you chose Local in the previous substep, click Select File and select the app image you downloaded.

    If you chose Remote, provide the full URL to the image file, for example http://<ip-address>:<port>/<full-path>/cisco-mso-<version>.nap.

  6. Click Upload to add the app to the cluster.

    A new tile will appear with the upload progress bar. Once the image upload is completed, the Nexus Dashboard will recognize the new image as an existing application and add it as a new version.

Step 4

Wait for the new image to initialize.

It may take up to 20 minutes for the new application image to become available.

Step 5

Activate the new image.

  1. In the Service Catalog screen, select the Installed Services tab.

  2. In the top right of the Nexus Dashboard Orchestrator tile, click the menu (...) and choose Available Versions.

  3. In the available versions window, click Activate next to the new image.

    Note 

    Do not Disable the currently running image before activating the new image. The image activation process will recognize the currently running image and perform the upgrade workflows necessary for the currently running version.

    It may take up to 20 additional minutes for all the application services to start and the GUI to become available. The page will automatically reload when the process is completed.

Step 6

(Optional) Delete the old application image.

Downgrading from this release is not supported so we recommend delete the old Orchestrator release image as described in this step.

  1. In the Service Catalog screen, select the Installed Services tab.

  2. In the top right of the Nexus Dashboard Orchestrator tile, click the menu (...) and choose Available Versions.

  3. In the available versions window, click the delete icon next to the previous image.

Step 7

Launch the app.

To launch the app, simply click Open on the application tile in the Nexus Dashboard's Service Catalog page.

The single sign-on (SSO) feature allows you to log in to the application using the same credentials as you used for the Nexus Dashboard.


What to do next

After you have upgraded the NDO service, we recommend you go through the configuration restore workflow to optimize your database, as described in Restore Existing Configuration for Database Optimization and then you must resolve any configuration drifts and redeploy the templates as described in Resolve Configuration Drifts.

Restore Existing Configuration for Database Optimization

Release 3.7(2) added database optimization functionality to the configuration restore workflow. After your upgrade is complete, we strongly recommend going through configuration restore process in order to update your existing configuration databases.


Note

Skipping this procedure may result in stale values from older configuration changes to remain in the database.


Before you begin

You must have:

  • Upgraded your Nexus Dashboard Orchestrator as described in Upgrading NDO Service Manually.

  • A backup of the existing configuration taken right before the upgrade to Release 3.7(2)

Procedure


Step 1

Log in to your Nexus Dashboard GUI and open the Nexus Dashboard Orchestrator service.

Step 2

Restore the configuration.

  1. In the main window, click the actions () icon next to the backup you created prior to the upgrade and select Rollback to this backup.

    This opens the Restore from this backup warning dialog.

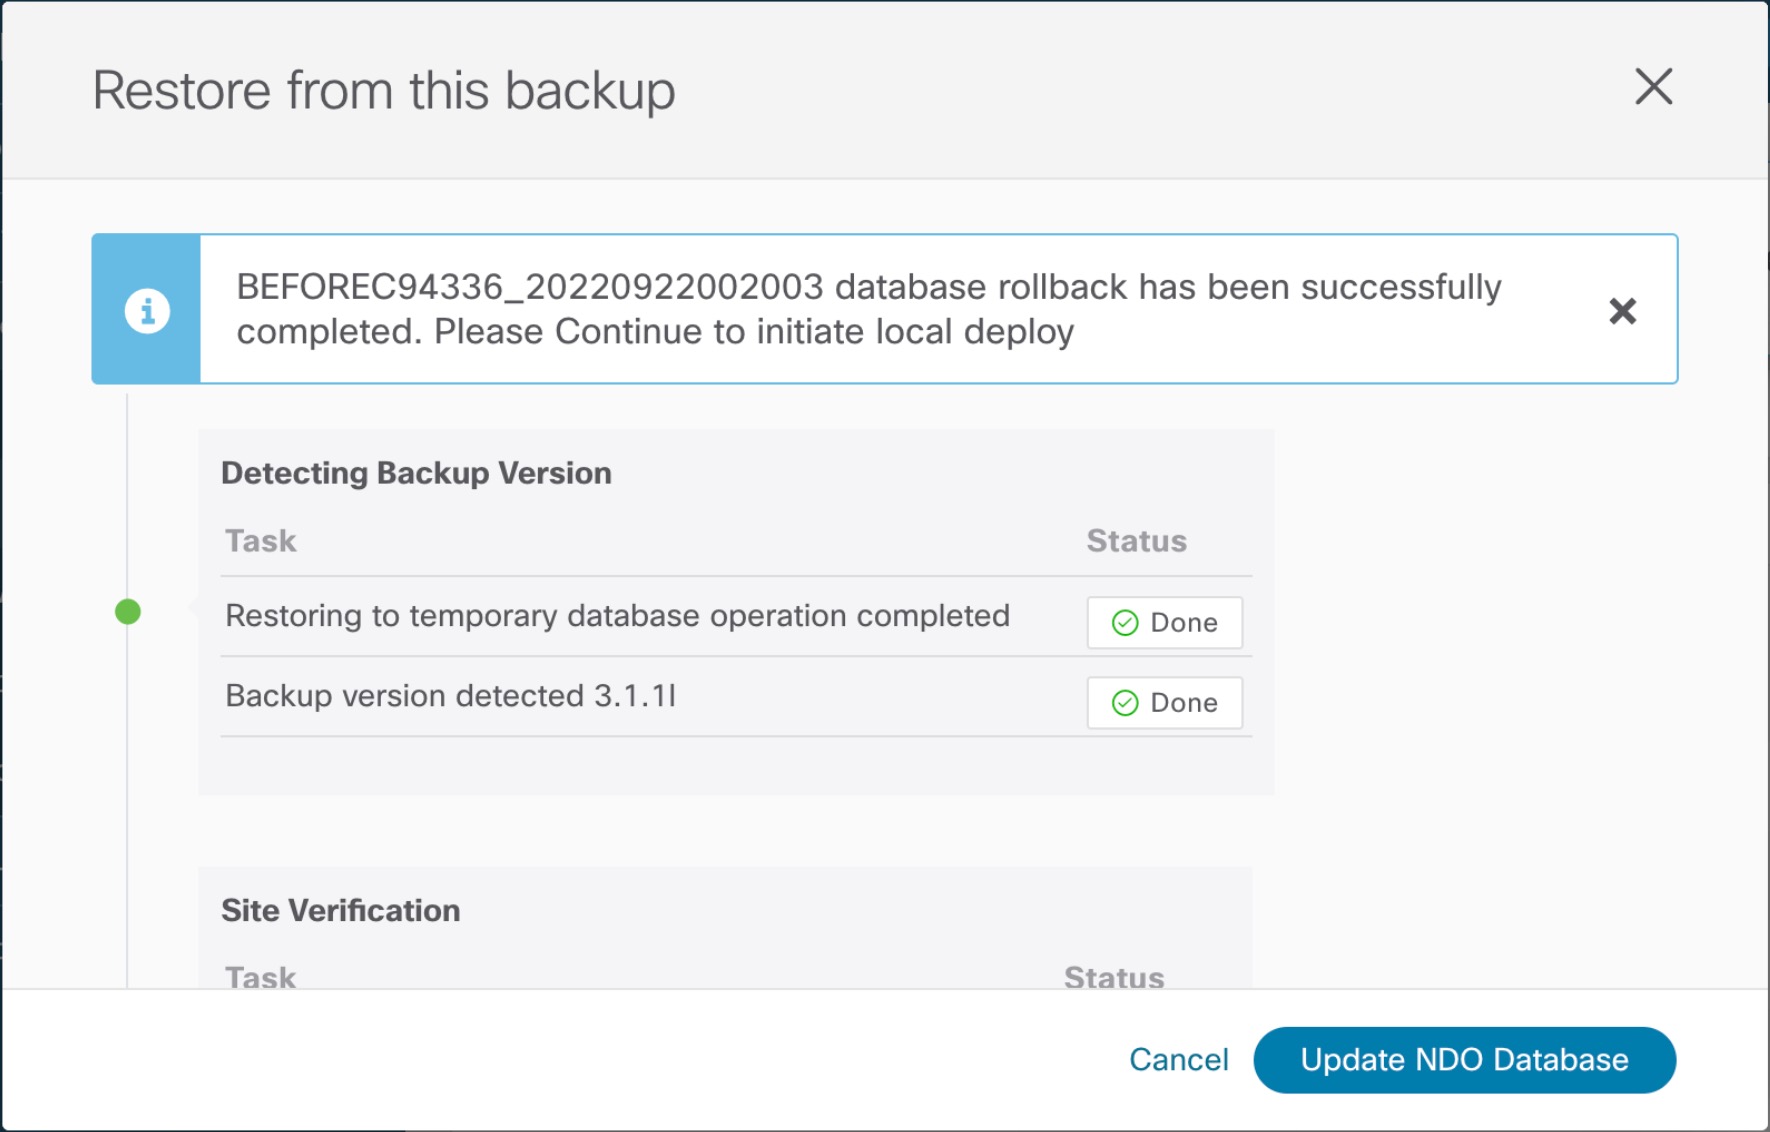
  2. In the Restore from this backup dialog window, click Restore to confirm that you want to restore the backup you selected.

    The time required for the database rollback and optimization to complete depends on the size of your configuration. Very large configurations may take up to an hour to finish.

  3. After the database is restored, click Update NDO Database to complete database optimization.

    Release 3.7(2) added database optimization functionality to the configuration restore workflow. So you will get an additional prompt for database optimization workflow.

Step 3

Verify that backup was restored successfully and all objects and configurations are present.

  1. In the Sites page, verify that all sites are listed as Managed.

  2. In the Tenants and Schemas pages, confirm that all tenants and schemas from your previous version's configuration are present.

  3. Navigate to Infrastructure > Site Connectivity and confirm that intersite connectivity is intact.

    In the main pane, click Show Connectivity Status next to each site and verify that the underlay and overlay connectivity is still successfully established.

  4. In the main pane, click Configure to open Fabric Connectivity Infra screen and verify External Subnet Pool addresses.

    You can view the external subnet pools by selecting General Settings > IPsec Tunnel Subnet Pools tab of the Fabric Connectivity Infra screen and verify that the External Subnet Pools previously configured in Cloud APIC have been imported from the cloud sites.

    These subnets are used to address the IPsec tunnel interfaces and loopbacks of the Cloud Routers used for on-premises connectivity and had to be configured directly in the Cloud APIC in earlier Nexus Dashboard Orchestrator releases.


Resolve Configuration Drifts

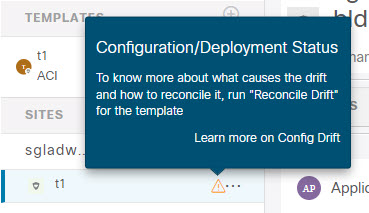
In some cases you may run into a situation where the configuration actually deployed in the site's controller is different from the configuration defined in the Nexus Dashboard Orchestrator. These configuration discrepancies are referred to as Configuration Drifts and are indicated by a yellow warning sign next to the template name in the schema view as shown in the following figure.

When migrating to NDO release 3.7(2) or later, enhancements have been introduced in the configuration rollback procedure to ensure that the content of the NDO database can be fully rebuilt based on the configuration information present in the backup file. This means that if some of the templates in your existing configuration were not fully deployed when the backup file was originally created (for example, left in the “edit” state), the NDO configuration for those templates would be based on that state and may differ from the configuration actually deployed on the fabrics' controllers resulting in a configuration drift.

Before you begin

You must have upgraded your Nexus Dashboard Orchestrator as described in Upgrading NDO Service Manually.

Procedure


Step 1

Check for configuration drifts using the API.

Beginning with release 3.7(2), you can generate a list of all templates that contain configuration drifts by using the /api/v1/schemas/template-modified-policy-states API call directly from your Nexus Dashboard Orchestrator's GUI as described in this step.

Alternatively, you can manually check every schema and template individually as described in the next step.

  1. Ensure that you are logged in to you Orchestrator UI.

    The API uses the authentication token from the Orchestrator UI login.

  2. From the Help menu in the top right corner of the window, choose Help Center.

  3. In the Help Center's Programming tile, click REST API.

  4. From the dropdown at the top of the page, select Nexus Dashboard Orchestrator to show NDO APIs.

  5. Scroll down to the /api/v1/schemas/template-modified-policy-states API and click Run.

    Depending on the number of templates and the size of the configuration, this may take a few minutes, and the Run button will be grayed out during this process.

  6. Note down all the templates returned by the API call.

Step 2

Check for configuration drifts using the GUI.

  1. In your Nexus Dashboard Orchestrator, navigate to Application Management > Schemas.

  2. Select the first schema and check its templates for configuration drifts.

    You will repeat the following steps for every schema and template in your deployment

    You can check for configuration drifts in one of the following two ways:

    • Check the template deployment status icon for each site to which the template is assigned:

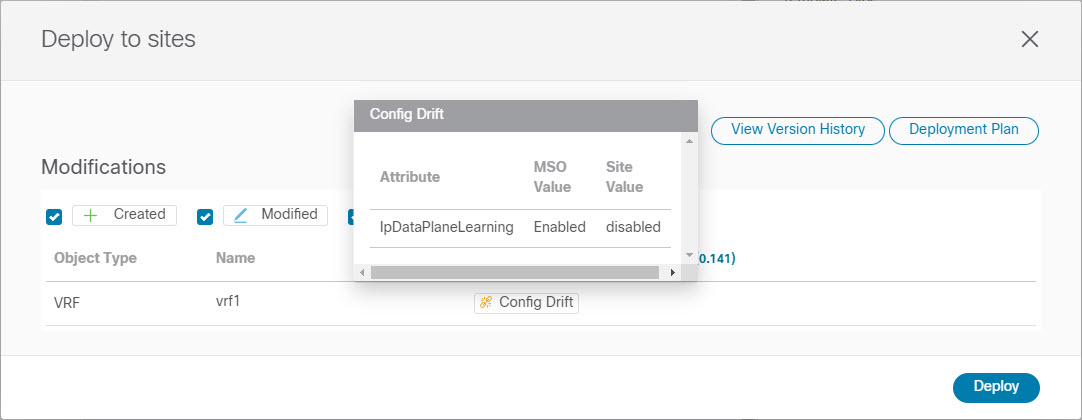
    • Select the template and click Deploy to sites to bring up the configuration comparison screen to check which objects contain configuration drifts:

Step 3

For eveyr template that contains a configuration drift, resolve the conflicts.

For more information about configuration drifts, check the "Configuration Drifts" chapter in the Cisco Nexus Dashboard Orchestrator Configuration Guide for ACI Fabrics.

  1. Close the template deployment dialog to return to the Schema view.

    Deploying any templates at this point would push the values in the Orchestrator database and overwrite any existing settings in the fabrics.

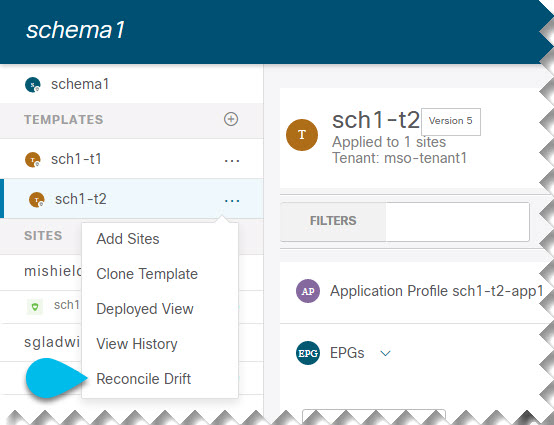
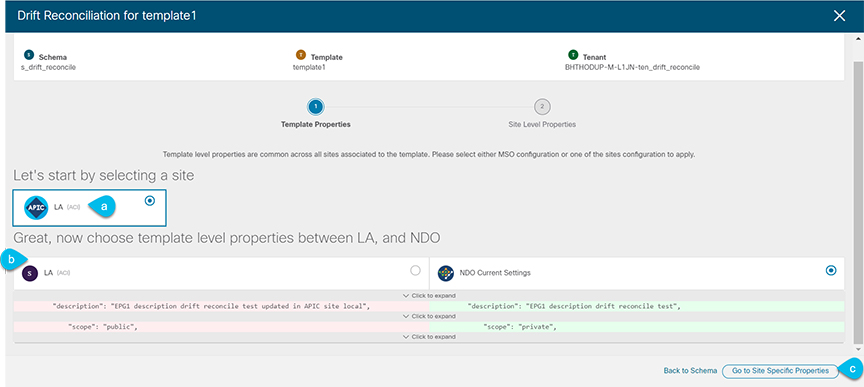
  2. From the template's Actions menu, select Reconcile Drift.

    The Drift Reconciliation wizard opens.

  3. In the Drift Reconciliation screen, compare the template-level configurations for each site and choose the one you want.

    Template-level properties are common across all sites associated to the template. You can compare the template level properties defined on Nexus Dashboard Orchestrator with the configuration rendered in each site and decide what should become the new configuration in the Nexus Dashboard Orchestrator template. Selecting the site configuration will modify those properties in the existing Nexus Dashboard Orchestrator template, whereas selecting the Nexus Dashboard Orchestrator configuration will keep the existing Nexus Dashboard Orchestrator template settings as is

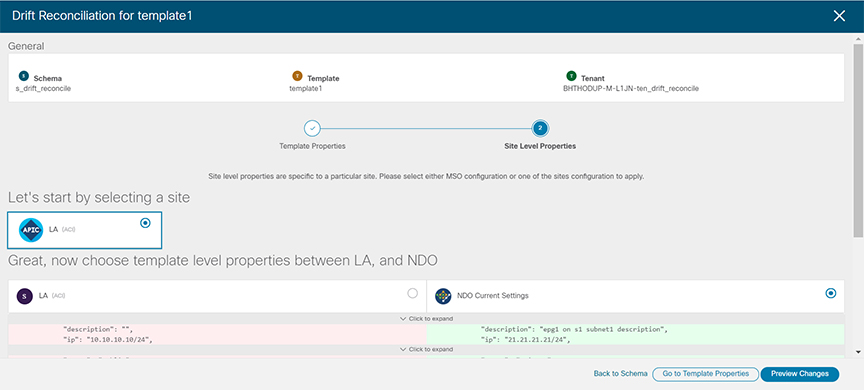
  4. Click Go to Site Specific Properties to switch to site-level configuration.

    You can choose a site to compare that specific site's configuration. Unlike template-level configurations, you can choose either the Nexus Dashboard Orchestrator-defined or actual existing configurations for each site individually to be retained as the template's site-local properties for that site.

    Even though in most scenarios you will make the same choice for both template-level and site-level configuration, the drift reconciliation wizard allows you to choose the configuration defined in the site's controller at the "Template Properties" level and the configuration defined in Nexus Dashboard Orchestrator at the "Site Local Properties" level or vice versa.

  5. Click Preview Changes to verify your choices.

    The preview will display full template configuration adjusted based on the choices picked in the Drift Reconciliation wizard. You can then click Deploy to sites to deploy the configuration and reconcile the drift for that template.