NX-API

This chapter contains the following sections:

About NX-API

NX-API is an enhancement to the Cisco MDS 9000 Series CLI system.

Cisco MDS 9000 NX-API is an RPC-style API, taking and executing CLI commands. Based on HTTP or HTTPS protocols as common to other Representational State Transfer (REST) API frameworks, it allows programmatic access to a Cisco MDS switch. NX-API provides the configuration and management capabilities of Cisco MDS NX-OS CLI with a modern web-based API, enabling users to control a Cisco MDS switch using a web browser. When coupled with a programming language like Python and the appropriate libraries, it facilitates storage networking automation.

Cisco MDS NX-API supports certain show commands and configuration commands that are noninteractive.


Note


A noninteractive command is a command that does not prompt the user to enter an input from the keyboard to proceed further.


NX-API Workflow

The NX-API backend uses the NGINX HTTP server. The NGINX server interfaces between the external client and the NXAPI server in the switch.

Figure 1. NX-API Workflow

NX-API Performance

NX-API throughput performance depends on the following factors:

  • HTTP and HTTPS—NX-API performance on an HTTP server is better compared to that on an HTTPS server. This is because an HTTPS server has an overhead of encrypting and decrypting data to provide more security.

  • Cisco MDS Switches (memory and process limitation)—NX-API performance is better in devices with more memory.

  • Command output size—NX-API performance is better when the command outputs are smaller.

  • Structured and unstructured outputs of the show commands—NX-API performance is better with unstructured outputs. Commands that support structured outputs are also called as NX-API aware commands in the document.

About NX-API Messages

HTTP Header

A header allows a client and a server to pass extra information as colon separated property-value pairs in requests and responses.

This is where the content encoding is specified for an NX-API request. The supported content types are:

Tag

Description

Type

Values

content-type

Request encoding type

string

application/json

application/json-rpc

application/xml

HTTP Method

Cisco MDS NX-API uses the POST method.

Message Body

The message body or payload contains the data for the HTTP method. For a list of supported objects see the NX-API Request Elements section.

Message Response

The message response is an HTTP return code and an HTTP response body that contains the data returned by the method. For a list of supported elements see the NX-API Respone Elements section. For a list of response codes refer to the NX-API Response Codes section.

Message Format

  • Cisco NX-API output of supported commands can be viewed in XML, JSON, and JSON-RPC. This message format can be used for both requests and responses.

    • XML—Cisco NX-API proprietary protocol for delivering Cisco MDS NX-OS CLI commands in an XML payload.

    • JSON—Cisco NX-API proprietary protocol for delivering Cisco MDS NX-OS CLI commands in a JSON payload.

    • JSON-RPC—A standard lightweight remote procedure call (RPC) protocol that can be used to deliver Cisco MDS NX-OS CLI commands in a JSON payload. The JSON-RPC 2.0 specification is outlined by jsonrpc.org.

NX-API does not map directly to the Cisco NX-OS NETCONF implementation.

Security

By default, Cisco MDS NX-API uses HTTP basic authentication (that is, all command requests must contain the username and password of the device in the HTTP header). NX-API can also leverage HTTPS to secure and encrypt data. An HTTPS connection provides more security over an HTTP connection. NX-API provides session-based cookie authentication as an alternative to the HTTP authentication method.

On Cisco NX-OS Releases 8.1(x) and 8.2(x), when NX-API is enabled over HTTPS, a 2048-bit SHA-1 self-signed certificate is created. This certificate is valid for two years. When an expired certificate is used, the browser displays a warning about security vulnerabilities. To avoid such vulnerabilities, we recommend the use of a CA-signed certificate. From Cisco NX-OS Release 8.3(1) and later, the self-signed certificate expires after 24 hours. We recommend that you use a CA-signed certificate.

For information on configuring CA-signed certificates, see the Configuring Certificate Authorities and Digital Certificates section in the Cisco MDS 9000 Series Security Configuration Guide, Release 8.x.

NX-API is integrated into the CLI authentication system of the Cisco MDS switch. This means that users must have the appropriate privilege to run CLI commands on the switch that are posted through NX-API. For example, a user with read only privileges on a Cisco MDS 9000 switch, cannot execute configuration commands through NX API.

NX-API performs authentication through a programmable authentication module (PAM) on a switch. Use cookies to reduce the number of PAM authentications, which in turn reduces the load on the PAM.

NX-API provides a session-based cookie, nxapi_auth when users first authenticate successfully. An nxapi_auth cookie expires in 600 seconds (10 minutes). This value is fixed and cannot be configured. The session cookie is used to avoid reauthentication during communication. If the session-based cookie is not included with subsequent requests, another session-based cookie is required; this is obtained through a full authentication process. Avoiding unnecessary use of the authentication process helps to reduce the workload of the MDS switch.

Limitations

  • The XML output for FCIP interface related commands is not supported.

  • The XML output for consistency checker commands is not supported.

Structured Output

The NX-OS supports redirecting the standard output of various show commands in the following structured output formats:

  • XML

  • JSON. The limit for JSON output is 60 MB.

  • JSON Native

Converting the standard Cisco MDS NX-OS output to any of these formats occurs on the Cisco MDS NX-OS CLI by "piping" the output to a JSON, JSON Native, or a XML interpreter. The JSON and XML interpreters are built-in into Cisco MDS NX OS software. For example, you can issue the show ip access command with the logical pipe ( | ) and specify the output format.The Cisco MDS NX-OS command output is properly structured and encoded in that format. This feature enables programmatic parsing of the data and supports streaming data from the switch through software streaming telemetry.

For more information on how to select different output formats, see NX-API Developer Sandbox section.

From Cisco MDS NX-OS Release 8.3(1), Cisco has implemented an enhanced version of JSON called JSON Native. This is a new CLI option to choose from. JSON Native displays the JSON output faster and more efficiently by bypassing an extra layer of command interpretation. In fact, JSON Native preserves the data type in the output; it displays integers as integers instead of converting them to a string for an output. We recommend to use JSON Native.

About JSON

JavaScript Object Notation (JSON) is a light-weight text-based open standard that is designed for human-readable data and is an alternative to XML. JSON was originally designed from JavaScript, but it is language-independent data format. JSON and JSON Native are supported for command output.

The two primary data structures that are supported in some way by all modern programming languages are as follows:

  • Ordered List of values—Often known as Array or List (for example, it is List in Python)

  • Collection of Key/Value pairs—Often known as Objects or Dictionary (for example, it is Dictionary in Python)

CLI Execution

switch# show cdp neighbors | json
{
  "TABLE_cdp_neighbor_brief_info": {
    "ROW_cdp_neighbor_brief_info": {
      "device_id": "SW-DRISHTI-ECBU-L13",
      "interface": "mgmt0",
      "ttl": "168",
      "capability": [
        "switch",
        "IGMP_cnd_filtering"
      ],
      "platform_id": "cisco",
      "port_id": "GigabitEthernet0/7"
    }
  },
  "neigh_count": "1"
}

Configuring NX-API CLI

The commands, command type, and output type for the Cisco MDS 9000 Series devices are entered using Cisco MDS NX-API by encoding the CLIs into the body of a HTTP/HTTPS POST. The response to the request is returned in XML or JSON output format.

For more details about NX-API response codes, see Table of NX-API Response Codes.

After configuring NX-API on the MDS switch, it may be accessed through the following URLs:

  • HTTP - http://switch_ip_address:port-number/ins

  • HTTPs - https://switch_ip_address:port-number/ins

For default HTTP and HTTPS settings, refer the Default Settings section.

The following example shows how to configure and enable NX-API:

  1. Ensure that the switch is accessible through the management interface.

    Refer to the Configuring the Management Interface section in the Cisco MDS 9000 Series Fundamentals Configuration Guide on how to enable the management interface.

  2. Enable the NX-API feature.

    switch# configure terminal
    switch(config)# feature nxapi
  3. (Optional) Disable the NX-API feature.

    switch(config)# no feature nxapi
  4. After configuring NX-API on the MDS switch, it may be accessed through the HTTP/HTTPS ports:

    (Optional) Configure HTTP port for NX-API.

    switch(config)# nxapi http port 8080 

    Use the no form of the command to disable it.

    (Optional) Configure HTTPS port for NX-API.

    switch(config)# nxapi https port 8443

    Use the no form of the command to disable it.

  5. (Optional) Install an identity certificate for NX-API HTTPS connections. Either a trust point or NX-API certificate may be used. You cannot configure both sources at the same time.

    1. Install a certificate with an unencrypted private key that is used only by the NX-API feature:

      switch(config)# nxapi certificate certfile  key keyfile  
    2. Install a certificate with an encrypted private key that is used only by the NX-API feature:

      switch(config)# nxapi certificate certfile  key keyfile  password  passphrase
    3. Use an already installed certificate in the trustpoint repository that may be shared with other features:

      switch(config)# nxapi trustpoint label 

    Note


    Installing a new NX-API certificate will reset the NX-API server. Installing a certificate from a host with NX-API may cause the script to fail.


    For information about configuring trust points, see the Configuring Certificate Authorities and Digital Certificates chapter in the Cisco MDS 9000 Series Security Configuration Guide, Release 8.x.

    • certfile is a signed certificate for this switch in privacy-enhanced mail (PEM) format. PEM format is a standard file format for storing and sending cryptographic RSA keys, certificates, and other data, based on a set of 1993 IETF standards.

    • keyfile is the private key for this switch in the PEM format. If the key is encrypted then the password option must also be specified.

    • passphrase is the password that is used to encrypt the private key.

    • label is the name of an already configured cryptographic trust point.


    Note


    • Certificates and keys installed using the nxapi certificate key command are not shared with any other crytographic features on the switch.

    • The password option used in the nxapi certificate key command is available only from Cisco MDS NX-OS Release 8.5(1).


  6. (Optional) If required, allow weak SSL ciphers for NX-API HTTPS connections. This reduces the security of SSL connections. However, this may be required for older devices to communicate with the switch.

    switch(config)# nxapi ssl ciphers weak
  7. (Optional) If required, configure SSL transports for NX-API HTTPS connections. Enabling non-default older transports reduces the security of SSL connections. However, this may be required for older devices to communicate with the switch. See Configuring SSL Transport for an LDAP Server to configure a SSL between LDAP client and server.

    • switch(config)# nxapi ssl protocols TLSv1.1 TLSv1.2 TLSv1.3
    • switch(config)# nxapi ssl protocols TLSv1.3

Preparing an Identity Certificate for Use in NX-API

An identity certificate for NX-API must be created before it can be imported with the nxapi certificate command. The certificate must consist of the switch identity certificate only; all CA and intermediate authority certificates must be removed. The private key must be removed and the total size must be less than 4096 bytes.

If a switch identity certificate is already installed in the switch crypto infrastructure under a trustpoint, this may be exported and reformattted, and the private key extracted, to be used in NX-API. If there is no switch identity certificate already installed, then it needs to be created by the CA.

For information on how to create a certificate, see the Configuring Certificate Authorities and Digital Certificates chapter in the Cisco MDS 9000 Series Security Configuration Guide, Release 8.x.


Note


The tools to prepare an existing identity certificate for NX-API use are not available on the switch. This must be done on another device such as a host with OpenSSL installed.


  1. (Optional) If a switch identity certificate is already installed on the switch, export it in PKCS12 format using the following command:

    switch(config)# crypto ca export trustpoint_name pkcs12 mytpexport.pkcs12 my_passphrase
  2. Upload the file to a host with OpenSSL installed on it:

    switch# copy mytpexport.pkcs12 sftp://10.10.2.2
  3. Extract the identity certificate:

    host$ openssl pkcs12 -in mytpexport.pkcs12 -nokeys -clcerts -out idcert.pem
    Enter Import Password: my_passphrase
    host$
  4. Extract unencrypted private key:

    host$ openssl pkcs12 -in mytpexport.pkcs12 -nocerts -nodes | openssl rsa -out unencryptedprivkey.pem
    Enter Import Password:
    writing RSA key
    host$
  5. Download the 2 files to the switch bootflash:

    switch# copy sftp://10.10.2.2/idcert.pem bootflash:
    switch# copy sftp://10.10.2.2/unencryptedprivkey.pem bootflash:

The files are now ready to be imported using the nxapi certificate command.

Using NX-API with cURL

Let us now examine the content of the show.version.json file on the host.

linux$ cat show.version.json
[{ "jsonrpc": "2.0", "method": "cli", "params": { "cmd": "show version", "version": 1 }, "id": 1 }]
EOF
 

Now use cURL on host to authenticate the switch and send it the desired POST request.


linux$ curl -v -u admin:cisco -H "Content-Type: application/json-rpc" -H "Cache-Control: no-cache" -d @show.version.json -X POST http://10.10.2.2:80/ins
 
Note: Unnecessary use of -X or --request, POST is already inferred.
*   Trying 10.10.2.2:80...
* Connected to 10.10.2.2:80 (10.10.2.2:80) port 80 (#0)
* Server auth using Basic with user 'admin'
> POST /ins HTTP/1.1
> Host: 10.10.2.2:80
> Authorization: Basic YWRtaW46bmJ2XzEyMzQ1
> User-Agent: curl/7.70.0
> Accept: */*
> Content-Type: application/json-rpc
> Cache-Control: no-cache
> Content-Length: 99
> 
* upload completely sent off: 99 out of 99 bytes
* Mark bundle as not supporting multiuse
< HTTP/1.1 200 OK
< Server: nginx/1.7.10
< Date: Mon, 14 Jun 1976 13:28:43 GMT
< Content-Type: application/json-rpc; charset=UTF-8
< Transfer-Encoding: chunked
< Connection: keep-alive
< Set-Cookie: nxapi_auth=dzqnf:1fNa+E8KGq0ZZM6TRZTFKTWejBg=; Secure; HttpOnly;
< X-Frame-Options: SAMEORIGIN
< X-XSS-Protection: 1; mode=block
< X-Content-Type-Options: nosniff
< Strict-Transport-Security: max-age=31536000; includeSubDomains
< Content-Security-Policy: block-all-mixed-content; base-uri 'self'; default-src 'self'; script-src 'self'; style-src 'self'; img-src 'self' ; connect-src 'self'; font-src 'self'; object-src 'none'; media-src 'self'; form-action 'self'; frame-ancestors 'self';
< 
{
        "jsonrpc":      "2.0",
        "result":       {
                "header_str":   "Cisco Nexus Operating System (NX-OS) Software\nTAC support: http://www.cisco.com/tac\nDocuments: http://www.cisco.com/en/US/products/ps9372/tsd_products_support_series_home.html\nCopyright (c) 2002-2020, Cisco Systems, Inc. All rights reserved.\nThe copyrights to certain works contained herein are owned by\nother third parties and are used and distributed under license.\nSome parts of this software are covered under the GNU Public\nLicense. A copy of the license is available at\nhttp://www.gnu.org/licenses/gpl.html.\n",
                "bios_ver_str": "2.1.17",
                "loader_ver_str":       "N/A",
                "kickstart_ver_str":    "8.4(1)SK(0) [build 8.4(1)SK(0.160)] [gdb]",
                "sys_ver_str":  "8.4(1)SK(0) [build 8.4(1)SK(0.160)] [gdb]",
                "bios_cmpl_time":       "01/08/14",
                "kick_file_name":       "bootflash:///kick-sky160",
                "kick_cmpl_time":       " 12/20/2020 12:00:00",
                "kick_tmstmp":  "09/08/2020 09:42:15",
                "isan_file_name":       "bootflash:///sky-sep14-02",
                "isan_cmpl_time":       " 12/20/2020 12:00:00",
                "isan_tmstmp":  "09/14/2020 05:56:35",
                "chassis_id":   "MDS 9250i 40 FC 2 IPS 8 FCoE (2 RU) Chassis",
                "module_id":    "40FC+8FCoE+2IPS Supervisor",
                "cpu_name":     "Motorola, e500v2",
                "memory":       4088480,
                "mem_type":     "kB",
                "proc_board_id":        "JAF1852AAFC",
                "host_name":    "host",
                "bootflash_size":       4001760,
                "kern_uptm_days":       0,
                "kern_uptm_hrs":        1,
                "kern_uptm_mins":       25,
                "kern_uptm_secs":       13,
                "rr_usecs":     715180,
                "rr_ctime":     "Mon Jun 14 12:02:47 1976",
                "rr_reason":    "Reset Requested by CLI command reload",
                "rr_sys_ver":   "8.4(1)SK(0.160)",
                "rr_service":   "",
                "manufacturer": "Cisco Systems, Inc."
        },
        "id":   1,
        "cmd":  "show version"
* Connection #0 to host 10.197.155.246 left intact

Examples of Structured Output

This section lists a selected few examples of Cisco MDS NX-OS commands that are displayed as XML, JSON and JSON Native output formats.

To check if a particular show command is NX-API-aware, enter the command along with | xml on the switch:

command | xml

If a command is NX-API-aware (supports structured output), the resulting output is in XML format:

switch# show device-alias merge status | xml

 <?xml version="1.0" encoding="ISO-8859-1"?>
<nf:rpc-reply xmlns="http://www.cisco.com/nxos:8.4.1.SK.0.:ddas" xmlns:nf="urn:ietf:params:xml:ns:netconf:base:1.0">
<nf:data>
<show>
<device-alias>
<merge>
<status>
<__readonly__>
<result>Success</result>
<reason>None</reason>
</__readonly__>
</status>
</merge>
</device-alias>
</show>
</nf:data>
</nf:rpc-reply>
]]>]]>

If a command is not NX-API-aware, the resulting output has the following error:

switch# show logging logfile | xml

Error: This command does not support XML output.
 

This example shows how to display the show version command in the XML format:


switch(config)# show version | xml

<?xml version="1.0" encoding="ISO-8859-1"?>
<nf:rpc-reply xmlns="http://www.cisco.com/nxos:8.4.2.:sysmgrcli" xmlns:nf="urn:ietf:params:xml:ns:netconf:base:1.0">
 <nf:data>
  <show>
   <version>
    <__readonly__>
     <header_str>Cisco Nexus Operating System (NX-OS) Software
TAC support: http://www.cisco.com/tac
Documents: http://www.cisco.com/en/US/products/ps9372/tsd_products_support_series_home.html
Copyright (c) 2002-2020, Cisco Systems, Inc. All rights reserved.
The copyrights to certain works contained in this software are
owned by other third parties and used and distributed under
license. Certain components of this software are licensed under
the GNU General Public License (GPL) version 2.0 or the GNU
Lesser General Public License (LGPL) Version 2.1. A copy of each
such license is available at
http://www.opensource.org/licenses/gpl-2.0.php and
http://www.opensource.org/licenses/lgpl-2.1.php
</header_str>
     <bios_ver_str>3.7.0</bios_ver_str>
     <kickstart_ver_str>8.4(2) [build 8.4(2.191)] [gdb]</kickstart_ver_str>
     <sys_ver_str>8.4(2) [build 8.4(2.191)] [gdb]</sys_ver_str>
     <bios_cmpl_time>04/01/2019</bios_cmpl_time>
     <kick_file_name>bootflash:///m9700-sf3ek9-kickstart-mzg.8.4.2.191.bin</kick_file_name>
     <kick_cmpl_time> 2/5/2020 12:00:00</kick_cmpl_time>
     <kick_tmstmp>01/08/2020 18:27:03</kick_tmstmp>
     <isan_file_name>bootflash:///m9700-sf3ek9-mzg.8.4.2.191.bin</isan_file_name>
     <isan_cmpl_time> 2/5/2020 12:00:00</isan_cmpl_time>
     <isan_tmstmp>01/14/2020 05:36:15</isan_tmstmp>
     <chassis_id>MDS 9706 (6 Slot) Chassis</chassis_id>
     <module_id>Supervisor Module-3</module_id>
     <cpu_name>Intel(R) Xeon(R) CPU C5528 @ 2.13GHz</cpu_name>
     <memory>8167228</memory>
     <mem_type>kB</mem_type>
     <proc_board_id>JAE19220AQJ</proc_board_id>
     <host_name>abc</host_name>
     <bootflash_size>3915776</bootflash_size>
     <slot0_size>0</slot0_size>
     <kern_uptm_days>19</kern_uptm_days>
     <kern_uptm_hrs>23</kern_uptm_hrs>
     <kern_uptm_mins>16</kern_uptm_mins>
     <kern_uptm_secs>11</kern_uptm_secs>
     <rr_usecs>768558</rr_usecs>
     <rr_ctime>Tue Jan 14 05:58:26 2020</rr_ctime>
     <rr_reason>Reset Requested by CLI command reload</rr_reason>
     <rr_sys_ver>8.4(2.171)</rr_sys_ver>
     <rr_service></rr_service>
     <manufacturer>Cisco Systems, Inc.</manufacturer>
    </__readonly__>
   </version>
  </show>
 </nf:data>
</nf:rpc-reply>
]]>]]>

This example shows how to display the show version in the JSON format:


switch(config)# show version | json

{
  "header_str": "Cisco Nexus Operating System (NX-OS) Software\nTAC support: http://www.cisco.com/tac\nDocuments: http://www.cisco.c
om/en/US/products/ps9372/tsd_products_support_series_home.html\nCopyright (c) 2002-2020, Cisco Systems, Inc. All rights reserved.\nT
he copyrights to certain works contained in this software are\nowned by other third parties and used and distributed under\nlicense.
 Certain components of this software are licensed under\nthe GNU General Public License (GPL) version 2.0 or the GNU\nLesser General
 Public License (LGPL) Version 2.1. A copy of each\nsuch license is available at\nhttp://www.opensource.org/licenses/gpl-2.0.php and
\nhttp://www.opensource.org/licenses/lgpl-2.1.php", 
  "bios_ver_str": "3.7.0", 
  "kickstart_ver_str": "8.4(2) [build 8.4(2.191)] [gdb]", 
  "sys_ver_str": "8.4(2) [build 8.4(2.191)] [gdb]", 
  "bios_cmpl_time": "04/01/2019", 
  "kick_file_name": "bootflash:///m9700-sf3ek9-kickstart-mzg.8.4.2.191.bin", 
  "kick_cmpl_time": "2/5/2020 12:00:00", 
  "kick_tmstmp": "01/08/2020 18:27:03", 
  "isan_file_name": "bootflash:///m9700-sf3ek9-mzg.8.4.2.191.bin", 
  "isan_cmpl_time": "2/5/2020 12:00:00", 
  "isan_tmstmp": "01/14/2020 05:36:15", 
  "chassis_id": "MDS 9706 (6 Slot) Chassis", 
  "module_id": "Supervisor Module-3", 
  "cpu_name": "Intel(R) Xeon(R) CPU C5528 @ 2.13GHz", 
  "memory": 8167228, 
  "mem_type": "kB", 
  "proc_board_id": "JAE19220AQJ", 
  "host_name": "abc", 
  "bootflash_size": 3915776, 
  "slot0_size": 0, 
  "kern_uptm_days": 19, 
  "kern_uptm_hrs": 23, 
  "kern_uptm_mins": 16, 
  "kern_uptm_secs": 22,
  "rr_usecs": 768558, 
  "rr_ctime": "Tue Jan 14 05:58:26 2020", 
  "rr_reason": "Reset Requested by CLI command reload", 
  "rr_sys_ver": "8.4(2.171)", 
  "rr_service": null, 
  "manufacturer": "Cisco Systems, Inc."
}

This example shows how to display the show version in the JSON Native format:


switch(config)# show version | json native

{
"header_str": "Cisco Nexus Operating System (NX-OS) Software\nTAC supp
ort: http://www.cisco.com/tac\nDocuments: http://www.cisco.com/en/US/products/ps
9372/tsd_products_support_series_home.html\nCopyright (c) 2002-2020, Cisco Syste
ms, Inc. All rights reserved.\nThe copyrights to certain works contained herein
are owned by\nother third parties and are used and distributed under license.\nS
ome parts of this software are covered under the GNU Public\nLicense. A copy of
the license is available at\nhttp://www.gnu.org/licenses/gpl.html.\n",
"bios_ver_str": "2.1.18",
"loader_ver_str": "N/A",
"kickstart_ver_str": "8.4(2a)",
"sys_ver_str": "8.4(2a)",
"bios_cmpl_time": "04/06/20",
"kick_file_name": "bootflash:///m9100-s5ek9-kickstart-mz.8.4.2a.bi
n",
"kick_cmpl_time": " 7/11/2020 12:00:00",
"kick_tmstmp": "06/20/2020 20:50:09",
"isan_file_name": "bootflash:///m9100-s5ek9-mz.8.4.2a.bin",
"isan_cmpl_time": " 7/11/2020 12:00:00",
"isan_tmstmp": "06/20/2020 22:05:47",
"chassis_id": "MDS 9148S 16G 48 FC (1 Slot) Chassis",
"module_id": "2/4/8/16 Gbps FC/Supervisor",
"cpu_name": "Motorola, e500v2",
"memory": 4088620,
"mem_type": "kB",
"proc_board_id": "JAF1751BGPS",
"host_name": "sw109-Mini",
"bootflash_size": 4001760,
"kern_uptm_days": 7,
"kern_uptm_hrs": 1,
"kern_uptm_mins": 13,
"kern_uptm_secs": 0,
"rr_usecs": 362070,
"rr_ctime": "Mon Sep 28 07:43:36 2020",
"rr_reason": "Reset due to upgrade",
"rr_sys_ver": "8.4(2b)",
"rr_service": "",
"manufacturer": "Cisco Systems, Inc."
}

NX-API Developer Sandbox

The NX-API Developer Sandbox is a Cisco-developed web-based user interface that is used to make NX-API requests and receive responses. Requests are in the form of show commands, and noninteractive configuration commands.

Configuring NX-API Sandbox

  1. Enable and configure the NX-API feature. For information on how to enable and configure the NX-API feature, refer the Configuring NX-API CLI section.

  2. Enable the NX-API sandbox:

    switch# configure terminal
    switch(config)# nxapi sandbox

To view the NX-API settings, use show nxapi command.

switch# show nxapi

NX-API:       Enabled         Sandbox:      Enabled     
HTTP Port:    Disabled        HTTPS Port:  8443         

Certificate Information:
    Issuer:   C=US, ST=CA, L=San Jose, O=Cisco Systems Inc., OU=dcnxos, CN=nxos
    Expires:  Nov 26 09:26:12 2019 GMT                                         
    Content:  -----BEGIN CERTIFICATE-----
MIIDpzCCAo+gAwIBAgIJAObmdczeHJL8MA0GCSqGSIb3DQEBCwUAMGoxCzAJBgNV
BAYTAlVTMQswCQYDVQQIDAJDQTERMA8GA1UEBwwIU2FuIEpvc2UxGzAZBgNVBAoM
EkNpc2NvIFN5c3RlbXMgSW5jLjEPMA0GA1UECwwGZGNueG9zMQ0wCwYDVQQDDARu
eG9zMB4XDTE5MTEyNTA5MjYxMloXDTE5MTEyNjA5MjYxMlowajELMAkGA1UEBhMC
VVMxCzAJBgNVBAgMAkNBMREwDwYDVQQHDAhTYW4gSm9zZTEbMBkGA1UECgwSQ2lz
Y28gU3lzdGVtcyBJbmMuMQ8wDQYDVQQLDAZkY254b3MxDTALBgNVBAMMBG54b3Mw
ggEiMA0GCSqGSIb3DQEBAQUAA4IBDwAwggEKAoIBAQDreVT3LAYarHxZxELwNwst
ZQqlmah5PJHBGUx+3YQcRi8v8wrEsRI7bZrQgDzXkFEH9yroJUghdc0nkM1GYHNF
avbj4qRaEveRejtGZNMPi11tAOWbRsU0ldxODV3+SeG/A220Bal58JzJjje5wyi8
Wu8UR8w4Lb32GYXI8ifBtlU0LrNsS0pE68yJt782y8IJIAEjGWX3L8dle4qwRqXg
6GBDPbwKFCvi+NX8JN48olONASSHXGdcmZSfiYUNKPD7+AwjG/luxSyIqnFW2w06
zwQLoIbXJx7zvl0Adt3H4ZnaRZOG5UvsWLgEdJZJkaqQPe0+7cpwcubN9/PJlO0l
AgMBAAGjUDBOMB0GA1UdDgQWBBTUI4IqOqmoKy5LEjygiJzd2nEGWzAfBgNVHSME
GDAWgBTUI4IqOqmoKy5LEjygiJzd2nEGWzAMBgNVHRMEBTADAQH/MA0GCSqGSIb3
DQEBCwUAA4IBAQC+7TPfDAz1t4yvG4rpypinU2Plp2FOBRdU85CIVREIplbRX8Vv
VMXYySnrKDjVRPcWtY+EtDW91BfS2I2usHkiKcnOYazDoxpamFI3D6lmb82JAAqG
NMV56hIJAYMpVqfbI+vtC93NR3F2fLD8/Hm/X4L8U6kdu2o+vgqYtc4OOl87lhJS
R8xA2N9kihOA1FUMVL89cFgRvxONjAyQImTB8uWl1stUGpH2kE3dABHC1sbZ1dNw
2/OxpfGnj1Qjvi4wKqjGpX/Kqc0AIx2zsKEX9hpPMQK/wlaRg8hlNCXJzzTQ7IVX
7PWJSqn7gpfyZIgZ9JQQ/WieCH32mQ2xGMDD
-----END CERTIFICATE-----

To access the NX-API Developer Sandbox, follow these steps:


Note


When using the NX-API Developer Sandbox, we recommend that you use Firefox Release 24.0 or later. The browser must be installed with the latest Adobe Flash player for the Copy and Python buttons in the NX-API Developer Sandbox to function.


  1. Open a browser and enter http://switch_ip_address :port-number for HTTP, or https://switch_ip_address :port-number for HTTPS in the address bar.

    The NX-API Developer Sandbox Authentication window is displayed:
    Figure 2. NX-API Developer Sandbox Authentication


  2. Log in using your switch credentials.

    The NX-API Developer Sandbox window is displayed.

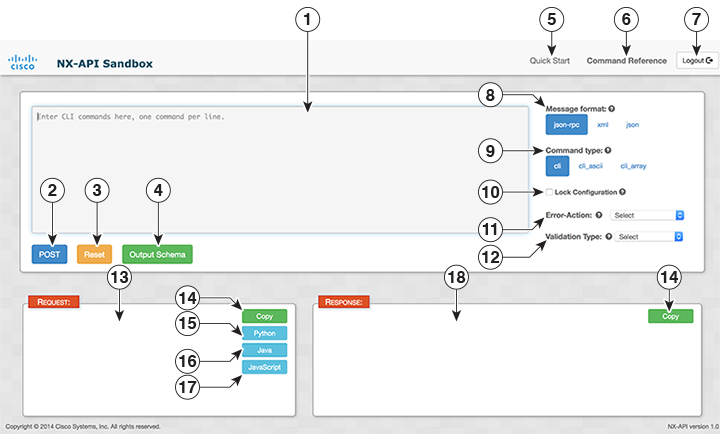
The NX-API Developer Sandbox is a web form that is hosted on the switch. It translates NX-OS CLI commands into equivalent XML or JSON payloads, and converts NX-API payloads into their CLI equivalents.

The web form is a single screen with three panes—Command (top pane), Request, and Response—as shown in the Figure 3.

Figure 3. NX-API Developer Sandbox

1

Command entry—Allows you to enter a command. Type or paste NX-OS CLI configuration commands, one command per line, into the text entry box.

10

Lock Configuration—Provides an exclusive lock to the configuration, whereby no other management agent will be able to modify the configuration.

2

POST—Generates the output for a given command.

11

Error Action—Specifies the error action options

  • Stop-on-error—Stops at the first CLI that fails.

  • Continue-on-error—Ignores and continues with other CLIs.

  • Rollback-on-error—Performs a rollback to the previous state the system was in.

    Note


    The rollback-on-error option is removed from Cisco MDS NX-OS Release 9.2(2).

3

Reset—Clears the command and the corresponding output

12

Validation Type—Specifies validation settings.

  • Validate-Only—Validates the configurations but does not apply the configurations.

  • Validate-and-Set—Validates the configurations, and applies the configurations on the switch if the validation is successful.

4

Output Schema—Displays the command schema for a command entered in the command pane.

13

REQUEST—Displays the output for a command that is entered in the selected message format.

5

Quick Start—Displays the online help for Cisco MDS NX-API.

14

Copy—Copies the data populated in the REQUEST or RESPONSE area.

6

Command Reference—Displays the Command Reference pane.

The Command Reference pane displays the command schema details of the command that is selected in the Show commands pane.

Note


Supported from Cisco MDS NX-OS Release 8.4(1).

15

Python

7

Logout—Logs the user out of NX-API sandbox.

16

Java

Note


Supported from Cisco MDS NX-OS Release 8.4(1).

8

Message format—Provides different message formats in which the command output is to be displayed.

17

Javascript

Note


Supported from Cisco MDS NX-OS Release 8.4(1).

9

Command type

  • cli — show or configuration commands.

  • cli_ascii — show or configuration commands, output without formatting.

  • cli_array

    CLI show commands.

    CLI show commands that expect structured output. Only for show commands. If the command does not support XML output, an error message is returned. Similar to cli, but with cli_array, data is returned as a list of one element, or an array, within square brackets [ ].

    Note


    The cli_array command type is supported from Cisco MDS NX-OS Release 8.4(1).

18

RESPONSE—Displays the API response for the command entered in the command entry area.

Controls in the Command pane allow you to choose a message format for a supported API, such as NX-API, and a command type, such as XML or JSON. The available command type options vary depending on the selected message format.

To generate an output of a command using the NX-API Developer Sandbox, follow these steps:

  1. Click the Message format type (json-rpc, xml, json) in which the command output is to be displayed. (By default, json-rpc is selected.)

  2. Click the Command type you have entered. The options differ based on the Message format type selected. (By default, cli is selected.)

    You can erase the contents of the text entry box (and the Request and Response panes) by clicking Reset at the bottom of the top pane.


    Note


    • If you select the xml Message format, you can enable chunk mode for the cli_show and cli_show_ascii Command types. Check the Enable chunk mode check box to chunk large show command outputs. To view the next chunk of the output, copy the session ID (SID) mentioned in between <sid> and </sid> tags in the RESPONSE area and paste it in the SID box below the Enable chunk mode check box.


  3. Type or paste NX-OS CLI configuration commands, one command per line, into the text entry box in the top pane.

  4. The command that you entered is displayed in the selected Message format in the REQUEST area.

    The Request pane also has a series of tabs. Each tab represents a different language: Python, Java, and JavaScript. Each tab enables you to view the request in the respective language. For example, after converting CLI commands into an XML or JSON payload, click the Python tab to view the request in Python, which you can use to create scripts.

    • To copy the data populated in the REQUEST area, click Copy.

    • To generate a Python code for the command entered, click Python.


      Note


      The xml Message format does not support the Python button.


  5. Click POST to generate the output of the command.

    The output of the command is displayed in the RESPONSE area.

    • To copy the data populated in the RESPONSE area, click Copy.

    To clear the command and the corresponding output, and reset the page, click Reset.

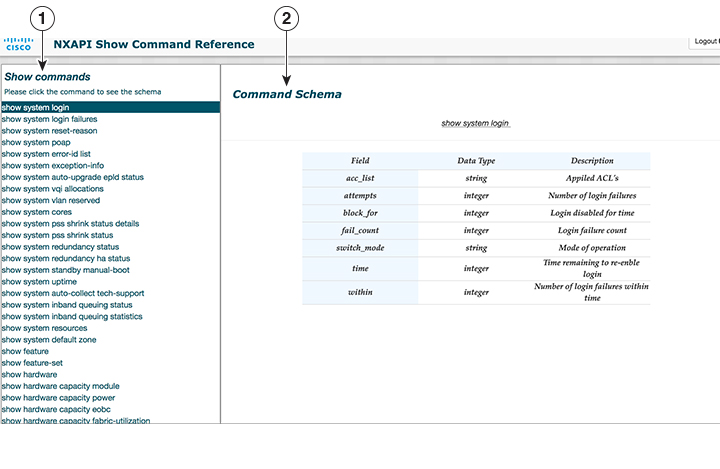
  6. Click Command Reference to view the list of show commands that are supported for NX-API.

    The Command Schema pane displays the details of the command that is selected in the Show commands pane.


    Note


    Currently, the Command Reference tab supports only the show commands.


    Figure 4. NX-API Show Command Reference

    1

    Show commands—Displays the list of supported show commands.

    2

    Command Schema—Displays the NX-API schema (keywords and description) for a command selected in the Show commands pane.

Example: Displaying NX-API Status

The following example displays the NX-API status response in different output formats:

XML Format

show nxapi

Request:

<?xml version="1.0"?>
<ins_api>
  <version>1.2</version>
  <type>cli_show</type>
  <chunk>0</chunk>
  <sid>sid</sid>
  <input>show nxapi</input>
  <output_format>xml</output_format>
</ins_api>

Response:

<ins_api>
  <type>cli_show</type>
  <version>1.2</version>
  <sid>eoc</sid>
  <outputs>
    <output>
      <body>
     <nxapi_status>Enabled</nxapi_status>
     <sandbox_status>Enabled</sandbox_status>
     <http_port>8080</http_port>
    </body>
      <input>show nxapi</input>
      <msg>Success</msg>
      <code>200</code>
    </output>
  </outputs>
</ins_api>

JSON Format

show nxapi

Request:

{
  "ins_api": {
    "version": "1.2",
    "type": "cli_show",
    "chunk": "0",
    "sid": "1",
    "input": "show nxapi",
    "output_format": "json"
  }
}
 

Response:

{
  "ins_api": {
    "type": "cli_show",
    "version": "1.2",
    "sid": "eoc",
    "outputs": {
      "output": {
        "input": "show nxapi",
        "msg": "Success",
        "code": "200",
        "body": {
          "nxapi_status": "Enabled",
          "sandbox_status": "Enabled",
          "http_port": "8080"
        }
      }
    }
  }
}
 

JSON-RPC Format

show nxapi

Request:

[
  {
    "jsonrpc": "2.0",
    "method": "cli",
    "params": {
      "cmd": "show nxapi",
      "version": 1.2
    },
    "id": 1
  }
]
 

Response:

{
  "jsonrpc": "2.0",
  "result": {
    "body": {
      "nxapi_status": "Enabled",
      "sandbox_status": "Enabled",
      "http_port": "8080"
    }
  },
  "id": 1
}
 

Example: Configuring VSAN to VLAN Mapping

The following example shows how to configure VSAN to VLAN mapping in global configuration mode (cli_conf):

vlan 3
fcoe vsan 3
vsan database
vsan 3
vsan 3 interface vfc1/8

Request:

<?xml version="1.0"?>
<ins_api>
  <version>1.2</version>
  <type>cli_conf</type>
  <chunk>0</chunk>
  <sid>sid</sid>
  <input>vlan 3 ;fcoe vsan 3 ;vsan database ;vsan 3 ;vsan 3 interface vfc1/8</input>
  <output_format>xml</output_format>
</ins_api>

Response:

<?xml version="1.0"?>
<ins_api>
  <type>cli_conf</type>
  <version>1.2</version>
  <sid>eoc</sid>
  <outputs>
    <output>
      <body/>
      <input>vlan 3</input>
      <code>200</code>
      <msg>Success</msg>
    </output>
    <output>
      <body/>
      <input>fcoe vsan 3</input>
      <code>200</code>
      <msg>Success</msg>
    </output>
    <output>
      <body/>
      <input>vsan database</input>
      <code>200</code>
      <msg>Success</msg>
    </output>
    <output>
      <body/>
      <input>vsan 3</input>
      <code>200</code>
      <msg>Success</msg>
    </output>
    <output>
      <body/>
      <input>vsan 3 interface vfc1/8</input>
      <code>200</code>
      <msg>Success</msg>
    </output>
  </outputs>
</ins_api>

Example: Configuring Zones and Zonesets

The following example shows how to configure a zone in global configuration mode (cli_conf):

zone name zone2 vsan 1
member pwwn 10:00:00:23:45:67:89:ab
member pwwn 10:00:00:23:45:67:89:cd

Request:

<?xml version="1.0"?>
<ins_api>
  <version>1.2</version>
  <type>cli_conf</type>
  <chunk>0</chunk>
  <sid>sid</sid>
  <input>zone name zone2 vsan 1 ;member pwwn 10:00:00:23:45:67:89:ab ;member pwwn 10:00:00:23:45:67:89:cd</input>
  <output_format>xml</output_format>
</ins_api>

Response:

<?xml version="1.0"?>
<ins_api>
  <type>cli_conf</type>
  <version>1.2</version>
  <sid>eoc</sid>
  <outputs>
    <output>
      <body/>
      <input>zone name zone2 vsan 1</input>
      <code>200</code>
      <msg>Success</msg>
    </output>
    <output>
      <body/>
      <input>member pwwn 10:00:00:23:45:67:89:ab</input>
      <code>200</code>
      <msg>Success</msg>
    </output>
    <output>
      <body/>
      <input>member pwwn 10:00:00:23:45:67:89:cd</input>
      <code>200</code>
      <msg>Success</msg>
    </output>
  </outputs>
</ins_api>

The following example shows how to configure a zoneset in global configuration mode (cli_conf):

zoneset name Zoneset1 vsan 1
member zone2
zoneset activate name Zoneset1 vsan 1

Request:

<?xml version="1.0"?>
<ins_api>
  <version>1.2</version>
  <type>cli_conf</type>
  <chunk>0</chunk>
  <sid>sid</sid>
  <input>zoneset name Zoneset1 vsan 1 ;member zone2 ;zoneset activate name Zoneset1 vsan 1</input>
  <output_format>xml</output_format>
</ins_api>

Response:

<?xml version="1.0"?>
<ins_api>
  <type>cli_conf</type>
  <version>1.2</version>
  <sid>eoc</sid>
  <outputs>
    <output>
      <body/>
      <input>zoneset name Zoneset1 vsan 1</input>
      <code>200</code>
      <msg>Success</msg>
    </output>
    <output>
      <body/>
      <input>member zone2</input>
      <code>200</code>
      <msg>Success</msg>
    </output>
    <output>
      <body>Zoneset activation initiated. check zone status
</body>
      <input>zoneset activate name Zoneset1 vsan 1</input>
      <code>200</code>
      <msg>Success</msg>
    </output>
  </outputs>
</ins_api>

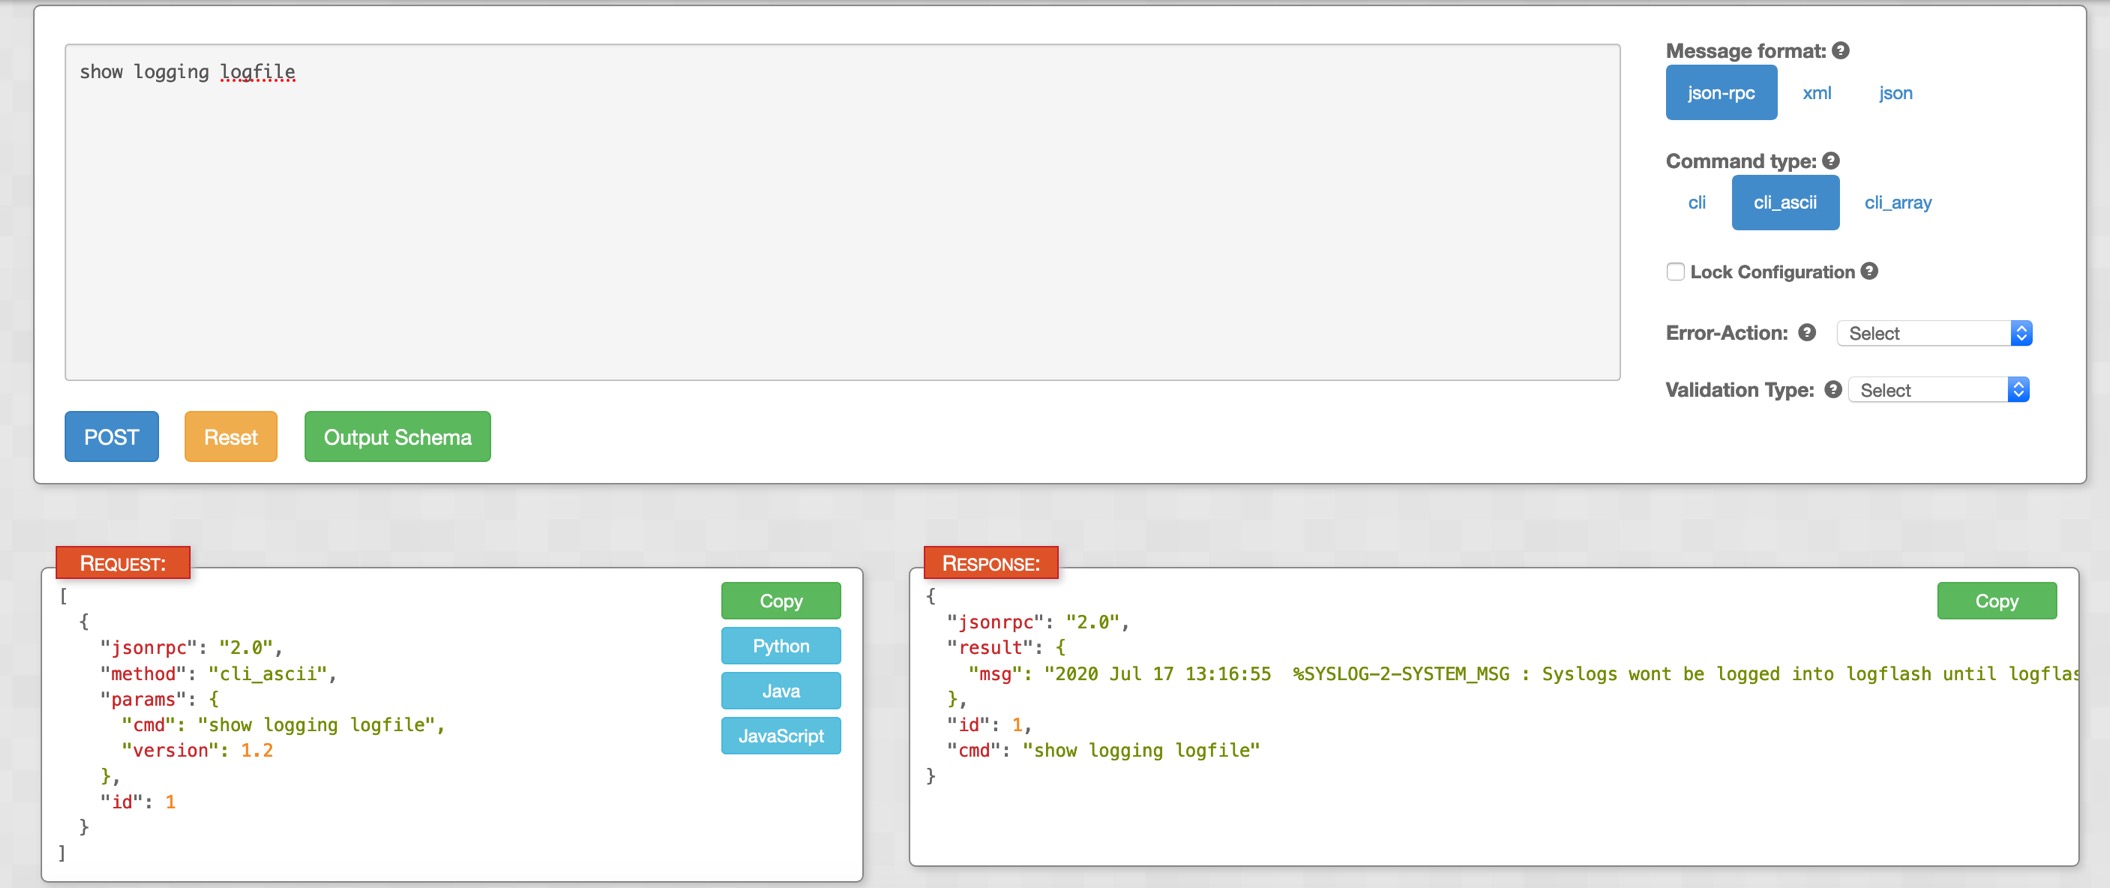
If a show command is not NX-API-aware, the output can still be accessed by setting the Command type element to cli_show_ascii for JSON and XML encoded requests, or show_ascii for JSON-RPC encoded requests. The command output is returned in the response body as a single flat string.

The following figure provides an example for a show command output that is not NX-API-aware, in the NX-API Developer Sandbox.

NX-API Request Elements

NX-API request elements are sent to a device in XML, JSON, or JSON-RPC formats. The HTTP header of the request must identify the content type of the request.


Note


A lock will be released by the system if the session that holds the lock is terminated for any reason. The session that acquired the lock can only perform necessary configurations.


Table 1. NX-API Request Elements for XML or JSON Format

NX-API Request Element

Description

version

Specifies the NX-API version.

type

Specifies the command type to be executed.

The following command types are supported:

  • cli—CLI configuration commands.

    CLI show commands that expect structured output. If the command does not support XML output, an error message is returned.

  • cli_array—CLI show commands.

    CLI show commands that expect structured output. Only for show commands. If the command does not support XML output, an error message is returned. Similar to cli, but with cli_array, data is returned as a list of one element, or an array, within square brackets [ ].

  • cli_ascii —CLI configuration commands.

    CLI show commands that expect ASCII output. This aligns with existing scripts that parse ASCII output. Users can use existing scripts with minimal changes.

  • cli_show —CLI show commands that expect structured output. If the command does not support XML output, an error message is returned.

  • cli_show_array—CLI configuration commands.

    CLI show commands that expect structured output. Only for show commands. Similar to cli_show, but with cli_show_array, data is returned as a list of one element, or an array, within square brackets [ ].

  • cli_show_ascii —CLI show commands that expect ASCII output. This aligns with existing scripts that parse ASCII output. Users can use existing scripts with minimal changes.

  • cli_conf —CLI configuration commands.

Note

 
  • Each command is executable only with the current user's authority.

  • A maximum of 10 consecutive show commands are supported. If the number of show commands exceeds 10, the 11th and subsequent commands are ignored.

  • No interactive commands are supported.

chunk

Some show commands can return a large amount of output. For the NX-API client to start processing the output before the entire command completes, NX-API supports output chunking for show commands.

Enable or disable chunk with the following settings:

  • 0—Do not chunk output.

  • 1—Chunk output.

Note

 
  • Only show commands support chunking. When a series of show commands are entered, only the first command is chunked and returned.

    The output message format is XML, which is the default. Special characters, such as < or >, are converted to form a valid XML message (< is converted to &lt; > is converted to &gt).

    You can use XML SAX to parse the chunked output.

  • When chunking is enabled, the message format is limited to XML. JSON output format is not supported when chunking is enabled.

Note


When chunking is enabled, the maximum message size supported is currently 200 MB of the chunked output.

roll_back

Specifies the configuration rollback options. Specify one of the following options.

  • Stop-on-error—Stops at the first CLI that fails.

  • Continue-on-error—Ignores and continues with other CLIs.

  • Rollback-on-error—Performs a rollback to the previous state the system configuration was in.

    Note


    The rollback-on-error option is removed from Cisco MDS NX-OS Release 9.2(2).

validate

Configuration validation settings. This element allows you to validate the commands before you apply them on the switch. This enables you to verify the consistency of a configuration (for example, the availability of necessary hardware resources) before applying it. Choose the validation type from the Validation Type drop-down list.

  • Validate-Only—Validates the configurations, but does not apply the configurations.

  • Validate-and-Set —Validates the configurations, and applies the configurations on the switch if the validation is successful.

lock

An exclusive lock on the configuration can be specified, whereby no other management or programming agent will be able to modify the configuration if this lock is held.

sid

The session ID element is valid only when the response message is chunked. To retrieve the next chunk of the message, you must specify a sid to match the sid of the previous response message.

input

Input can be one command or multiple commands. However, commands that belong to different message types should not be mixed. For example, show commands belong to the cli_show message format and are not supported in cli_conf message format.

Note


Multiple commands are separated with a semicolon (;). (The ; must be surrounded with single blank characters.)

The following are examples of multiple commands:

  • cli_show

    show version ; show interface brief ; show vsan

  • cli_conf

    interface fc4/1 ; no shut

output_format

The available output message formats are:

  • xml—Specifies output in XML format.

  • json—Specifies output in JSON format.

  • json-rpc—Specifies output in JSON-RPC format.

Note


The Cisco MDS 9000 device CLI supports XML output, which means that the JSON output is converted from XML. The conversion is processed on the switch.

To manage computational overhead, the JSON output is determined by the amount of output. If the output exceeds 1 MB, the output is returned in XML format. When the output is chunked, only XML output is supported.

The content-type header in the HTTP or HTTPS response headers indicate the type of response format (XML, JSON, or JSON-RPC).

NX-API Response Elements

The following table lists the NX-API elements that respond to a CLI command:

Table 2. NX-API Response Elements

NX-API Response Element

Description

version

NX-API version.

type

Type of command to be executed.

sid

Session ID of the response. This element is valid only when the response message is chunked.

outputs

Tag that encloses all command outputs.

When multiple commands are either of cli_show or cli_show_ascii command type, each command output is enclosed by a single output tag.

When the command type is cli_conf, there is a single output tag for all the commands because cli_conf commands require context.

output

Tag that encloses the output of a single command output.

For cli_conf command type, this element contains the outputs of all the commands.

input

Tag that encloses a single command specified in the request. This element helps associate a request input element with the appropriate response output element.

body

Body of the command response.

code

Error code returned from command execution.

NX-API uses standard HTTP error codes as described by the HTTP Status Code Registry (http://www.iana.org/assignments/http-status-codes/http-status-codes.xhtml).

msg

Error message associated with the returned error code.

Table of NX-API Response Codes

The following are the possible NX-API errors, error codes, and messages pertaining to an NX-API response.

Table 3. NX-API Response Codes

NX-API Response

Code

Message

SUCCESS

200

Success.

CUST_OUTPUT_PIPED

204

Output is piped elsewhere due to request.

CHUNK_ALLOW_ONE_CMD_ERR

400

Chunking allowed only to one command.

CLI_CLIENT_ERR

400

CLI execution error.

CLI_CMD_ERR

400

Input CLI command error.

IN_MSG_ERR

400

Request message is invalid.

NO_INPUT_CMD_ERR

400

No input command.

PERM_DENY_ERR

401

Permission denied.

CONF_NOT_ALLOW_SHOW_ERR

405

Configuration mode does not allow show command .

SHOW_NOT_ALLOW_CONF_ERR

405

Show mode does not allow configuration.

EXCEED_MAX_SHOW_ERR

413

Maximum number of consecutive show commands exceeded. The maximum is 10.

MSG_SIZE_LARGE_ERR

413

Response size too large.

BACKEND_ERR

500

Backend processing error.

FILE_OPER_ERR

500

System internal file operation error.

LIBXML_NS_ERR

500

System internal LIBXML NS error.

LIBXML_PARSE_ERR

500

System internal LIBXML parse error.

LIBXML_PATH_CTX_ERR

500

System internal LIBXML path context error.

MEM_ALLOC_ERR

500

System internal memory allocation error.

USER_NOT_FOUND_ERR

500

User not found from input or cache.

XML_TO_JSON_CONVERT_ERR

500

XML to JSON conversion error.

CHUNK_ALLOW_XML_ONLY_ERR

501

Chunking allows only XML output.

JSON_NOT_SUPPORTED_ERR

501

JSON not supported due to large amount of output.

MSG_TYPE_UNSUPPORTED_ERR

501

Message type not supported.

PIPE_OUTPUT_NOT_SUPPORTED_ERR

501

Pipe operation not supported.

PIPE_XML_NOT_ALLOWED_IN_INPUT

501

Pipe XML is not allowed in input.

RESP_BIG_JSON_NOT_ALLOWED_ERR

501

Response has large amount of output. JSON not supported.

STRUCT_NOT_SUPPORTED_ERR

501

Structured output unsupported.

ERR_UNDEFINED

600

Undefined.

Default Settings

The following table lists the default settings for HTTP and HTTPS for Cisco MDS Release versions:

Cisco MDS NX-OS Release

HTTP

HTTPS

Cisco MDS NX-OS Release 8.2(2) and earlier

Enabled

Disabled

Cisco MDS NX-OS Release 8.3(1)

Cisco MDS NX-OS Release 8.3(2)

Enabled

Enabled

Cisco MDS NX-OS Release 8.4(1) and later

Disabled

Enabled

The Table 1 table lists the supported HTTP and HTTPS ports for Cisco MDS Release versions:

Table 4. Supported HTTP and HTTPS Ports

Cisco MDS NX-OS Release

HTTP Port

HTTPS Port

Cisco MDS NX-OS Release 8.2(1) and earlier

8080

443

Cisco MDS NX-OS Release 8.3(1) and later

8080

8443