Understand CUCM Security By Default and ITL Operation and Troubleshooting
Available Languages
Download Options
Bias-Free Language
The documentation set for this product strives to use bias-free language. For the purposes of this documentation set, bias-free is defined as language that does not imply discrimination based on age, disability, gender, racial identity, ethnic identity, sexual orientation, socioeconomic status, and intersectionality. Exceptions may be present in the documentation due to language that is hardcoded in the user interfaces of the product software, language used based on RFP documentation, or language that is used by a referenced third-party product. Learn more about how Cisco is using Inclusive Language.
Contents
Introduction
This document describes the Security By Default (SBD) feature of Cisco Unified Communications Manager (CUCM) Versions 8.0 and later.
Background Information
CUCM Version 8.0 and later introduces the SBD feature, which consists of Identity Trust List (ITL) files and the Trust Verification Service (TVS).
Every CUCM cluster now uses ITL-based security automatically. There is a trade-off between security and ease of use/ease of administration that administrators must be aware of before they make certain changes to a Version 8.0 CUCM cluster.
This document serves as a supplement to the official Security By Default documents, and provides operational information and troubleshooting tips to help administrators and ease the troubleshooting process.
It is a good idea to become familiar with these core concepts of SBD: Asymmetric Key Cryptography Wikipedia article and Public Key Infrastructure Wikipedia article.
SBD Overview
This section provides a quick overview of exactly what SBD provides. For full technical details of each function, see the SBD Detail and Troubleshooting Information section.
SBD provides these three functions for supported IP phones:
- Default authentication of TFTP downloaded files (configuration, locale, ringlist) that use a signing key
- Optional encryption of TFTP configuration files that use a signing key
- Certificate verification for phone-initiated HTTPS connections that use a remote certificate trust store on CUCM (TVS)
This document provides an overview of each of these functions.
TFTP Download Authentication
When a Certificate Trust List (CTL) or ITL file is present, the IP phone requests a signed TFTP configuration file from the CUCM TFTP server.
This file allows the phone to verify that the configuration file came from a trusted source. With CTL/ITL files present on phones, configuration files must be signed by a trusted TFTP server.
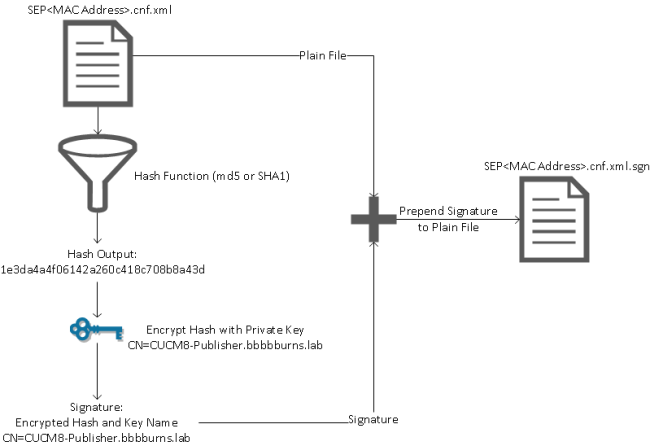
The file is plain text on the network while it is transmitted, but comes with a special verification signature.
The phone requests SEP<MAC Address>.cnf.xml.sgn in order to receive the configuration file with the special signature.
This configuration file is signed by the TFTP private key that corresponds to CallManager.pem on the Operating System (OS) Administration Certificate Management page.

The signed file has a signature at the top in order to authenticate the file, but is otherwise in plain text XML.
The image below shows that the signer of the configuration file is CN=CUCM8-Publisher.bbbburns.lab which is in turn signed by CN=JASBURNS-AD.
This means that the phone needs to verify the signature of CUCM8-Publisher.bbbburns.lab against the ITL file before this configuration file is accepted.

Here is a diagram that shows how the private key is used along with a Message Digest Algorithm (MD)5 or Secure Hash Algorithm (SHA)1 hash function in order to create the signed file.
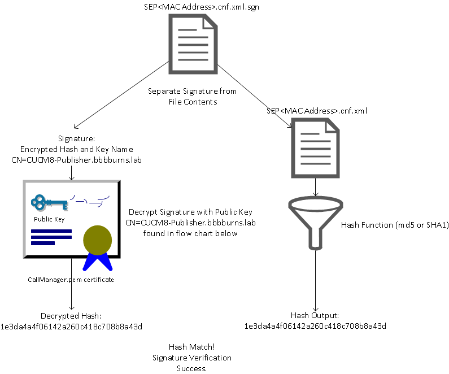
Signature verification reverses this process through the use of the public key that matches in order to decrypt the hash. If the hashes match, it shows:
- This file has not been modified in transit.
- This file comes from the party listed in the signature, since anything decrypted successfully with the public key must have been encrypted with the private key.
TFTP Configuration File Encryption
If optional TFTP configuration encryption is enabled in the associated Phone Security Profile, the phone requests an encrypted configuration file.
This file is signed with the TFTP private key and encrypted with a symmetric key exchanged between the phone and the CUCM (refer to the Cisco Unified Communications Manager Security Guide, Release 8.5(1) for full details).
Its contents cannot be read with a network sniffer unless the observer has the necessary keys.
The phone requests SEP<MAC Address>.cnf.xml.enc.sgn in order to get the signed encrypted file.

The encrypted configuration file has the signature at the beginning as well, but there is no plain text data after, only encrypted data (garbled binary characters in this text editor).
The image shows that the signer is the same as in the previous example, so this signer must be present in the ITL file before the phone accepts the file.
Further, the decryption keys must be correct before the phone can read the contents of the file.

Trust Verification Service (Remote Certificate and Signature Verification)
IP phones contain a limited amount of memory, and there can also be a large number of phones to manage in a network.
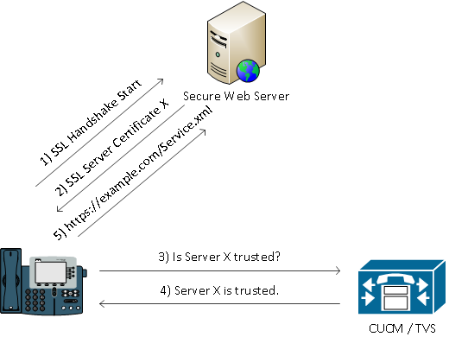
CUCM acts as a remote trust store via the TVS so that a full certificate trust store does not have to be placed on each IP phone.
Any time the phone cannot verify a signature or certificate via the CTL or ITL files, it asks the TVS server for verification.
This central trust store is easier to manage than if the trust store was present on all IP phones.
SBD Detail and Troubleshooting Information
This section details the SBD process.
ITL Files and Certificates Present on CUCM
First, there are a number of files that must be present on the CUCM server itself. The most important piece is the TFTP certificate and the TFTP private key.
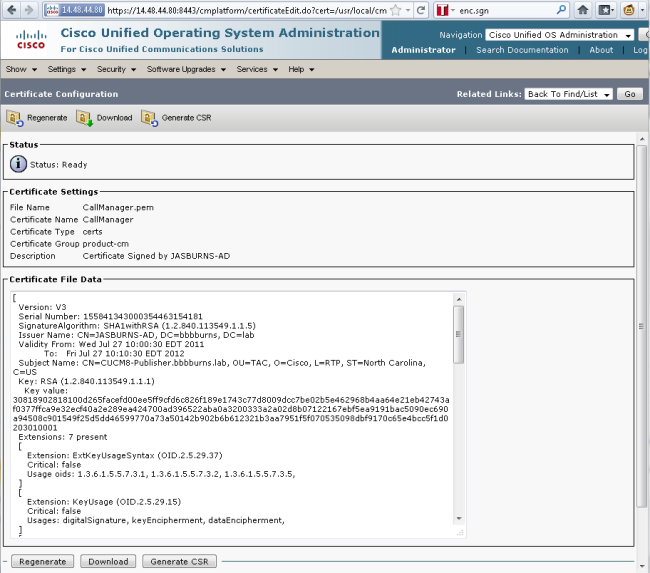
The TFTP Certificate is located under OS Administration > Security > Certificate Management > CallManager.pem.
The CUCM server uses the CallManager.pem certificate private and public keys for the TFTP service (as well as for the Cisco Call Manager (CCM) service).
The image shows that the CallManager.pem certificate is issued to CUCM8-publisher.bbbburns.lab and signed by JASBURNS-AD. All TFTP configuration files are signed by the private key below.
All phones can use the TFTP public key in the CallManager.pem certificate in order to decrypt any file encrypted with the TFTP private key, as well as to verify any file signed with the TFTP private key.
In addition to the CallManager.pem certificate private key, the CUCM server also stores an ITL file that is presented to phones.
The show itl command shows the full contents of this ITL file via Secure Shell (SSH) access to the CUCM server OS CLI.
This section breaks down the ITL file piece-by-piece, because it has a number of important components that the phone uses.
The first portion is the signature information. Even the ITL file is a signed file. This output shows that it is signed by the TFTP private key that is associated with the previous CallManager.pem certificate.
admin:show itl
Length of ITL file: 5438
The ITL File was last modified on Wed Jul 27 10:16:24 EDT 2011

        Parse ITL File
        ----------------

Version:        1.2
HeaderLength:   296 (BYTES)

BYTEPOS TAG             LENGTH  VALUE
------- ---             ------  -----
3       SIGNERID        2       110
4       SIGNERNAME      76      CN=CUCM8-Publisher.bbbburns.lab;
                                OU=TAC;O=Cisco;L=RTP;ST=North Carolina;C=US
5       SERIALNUMBER    10      21:00:2D:17:00:00:00:00:00:05
6       CANAME          15      CN=JASBURNS-AD
*Signature omitted for brevity*
The next sections each contain their purpose inside of a special Function parameter. The first function is the System Administrator Security Token. This is the signature of the TFTP public key.
        ITL Record #:1
                  ----
BYTEPOS TAG             LENGTH  VALUE
------- ---             ------  -----
1       RECORDLENGTH    2       1972
2       DNSNAME         2
3       SUBJECTNAME     76      CN=CUCM8-Publisher.bbbburns.lab;
                                OU=TAC;O=Cisco;L=RTP;ST=North Carolina;C=US
4       FUNCTION        2       System Administrator Security Token
5       ISSUERNAME      15      CN=JASBURNS-AD
6       SERIALNUMBER    10      21:00:2D:17:00:00:00:00:00:05
7       PUBLICKEY       140
8       SIGNATURE       256
9       CERTIFICATE     1442    0E 1E 28 0E 5B 5D CC 7A 20 29 61 F5
                                8A DE 30 40 51 5B C4 89 (SHA1 Hash HEX)
This etoken was used to sign the ITL file.
The next function is CCM+TFTP. This is again the TFTP public key that serves to authenticate and decrypt downloaded TFTP configuration files.
        ITL Record #:2
                  ----
BYTEPOS TAG             LENGTH  VALUE
------- ---             ------  -----
1       RECORDLENGTH    2       1972
2       DNSNAME         2
3       SUBJECTNAME     76      CN=CUCM8-Publisher.bbbburns.lab;
                                OU=TAC;O=Cisco;L=RTP;ST=North Carolina;C=US
4       FUNCTION        2       CCM+TFTP
5       ISSUERNAME      15      CN=JASBURNS-AD
6       SERIALNUMBER    10      21:00:2D:17:00:00:00:00:00:05
7       PUBLICKEY       140
8       SIGNATURE       256
9       CERTIFICATE     1442    0E 1E 28 0E 5B 5D CC 7A 20 29 61 F5
                                8A DE 30 40 51 5B C4 89 (SHA1 Hash HEX)
The next function is TVS. There is an entry for the public key of each TVS server to which the phone connects.
This allows the phone to establish a Secure Sockets Layer (SSL) session to the TVS server.
        ITL Record #:3
                  ----
BYTEPOS TAG             LENGTH  VALUE
------- ---             ------  -----
1       RECORDLENGTH    2       743
2       DNSNAME         2
3       SUBJECTNAME     76      CN=CUCM8-Publisher.bbbburns.lab;
                                OU=TAC;O=Cisco;L=RTP;ST=North Carolina;C=US
4       FUNCTION        2       TVS
5       ISSUERNAME      76      CN=CUCM8-Publisher.bbbburns.lab;
                                OU=TAC;O=Cisco;L=RTP;ST=North Carolina;C=US
6       SERIALNUMBER    8       2E:3E:1A:7B:DA:A6:4D:84
7       PUBLICKEY       270
8       SIGNATURE       256
11      CERTHASH        20      C7 E1 D9 7A CC B0 2B C2 A8 B2 90 FB
                                AA FE 66 5B EC 41 42 5D
12      HASH ALGORITHM  1       SHA-1
The final function included in the ITL file is the Certificate Authority Proxy Function (CAPF).
This certificate allows the phones to establish a secure connection to the CAPF service on the CUCM server so that the phone can install or update a Locally Significant Certificate (LSC).
        ITL Record #:4
                  ----
BYTEPOS TAG             LENGTH  VALUE
------- ---             ------  -----
1       RECORDLENGTH    2       455
2       DNSNAME         2
3       SUBJECTNAME     61      CN=CAPF-9c4cba7d;
                                OU=TAC;O=Cisco;L=RTP;ST=North Carolina;C=US
4       FUNCTION        2       CAPF
5       ISSUERNAME      61      CN=CAPF-9c4cba7d;
                                OU=TAC;O=Cisco;L=RTP;ST=North Carolina;C=US
6       SERIALNUMBER    8       0A:DC:6E:77:42:91:4A:53
7       PUBLICKEY       140
8       SIGNATURE       128
11      CERTHASH        20      C7 3D EA 77 94 5E 06 14 D2 90 B1
                                A1 43 7B 69 84 1D 2D 85 2E
12      HASH ALGORITHM  1       SHA-1

The ITL file was verified successfully.
The next section covers exactly what happens when a phone boots.
Phone Downloads ITL and Configuration File
After the phone boots and obtains an IP address as well as the address of a TFTP server, it asks for the CTL and the ITL files first.
This packet capture shows a phone request for the ITL file. If you filter on tftp.opcode == 1, you see every TFTP Read Request from the phone:
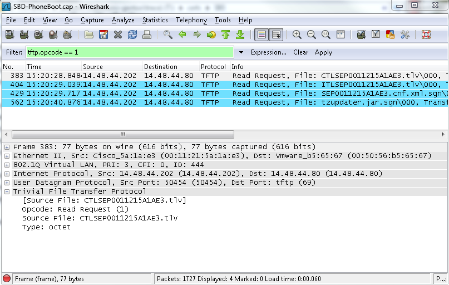
Since the phone received CTL and ITL files from TFTP successfully, the phone asks for a signed configuration file.
The phone console logs that show this behavior are available from the phone web interface:
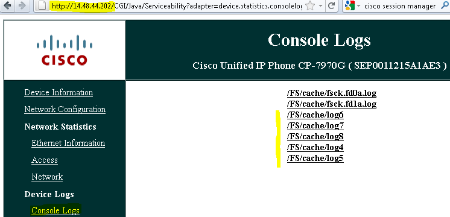
First the phone requests a CTL file, which succeeds:
837: NOT 09:13:17.561856 SECD: tlRequestFile: Request CTLSEP0011215A1AE3.tlv
846: NOT 09:13:17.670439 TFTP: [27]:Requesting CTLSEP0011215A1AE3.tlv from
14 . 48 . 44 . 80
847: NOT 09:13:17.685264 TFTP: [27]:Finished --> rcvd 4762 bytes
Next the phone also requests an ITL file:
868: NOT 09:13:17.860613 TFTP: [28]:Requesting ITLSEP0011215A1AE3.tlv from
14 . 48 . 44 . 80
869: NOT 09:13:17.875059 TFTP: [28]:Finished --> rcvd 5438 bytes
Phone Verifies ITL and Configuration File
After the ITL file is downloaded, it must be verified. There are a number of states that a phone can be in at this point, so this document covers them all.
- The phone has no CTL or ITL file present or ITL is blank because of the Prepare Cluster for Rollback to Pre 8.0 parameter. in this state, the phone blindly trusts the next CTL or ITL file downloaded and uses this signature henceforth.
- The phone already has a CTL but no ITL. In this state, the phone only trusts an ITL if it can be verified by the CCM+TFTP function in the CTL file.
- The phone already has a CTL and an ITL file. In this state, the phone verifies that the recently downloaded files match the signature in either the CTL, ITL, or TVS server.
Here is a flow chart that describes how the phone verifies signed files and HTTPS certificates:
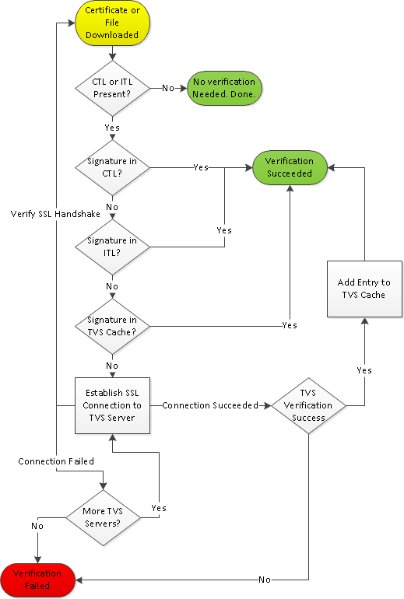
In this case, the phone is able to verify the signature in the ITL and CTL files. The phone already has both a CTL and ITL so it simply checked against them and found the correct signature.
877: NOT 09:13:17.925249 SECD: validate_file_envelope:
File sign verify SUCCESS; header length <296>
Since the phone downloaded the CTL and ITL files, from this point on it ONLY requests signed configuration files.
This illustrates that the phone logic is to determine that the TFTP server is secure, based on the presence of CTL and ITL, and then to ask for a signed file:
917: NOT 09:13:18.433411 tftpClient: tftp request rcv'd from /usr/tmp/tftp,
srcFile = SEP0011215A1AE3.cnf.xml, dstFile = /usr/ram/SEP0011215A1AE3.cnf.xml
max size = 550001
918: NOT 09:13:18.457949 tftpClient: auth server - tftpList[0] = ::ffff:
14 . 48 . 44 . 80
919: NOT 09:13:18.458937 tftpClient: look up server - 0
920: NOT 09:13:18.462479 SECD: lookupCTL: TFTP SRVR secure
921: NOT 09:13:18.466658 tftpClient: secVal = 0x9 922: NOT 09:13:18.467762
tftpClient: ::ffff:14 . 48 . 44 . 80 is a secure server
923: NOT 09:13:18.468614 tftpClient: retval = SRVR_SECURE
924: NOT 09:13:18.469485 tftpClient: Secure file requested
925: NOT 09:13:18.471217 tftpClient: authenticated file approved - add .sgn
-- SEP0011215A1AE3.cnf.xml.sgn
926: NOT 09:13:18.540562 TFTP: [10]:Requesting SEP0011215A1AE3.cnf.xml.sgn
from 14 . 48 . 44 . 80 with size limit of 550001
927: NOT 09:13:18.559326 TFTP: [10]:Finished --> rcvd 7652 bytes
Once the signed configuration file is downloaded, the phone must authenticate it against the Function for CCM+TFTP inside the ITL:
937: NOT 09:13:18.656906 SECD: verifyFile: verify SUCCESS
</usr/ram/SEP0011215A1AE3.cnf.xml>
Phone Contacts TVS for Unknown Certificate
The ITL file provides a TVS function which contains the certificate of the TVS service that runs on the CUCM server TCP port 2445.
TVS runs on all servers where the CallManager service is activated. The CUCM TFTP service uses the configured CallManager group in order to build a list of TVS servers the phone must contact on the phone configuration file.
Some labs use only a single CUCM server. In a multi-node CUCM cluster, there can be up to three TVS entries for a phone, one for each CUCM in the CUCM Group of the phone.
This example shows what happens when the Directories button on the IP phone is pressed. The Directories URL is configured for HTTPS, so the phone is presented with the Tomcat web certificate from the Directories server.
This Tomcat web certificate (tomcat.pem in OS Administration) is not loaded in the phone, so the phone must contact TVS in order to authenticate the certificate.
Refer to the previous TVS Overview diagram for a description of the interaction. Here is the phone console log perspective:
First you find the Directory URL:
1184: NOT 15:20:55.219275 JVM: Startup Module Loader|cip.dir.TandunDirectories:
? - Directory url https://14 . 48 . 44 . 80:8443/ccmcip/xmldirectory.jsp
This is a SSL/Transport Layer Security (TLS) secure HTTP session that requires verification.
1205: NOT 15:20:59.404971 SECD: clpSetupSsl: Trying to connect to IPV4, IP:
14 . 48 . 44 . 80, Port : 8443
1206: NOT 15:20:59.406896 SECD: clpSetupSsl: TCP connect() waiting,
<14 . 48 . 44 . 80> c:8 s:9 port: 8443
1207: NOT 15:20:59.408136 SECD: clpSetupSsl: TCP connected,
<14 . 48 . 44 . 80> c:8 s:9
1208: NOT 15:20:59.409393 SECD: clpSetupSsl: start SSL/TLS handshake,
<14 . 48 . 44 . 80> c:8 s:9
1209: NOT 15:20:59.423386 SECD: srvr_cert_vfy: Server Certificate
Validation needs to be done
The phone first verifies that the certificate presented by the SSL/TLS server is present in the CTL. Then the phone looks at the Functions in the ITL file in order to see if it finds a match.
This error message says "HTTPS cert not in CTL," which means "that certification cannot be found in the CTL or the ITL."
1213: NOT 15:20:59.429176 SECD: findByCertAndRoleInTL: Searching TL from CTL file
1214: NOT 15:20:59.430315 SECD: findByCertAndRoleInTL: Searching TL from ITL file
1215: ERR 15:20:59.431314 SECD: EROR:https_cert_vfy: HTTPS cert not in CTL,
<14 . 48 . 44 . 80>
After the direct contents of the CTL and ITL file are checked for the certificate, the next thing the phone checks is the TVS cache.
This is done in order to cut down on network traffic if the phone has recently asked the TVS server for the same certificate.
If the HTTPS certificate is not found in the phone cache, you can make a TCP connection to the TVS server itself.
1220: NOT 15:20:59.444517 SECD: processTvsClntReq: TVS Certificate
Authentication request
1221: NOT 15:20:59.445507 SECD: lookupAuthCertTvsCacheEntry: No matching
entry found at cache
1222: NOT 15:20:59.446518 SECD: processTvsClntReq: No server sock exists,
must be created
1223: NOT 15:20:59.451378 SECD: secReq_initClient: clnt sock fd 11 bound
to </tmp/secClnt_secd>
1224: NOT 15:20:59.457643 SECD: getTvsServerInfo: Phone in IPv4 only mode
1225: NOT 15:20:59.458706 SECD: getTvsServerInfo: Retreiving IPv4 address
1230: NOT 15:20:59.472628 SECD: connectToTvsServer: Successfully started
a TLS connection establishment to the TVS server: IP:14 . 48 . 44 . 80, port:2445
(default); Waiting for it to get connected.
Remember that the connection to TVS itself is SSL/TLS (secure HTTP, or HTTPS), so it is also a certificate that needs to be authenticated against the CTL ot ITL.
If everything goes correctly, the TVS server certificate is found in the TVS function of the ITL file. See ITL Record #3 in the previous example ITL file.
1244: NOT 15:20:59.529938 SECD: srvr_cert_vfy: Server Certificate Validation
needs to be done
1245: NOT 15:20:59.533412 SECD: findByIssuerAndSerialAndRoleInTL:
Searching TL from CTL file
1246: NOT 15:20:59.534936 SECD: findByIssuerAndSerialAndRoleInTL:
Searching TL from ITL file
1247: NOT 15:20:59.537359 SECD: verifyCertWithHashFromTL: cert hash and
hash in TL MATCH
1248: NOT 15:20:59.538726 SECD: tvs_cert_vfy: TVS cert verified with hash
from TL, <14 . 48 . 44 . 80>
Success! The phone now has a secure connection to the TVS server. The next step is to ask the TVS server "Hello, do I trust this Directories server certificate?"
This example shows the answer to that question - a response of 0 which means success (no error).
1264: NOT 15:20:59.789738 SECD: sendTvsClientReqToSrvr: Authenticate
Certificate : request sent to TVS server - waiting for response
1273: NOT 15:20:59.825648 SECD: processTvsSrvrResponse: Authentication Response
received, status : 0
Since there is a successful response from TVS, the results for that certificate are saved into the cache.
This means that, if you press the Directories button again within the next 86,400 seconds, you do not need to contact the TVS server in order to verify the certificate. You can simply access the local cache.
1279: NOT 15:20:59.837086 SECD: saveCertToTvsCache: Saving certificate
in TVS cache with default time-to-live value: 86400 seconds
1287: ERR 15:20:59.859993 SECD: Authenticated the HTTPS conn via TVS
Finally, you verify that your connection to the Directories server succeeded.
1302: ERR 15:21:01.959700 JVM: Startup Module Loader|cip.http.ae:?
- listener.httpSucceed:  https://14 . 48 . 44 . 80:8443/ccmcip/
xmldirectoryinput.jsp?name=SEP0011215A1AE3
Here is an example of what happens on the CUCM server where TVS runs. You can collect TVS logs with the Cisco Unified Real-Time Monitoring Tool (RTMT).
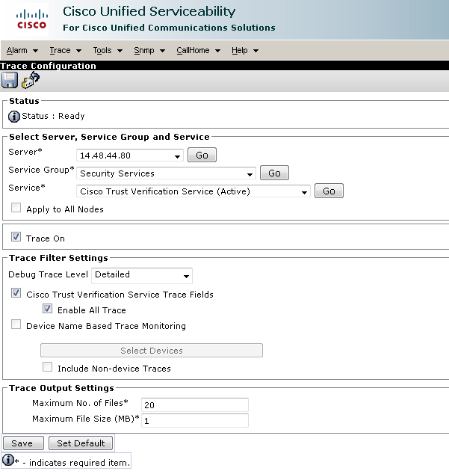
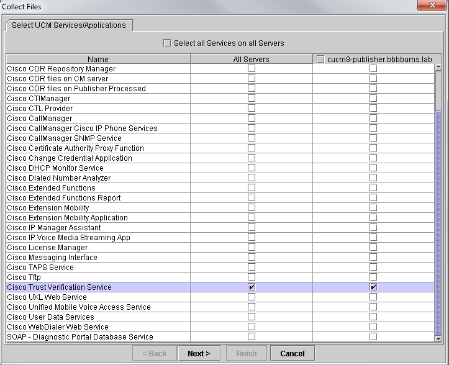
The CUCM TVS logs show that you SSL handshake with the phone, the phone asks TVS about the Tomcat certificate, then TVS responds to indicate that the certificate is matched in the TVS certificate store.
15:21:01.954 |   debug 14 . 48 . 44 . 202: tvsSSLHandShake Session ciphers - AES256-SHA
15:21:01.954 |   debug TLS HS Done for ph_conn .
15:21:02.010 |   debug     MsgType               : TVS_MSG_CERT_VERIFICATION_REQ
15:21:02.011 |   debug tvsGetIssuerNameFromX509 - issuerName : CN=CUCM8-
Publisher.bbbburns.lab;OU=TAC;O=Cisco;L=RTP;ST=North Carolina;C=US and Length: 75

15:21:02.011 |   debug CertificateDBCache::getCertificateInformation -
Certificate compare return =0
15:21:02.011 |   debug CertificateDBCache::getCertificateInformation -
Certificate found and equal
15:21:02.011 |   debug     MsgType               : TVS_MSG_CERT_VERIFICATION_RES
The TVS certificate store is a list of all certificates contained on the OS Administration > Certificate Management web page.
Manually Verify that Phone ITL Matches CUCM ITL
One common misconception seen while troubleshooting concerns the tendency to delete the ITL file with the hope that it resolves a file verification problem.
Sometimes ITL file deletion is required, but the ITL file only needs to be deleted when ALL of these conditions are met.
- The signature of the ITL file on the phone does not match the signature of the ITL file on the CM TFTP server.
- The TVS signature in the ITL file does not match the certificate presented by TVS.
- The phone shows "Verification Failed" when it attemps to download the ITL file or configuration files.
- No backup exists of the old TFTP private key.
Here is how you check the first two of these conditions.
First, you can compare the checksum of the ITL file present on CUCM with the checksum ITL file of the phone.
There currently is no way to look at the MD5sum of the ITL file on CUCM from CUCM itself until you run a version with the fix for this Cisco bug ID CSCto60209.
In the interim, run this with your favorite GUI or CLI programs:
jasburns@jasburns-gentoo /data/trace/jasburns/certs/SBD $ tftp 14 . 48 . 44 . 80
tftp> get ITLSEP0011215A1AE3.tlv
Received 5438 bytes in 0.0 seconds
tftp> quit
jasburns@jasburns-gentoo /data/trace/jasburns/certs/SBD $ md5sum
ITLSEP0011215A1AE3.tlv
b61910bb01d8d3a1c1b36526cc9f2ddc  ITLSEP0011215A1AE3.tlv
This shows that the MD5sum of the ITL file in CUCM is b61910bb01d8d3a1c1b36526cc9f2ddc.
Now you can look at the phone itself in order to determine the hash of the ITL file loaded there: Settings > Security Configuration > Trust List.
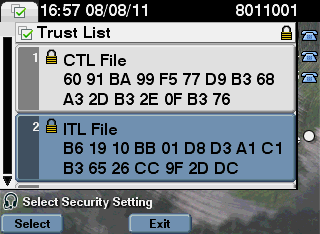
This shows that the MD5sums match. This means that the ITL file on the phone matches the file on the CUCM, so it does not need to be deleted.
If it DOES match, you need to move on to the next operation - determine whether or not the TVS certificate in the ITL matches the certificate presented by TVS. This operation is a bit more involved.
First, look at the packet capture of the phone that connects to the TVS server on TCP port 2445.
Right-click on any packet in this stream in Wireshark, click Decode As, and select SSL. Find the Server Certificate that looks like this:
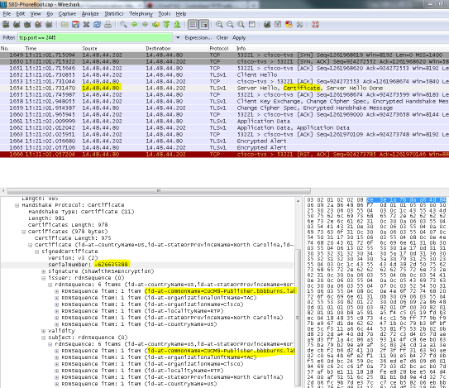
Look at the TVS certificate contained within the previous ITL file. You then see an entry with the serial number 2E3E1A7BDAA64D84.
admin:show itl
        ITL Record #:3
                  ----
BYTEPOS TAG             LENGTH  VALUE
------- ---             ------  -----
1       RECORDLENGTH    2       743
2       DNSNAME         2
3       SUBJECTNAME     76      CN=CUCM8-Publisher.bbbburns.lab;
                                OU=TAC;O=Cisco;L=RTP;ST=North Carolina;C=US
4       FUNCTION        2       TVS
5       ISSUERNAME      76      CN=CUCM8-Publisher.bbbburns.lab;
                                OU=TAC;O=Cisco;L=RTP;ST=North Carolina;C=US
6       SERIALNUMBER    8       2E:3E:1A:7B:DA:A6:4D:84
Success, the TVS.pem inside of the ITL file matches the TVS certificate presented on the network. You do not need to delete the ITL, and TVS presents the correct certificate.
If file authentication still fails, check the rest of the previous flow chart.
Restrictions and Interactions
Regenerate Certificates / Rebuild a Cluster / Certificate Expiration
The most important certificate is now the CallManager.pem certificate. This certificate private key is used in order to sign all TFTP configuration files, which includes the ITL file.
If the CallManager.pem file is regenerated, a new CCM+TFTP certificate is generated with a new private key. Additionally the ITL file is now signed by this new CCM+TFTP key.
After you regenerate CallManager.pem and restart the TVS and TFTP service, this happens when a phone boots.
- The phone attempts to download the new ITL file signed by the new CCM+TFTP from the TFTP server. The phone has only the old ITL file at this point, and the new keys are not in the ITL file present on the phone.
- Since the phone could not find the new CCM+TFTP signature in the old ITL, it attempts to contact the TVS service.
Note: This part is extremely important. The TVS certificate from the old ITL file must still match. If both the CallManager.pem and TVS.pem are regenerated at the same exact time, the phones are not able to download any new files without deleting the ITL from the phone manually.
- When the phone contacts TVS, the CUCM server that runs TVS has the new CallManager.pem certificate in the OS Certificate Store.
- The TVS server returns success and the phone loads the new ITL file into memory.
- The phone now attempts to download a configuration file, which has been signed by the new CallManager.pem key.
- Since the new ITL has been loaded, the newly signed configuration file is successfully verified by the ITL in memory.
Key Points:
- Never regenerate both the CallManager.pem and TVS.pem certificates at the same time.
- If either TVS.pem or CallManager.pem is regenerated, TVS and TFTP must be restarted and phones reset in order to obtain the new ITL files.
- Newer versions of CUCM handle this phone reset automatically and warn the user at certificate regeneration time.
- If more than one TVS server exists (more than one server in the CallManager Group), the additional servers can authenticate the new CallManager.pem certificate.
Move Phones Between Clusters
When you move phones from one cluster to another with ITLs in place, the ITL and TFTP Private Key must be taken into account.
Any new configuration file presented to the phone MUST match a signature in CTL, ITL, or a signature in the phone current TVS service.
This document explains how to make sure the new cluster ITL file and configuration files can be trusted by the current ITL file on the phone. https://supportforums.cisco.com/docs/DOC-15799.
Backup And Restore
The CallManager.pem certificate and private key are backed up via Disaster Recovery System (DRS). If a TFTP server is rebuilt, it MUST be restored from backup so that the private key can be restored.
Without the CallManager.pem private key on the server, phones with current ITLs that use the old key do not trust signed configuration files.
If a cluster is rebuilt and not restored from backup, it is exactly like the "Moving Phones Between Clusters" document. This is because a cluster with a new key is a different cluster as far as the phones are concerned.
There is one serious defect associated with backup and restore. If a cluster is susceptible to Cisco bug ID CSCtn50405, the DRS backups do not contain the CallManager.pem certificate.
This causes any server restored from this backup to generate corrupt ITL files until a new CallManager.pem is generated.
If there are no other functional TFTP servers that did not go through the backup and restore operation, this possibly means that all ITL files need to be deleted from the phones.
In order to verify if your CallManager.pem file needs to be regenerated, enter the show itl command followed by:
run sql select c.subjectname, c.serialnumber, c.ipv4address, t.name from
certificate as c, certificatetrustrolemap as r, typetrustrole as t where  c.pkid =
r.fkcertificate and t.enum = r.tktrustrole
In the ITL output, the key errors to look for are:
This etoken was not used to sign the ITL file.
and
Verification of the ITL file failed.
Error parsing the ITL file!!
The previous Structured Query Language (SQL) query searches for the certificates that have a role of "Authentication and Authorization."
The CallManager.pem certificate in the previous database query that has the role of Authentication and Authorization must also be present in the OS Administration Certificate Management web page.
If the previous defect is encountered, there is a mismatch between the CallManager.pem certificates in the query and in the OS web page.
Change Host Names or Domain Names
If you change the hostname or domain name of a CUCM server, it regenerates all certificates at once on that server. The certificate regeneration section explained that regeneration of both the TVS.pem and CallManager.pem is a "bad thing."
There are a few scenarios where a hostname change fails, and a few where it works without problems. This section covers all of them and links them back to the what you already know about TVS and ITL from this document.
Single Node Cluster with only ITL (use caution, this breaks without preparation)
- With a Business Edition server or publisher-only deployment, both the CallManager.pem and TVS.pem are regenerated at the same time when you change hostnames.
- If the hostname is changed on a single node cluster without first using the Rollback Enterprise parameter covered here, the phones are not able to verify the new ITL file or configuration files against their current ITL file.
- The phones are not able to connect to TVS because the TVS certificate is also no longer trusted.
- The phones display an error about "Trust List Verification Failed," no new configuration changes take effect, and secure service URLs fail.
- The only solution if the precaution in step 2 is not first taken is to manually delete the ITL from every phone.
Single Node Cluster with both CTL and ITL (this can be temporarily broken, but easily fixed)
- After you run through the rename of servers, rerun the CTL client. This places the new CallManager.pem certificate in the CTL file that the phone downloads.
- New configuration files, which include the new ITL files, can be trusted based on the CCM+TFTP function in the CTL file.
- This works because the updated CTL file is trusted based on a USB eToken private key that remains the same.
Multi-Node Cluster with only ITL (this generally works, but can be permanently broken if done hastily)
- Because a multi-node cluster has multiple TVS servers, any single server can have its certificates regenerated without a problem. When the phone is presented with this new, unfamiliar signature, it asks another of the TVS servers to verify the new server certificate.
- There are two main problems that can cause this to fail:
- If all servers are renamed and rebooted at the same time, none of the TVS servers are reachable with known certificates when the servers and phones come back up.
- If a phone has only a single server in the CallManager Group, the additional TVS servers make no difference. See the "Single Node Cluster" scenario in order to resolve this, or add another server to the phone CallManager Group.
Multi-Node Cluster with both CTL and ITL (this cannot be permanently broken)
- After you run through the renames, the TVS service authenticates the new certificates.
- Even if all TVS servers are unavailable for some reason, the CTL client can still be used in order to update the phones with the new CallManager.pem CCM+TFTP certificates.
Centralized TFTP
When a phone with an ITL boots, it requests these files: CTLSEP<MAC Address>.tlv, ITLSEP<MAC Address>.tlv, and SEP<MAC Address>.cnf.xml.sgn.
If the phone cannot find these files, it requests the ITLFile.tlv and the CTLFile.tlv, which a centralized TFTP server provides to any phone that requests it.
With centralized TFTP, there is a single TFTP cluster that points to a number of other sub clusters.
Often this is done because phones on multiple CUCM clusters share the same DHCP scope, and therefore must have the same DHCP Option 150 TFTP server.
All IP phones point to the central TFTP cluster, even if they register to other clusters. This central TFTP server queries the remote TFTP servers whenever it receives a request for a file it cannot find.
Because of this operation, centralized TFTP only works in an ITL homogeneous environment.
All servers must run CUCM Version 8.x or later, or all servers must run versions prior to Version 8.x.
If an ITLFile.tlv is presented from the Centralized TFTP server, phones do not trust any files from the remote TFTP server because the signatures do not match.
This happens in a heterogenous mix. In a homogeneous mix, the phone requests ITLSEP<MAC>.tlv which is pulled from the correct remote cluster.
In a heterogeneous environment with a mix of pre-Version 8.x and Version 8.x clusters, the "Prepare Cluster for Rollback to Pre 8.0" must be enabled on the Version 8.x cluster as described in Cisco bug ID CSCto87262 .
Configure the "Secured Phone URL Parameters" with HTTP instead of HTTPS. This effectively disables the ITL functions on the phone.
Frequently Asked Questions
Can I turn off SBD?
You can only turn off SBD if SBD and ITL currently work.
SBD can be temporarily disabled on phones with the Prepare Cluster for Rollback to pre 8.0" Enterprise Parameter and by configuring the "Secured Phone URL Parameters" with HTTP instead of HTTPS.
When you set the Rollback parameter, it creates a signed ITL file with blank function entries.
The "empty" ITL file is still signed, so the cluster must be in a fully functional security state before this parameter can be enabled.
After this parameter is enabled and the new ITL file with blank entries is downloaded and verified, the phones accept any configuration file, no matter who has signed it.
It is not recommended to leave the cluster in this state, because none of the three functions previously metioned (authenticated configuration files, encrypted configuration files, and HTTPS URLs) are available.
Can I easily delete the ITL file from all phones once the CallManager.pem is lost?
There is currently no method to delete all ITLs from a phone remotely provided by Cisco. That is why the procedures and interactions described in this document are so important to take into account.
There is a currently an unresolved enhancement to Cisco bug ID CSCto47052 that requests this functionality, but it has not yet been implemented.
In the interim period, a new feature has been added via Cisco bug ID CSCts01319 that possibly allows the Cisco Technical Assistance Center (TAC) to revert to the previously trusted ITL if it is still available on the server.
This only works in certain instances where the cluster is on a version with this defect fix, and where the previous ITL exists in a backup stored in a special location on the server.
View the defect to see if your version has the fix. Contact Cisco TAC in order to run through the potential recovery procedure explained in the defect.
If the previous procedure is not available, the phone buttons must be pushed manually on the phone in order to delete the ITL file. This is the trade-off that is made between security and ease of administration. In order for the ITL file to be truly secure, it must not be easily removed remotely.
Even with scripted button presses with Simple Object Access Protocol (SOAP) XML objects, the ITL cannot be remotely removed.
This is because, at this point, TVS access (and thus Secure Authentication URL access to validate incoming SOAP XML button push objects) is nonfunctional.
If the authentication URL is not configured as secure, it is possible to script the key presses in order to delete an ITL, but this script is not available from Cisco.
Other methods in order to script remote key presses without using the Authentication URL are possibly available from a third party, but these applications are not provided by Cisco.
The most frequently used method in order to delete the ITL is an email broadcast to all phone users that instructs them of the key sequence.
If settings access is set to Restricted or Disabled, the phone needs to be factory reset, as users do not have access to the Settings menu of the phone.
Revision History
| Revision | Publish Date | Comments |
|---|---|---|
2.0 |
14-Jul-2023 |
Recertification |
1.0 |
27-May-2013 |
Initial Release |
Contributed by Cisco Engineers
- Jason Burns
Contact Cisco
- Open a Support Case

- (Requires a Cisco Service Contract)
 Feedback