Introduction
This document describes the steps to set up RADKit and shows the configuration necessary to start the use of it with Collaboration Products.
Requirements
Cisco recommends that you have knowledge on these topics:
- Basic knowledge of any VOS Collaboration product
- Basic knowledge of CLI/SSH Access
Components Used
The information in this document is based on these software and hardware versions:
- Cisco Unified Communications Manager 12.5 and 14.0
The information in this document was created from the devices in a specific lab environment. All of the devices used in this document started with a cleared (default) configuration. If your network is live, ensure that you understand the potential impact of any command.
Terminology
RADKit: It is a connector providing secure remote access to the user devices to Cisco TAC engineers and partners. It supports multiple protocols to interact with devices, such as SSH or HTTP/HTTPs.
RADKit Service: This is the Server side. It is handled and entirely managed by the User. From the Server side, user controls, who canaccess the devices and for how long. Radkit Service must have conectivity to the devices in the network to provide access to them.
RADKit Client: This is the Client side. It is the PC used to connect to the devices in the user network.
RADKit Architecture
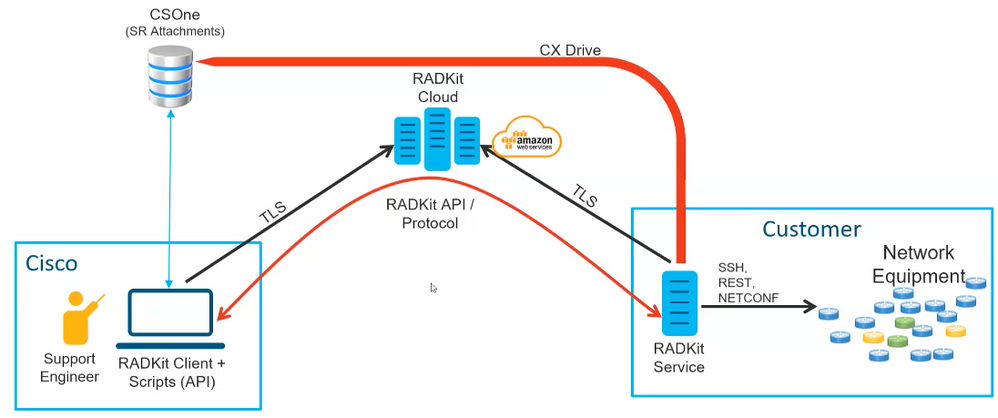 RADKit Architecture
RADKit Installation
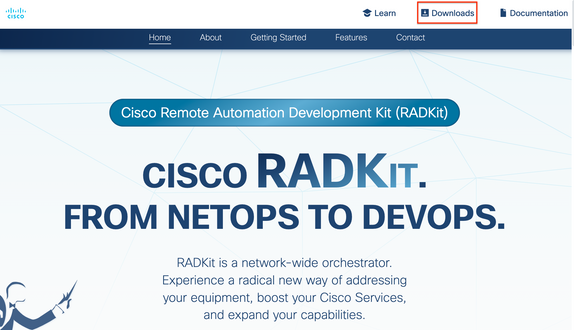
Step 1. Navigate to https://radkit.cisco.com and click Downloads, then go to the release folder.

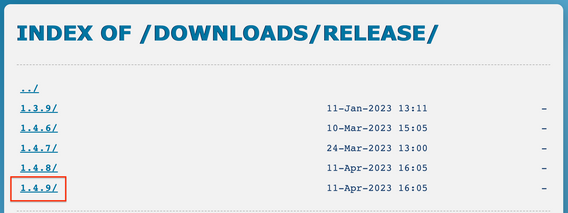
Step 2. Click the latest release.
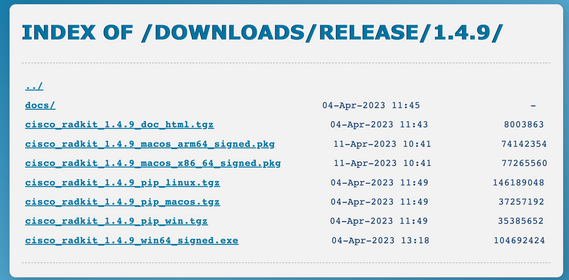
Step 3. Download the correct file depending on your OS system.
Step 4. Run the installer on the PC or server. As part of the installation, Radkit needs to install three applications: Radkit Service, Radkit Client and Radkit network console.
RADKit Service (User side)
Onboarding
Step 1. To start configuring the RADKit service, navigate to Applications and locate RADKit Service. The first time you run it shows a message "not yet bootstrapped".
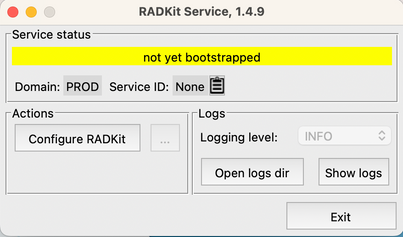
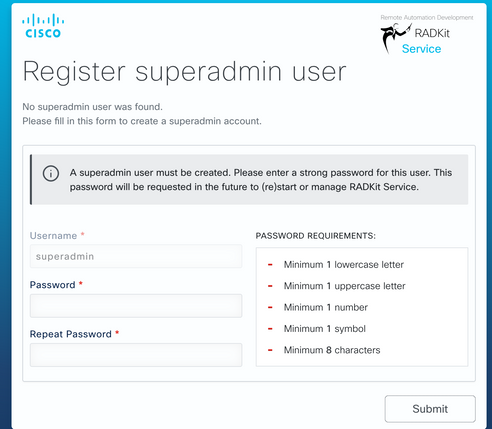
Step 2. Click Configure RADKit, the browser pops up automatically with URL https://localhost:8081/bootstrap.
- Create password for superadmin user and click Submit.
- This superadmin username and password is requested each time the service is started or configured.
Step 3. Once you click Submit, the browser redirects you to https://localhost:8081/#/connectivity/.
Under Connectivity > Service Enrollment, there are two authentications methods: Single Sing-On and One-Time Password.
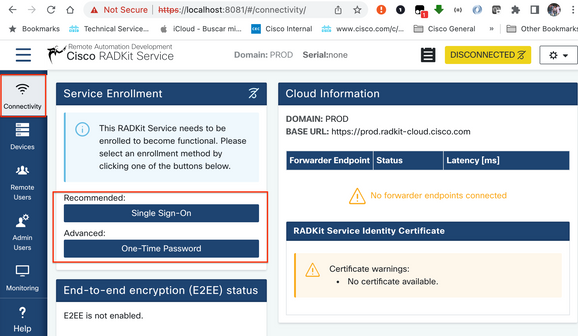
Step 4. You can use Single Sign-On providing your CEC.
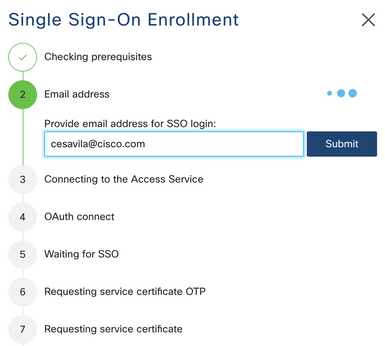
Step 5. Complete the wizard and complete the steps until it shows "Service enrolled with new identity: xxxx-xxxx-xxxx", and when clicking on Close the service shows as Connected.


Note: A Cisco account is needed to activate RADKit Service.

Caution:
- If the Server where the RADKit Service is running requires a proxy to be defined, apart from defining the Proxy on the Server/PC itself, a environment variable also needs to be defined for the RADKit Service to work RADKIT_CLOUD_CLIENT_PROXY_URL=http://proxy.example.com:80.
Add devices
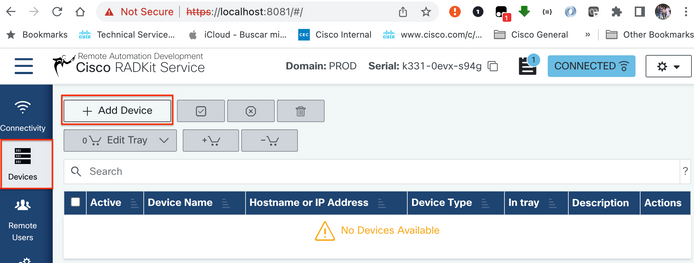
Step 1. Navigate to Devices and click Add Device.
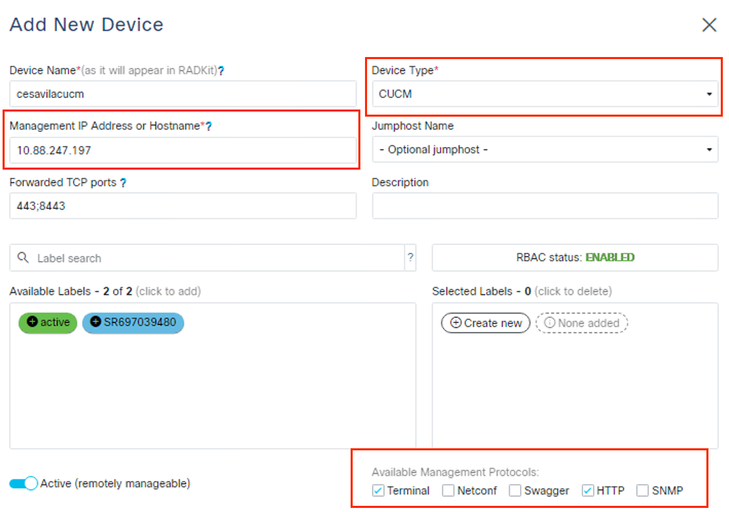
Step 2. You need to configure the next details:
- Device Name
- Management IP address or Hostname
- Device Type
Additionally, you must configure Forwarded TCP ports, which are ports used by the device that need to be accessible from the RADKit Client. On this example,the ports used are 443 for GUI Access and 8443 for RTMT.
Finally, select the available Management Protocols, in this case Terminal and HTTP.
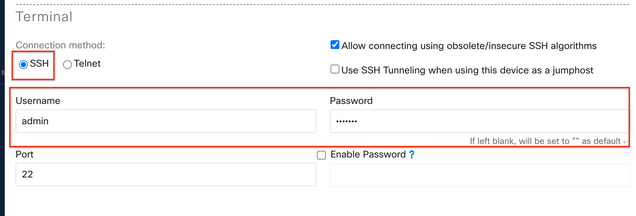
Step 3. For each Management Protocol configure the correct settings and click Add & Close.
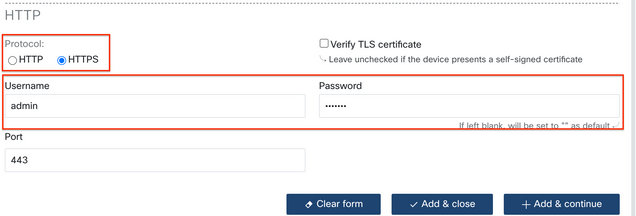
Step 4. Once added, the device must be displayed in the device list, it can be enabled/disabled for remote access.

Authorize remote users
Step 1. In order to grant user access to the Devices configured in the RADKit Service, go to Remote Users and select Add Users.

Step 2. Configure the user details:
- Email address
- Full Name (optional)
- Activate the user.
- Specify if the Activation must be Manually controlled or set a time frame to grant access to that user.
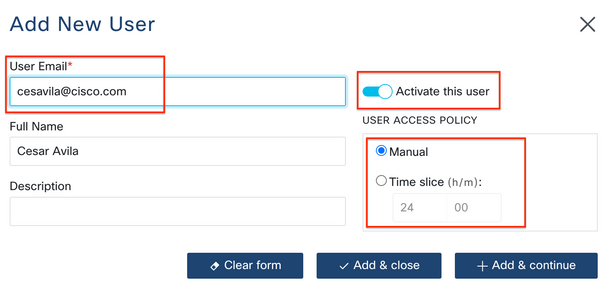
Step 3. Select Add & Close.
RADkit Client (TAC side)
Login
Step 1. On the Client PC, navigate to Applications and locate RADkit Client.
Step 2. Create a client instance with your SSO login.
>>> client = sso_login("cesavila@cisco.com")
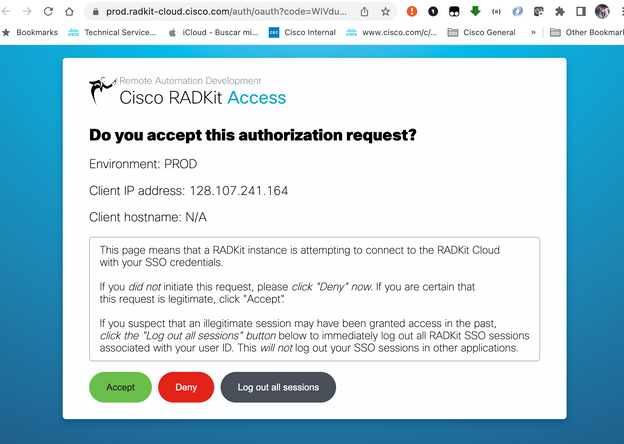
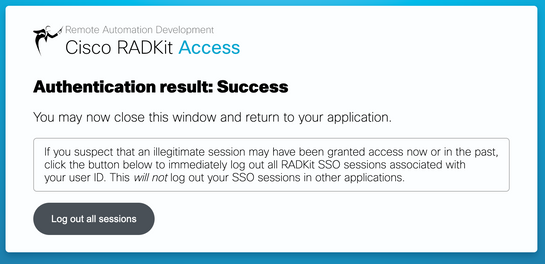
Step 3. Accept the SSO Authorization Request opened automatically on your browser.
Step 4. Create a service instance using the user generated Serial Number from the RADKit Service - Onboarding stage.

>>> service = client.service("k331-0evx-s94g")

Note: service is a variable that can be anything.
Step 5. Check the devices available for access.
>>> service.inventory

To refresh the inventory list, use the command update_inventory.
SSH Access
Step 1. Create an object from the inventory list.
>>> cucm = service.inventory['cesavilacucm']
![cucm = service.inventory['cesavilacucm']](/c/dam/en/us/support/docs/unified-communications/unified-communications-manager-version-14/222048-set-up-radkit-applied-in-the-collaborati-24.png)
Step 2. Start the SSH session with the interactive command.
>>> cucm.interactive()
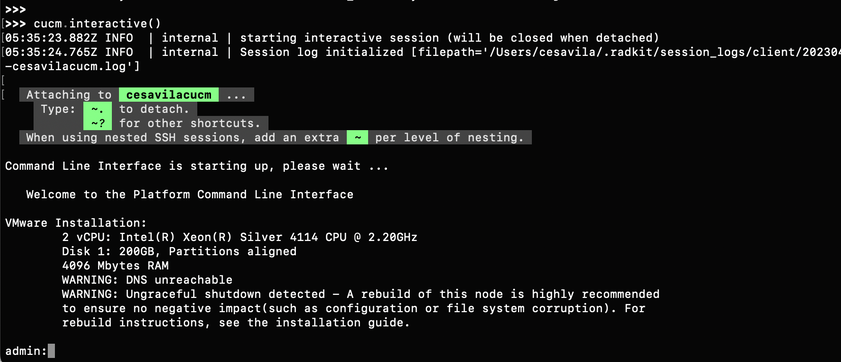
Step 3. Now you are able to manage the device normally.

Caution:
- Always be mindful of our responsibility when operating in a user environment.
- RADKit must be used as a data collection tool.
- Never do any changes without the user permission.
- Document all your findings in the case notes.
GUI Access
Step 1. Ensure the HTTP Credentials are added in the RADKit Service on the device configuration.
Step 2. Start the HTTP Proxy on the Radkit Client and define the Local port used to connect to the Proxy.
>>> http_proxy = client.start_http_proxy(4001)

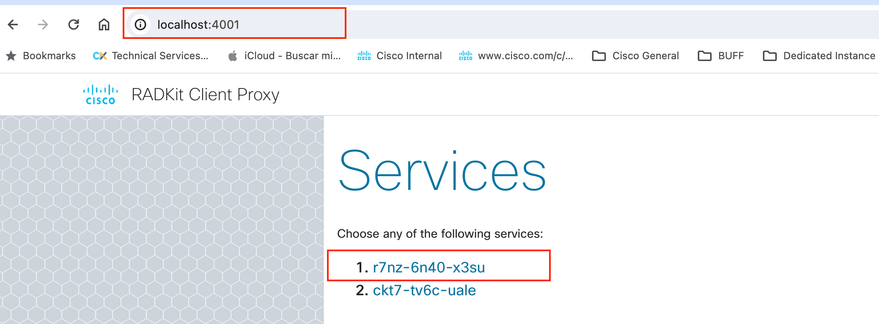
Step 3. From the Web Browser, navigate to https://localhost:4001 and select the Service you want to connect to.
Step 4. Click the option Go to Web Page on the correct device to connect to its Web Page.
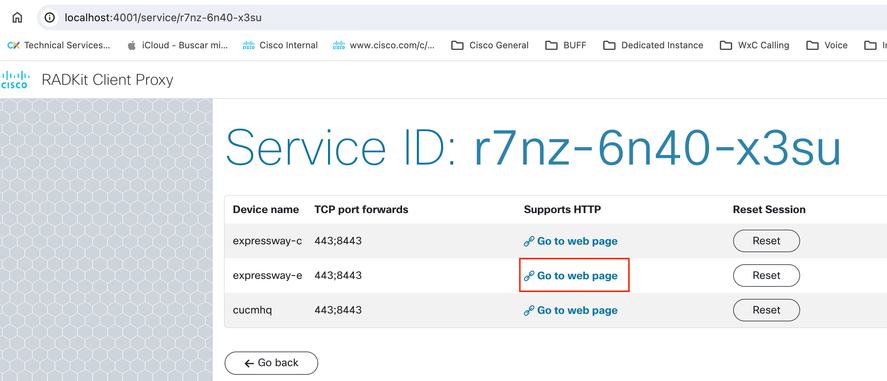

Note: The first time HTTP Proxy is setup on a RADKit Client, it is recommended to click on the option Reset for each Devices before attempting to open the Device Web Page.
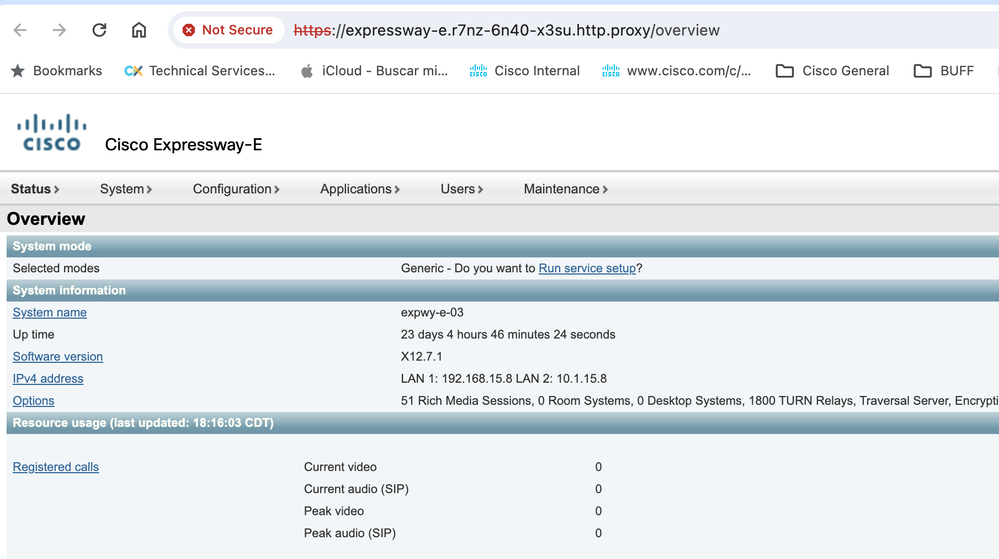
Step 5. The Web Page is displayed.
Step 1. Verify the TCP Forwarded ports configured for the device.
>>> cucm.forwarded_tcp_ports

Step 2. Configure a local port to be mapped with the destination port of the device, you must use the local port to access the device GUI.
>>> cucm.forward_tcp_port(local_port=8443, destination_port=443)

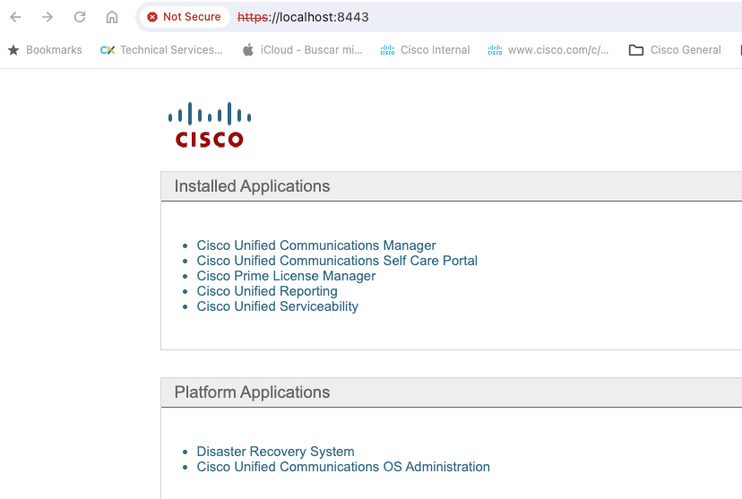
Step 3. Open your browser and type the URL with the port configured in Step 2: https://localhost:8443.
The GUI of the device is now accessible.

Note: To access the GUI of the product you still need the credentials to be able to login, therefore it is recommended for user to create a Read-Only User Account for access.
Log Collection
Step 1. Verify that port 8443 is listed in the TCP Forwarded ports configured for the device.
>>> cucm.forwarded_tcp_ports

Step 2. Configure the same port 8443 as local port to be mapped with port 8443 as the destination port of the device.
>>> cucm.forward_tcp_port(local_port=8443, destination_port=8443)

Step 3. Open RTMT and type 127.0.0.1 in the Host IP Address, it automatically uses port 8443.
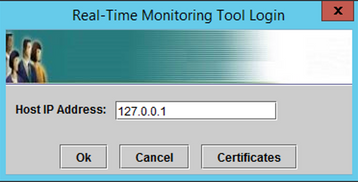
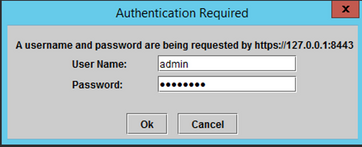
Step 4. Login with the correct credentials.
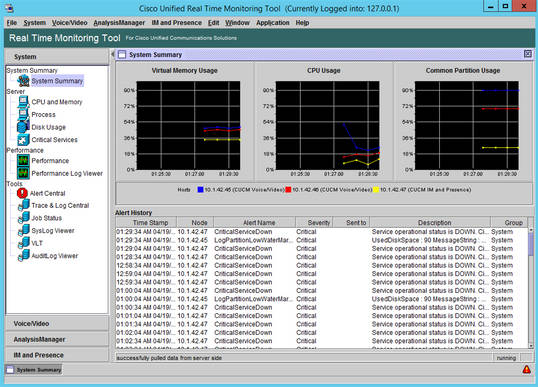
Step 5. RTMT displays.
Step 6. Go to AnalysisManager on the left panel.
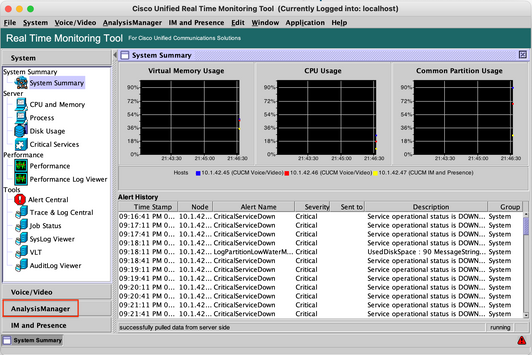
Step 7. Click Nodes and Add to configure the details of the device to be added using localhost and the forwarded TCP Port.
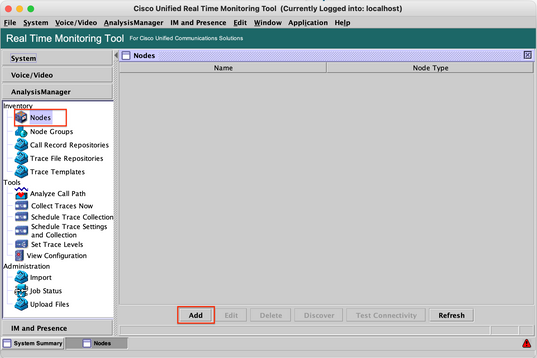
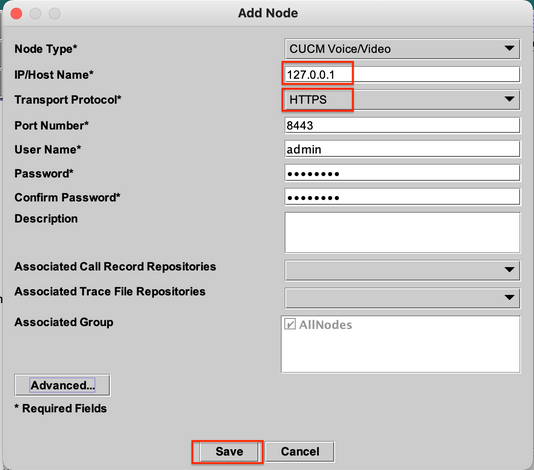
Step 8. Click Analysis Manager on the menu at the top and select Preferences.

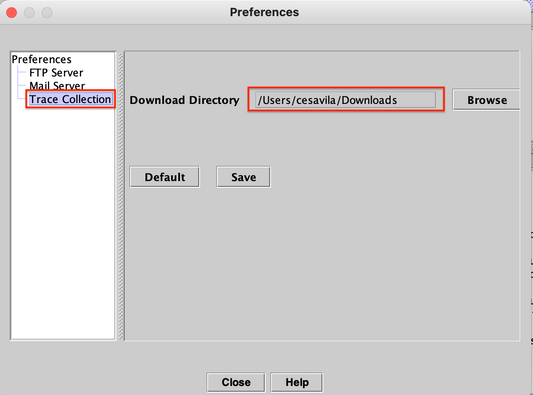
Step 9. Go to Trace Collection and select the Correct folder to download the logs, Click Save and then Close.
Step 10. Go to Collect Traces now.
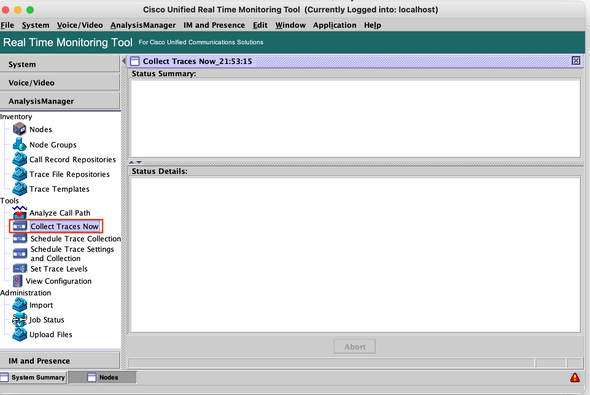
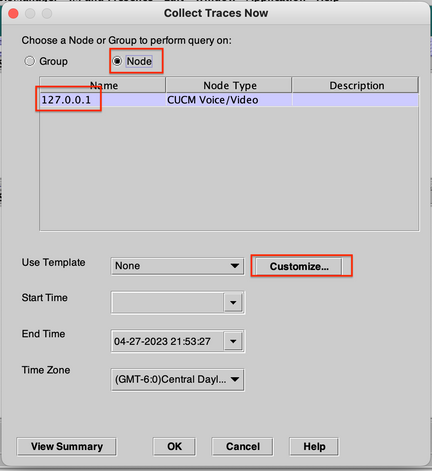
Step 11. Select the option Node, select the device that was added on Step 7 and click Customize.
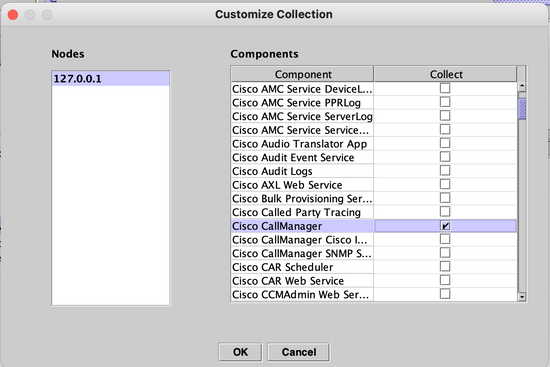
Step 12. Select the logs to be collected from the device and click OK.
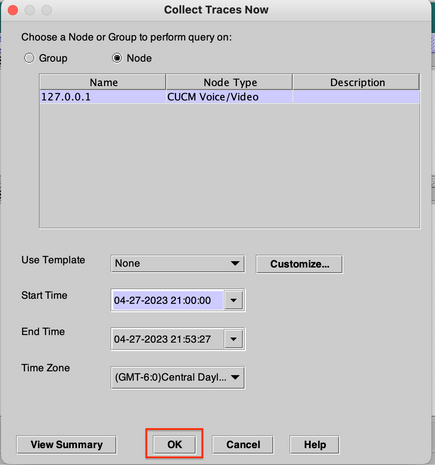
Step 13. Finally select Start Time and End Time of the logs to be collected and click OK.
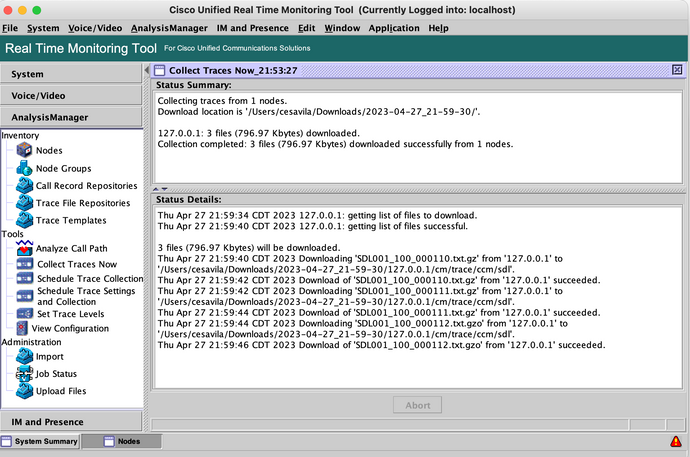
Step 14. Files are downloaded to the local PC (RADKit Client PC) successfully.
SOAP API is currently supported for CUCM. Additionally, Swagger is supported for CMS, Expressway, CVP, and so on.
Step 1. Ensure the HTTP Credentials are added in the RADKit Service on the device configuration.
Step 2. Run the HTTP Post command on the RADKit Client, specify the resource path, request body with the necessary parameters and headers.


Note: The postprocessors option 'cucm-extract' is used to remove the HTTP Response headers to be able to save the log to a file.

Step 3. Save the content to a file to get the Trace File saved in the local PC.
>>> content = r.content
>>> with open('SDL002_100_000819.txt.gz', 'wb') as file:
        file.write(content)
RADKit Use Cases
As it has been highlighted, RADKit provides a secure connection to the network devices including Collaboration servers without the need of being on a webex. The idea is to simplify some of the challenges around data collection by providing on demand access to the required devices.
Talking specifically about Collaboration deployments, RADKit currently can be very useful for a variety of issues such as:
- DB Replication issues.
- Certificate regeneration procedures.
- System Health check.
- Configuration validation in GUI / CLI.
- Log Collection through Web Interface (E.g. CER, Expressway, CIMC, etc).
- Debug logs via CLI on Voice Gateways.
Related Information


![cucm = service.inventory['cesavilacucm']](/c/dam/en/us/support/docs/unified-communications/unified-communications-manager-version-14/222048-set-up-radkit-applied-in-the-collaborati-24.png)


 Feedback