Introduction
This document describes how to reuse the Multi-SAN Tomcat certificate for CallManager on a Cisco Unified Communications Manager (CUCM) server.
Prerequisites
Requirements
Cisco recommends that you have knowledge of these topics:
- CUCM certificates
- Real-Time Monitoring Tool (RTMT)
- Identity Trust List (ITL)
Components Used
The information in this document is based on CUCM 14.0.1.13900-155.
The information in this document was created from the devices in a specific lab environment. All of the devices used in this document started with a cleared (default) configuration. If your network is live, ensure that you understand the potential impact of any command.
Background Information
The two main services for CUCM are Tomcat and CallManager. In the earlier versions, different certificates for each service were required for the complete cluster. In CUCM version 14, a new feature was added to reuse the Multi-SAN Tomcat certificate for CallManager service as well. The benefits of using this feature are:
- Reduces the cost of getting two certificates signed by a Public Certificate Authority(CA) for one cluster of CA-signed certificates.
- This feature reduces the size of the ITL file, thereby reducing the overhead.
Configure

Caution: Before you upload a Tomcat certificate, verify Single sign-on (SSO) is disabled. In case it is enabled, SSO must be disabled and re-enabled once the Tomcat certificate regeneration process is finished.
1. Set Tomcat Certificate as Multi-SAN
In CUCM 14, the Tomcat Multi-SAN certificate can be Self-Signed or CA-signed. If your Tomcat certificate is already Multi-SAN, skip this section.
Self-Signed
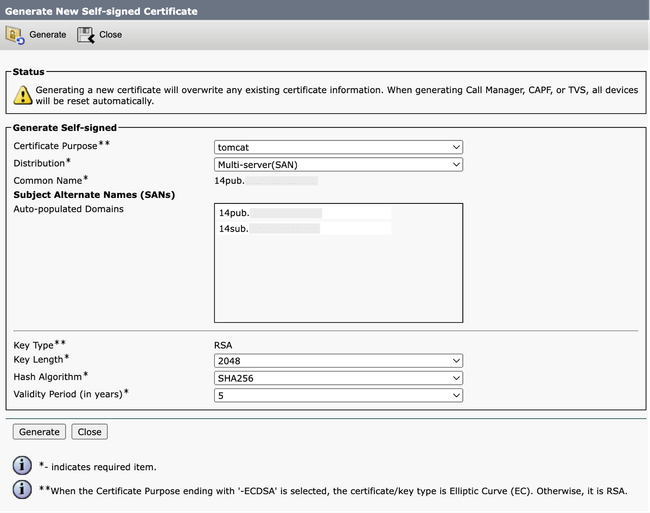
Step 1. Log in to Publisher > Operating System (OS) Administration and navigate to Security > Certificate Management > Generate Self-Signed.
Step 2. Choose Certificate Purpose: tomcat > Distribution: Multi-Server SAN. It auto-populates the SAN domains and the parent domain.
 Generate Self-Signed Multi-SAN Tomcat Certificate Screen
Step 3. Click Generate, and validate that all your nodes are listed under the Certificate upload operation successful message. Click Close.
 Generate Self-Signed Multi-SAN Tomcat Successful Message
Step 4. Restart Tomcat service, open a CLI session to all the nodes of the cluster, and run utils service restart Cisco Tomcat command.
Step 5. Navigate to the Publisher > Cisco Unified Serviceability > Tools > Control Center - Network Services and restart the Cisco DRF Master Service and Cisco DRF Local Service.
Step 6. Navigate to each Subscriber > Cisco Unified Serviceability > Tools > Control Center - Network Services and restart Cisco DRF Local Service.
CA-Signed
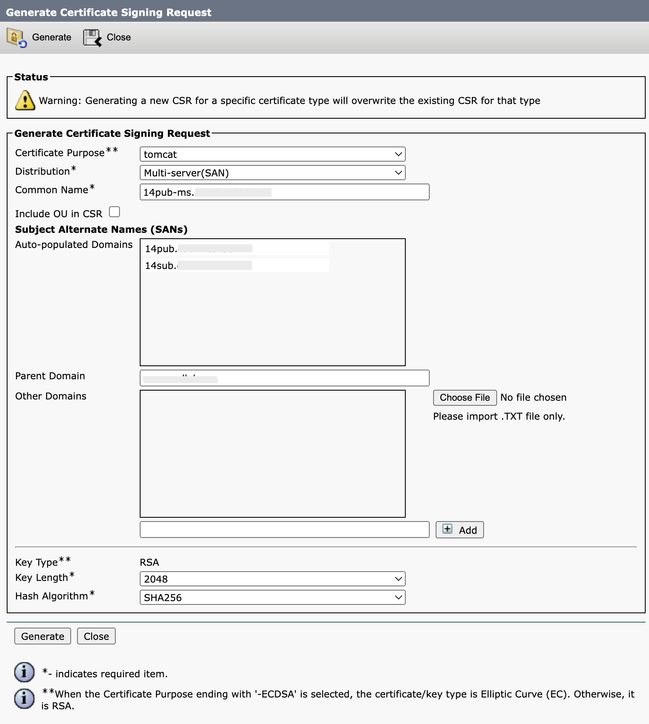
Step 1. Log in to Publisher > Operating System (OS) Administration and navigate to Security > Certificate Management > Generate CSR.
Step 2. Choose Certificate Purpose: tomcat > Distribution: Multi-Server SAN. It auto-populates the SAN domains and the parent domain.
 Generate Multi-SAN CSR for Tomcat Certificate Screen
Step 3. Click Generate, and validate all your nodes are listed under the CSR export operation successful message. Click Close.
 Generate Multi-SAN CSR Tomcat Successful Message
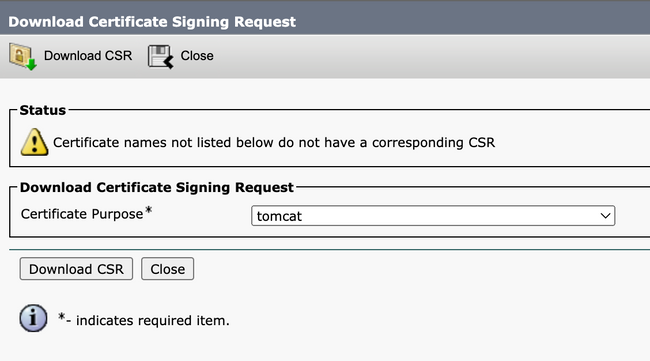
Step 4. Click Download CSR > Certificate Purpose: tomcat > Download.
 Download Tomcat CSR Screen
Step 5. Send the CSR to your CA for signing.
Step 6. In order to upload the CA trust chain, navigate Certificate Management > Upload certificate > Certificate Purpose: tomcat-trust. Set the description of the certificate and browse the trust-chain files.
Step 7. Upload the CA-signed certificate, navigate to Certificate Management > Upload certificate > Certificate Purpose: tomcat. Set the description of the certificate and browse the CA-signed certificate file.
Step 8. Restart the Tomcat service, open a CLI session to all the nodes of the cluster, and run the utils service restart Cisco Tomcat command.
Step 9. Navigate to the Publisher > Cisco Unified Serviceability > Tools > Control Center - Network Services and restart the Cisco DRF Master Service and Cisco DRF Local Service.
Step 10. Navigate to each Subscriber > Cisco Unified Serviceability > Tools > Control Center - Network Services and restart Cisco DRF Local Service.
2. Reuse Tomcat Certificate for CallManager

Caution: For CUCM 14, a new enterprise parameter Phone Interaction on Certificate Update is introduced. Use this field to reset phones either manually or automatically as applicable when one of the TVS, CAPF, or TFTP (CallManager/ITLRecovery) certificates are updated. This parameter is by default set to reset the phones automatically
Step 1. Navigate to your CUCM publisher, and then to Cisco Unified OS Administration > Security > Certificate Management.
Step 2. Click Reuse Certificate.
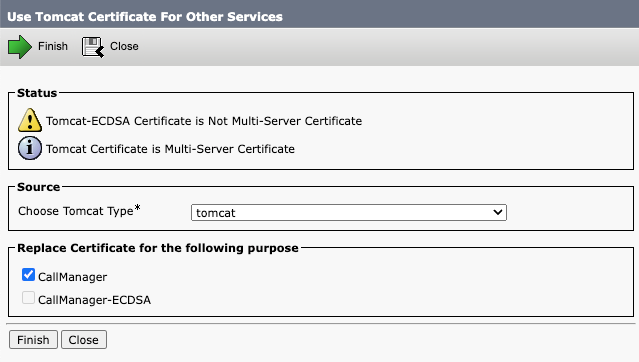
Step 3. From the choose Tomcat type drop-down list, choose tomcat.
Step 4. From the Replace Certificate for the following purpose pane, check the CallManager check box.
 Reuse Tomcat Certificate for Other Services Screen

Note: If you choose Tomcat as the certificate type, CallManager is enabled as the replacement. If you choose tomcat-ECDSA as the certificate type, CallManager-ECDSA is enabled as the replacement.
Step 5. Click Finish in order to replace the CallManager certificate with the Tomcat Multi-SAN certificate.
 Reuse Tomcat Certificate Successful Message
Step 6. Restart the Cisco HAProxy service, open a CLI session to all the nodes of the cluster, and run the utils service restart Cisco HAProxy command.

Note: In order to determine if the cluster is in Mixed Mode, navigate to Cisco Unified CM Administration > System > Enterprise Parameters > Cluster Security Mode (0 == Non-Secure; 1 == Mixed Mode).
Step 7. If your cluster is in Mixed Mode, open a CLI session to the Publisher node, and run utils ctl update CTLFile command, and reset all the phones of the cluster for the CTL file updates to take effect.
Verify
Step 1. Navigate to your CUCM publisher and then to Cisco Unified OS Administration > Security > Certificate Management.
Step 2. Filter by Find Certificate List where: Usage > begins with: identity and click Find.
Step 3. CallManager and Tomcat certificates must end with the same Common Name_Serial Number value.
 Verify Tomcat Certificate Reuse for CallManager
Related Information


 Feedback