Configure and Troubleshoot Collaboration Edge (MRA) Certificates
Available Languages
Download Options
Bias-Free Language
The documentation set for this product strives to use bias-free language. For the purposes of this documentation set, bias-free is defined as language that does not imply discrimination based on age, disability, gender, racial identity, ethnic identity, sexual orientation, socioeconomic status, and intersectionality. Exceptions may be present in the documentation due to language that is hardcoded in the user interfaces of the product software, language used based on RFP documentation, or language that is used by a referenced third-party product. Learn more about how Cisco is using Inclusive Language.
Contents
Introduction
This document describes certificates in regards to Mobile Remote Access (MRA) deployments.
Prerequisites
Requirements
There are no specific requirements for this document.
Components Used
This document is not restricted to specific software and hardware versions.
The information in this document was created from the devices in a specific lab environment. All of the devices used in this document started with a cleared (default) configuration. If your network is live, ensure that you understand the potential impact of any command.
Background Information
Public vs. Private Certificate Authority (CA)
There are a number of options to sign certificates on the Expressway-C and E servers. You can opt to have the Certificate Signing Request (CSR) signed by a public CA such as GoDaddy, Verisign, or others, or you can sign it internally if you use your own Certificate Authority (can either be self-signed with OpenSSL or an internal enterprise CA such as a Microsoft Windows server). For more information on how to create and sign the CSRs used by any of these methods please see the Video Communication Server (VCS) Certificate Creation Guide.
The only server that is really required to be signed by a public CA is the Expressway-E. This is the only server where the clients see the certificate when they sign in via MRA, therefore, use a public CA to ensure that users do not have to manually accept the certificate. The Expressway-E can work with an internal CA-signed certificate, but first-time users would be prompted to accept the untrusted certificate. MRA registration of 7800 and 8800 series phones would not work with internal certificates because their certificate trust list cannot be modified. For simplicity, it is suggested that your Expressway-C and Expressway-E certificates both be signed by the same CA; however, this is not a requirement as long as you properly configured the trusted CA lists on both servers.
How Certificate Chains Work
Certificates are linked together in a chain of two or more used to verify the source that signed the certificate of the server. There are three types of certificates in a chain; the client/server certificate, intermediate certificate (in some cases), and the root certificate (also referred to as the root CA as this is the highest level authority that signed the certificate).
Certificates contain two primary fields that build the chain; the subject, and the issuer.
The subject is the name of the server or authority that this certificate represents. In the case of an Expressway-C or Expressway-E (or other Unified Communications (UC) devices), this is built from the Fully Qualified Domain Name (FQDN).
The issuer is the authority that validated that specific certificate. Since anyone can sign a certificate (which includes the server that created the certificate, to begin with, also known as self-signed certificates), servers and clients have a list of issuers or CAs that they trust as authentic.
A certificate chain always ends with a self-signed top-level or root certificate. As you move through the certificate hierarchy, each certificate has a different issuer in relation to the subject. Eventually, you would encounter the root CA where the subject and issuer match. This indicates that it is the top-level certificate and thus, the one that needs to be trusted by a client or server's trusted CA list.
SSL Handshake Summary
In the case of the traversal zone, the Expressway-C always acts as the client while the Expressway-E always is the server. The simplified exchange works as shown:
Expressway-C Expressway-E
---------Client Hello-------->
<--------Server Hello---------
<----Server Certificate-------
<----Certificate Request---
------Client Certificate------>
The key here is in the exchange since the Expressway-C always initiates the connection, and thus is always the client. The Expressway-E is the first one to send its certificate. If the Expressway-C cannot validate this certificate, it tears down the handshake and cannot send its own to the Expressway-E.
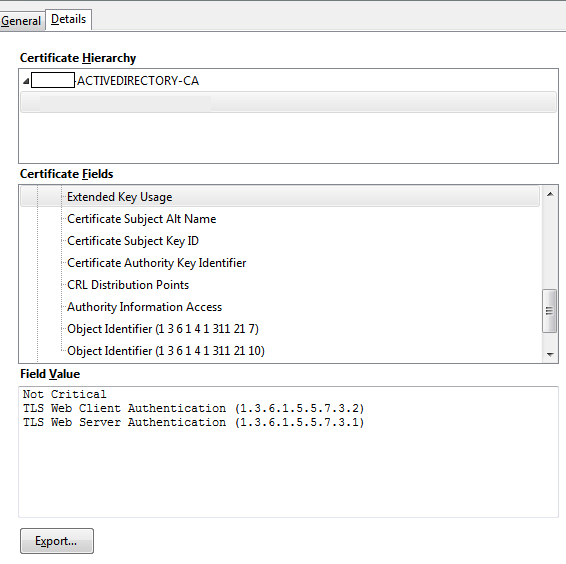
Another important thing to note is the Transport Layer Security (TLS) web client authentication and TLS web server authentication attributes on certificates. These attributes are determined on the CA that signed the CSR (if a Windows CA is used, this is determined by the template selected), and indicate if the certificate is valid in the role of the client or the server (or both). Because for a VCS or Expressway, it can be based on the situation (it is always the same for a traversal zone), and the certificate must have both client and server authentication attributes.
The Expressway-C and Expressway-E give an error when uploaded to a new server certificate, if both are not applied.
If you are unsure if a certificate has these attributes, you can open the certificate details in a browser, or in your OS, and check the Extended Key Usage section (see the image). The format can vary and depends on how you look at the certificate.
Example:
Configure
Expressway-C and Expressway-E Traversal Zone / Trust
Generate and Sign CSRs
As described earlier, the Expressway-C and Expressway-E certificates must be signed either by an internal or external CA or by OpenSSL to self-sign.
Note: You cannot use the temporary certificate that comes on the Expressway server, as it is not supported. If you use wildcard certificates where you have a CA sign certificate and the subject line is not specifically defined, it is not supported.
The first step is to generate the CSR and have it signed by the preferred CA type. The process for this is given specifically in the Certificate Creation Guide. While you create the CSR, it is important to keep in mind the necessary Subject Alternative Names (SANs) that need to be included in the certificates. This is also listed in the certificates guide and the Mobile Remote Access Deployment Guide. Check the most recent versions of the guide as more can be added as new features arrive. List of common SANs that need to be included, based on the features used:
Expressway-C
- Any domains (internal or external) added to the domains list.
- Any persistent chat node aliases if XMPP federation is used.
- Secure device profile names on CUCM if secure device profiles are used.
Expressway-E
- Any domains configured on the Expressway-C.
- Any persistent chat node aliases if XMPP federation is used.
- Any domains advertised for XMPP federations.
Note: If the base domain used for external Service record (SRV) lookups is not included as a SAN in the Expressway-E certificate (either xxx.com or collab-edge.xxx.com), the Jabber clients still require the end-user to accept the certificate on the first connection and TC endpoints would fail to connect at all.
Configure the Expressway-C and Expressway-E to Trust Each Other
In order for the Unified Communications traversal zone to establish a connection, Expressway-C and Expressway-E must trust each other's certificates. For this example assume the Expressway-E certificate was signed by a public CA that use this hierarchy.
Certificate 3
Issuer: GoDaddy Root CA
Subject: GoDaddy Root CA
Certificate 2
Issuer: GoDaddy Root CA
Subject: GoDaddy Intermediate Authority
Certificate 1
Issuer: GoDaddy Intermediate Authority
Subject: Expressway-E.lab
The Expressway-C needs to be configured with trust certificate 1. In most cases, based on the trusted certificates applied to the server, it only sends its lowest level server certificate. That means that for the Expressway-C to trust certificate 1, you must upload both certificates 2 and 3 to the Expressway-C's trusted CA list (Maintenance> Security > Trusted CA List). If you leave out the intermediate certificate 2 when the Expressway-C receives the Expressway-E certificate, it cannot have a way to tie it to the trusted GoDaddy Root CA, therefore it would be rejected.
Certificate 3
Issuer: GoDaddy Root CA
Subject: GoDaddy Root CA
Certificate 1
Issuer: GoDaddy Intermediate Authority - Not Trusted!
Subject: Expressway-E.lab
Additionally, if you only upload the intermediate certificate without the root to the trusted CA list of the Expressway-C, it would see that the GoDaddy Intermediate Authority is trusted, but it is signed by a higher authority, in this case, GoDaddy Root CA which is not trusted, therefore it would fail.
Certificate 2
Issuer: GoDaddy Root CA - Not Trusted!
Subject: GoDaddy Intermediate Authority
Certificate 1
Issuer: GoDaddy Intermediate Authority
Subject: Expressway-E.lab
With all intermediates and the root added to the trusted CA list, the certificate can be verified...
Certificate 3
Issuer: GoDaddy Root CA - Self-signed top-level certificate is trusted and chain complete!
Subject: GoDaddy Root CA
Certificate 2
Issuer: GoDaddy Root CA
Subject: GoDaddy Intermediate Authority
Certificate 1
Issuer: GoDaddy Intermediate Authority
Subject: Expressway-E.lab
If you are unsure what the certificate chain is, you can check your browser when logged into the web interface of the specific Expressway. The process varies slightly based on your browser, but in Firefox, you can click the lock icon on the far left of the address bar. Then in the pop-up, click More Information > View Certificate > Details. If your browser can piece together the full chain, you can see the chain from top to bottom. If the top-level certificate does not have a subject and issuer that match, that means the chain is not completed. You can also export each certificate in the chain by themselves, if you click export with the desired certificate highlighted. This is useful if you are not 100% certain you have uploaded the correct certificates to the CA trust list.
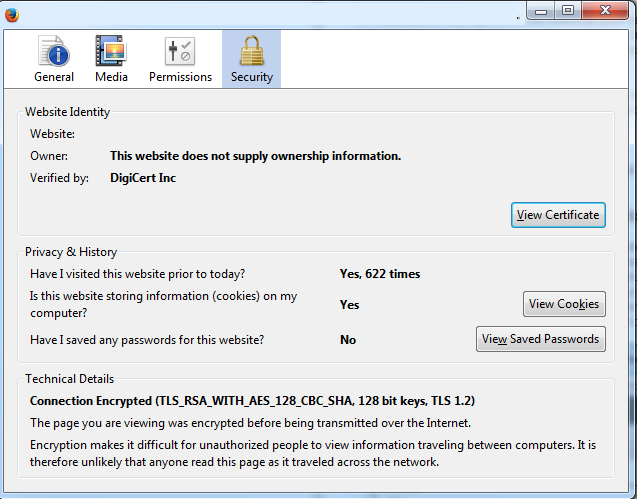
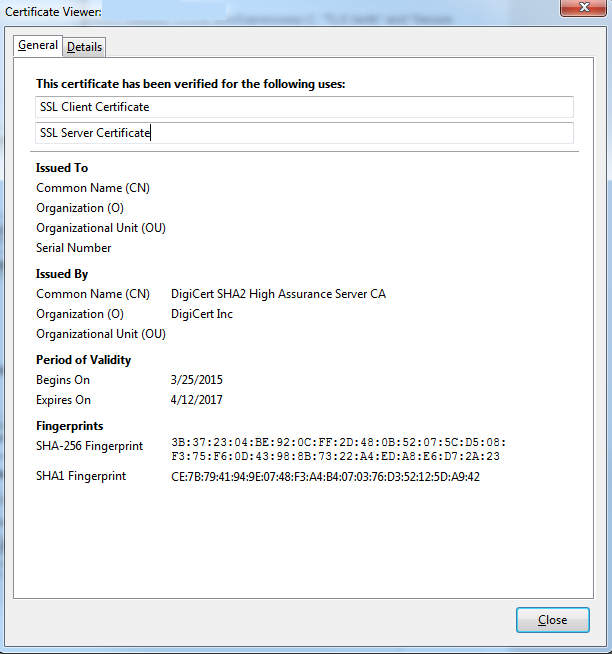
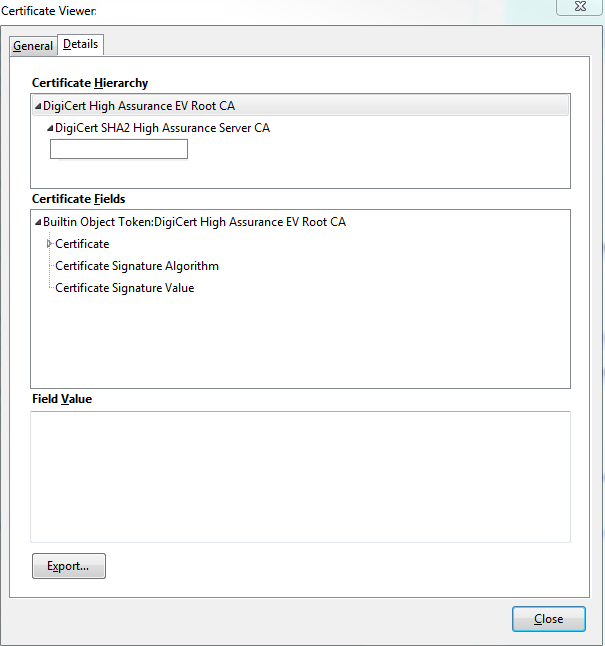
Now that the Expressway-C trusts the certificate from the Expressway-E, ensure it works in the opposite direction. If the Expressway-C certificate is signed by the same CA that signed the Expressway-E, the process is simple. Upload the same certificates to the Trusted CA list on the Expressway-E as you already did to the C. If the C is signed by a different CA, you need to use the same process as shown in the image, but use the chain the signed the Expressway-C certificate instead.
Secure Communication Between Cisco Unified Communications Manager (CUCM) and Expressway-C
Overview
Unlike the traversal zone between Expressway-C and Expressway-E, secure signalling is NOT required between Expressway-C and CUCM. Unless it is not allowed by internal security policies, you must always configure MRA to work with non-secure device profiles on CUCM first to confirm the rest of the deployment is correct before you continue with this step.
There are two main security features that can be enabled between CUCM and Expressway-C; TLS Verify and Secure Device Registrations. There is an important distinction between these two because they use two different certificates from the CUCM side in the SSL handshake.
TLS Verify - tomcat certificate
Secure SIP Registrations - CallManager certificate
Configure Trust Between CUCM and Expressway-C
The concept, in this case, is exactly the same as between Expressway-C and Expressway-E. The CUCM must first trust the server certificate of the Expressway-C. That means that on the CUCM, the intermediates and root certificates of the Expressway-C need to be uploaded as a tomcat-trust certificate for the TLS verify feature and a CallManager-trust for secure device registrations. To achieve this, navigate to Cisco Unified OS Administration in the upper right of the CUCM web GUI, then Security> Certificate Management. Here you can click Upload Certificate/Certificate Chain and select the correct trust format or click Find to see the list of currently uploaded certificates.
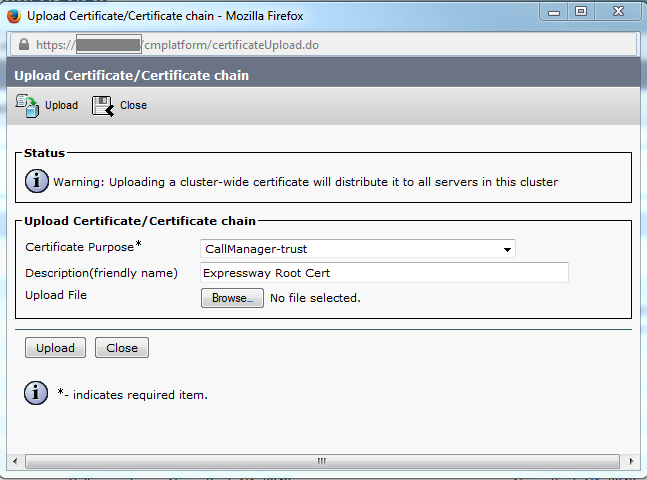
You need to ensure that the Expressway-C trusts the CA that signed the CUCM certificates. This can be achieved if you add them to the trusted CA list. In almost all cases, if you signed the CUCM certificates with a CA, the tomcat and CallManager certificates must be signed by the same CA. If they are different, you need to trust both if you use TLS Verify and Secure Registrations.
For secure SIP registrations, you also must ensure that the secure device profile name on the CUCM that is applied to the device is listed as a SAN on the Expressway-C certificate. If this does not contain the secure register messages, it would fail with a 403 from the CUCM, which indicates a TLS failure.
Note: When the SSL handshake takes place between the CUCM and Expressway-C for a secure SIP registration, two handshakes take place. First, the Expressway-C acts as the client and initiates the connection with the CUCM. Once that has been completed successfully, the CUCM initiates another handshake as the client to reply. This means that just like the Expressway-C, the CallManager certificate on CUCM must have both TLS Web Client and TLS Web Server authentication attributes applied. The difference is that the CUCM allows these certificates to be uploaded without both, and the internal secure registrations would work fine if the CUCM only has the server authentication attribute. You can confirm this on CUCM if you look for the CallManager certificate on the list and select it. There, you can look at the usage oids under the Extension section. You can see 1.3.6.1.5.5.7.3.2 for THE Client Authentication and 1.3.6.1.5.5.7.3.1 for THE Server Authentication. You can also download the certificate from this window.
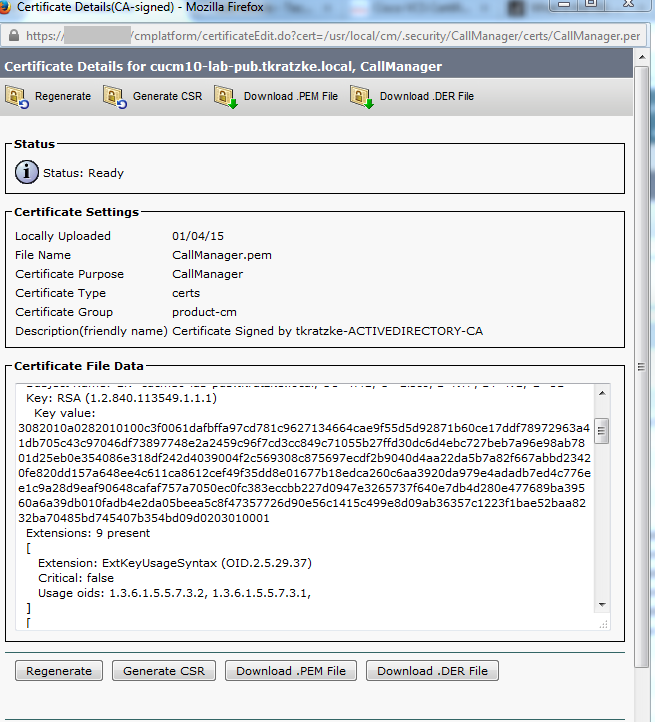
Note: The trust certificates applied to the publisher in a cluster must replicate over to the subscribers. It is good to confirm by logging into them separately on a new configuration.
Note: In order for the Expressway-C to properly validate the certificate from CUCM, the CUCM servers MUST be added in the Expressway-C with the FQDN, not the IP address. The only way the IP address can work is if the IP of each CUCM node is added as a SAN in the certificate, which is almost never done.
CUCM Servers With Self Signed Certificates
By default, a CUCM server comes with self-signed certificates. If these are in place, it is not possible to use both TLS Verify and Secure Device Registrations at the same time. Either feature can be used on its own, but because the certificates are self-signed, it means both the self-signed Tomcat and self-signed CallManager certificates need to be uploaded to the trusted CA list on the Expressway-C. When Expressway-C searches its trust list to validate a certificate, it stops once it finds one with a subject that matches. Because of this, whichever is higher on the trust list, tomcat or CallManager, that feature would work. The lower one would fail just as if it was not present. The solution to this is to sign your CUCM certificates with a CA (public or private) and trust that CA alone.
Expressway-C and Expressway-E Cluster Considerations
Cluster Certificates
It is strongly recommended that if you have a cluster of Expressway-C or Expressway-E servers for redundancy that you generate a separate CSR for each server and have it signed by a CA. In the previous scenario, the Common Name (CN) of each peers certificate would be the same cluster Fully Qualified Domain Name (FQDN) and the SANs would be the cluster FQDN and the respective peers FQDN as shown in the image:
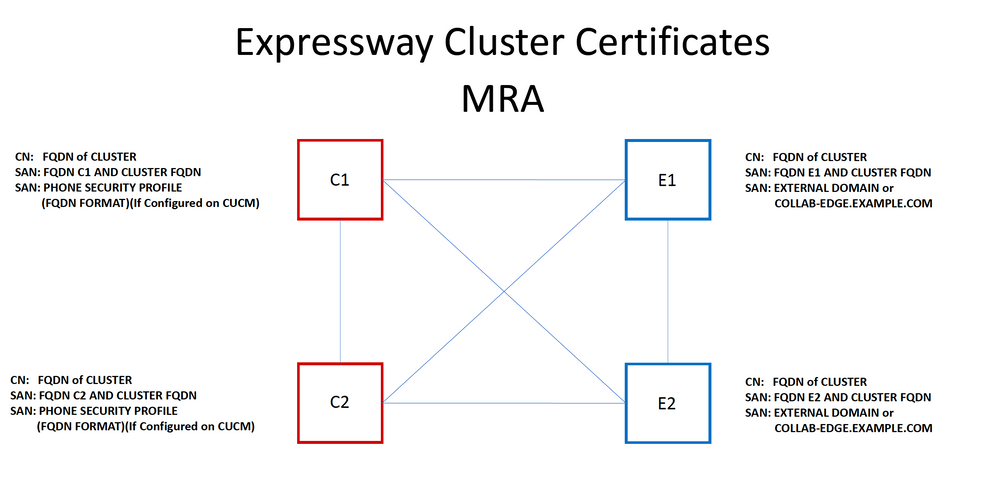
It is possible for you to use the cluster FQDN as the CN and each peers FQDN and the cluster FQDN in the SAN to use the same certificate for all nodes in the cluster, and therefore avoid the cost of multiple certificates signed by a public CA.
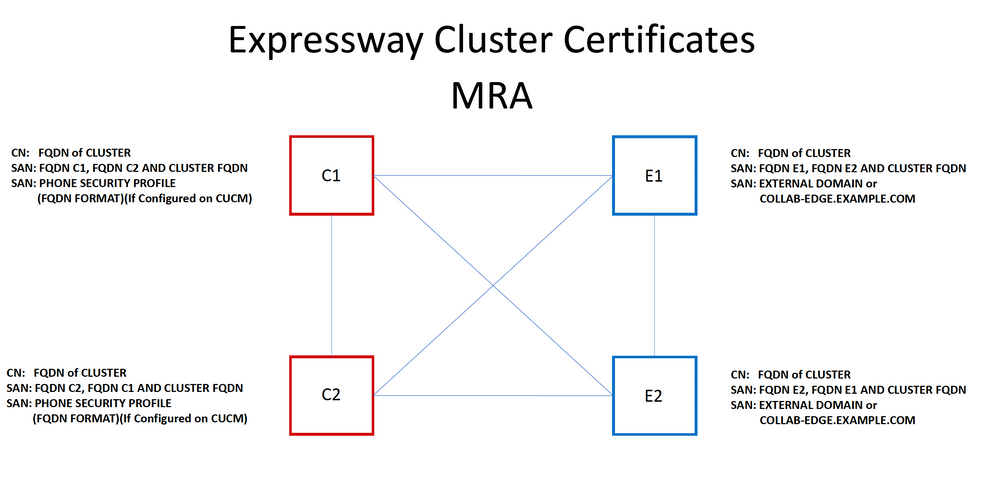
Note: The Phone Security Profile names on the Cs certificate are only required if you use Secure Phone Security Profiles on the UCM. The external domain or collab-edge.example.com (where example.com is your domain) is a requirement only for IP Phone and TC endpoint registration over MRA. This is optional for Jabber registration over MRA. If not present, then jabber would prompt to accept the certificate when jabber logs in over MRA.
If absolutely necessary, this can be done with the next process or you can use OpenSSL to generate both the private key and CSR manually:
Step 1. Generate a CSR on the primary of the cluster and configure it to list the cluster-alias as the CN. Add all peers in the cluster as alternative names, along with all other required SANs.
Step 2. Sign this CSR and upload it to the primary peer.
Step 3. Log into the primary as root and download the private key located in /Tandberg/persistent/certs.
Step 4. Upload both the signed certificate and the matched private key to each other peer in the cluster.
Note: This is not recommended for these reasons:
1. It is a security risk because all peers use the same private key. If one is somehow compromised, an attacker can decrypt traffic from any of the servers.
2. If a change needs to be made to the certificate, this entire process must be followed again rather than a simple CSR generation and signing.
Trusted CA Lists
Unlike CUCM subscribers in a cluster, the trusted CA list is NOT replicated from one peer to another in an Expressway or VCS cluster. That means that if you have a cluster, you need to manually upload trusted certificates to the CA list on each peer.
Verify
Use this section to confirm that your configuration works properly.
Check the Current Certificate Information
There are a number of ways you can check the information on an existing certificate. The first option is via the web browser. Use the method depicted in the previous section which can also be used to export a specific certificate in the chain. If you need to verify SANs, or other attributes added to the Expressway server certificate, you can do this directly through the web Graphical User Interface (GUI), navigate to Maintenance > Security Certificates > Server Certificate, then click Show Decoded.
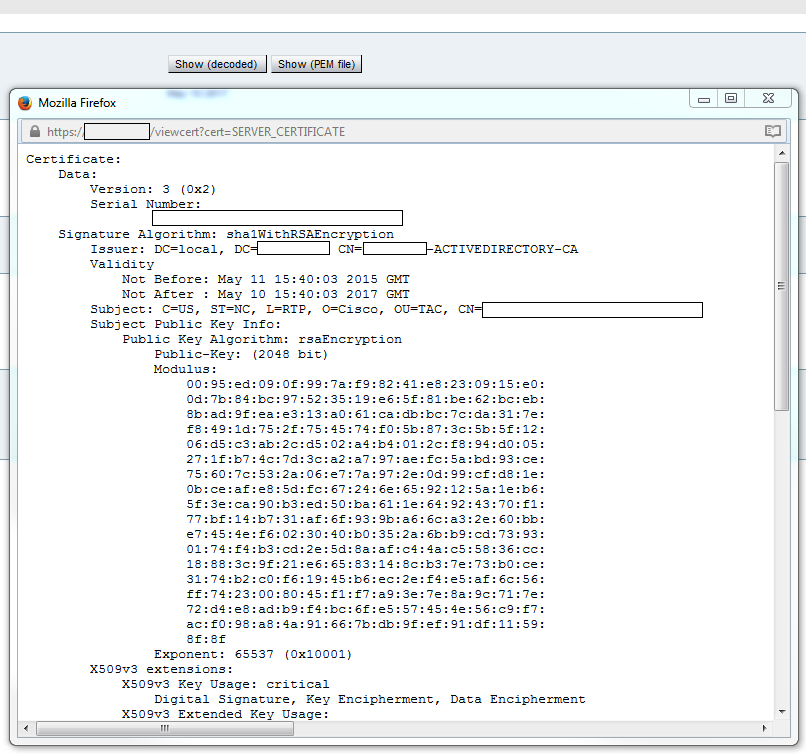
Here you can see all the specific details of the certificate without the need to download it. You can also do the same for an active CSR if the associated signed certificate has not yet been uploaded.
Read/Export a Certificate In Wireshark
If you have a Wireshark capture of the SSL handshake that includes the certificate exchange, Wireshark can actually decode the certificate for you, and you can actually export any certificates in the chain (if the full chain is exchanged) from within. Filter your packet capture for the specific port of the certificate exchange (generally 7001 in the case of the traversal zone). Next, if you do not see the client and server hello packets along with the SSL handshake, right-click on one of the packets in the TCP stream and select decode as. Here, select SSL and click apply. Now, if you have captured the correct traffic, you must see the certificate exchange. Find the packet from the correct server that contains the certificate in the payload. Expand the SSL section in the lower pane until you see the list of certificates as shown in the image:
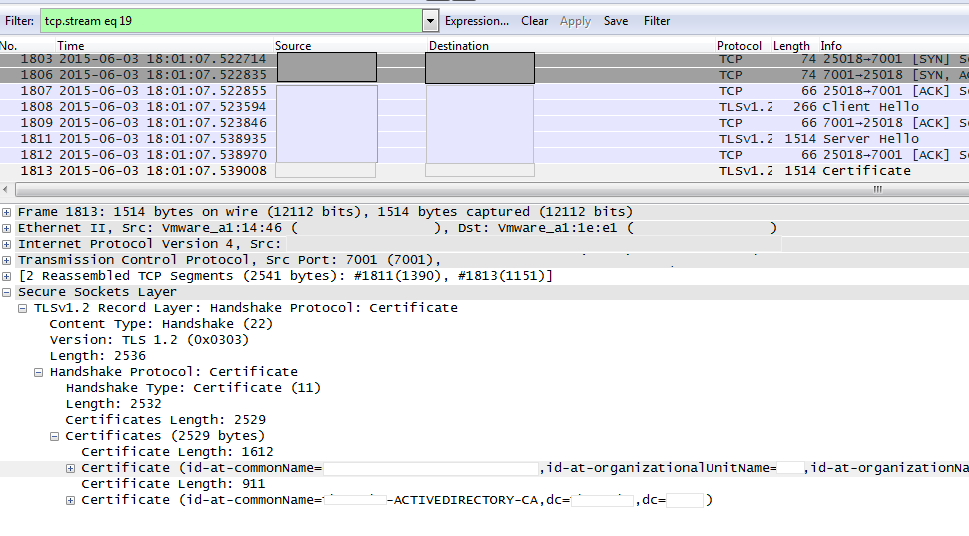
Here you can expand any of the certificates to see all of the details. If you want to export the certificate, right-click on the desired certificate in the chain (if there are multiple) and select Export Selected Packet Bytes. Enter a name for the certificate and click Save. Now, you must be able to open the certificate in Windows Certificate Viewer (if you give it a .cer extension), or upload it to any other tools for analysis.
Troubleshoot
This section provides the information you can use to troubleshoot your configuration.
Test to Know If A Certificate Is Trusted On The Expressway
While the best method is to manually check the certificate chain and ensure all members are included in the Expressway trusted CA list, you can quickly check to ensure that the Expressway trusts a specific client's certificate with the help of the Client Certificate Testing under Maintenance > Security Certificates in the web GUI. Keep all the default settings the same. Select Upload Test File (pem format) from the dropdown and select the client certificate you wish to verify. If the certificate is not trusted, you would get an error, as shown in the image, that explains the reason it was rejected. The error you see is the decoded information of the uploaded certificate for reference.
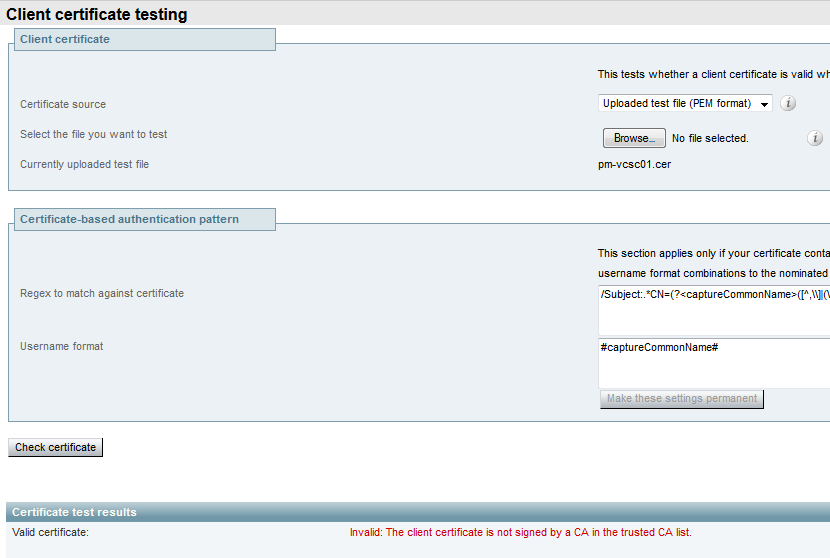
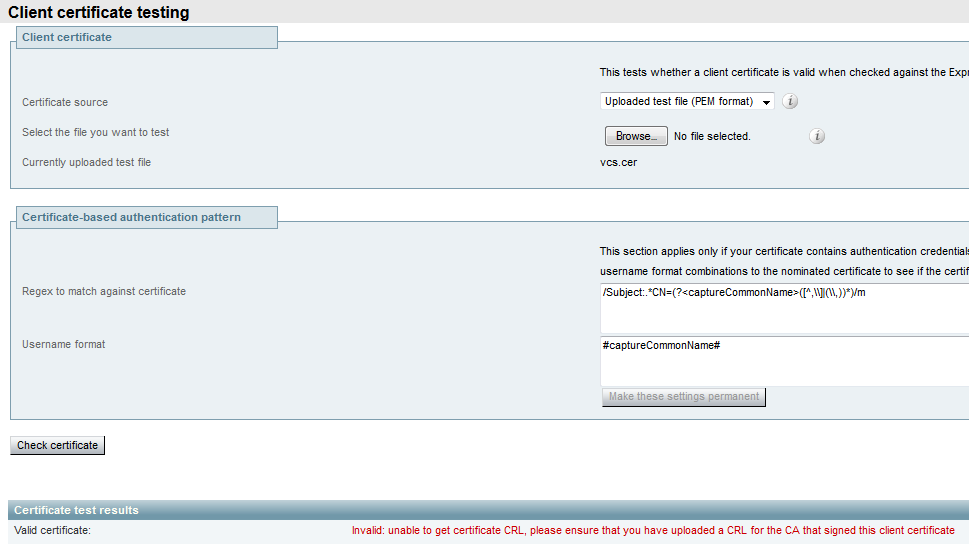
If you get an error that claims the Expressway is unable to get the certificate CRL, but the Expressway does not use the CRL checking, this means the certificate would be trusted and has passed all other verification checks.
Synergy Light Endpoints (7800/8800 Series Phones)
These new devices come with a pre-populated certificate trust list, which includes a large number of well-known public CAs. This trust list cannot be modified, which means your Expressway-E certificate MUST be signed by one of these matched public CAs in order to work with these devices. If it is signed by an internal CA or a different public CA, the connection would fail. There is no option for the user to manually accept the certificate as there is with Jabber clients.
Note: It has been found for some deployments that the use of a device such as a Citrix NetScaler with a CA from the list included on the 7800/8800 Series Phones can register over MRA even if the Expressway-E uses an internal CA. The NetScalers root CA needs to be uploaded to the Expressway-E, and the Internal root CA needs to be uploaded to the Netscaler in order for SSL authentication to work. This has been demonstrated to work, and is best-effort support.
Note: If the trusted CA list appears to have all the correct certificates in, but it still gets rejected, ensure there is not another certificate higher on the list with the same subject that could conflict with the correct one. When all else fails, you can always export the chain directly from the browser or Wireshark, and upload all certificates to the opposite servers CA list. This would guarantee it to be the trusted certificate.
Note: When you troubleshoot a traversal zone issue, sometimes the problem can appear to be a certificate related, but it is actually something on the software side. Ensure that the account username and password used for the traversal is correct.
Note: The VCS or Expressway does not support greater than 999 characters in the SAN field of a certificate. Any SANs that are past this limit (which requires a lot of alternative names) would be ignored as if they were not there.
Video Resources
This section provides information in the video that can guide you through all the Certificate configuration processes.
Generate a CSR for MRA or Clustered Expressways
Install Server Certificate to Expressway
How to Configure Certificate Trust Between Expressways
Revision History
| Revision | Publish Date | Comments |
|---|---|---|
2.0 |
22-Jun-2023 |
Added Alt Text.
Updated PII, Machine Translation, Style Requirements, Grammar and Formatting. |
1.0 |
05-Nov-2018 |
Initial Release |
Contributed by Cisco Engineers
- Tim KratzkeCisco TAC Engineer
- Jason GilbertCisco TAC Engineer
Contact Cisco
- Open a Support Case

- (Requires a Cisco Service Contract)
 Feedback