Configure the Advanced Wireless Settings on the RV340W Router
Available Languages
Objective
Radio settings are used to configure the wireless radio antenna and its properties on the router so that communications can be fast, congestion-free, and tailored to the optimal network setup. Having a wireless feature on the router allows the device to also manage as a Wireless Access Point. An integrated wireless feature in the router is a progressive solution to reduce the cost of additional wireless networking devices while providing the same opportunities to expand when it becomes necessary.
The advanced wireless settings allow the wireless feature to serve clients that operate at specific data rates.
This article aims to show you how to configure the Advanced Wireless Settings on the RV340W Router.
Applicable Devices
- RV340W
Software Version
- 1.0.01.16
Configure the Advanced Wireless Settings
Configure the 2.4 GHz Settings
Step 1. Log in the web-based utility and choose Wireless > Advanced Settings.
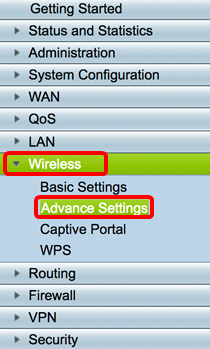
Step 2. Choose a radio tab to configure. The options are 2.4G and 5G.
Note: In this example, 2.4G is chosen.

Step 3. Check the Enable Frame Burst check box to enable the radio to rapidly send a series of frames in succession for a brief period of time. Frame burst enhances the ability of a client to upload data at higher throughputs with the use of inter-frame wait intervals to burst a sequence of up to three packets before it has to wait for a required period.
Note: Enabling this feature may increase downstream throughput.
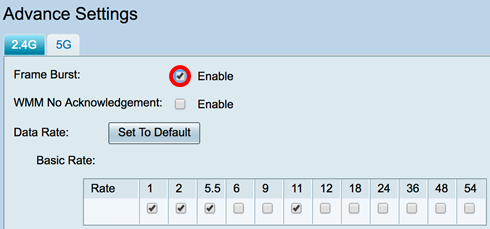
Step 4. (Optional) Check the Enable check box to enable WMM No Acknowledgement. The Wi-Fi Multimedia (WMM) option enables the Quality of Service (QoS) function that is used for multimedia applications such as VoIP and video. This allows the network packets of the multimedia application to have priority over regular data network packets, hence allowing multimedia applications to run smoother and with fewer errors. This feature results in more efficient throughput but with higher error rates.

Step 5. (Optional) Click the Set To Default button to revert the data rate check boxes to its default in the Basic Rate table below.

Step 6. In the Basic Rate table, check the check boxes of applicable rates in Megabits per second (Mbps) at which the 2.4 GHz radio will broadcast. The default rates are 1 Mbps, 2 Mbps, 5.5 Mbps, and 11 Mbps.
Note: The rates 1 Mbps and 2 Mbps are used for legacy devices that only transmit at a lower maximum rate.

Step 7. In the Transmission Rate area, check the check boxes of the necessary rates at the bandwidth of your wireless network. The default setting is all check boxes are checked.

Step 8. In the HT MCS Index, check the check boxes of the necessary High Transmission Modulation and Coding Scheme Index (HT MCS) rates. MCS, also associated with Multiple-Input Multiple-Output (MIMO), describes the data rates at which the antennas use to create spatial streams. In 802.11n, data streams can be transmitted and received over both the antennas. This results in a greater number of bits transmitted and received at a given point of time, effective usage of multipath signals which is usually a problem in indoor coverage.
Note: In this example, all the rates are checked in order to accommodate legacy devices connected to the network.

Step 9. Click a CTS Protection Mode radio button. The Clear-To-Send (CTS) Protection option enables the protection mechanism, which is used to minimize collisions among stations in a mixed 802.11b and 802.11g environment. The available options are:
- Disabled — The CTS Protection mode is disabled.
- Auto — The CTS Protection checks only when necessary.
Note: In this example, Auto is chosen.

Step 10. In the Beacon Interval field, enter the time in milliseconds between the beacon frame transmissions. Beacon frames are transmitted periodically to announce the presence of a wireless network. The default is 100.
Note: In this example, the default value 100 is used.

Step 11. In the DTIM Interval field, enter an integer from 1 to 255. Some beacon frames include Delivery Traffic Indication Messages (DTIM) which indicate if a client has buffered data on the WAP. A beacon count of 1 checks every beacon for DTIM messages while a count of 50 checks every 50th beacon.
Note: In this example, the default value of 1 is used.
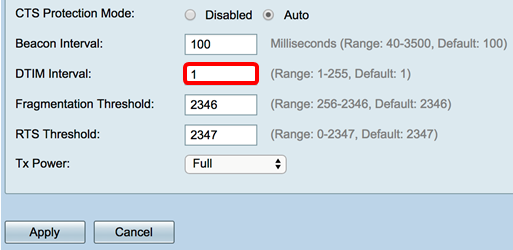
Step 12. In the Fragmentation Threshold field, enter the maximum size of packets in bytes that can be transmitted over the network. Packets larger than the maximum size are fragmented and sent as several smaller packets. Fragmentation is not recommended unless you experience radio interference.
Note: In this example, the default value 2346 is used.

Step 13. In the RTS Threshold field, enter the Request to Send (RTS) threshold value which indicates the number of octets in a MAC Protocol Data Unit (MPDU), below which an RTS/CTS handshake is not performed. A low threshold value sends packets more frequently, which consumes more bandwidth. The more packets that are sent, however, the faster a network can recover from interference or collisions that occur on busy networks.
Note: In this example, the default value of 2347 is used.

Step 14. From the Tx Power drop-down list, choose a percentage of power at which the router will use to transmit over the radio. The options are:
- Full — The radio uses 100% transmission power.
- High (50%) — The radio uses 50% transmission power.
- Medium (25%) — The radio uses 25% transmission power.
- Low (12%) — The radio uses 12% transmission power.
Note: In this example, Full is chosen.

Step 15. Click Apply.
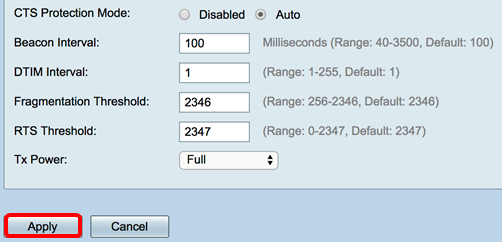
You should now have successfully configured the 2.4 GHz Advanced Wireless Settings on the RV340W Router.
Configure the 5 GHz Settings
Step 1. Click the 5G tab.

Step 2. Check the Enable Frame Burst check box to enable the radio to rapidly send a series of frames in succession for a brief period of time. Frame burst enhances the ability of a client to upload data at higher throughputs with the use of inter-frame wait intervals to burst a sequence of up to three packets before it has to wait for a required period. The default is unchecked.
Note: Enabling this feature may increase downstream throughput.
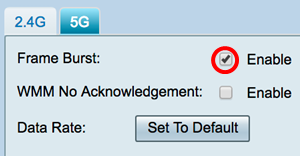
Step 3. (Optional) Check the Enable check box to enable WMM No Acknowledgement. The Wi-Fi Multimedia (WMM) option enables the Quality of Service (QoS) function that is used for multimedia applications such as VoIP and video. This allows the network packets of the multimedia application to have priority over regular data network packets, hence allowing multimedia applications to run smoother and with fewer errors. This feature results in more efficient throughput but with higher error rates. The default is unchecked.
Note: In this example, WMM No Acknowledgment is unchecked.

Step 4. (Optional) Click the Set To Default button to revert the data rate check boxes to its default in the Basic Rate table below.

Step 5. In the Basic Rate table, check the check boxes of applicable rates in Megabits per second (Mbps) at which the 5 GHz radio will broadcast. The default rates are 6 Mbps, 12 Mbps, and 24 Mbps.
Note: The rates 6 Mbps, 12 Mbps, and 24 Mbps are used for legacy devices at the 5 GHz band that only transmit at specific rates.

Step 6. In the Transmission Rate area, check the check boxes of the necessary rates at the bandwidth of your wireless network. The default setting is all check boxes are checked.

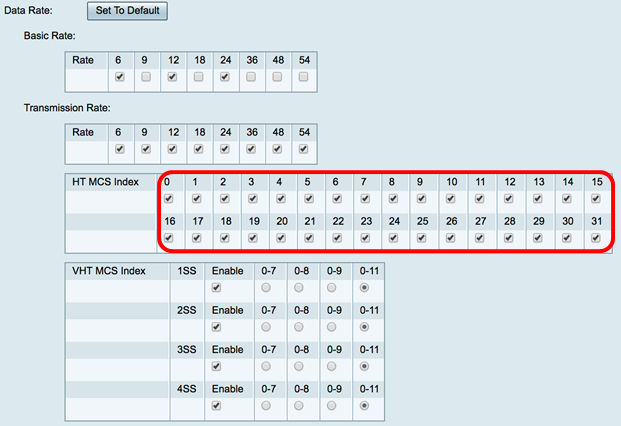
Step 7. In the HT MCS Index, check the check boxes of the necessary High Transmission Modulation and Coding Scheme Index (HT MCS) rates. MCS, also associated with Multiuser Multiple-Input Multiple-Output (MU-MIMO), describes the data rates at which the antennas use to create spatial streams.
Note: In this example, all the rates are checked in order to accommodate legacy devices connected to the network.
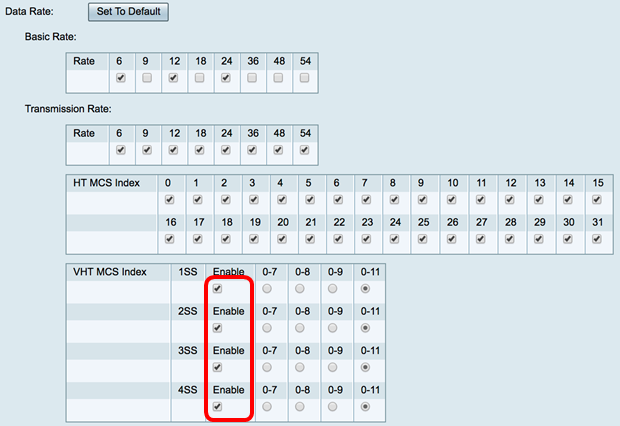
Step 8. In the VHT MCS Index, check the Enable check box of the number of spatial streams you want to enable for each antenna. MU-MIMO is a feature introduced with 802.11ac Wave 2. Wave 2 MU-MIMO support is required on both the access point and client device to work. It operates in the downstream direction, access point to client, and allows an access point to transmit to multiple client devices simultaneously. The options are:
- 1SS — one or single spatial stream
- 2SS — two spatial streams
- 3SS — three spatial streams
- 4SS — four spatial streams
Note: In this example, all check boxes are checked.
Step 9. Click a radio button to choose the kind of rate at which the VHT MCS supports.
- 0-7 — The minimum support of MCS from zero through seven.
- 0-8 — The minimum support of MCS from zero through eight.
- 0-9 — The minimum support of MCS from zero through nine.
- 0-11 — The minimum support of MCS from zero through 11.
Note: In this example, 0-11 was used for all the enabled spatial stream values.

Step 10. Click a CTS Protection Mode radio button. The Clear-To-Send (CTS) Protection option enables the protection mechanism, which is used to minimize collisions among stations in a mixed 802.11b and 802.11g environment. The available options are:
- Disabled — The CTS Protection mode is disabled.
- Auto — The CTS Protection checks only when necessary.
Note: In this example, Auto is chosen.

Step 11. In the Beacon Interval field, enter the time in milliseconds between the beacon frame transmissions. Beacon frames are transmitted periodically to announce the presence of a wireless network. The default is 100.
Note: In this example, the default value 100 is used.

Step 12. In the DTIM Period field, enter an integer from 1 to 255. Some beacon frames include Delivery Traffic Indication Messages (DTIM) which indicate if a client has buffered data on the WAP. A beacon count of 1 checks every beacon for DTIM messages while a count of 50 checks every 50th beacon.
Note: In this example, the default value 1 is used.

Step 13. In the Fragmentation Threshold field, enter the maximum size of packets in bytes that can be transmitted over the network. Packets larger than the maximum size are fragmented and sent as several smaller packets. Fragmentation is not recommended unless you experience radio interference.
Note: In this example, the default value 2346 is used.

Step 14. In the RTS Threshold field, enter the Request to Send (RTS) threshold value which indicates the number of octets in a MAC Protocol Data Unit (MPDU), below which an RTS/CTS handshake is not performed. A low threshold value sends packets more frequently, which consumes more bandwidth. The more packets that are sent, however, the faster a network can recover from interference or collisions that occur on busy networks.
Note: In this example, the default value 2347 is used.

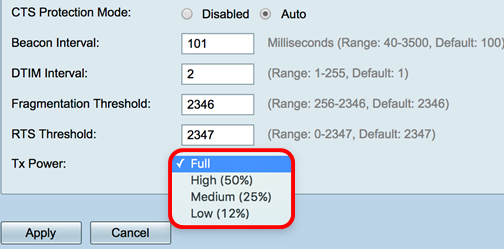
Step 15. From the Tx Power drop-down list, choose a percentage of power at which the router will use to transmit over the radio. The options are:
- Full — The radio uses 100% transmission power.
- High (50%) — The radio uses 50% transmission power.
- Medium (25%) — The radio uses 25% transmission power.
- Low (12%) — The radio uses 12% transmission power.
Note: In this example, Full is chosen.
Step 16. Click Apply.

You should now have successfully configured the 5 GHz Advanced Wireless Settings on the RV340W Router.
 Feedback