Introduction
This article describes the process of reserving licenses as part of specific license reservation (SLR) in Cisco Smart Software Manager (CSSM).
Prerequisites
Requirements
Before you start, ensure that you have the following:
Since not all products support SLR, Cisco also recommends that you have the knowledge of the following topic:
Reserving Licenses (SLR)
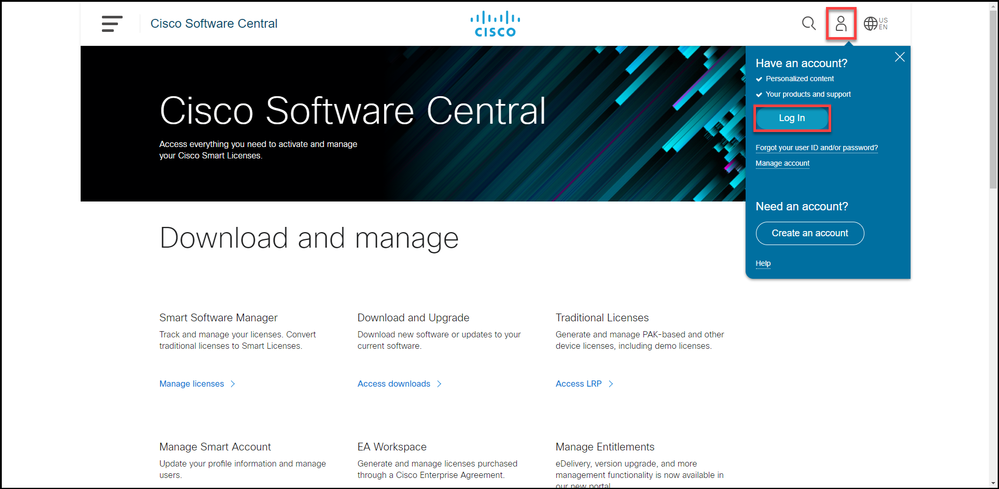
Step 1:
Go to Cisco Software Central and log in with your Cisco.com account.
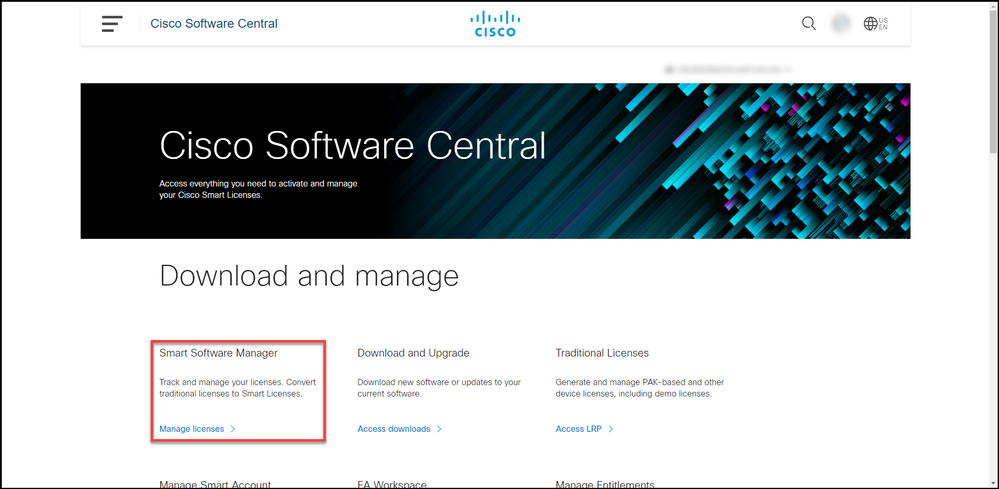
Step 2:
In theSmart Software Managersection, clickManage licenses.
Step 3:
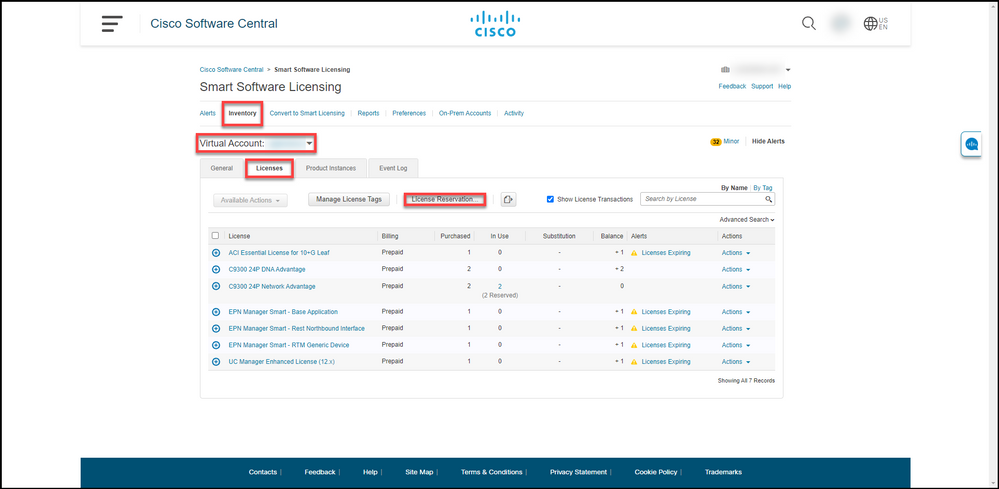
On the Inventory tab, select your Virtual account, click Licenses, and then click the License Reservation button.
Step result: The system displays the Smart License Reservation dialog box.
Step 4:
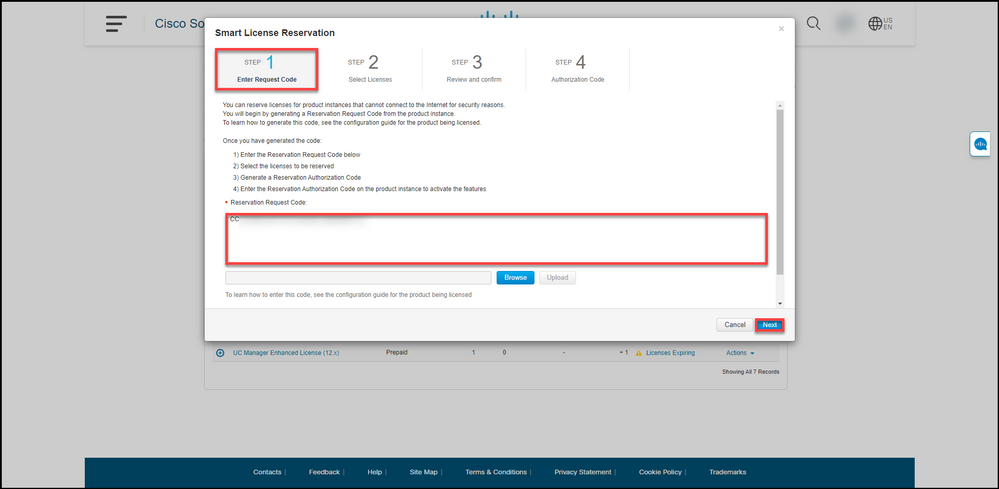
In the Smart License Reservation dialog box, in Step 1: Enter Request Code, in the Reservation Request Code text box, enter the reservation request code that you . Click Next.
Step result: The system displays Step 2: Select Licenses.
Step 5:
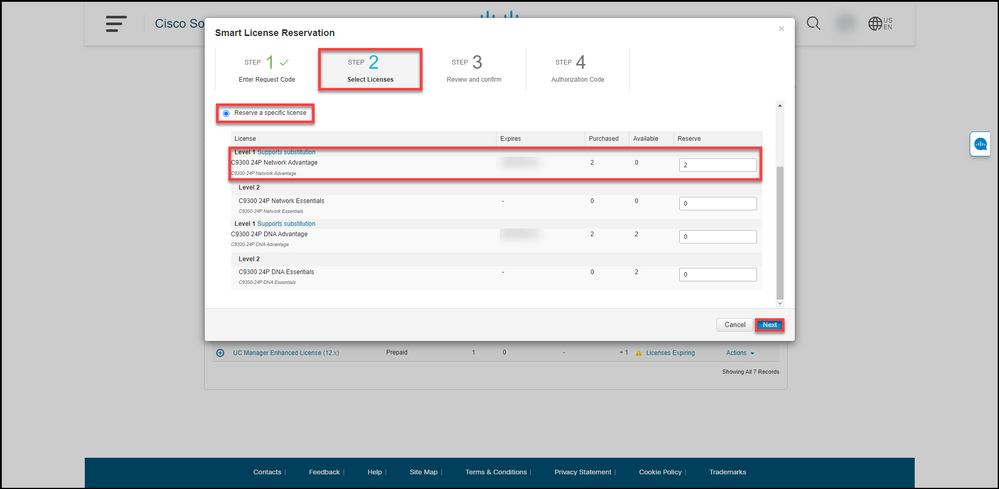
In Step 2: Select Licenses, click the Reserve a specific license radio button, and then in the list of licenses, enter the quantity of the licenses in one of the following ways:
|
If the value in the Expires column is:
|
Then:
|
|
a. Single expiry date
|
In the Reserve column, enter the number of licenses that you want to reserve, and then click Next.
|
|
b. Multiple terms
|
In the Expires column, click the multiple terms button. The system displays a dialog box with an overview of the expiration dates for each entitlement. In the dialog box, in the Quantity to Reserve column, enter the quantity, and then click Save. The system updates the quantity of licenses in Step 2 Select Licenses. Click Next.
Note: If you do not specify the quantity, then the system selects the entitlement with the longest time remaining before the expiration by default.
|
Step result: The system displays Step 3: Review and confirm.
Step 6:
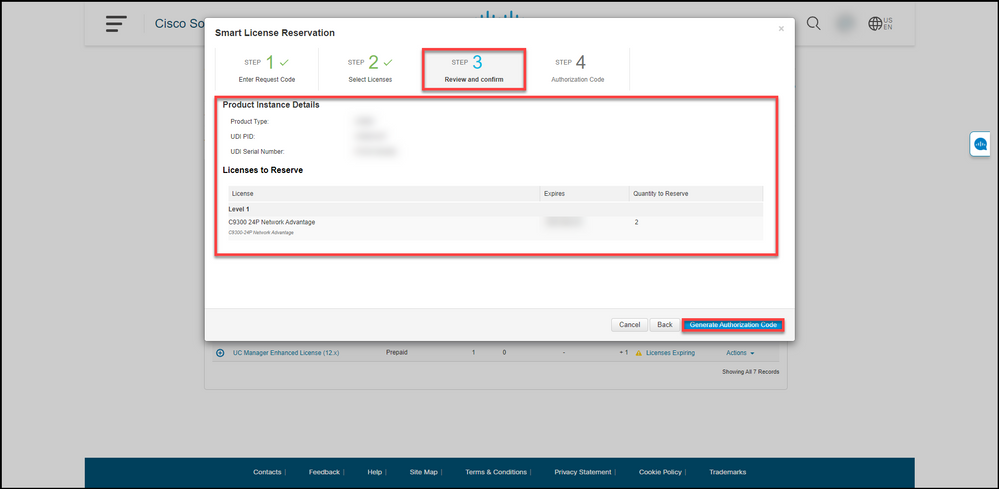
In Step 3: Review and confirm, review the information in the Product Instance Details and Licenses to Reserve sections. If the information displayed is correct, click the Generate Authorization Code button.
Step result: The system displays Step 4: Authorization Code.
Step 7:
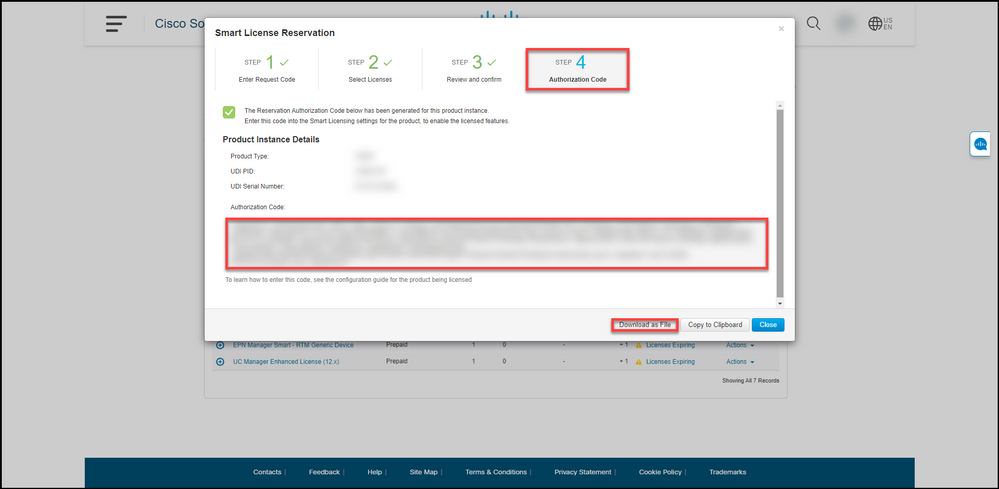
In Step 4: Authorization Code, the system confirms that the reservation authorization code was generated for this product instance. Click the Download as File button to save the authorization code as a file to your computer. Remember that you need to then transfer the saved file with the authorization code either to a flash drive or network resource (for example, a TFTP server) to be able to install the authorization code on a device. Click Close.
Step result: The system displays the notification message that confirms that you successfully downloaded the file with the authorization code.
Verify
You can confirm that you successfully reserved your licenses by using one of the following options:
Option 1
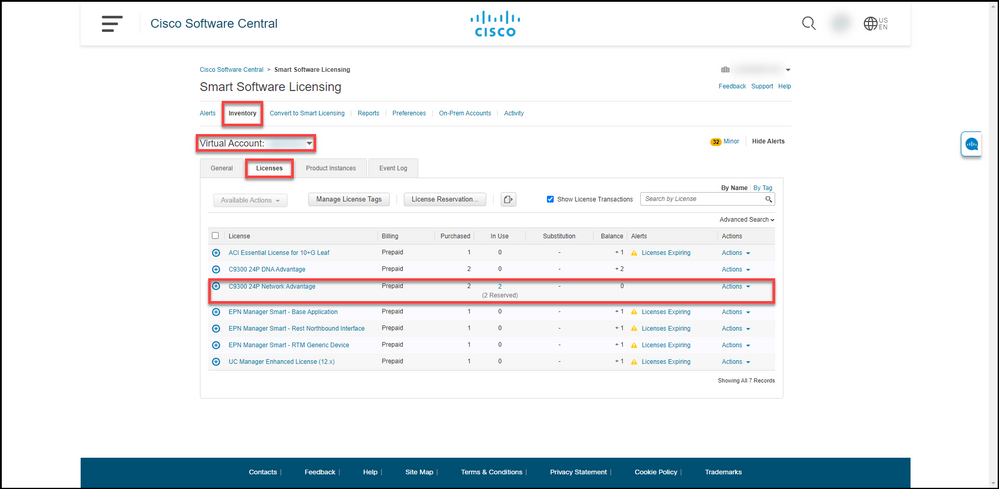
Verification Step: On the Inventory tab, select your Virtual account, click Licenses, and in the In Use column next to the license you reserved, the system displays the amount of reserved licenses in parentheses. To view detailed information about your reserved licenses, expand the license that you reserved by clicking the circled plus icon.
Option 2
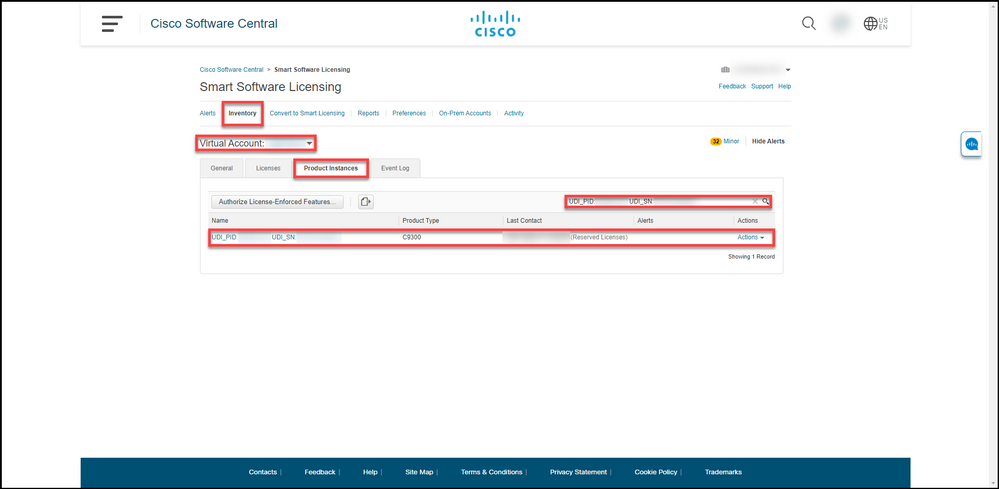
Verification Step 1: On the Inventory tab, select your Virtual account, click Product Instances, search by device or product type, and then press Enter.
Step result: The system displays the product instance and in the Last Contact column you can view the date and time along with (Reserved Licenses).
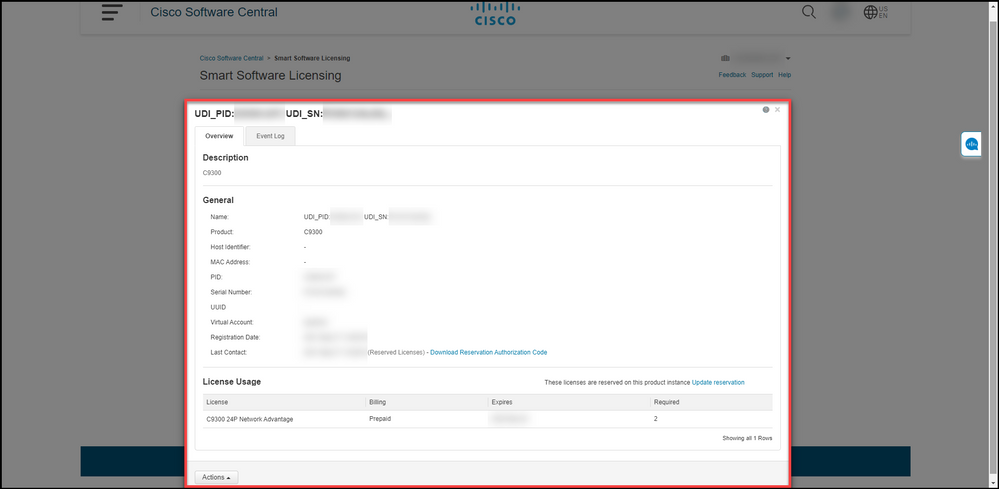
Verification Step 2: For an overview of your license usage, click the hyperlink in the Name column.
Step result: The system displays the product instance dialog box.
Option 3
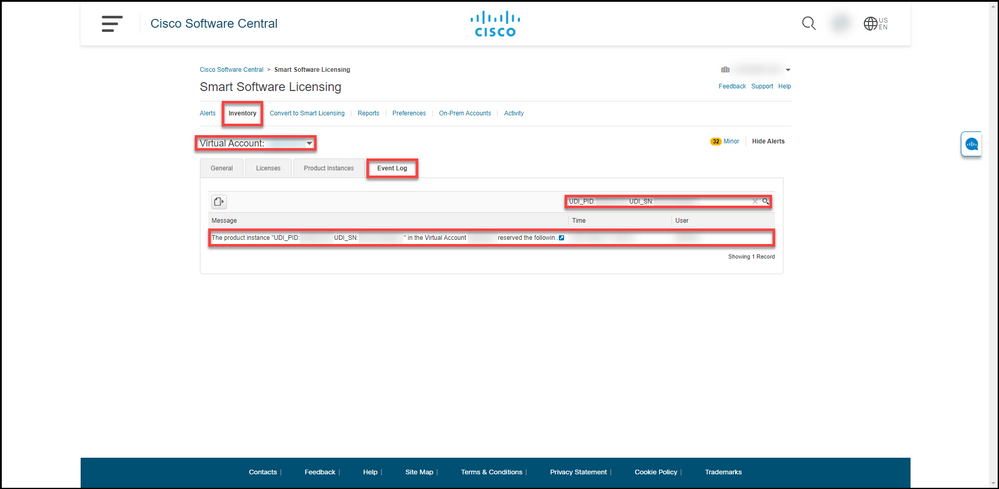
Verification Step: On the Inventory tab, select your Virtual account, click Event Log, search by license or product, and then press Enter.
Step result: The system displays a message with information about license reservation.
Troubleshooting
If you experience an issue during the process of reserving licenses, open a case inSupport Case Manager (SCM).
Next Steps
After you reserve licenses, you need to install the authorization code on a device.
Related Information
How to Enable Factory Preinstalled SLR on a Smart Account
How to Identify That the Smart Account Is Enabled for SLR
How to Identify Products That Support SLR
How to Obtain the Reservation Request Code
How to Install the Authorization Code on a Device
How to Update the License Reservation (SLR)
How to Transfer a Product Instance (SLR)
How to Transfer Licenses Between Virtual Accounts (SLR)
How to Rehost Licenses from a Failed Product (SLR)
How to Obtain the Reservation Return Code
How to Remove a Product Instance (SLR)


 Feedback