Introduction
This document describes how to exchange the Admin Workstation (AW) self-signed SSL certificates to the Customer Voice Portal (CVP), Finesse, Cisco Enterprise Chat and Email (ECE), Cisco Unified Intelligence Center (CUIC), Cisco Identity Service (idS) and Virtualized Voice Browser (VVB) for Package Contact Center Enterprise (PCCE) Single Pane of Glass (SPOG).
Contributed by Nagarajan Paramasivam and Robert Rogier, Cisco TAC Engineers.
Prerequisites
Requirements
Cisco recommends that you have knowledge of these topics:
- Packaged/Unified Contact Center Enterprises (PCCE/UCCE)
- VOS Platform
- Certificaite Management
- Certificate keystore
Components Used
The information in this document is based on these components:
- Admin Workstation (CCEADMIN/SPOG)
- CVP
- Finesse
- CUIC, IDS
- VVB
- Cisco ECE
The information in this document was created from the devices in a specific lab environment. All of the devices used in this document started with a cleared (default) configuration. If your network is live, ensure that you understand the potential impact of any command.
Background Information
It's recommended that you have read and understand the PCCE Administration and Configuration Guide, specifically the Reference appendix at the end which covers certificate setup and configuration. PCCE Administration and Configuration Guide
New User Interface – SPOG
Packaged CCE 12.0 has a new user interface which is in accordance with other contact center applications. The user interface allows you to configure the solution through one application. Sign in to the new Unified CCE Administration at https://<IP Address>/cceadmin. <IP Address> is the address of the Side A or B Unified CCE AW or the optional external HDS.
In this release, the Unified CCE Administration interface allows you to configure this:
- Campaigns
- Courtesy Callback
- SIP Server Groups
- File Transfers: File transfer is possible only through Principal AW (Side A AW in 2000 agent deployment and configured AW in 4000 agent and 12000 agent deployments).
- Routing Patterns: Dialed number pattern in Unified CVP Operations Console is now called Routing Pattern in Unified CCE Administration.
- Locations: In Unified CCE Administration, Routing Code is now the location prefix instead of Site ID.
- Device Configuration: Unified CCE Administration allows you to configure the following devices: CVP Server, CVP Reporting Server, VVB, Finesse, Identity Service (Single Sign-on Setup).
- Team Resources: Unified CCE Administration allows you to define and associate the following resources for agent teams: Call Variables Layout, Desktop Layout, Phone Books, Workflows, Reasons (Not Ready, Sign Out, Wrap-Up).
- Email and Chat
It is required, prior to attempting to manage the system through SPOG, to exchange the SSL certificates between the Customer Voice Portal (CVP), Finesse, Cisco Enterprice Chat and Email (ECE), Cisco Unified Intelligence Center (CUIC), Cisco Identity Service (idS) and Virtual Voice Browser (VVB) and Admin Workstation (AW) in order to establish a trust communciation.
SSL Certificate Export
Administration Workstation (AW)
Step 1. Access the https://localhost URL in the AW server and download the server SSL certificates.
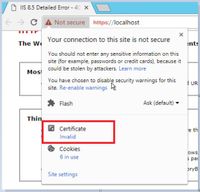

Step 2. In the certificate window, navigate to the Details tab and click on the Copy To File button.
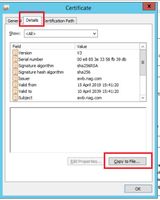
Step 3.Select Base-64 encoded X.509 (CER) and store the certificate in the local storage.

Finesse
Step 1. Access the https://Finesseserver:8443/cmplatform and download the tomcat certificate.
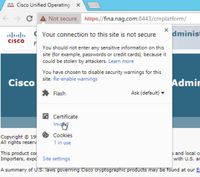
Step 2. In the certificate window, navigate to the Details tab and click on the Copy To File button.
Step 3. Select Base-64 encoded X.509 (CER) and store the certificate in the local storage.

Cisco ECE
Step 1. Access the https://ECEWebServer and download the server SSL certificate.

Step 2. In the certificate window, navigate to the Details tab and click on the Copy To File button.
Step 3. Select Base-64 encoded X.509 (CER) and store the certificate in the local storage.

CUIC
Step 1. Access the https://CUICServer:8443/cmplatform and download the tomcat certificate.
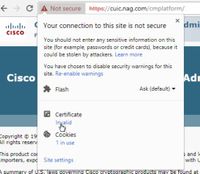
Step 2. In the certificate window, navigate to the Details tab and click on the Copy To File button.
Step 3. Select Base-64 encoded X.509 (CER) and store the certificate in the local storage.

Cisco idS
Step 1. Access the https://IDSServer:8553/idsadmin/ and download the tomcat certificate.
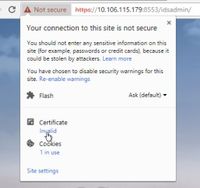
Step 2. In the certificate window, navigate to the Details tab and click on the Copy To File button.
Step 3. Select Base-64 encoded X.509 (CER) and store the certificate in the local storage.

LiveData
Step 1. Access the https://LiveDataServer:8444/cuic/gadget/LiveData/ and download the tomcat certificate.
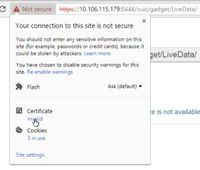
Step 2. In the certificate window, navigate to the Details tab and click on the Copy To File button.
Step 3. Select Base-64 encoded X.509 (CER) and store the certificate in the local storage.

VVB
Step 1. Access the https://VVBServer/appadmin/main and download the tomcat certificate.

Step 2. In the certificate window, navigate to the Details tab and click on the Copy To File button.
Step 3. Select Base-64 encoded X.509 (CER) and store the certificate in the local storage.

SSL Certificate Import to Keystore
CVP Call Server and Reporting Server
Step 1. Log in to the CVP Server and copy the AW CCE Admin certificates to the C:\cisco\cvp\conf\security.

Step 2. Navigate to the %CVP_HOME%\conf\ and open the security.properties to copy the Keystore password.

Step 3. Open the command prompt as administrator and run the command cd %CVP_HOME%\jre\bin.

Step 4. Use this command inorder to import the AW certificates to the CVP server.
keytool -import -trustcacerts -keystore %CVP_HOME%\conf\security\.keystore -storetype JCEKS -alias awa.nag.com -file C:\Cisco\CVP\conf\security\AWA.cer

Step 5. At the password prompt, paste the password copied from the security.properties.
Step 6. Type yes to trust the certificate and ensure you get the result Certificate was added to keystore.

Step 7. There is a warning prompted along with the successful import. This is due to proprietary format Keystore, you can ignore it.
Warning:
The JCEKS keystore uses a proprietary format. It is recommended to migrate to PKCS12 which is an industry standard format using "keytool -importkeystore -srckeystore C:\Cisco\CVP\conf\security\.keystore -destkeystore C:\Cisco\CVP\conf\security\.keystore -deststoretype pkcs12".

Admin Workstation
Step 1. Log in to the AW server and open the command prompt as administrator.
Step 2. Navigate to C:\Program Files(x86)\Java\jre1.8.0_181\lib\security and ensure the cacerts file exist.

Step 3. Type the command cd %JAVA_HOME% and enter.

Step 4. Use this command in order to import the Finesse certificates to the AW server.
keytool -import -file C:\Users\Administrator.NAG\Downloads\Cert\FINA.cer -alias fina.nag.com-keystore .\lib\security\cacerts

Step 5. The first time you use this keytool, use the password changeit in order to change the password of a certificate store.
Step 6. Enter a new password for the Keystore and re-enter to confirm the password.

Step 7. Type yes in order to trust the certificate and ensure you get the result Certificate was added to keystore.

Note: Step 1 to 7 should be repeated with all other Finesse nodes and all the CUIC nodes as well
Step 8. If the keystore password entered wrongly or performed the steps without reset, it is expected to get this exception.
Trust this certificate? [no]: yes
Certificate was added to keystore
keytool error: java.io.FileNotFoundException: .\lib\security\cacerts (The system cannot find the path specified)
Enter keystore password:
keytool error: java.io.IOException: Keystore was tampered with, or password was incorrect
Step 9. In order to change the keystore password use this command and restart the procedure again from Step 4 with the new password.
keytool -storepasswd -keystore .\lib\security\cacerts

Step 10. After the successful import, use this command to view the certificate from the keystore.
keytool -list -keystore .\lib\security\cacerts -alias fina.nag.com
keytool -list -keystore .\lib\security\cacerts -alias cuic.nag.com

Finesse, CUIC, Cisco idS and VVB
Step 1. Log in to the Finesse server OS administration page and upload the AW SSL certificates in the tomcat trust.
Step 2. Navigate to OS Administration > Security > Certificate Management.

Step 3. Click on the Upload Certificate\Certificate Chain and select the tomcat-trust from the dropdown.
Step 4. Browse the certificate store in the local storage and click Upload button.
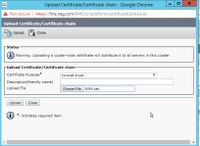
Step 5. Repeat the steps to upload all the AW server certificate to the Finesse cluster.
Note: It is not required to upload the tomcat-trust certificate to the secondary node, this is automatically replicated.
Step 6. Restart the tomcat service in order to the certificate changes take effect.
Step 7. In CUIC, IDS and VVB, follow the steps from 2 to 4 and upload the AW certificate.
Certificate Exchange between Finesse and CUIC/LiveData
Step 1. Keep the Finesse, CUIC and LiveData certificates in a separate folder.

Step 2. Log in to the Finesse, CUIC and LiveData OS Administration page.
Step 3. Navigate to OS Administration > Security > Certificate Management.
Step 4. Click on the Upload Certificate\Certificate Chain and select the tomcat-trust from the dropdown.
Step 5. Browse the certificate store in the local storage and select Either servers certificate as below, then click Upload button.
In Finesse server – CUIC and LiveData as Tomcat trust
In CUIC Server – Finesse and LiveData as tomcat trust
In LiveData Server – CUIC and Finesse as Tomcat trust
Note: It is not required to upload the tomcat-trust certificate to the secondary node, this is automatically replicated.
Step 6. Restart the tomcat service on each node in order for the certificate changes to take effect.


 Feedback