Introduction
This document describes the process of upgrading and downgrading cloud-registered endpoints and analyzes two edge cases:
- SX/MX endpoints that are on TC software and need an upgrade to RoomOS to register to the Cloud.
- Desk Pro Step Upgrade, in cases where Desk Pro is on older CE OS versions.
These cases are usually seen when a new endpoint is received after RMA that is on an older version.
The information in this document was created from devices in a specific lab environment. All of the devices used in this document started with a cleared (default) configuration. If your network is live, ensure that you understand the potential impact of any command.
The following equipment was used:
- Room Kit endpoint
- Codec Plus endpoint
- SX10 endpoint
- Desk Pro endpoint
- Control Hub Organization
Software Upgrades for Cloud-registered endpoints
Endpoints that are already registered to the Cloud and are shown as "Online" on Control Hub are either automatically upgraded with no administrator action needed or the administrator needs to manually select the next RoomOS version for the Software channel that the device is subscribed to. The article RoomOS Software Upgrades describes how the Software channels work and how the software can be managed.
A cloud-registered endpoint cannot be locally managed and have software uploaded to it manually by using the endpoint's GUI. By navigating to the Software tab under the System Maintenance section on a cloud-registered endpoint's GUI, it shows:
"Your system is cloud-managed, and you cannot manage the software locally. Go to Cisco Webex Control Hub to change the software channel."
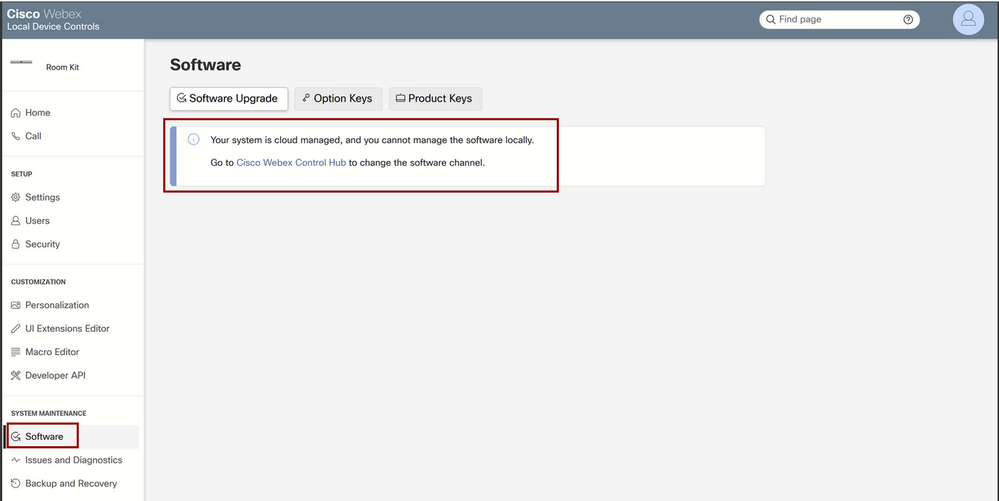 Local Device Controls Software section for a cloud-registered endpoint
Note: To access the endpoint's GUI, enter the endpoint's IP address in a web browser and use an admin's credentials to log in. The default username is admin and the default password is blank, but only for an endpoint that you have just received or you have factory reset. You need to be on the same network/VLAN as the endpoint you are trying to access, or else you cannot use the device's GUI.
How to Downgrade a device to a previous RoomOS version
For a cloud-registered endpoint, you cannot perform a downgrade to any RoomOS version that is older than 3 months. The version that you are willing to downgrade your device to needs to be available in your Control Hub Organization's Software Channel. Your Control Hub administrator can manage which RoomOS version is available in most of the channels in your Organization.
Note: You cannot affect the Preview channel in your Control Hub Organization because it is always at the newest available software version for you to always be able to test the latest RoomOS version.
To move a Software channel to a previous OS version, navigate to the Devices tab under the Management section. Then select the Software tab:
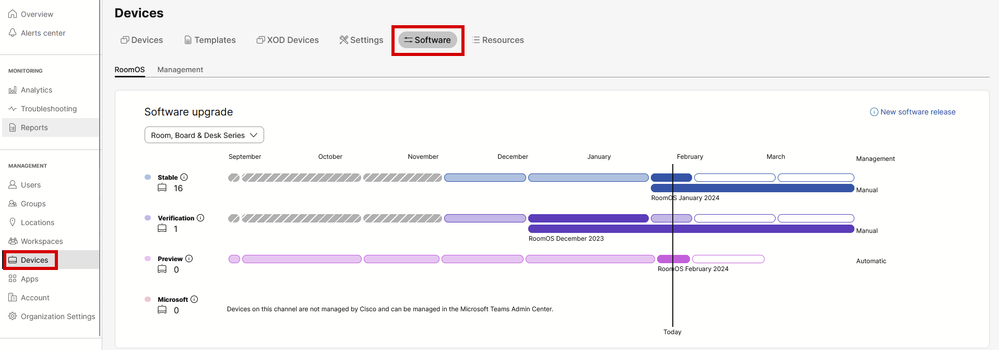 Device's Software section in Control Hub

Note: You have access to the last 3 RoomOS versions published. Once you move one of the channels to a previous or upcoming software version, all the endpoints assigned to that channel that are currently online are going to upgrade either immediately or at night-time, depending on what you choose. The same happens when you move an endpoint to a different software channel that has a different RoomOS version than the one the endpoint is currently running on. Because of this, it is suggested that you do not move your stable software channel into previous versions. All the endpoints on the stable channel are affected. You can perform your testing with downgrading on the verification channel. However, all devices currently assigned to the verification channel are going to be affected. Plan accordingly.
Then, scroll down and choose the option to Manage Software next to your verification channel:
 Verification Software Channel in Control Hub
Choose the previous Room OS version that you prefer, along with the time that you would like the downgrade to happen, and click Save.
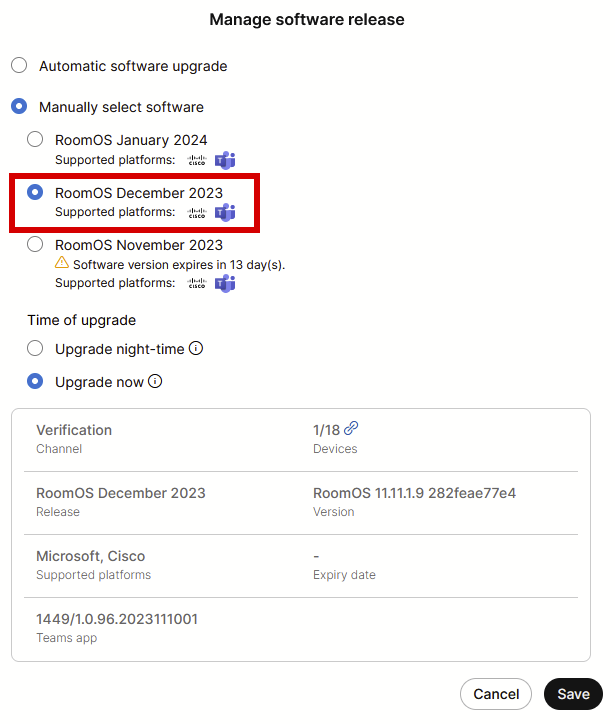 Software Management pop-up
Once this is performed, navigate to Workspace and select the workspace to which your device belongs. Then click Edit:
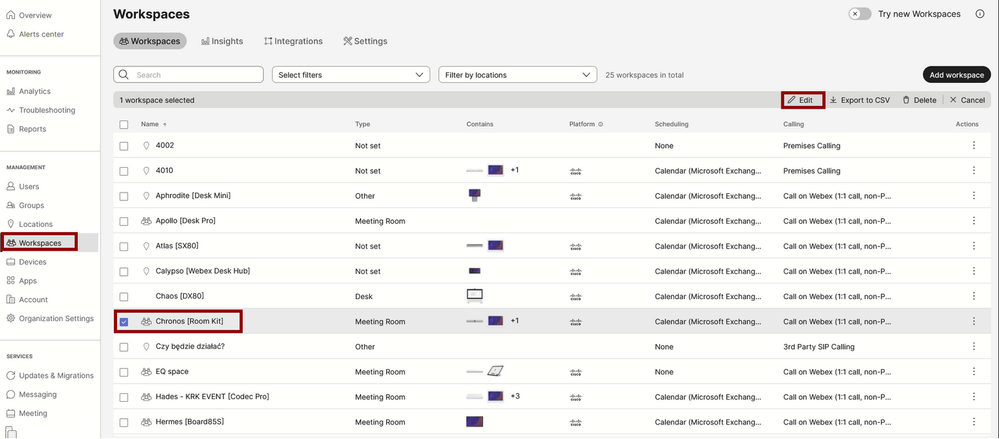 Workspaces section in Contol Hub
On the window that opens, click Select Software Upgrade Channel and choose Verification Channel.
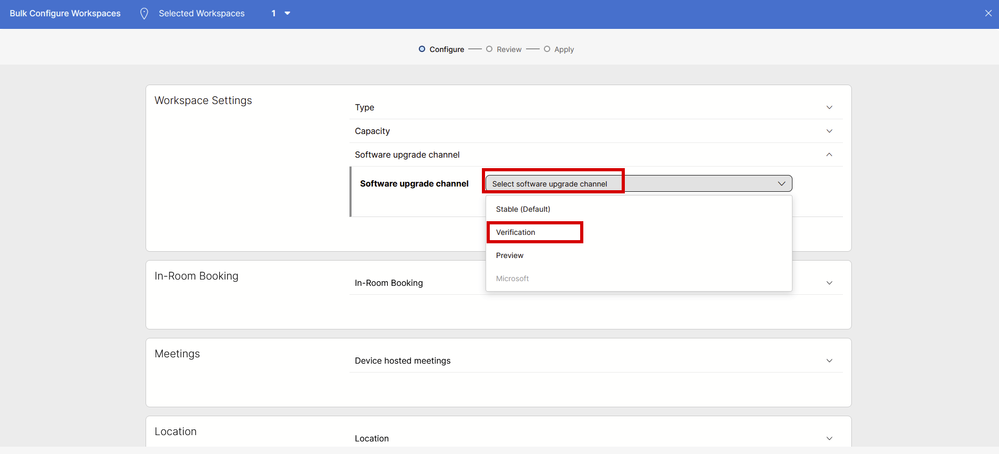 Workspace Bulk Configuration Wizard - Configure section
Then, click Next at the bottom of the screen and Apply on the Configuration Preview report:
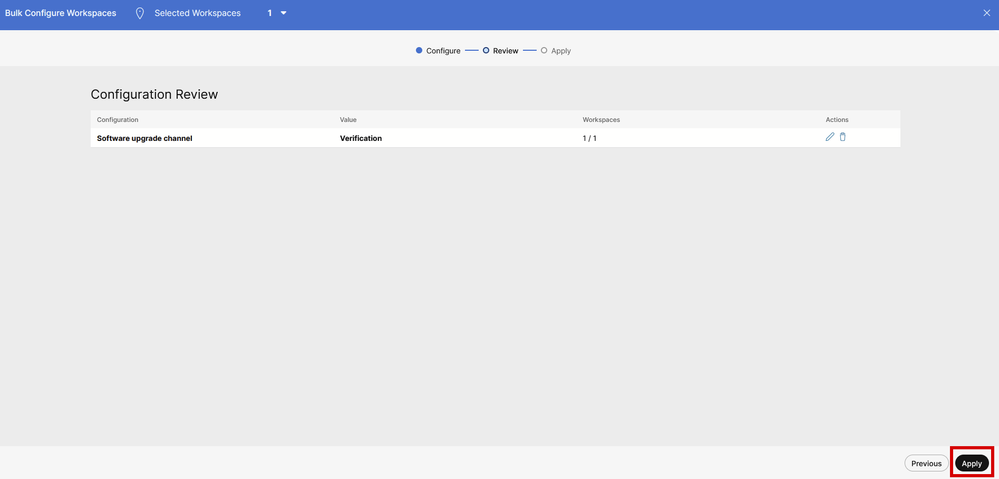 Workspace Bulk Configuration Wizard - Review section
The downgrade of the device will occur either immediately or overnight. Once the endpoint is downgraded, there is a message mentioning that the firmware on the peripherals is not compatible with the endpoint OS. This message is visible on the GUI of the endpoint and/or on the endpoint screen. This is expected as your endpoint realizes that its peripherals are on "future" firmware versions, not yet released. Then, the peripherals are downgraded to a compatible firmware version that matches your current RoomOS version.
How to manually upgrade a device
In cases where you need to upgrade an endpoint (not currently registered to the cloud) to a newer version of RoomOS to be able to register the device in the cloud, the update cannot happen automatically. You need to perform an update manually from the GUI of the device. This means that the device must already be connected to the network and you can access the device via HTTP. This allows you to access the device via the GUI.
To perform a manual update, navigate to the Maintenance tab and then click Software Upgrade:
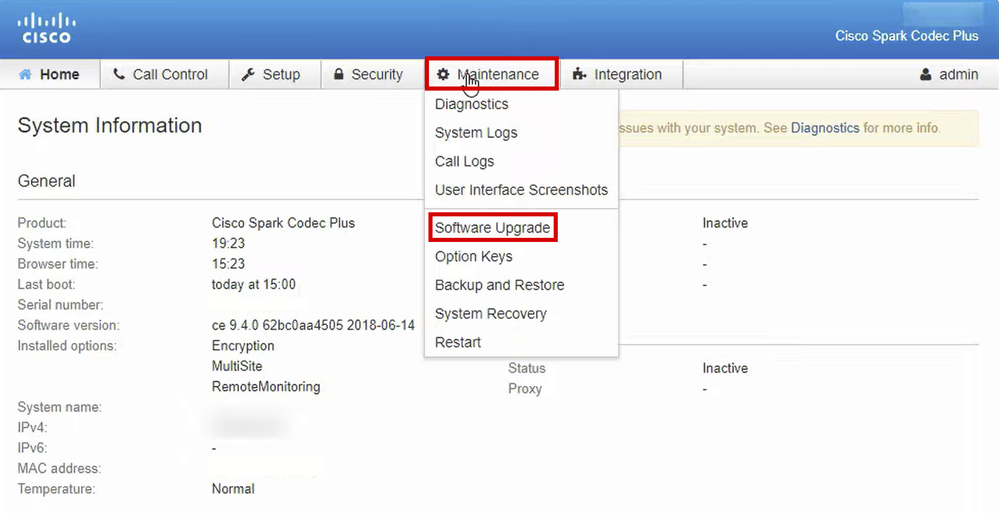 Home section of the GUI of an endpoint on CE 9.4 OS version
Tip: The endpoint used for the previous example is on CE version 9.4 OS. Depending on the OS version that your endpoint is on, the navigation through the menu and the naming of the elements on the GUI are going to differ.
Once you navigate to the software upgrade section, locate the option to upgrade the endpoint by choosing a software file locally from your machine and uploading it. At this stage, download the software installation package from software.cisco.com. Upload it and click Install software:
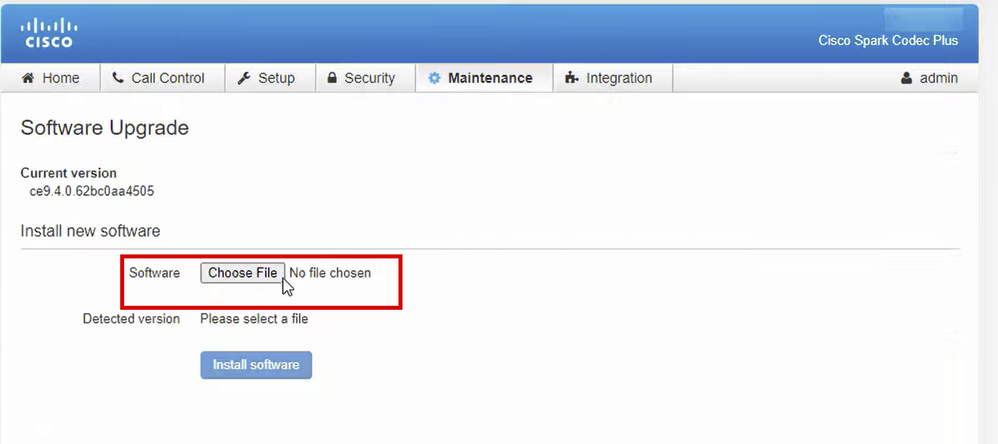 Software Upgrade section of the GUI of an endpoint on CE 9.4 OS version
Note: If you can ping the device, it does not necessarily mean that the device can be reached via HTTP and you can successfully have access to the GUI. Ping is sending ICMP traffic to the endpoint. GUI is accessed over HTTP.
There is a chance that the device is pingable, but when reaching out to the GUI of the device, you are not able to navigate through the menu and see this message:
"Connection lost. Please reload the page to reconnect."
 Connection lost banner on endpoint GUI
In this scenario, it is useful to check once more the network configuration of the device. The proxy settings set in the device's environment can affect and block HTTP from reaching the device.
SX/MX Endpoint that is on TC Software
There are some rare cases in which you receive an SX-series or MX-series endpoint that is still on TC OS version and would like to upgrade it to the newest CE version that supports Cloud Registration. In such cases, intermediate upgrades to older OS versions need to be done before the upgrade to CE is successful.
- Navigate to software.cisco.com and locate the software package that corresponds to the endpoint that you are trying to update.
- Note: If you are trying to upgrade SX10 to the latest CE version, select the appropriate package for SX10. You cannot use a software package listed under SX20. Although endpoints can be similar, each one has its own software release, which you must choose. Software packages under the SX20 endpoint cannot be downloaded and used to upgrade SX10. Installation is going to fail because the type of the endpoint does not match the OS installation file you are trying to use.
- For example, an SX10 device that is on TC.3.14 OS version cannot be updated to CE9.15.15.4. You will see the error “The Installation Failed: Installation failed” if you try to directly perform an upgrade to CE9.15.15.4.
First, proceed with an upgrade to the intermediate OS version TC.3.21, seen below:
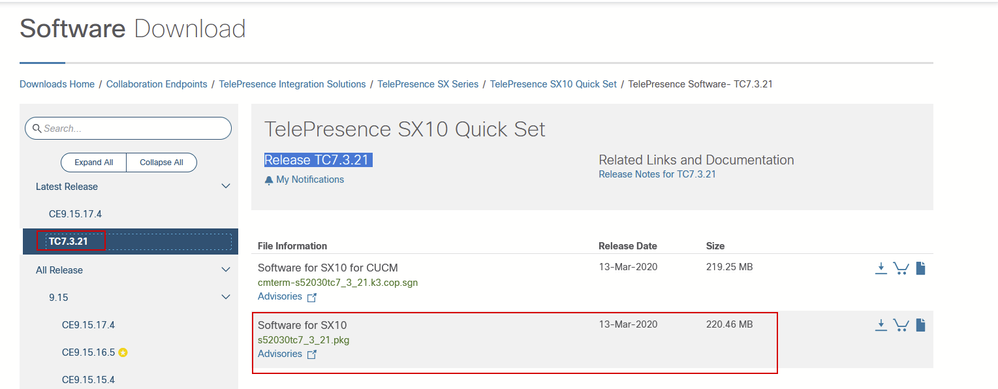 SX10 TC 7.3.21 Software Package
Once you have downloaded and successfully installed TC7.3.21, upgrade the endpoint to the latest CE version available.
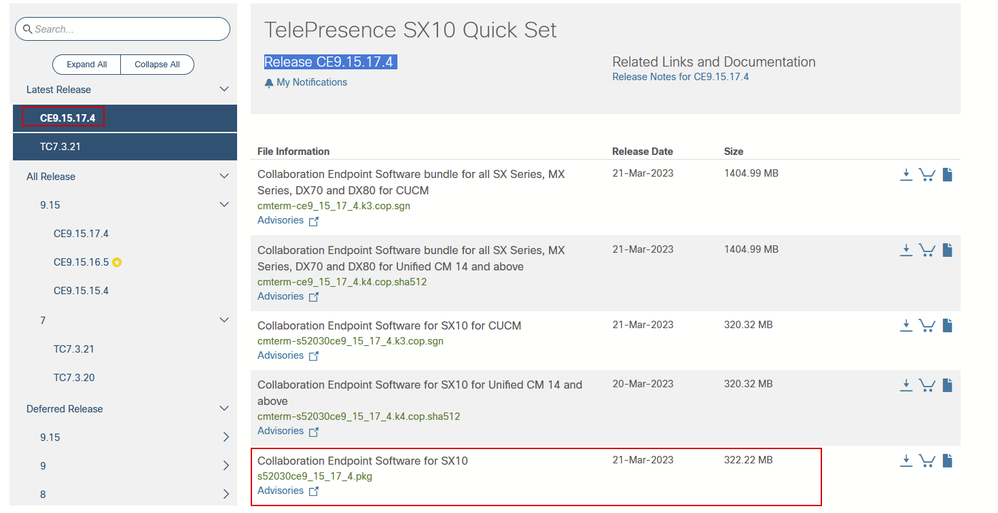 SX10 CE9.15.17.4 Software Package
The preceding two software versions need to be installed via the GUI of the device. You must install both versions back to back. There is no reason to leave an endpoint at version TC7.3.21, as it is quite old and it must be used as a step upgrade to the newer OS versions.
How do I choose the correct package from software.cisco.com for an endpoint that is going to be registered to Cloud?
In the preceding pictures, the software file selected in the red color rectangle has the .pkg filename extension. The software packages listed under each of the software versions for each endpoint are not identical. The package description along with the package name can be used to help you choose the appropriate package that you must use to upgrade your endpoint to the desired OS version.
All packages that mention they can be used for CUCM or Unified CM must be avoided for endpoints that you are willing to fully register to the cloud. Additionally, packages that have the ending .sha512 in their name cannot be used for any upgrade that is performed through the GUI of the endpoint. Packages containing .cop in their name are used for on-prem deployments and must not be used for an endpoint that is going to be fully cloud-registered.
Note: For upgrades to the latest RoomOS 11 versions, all available upgrade packages have the extension .sha512. There has been a change for the RoomOS 11 leading to xx.k3.cop.sgn packages being deprecated. If an upgrade to RoomOS 11 is needed, then the appropriate .sha512 package needs to be used for updates done from the GUI of the endpoint. Details explaining this change can be found at this link: Software files have changed - specific upgrade paths are applicable.
For example, for the Room Kit endpoint, to upgrade to the latest RoomOS 11 version, the package shown in the picture must be used for a manual upgrade through the endpoint's GUI:
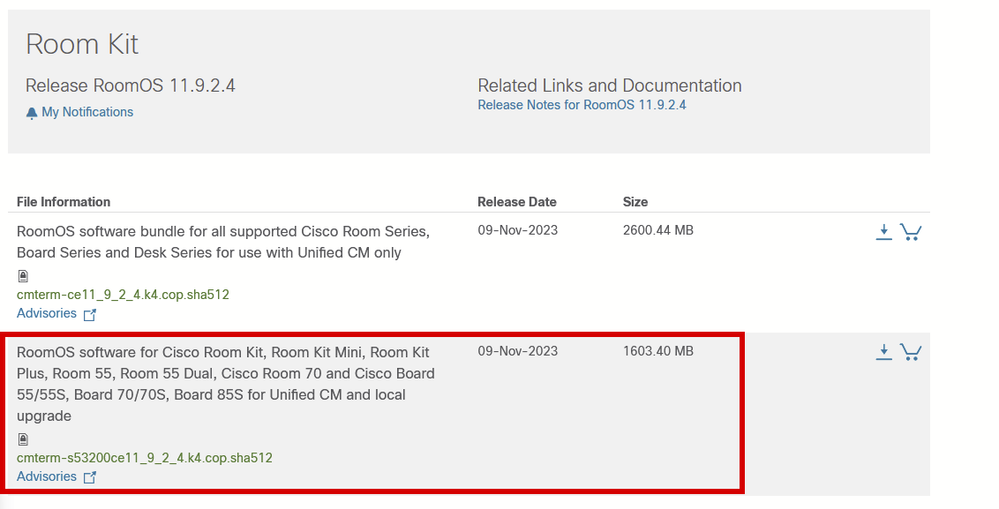 Room Kit RoomOS 11.9.2.4 Software PackageNotice the description of the selected file in this picture. It mentions "local upgrade," which means that the package can be used to upgrade the endpoint through the GUI.
Desk Pro Step Upgrade when Desk Pro is on CE OS versions
There is a chance that you receive a Desk Pro endpoint from an RMA that is on a CE OS version. In such a scenario, you need to perform a Step Upgrade before you can upgrade the endpoint to the latest RoomOS version and register it to the Cloud.
- Log in to software.cisco.com:
- Navigate to Desk Pro software. You can use this link to directly access it: Software Download: Desk Pro
- Locate the CE9.15.6 StepUpgrade.
- Download the package containing the step upgrade shown in the picture below.
- Manually install it using the GUI of the device.
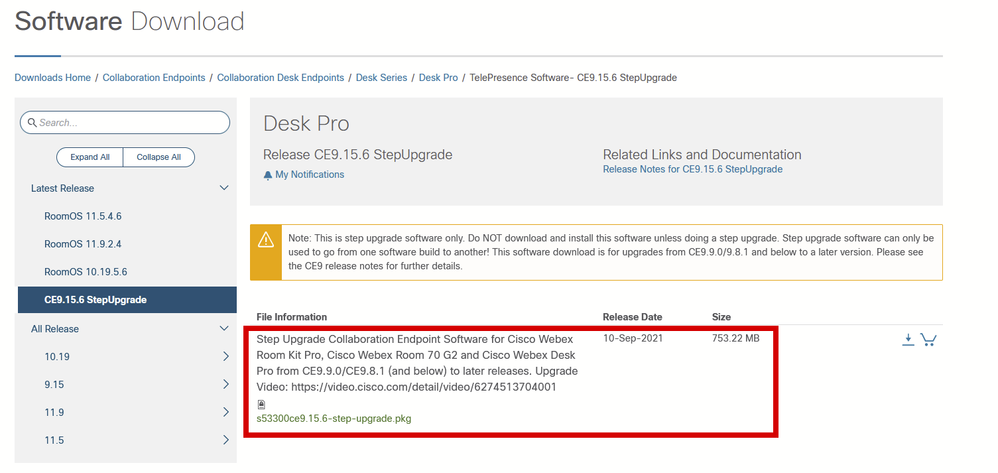 Desk Pro CE9.15.6 StepUpgrade Software Package
- Note: The device must not remain and be used in the CE9.15.6 StepUpgrade OS version. This OS version is offered only as a means to overcome some software limitations with older CE versions, like the limitation that prevents an upgrade from an installation file that exceeds 1GB in size. On CE9.15.6 OS version, the device is not able to perform calls or register to the Cloud. Upgrade the device to RoomOS 10.19.5.6 immediately.
- Upgrade to RoomOS 10.19.5.6:
- After the installation is complete, proceed by downloading and installing RoomOS 10.19.5.6. Upgrade steps remain the same as previously. The available upgrade packages are shown on the Software Download page.
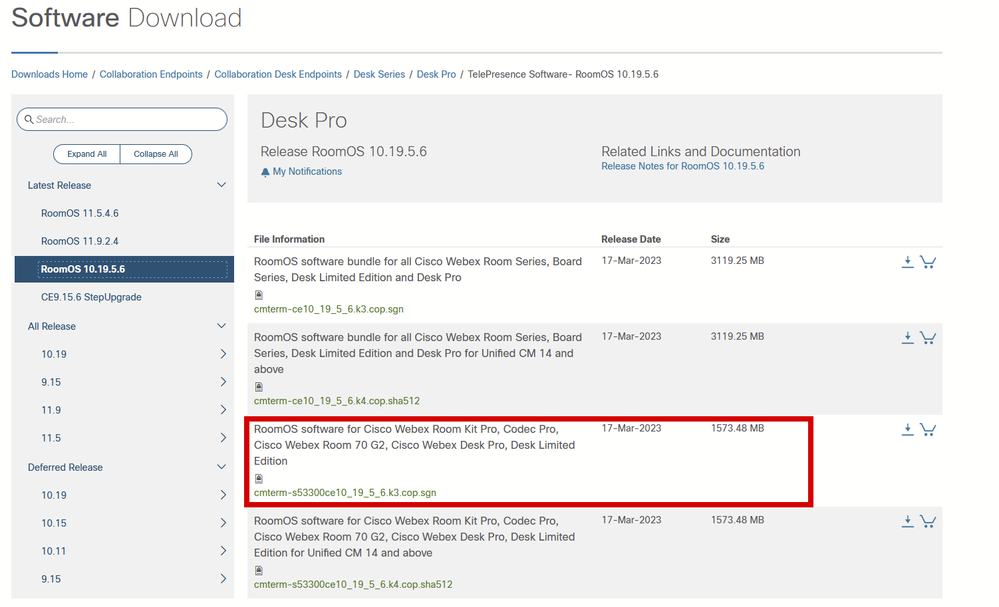 Desk Pro RoomOS 10.19.5.6 Software Package
- Use the highlighted package with the .cop.sgn extension, which is approximately 1.5GB in size. Then you can register your device to the Cloud. After registration is complete, the endpoint is automatically updated to the latest version, or you canchoose to manually upgrade the endpoint from the GUI to the latest RoomOS version.
Related Information


 Feedback