• Configuration Examples for IKEv2 Load Balancer for IPv4 Deployments
  • How to Configure IKEv2 Load Balancer for IPv6 Deployments
  • Activating the IKEv2 Redirect Mechanism on the Client
  • Configuring Optional Parameters for IKEv2 Load Balancer Support
  • Configuration Examples for IKEv2 Load Balancer for IPv6 Deployments
  • Verifying IKEv2 Load Balancer Configuration
  • Additional References
  • Feature Information for IKEv2 Load Balancer for IPv4 and IPv6 Deployments
  • Configuring IKEv2 Load Balancer

    The IKEv2 Load Balancer feature provides support for enabling clusters of FlexVPN gateways and distributes incoming Internet Key Exchange Version 2 (IKEv2) connection requests among FlexVPN gateways. This feature redirects the incoming FlexVPN or AnyConnect client requests to the least loaded FlexVPN gateway based on the system and crypto load factors.

    Prerequisites for IKEv2 Load Balancer

    • For the server-side configuration, the Hot Standby Router Protocol (HSRP) and FlexVPN server (IKEv2 profile) must be configured.

    • For the client-side configuration, the FlexVPN client must be configured.

    Restrictions for IKEv2 Load Balancer

    • In Cisco IOS XE 17.13.1a release, IKEv2 load balancer is only supported on C8500-12X platform.

    • Redirection of an IKEv2 request is only supported using IP address and not a FQDN (Fully Qualified Domain Name).

    • The limit to number of nodes that can be set up in a cluster is 10.

    • In Cisco IOS XE 17.13.1a release, if you are configuring IKEv2 in an IPv6 deployment, the IKEv2 load balancer only supports a single VIP (Virtual IP address).

    • For headend systems, it is recommended to configure DPD to operate on an 'on demand' basis. Periodic DPD checks should be avoided as they can generate excessive control-plane traffic, leading to increased CPU utilization and potential system instability.

    • The Idle Timer is set to expire when there is no traffic between two IPSec SA peers. Upon expiration, the system deletes the session.

    Information About IKEv2 Load Balancer

    Overview of IKEv2 Load Balancer

    The IKEv2 Load Balancer Support feature provides a Cluster Load Balancing (CLB) solution by redirecting requests from remote access clients to the Least Loaded Gateway (LLG) in the Hot Standby Router Protocol (HSRP) group or cluster. An HSRP cluster is a group of gateways or FlexVPN servers in a LAN or in an enterprise network. The CLB solution works with the Internet Key Exchange Version 2 (IKEv2) redirect mechanism defined in RFC 5685 by redirecting requests to the LLG in the HSRP cluster.


    Note


    To plan a cluster network, it is important to consider the number of clients hosted on the network and define the maximum number of SAs allowed on cluster headend.


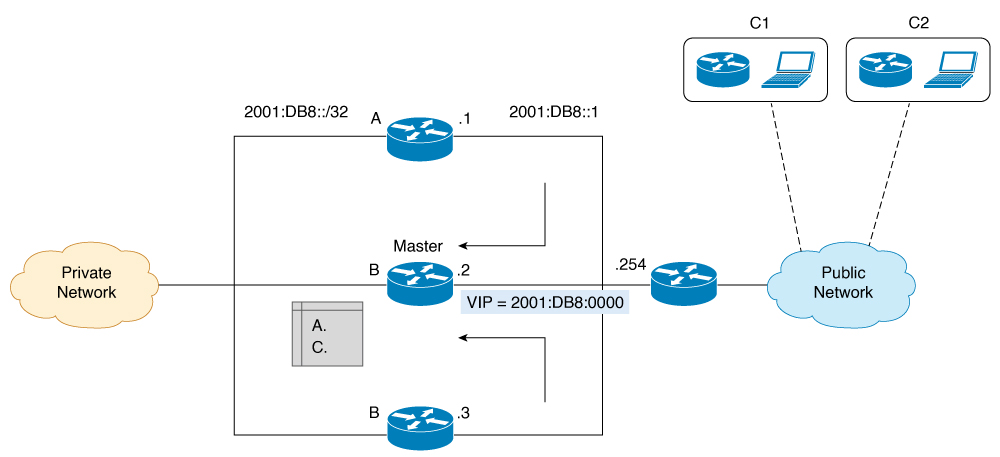
    The figure below shows the working of the IKEv2 cluster load balancing solution in both IPv4 and IPv6 deployments.

    Figure 1. IKEv2 Cluster Load Balancing Solutions for IPv4 deployments
    Figure 2. IKEv2 Cluster Load Balancing Solutions for IPv6 deployments
    1. An active HSRP gateway is elected as primary in the HSRP group and takes ownership of the Virtual IP address (VIP) for the group. The primary maintains a list of gateways in the cluster, keeps track of the load on each gateway, and redirects the FlexVPN client requests to the LLG.

    2. The remaining gateways, termed as subordinates, send load updates to the primary at periodic intervals.

    3. When an IKEv2 client connects to the HSRP VIP, the request first reaches the primary, which in turn, redirects the request to the LLG in the cluster.


    Note


    To configure IKEv2 cluster load balancing in an IPv6 environment, it is mandatory that the VIP and IPv6 address of the WAN is in the same subnet of the cluster.


    The components of the CLB solution are as follows:

    • HSRP

    • CLB primary

    • CLB subordinate

    • CLB communication

    • IKEv2 redirects mechanism

    Hot Standby Router Protocol

    Hot Standby Router Protocol (HSRP) is used to elect the primary HSRP or Active Router (AR). For HSRP to elect a designated device, you must configure the VIP for one device in the group. This address is learned by other devices in the group. The IP address that is assigned to the primary is used as the VIP for the group. The HSRP active router (also called primary CLB) receives the IKEv2 requests and redirects these requests to the LLG in the cluster. The redirection is performed at the IKEv2 protocol level thereby achieving the following:

    • All requests from the FlexVPN client reach the primary HSRP as the VIP is configured on the FlexVPN clients. The configuration of FlexVPN clients is minimized because the FlexVPN clients must only know the VIP of the HSRP cluster.

    • The primary CLB is run on the same gateway as the primary HSRP, thereby maintaining the load information of all subordinate CLBs. The primary CLB enables effective redirection of requests and avoids multiple redirects and loops.

    Primary CLB

    A primary CLB runs on the primary HSRP or Active Router (AR). The primary receives updates from subordinate CLBs and sorts them based on their load condition to calculate the least loaded gateway (LLG). The primary sends the IP address of the LLG to IKEv2 (on the FlexVPN server). The IP address is sent to the initiator (FlexVPN client), which initiates an IKEv2 session with the LLG. The primary redirects incoming IKEv2 client connections towards the LLG. For more information, see IKEv2 Redirect Mechanism.


    Note


    If the IKEv2 cluster on the primary router is shutdown, the IKEv2 cluster on the secondary router also goes to shutdown state

    Subordinate CLB

    A CLB subordinate runs on all devices in an HSRP group except on the Active Router (AR). The subordinates are responsible for sending periodic load updates to the server. A CLB subordinate is a fully functional IKEv2 gateway which supplies information to the primary CLB. Apart from updates, CLB subordinates send messages for aliveness assurance to the primary CLB.

    CLB Load Management Mechanism

    The CLB Load Management Mechanism is a TCP-based protocol that runs between the primary CLB and the CLB subordinates. The CLB load management mechanism informs the primary CLB about the load on the CLB subordinates. Based on this information, the primary CLB selects the LLG to handle the session on each new incoming IKEv2 connection.


    Note


    Secondary nodes periodically update their cluster IP. To avoid synchronization issues, ensure proper management of these updates within your network management routine.


    Benefits of IKEv2 Load Balancer

    • The IKEv2 Load Balancer Support feature is easy to configure and cost-effective.

    • A FlexVPN client need not know the IP addresses of all gateways in the cluster. The client need only know the virtual IP address of the cluster.

    • The entire crypto session is redirected to a node in the cluster.

    IKEv2 Redirect Mechanism

    The IKEv2 redirect mechanism enables a VPN gateway to redirect a FlexVPN client request to another VPN gateway based on load conditions and maintenance requirements.

    The IKEv2 redirect mechanism is performed on security association (SA) initialization (IKE_SA_INIT) and on SA authentication (IKE_AUTH).

    Redirect During IKEv2 Initial Exchange (SA Initialization)

    A FlexVPN client, or an AnyConnect client indicates support for Internet Key Exchange Version 2 (IKEv2) redirect mechanism by including a REDIRECT_SUPPORTED notification message in the initial IKE_SA_INIT request. Use the crypto ikev2 redirect client command to enable the redirect mechanism on a client. Use the crypto ikev2 redirect gateway init command to enable redirect at IKE_SA_INIT on the gateway.

    To redirect an IKEv2 request to another new gateway, the gateway that receives the IKE_SA_INIT request selects the IP address or the fully qualified domain name (FQDN) of the new gateway (in this case, the LLG) with help of the crypto load balancer (CLB) module. The gateway replies with an IKE_SA_INIT response that contains a REDIRECT notification message. The notification includes information such as the new gateway and the nonce value from the payload in the IKE_SA_INIT request. When a client receives the IKE_SA_INIT response, it verifies the nonce value sent in the IKE_SA_INIT request and the gateway information provided in the redirect notification, and confirms whether the redirect notification is as per the configuration.


    Note


    If the nonce value does not match, the client discards the response and waits for another response, thereby preventing denial of service (DoS) attacks on the initiator. DoS attacks could be caused by an attacker injecting incorrect redirect payloads in IKE_SA_INIT responses.


    In the IKE_SA_INIT exchange with the new gateway, the client message contains the REDIRECTED_FROM notification payload. The REDIRECTED_FROM notification payload consists of the IP address of the original VPN gateway that redirected the client. The IKEv2 exchange then proceeds as it would have proceeded with the original gateway.


    Note


    The client may be redirected again by the new gateway if the new gateway also cannot serve the client. The client does not include the REDIRECT_SUPPORTED payload again in the IKE_SA_INIT exchange with the new gateway after the redirect. The presence of the REDIRECTED_FROM notification payload in the IKE_SA_INIT exchange with the new gateway indicates to the new gateway that the client supports the IKEv2 redirects mechanism.


    Redirect During IKE_AUTH Exchange (SA Authentication)

    A thorough security analysis shows that redirect during IKE_AUTH is neither more nor less secure than redirect during IKE_INIT. However, for performance and scalability reasons, we recommend redirect during IKE_INIT. Use the crypto ikev2 redirect gateway auth command to enable the redirect mechanism on the gateway. Use the redirect gateway auth command to enable redirect on authentication for selected IKEv2 profiles.

    In this method, the client authorization payload is verified before sending the redirect notification payload. A client also verifies the gateway authorization payload before acting on the redirect notification. As the authorization payload is exchanged and successfully verified, the IKEv2 security association (SA) is validated successfully and the INITIAL_CONTACT is processed to decide on redirecting the request. If there is a redirect, the gateway creates the IKE SA and sends the IKE_AUTH response with the redirect notification.

    A child SA is not created in this method. The IKE_AUTH does not contain a payload pertaining to a child SA. When the client receives the IKE_AUTH response, the client verifies the gateway authentication payload and deletes the IKEv2 SA with the gateway by sending a delete notification. The client acts on the redirect notification payload to establish connection with the new gateway. The client does not wait for an acknowledgment for the delete notification before establishing a connection with the new gateway. If the IKE_AUTH exchange involves the Extensible Authentication Protocol (EAP) authentication, the gateway has the choice of sending the redirect payload in the first or last IKE_AUTH response. The EAP authentication is included in the first IKE_AUTH response because it is not necessary to provide credentials for each redirect.

    Compatibility and Interoperability

    The IKEv2 redirect mechanism is based on RFC 5685. The gateway (IKEv2 responder) is compatible with clients (IKEv2 initiator) that implement the standard. Similarly, the client (initiator) implementation must be compatible with third party servers (responder) implementing the standard. The load management mechanism is Cisco proprietary and is only supported on Cisco IOS devices.

    Handling Redirect Loops

    A client request could be redirected multiple times in a sequence because of either an incorrect configuration or a denial of service (DoS) attack. In some cases, a client could enter a loop with two or more gateways redirecting the client to the other gateway thereby denying service to the client. To prevent this, a client can be configured, using the crypto ikev2 redirect client command with the max-redirects number keyword argument pair, to not accept more than a specific number of redirects for a particular IKEv2 security association (SA) setup.

    IKEv2 Cluster Reconnect

    The IKEv2 cluster reconnect feature allows Cisco AnyConnect client to reconnect to any server in the cluster. The crypto ikev2 reconnect key is introduced on the server to encrypt the opaque data pushed to the client. During failure detection, the client does reconnect with new or existing server without having to prompt for authentication credentials again.

    There are only two key index values, 1 and 2 and at any point in time, any one of the keys configured using this will be active. The Cisco IOS server will be able to decrypt the reconnect data as long as the reconnect key is configured using the reconnect key CLI on the IOS server. This is true even if the key is only the back-up key.

    This feature does not support when the anyconnect-eap keyword as authentication method in the IKEv2 profile through the authentication command.

    How to Configure IKEv2 Load Balancer for IPv4 Deployments

    Configuring an HSRP Group for Load Balancing

    Hot Standby Router Protocol (HSRP) is used to elect the primary HSRP or Active Router (AR). For HSRP to elect a designated device, you must configure the VIP for one device in the group. This address is learned by other devices in the group. The IP address that is assigned to the primary is used as the VIP for the group. The HSRP active router (also called primary CLB) receives the IKEv2 requests and redirects these requests to the LLG in the cluster. The redirection is performed at the IKEv2 protocol level thereby achieving the following:

    • All requests from the FlexVPN client reach the primary HSRP as the VIP is configured on the FlexVPN clients. The configuration of FlexVPN clients is minimized because the FlexVPN clients must only know the VIP of the HSRP cluster.

    • The primary CLB is run on the same gateway as the primary HSRP, thereby maintaining the load information of all CLB subordinates. The CLB primary enables effective redirection of requests and avoids multiple redirects and loops.

    SUMMARY STEPS

    1. enable
    2. configure terminal
    3. interface type number
    4. ip address ip-address mask [secondary]
    5. standby [group-number] priority priority
    6. standby group-name
    7. exit
    8. Repeat Steps 3 to 7 to configure an HSRP group for another cluster.

    DETAILED STEPS

      Command or Action Purpose

    Step 1

    enable

    Example:

    Device> enable

    Enables privileged EXEC mode.

    • Enter your password if prompted.

    Step 2

    configure terminal

    Example:

    Device# configure terminal

    Enters global configuration mode.

    Step 3

    interface type number

    Example:

    
    Device(config)# interface GigabitEthernet 0/0/0

    Configures an interface type and enters interface configuration mode.

    Step 4

    ip address ip-address mask [secondary]

    Example:

    Device(config-if)# ip address 10.0.0.1 255.255.255.0

    Specifies a primary or secondary IP address for an interface.

    Step 5

    standby [group-number] priority priority

    Example:

    Device(config-if)# standby 1 priority 110

    Configures the HSRP priority.

    Step 6

    standby group-name

    Example:

    Device(config-if)# standby group1

    Specifies the name of the HSRP standby group.

    Step 7

    exit

    Example:

    Device(config-if)# exit

    Exits to global configuration mode.

    Step 8

    Repeat Steps 3 to 7 to configure an HSRP group for another cluster.

    Configuring the Load Management Mechanism

    Before you begin


    Note


    Starting with Cisco IOS XE 17.14.1a, the default setting for load deficit normalization has been updated to 5. Ensure that your configuration aligns with this new default, unless your deployment requires a custom setting.


    SUMMARY STEPS

    1. enable
    2. configure terminal
    3. crypto ikev2 cluster
    4. holdtime milliseconds
    5. master {overload-limit percent | weight {crypto-load weight-number | system-load weight-number}}
    6. port port-number
    7. slave {hello milliseconds | max-session number | priority number | update milliseconds}
    8. standby-group group-name
    9. shutdown
    10. exit
    11. crypto ikev2 reconnect key key index active name
    12. end

    DETAILED STEPS

      Command or Action Purpose

    Step 1

    enable

    Example:

    Device> enable

    Enables privileged EXEC mode.

    • Enter your password if prompted.

    Step 2

    configure terminal

    Example:

    Device# configure terminal

    Enters global configuration mode.

    Step 3

    crypto ikev2 cluster

    Example:

    Device(config)# crypto ikev2 cluster

    Defines an IKEv2 cluster policy and enters IKEv2 cluster configuration mode.

    Step 4

    holdtime milliseconds

    Example:

    Device(config-ikev2-cluster)# holdtime 10000

    (Optional) Specifies the time, in milliseconds, to receive messages from a peer.

    • If no messages are received within the configured time, the peer is declared “dead.”

    Step 5

    master {overload-limit percent | weight {crypto-load weight-number | system-load weight-number}}

    Example:

    Device(config-ikev2-cluster)# master weight crypto-load 10

    Specifies settings for the primary in the HSRP cluster.

    • overload-limit percent —The threshold load of the cluster. The load limit to decide when a device is busy and to ignore it when redirecting it for requests.

    • weight —Specifies the weight of a load attribute. Range: 0 to 100. Default: 100.

    • crypto-load weight-number —The IKE and IPsec security association (SA) load.

    • system-load weight-number —The system and memory load.

    Step 6

    port port-number

    Example:

    Device(config-ikev2-cluster)# port 2000

    (Optional) Specifies the cluster primary listen port.

    Step 7

    slave {hello milliseconds | max-session number | priority number | update milliseconds}

    Example:

    Device(config-ikev2-cluster)# slave max-session 90

    Specifies settings for subordinate gateways in the HSRP group.

    • hello milliseconds —The hello interval, in milliseconds, for a subordinate gateway.

    • max-session number —The maximum number of SAs allowed on a subordinate. This keyword is mandatory and cannot be skipped.

      Note


      When specifying the the maximum number of SA’s using max-session keyword, specify a value that includes some buffer for crypto sessions as rekeys and retransmissions, create some extra sessions and these sessions continue to exist for a while before they are deleted. Providing a buffer also supports fault tolerance between master and secondary server.

    • priority number —The subordinate priority.

    • update milliseconds —The interval, in milliseconds, between two update messages for a subordinate gateway.

    Step 8

    standby-group group-name

    Example:

    Device(config-ikev2-cluster)# standby-group group1

    Defines the HSRP group containing the subordinates.

    • group-name —The group name is derived from the group-name argument specified in the standby name command.

    Step 9

    shutdown

    Example:

    Device(config-ikev2-cluster)# shutdown

    (Optional) Disables the IKEv2 cluster policy.

    Step 10

    exit

    Example:

    Device(config-ikev2-cluster)# exit

    Exits IKEv2 cluster configuration mode and returns to global configuration mode.

    Step 11

    crypto ikev2 reconnect key key index active name

    Example:

    Device(config)# crypto ikev2 reconnect key 1 active test123

    Enables the IKEv2 opaque data support for session reconnect.

    Note


    The ikev2 cluster reconnect feature is enabled for encryption only when the active keyword is present in the ikev2 reconnect key active name key-string . The active keyword is mandatory to enable the cluster reconnect feature. If you use the ikev2 reconnect key key-name key-string command without the active keyword in the command, the headend will only be able to decrypt.

    Step 12

    end

    Example:

    Device(config-ikev2-cluster)# end

    Exits IKEv2 cluster configuration mode and returns to privileged EXEC mode.

    Activating the IKEv2 Redirect Mechanism on the Server

    SUMMARY STEPS

    1. enable
    2. configure terminal
    3. crypto ikev2 redirect gateway init
    4. end

    DETAILED STEPS

      Command or Action Purpose

    Step 1

    enable

    Example:

    Device> enable

    Enables privileged EXEC mode.

    • Enter your password if prompted.

    Step 2

    configure terminal

    Example:

    Device# configure terminal

    Enters global configuration mode.

    Step 3

    crypto ikev2 redirect gateway init

    Example:

    Device(config)# crypto ikev2 redirect gateway init

    Enables the IKEv2 redirect mechanism on the gateway during SA initiation.

    Step 4

    end

    Example:

    Device(config)# end

    Exits global configuration mode and returns to privileged EXEC mode.

    Activating the IKEv2 Redirect Mechanism on the Client

    SUMMARY STEPS

    1. enable
    2. configure terminal
    3. crypto ikev2 redirect client [max-redirects number]
    4. end

    DETAILED STEPS

      Command or Action Purpose

    Step 1

    enable

    Example:

    Device> enable

    Enables privileged EXEC mode.

    • Enter your password if prompted.

    Step 2

    configure terminal

    Example:

    Device# configure terminal

    Enters global configuration mode.

    Step 3

    crypto ikev2 redirect client [max-redirects number]

    Example:

    Device(config)# crypto ikev2 redirect client max-redirects 15

    Enables the IKEv2 redirect mechanism on the FlexVPN client.

    • max-redirects number —(Optional) Specifies the maximum number of redirects that can be configured on the FlexVPN client for redirect loop detection.

    Step 4

    end

    Example:

    Device(config)# end

    Exits global configuration mode and returns to privileged EXEC mode.

    Configure Dead Peer Detection

    Dead Peer Detection allows you to configure your router to query the liveliness of its Internet Key Exchange (IKE) peer at regular intervals. While DPD is optional in some configurations, it is recommended for IKEv2 cluster functionality and is mandatory for Cluster Load Balancing (CLB) under all conditions. Ensure that DPD is configured on both primary and secondary nodes when setting up a cluster configuration.

    SUMMARY STEPS

    1. enable
    2. configure terminal
    3. dpd interval retry-interval {on-demand | periodic}
    4. exit

    DETAILED STEPS

      Command or Action Purpose

    Step 1

    enable

    Example:

    Device> enable

    Enables privileged EXEC mode.

    • Enter your password if prompted.

    Step 2

    configure terminal

    Example:

    Device# configure terminal

    Enters global configuration mode.

    Step 3

    dpd interval retry-interval {on-demand | periodic}

    Example:

    
    Device(config)# crypto ikev2 dpd 500 50 on-demand

    Allows live checks for peers as follows:

    • on-demand: Specifies the on-demand mode to send keepalive, only in the absence of any incoming data traffic, to check liveliness of the peer before sending any data. DPD on-demand is required on both primary and secondary nodes for cluster configuration and is essential for ensuring the proper function of IKEv2 cluster functionality.

    • periodic: Specifies the periodic mode to send keepalives regularly at the specified interval. DPD is mandatory for CLB to maintain a reliable state and peer availability under all conditions.

    Step 4

    exit

    Example:

    Device(config-if)# exit

    Exits to global configuration mode.

    Configuration Examples for IKEv2 Load Balancer for IPv4 Deployments

    Example: Configuring an HSRP Group for Load Balancing

    The following example shows RouterA configured as the active router for an Hot Standby Router Protocol (HSRP) group with a priority of 110. The default priority level is 100. This HSRP group is assigned the group name of group1. The group name is referred in the cluster policy.

    Device(config)# hostname RouterA
    Device(config)# interface GigabitEthernet 0/0/0
    Device(config-if)# ip address 10.0.0.1 255.255.255.0
    Device(config-if)# standby 1 priority 110
    Device(config-if)# standby group1
    Device(config-if)# end

    Example: Configuring the Load Management Mechanism

    The following example shows how to configure the load management mechanism in IKEv2:

    Device> enable
    Device# configure terminal
    Device(config)# crypto ikev2 cluster
    Device(config-ikev2-cluster)# holdtime 10000
    Device(config-ikev2-cluster)# master crypto-load 10
    Device(config-ikev2-cluster)# port 2000
    Device(config-ikev2-cluster)# slave priority 90
    Device(config-ikev2-cluster)# standby-group group1
    Device(config-ikev2-cluster)# shutdown
    Device(config-ikev2-cluster)# end

    Example: Configuring the Redirect Mechanism

    The following example shows how to enable the redirect mechanism on a client and during initiation on a gateway:

    Device> enable
    Device# configure terminal
    Device(config)# crypto ikev2 redirect client
    Device(config)# crypto ikev2 redirect gateway init
    Device(config)# end

    Example: Configuring the Cluster Reconnect Key

    The following example shows how to enable the reconnect key on a server:

    Device> enable
    Device# configure terminal
    Device(config)# crypto ikev2 reconnect key 1 active key
    Device(config)# crypto ikev2 reconnect key 2 test
    Device(config)# end

    How to Configure IKEv2 Load Balancer for IPv6 Deployments

    Configuring an HSRP Group for Load Balancing


    Note


    From Cisco IOS XE 17.13.1a load balancing support for IKEv2 cluster in an IPv6 topology is introduced. The configuration steps for IPv6 topology now reference the keywords primary and secondary that correspond to keywords master and slave used in the IPv4 topology.


    SUMMARY STEPS

    1. enable
    2. configure terminal
    3. interface type number
    4. ip address ip-address mask [secondary]
    5. standby [group-number] priority priority
    6. standby group-name
    7. standby delay mimimum [seconds]
    8. standby version 2
    9. exit
    10. Repeat Steps 3 to 7 to configure an HSRP group for another cluster.

    DETAILED STEPS

      Command or Action Purpose

    Step 1

    enable

    Example:

    Device> enable

    Enables privileged EXEC mode.

    • Enter your password if prompted.

    Step 2

    configure terminal

    Example:

    Device# configure terminal

    Enters global configuration mode.

    Step 3

    interface type number

    Example:

    
    Device(config)# interface GigabitEthernet 0/0/0

    Configures an interface type and enters interface configuration mode.

    Step 4

    ip address ip-address mask [secondary]

    Example:

    Device(config-if)# ip address 10.0.0.1 255.255.255.0

    Specifies a primary or secondary IP address for an interface.

    Step 5

    standby [group-number] priority priority

    Example:

    Device(config-if)# standby 1 priority 110

    Configures the HSRP priority.

    Step 6

    standby group-name

    Example:

    Device(config-if)# standby group1

    Specifies the name of the HSRP standby group.

    Step 7

    standby delay mimimum [seconds]

    Example:

    Device(config-if)# standby delay minimum 120

    Configures the HSRP priority.

    Step 8

    standby version 2

    Example:

    Device(config-if)# standby version 2

    Configures the HSRP priority.

    Step 9

    exit

    Example:

    Device(config-if)# exit

    Exits to global configuration mode.

    Step 10

    Repeat Steps 3 to 7 to configure an HSRP group for another cluster.

    Configuring the Load Management Mechanism

    SUMMARY STEPS

    1. enable
    2. configure terminal
    3. crypto ikev2 cluster
    4. holdtime milliseconds
    5. primary {overload-limit percent | weight {crypto-load weight-number | system-load weight-number}}
    6. port port-number
    7. secondary {hello milliseconds | max-session number | priority number | update milliseconds}
    8. standby-group group-name
    9. shutdown
    10. exit
    11. end

    DETAILED STEPS

      Command or Action Purpose

    Step 1

    enable

    Example:

    Device> enable

    Enables privileged EXEC mode.

    • Enter your password if prompted.

    Step 2

    configure terminal

    Example:

    Device# configure terminal

    Enters global configuration mode.

    Step 3

    crypto ikev2 cluster

    Example:

    Device(config)# crypto ikev2 cluster

    Defines an IKEv2 cluster policy and enters IKEv2 cluster configuration mode.

    Step 4

    holdtime milliseconds

    Example:

    Device(config-ikev2-cluster)# holdtime 10000

    (Optional) Specifies the time, in milliseconds, to receive messages from a peer.

    • If no messages are received within the configured time, the peer is declared “dead.”

    Step 5

    primary {overload-limit percent | weight {crypto-load weight-number | system-load weight-number}}

    Example:

    Device(config-ikev2-cluster)# primary weight crypto-load 10

    Specifies settings for the primary in the HSRP cluster.

    • overload-limit percent —The threshold load of the cluster. The load limit to decide when a device is busy and to ignore it when redirecting it for requests.

    • weight —Specifies the weight of a load attribute. Range: 0 to 100. Default: 100.

    • crypto-load weight-number —The IKE and IPsec security association (SA) load.

    • system-load weight-number —The system and memory load.

    Step 6

    port port-number

    Example:

    Device(config-ikev2-cluster)# port 2000

    (Optional) Specifies the cluster primary listen port.

    Step 7

    secondary {hello milliseconds | max-session number | priority number | update milliseconds}

    Example:

    Device(config-ikev2-cluster)# slave max-session 90

    Specifies settings for subordinate gateways in the HSRP group.

    • hello milliseconds —The hello interval, in milliseconds, for a subordinate gateway.

    • max-session number —The maximum number of SAs allowed on a subordinate. This keyword is mandatory and cannot be skipped.

    • priority number —The subordinate priority.

    • update milliseconds —The interval, in milliseconds, between two update messages for a subordinate gateway.

    Note


    When specifying the the maximum number of SA’s using max-session keyword, specify a value that includes some buffer for crypto sessions as rekeys and retransmissions, create some extra sessions and these sessions continue to exist for a while before they are deleted. Providing a buffer also supports fault tolerance between master and secondary server.

    Step 8

    standby-group group-name

    Example:

    Device(config-ikev2-cluster)# standby-group group1

    Defines the HSRP group containing the subordinates.

    • group-name —The group name is derived from the group-name argument specified in the standby name command.

    Step 9

    shutdown

    Example:

    Device(config-ikev2-cluster)# shutdown

    (Optional) Disables the IKEv2 cluster policy.

    Step 10

    exit

    Example:

    Device(config-ikev2-cluster)# exit

    Exits IKEv2 cluster configuration mode and returns to global configuration mode.

    Step 11

    end

    Example:

    Device(config-ikev2-cluster)# end

    Exits IKEv2 cluster configuration mode and returns to privileged EXEC mode.

    Activating the IKEv2 Redirect Mechanism on the Server

    SUMMARY STEPS

    1. enable
    2. configure terminal
    3. crypto ikev2 redirect gateway init
    4. end

    DETAILED STEPS

      Command or Action Purpose

    Step 1

    enable

    Example:

    Device> enable

    Enables privileged EXEC mode.

    • Enter your password if prompted.

    Step 2

    configure terminal

    Example:

    Device# configure terminal

    Enters global configuration mode.

    Step 3

    crypto ikev2 redirect gateway init

    Example:

    Device(config)# crypto ikev2 redirect gateway init

    Enables the IKEv2 redirect mechanism on the gateway during SA initiation.

    Step 4

    end

    Example:

    Device(config)# end

    Exits global configuration mode and returns to privileged EXEC mode.

    Activating the IKEv2 Redirect Mechanism on the Client

    SUMMARY STEPS

    1. enable
    2. configure terminal
    3. crypto ikev2 redirect client [max-redirects number]
    4. end

    DETAILED STEPS

      Command or Action Purpose

    Step 1

    enable

    Example:

    Device> enable

    Enables privileged EXEC mode.

    • Enter your password if prompted.

    Step 2

    configure terminal

    Example:

    Device# configure terminal

    Enters global configuration mode.

    Step 3

    crypto ikev2 redirect client [max-redirects number]

    Example:

    Device(config)# crypto ikev2 redirect client max-redirects 15

    Enables the IKEv2 redirect mechanism on the FlexVPN client.

    • max-redirects number —(Optional) Specifies the maximum number of redirects that can be configured on the FlexVPN client for redirect loop detection.

    Step 4

    end

    Example:

    Device(config)# end

    Exits global configuration mode and returns to privileged EXEC mode.

    Configuring Optional Parameters for IKEv2 Load Balancer Support

    Configuring Idle Timer

    You can configure the IPSec SA Idle timer to drop SAs for inactive peers after specified time. This is an optional configuration.

    SUMMARY STEPS

    1. enable
    2. configure terminal
    3. crypto ipsec security-association idle-time seconds
    4. exit

    DETAILED STEPS

      Command or Action Purpose

    Step 1

    enable

    Example:

    Device> enable

    Enables privileged EXEC mode.

    • Enter your password if prompted.

    Step 2

    configure terminal

    Example:

    Device# configure terminal

    Enters global configuration mode.

    Step 3

    crypto ipsec security-association idle-time seconds

    Example:

    
    Device(config)# crypto ipsec security-association idle-time 600

    Configures the IPsec SA idle timer.

    The seconds argument specifies the time, in seconds, that the idle timer will allow an inactive peer to maintain an SA. Valid values for the seconds argument range from 60 to 86400.

    Note


    When specifying the idle timer, it is important to consider the rate of incoming and outgoing traffic and then set the timer accordingly.

    Step 4

    exit

    Example:

    Device(config-if)# exit

    Exits to global configuration mode.

    Configure Dead Peer Detection

    Dead Peer Detection allows you to configure your router to query the liveliness of its Internet Key Exchange (IKE) peer at regular intervals. While DPD is optional in some configurations, it is recommended for IKEv2 cluster functionality and is mandatory for Cluster Load Balancing (CLB) under all conditions. Ensure that DPD is configured on both primary and secondary nodes when setting up a cluster configuration.

    SUMMARY STEPS

    1. enable
    2. configure terminal
    3. dpd interval retry-interval {on-demand | periodic}
    4. exit

    DETAILED STEPS

      Command or Action Purpose

    Step 1

    enable

    Example:

    Device> enable

    Enables privileged EXEC mode.

    • Enter your password if prompted.

    Step 2

    configure terminal

    Example:

    Device# configure terminal

    Enters global configuration mode.

    Step 3

    dpd interval retry-interval {on-demand | periodic}

    Example:

    
    Device(config)# crypto ikev2 dpd 500 50 on-demand

    Allows live checks for peers as follows:

    • on-demand: Specifies the on-demand mode to send keepalive, only in the absence of any incoming data traffic, to check liveliness of the peer before sending any data. DPD on-demand is required on both primary and secondary nodes for cluster configuration and is essential for ensuring the proper function of IKEv2 cluster functionality.

    • periodic: Specifies the periodic mode to send keepalives regularly at the specified interval. DPD is mandatory for CLB to maintain a reliable state and peer availability under all conditions.

    Step 4

    exit

    Example:

    Device(config-if)# exit

    Exits to global configuration mode.

    Configuration Examples for IKEv2 Load Balancer for IPv6 Deployments

    Example: Configuring an HSRP Group for Load Balancing

    The following example shows RouterA configured as the active router for an Hot Standby Router Protocol (HSRP) group with a priority of 110. The default priority level is 100. This HSRP group is assigned the group name of group1. The group name is referred in the cluster policy.

    Device(config)# hostname RouterA
    Device(config)# interface GigabitEthernet 0/0/0
    Device(config-if)# ip address 2001:DB8::1
    Device(config-if)# standby 1 priority 110
    Device(config-if)# standby group 1
    Device(config-if)# standby version 1
    Device(config-if)# end

    Example: Configuring the Load Management Mechanism

    The following example shows how to configure the load management mechanism in IKEv2:

    Device> enable
    Device# configure terminal
    Device(config)# crypto ikev2 cluster
    Device(config-ikev2-cluster)# holdtime 10000
    Device(config-ikev2-cluster)# primary crypto-load 10
    Device(config-ikev2-cluster)# port 2000
    Device(config-ikev2-cluster)# secondary priority 90
    Device(config-ikev2-cluster)# standby-group group1
    Device(config-ikev2-cluster)# shutdown
    Device(config-ikev2-cluster)# end

    Example: Configuring the Redirect Mechanism

    The following example shows how to enable the redirect mechanism on a client and during initiation on a gateway:

    Device> enable
    Device# configure terminal
    Device(config)# crypto ikev2 redirect client
    Device(config)# crypto ikev2 redirect gateway init
    Device(config)# end

    Verifying IKEv2 Load Balancer Configuration

    To display the configuration of Internet Key Exchange Version 2 (IKEv2) cluster policy, use the show crypto ikev2 cluster command in privileged EXEC mode

    The following is sample output from the show crypto ikev2 cluster command for an HSRP primary gateway:

    Device# show crypto ikev2 cluster

    Role           : CLB Primary
    Status         : Up
    CLB Secondary  : 2
    Cluster IP     : 2001:DB8::10
    Hold time      : 15000 msec
    Overload limit : 80%
    Codes          : '*' Least loaded, '-' Overloaded
     
    Load statistics:
      Gateway           Role   Last-seen  Prio   Load     IKE  FQDN
      -------------------------------------------------------------
    2001:DB8::1        Primary     --      100   26.6%   3996
    2001:DB8::2        Second  00:01.452   100   26.6%   3999
    2001:DB8::3        Second  00:00.271   100   26.6%   4006
    

    Note


    The secondary server shares crypto load and system load details based on the configuration of the update message. These factors help in identifying an LLG. These details are not static and therefore the load is not distributed equally or in a linear manner.


    The following is sample output from the show crypto ikev2 cluster command for an HSRP secondary gateway:

    Device# show crypto ikev2 cluster
    Role           : CLB Secondary
    Status         : Up
    Cluster IP     : 1:1:1::100
    Hold time      : 15000 msec
    Hello-interval : 5000 msec
    Update-interval: 6000 msec
    
    Load statistics:
      Gateway            Last-Ack  Prio   Load     IKE  FQDN
      ------------------------------------------------------
      1:1:1::2          00:02.671   100   51.0%   2793


    To display the configuration of Internet Key Exchange Version 2 (IKEv2) cluster policy with additional details, use the show crypto ikev2 cluster details command in privileged EXEC mode.

    Device# show crypto ikev2 cluster details

    
    Gateway        Priority     In-neg     Crypto   CPU   Mem    Composite Prioritized
      ---------------------------------------------------------------------------------------
      1:1:1::6     100         2.5%      17.4%    43%   20%      43.0%       43.0%
      1:1:1::3     100         0.0%      17.5%    39%   23%      39.0%       39.0%
      1:1:1::2     100         0.0%      17.0%    40%   18%      40.0%       40.0%
      1:1:1::5     100         0.0%      18.9%    43%   17%      43.0%       43.0%
      1:1:1::1     100         0.0%      16.3%    40%   19%      40.0%       40.0%
      1:1:1::4     100         0.0%      16.3%    42%   16%      42.0%       42.0%


    To display Internet Key Exchange Version 2 (IKEv2) security association (SA) statistics, use the show crypto ikev2 cluster stats command in privileged EXEC mode.

    Device# show crypto ikev2 cluster stats

    
    Gateway        Priority     In-neg     Crypto   CPU   Mem    Composite Prioritized
      ---------------------------------------------------------------------------------------
      1:1:1::6     100         2.5%      17.4%    43%   20%      43.0%       43.0%
      1:1:1::3     100         0.0%      17.5%    39%   23%      39.0%       39.0%
      1:1:1::2     100         0.0%      17.0%    40%   18%      40.0%       40.0%
      1:1:1::5     100         0.0%      18.9%    43%   17%      43.0%       43.0%
      1:1:1::1     100         0.0%      16.3%    40%   19%      40.0%       40.0%
      1:1:1::4     100         0.0%      16.3%    42%   16%      42.0%       42.0%


    Additional References

    Related Documents

    Related Topic

    Document Title

    Cisco IOS commands

    Master Command List, All Releases

    Security commands

    HSRP configuration

    Configuring HSRP

    HSRP commands

    Cisco IOS First Hop Redundancy Protocols Command Reference

    Standards and RFCs

    Standard/RFC

    Title

    RFC 5685

    Redirect Mechanism for the Internet Key Exchange Protocol Version 2 (IKEv2)

    Technical Assistance

    Description

    Link

    The Cisco Support and Documentation website provides online resources to download documentation, software, and tools. Use these resources to install and configure the software and to troubleshoot and resolve technical issues with Cisco products and technologies. Access to most tools on the Cisco Support and Documentation website requires a Cisco.com user ID and password.

    http://www.cisco.com/cisco/web/support/index.html

    Feature Information for IKEv2 Load Balancer for IPv4 and IPv6 Deployments

    The following table provides release information about the feature or features described in this module. This table lists only the software release that introduced support for a given feature in a given software release train. Unless noted otherwise, subsequent releases of that software release train also support that feature.

    Use Cisco Feature Navigator to find information about platform support and Cisco software image support. To access Cisco Feature Navigator, go to www.cisco.com/go/cfn. An account on Cisco.com is not required.
    Table 1. Feature Information for IKEv2 Load Balancer

    Feature Name

    Releases

    Feature Information

    IKEv2 fast convergence with cluster reconnect for Anyconnect

    15.6(1)T

    Cisco IOS XE Release 3.17S

    The IKEv2 fast convergence with cluster reconnect for Anyconnect feature enables the Cisco AnyConnect client to reconnect to any server in the cluster.

    The following command was introduced or modified: crypto ikev2 reconnect key

    IKEv2 Load Balancer Support

    Cisco IOS XE Release 3.8S

    The IKEv2 Load Balancer Support feature distributes incoming IKEv2 requests from FlexVPN clients among IKEv2 FlexVPN servers or gateways by redirecting requests to the least loaded gateway.

    The following commands were introduced or modified: crypto ikev2 cluster, crypto ikev2 redirect, holdtime, primary (IKEv2), port (IKEv2), redirect gateway, subordinate (IKEv2), standby-group, show crypto ikev2 cluster, show crypto ikev2 sa.

    IKEv2 Load Balancer Support for IPv6 deployments

    Cisco IOS XE Release 17.13.1a

    Support for IKEv2 Load Balancer in IPv6 deployments was introduced only for C8500-12X platform.