Cisco WAE Design 7.0.1 Integration and Development Guide
Bias-Free Language
The documentation set for this product strives to use bias-free language. For the purposes of this documentation set, bias-free is defined as language that does not imply discrimination based on age, disability, gender, racial identity, ethnic identity, sexual orientation, socioeconomic status, and intersectionality. Exceptions may be present in the documentation due to language that is hardcoded in the user interfaces of the product software, language used based on RFP documentation, or language that is used by a referenced third-party product. Learn more about how Cisco is using Inclusive Language.
- Updated:
- May 3, 2017
Chapter: Exporting Routes and Tables
Exporting Routes
The ability to export routes and tables facilitates the exchange of information in a text editable format. It also supplements the analysis of routes and plan file objects. For example, you can export demand routes using L1 links to determine which L1 links are used by demands. Because you can export routes that changed due to failure states, you can fine-tune your analysis of how failures impact the network.
Export Routes
You can export routes using the WAE Design GUI or using export_routes CLI tool.
This tool creates one of the following tables, depending on what you are exporting:
- <CircuitHops>
- <DemandHops>
- <L1CircuitHops>
- <L1CircuitPathHops>
- <LSPHops>
- <LSPPathHops>
- <ShortestIGPPathHops>
- <ShortestLatencyPathHops>
- <ShortestTEPathHops>
The table generated is output to a.txt file containing only this table. Their key columns are a combination of the key column identified for their object type plus a Step column. The Step column is an integer that identifies the sequence of this hop in the route path. For example, the <Demands> table has key columns of Name, Source, Destination, and ServiceClass. Therefore, the <DemandHops> table has these four columns to uniquely identify the demand, plus a Step column to identify the hop sequence.
Each exported hops table includes the following columns to specify details of the hop and its position with respect to other hops in the route. Note that the routes of demands might be split to account for ECMP routing or multicast. So demand hops might not be listed sequentially as a hop could be followed by two next hops as the route and traffic split into two.
- UnresolvedHop—The hop type and complete definition. For example, if{cr1.atl|to_cr1.hst} means this hop is an interface with a source node of cr1.atl and an egress interface of to_cr1.hst. For a complete list of these object notations, see Plan Files and Tables .
- PreviousStep—Identifies the previous step or steps in the route. As such, this identifies the previous hop in the route. For example, if you are on the row corresponding to Step 4, and the PreviousStep is 2, then the previous hop is contained in the row corresponding to Step 2.
If the PreviousStep column is empty, then this is the first hop in the route.
- NextStep—Identifies the next step in that table. As such, this identifies the next hop in the route.
If the NextStep column is empty, then this is the last hop in the route.
- TrafficProportion—The proportion of traffic on this hop compared to the other hops in the route. Although this value is usually 1, in the case of ECMP routing, it could be less than 1.
Optionally, you can fail objects prior to exporting their routes and then export only the routes that changed due to that failed state.
|
|
|
|---|---|
|
|
Example Export Route Tables
Table 5-1 is an example <LSPHops> table that was created using active LSPs with interface hops. The cr2.par_cr1.fra LSP has no interface hops in its route. In the table, it has only one step and no previous or next steps. The cr1.ams_cr1.par LSP has three interface hops (Steps 1, 2, and 3) between source (cr1.ams) and destination (cr1.par).
|
|
|
|
|
|
|
|
|
|---|---|---|---|---|---|---|---|
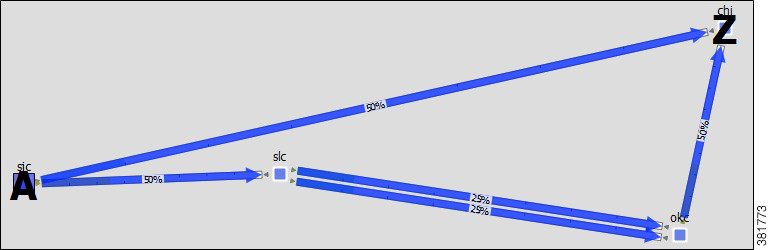
Table 5-2 is an example <DemandHops> table that was created using demands with interface hops (Figure 5-1). The demand route in this example splits into multiple ECMP paths.
Figure 5-1 Example Demand Route Shown in <DemandHops> Table
|
|
|
|
|
|
|
|
|
|
|---|---|---|---|---|---|---|---|---|
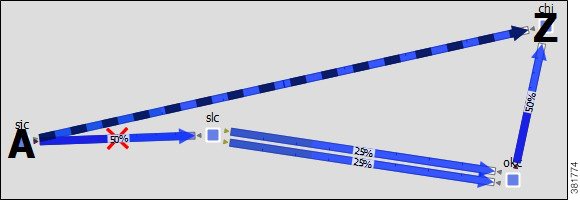
If you were to fail the circuit between sjc and slc and export only routes that changed during a failed state, the resulting exported route table would be as shown in Table 5-3 .
|
|
|
|
|
|
|
|
|
|
|---|---|---|---|---|---|---|---|---|
Export Routes Using the GUI
From the WAE Design GUI, follow these steps to export routes to the hops tables. Hops tables are created for the object that is selected in the dialog box. For example, if you select Circuits, WAE Design creates a <CircuitHops> table containing all circuits in the plan file.
If you want to export routes only for those objects whose route changed due failure state, fail all relevant objects before exporting the routes and select the “Only export routes changed by failure state” option. Alternatively, you could run Simulation Analysis and then fail one or more objects to the worst-case failure. For more information, see the Cisco WAE Design User Guide.
When exporting circuits, only L3 circuits using L1 hops are exported.
When exporting L3 circuits and L1 circuits, the Active Path Sim property in the L1 Circuits table is considered. This property identifies which L1 circuit path is currently being used by the L1 circuit. If an L1 circuit path is not available due to failure, the L1 circuit’s Active Path Sim is updated to the L1 circuit path that is being used. When exporting L1 circuit paths, all routed paths are exported.
Step 1![]() Choose Export > Export Routes. The Export Routes dialog box opens.
Choose Export > Export Routes. The Export Routes dialog box opens.
Step 2![]() Select the object for which you want to export routes.
Select the object for which you want to export routes.
Step 3![]() Except for circuits and L1 circuits, select the hop type that you want to export. For circuits, L1 circuits, and L1 circuit paths, the only available option is Layer 1 links hops.
Except for circuits and L1 circuits, select the hop type that you want to export. For circuits, L1 circuits, and L1 circuit paths, the only available option is Layer 1 links hops.
Step 4![]() If exporting only routes that changed due to a failure, select the associated option.
If exporting only routes that changed due to a failure, select the associated option.
Step 5![]() Click OK, and save the.txt file to the location of your choice.
Click OK, and save the.txt file to the location of your choice.
Export Explicit LSP Path Settings
Tab-delimited.txt files listing all explicit LSP path settings are created by choosing File > Export > Explicit LSP Settings in the WAE Design GUI, or using export_routes CLI tool. The Hops column lists the explicitly routed path of each LSP in object notation. For a complete list of these object notations, see Plan Files and Tables .
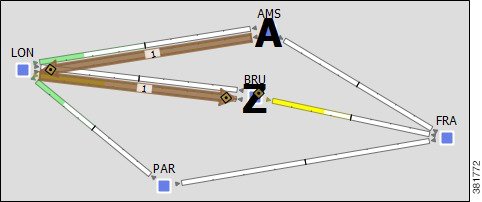
Table 5-4 is an example output file. In addition to these columns, the file also contains SetupBW, SetupPri, and HoldPri columns. Figure 5-2 shows the first LSP path option listed in Table 5-4 .
Figure 5-2 Path Option 1 for the cr1.ams_er1.BRU LSP
Export L1 Link Wavelength Utilization
Changes in the routing and Lambdas of L1 circuits paths affect the utilized wavelengths on L1 links. Any L1 failure or a site failure could cause the L1 circuit path to be rerouted. If Auto Lambda is enabled, then the L1 circuit path could be forced to select a Lambda on a different path option in order to avoid lambda blocking. For more information about Layer 1, see the Cisco WAE Design User Guide.
The Export Lambda Utilization tool lets you create and export a file containing a <LambdaUtil> table that identifies all of the L1 circuit path Lambda Sim values that are routed on each L1 link. This is useful for determining how many L1 circuits paths are using an L1 link, to determine how fragmented the wavelength usage is across L1 links, and to perform more elaborate wavelength assignments.
The table shows whether there is a failure, the L1 link, and the Lambda values of the L1 circuit paths traversing it. Each Lambda column correlates to a different L1 circuit path. To see the names of the L1 circuit paths, use the “Specify L1 circuit paths” option.
Example: In this simple network there are no failures, and only four Lambdas are used. The ams-lon L1 link has an L1 circuit path using Lambda1 and none using the remaining Lambdas. The lon-par L1 link has four L1 circuit paths using it.
|
|
|||||||
|---|---|---|---|---|---|---|---|
To see the effects of L1 link, L1 node, and sites failures on the wavelength utilization of L1 links, select the relevant failure sets.
Example: Row 2 shows that the L1lnk{rom|lon|rom-lon} failure causes an L1 circuit path to switch from one Lambda 1 to another lambda on the ams-lon L1 link or causes it to switch path options that it is using. Row 3 shows that the L1lnk{par|rom|par-rom} failure prevents L1 circuit paths from using either Lambda1 or Lambda2 when traversing the ams-lon L1 link.
|
|
||||||||
|---|---|---|---|---|---|---|---|---|
Step 1![]() If you want to export the lambda utilization for only selected L1 links, first select those L1 links.
If you want to export the lambda utilization for only selected L1 links, first select those L1 links.
Step 2![]() Choose File > Export > Lambda Utilization.
Choose File > Export > Lambda Utilization.
Step 3![]() Select which L1 links to use: All, those selected, or a selected tag.
Select which L1 links to use: All, those selected, or a selected tag.
Step 4![]() If you want to run Simulation Analysis on L1 links, L1 nodes, or sites, select one or more of these options.
If you want to run Simulation Analysis on L1 links, L1 nodes, or sites, select one or more of these options.
Step 5![]() If you want to know the name of the L1 circuit path for each Lambda referenced in the table, select “Specify L1 circuit paths.” Then click OK.
If you want to know the name of the L1 circuit path for each Lambda referenced in the table, select “Specify L1 circuit paths.” Then click OK.
Export Current Table
To export the table that is currently showing in the WAE Design GUI, choose File > Export > Table. Only the columns that are showing appear in the exported table. To show and hide tables and columns, choose View >Tables.
You can also export a table or portions of a table using a simple cut-and-paste method. Select the rows and columns, use Ctrl-C (Cmd-C on Mac) to copy the selection, and then paste it to the desired document. If you paste this information into an Excel document, the data is correctly placed into the Excel rows and columns.
 Feedback